Geth builds a private chain
puppeth is a very useful command in Geth that allows you to create, configure and manage your private chains using an interactive command line interface. However, in the latest version of Geth, the libraries and puppeth tools used for dynamic development have been deleted, which also increases the burden on us to build a private chain.
prerequisite
1. Geth is installed correctly, and the environment variables are configured
correctly. 2. Go is installed correctly, and the environment variables are configured correctly.
3. Sometimes it is useless to execute some files using normal cmd. You need to start cmd as an administrator.
You can use the command: geth versionto check whether your configuration information is correct, the following is my configuration information.
C:\Users\HAO>geth version
Geth
Version: 1.11.5-unstable
Architecture: amd64
Go Version: go1.20.1
Operating System: windows
GOPATH=D:\GoApiTool
GOROOT=E:\SoftWare\Go
1. Create geth.json
Create a json file directly, name it yourself, write in json:
{
    "config": {
          "chainId": 1234,
          "homesteadBlock": 0,
          "eip150Block": 0,
          "eip155Block": 0,
          "eip158Block": 0
      },
    "alloc"      : {},
    "coinbase"   : "0x0000000000000000000000000000000000000000",
    "difficulty" : "0x20000",
    "extraData"  : "",
    "gasLimit"   : "0x2fefd8",
    "nonce"      : "0x0000000000000042",
    "mixhash"    : "0x0000000000000000000000000000000000000000000000000000000000000000",
    "parentHash" : "0x0000000000000000000000000000000000000000000000000000000000000000",
    "timestamp"  : "0x00"
  }
chainId can choose a relatively larger number.
2. Create a nodedata folder
Create a nodedata folder in the same directory as the geth.json file to store keystore and other files.

3. Specify json to generate keystore
Use commands: geth --datadir nodedata --networkid 776211 --rpc init ./geth.jsongenerate keystore and other files, set networkid yourself to avoid node collision.
After success, relevant files will be generated in the specified file, geth is used to store data, and keystore is used to store private keys

4. Create an account
Execute the command: geth --datadir “nodedata” account newgenerate an account, and you need to enter a password at this time. Please be sure to remember this password, don't make a mistake, it will be used immediately later. At this time, a file starting with UTC will be generated in the keystore, and the file is not large.

5. Create passwd file
Note that the extension of the file can be seen first, and the specific opening method can be seen in the figure below:
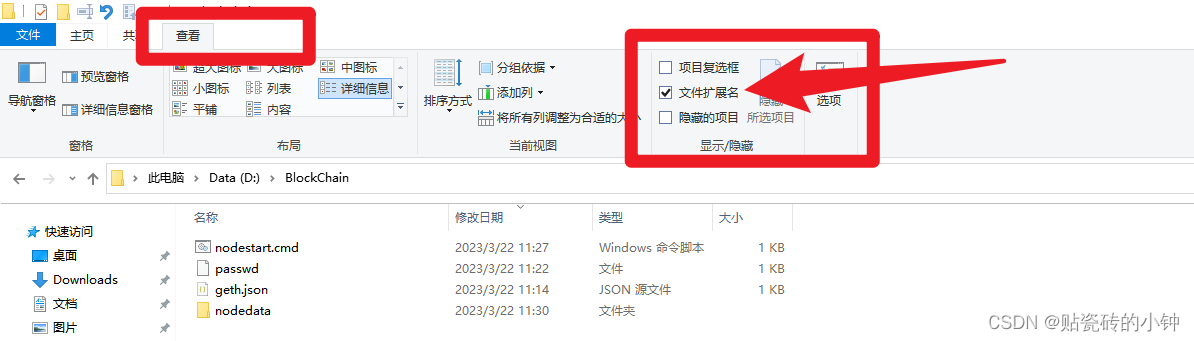
Create a passwd file in the same directory as the geth.json file, without any suffix, and edit this file, and enter the password you set when you created the account , don't make a mistake. (This file name and file format are not mandatory, you can define it yourself, you will use it later, please remember the file name)

6. Create a nodestart one-click startup file
Create a nodestart.bat file in the json file, which is a startup command for the Ethereum Geth client, which is used to start a private blockchain with a complete synchronization mode, and open the API on the HTTP and WebSocket protocols. The specific content inside is:
geth --ethash.cachedir "D:\BlockChain\Ethash" --ethash.dagdir "D:\BlockChain\Ethash" --allow-insecure-unlock --unlock=0 --password ./passwd --networkid 776211 --datadir "nodedata" --http --http.api "admin,debug,web3,eth,txpool,personal,ethash,miner,net" --http.corsdomain="*" --http.port=8545 --http.addr="0.0.0.0" --ws --ws.addr "0.0.0.0" --ws.port=8546 --ws.origins "*" --ws.api "admin,debug,web3,eth,txpool,personal,ethash,miner,net" --syncmode full console
Parameter description:
1. --ethash.cachedir "D:\BlockChain\Ethash":Specify the path of the Ethash cache directory.
2. --ethash.dagdir "D:\BlockChain\Ethash":Specify the path of the Ethash DAG directory.
3. --allow-insecure-unlock:Allow unsafe account unlocking methods.
4. --unlock=0:The index of the unlocked account, here is the first account to be unlocked.
5. --password ./passwd:Specify the password file path to unlock the account, here is a file named passwd.
6. --networkid 776211:Specify the network ID where the node is located.
7. --datadir "nodedata":Specify the path of the node data storage directory.
8. --http:Enable HTTP-RPC service.
9. --http.api "admin,debug,web3,eth,txpool,personal,ethash,miner,net":Specify the API to be opened by the HTTP-RPC service.
10. --http.corsdomain="*":Allow all sources to access HTTP-RPC services.
11. --http.port=8545:Specify the port number of the HTTP-RPC service.
12. --http.addr="0.0.0.0":Specify the IP address bound to the HTTP-RPC service.
13. --ws:Enable WebSocket-RPC service.
14. --ws.addr "0.0.0.0":Specify the IP address bound to the WebSocket-RPC service.
15. --ws.port=8546:Specify the port number of the WebSocket-RPC service.
16. --ws.origins "*":Allow all sources to access the WebSocket-RPC service.
17.--ws.api "admin,debug,web3,eth,txpool,personal,ethash,miner,net":Specify the API to be exposed by the WebSocket-RPC service.
18. --syncmode full:Specify the node synchronization mode as full mode, that is, download all blocks.
19. console:Start the console mode, and you can enter the Geth command in the console to interact with the node.
You can also modify these parameters and options appropriately according to your own needs and environment to ensure that the startup and operation of the node is correct and safe.
Note: You must be careful about the interval between the above codes. If it flashes directly when you double-click to start in the next step, it means that there may be no spaces where there should be spaces.
At this point, it is basically completed. At this time, double-click the nodestart.bat file to initialize. The first startup may take a little longer, and the cache will be loaded in the Ethash cache directory just specified. It seems that the file is quite large. There are several g.
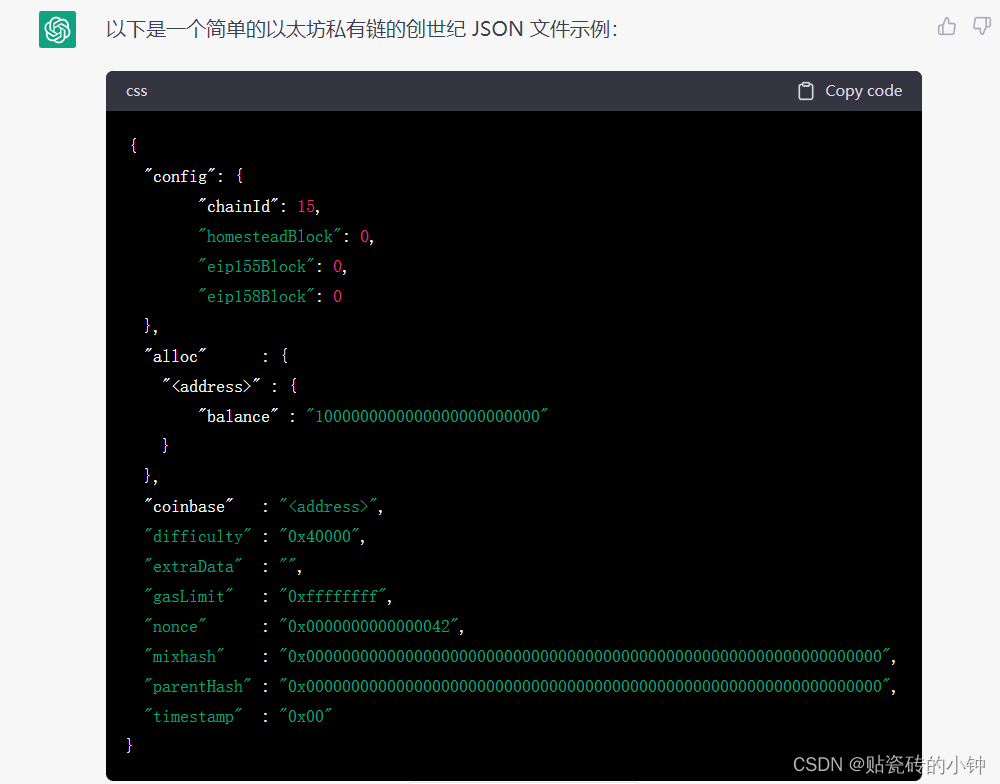
Supplement: About ChatGPT
We can search for the genesis block json file through Baidu, Google and other browsers. Anyway, there are quite a lot. We can also use the recently super popular ChatGPT to let it generate a genesis json file.

 Note: Please
 <address>replace with the address you want to set as pre-assigned, there can be multiple addresses, and the initial balance of each address can also be different. The Genesis JSON file given here contains some basic parameter settings, which you can modify as needed. In addition, it should be noted that if the network ID you choose is the same as the network ID of the public Ethereum network, then you need to add --networkid <your_network_id> the parameter