Article Directory
- Environment preparation: MQ deployment [docker environment]
- message reliability
- dead letter exchange
- MQ cluster
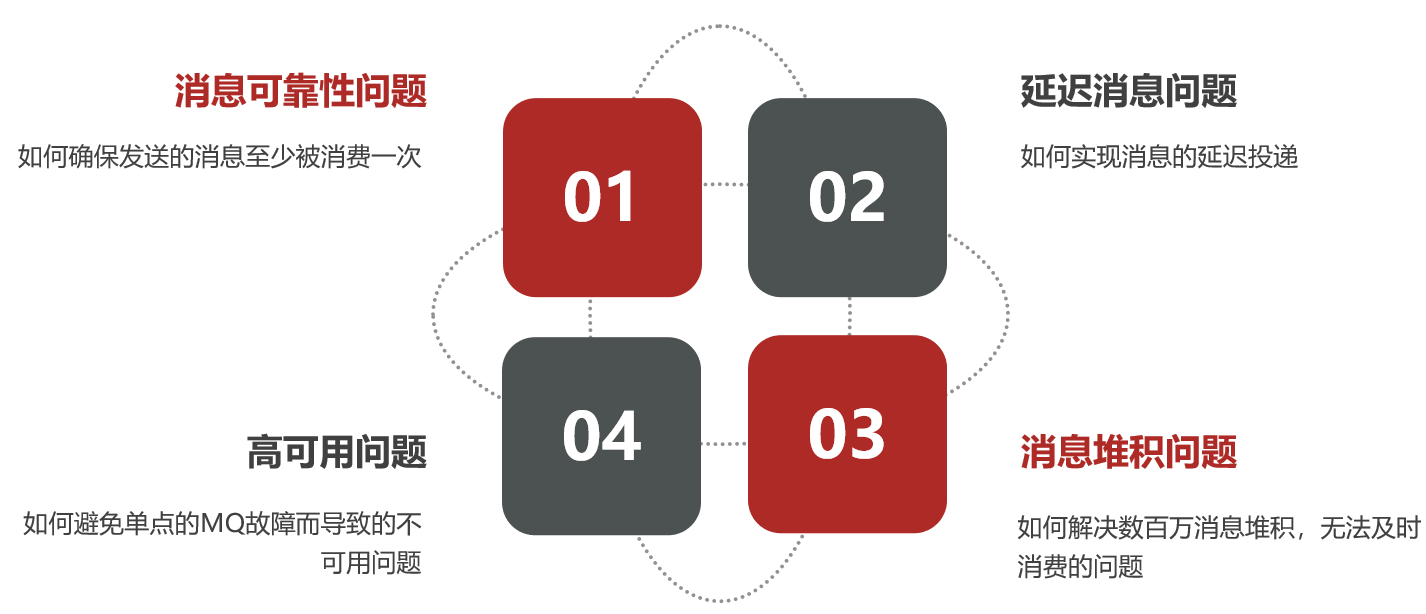
- Some common problems of MQ
Environment preparation: MQ deployment [docker environment]
- download mirror
docker pull rabbitmq:3.8-management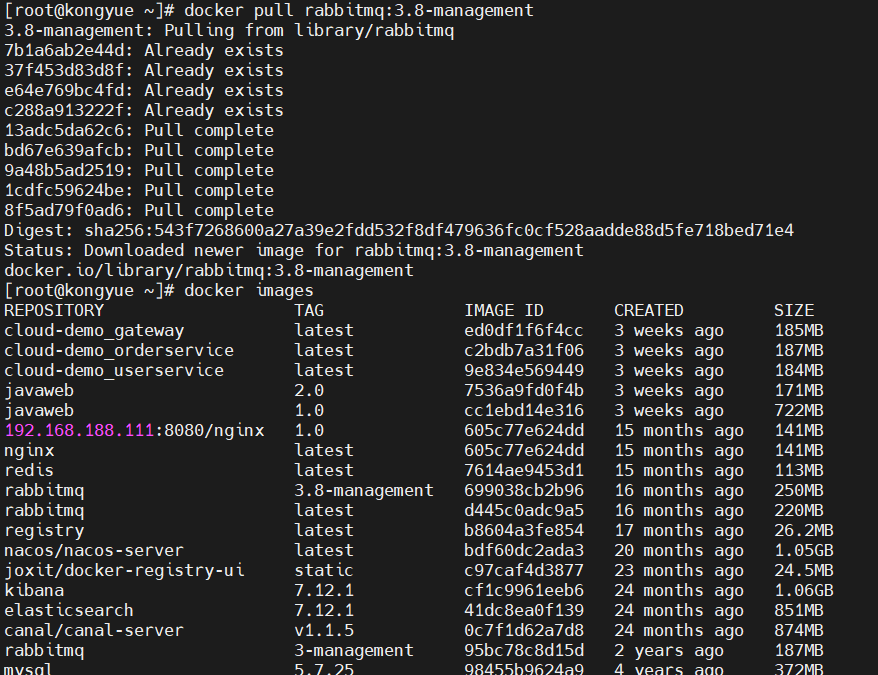
- Install MQ
docker run \ -e RABBITMQ_DEFAULT_USER=itcast \ -e RABBITMQ_DEFAULT_PASS=123321 \ -v mq-plugins:/plugins \ --name mq1 \ --hostname mq1 \ -p 15672:15672 \ -p 5672:5672 \ -d \ rabbitmq:3.8-management - test
[root@kongyue ~]# docker ps
CONTAINER ID   IMAGE                     COMMAND                   CREATED          STATUS          PORTS                                                                                                                                                 NAMES
7eea857604d3   rabbitmq:3.8-management   "docker-entrypoint.s…"   17 seconds ago   Up 16 seconds   4369/tcp, 5671/tcp, 0.0.0.0:5672->5672/tcp, :::5672->5672/tcp, 15671/tcp, 15691-15692/tcp, 25672/tcp, 0.0.0.0:15672->15672/tcp, :::15672->15672/tcp   mq1
message reliability
- From sending the message to receiving it by the consumer, it will manage multiple processes. Each of these steps can lead to message loss, common reasons for loss include:
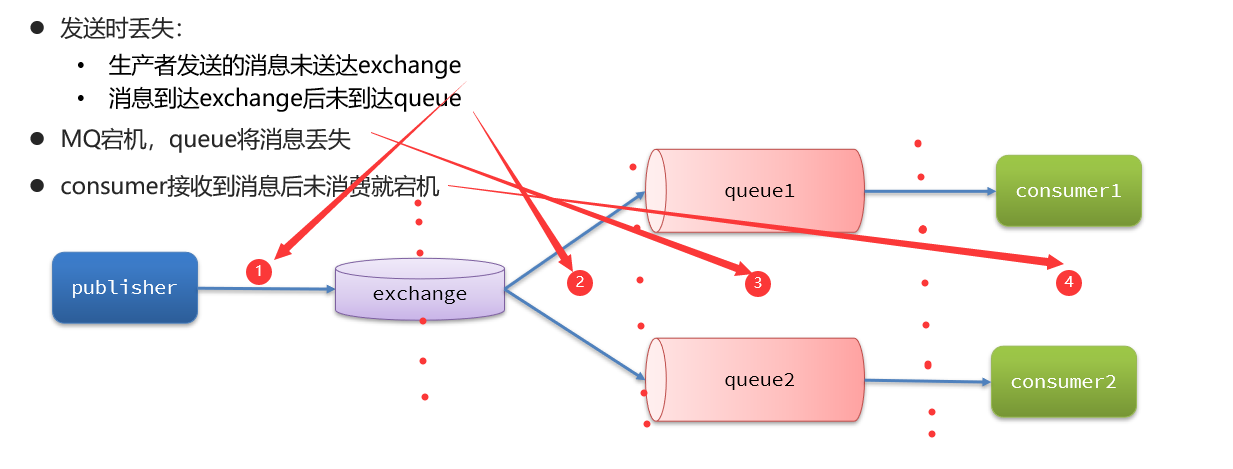
- For these problems, RabbitMQ gives solutions respectively:
- Producer Confirmation Mechanism
- mq persistence
- Consumer Confirmation Mechanism
- Failure retry mechanism
Producer message acknowledgment
RabbitMQ provides a publisher confirm mechanism to avoid loss of messages sent to MQ. This mechanism must assign a unique ID to each message. After the message is sent to MQ, a result will be returned to the sender, indicating whether the message is processed successfully. There are two ways to return results:
- publisher-confirm, the sender confirms
- The message is successfully delivered to the switch and returns ack
- The message was not delivered to the exchange , return nack
- An exception occurred during message sending and no receipt was received
- publisher-return, sender receipt
- Messages are delivered to exchanges, but not routed to queues. Return ACK and the reason for routing failure.

- Messages are delivered to exchanges, but not routed to queues. Return ACK and the reason for routing failure.
- Note: When the confirmation mechanism sends a message, it is necessary to set a globally unique id for each message to distinguish different messages and avoid ack conflicts
project configuration
- First, modify the application.yml file in the producer service and add the following content:
spring: rabbitmq: publisher-confirm-type: correlated #生产者确认类型 publisher-returns: true #开启publish-return功能 template: mandatory: true #定义消息路由失败时的策略publish-confirm-type: Enable publisher-confirm, here supports two types:simple: Synchronously wait for the confirm result until timeoutcorrelated: Asynchronous callback, define ConfirmCallback, this ConfirmCallback will be called back when MQ returns the result
publish-returns: Enable the publish-return function, which is also based on the callback mechanism, but defines the ReturnCallbacktemplate.mandatory: Defines the policy when message routing fails. true, call ReturnCallback; false: discard the message directly
Define Return callback and ConfirmCallback
- The message is successfully sent to the exchange, but not routed to the queue, call ReturnCallback
- Each RabbitTemplate can only configure one ReturnCallback, so it needs to be configured when the project is loaded:
- Modify the producer service and add one:
import lombok.extern.slf4j.Slf4j;
import org.springframework.amqp.rabbit.core.RabbitTemplate;
import org.springframework.beans.BeansException;
import org.springframework.context.ApplicationContext;
import org.springframework.context.ApplicationContextAware;
import org.springframework.context.annotation.Configuration;

@Slf4j
@Configuration
public class CommonConfig implements ApplicationContextAware {


    @Override
    public void setApplicationContext(ApplicationContext applicationContext) throws BeansException {


        // 获取RabbitTemplate
        RabbitTemplate rabbitTemplate = applicationContext.getBean(RabbitTemplate.class);
        // 设置ReturnCallback
        rabbitTemplate.setReturnCallback((message, replyCode, replyText, exchange, routingKey) -> {


            // 投递失败,记录日志
            log.info("消息发送失败,应答码{},原因{},交换机{},路由键{},消息{}",
                     replyCode, replyText, exchange, routingKey, message.toString());
            // 如果有业务需要,可以重发消息
        });
    }
}
- ConfirmCallback can be specified when sending a message, because the logic of each business processing confirm success or failure is not necessarily the same.
- Define a unit test method:
public void testSendMessage2SimpleQueue() throws InterruptedException {


    // 1.消息体
    String message = "hello, spring amqp!";
    // 2.全局唯一的消息ID,需要封装到CorrelationData中
    CorrelationData correlationData = new CorrelationData(UUID.randomUUID().toString());
    // 3.添加callback
    correlationData.getFuture().addCallback(
        result -> {


            if(result.isAck()){


                // 3.1.ack,消息成功
                log.debug("消息发送成功, ID:{}", correlationData.getId());
            }else{


                // 3.2.nack,消息失败
                log.error("消息发送失败, ID:{}, 原因{}",correlationData.getId(), result.getReason());
            }
        },
        ex -> log.error("消息发送异常, ID:{}, 原因{}",correlationData.getId(),ex.getMessage())
    );
    // 4.发送消息
    rabbitTemplate.convertAndSend("task.direct", "task", message, correlationData);

    // 休眠一会儿,等待ack回执
    Thread.sleep(2000);
}
message persistence
- MQ stores messages in memory by default. To ensure that messages are safely stored in RabbitMQ, the message persistence mechanism must be enabled to ensure that messages cached in MQ are not lost.
- switch persistence
- queue persistence
- message persistence
switch persistence
- In SpringAMQP, switch persistence can be specified by code:
@Bean public DirectExchange simpleExchange(){ // 三个参数:交换机名称、是否持久化、当没有queue与其绑定时是否自动删除 return new DirectExchange("simple.direct", true, false); }- By default, switches declared by Spring AMQP are persistent.
- In the RabbitMQ console, you can see the mark on the persistent switch
D: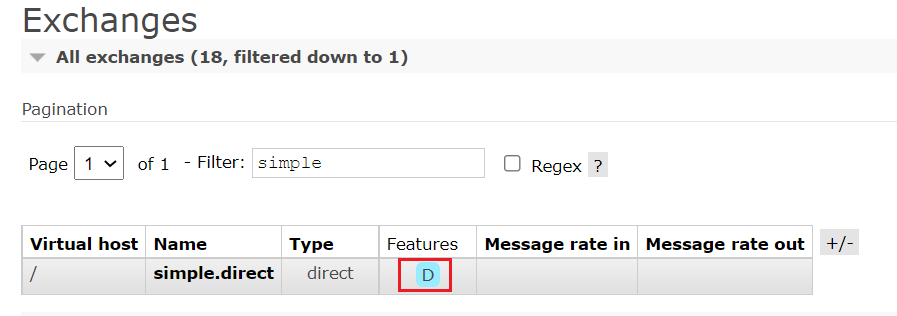
queue persistence
- In SpringAMQP, switch persistence can be specified by code:
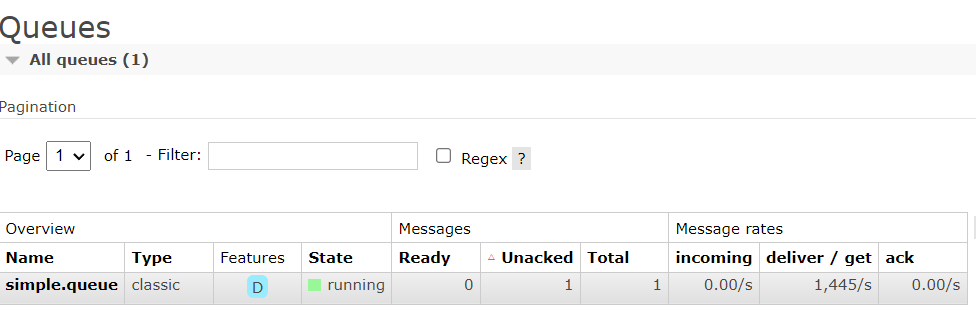
@Bean public Queue simpleQueue(){ // 使用QueueBuilder构建队列,durable就是持久化的 return QueueBuilder.durable("simple.queue").build(); }- By default, queues declared by Spring AMQP are persistent.
- RabbitMQ console sees the persistent queue will be
Dmarked with:

message persistence
When using SpringAMQP to send messages, you can set the properties of the message (MessageProperties) and specify the delivery-mode:
- 1: non-persistent
- 2: Persistence
 @Test
    public void testDuarbleMessage() {


        //创建消息
        Message message = MessageBuilder.withBody("hello, ttl queue".getBytes(StandardCharsets.UTF_8))
                .setDeliveryMode(MessageDeliveryMode.PERSISTENT)
                .build();
        //消息ID,需要封装到需要封装到CorrelationData中
        CorrelationData correlationData = new CorrelationData(UUID.randomUUID().toString());
        //发送消息
        rabbitTemplate.convertAndSend("simple.queue",message,correlationData);
        log.debug("发送消息成功!");
    }
- By default, any message sent by Spring AMQP is persistent, without specifying it.
Consumer Message Confirmation
- RabbitMQ is a mechanism that burns after reading . RabbitMQ confirms that the message will be deleted immediately after being consumed by the consumer. RabbitMQ supports the consumer confirmation mechanism, that is, the consumer can send an ack receipt to MQ after processing the message, and MQ will delete the message after receiving the ack receipt.
Imagine this scenario:
- 1) RabbitMQ delivers messages to consumers
- 2) After the consumer gets the message, it returns ACK to RabbitMQ
- 3) RabbitMQ delete message
- 4) The consumer is down and the message has not been processed
. In this way, the message is lost. Therefore, the timing of the consumer returning ACK is very important.
SpringAMQP allows configuration of three confirmation modes:
- manual: manual ack, you need to call the api to send ack after the business code ends.
- auto: automatic ack, the listener code is monitored by spring to see if there is an exception, if there is no exception, it will return ack; if an exception is thrown, it will return nack
- none: close ack, MQ assumes that the consumer will successfully process the message after getting it, so the message will be deleted immediately after delivery
From this we can see:
- In none mode, message delivery is unreliable and may be lost
- The auto mode is similar to the transaction mechanism. When an exception occurs, it returns nack, and the message is rolled back to mq; if there is no exception, it returns ack
- manual: According to the business situation, judge when the ack
should be normal. We all use the default auto.
none mode demo
- Modify the confirmation mechanism:
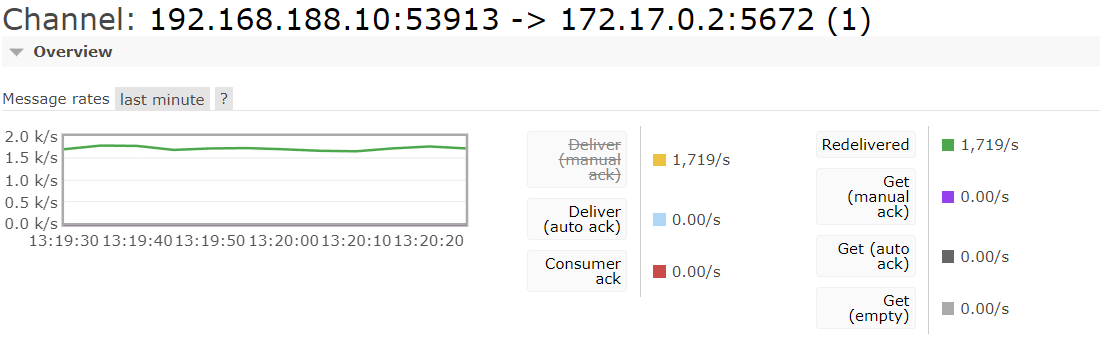
spring: rabbitmq: listener: simple: acknowledge-mode: auto # 关闭ack - Break the point at the abnormal position and send the message again. When the program is stuck at the break point, you can find that the message status is unack (undetermined status):
- After an exception is thrown, because Spring will automatically return nack, the message returns to the Ready state and is not deleted by RabbitMQ:

Consumption failure retry mechanism
- When the consumer has an exception, the message will continue to requeue (re-enter the queue) to the queue, and then resend to the consumer, and then the exception again, requeue again, infinite loop, causing the message processing of mq to soar, bringing unnecessary pressure:

local retry
- Use Spring's retry mechanism to use local retry when the consumer is abnormal, instead of unlimited requeue to the mq queue.
- Modify the application.yml file of the consumer service and add the content:
spring: rabbitmq: listener: simple: retry: enabled: true # 开启消费者失败重试 initial-interval: 1000 # 初识的失败等待时长为1秒 multiplier: 1 # 失败的等待时长倍数,下次等待时长 = multiplier * last-interval max-attempts: 3 # 最大重试次数 stateless: true # true无状态;false有状态。如果业务中包含事务,这里改为false - Restart the consumer service and repeat the test:
- SpringAMQP will throw exception AmqpRejectAndDontRequeueException
- Check the RabbitMQ console and find that the message is deleted, indicating that the last SpringAMQP returns ack, and mq deletes the message

in conclusion:
- When local retry is enabled, if an exception is thrown during message processing, it will not be requeed to the queue, but will be retried locally by the consumer
- After the maximum number of retries is reached, Spring will return ack and the message will be discarded
failure strategy
After the retry mode is turned on, the number of retries is exhausted. If the message still fails, the MessageRecoverer interface is required to handle it. It contains three different implementations:
- RejectAndDontRequeueRecoverer: After the retries are exhausted, directly reject and discard the message. This is the default
- ImmediateRequeueMessageRecoverer: After retries are exhausted, nack is returned, and the message is re-queued
- RepublishMessageRecoverer: After the retries are exhausted, deliver the failure message to the specified exchange

-
Define the exchange and queue for processing failed messages in the consumer service
@Bean public DirectExchange errorMessageExchange(){ return new DirectExchange("error.direct"); } @Bean public Queue errorQueue(){ return new Queue("error.queue", true); } @Bean public Binding errorBinding(Queue errorQueue, DirectExchange errorMessageExchange){ return BindingBuilder.bind(errorQueue).to(errorMessageExchange).with("error"); } -
Define a RepublishMessageRecoverer, associate queues and switches
@Bean
public MessageRecoverer republishMessageRecoverer(RabbitTemplate rabbitTemplate){


    return new RepublishMessageRecoverer(rabbitTemplate, "error.direct", "error");
}
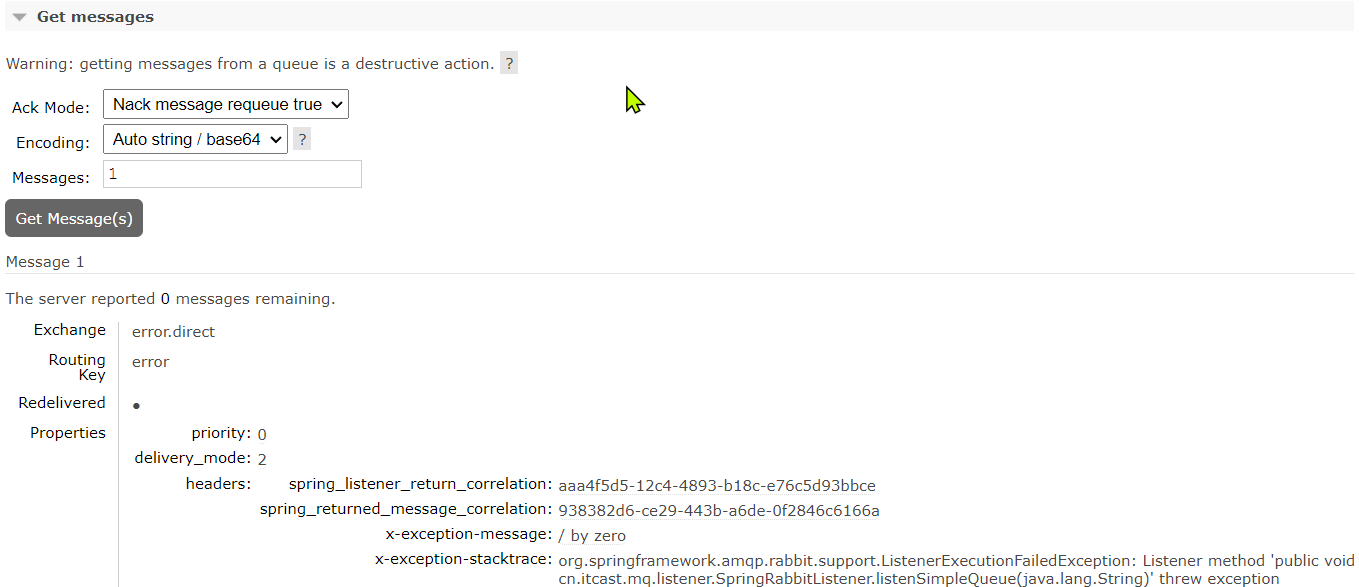
- Full code:
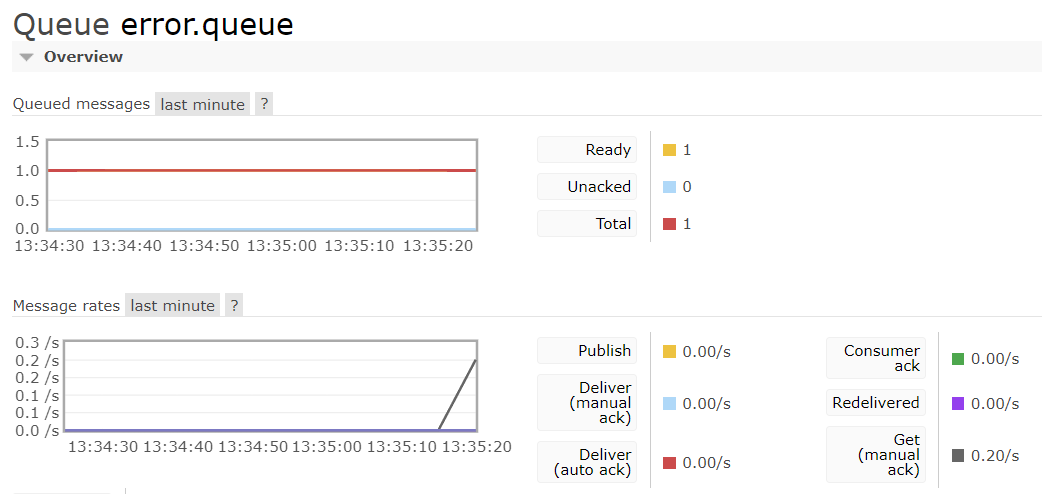
import org.springframework.amqp.core.Binding; import org.springframework.amqp.core.BindingBuilder; import org.springframework.amqp.core.DirectExchange; import org.springframework.amqp.core.Queue; import org.springframework.amqp.rabbit.core.RabbitTemplate; import org.springframework.amqp.rabbit.retry.MessageRecoverer; import org.springframework.amqp.rabbit.retry.RepublishMessageRecoverer; import org.springframework.context.annotation.Bean; @Configuration public class ErrorMessageConfig { @Bean public DirectExchange errorMessageExchange(){ return new DirectExchange("error.direct"); } @Bean public Queue errorQueue(){ return new Queue("error.queue", true); } @Bean public Binding errorBinding(Queue errorQueue, DirectExchange errorMessageExchange){ return BindingBuilder.bind(errorQueue).to(errorMessageExchange).with("error"); } @Bean public MessageRecoverer republishMessageRecoverer(RabbitTemplate rabbitTemplate){ return new RepublishMessageRecoverer(rabbitTemplate, "error.direct", "error"); } } - Restart the test:
- Restart the project, use the previous simulated exception to test, and you can see the specific exception information in the error queue
@RabbitListener(queues = "simple.queue")
    public void listenSimpleQueue(String msg) {


        System.out.println("消费者接收到simple.queue的消息:【" + msg + "】");
        //模拟异常
        System.out.println(1/0);
        log.debug("消息处理完毕!!!");
    }
Summarize
How to ensure the reliability of RabbitMQ messages?
- Enable the producer confirmation mechanism to ensure that the producer's message can reach the queue
- Enable the persistence function to ensure that the message will not be lost in the queue before it is consumed
- Turn on the consumer confirmation mechanism as auto, and the spring will complete the ack after confirming that the message is processed successfully
- Enable the consumer failure retry mechanism and set MessageRecoverer. After multiple retries fail, the message will be delivered to the abnormal switch and handed over to manual processing.
dead letter exchange
Getting to Know Dead Letter Switches
When a message in a queue meets one of the following conditions, it can become a dead letter:
- The consumer uses basic.reject or basic.nack to declare consumption failure, and the requeue parameter of the message is set to false
- The message is an expired message, no one consumes after timeout
- The queue message to be delivered is full and cannot be delivered
If the queue containing dead letters is configured with dead-letter-exchangeattributes and a switch is specified, the dead letters in the queue will be delivered to this switch, and this switch is called a dead letter exchange (Dead Letter Exchange, check DLX).

When the queue delivers the dead letter to the dead letter exchange, it must know two pieces of information:
- dead letter switch name
- The RoutingKey bound to the dead letter exchange and the dead letter queue
Only in this way can we ensure that the delivered message can reach the dead letter exchange and be correctly routed to the dead letter queue.
Dead letter switch receiving dead letter demo
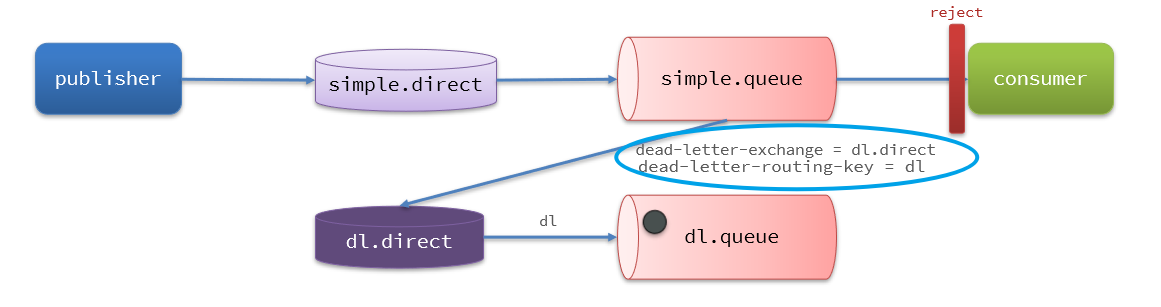
- Add a dead letter switch to simple.queue, and bind a queue to the dead letter switch. In this way, the message will not be discarded after it becomes a dead letter, but will be finally delivered to the dead letter exchange and routed to the queue bound to the dead letter exchange.
- In the consumer service, define a set of dead letter switches and dead letter queues:
// 声明普通的 simple.queue队列,并且为其指定死信交换机:dl.direct
@Bean
public Queue simpleQueue2(){


    return QueueBuilder.durable("simple.queue") // 指定队列名称,并持久化
        .deadLetterExchange("dl.direct") // 指定死信交换机
        .build();
}
// 声明死信交换机 dl.direct
@Bean
public DirectExchange dlExchange(){


    return new DirectExchange("dl.direct", true, false);
}
// 声明存储死信的队列 dl.queue
@Bean
public Queue dlQueue(){


    return new Queue("dl.queue", true);
}
// 将死信队列 与 死信交换机绑定
@Bean
public Binding dlBinding(){


    return BindingBuilder.bind(dlQueue()).to(dlExchange()).with("simple");
}
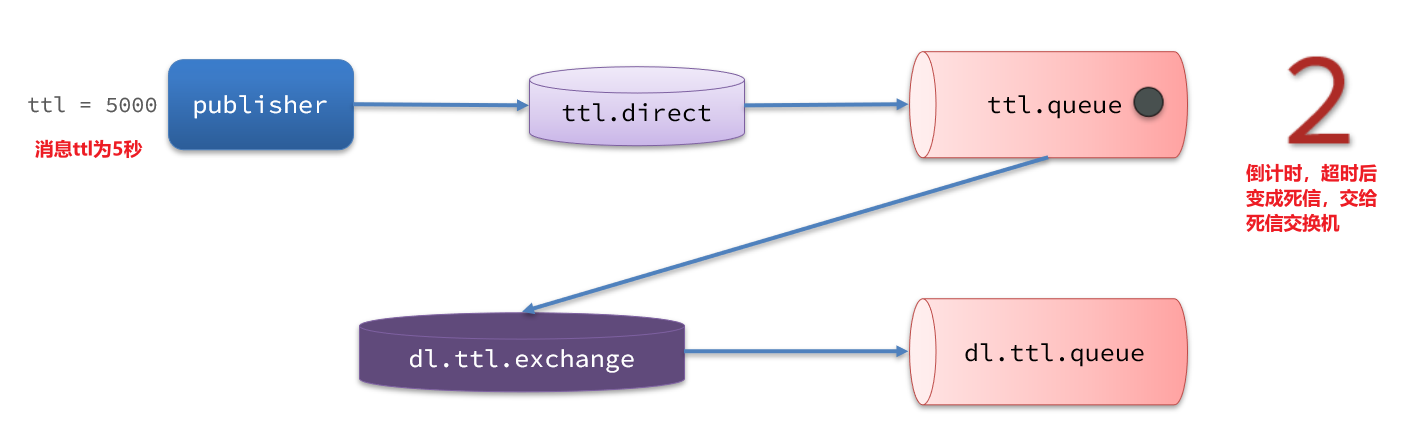
TTL(Time-To-Live)
If a message in a queue is not consumed after a timeout, it will become a dead letter. There are two cases of timeout:
- The queue where the message is located has a timeout set
- The message itself sets a timeout
- In the SpringRabbitListener of the consumer service, define a new consumer, and declare the dead letter switch and dead letter queue
@RabbitListener(bindings = @QueueBinding( value = @Queue(name = "dl.ttl.queue", durable = "true"), exchange = @Exchange(name = "dl.ttl.direct"), key = "ttl" )) public void listenDlQueue(String msg){ log.info("接收到 dl.ttl.queue的延迟消息:{}", msg); } - Declare a queue, specify the TTL & declare the switch, and bind the ttl to the switch
@Bean public Queue ttlQueue(){ return QueueBuilder.durable("ttl.queue") // 指定队列名称,并持久化 .ttl(10000) // 设置队列的超时时间,10秒 .deadLetterExchange("dl.ttl.direct") // 指定死信交换机 .build(); } @Bean public DirectExchange ttlExchange(){ return new DirectExchange("ttl.direct"); } @Bean public Binding ttlBinding(){ return BindingBuilder.bind(ttlQueue()).to(ttlExchange()).with("ttl"); } - Send a message, but don't specify a TTL
@Test
public void testTTLQueue() {


    // 创建消息
    String message = "hello, ttl queue";
    // 消息ID,需要封装到CorrelationData中
    CorrelationData correlationData = new CorrelationData(UUID.randomUUID().toString());
    // 发送消息
    rabbitTemplate.convertAndSend("ttl.direct", "ttl", message, correlationData);
    // 记录日志
    log.debug("发送消息成功");
}
- Log of sent message:
- View the log of the received message:

- Because the TTL value of the queue is 10 seconds. You can see that the time difference between message sending and receiving is exactly 10 seconds.
- When sending a message, set the TTL
@Test
public void testTTLMsg() {


    // 创建消息
    Message message = MessageBuilder
        .withBody("hello, ttl message".getBytes(StandardCharsets.UTF_8))
        .setExpiration("5000")
        .build();
    // 消息ID,需要封装到CorrelationData中
    CorrelationData correlationData = new CorrelationData(UUID.randomUUID().toString());
    // 发送消息
    rabbitTemplate.convertAndSend("ttl.direct", "ttl", message, correlationData);
    log.debug("发送消息成功");
}
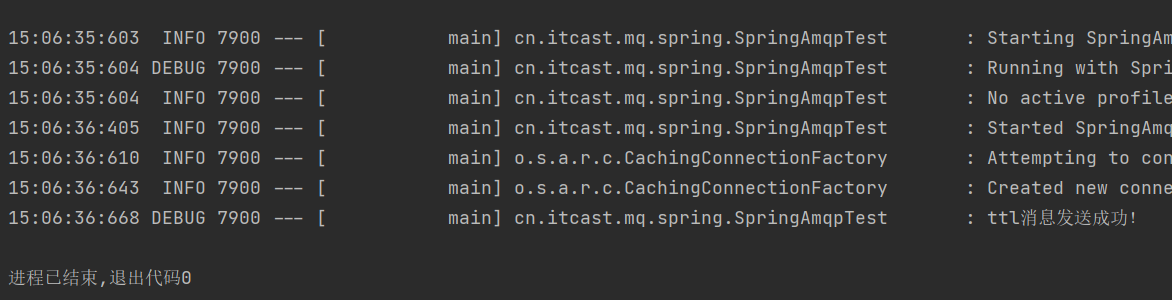
- View sent message log:
15:12:16:804 DEBUG 21600 --- [ main] cn.itcast.mq.spring.SpringAmqpTest : 发送消息成功 - Receive message log:
15:12:21:810 INFO 14572 --- [ntContainer#0-1] c.i.mq.listener.SpringRabbitListener : 接收到 dl.ttl.queue的延迟消息:hello, ttl message - When the TTL is set for both the queue and the message, any one of them will become a dead letter when it expires.
delay queue
- Delay Queue (Delay Queue) mode: use TTL combined with dead-letter switches to achieve the effect that consumers delay receiving messages after messages are sent.

- Use cases for delay queues include:
- Delay in sending SMS
- The user places an order, if the user does not pay within 15 minutes, it will be automatically canceled
- Schedule a work meeting and automatically notify all participants 20 minutes later
Because there are many demands for delay queues, RabbitMQ officially launched the DelayExchange plug-in, which natively supports delay queue effects. Refer to RabbitMQ's plugin list page
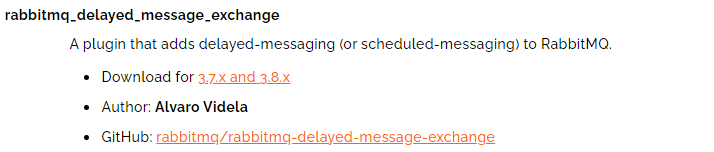
Install the DelayExchange plugin
- Pay attention to the version compatibility between the DelayExchange plug-in and RabbitMQ : the DelayExchange3.8.9 plug-in corresponds to RabbitMQ version 3.8.5 and above.
- upload plugin
- Because it is based on Docker installation, you need to check the data volume corresponding to the RabbitMQ plugin directory first.
docker volume inspect mq-plugins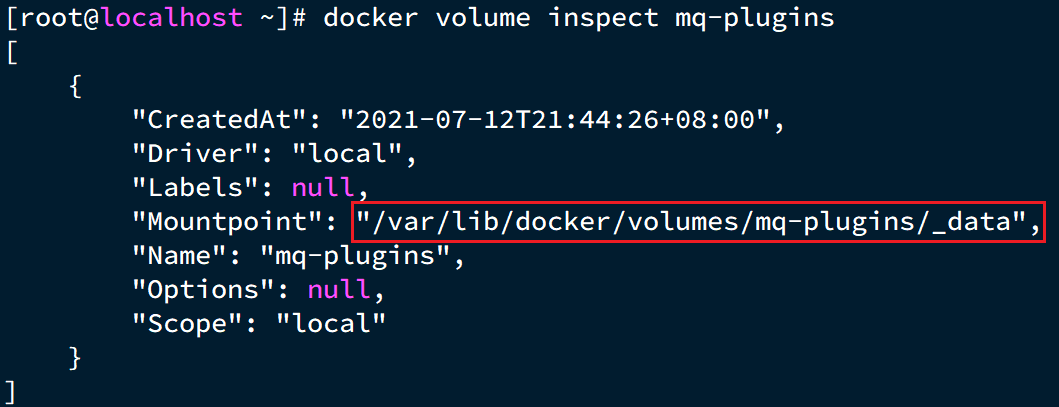
- Next, upload the plugin to this directory:

- install plugin
- Enter the inside of the MQ container to perform the installation, execute the command (note the container name)
docker exec -it mq1 bash- After entering the container, execute the following command to enable the plugin:
rabbitmq-plugins enable rabbitmq_delayed_message_exchange- The result is as follows:
[root@kongyue ~]# docker exec -it mq1 bash
root@mq1:/# rabbitmq-plugins enable rabbitmq_delayed_message_exchange
Enabling plugins on node rabbit@mq1:
rabbitmq_delayed_message_exchange
The following plugins have been configured:
  rabbitmq_delayed_message_exchange
  rabbitmq_management
  rabbitmq_management_agent
  rabbitmq_prometheus
  rabbitmq_web_dispatch
Applying plugin configuration to rabbit@mq1...
The following plugins have been enabled:
  rabbitmq_delayed_message_exchange

started 1 plugins.
root@mq1:/# exit
exit
use plugin
The principle of the DelayExchange plug-in is to upgrade the functions of the official native Exchange:
-
Temporarily store messages received by DelayExchange in memory (official Exchange cannot store messages)
-
Timing in DelayExchange, the message is delivered to the queue after timeout
-
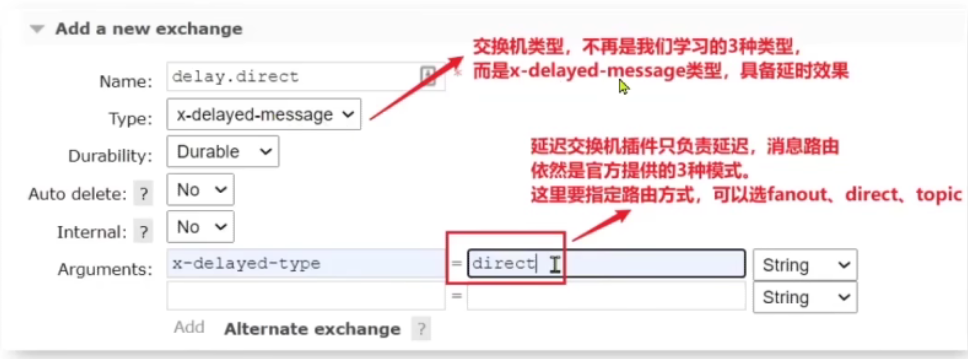
Declare a DelayExchange on the RabbitMQ management platform
-
The message delay time needs to be specified when sending the message
Principle of Delay Exchange
DelayExchange requires an exchange to be declared as delayed. When we send a message to delayExchange, the flow is as follows:
- receive message
- Determine whether the message has the x-delay attribute
- If there is an x-delay attribute, it means that it is a delayed message, which is persisted to the hard disk, and the x-delay value is read as the delay time
- Return the routing not found result to the message sender
- After the x-delay time expires, re-deliver the message to the specified queue
Use DelayExchange
-
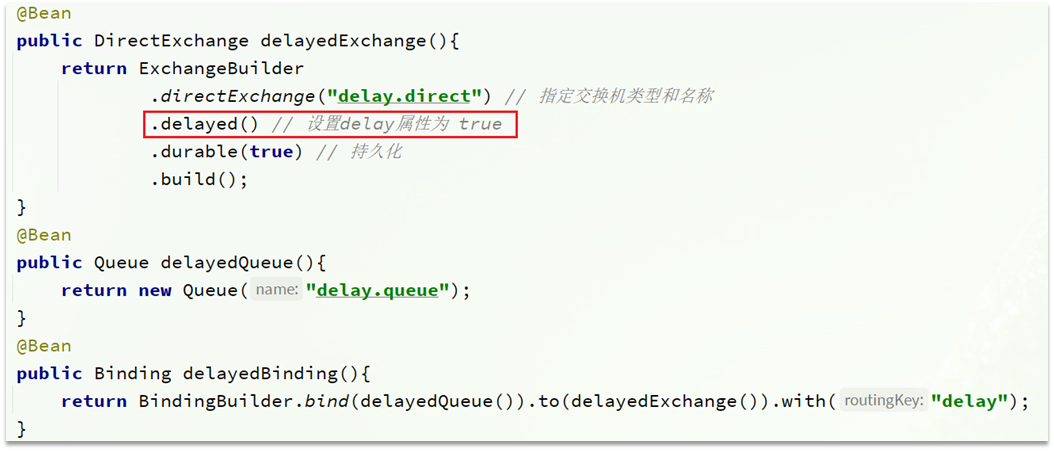
The use of the plug-in is also very simple: declare a switch, the type of the switch can be any type, just set the delayed attribute to true, and then declare the queue to bind it.
- Annotation method (recommended):
@RabbitListener(bindings = @QueueBinding( value = @Queue(name = "delay.queue",durable = "true"), exchange = @Exchange(name = "delay.direct",delayed = "true"), key = "delay" )) public void listenDelayedQueue(String msg) { log.info("接收到delay.queue的延迟消息:{}"+msg); }- Based on @Bean way:
-
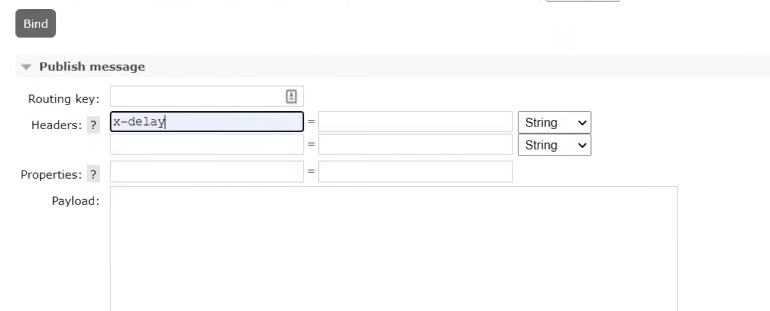
Send a message
- When sending a message, be sure to carry the x-delay attribute to specify the delay time:
@Test
    public void testDelayedMsg() {


        // 创建消息
        Message message = MessageBuilder
                .withBody("hello, delay message".getBytes(StandardCharsets.UTF_8))
                .setHeader("x-delay",10000)
                .build();
        // 消息ID,需要封装到CorrelationData中
        CorrelationData correlationData = new CorrelationData(UUID.randomUUID().toString());
        // 发送消息
        rabbitTemplate.convertAndSend("delay.direct", "delay", message, correlationData);
        log.debug("发送消息成功");
    }
- Since the switch saves the information to the hard disk and returns the routing not found result to the message sender, the following error message will appear
15:24:47:054 DEBUG 6124 --- [           main] cn.itcast.mq.spring.SpringAmqpTest       :
发送消息成功
15:24:47:056  INFO 6124 --- [nectionFactory1] cn.itcast.mq.config.CommonConfig         :
消息发送失败,应答码312,原因NO_ROUTE,交换机delay.direct,路由键delay,
消息(Body:'[B@18f05d55(byte[18])' MessageProperties [headers={

      spring_returned_message_correlation=aac9ebb8-f8eb-4c39-a64b-c1bf35b0c639},
contentType=application/octet-stream, contentLength=0, receivedDeliveryMode=PERSISTENT, priority=0, receivedDelay=10000, deliveryTag=0])
-
Solve the error problem
import lombok.extern.slf4j.Slf4j;
import org.springframework.amqp.rabbit.core.RabbitTemplate;
import org.springframework.beans.BeansException;
import org.springframework.context.ApplicationContext;
import org.springframework.context.ApplicationContextAware;
import org.springframework.context.annotation.Configuration;

@Slf4j
@Configuration
public class CommonConfig implements ApplicationContextAware {


    @Override
    public void setApplicationContext(ApplicationContext applicationContext) throws BeansException {


        // 获取RabbitTemplate
        RabbitTemplate rabbitTemplate = applicationContext.getBean(RabbitTemplate.class);
        // 设置ReturnCallback
        rabbitTemplate.setReturnCallback((message, replyCode, replyText, exchange, routingKey) -> {


            //判断是否有延迟消息
            if(message.getMessageProperties().getReceivedDelay()>0) {


                //判断是一个延迟消息,忽视错误
                return;
            }
            // 投递失败,记录日志
            log.info("消息发送失败,应答码{},原因{},交换机{},路由键{},消息{}",
                     replyCode, replyText, exchange, routingKey, message.toString());
            // 如果有业务需要,可以重发消息
        });
    }
}
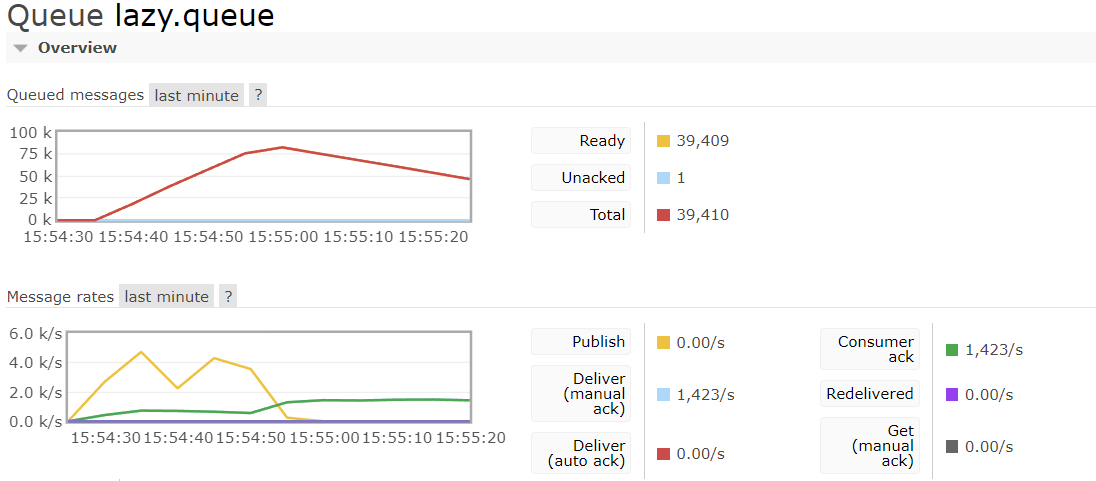
lazy queue
message accumulation problem
-
When the speed at which producers send messages exceeds the speed at which consumers can process messages, messages in the queue will accumulate until the queue stores messages to the upper limit. Messages sent later will become dead letters and may be discarded. This is the problem of message accumulation.

-
There are three ways to solve message accumulation:
- Add more consumers and increase consumption speed
- Open the thread pool in the consumer to speed up message processing
- Expand the queue volume and increase the stacking limit
lazy queue
Starting from version 3.6.0 of RabbitMQ, the concept of Lazy Queues, that is, lazy queues, has been added. The characteristics of lazy queue are as follows:
- After receiving the message, store it directly on disk instead of memory
- Consumers only read from disk and load them into memory when they want to consume messages
- Support millions of message storage
Set lazy-queue based on the command line[understand]
To set a queue as a lazy queue, you only need to specify the x-queue-mode attribute as lazy when declaring the queue. A running queue can be changed to a lazy queue via the command line:
rabbitmqctl set_policy Lazy "^lazy-queue$" '{"queue-mode":"lazy"}' --apply-to queues
Command interpretation:
rabbitmqctl: command-line tool for RabbitMQset_policy: add a strategyLazy: Policy name, which can be customized"^lazy-queue$": Match the name of the queue with a regular expression'{"queue-mode":"lazy"}': Set the queue mode to lazy mode--apply-to queues: The target of the policy is all queues
Declare lazy-queue based on @Bean
@Bean
    public Queue lazyQueue() {


        return QueueBuilder.durable("lazy.queue")
                .lazy()
                .build();
    }
Declare LazyQueue based on @RabbitListener
@RabbitListener(queuesToDeclare = cQueue(
	name = "lazy.queue",
	arguments = @Argument(name = "x-queue-mode" ,value = "lazy")
))
public void listenLazyQueue(string msg){


	log.info("接收到lazy.queue的消息:{",msg);
}
practice
- Create a new LazyConfig class
import org.springframework.amqp.core.Queue;
import org.springframework.amqp.core.QueueBuilder;
import org.springframework.context.annotation.Bean;
import org.springframework.context.annotation.Configuration;

@Configuration
public class LazyConfig {


    @Bean
    public Queue lazyQueue() {


        return QueueBuilder.durable("lazy.queue")
                .lazy()
                .build();
    }
    @Bean
    public Queue normalQueue() {


        return QueueBuilder.durable("normal.queue").build();
    }

}
-
The switch is not explicitly specified here, and the default switch of springAMQP will be used by default.
Name Type Features Message rate in Message rate out (AMQP default) direct D 0.00/s 0.00/s -
The default exchange is implicitly bound to each queue with a routing key equal to the queue name. Cannot be explicitly bound to or unbound from the default exchange. Nor can it be deleted.
@Test
    public void testLazyQueue() {


        for (int i = 0; i < 100_000; i++) {


        Message message = MessageBuilder.withBody("hello lazyQueue".getBytes(StandardCharsets.UTF_8))
                .build();

        rabbitTemplate.convertAndSend("lazy.queue",message);
        }
    }
MQ cluster
cluster classification
RabbitMQ is written based on the Erlang language, and Erlang is a concurrency-oriented language that naturally supports cluster mode. The RabbitMQ cluster has two modes:
-
Ordinary cluster : It is a distributed cluster that distributes queues to each node of the cluster, thereby improving the concurrency capability of the entire cluster. Normal mode clusters do not perform data synchronization, and each MQ has its own queue and data information (other metadata information such as switches will be synchronized). For example, we have 2 MQs: mq1 and mq2. If your message is in mq1 and you are connected to mq2, then mq2 will go to mq1 to pull the message and return it to you. If mq1 goes down, the message will be lost.
-
Mirror cluster : It is a master-slave cluster. On the basis of ordinary clusters, a master-slave backup function is added to improve the data availability of the cluster. Different from the normal mode, the queue will be synchronized between the mirror nodes of each mq, so you can get the message when you connect to any mirror node. And if a node goes down, no data will be lost. However, this approach increases bandwidth consumption for data synchronization.
Although the mirror cluster supports master-slave, master-slave synchronization is not strongly consistent, and there may be a risk of data loss in some cases. Therefore, after RabbitMQ version 3.8, a new function was introduced: the arbitration queue to replace the mirror cluster, and the bottom layer uses the Raft protocol to ensure the data consistency between the master and the slave.
normal cluster
Cluster structure and characteristics
Ordinary clusters, or classic clusters, have the following characteristics:
- Part of the data will be shared between each node in the cluster, including: switch and queue metadata. Messages in the queue are not included.
- When accessing a node in the cluster, if the queue is not on the node, it will be passed from the node where the data is located to the current node and returned
- If the node where the queue is located goes down, the messages in the queue will be lost


Common Cluster Deployment
- Plan to deploy a 3-node mq cluster
| CPU name | console port | amqp communication port |
|---|---|---|
| mqNode1 | 8081 —> 15672 | 8071 —> 5672 |
| mqNode2 | 8082 —> 15672 | 8072 —> 5672 |
| mqNode3 | 8083 —> 15672 | 8073 —> 5672 |
- The default labels of nodes in the cluster are:
rabbit@[hostname], so the names of the above three nodes are:- rabbit@mqNode1
- rabbit@mqNode2
- rabbit@mqNode3
get cookie
-
The bottom layer of RabbitMQ depends on Erlang, and the Erlang virtual machine is a distributed-oriented language that supports cluster mode by default. Each RabbitMQ node in cluster mode uses a cookie to determine if they are allowed to communicate with each other.
-
For two nodes to be able to communicate, they must have the same shared secret, called an Erlang cookie . A cookie is just a string of alphanumeric characters up to 255 characters.
-
Every cluster node must have the same cookie . It is also needed between instances to communicate with each other.
-
First obtain a cookie value in the previously started mq container as the cluster cookie. Execute the following command:
docker exec -it mq cat /var/lib/rabbitmq/.erlang.cookie -
The cookie values are as follows:
FXZMCVGLBIXZCDEMMVZQ -
Next, stop and delete the current mq container, we rebuild the cluster
docker rm -f mq
Prepare cluster configuration
echo FXZMCVGLBIXZCDEMMVZQ> .erlang.cookie
- Create a new configuration file rabbitmq.conf in the /tmp/rabbitMqCluster directory:
cd /tmp/rabbitMqCluster touch rabbitmq.conf - The content of the file is as follows:
loopback_users.guest = false listeners.tcp.default = 5672 cluster_formation.peer_discovery_backend = rabbit_peer_discovery_classic_config cluster_formation.classic_config.nodes.1 = rabbit@mqNode1 cluster_formation.classic_config.nodes.2 = rabbit@mqNode2 cluster_formation.classic_config.nodes.3 = rabbit@mqNode3 - Create another file to record cookies
cd /tmp/rabbitMqCluster # 创建cookie文件 touch .erlang.cookie # 写入cookie 请使用自己生成的cookie echo "FXZMCVGLBIXZCDEMMVZQ" > .erlang.cookie # 修改cookie文件的权限 chmod 600 .erlang.cookie - Prepare three directories, mqNode1, mqNode2, mqNode3:
cd /tmp/rabbitMqCluster # 创建目录 mkdir mqNode1 mqNode2 mqNode3 - Then copy rabbitmq.conf
[root@kongyue rabbitMqCluster]# mkdir mqNode1 mqNode2 mqNode3
[root@kongyue rabbitMqCluster]# cp .erlang.cookie mqNode1
[root@kongyue rabbitMqCluster]# cp .erlang.cookie mqNode2
[root@kongyue rabbitMqCluster]# cp .erlang.cookie mqNode3
[root@kongyue rabbitMqCluster]# cp rabbitmq.conf mqNode1
[root@kongyue rabbitMqCluster]# cp rabbitmq.conf mqNode2
[root@kongyue rabbitMqCluster]# cp rabbitmq.conf mqNode3
Start the cluster
- Create a network:
docker network create mq-net - run command
docker run -d --net mq-net \
-v ${

      PWD}/mqNode1/rabbitmq.conf:/etc/rabbitmq/rabbitmq.conf \
-v ${

      PWD}/.erlang.cookie:/var/lib/rabbitmq/.erlang.cookie \
-v mq-plugins:/plugins \
-e RABBITMQ_DEFAULT_USER=itcast \
-e RABBITMQ_DEFAULT_PASS=123321 \
--name mqNode1 \
--hostname mqNode1 \
-p 8071:5672 \
-p 8081:15672 \
rabbitmq:3.8-management
docker run -d --net mq-net \ -v ${ PWD}/mqNode2/rabbitmq.conf:/etc/rabbitmq/rabbitmq.conf \ -v ${ PWD}/.erlang.cookie:/var/lib/rabbitmq/.erlang.cookie \ -v mq-plugins:/plugins \ -e RABBITMQ_DEFAULT_USER=itcast \ -e RABBITMQ_DEFAULT_PASS=123321 \ --name mqNode2 \ --hostname mqNode2 \ -p 8072:5672 \ -p 8082:15672 \ rabbitmq:3.8-managementdocker run -d --net mq-net \ -v ${ PWD}/mqNode3/rabbitmq.conf:/etc/rabbitmq/rabbitmq.conf \ -v ${ PWD}/.erlang.cookie:/var/lib/rabbitmq/.erlang.cookie \ -v mq-plugins:/plugins \ -e RABBITMQ_DEFAULT_USER=itcast \ -e RABBITMQ_DEFAULT_PASS=123321 \ --name mqNode3 \ --hostname mqNode3 \ -p 8073:5672 \ -p 8083:15672 \ rabbitmq:3.8-management
test
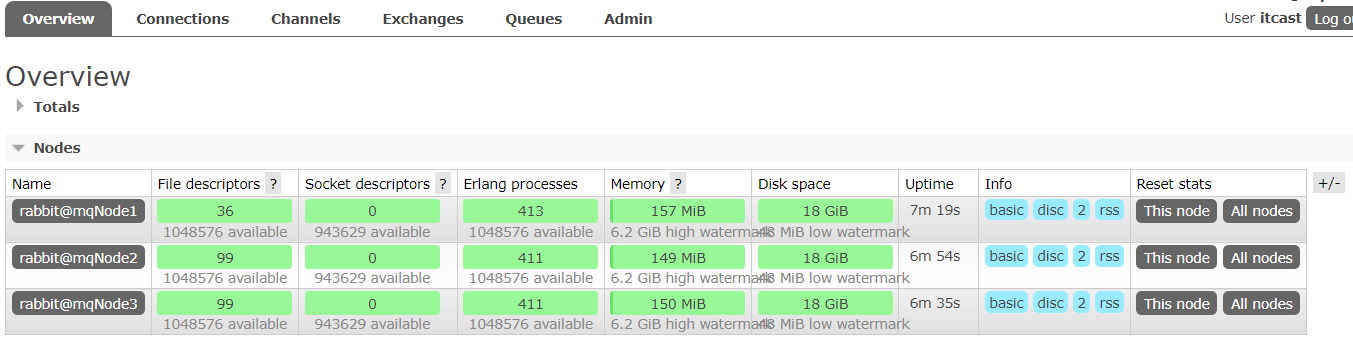
- Log in to any node and view the node
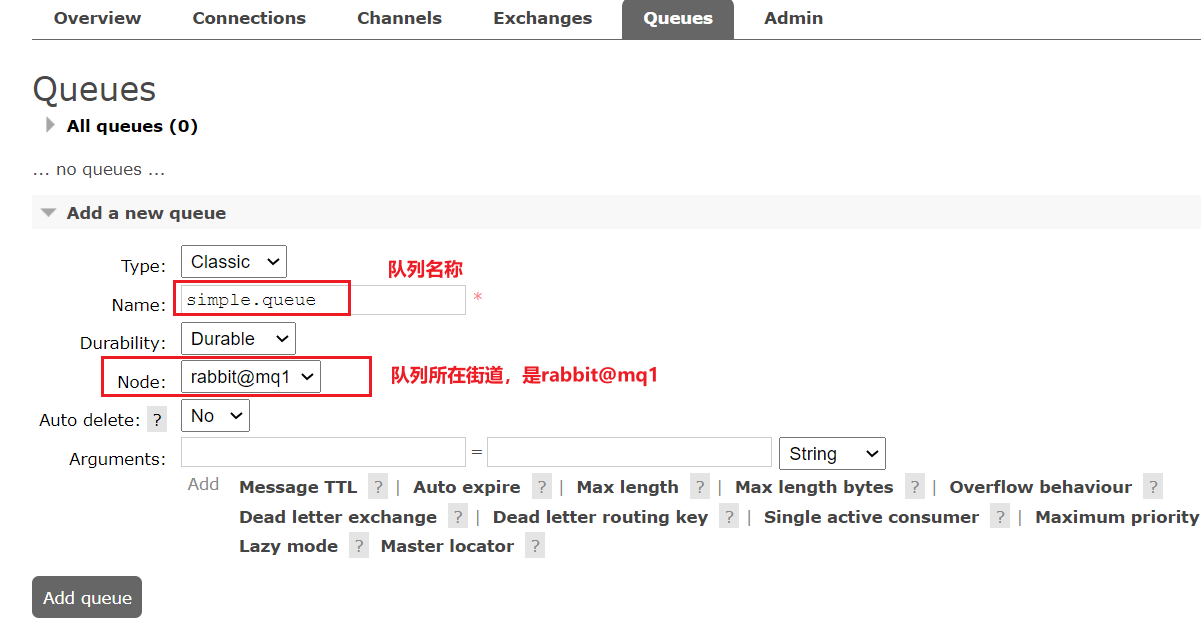
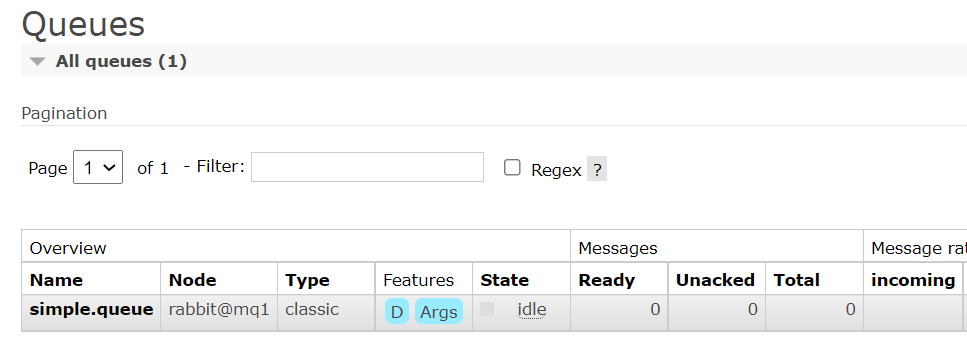
- Add a queue to the mq1 node:
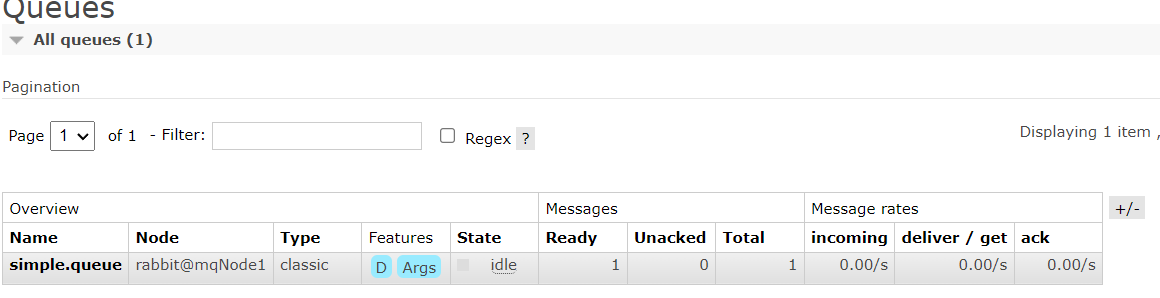
- It can also be seen in both mq2 and mq3 consoles:
Data Sharing Test
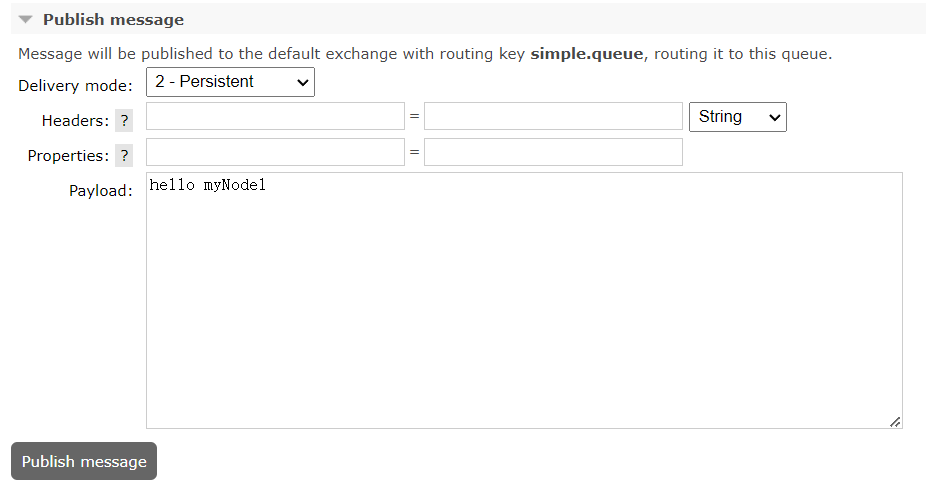
- Use the console to send a message to this queue
mirror mode
Cluster structure and characteristics
Mirror cluster: the essence is the master-slave mode, with the following characteristics:
- Switches, queues, and messages in queues will be backed up synchronously between mirror nodes of each mq.
- The node that creates the queue is called the primary node of the queue, and the other nodes that are backed up to are called the mirror nodes of the queue.
- A queue's master node may be another queue's mirror node
- All operations are completed by the master node, and then synchronized to the mirror node
- After the master goes down, the mirror node will be replaced by the new master

Summarize:
- The mirror queue structure is one master and multiple slaves (slave is mirror image)
- All operations are completed by the master node, and then synchronized to the mirror node
- After the master goes down, the mirror node will replace it as the new master (if the master is down before the master-slave synchronization is completed, data loss may occur)
- Does not have load balancing function, because all operations will be completed by the master node (but different queues, the master node can be different, you can use this to improve throughput)
Configuration of mirror mode
- There are 3 modes for mirror mode configuration:
| ha-mode | ha-params | Effect |
|---|---|---|
| exact mode exactly | The number of copies of the queue count | The number of queue replicas (sum of primary and mirror servers) in the cluster. If count is 1, it means a single copy: the queue master node. A count value of 2 means 2 copies: 1 queue master and 1 queue mirror. In other words: count = number of mirrors + 1. If there are fewer than count nodes in the cluster, the queue will be mirrored to all nodes. If there is a cluster total greater than count+1, and the node containing the mirror fails, a new mirror will be created on another node. |
| all | (none) | Queues are mirrored across all nodes in the cluster. The queue will be mirrored to any newly joined nodes. Mirroring to all nodes will put additional pressure on all cluster nodes, including network I/O, disk I/O, and disk space usage. It is recommended to use exactly, and set the number of replicas to (N / 2 +1). |
| nodes | node names | Specify which nodes the queue is created to. If none of the specified nodes exist, an exception will occur. If the specified node exists in the cluster but is temporarily unavailable, a node will be created to the node the current client is connected to. |
- Take the rabbitmqctl command as an example to explain the configuration syntax.
- exactly mode
rabbitmqctl set_policy ha-two "^two\." '{"ha-mode":"exactly","ha-params":2,"ha-sync-mode":"automatic"}'
rabbitmqctl set_policy: Fixed wordingha-two: policy name, custom"^two\.": Match the regular expression of the queue, the queue that conforms to the naming rules will take effect, here is anytwo.queue name starting with'{"ha-mode":"exactly","ha-params":2,"ha-sync-mode":"automatic"}': Policy content"ha-mode":"exactly": strategy mode, here is exactly mode, specify the number of copies"ha-params":2: Policy parameter, here is 2, that is, the number of replicas is 2, 1 master and 1 mirror"ha-sync-mode":"automatic": Synchronization strategy, the default is manual, that is, newly added mirror nodes will not synchronize old messages. If it is set to automatic, the newly added mirror node will synchronize all the messages in the master node, which will bring additional network overhead
- all mode
rabbitmqctl set_policy ha-all "^all\." '{"ha-mode":"all"}'
ha-all: policy name, custom"^all\.": matches allall.queue names starting with'{"ha-mode":"all"}': policy content"ha-mode":"all": Strategy mode, here is all mode, that is, all nodes will be called mirror nodes
- nodes mode
rabbitmqctl set_policy ha-nodes "^nodes\." '{"ha-mode":"nodes","ha-params":["rabbit@nodeA", "rabbit@nodeB"]}'
rabbitmqctl set_policy: Fixed wordingha-nodes: policy name, custom"^nodes\.": Match the regular expression of the queue, the queue that conforms to the naming rules will take effect, here is anynodes.queue name starting with'{"ha-mode":"nodes","ha-params":["rabbit@nodeA", "rabbit@nodeB"]}': Policy content"ha-mode":"nodes": Strategy mode, here is the nodes mode"ha-params":["rabbit@mq1", "rabbit@mq2"]: Policy parameter, here specify the name of the node where the copy is located
Test exactly mode
- Use mirroring in exact mode, because the number of cluster nodes is 3, so the number of mirroring is set to 2, run the following command:
docker exec -it mqNode1 rabbitmqctl set_policy ha-two "^two\." '{"ha-mode":"exactly","ha-params":2,"ha-sync-mode":"automatic"}'
[root@kongyue rabbitMqCluster]# docker exec -it mqNode1 rabbitmqctl set_policy ha-two "^two\." '{"ha-mode":"exactly","ha-params":2,"ha-sync-mode":"automatic"}'
Setting policy "ha-two" for pattern "^two\." to "{"ha-mode":"exactly","ha-params":2,"ha-sync-mode":"automatic"}" with priority "0" for vhost "/" ...
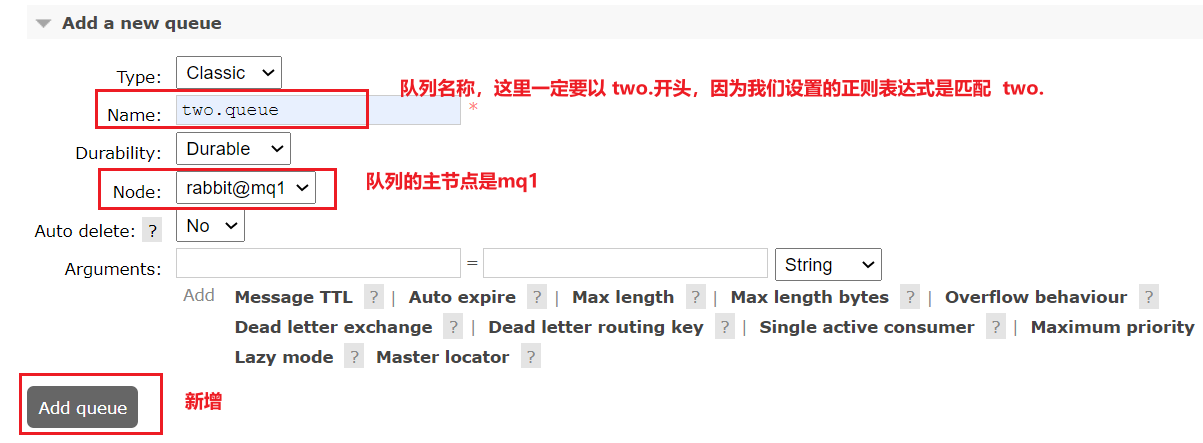
- Create a new queue:
- Check the queue on any mq console:

Test data sharing
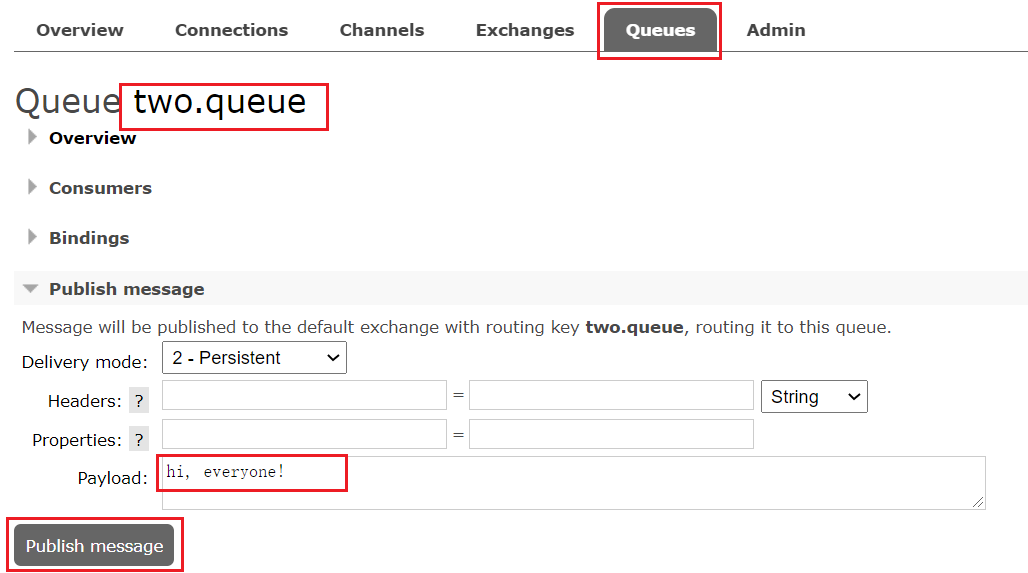
- 给two.queue发送一条消息:
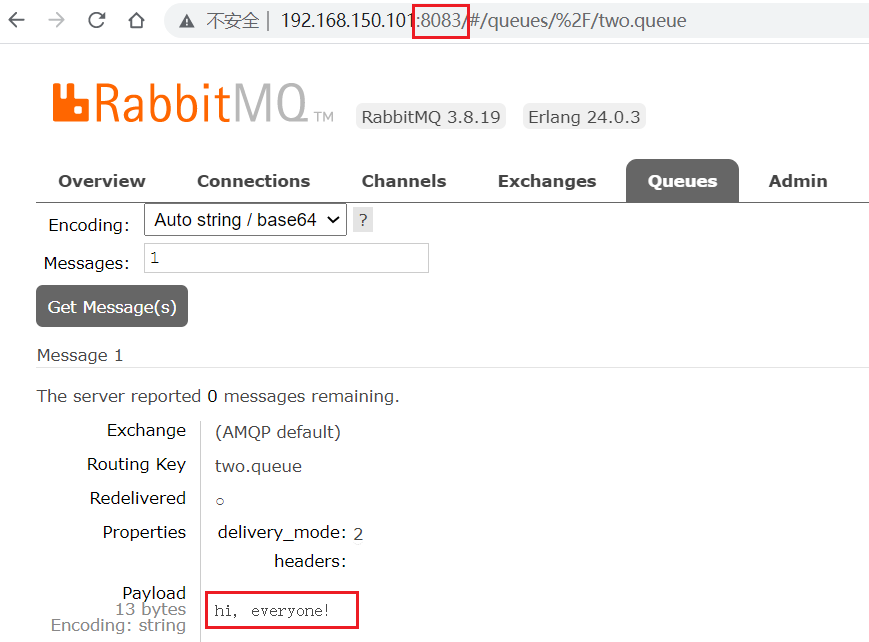
- Then check the message in any console of mq1, mq2, mq3:
Test high availability
- Let the master node mq1 of two.queue go down:
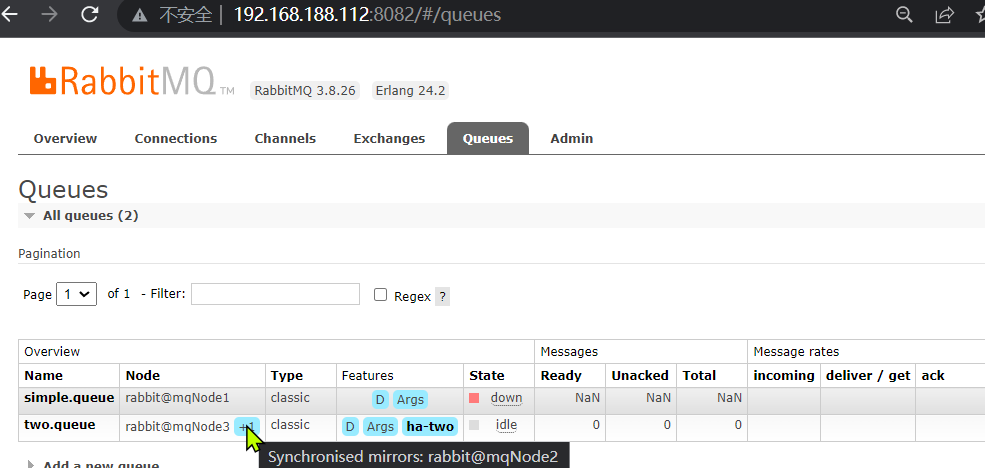
docker stop mqNode1 - View cluster status:

- View queue status:

Arbitration Queue
cluster characteristics
Arbitration queue: Arbitration queue is a new function available after version 3.8. It is used to replace the mirror queue and has the following characteristics:
- Like the mirror queue, it is a master-slave mode and supports master-slave data synchronization
- Very easy to use, no complicated configuration
- Master-slave synchronization based on Raft protocol, strong consistency
Deployment: Add Quorum Queue
- Note: Enter each rabbitMQ container to open the delay DelayExchange plug-in
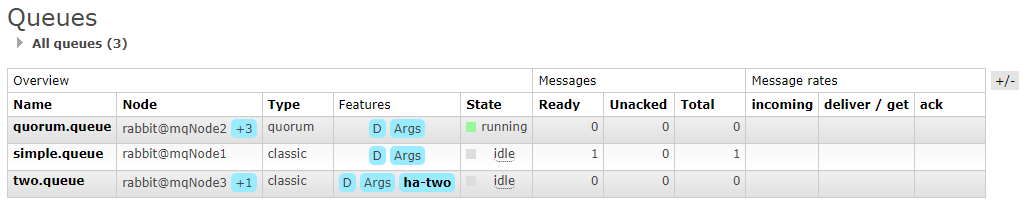
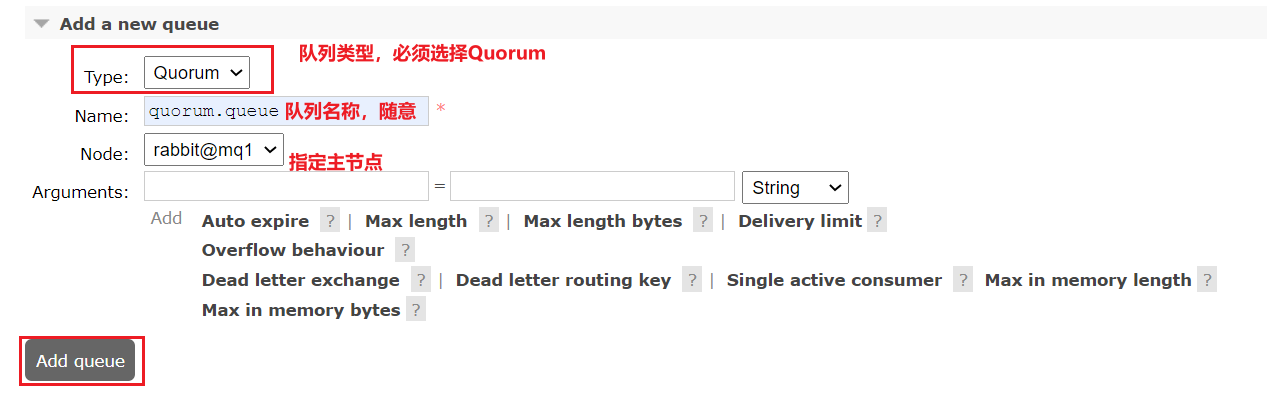
- To add a queue in any console, be sure to select the queue type as Quorum type.
- View queues on any console:
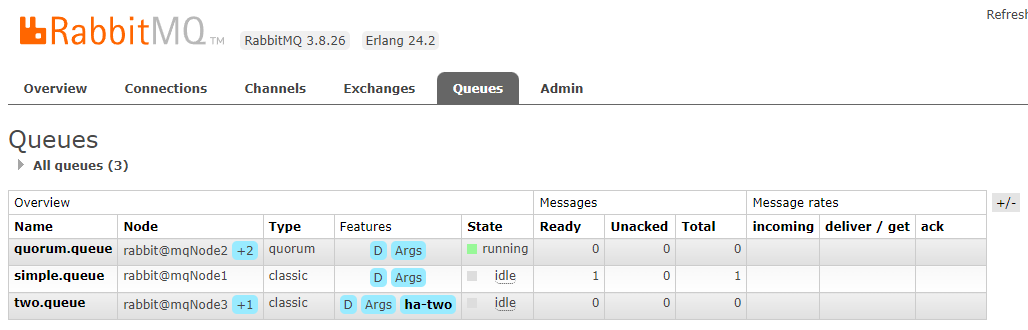
- +2 word for quorum queue. It means that this queue has 2 mirror nodes.
- Because the default mirror number of the quorum queue is 5. If the cluster has 7 nodes, then the number of mirrors must be 5; now the cluster has only 3 nodes, so the number of mirrors is 3.
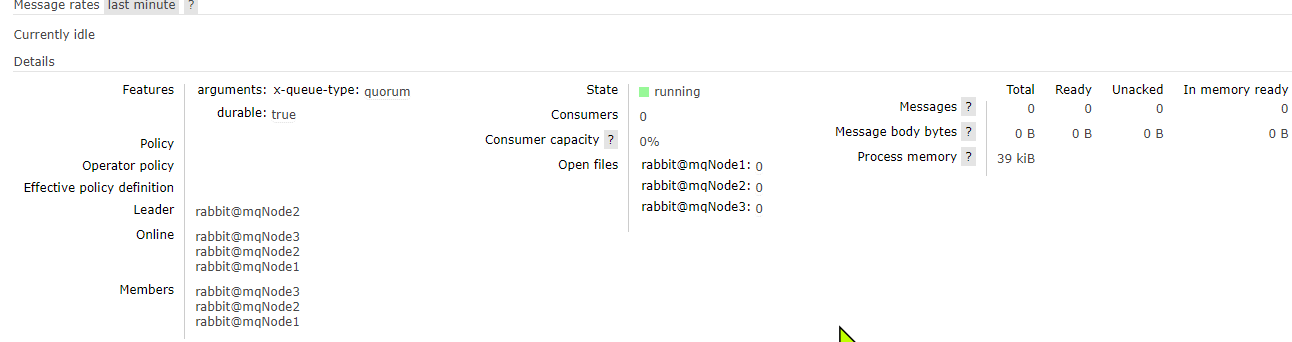
- View the details of the queue on each node
Java code to create quorum queue
@Bean
public Queue quorumQueue() {


    return QueueBuilder
        .durable("quorum.queue") // 持久化
        .quorum() // 仲裁队列
        .build();
}
SpringAMQP connects to MQ cluster
spring:
  rabbitmq:
    addresses: 192.168.188.112:8071, 192.168.188.112:8072, 192.168.188.112:8073
    username: itcast
    password: 123321
    virtual-host: /
- Restart the project and check the queue:

Cluster expansion
Join the cluster
- Start a new MQ container:
docker run -d --net mq-net \ -v ${PWD}/.erlang.cookie:/var/lib/rabbitmq/.erlang.cookie \ -e RABBITMQ_DEFAULT_USER=itcast \ -e RABBITMQ_DEFAULT_PASS=123321 \ --name mqNode4 \ --hostname mqNode4 \ -p 8074:15672 \ -p 8084:15672 \ rabbitmq:3.8-management - Enter the container console:
docker exec -it mqNode4 bash - stop mq process
rabbitmqctl stop_app - Reset data in RabbitMQ:
rabbitmqctl reset - Join mqNode1:
rabbitmqctl join_cluster rabbit@mqNode1 - Start the mq process again
rabbitmqctl start_app
[root@kongyue rabbitMqCluster]# docker exec -it mqNode4 bash
root@mqNode4:/# rabbitmqctl stop_app
Stopping rabbit application on node rabbit@mqNode4 ...
root@mqNode4:/# rabbitmqctl reset
Resetting node rabbit@mqNode4 ...
root@mqNode4:/# rabbitmqctl join_cluster rabbit@mqNode1
Clustering node rabbit@mqNode4 with rabbit@mqNode1
root@mqNode4:/# rabbitmqctl start_app
Starting node rabbit@mqNode4 ...
- result:

Add quorum queue copy
- First check the current copy of the quorum.queue queue, enter the mqNode1 container, and execute the command:
[root@kongyue rabbitMqCluster]# docker exec -it mqNode1 bash
root@mqNode1:/# rabbitmq-queues quorum_status "quorum.queue"
Status of quorum queue quorum.queue on node rabbit@mqNode1 ...
┌────────────────┬────────────┬───────────┬──────────────┬────────────────┬──────┬─────────────────┐
│ Node Name      │ Raft State │ Log Index │ Commit Index │ Snapshot Index │ Term │ Machine Version │
├────────────────┼────────────┼───────────┼──────────────┼────────────────┼──────┼─────────────────┤
│ rabbit@mqNode3 │ follower   │ 2         │ 2            │ undefined      │ 1    │ 1               │
├────────────────┼────────────┼───────────┼──────────────┼────────────────┼──────┼─────────────────┤
│ rabbit@mqNode2 │ leader     │ 2         │ 2            │ undefined      │ 1    │ 1               │
├────────────────┼────────────┼───────────┼──────────────┼────────────────┼──────┼─────────────────┤
│ rabbit@mqNode1 │ follower   │ 2         │ 2            │ undefined      │ 1    │ 1               │
└────────────────┴────────────┴───────────┴──────────────┴────────────────┴──────┴─────────────────┘
- Join mqNode4:
root@mqNode1:/# rabbitmq-queues add_member "quorum.queue" "rabbit@mqNode4"
Adding a replica for queue quorum.queue on node rabbit@mqNode4...
root@mqNode1:/# rabbitmq-queues quorum_status "quorum.queue"
Status of quorum queue quorum.queue on node rabbit@mqNode1 ...
┌────────────────┬────────────┬───────────┬──────────────┬────────────────┬──────┬─────────────────┐
│ Node Name      │ Raft State │ Log Index │ Commit Index │ Snapshot Index │ Term │ Machine Version │
├────────────────┼────────────┼───────────┼──────────────┼────────────────┼──────┼─────────────────┤
│ rabbit@mqNode4 │ follower   │ 3         │ 3            │ undefined      │ 1    │ 1               │
├────────────────┼────────────┼───────────┼──────────────┼────────────────┼──────┼─────────────────┤
│ rabbit@mqNode3 │ follower   │ 3         │ 3            │ undefined      │ 1    │ 1               │
├────────────────┼────────────┼───────────┼──────────────┼────────────────┼──────┼─────────────────┤
│ rabbit@mqNode2 │ leader     │ 3         │ 3            │ undefined      │ 1    │ 1               │
├────────────────┼────────────┼───────────┼──────────────┼────────────────┼──────┼─────────────────┤
│ rabbit@mqNode1 │ follower   │ 3         │ 3            │ undefined      │ 1    │ 1               │
└────────────────┴────────────┴───────────┴──────────────┴────────────────┴──────┴─────────────────┘
- Looking at the console, the number of mirrors of quorum.queue has also changed from +2 to +3: