Directory overview
-
- 0x00 preamble
- 0x01 daily use
-
- 0x001. The configuration error when shutting down selinux causes the linux server to fail to start normally?
- 0x002. How to enter single-user mode?
- 0x003. Set the service to start automatically at boot?
- 0x004, close the firewall
- 0x005, close selinux
- 0x006, close networkmanager
- 0x007 centos system installation (physical machine)
- View system performance related
- 0x02 service related
- 0x03 common configuration
- 0x04 Commonly used commands
0x00 preamble
This article mainly collects various trivial records in daily work and experiments. Because my memory is poor, I created this record!
0x01 daily use
0x001. The configuration error when shutting down selinux causes the linux server to fail to start normally?
解决:进入单用户模式,从新更改配置文件,其它类似问题同理
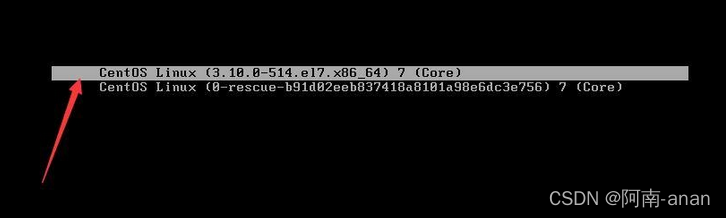
0x002. How to enter single-user mode?
开机进入如下界面,按下e
Press the key to find on this pagero
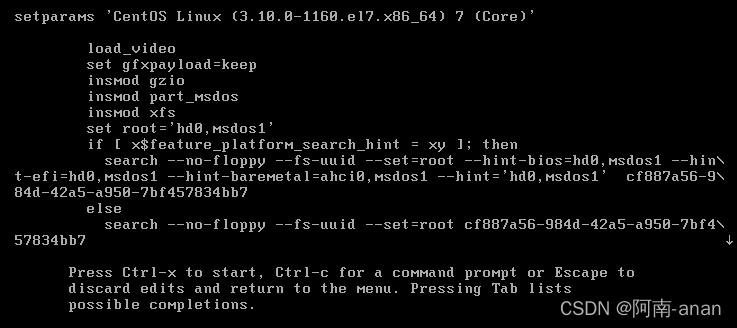
Press the key to find ro, ro means read only, will be roreplaced by rw init=/sysroot/bin/sh
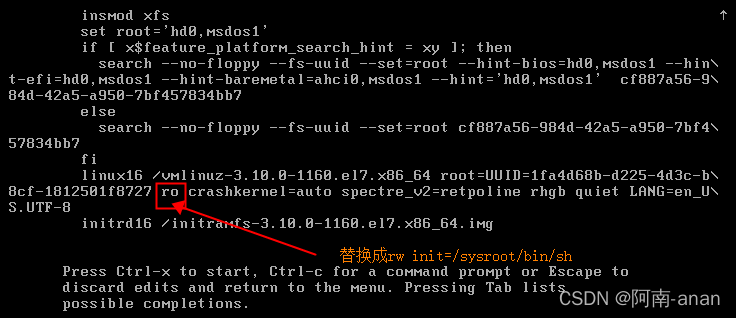
press to ctrl+xenter single-user mode

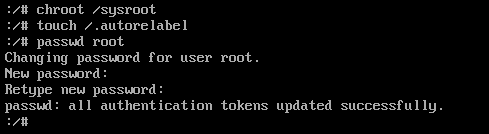
0x0001 Change the root password in single-user mode
Execute the chroot /sysroot command to switch systems, and the /sysroot/ directory is the original system
Execute touch /.autorelabel Execute this command to make SELinux take effect. If not executed, the password will not take effect. Press Ctrl+D, execute reboot to restart to take effect
Press ctrl+d, then restart the system to make the changes take effect (reboot)

0x003. Set the service to start automatically at boot?
systemctl stop firewalld
sysemctl enable firewalld
0x004, close the firewall
ditto
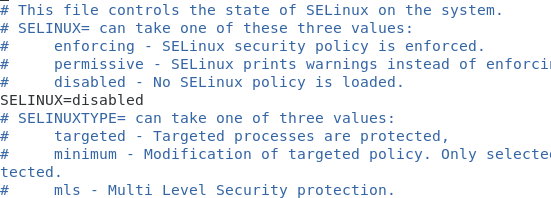
0x005, close selinux
vi /etc/selinux/config
设置SELINUX=disabled
0x006, close networkmanager
systemctl stop NetworkManager
systemctl disable NetworkManager 永久关闭网络管理命令
0x007 centos system installation (physical machine)
- Insert the u disk to boot, press delete to enter the bios, select Boot, and then select Boot option to select the UEFI u disk name, as shown in the figure, the last one is the keyboard information. Then press f10 to save.
 When you see the following page, press Enter (press ctrl+alt+delete if the process goes wrong)
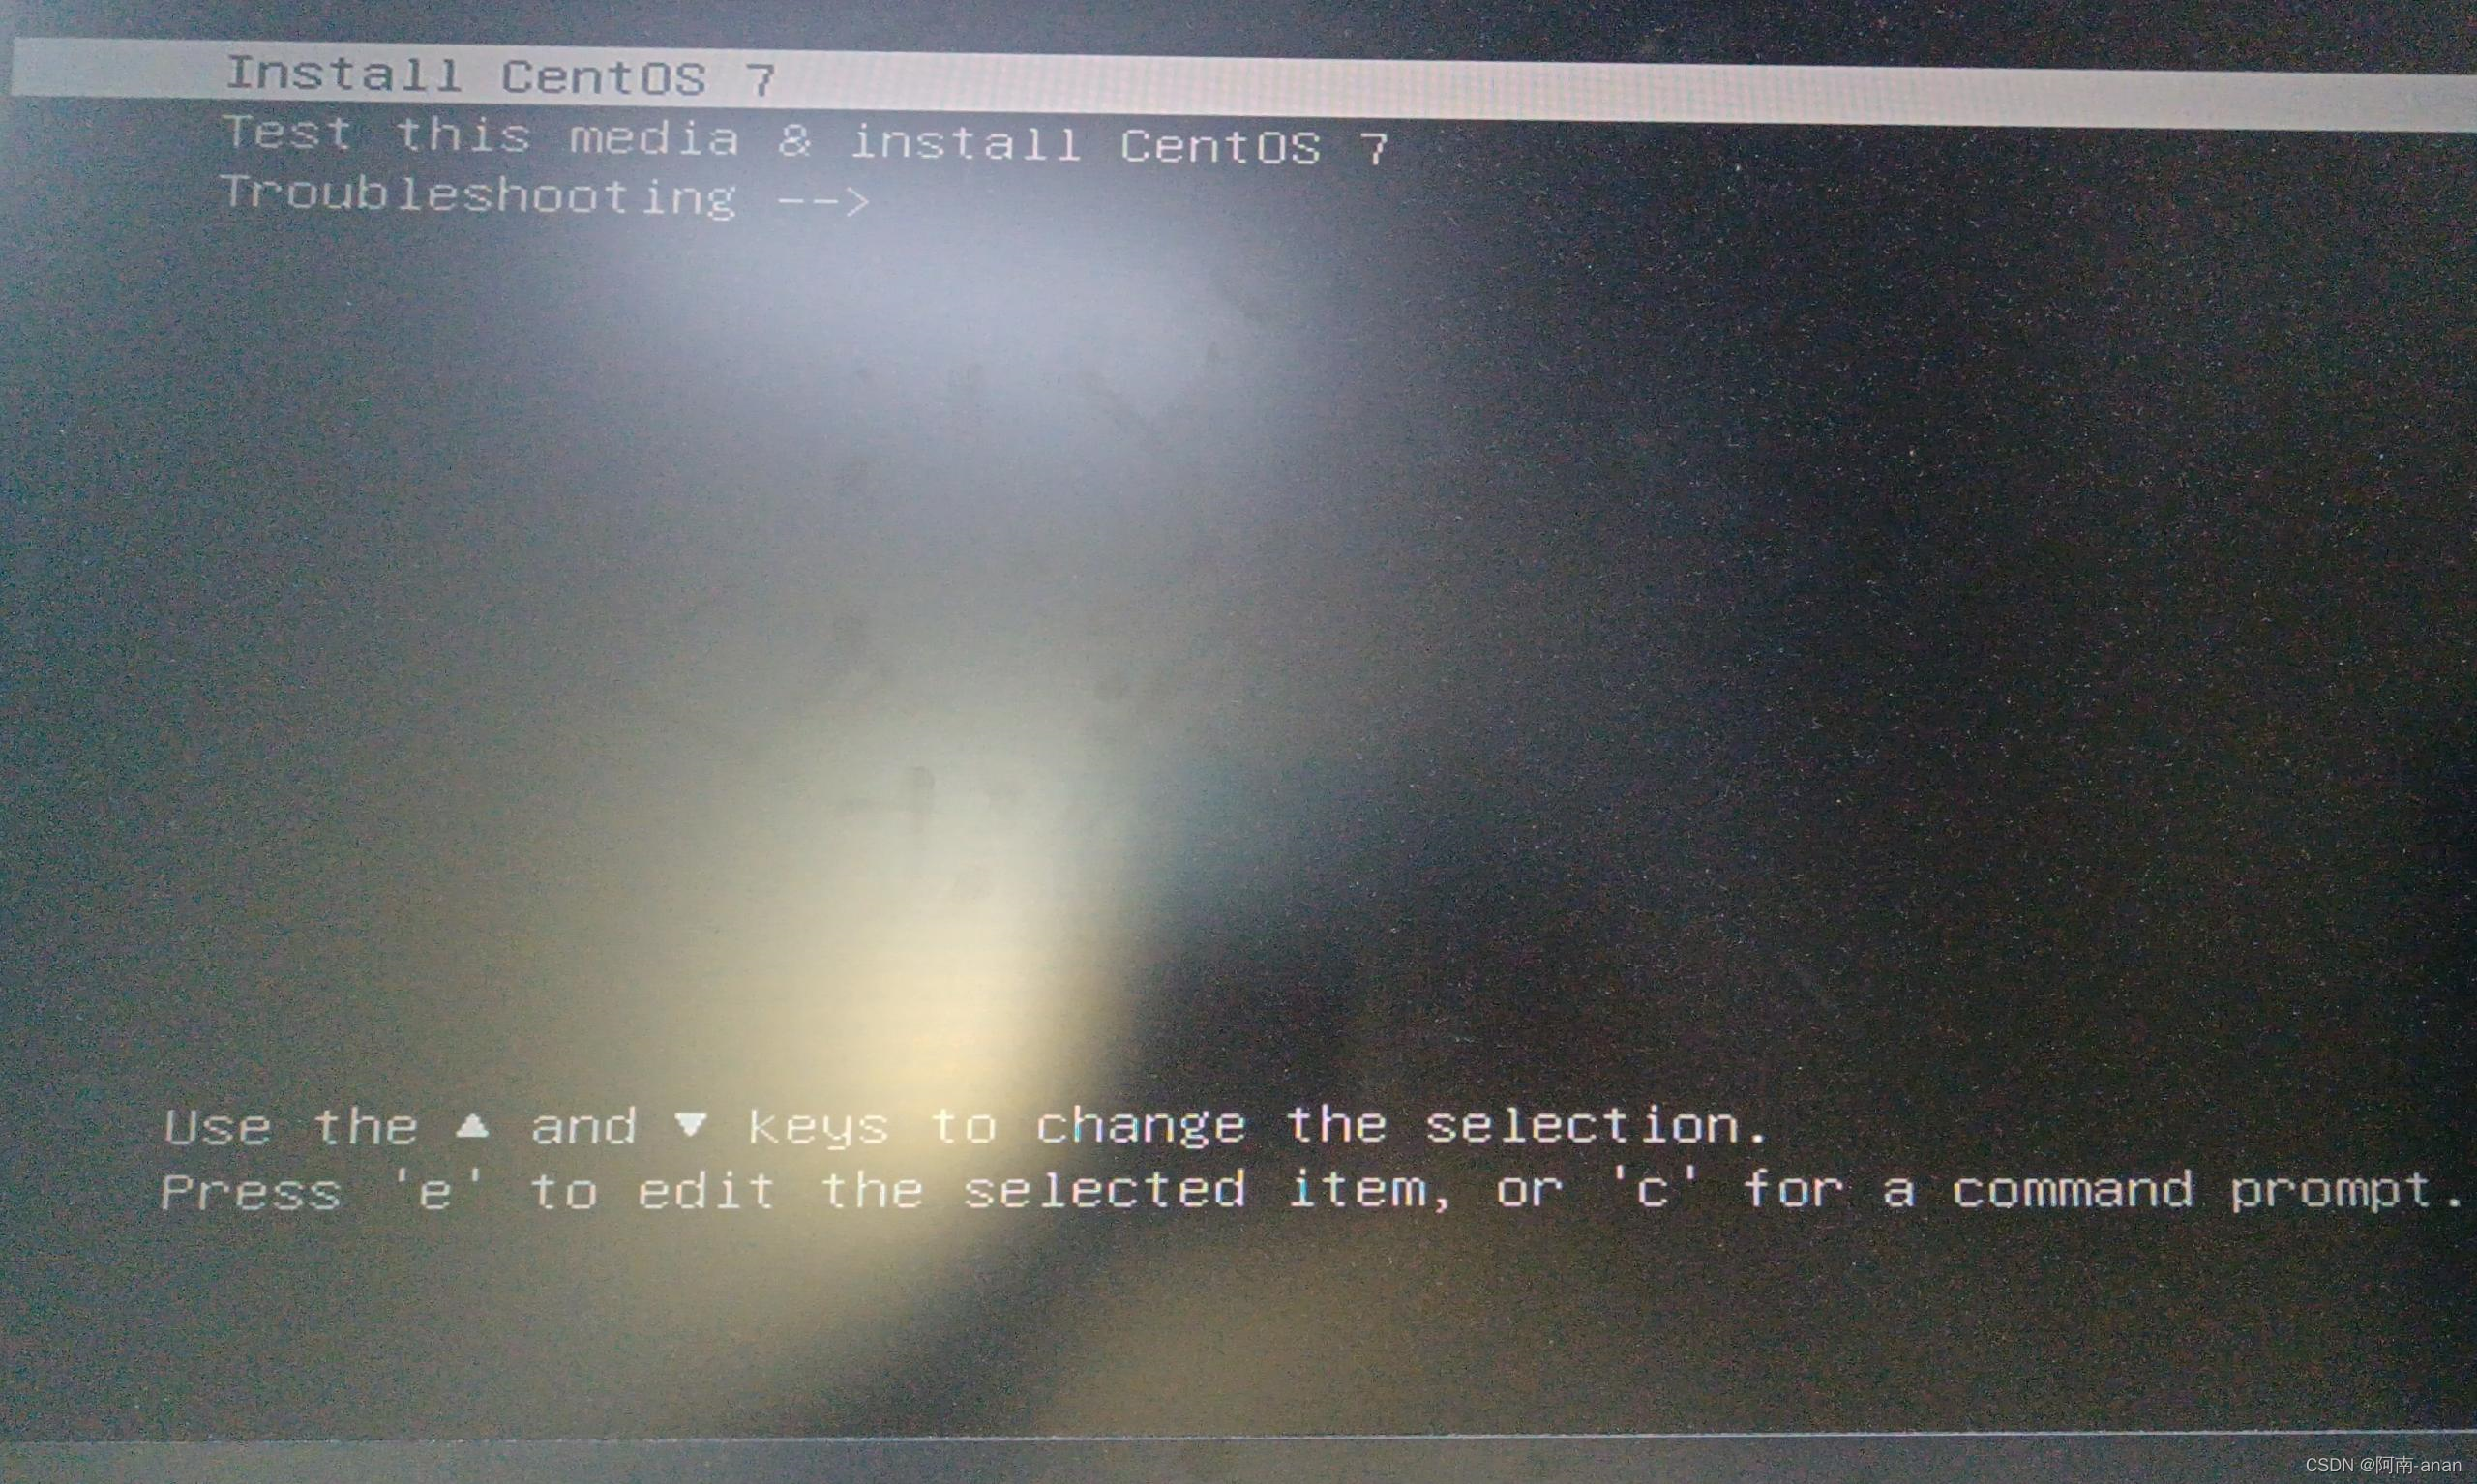
 to enter the following page, select Install CentOS7, press e to enter single-user mode, and modify the image path
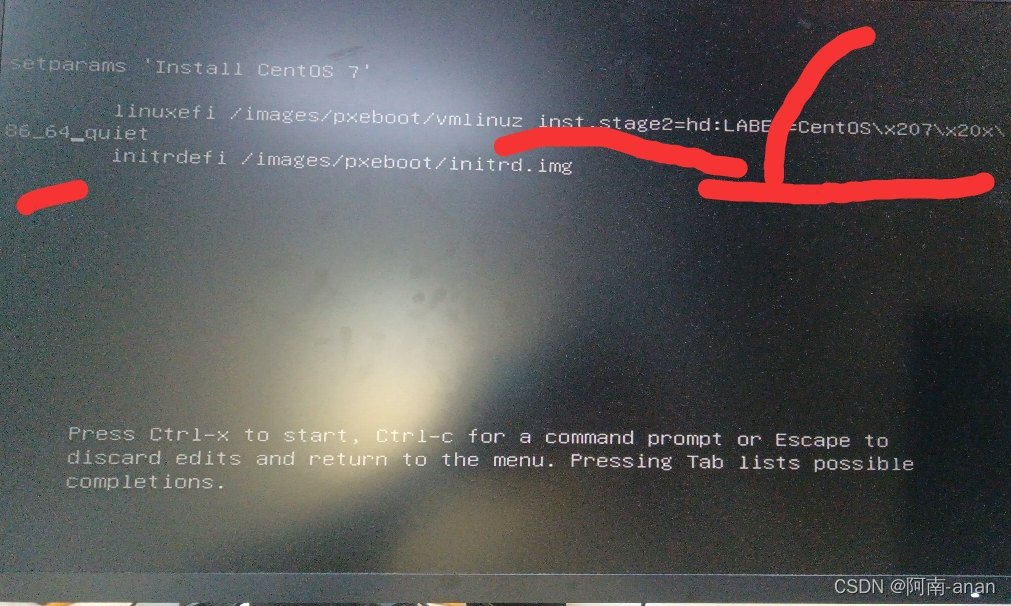
 to see the following interface, from inst to _64 Delete all the content in between.
 Enter linux dd at the location where the content is deleted, and then press ctrl+x to view all available paths. Find the U disk to
 display all available paths as follows. Here it is very obvious that the last one is our U disk path. , and then press ctrl+alt+delete to reconfigure the image path
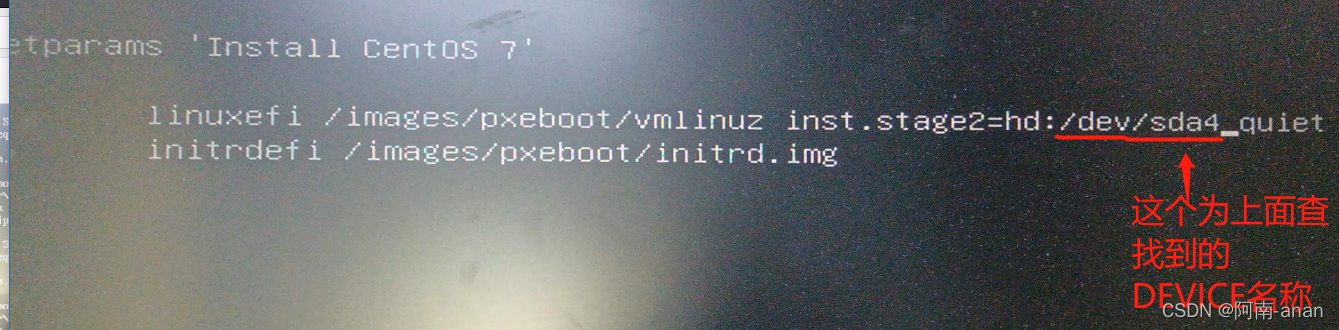
 to the following, /dev/ is followed by the drive letter (DEVICE) of the U disk, and then press ctrl+x
View system performance related
free -h to check the system memory, mainly look at the row of Mem under total
df -h to check the disk space, check the column of size, and add the values of the column to the total value
0x02 service related
1. Install Mysql service
2. Install php7.4
3. Install httpd
4. Install nginx
0x03 common configuration
0x001 network settings
0x0001 configure dynamic ip
0x0002 configure static IP
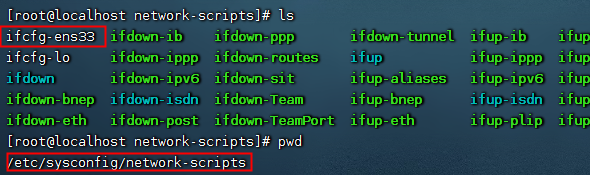
进入配置文件夹
cd /etc/sysconfig/network-scripts
Query the current IP assigned by dhcp
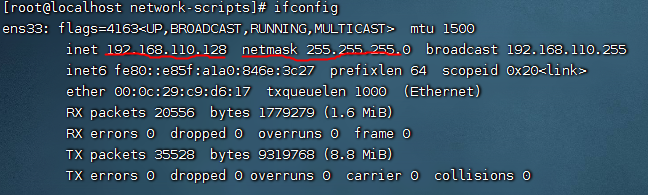
View gateway information
route -n

View dns information
cat /etc/resolv.conf

配置
vim  ifcfg-ens33
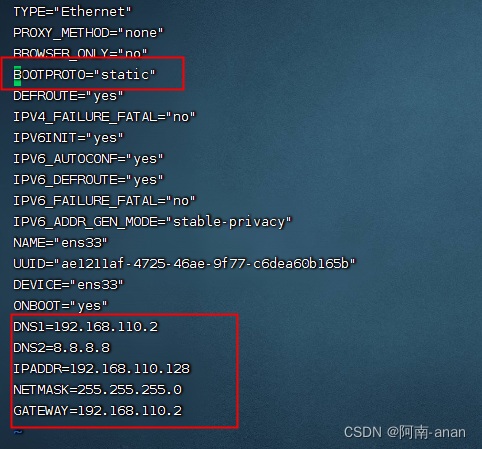
DNS1=192.168.110.2
DNS2=8.8.8.8
IPADDR=192.168.110.128
NETMASK=255.255.255.0
GATEWAY=192.168.110.2
systemctl restart network

Test whether the network is normal

0x002ssh configuration
0x0001 configure ssh remote login
Under normal circumstances, when the server starts, there is no problem with the port, the login address is correct, and the user who is allowed to log in with a password or ssh can basically log in to the server through remote ssh
vim /etc/ssh/sshd_config
Port 22
PasswordAuthentication yes
ListenAddress 0.0.0.0
AllowUsers newusername //允许制定用户使用SSH登陆   #centos7默认配置未发现该项  或者是 PermitRootLogin yes
systemctl start sshd
0x0002 ssh security configuration
Port 22                  # 可以更改ssh登录端口
ListenAddress 0.0.0.0    #可以通过这里设置白名单登录
PermitRootLogin no       #可以设置禁用root远程登录,通过其它用户远程登录后再切换root
MaxAuthTries 6           #设置最大重试次数
PermitEmptyPasswords no   #禁止空密码登录
Add this option at the end of the example
sshd_config to specify the user to log in from the specified ip
AllowUsers [email protected]
0x003ssh configuration public key login
Under normal circumstances, I use ssh account to log in to manage Linux services. For enterprises, there may be senior network engineers who can handle ssh without going online. However, as a small business or an individual, we generally use ssh to go out of the network. Those with a higher security awareness may change port 22, and those with a low security awareness directly expose the ssh port on the public network. Therefore, there are many small partners’ servers every day. Suffering from brute force attacks from all over the world. Today we will learn how to control our Linux without using the ssh account password, that is, using a key pair.
Step 1: Make a key pair
Complete the following operations, and a .ssh folder will be generated in the user root directory
[root@localhost ~]# ssh-keygen         #生成秘钥对命令
Generating public/private rsa key pair.
Enter file in which to save the key (/root/.ssh/id_rsa):  #这里直接回车即可
Created directory '/root/.ssh'.
Enter passphrase (empty for no passphrase):     #第一次测试这里直接回车
Enter same passphrase again:    #第一次测试这里直接回车
Your identification has been saved in /root/.ssh/id_rsa.   #这是我们的私钥
Your public key has been saved in /root/.ssh/id_rsa.pub.  #这是我们的公钥
The key fingerprint is:
SHA256:gXk+GVw+zqzENR0SprrxGOdtyjzZwvEFAdNfrN9+ntY root@localhost
The key's randomart image is:
+---[RSA 2048]----+
|        oo=...   |
|       + *oo .o |
|     o * =o.o   |
|       = O.oo   |
|      + S +. . . |
|       X.+ . . .|
|     o.+=o.   ..|
|       o=oo   .E|
|        +o   .oo|
+----[SHA256]-----+
Step 2: Install the public key
[root@localhost ~]# cd .ssh   #进入隐藏目录
[root@localhost .ssh]# cat id_rsa.pub >> authorized_keys   #将公钥写入指定文件
[root@localhost .ssh]# ls #查看结果
authorized_keys id_rsa id_rsa.pub
Step 3: Set permissions
To ensure successful connection, at least the following permissions need to be configured
[root@localhost .ssh]# chmod 600 authorized_keys   #保证authorized_keys读写权限
[root@localhost .ssh]# chmod 700 ~/.ssh #给.ssh读写执行权限
[root@localhost .ssh]# ll
总用量 12
-rw-------. 1 root root  396 12月 23 17:50 authorized_keys
-rw-------. 1 root root 1675 12月 23 17:44 id_rsa
-rw-r--r--. 1 root root  396 12月 23 17:44 id_rsa.pub
Step 4: Configure SSH
[root@localhost ~]# vim /etc/ssh/sshd_config
  #允许秘钥认证,如果配置文件中没有则添加
  RSAAuthentication yes
  PubkeyAuthentication yes
  #允许root登录,不轮密码还是秘钥,都需要打开
PermitRootLogin yes
  #设置是否允许密码登录,建议秘钥能登录后再修改成no
PasswordAuthentication no
Step 5: Restart the service where the modification of the configuration file is involved in Linux
[root@localhost ~]# systemctl restart sshd
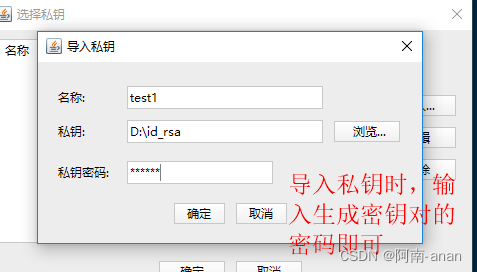
Step 6: Download the private key
I downloaded it and put it on the D drive
[root@localhost .ssh]# ls
authorized_keys id_rsa id_rsa.pub
#id_rsa   使我们下载的私钥文件
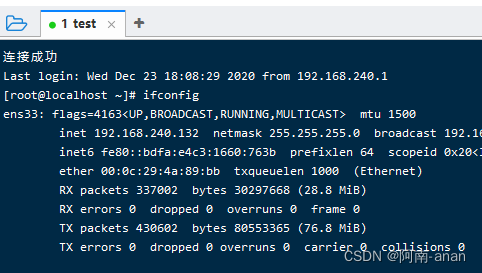
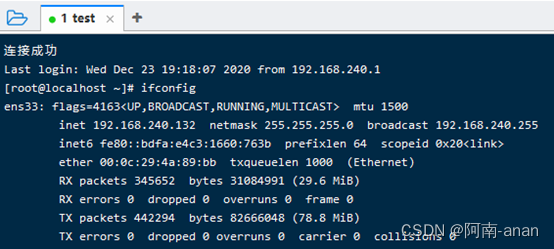
Step 7: Use the ssh tool to connect
Here I use the finalshell ssh tool for testing

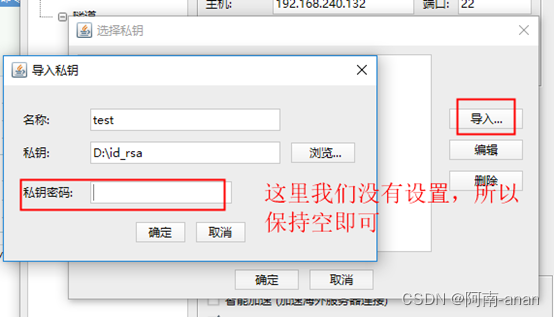
More secure ssh private key: set a password for the private key.
The private key file can be copied, so there is a certain risk. In order to avoid being stolen by others, we will generate a private key with a "password" next.
[root@localhost ~]# ssh-keygen
Generating public/private rsa key pair.
Enter file in which to save the key (/root/.ssh/id_rsa):  #直接回车
Created directory '/root/.ssh'.
Enter passphrase (empty for no passphrase):   #输入私钥密码
Enter same passphrase again:   #再次输入私钥密码
Your identification has been saved in /root/.ssh/id_rsa.
Your public key has been saved in /root/.ssh/id_rsa.pub.
The key fingerprint is:
SHA256:+ca2UcZlMe1jpsFbF1n9b4WhCZEnzB3B7wsPVNY9fAc root@localhost
The key's randomart image is:
+---[RSA 2048]----+
|         o.=ooE+*|
|         * + +BB|
|           +.*o+*|
|         . .+=o==|
|       S .+.B =|
|         o ooo. o|
|         *  + o |
|         o o o |
|         .     |
+----[SHA256]-----+
Subsequent steps can be carried out according to the first method of generating a key, and I will not repeat them here.
Summary
Finally, remember to go to the configuration file to close the password login
[root@localhost ~]# vim /etc/ssh/sshd_config
  #设置将PasswordAuthentication 的值设置为no即可
PasswordAuthentication no
[root@localhost ~]# systemctl restart sshd
0x004 Centos configuration environment variables
vim /etc/profile    将需要配置的可执行文件的绝对路径追加到文件末尾
source /etc/profile   使配置生效
0x005 chattr for system reinforcement
Linux chattr命令用于改变文件属性。

这项指令可改变存放在ext2文件系统上的文件或目录属性,这些属性共有以下8种模式:

    a:让文件或目录仅供附加用途。
    b:不更新文件或目录的最后存取时间。
    c:将文件或目录压缩后存放。
    d:将文件或目录排除在倾倒操作之外。
    i:不得任意更动文件或目录。
    s:保密性删除文件或目录。
    S:即时更新文件或目录。
    u:预防意外删除。
示例:
     chattr +/- i  /etc/passwd   设置属性
      lsattr /etc/passwd           查看属性
0x04 Commonly used commands
https://blog.csdn.net/xiaoguaihai/article/details/8705992?spm=1001.2101.3001.6661.1&utm_medium=distribute.pc_relevant_t0.none-task-blog-2%7Edefault%7EBlogCommendFromBaidu%7ERate-1.pc_relevant_antiscanv2&depth_1-utm_source=distribute.pc_relevant_t0.none-task-blog-2%7Edefault%7EBlogCommendFromBaidu%7ERate-1.pc_relevant_antiscanv2&utm_relevant_index=1