Table of contents
1. Introduction of the author
Wang Yiteng, male, School of Electronic Information, Xi'an Polytechnic University, 2022 graduate student
Research direction: 3D hand pose and mesh estimation
Email: [email protected]
Lu Zhidong, male, School of Electronic Information, Xi'an Polytechnic University, 2022 graduate student, Zhang Hongwei's artificial intelligence research group
Research direction: machine vision and artificial intelligence
Email: [email protected]
2. Algorithm introduction
2.1 Introduction to Alibaba Cloud

Founded in 2009, Alibaba Cloud is the world's leading cloud computing and artificial intelligence technology company. It is committed to providing safe and reliable computing and data processing capabilities through online public services, making computing and artificial intelligence an inclusive technology. Alibaba Cloud serves leading companies in many fields such as manufacturing, finance, government affairs, transportation, medical care, telecommunications, energy, etc., including large corporate customers such as China Unicom, 12306, Sinopec, PetroChina, Philips, BGI, as well as Weibo, Zhihu, etc. , Hammer Technology and other star Internet companies. In challenging application scenarios such as the Tmall Double 11 Global Carnival and 12306 Spring Festival travel ticket purchases, Alibaba Cloud has maintained a good operating record. Alibaba Cloud has
deployed efficient and energy-saving green data centers around the world, using clean computing New World provides a steady stream of energy and power, and the service areas include China (North China, East China, South China, Hong Kong), Singapore, the United States (US East, US West), Europe, the Middle East, Australia, Japan Yuanfudao, Zhongtai Securities
, For Xiaomi, Yuanfuda, Soul, and Dangbei, among the apps or companies we are familiar with, Alibaba Cloud provides them with powerful, safe, and stable cloud products and services.
Computing, container, storage, network and CDN, security, middleware, database, big data computing, artificial intelligence and machine learning, media service, enterprise service and cloud communication, Internet of Things, development tools, migration and operation and maintenance management and proprietary In terms of cloud and other aspects, Alibaba Cloud has done a good job.
2.2 ID photo generation background
Traditional method: P-mapping is usually done manually, which is not only time-consuming and labor-intensive, but also difficult to guarantee the effect and prone to flaws.
Machine learning method: Usually, edge detection algorithm is used for character contour extraction.
Deep learning approach: Segmentation algorithms are usually used for character segmentation. For example U-Net network.

2.3 Image Segmentation Algorithm
The SeedNet network in "BiHand: Recovering Hand Mesh with Multi-stage Bisected Hourglass Networks" is a classic network that converts segmentation tasks into multiple tasks. The author's idea is to gather semantics as much as possible through multi-task learning, which may result in better segmentation or better pose estimation. In fact, this model is part of a multi-stage learning network. The author wants to improve the performance of the network through intermediate supervision.
I extract the SeedNet and training weights in the bihand network, and the segmentation results are shown as follows.

The model I use is not the whole process, but the first stage. In order to visualize the best results, I visualize the output of the first stage, that is, the SeedNet network in different ways.
The first picture from the left is the original picture, and the second picture is the sigmoid, and then use plt.imshow(colored_mask, cmap='jet') for color mapping. The third picture is the two-color segmentation map after the tensor output by the network passes through sigmoid, and the gate value is 0.5. The fourth is the direct output of the network, using the directly generated tensor map for color mapping. The fifth picture is the color mapping after processing the tensor with sigmoid. The sixth is to use sigmoid to process tensors and perform 0,1 segmentation mask mapping. Using the original model and network requires a lot of code. The following is the modified code:
下面为修改后的net_seedd代码:# Copyright (c) Lixin YANG. All Rights Reserved.
r"""
Networks for heatmap estimation from RGB images using Hourglass Network
"Stacked Hourglass Networks for Human Pose Estimation", Alejandro Newell, Kaiyu Yang, Jia Deng, ECCV 2016
"""
import numpy as np
import torch
import torch.nn as nn
import torch.nn.functional as F
from skimage import io,transform,util
from termcolor import colored, cprint

from bihand.models.bases.bottleneck import BottleneckBlock
from bihand.models.bases.hourglass import HourglassBisected
import bihand.utils.func as func
import matplotlib.pyplot as plt

from bihand.utils import misc
import matplotlib.cm as cm
def color_mask(output_ok):
    # 颜色映射
    cmap = plt.cm.get_cmap('jet')

    # 将张量转换为numpy数组
    mask_array = output_ok.detach().numpy()

    # 创建彩色图像
    cmap = cm.get_cmap('jet')
    colored_mask = cmap(mask_array)
    return colored_mask
    # 可视化
    # plt.imshow(colored_mask, cmap='jet')
    # plt.axis('off')
    # plt.show()
def two_color(mask_tensor):
    # 将张量转换为numpy数组
    mask_array = mask_tensor.detach().numpy()

    # 将0到1之间的值转换为二值化掩码
    threshold = 0.5 # 阈值,大于阈值的为白色,小于等于阈值的为黑色
    binary_mask = np.where(mask_array > threshold, 1, 0)
    return binary_mask
    # 可视化
    # plt.imshow(binary_mask, cmap='gray')
    # plt.axis('off')
    # plt.show()
class SeedNet(nn.Module):
    def __init__(
        self,
        nstacks=2,
        nblocks=1,
        njoints=21,
        block=BottleneckBlock,
    ):
        super(SeedNet, self).__init__()
        self.njoints  = njoints
        self.nstacks  = nstacks
        self.in_planes = 64

        self.conv1 = nn.Conv2d(3, self.in_planes, kernel_size=7, stride=2, padding=3, bias=True)
        self.bn1 = nn.BatchNorm2d(self.in_planes)
        self.relu = nn.ReLU(inplace=True)
        self.maxpool = nn.MaxPool2d(2, stride=2)
        self.layer1 = self._make_residual(block, nblocks, self.in_planes, 2*self.in_planes)
        # current self.in_planes is 64 * 2 = 128
        self.layer2 = self._make_residual(block, nblocks, self.in_planes, 2*self.in_planes)
        # current self.in_planes is 128 * 2 = 256
        self.layer3 = self._make_residual(block, nblocks, self.in_planes, self.in_planes)

        ch = self.in_planes # 256

        hg2b, res1, res2, fc1, _fc1, fc2, _fc2= [],[],[],[],[],[],[]
        hm, _hm, mask, _mask = [], [], [], []
        for i in range(nstacks): # 2
            hg2b.append(HourglassBisected(block, nblocks, ch, depth=4))
            res1.append(self._make_residual(block, nblocks, ch, ch))
            res2.append(self._make_residual(block, nblocks, ch, ch))
            fc1.append(self._make_fc(ch, ch))
            fc2.append(self._make_fc(ch, ch))
            hm.append(nn.Conv2d(ch, njoints, kernel_size=1, bias=True))
            mask.append(nn.Conv2d(ch, 1, kernel_size=1, bias=True))

            if i < nstacks-1:
                _fc1.append(nn.Conv2d(ch, ch, kernel_size=1, bias=False))
                _fc2.append(nn.Conv2d(ch, ch, kernel_size=1, bias=False))
                _hm.append(nn.Conv2d(njoints, ch, kernel_size=1, bias=False))
                _mask.append(nn.Conv2d(1, ch, kernel_size=1, bias=False))

        self.hg2b  = nn.ModuleList(hg2b) # hgs: hourglass stack
        self.res1  = nn.ModuleList(res1)
        self.fc1   = nn.ModuleList(fc1)
        self._fc1  = nn.ModuleList(_fc1)
        self.res2  = nn.ModuleList(res2)
        self.fc2   = nn.ModuleList(fc2)
        self._fc2  = nn.ModuleList(_fc2)
        self.hm   = nn.ModuleList(hm)
        self._hm  = nn.ModuleList(_hm)
        self.mask  = nn.ModuleList(mask)
        self._mask = nn.ModuleList(_mask)


    def _make_fc(self, in_planes, out_planes):
        bn = nn.BatchNorm2d(in_planes)
        conv = nn.Conv2d(in_planes, out_planes, kernel_size=1, bias=False)
        return nn.Sequential(conv, bn, self.relu)


    def _make_residual(self, block, nblocks, in_planes, out_planes):
        layers = []
        layers.append( block( in_planes, out_planes) )
        self.in_planes = out_planes
        for i in range(1, nblocks):
            layers.append(block( self.in_planes, out_planes))
        return nn.Sequential(*layers)

    def forward(self, x):

        l_hm, l_mask, l_enc = [], [], []
        x = self.conv1(x) # x: (N,64,128,128)
        x = self.bn1(x)
        x = self.relu(x)

        x = self.layer1(x)
        x = self.maxpool(x) # x: (N,128,64,64)
        x = self.layer2(x)
        x = self.layer3(x)

        for i in range(self.nstacks): #2
            y_1, y_2, _ = self.hg2b[i](x)

            y_1 = self.res1[i](y_1)
            y_1 = self.fc1[i](y_1)
            est_hm = self.hm[i](y_1)
            l_hm.append(est_hm)

            y_2 = self.res2[i](y_2)
            y_2 = self.fc2[i](y_2)
            est_mask = self.mask[i](y_2)
            l_mask.append(est_mask)

            if i < self.nstacks-1:
                _fc1 = self._fc1[i](y_1)
                _hm = self._hm[i](est_hm)
                _fc2 = self._fc2[i](y_2)
                _mask = self._mask[i](est_mask)
                x = x + _fc1 + _fc2 + _hm + _mask
                l_enc.append(x)
            else:
                l_enc.append(x + y_1 + y_2)
        assert len(l_hm) == self.nstacks
        return l_hm, l_mask, l_enc

if __name__ == '__main__':
    #a = torch.randn(10, 3, 256, 256)
    # SeedNetmodel = SeedNet()
    # output1,output2,output3 = SeedNetmodel(a)
    # print(output1,output2,output3)

    #total_params = sum(p.numel() for p in SeedNetmodel.parameters())/1000000
    #print("Total parameters: ", total_params)
    pretrained_weights_path = 'E:/bihand/released_checkpoints/ckp_seednet_all.pth.tar'
    img_rgb_path=r"E:\FreiHAND\training\rgb\00000153.jpg"
    img=io.imread(img_rgb_path)
    resized_img = transform.resize(img, (256, 256), anti_aliasing=True)
    img256=util.img_as_ubyte(resized_img)


    #plt.imshow(resized_img)
    #plt.axis('off')  # 关闭坐标轴
    #plt.show()


    ''' implicit HWC -> CHW, 255 -> 1 '''
    img1 = func.to_tensor(img256).float() #转换为张量并且进行标准化处理
    ''' 0-mean, 1 std,  [0,1] -> [-0.5, 0.5] '''
    img2 = func.normalize(img1, [0.5, 0.5, 0.5], [1, 1, 1])
    img3 = torch.unsqueeze(img2, 0)
    ok=img3
    print(img.shape)
    SeedNetmodel = SeedNet()

    misc.load_checkpoint(SeedNetmodel, pretrained_weights_path)#加载权重

    output1, output2, output3 = SeedNetmodel(img3)
    #mask_tensor = torch.rand(1, 64, 64)
    output=output2[1] # 1,1,64,64
    output_1=output[0]# 1,64,64
    output_ok=torch.sigmoid(output_1[0])
    output_real=output_1[0].detach().numpy()#直接产生的张量图
    color_mask=color_mask(output_ok) #显示彩色分割图
    two_color=two_color(output_ok)#显示黑白分割图


    see=output_ok.detach().numpy()


    # 使用Matplotlib库显示分割掩码
    # plt.imshow(see, cmap='gray')
    # plt.axis('off')
    # plt.show()
   # print(output1, output2, output3)


    images = [resized_img, color_mask, two_color,output_real,see,see]
    rows = 1
    cols = 4

    # 创建子图并展示图像
    fig, axes = plt.subplots(1, 6, figsize=(30, 5))

    # 遍历图像列表,并在每个子图中显示图像
    for i, image in enumerate(images):
        ax = axes[i] if cols > 1 else axes  # 如果只有一列,则直接使用axes
        if i ==5:
            ax.imshow(image, cmap='gray')
        else:
         ax.imshow(image)

        ax.imshow
        ax.axis('off')

    # 调整子图之间的间距
    plt.subplots_adjust(wspace=0.1, hspace=0.1)

    # 展示图像
    plt.show()
The above code files are in bihand/models/net_seed.py, and all code links are at https://github.com/lixiny/bihand.
Modify the code in bihand/models/net_seed.p to the code provided by me to use the model trained by the author and perform various visualizations. (The pre-trained model is downloaded according to the author's code prompt)
3. Call Alibaba Cloud API to generate ID photos
3.1 Preparations
1. Find the interface
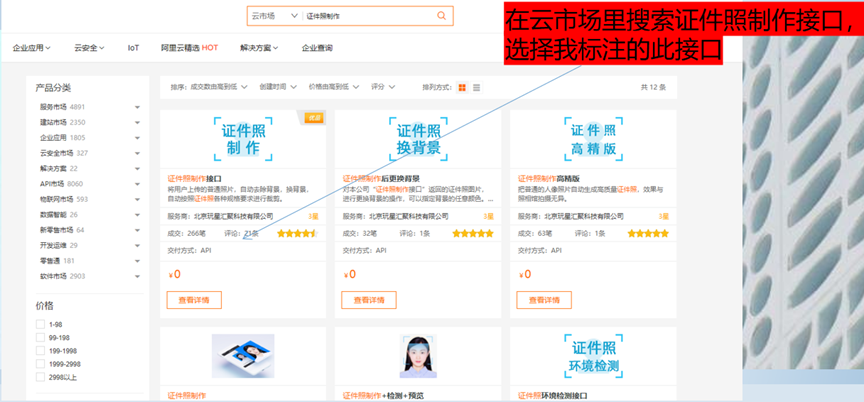
and enter the link below to quickly access
the link
2. Buy a trial package
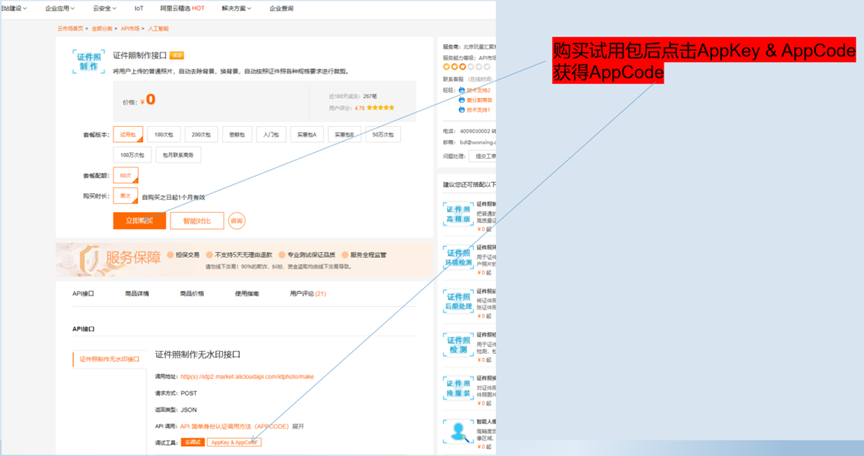
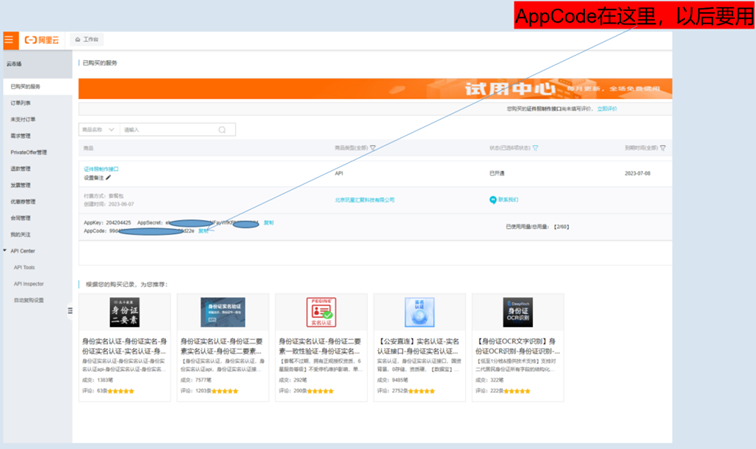
3. Check the APPcode
4. Download the code
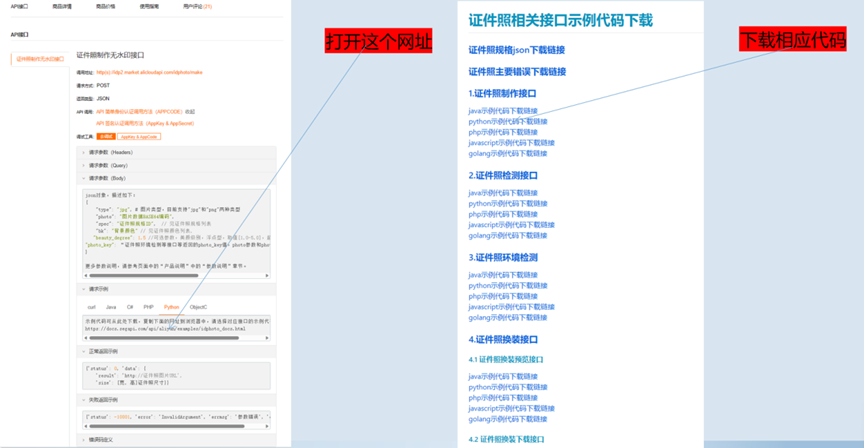
5. Parameter description
3.2 Experiment code
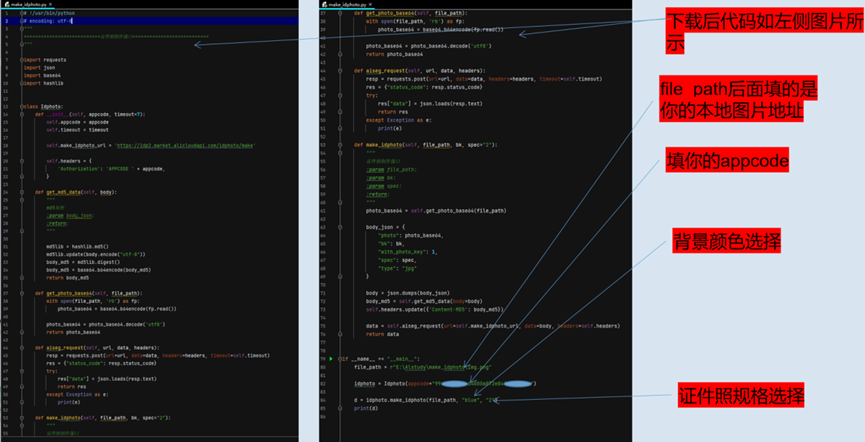
# !/usr/bin/python
# encoding: utf-8
"""
===========================证件照制作接口===========================
"""

import requests
import json
import base64
import hashlib


class Idphoto:
    def __init__(self, appcode, timeout=7):
        self.appcode = appcode
        self.timeout = timeout

        self.make_idphoto_url = 'https://idp2.market.alicloudapi.com/idphoto/make'

        self.headers = {
            'Authorization': 'APPCODE ' + appcode,
        }

    def get_md5_data(self, body):
        """
        md5加密
        :param body_json:
        :return:
        """

        md5lib = hashlib.md5()
        md5lib.update(body.encode("utf-8"))
        body_md5 = md5lib.digest()
        body_md5 = base64.b64encode(body_md5)
        return body_md5

    def get_photo_base64(self, file_path):
        with open(file_path, 'rb') as fp:
            photo_base64 = base64.b64encode(fp.read())

        photo_base64 = photo_base64.decode('utf8')
        return photo_base64

    def aiseg_request(self, url, data, headers):
        resp = requests.post(url=url, data=data, headers=headers, timeout=self.timeout)
        res = {"status_code": resp.status_code}
        try:
            res["data"] = json.loads(resp.text)
            return res
        except Exception as e:
            print(e)

    def make_idphoto(self, file_path, bk, spec="2"):
        """
        证件照制作接口
        :param file_path:
        :param bk:
        :param spec:
        :return:
        """
        photo_base64 = self.get_photo_base64(file_path)

        body_json = {
            "photo": photo_base64,
            "bk": bk,
            "with_photo_key": 1,
            "spec": spec,
            "type": "jpg"
        }

        body = json.dumps(body_json)
        body_md5 = self.get_md5_data(body=body)
        self.headers.update({'Content-MD5': body_md5})

        data = self.aiseg_request(url=self.make_idphoto_url, data=body, headers=self.headers)
        return data


if __name__ == "__main__":
    file_path = "图片地址"

    idphoto = Idphoto(appcode="你的appcode")

    d = idphoto.make_idphoto(file_path, "red", "2")
    print(d)
3.3 Experimental results and analysis

The original picture

with a red background as the ID photo.

The background as the blue ID photo.

In addition, I tried to use Shiba Inu photos as an experiment, and the ID photo was also generated. The
original image

with the red background as the ID photo.

References (links and citations available for reference)
1. Reference: BiHand: Recovering Hand Mesh with Multi-stage Bisected Hourglass Networks (BMVC2020)
paper link: https://arxiv.org/pdf/2008.05079.pdf