Use Qt to design beautiful login and registration interfaces
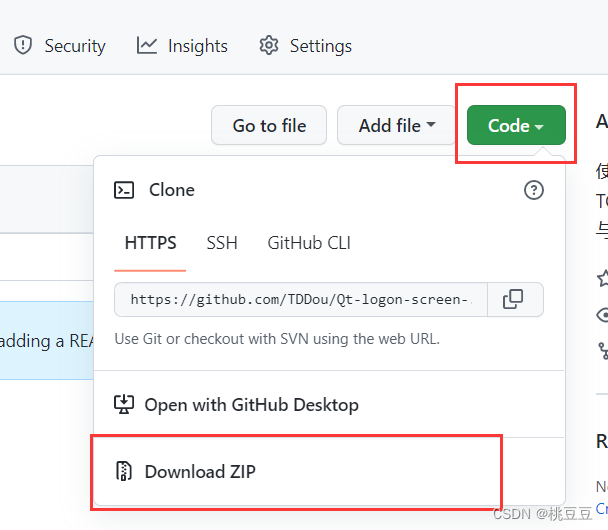
Stream-saving mode: If you only want the finished product, click the link below to directly download the Login project, import it into Qt5 and use it directly. If you want to learn the design process, you can continue to look down.
https://github.com/TDDou/Qt-logon-screen-.git
Table of contents
2.4 Login using SQLite database
3.3 Use SQLite database to realize registration
Appendix (contains complete code for each file)
foreword
It is mainly a front-end application made for the completion of the school's smart combination lock training project. It uses Qt5. Many places are not perfect, but I personally think that the interface design is quite beautiful. Here I mainly describe the interface. design.
At the same time, the project has been uploaded to github, you can click the link below to download it for free. There are a total of two files, one is PasswordLock, which is a complete application (including SQLite database and TCP network communication application) made by our school for this training. There are many files. If you are interested, you can take a look. The other is the Login file, which only includes the design of the login and registration interface, which is also the project organized in this article. It is recommended that you download the Login file for extended design.
https://github.com/TDDou/Qt-logon-screen-.git
1. Rendering
Let’s take a look at the renderings first:


2. Login interface
2.1 Create a new project.
Click on the upper left corner to create a new project, just select the Application template, and then take a name and select the created path. Then select "QMainWindow" as the base class, and then click "Next".


2.2 Add resource files
Add a resource file to store our image resources. Right-click the mouse on the project name on the left, select "Add New", and then operate as shown below

Then enter a name, here I take it as "images", then wait for it to be added, and then click "Add Rrefix" to add a prefix:
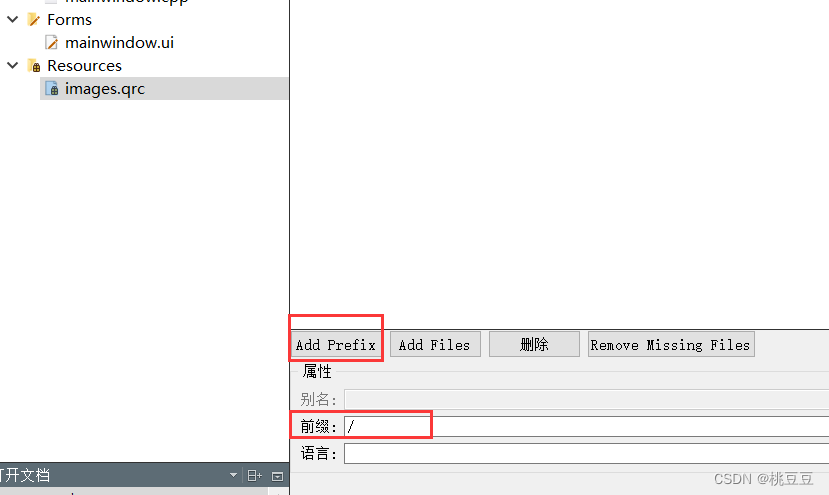
Then copy all the picture files we prepared in advance to our project directory . Then click "Add Files" and select all the files we just copied in. After adding it, be sure to click Save (Ctrl+s)! ! Then we can see the pictures we added in the display bar above.
2.3 Login interface design
(1) Drag in the component.
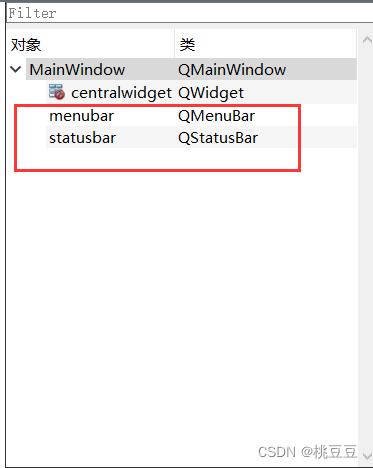
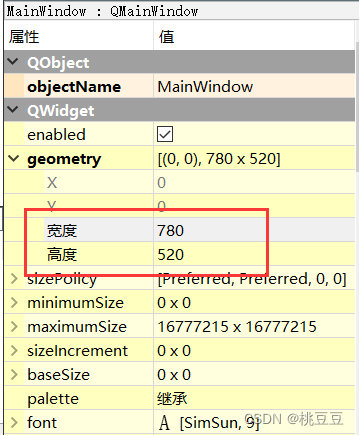
Double-click the mainwindow.ui file to go to the design mode and adjust the default properties. You can right-click the menubar and statusbar components to delete them or not, depending on your personal preference. I deleted it here, because I personally prefer a simple interface (in fact, you can choose QWidget when creating a new project). Then set its size to 780*520 (see personal preference).
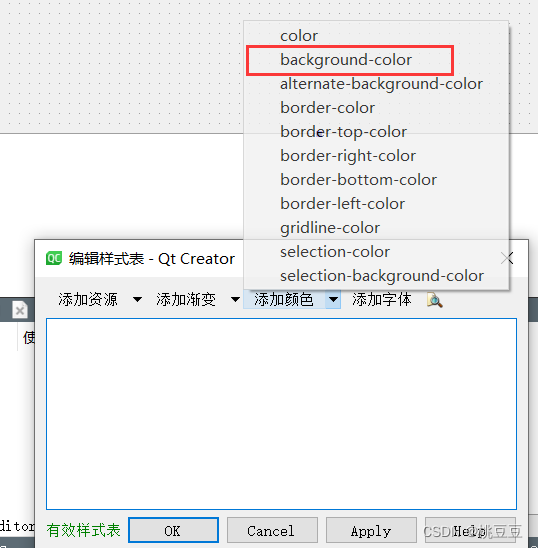
Right-click the design interface, select " Change Style Sheet ", then click the small triangle next to "Add Color" , and select " background-color ". Choose the default pure white color to add. Finally click on the Apply application.

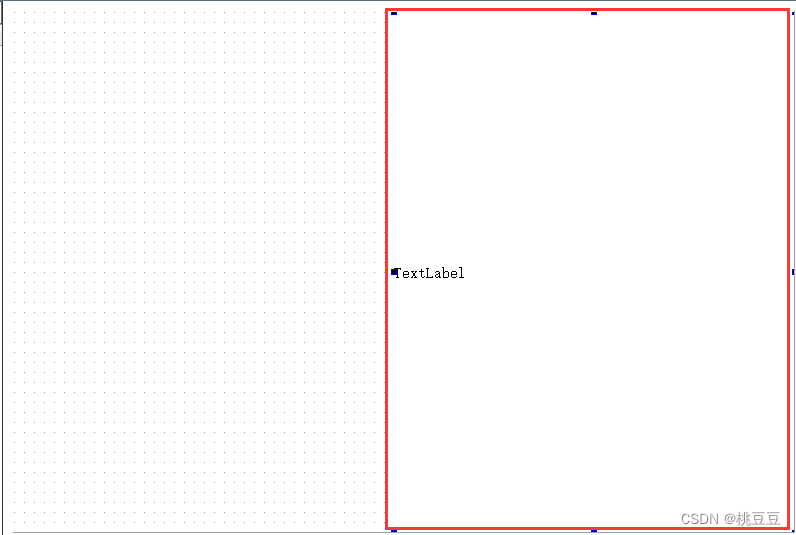
Then drag in a "Label" component from the left, enlarge it and place it in a suitable position for placing pictures, as shown in the following figure:
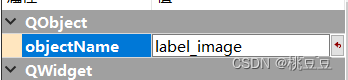
Double-click it to delete the text. Then change its objectName to "label_image" in the property bar on the right for easy use.
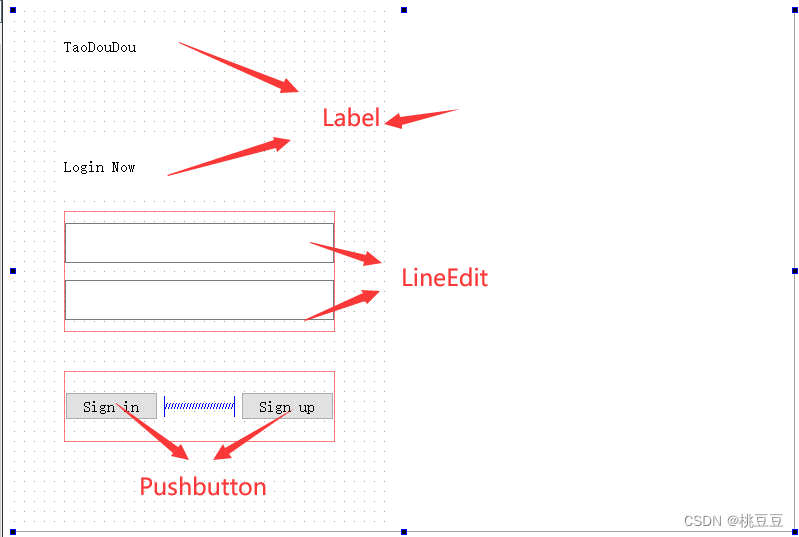
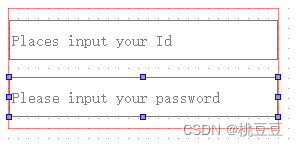
Then continue to drag in two Label components, two LineEdit components and two Pushbutton components. Modify the objectName of the component in the same way to facilitate subsequent programming references. Two LineEdit components, the first is used to enter the user name, and the second is used to enter the login password. Two Pushbutton widgets, one for login and one for registration. Double-click the component to modify the display text and arrange it as shown below:
Select the LineEdit component, find the placeholderText column in the property bar on the right, and enter the prompt text you want to display. The effect is as follows:
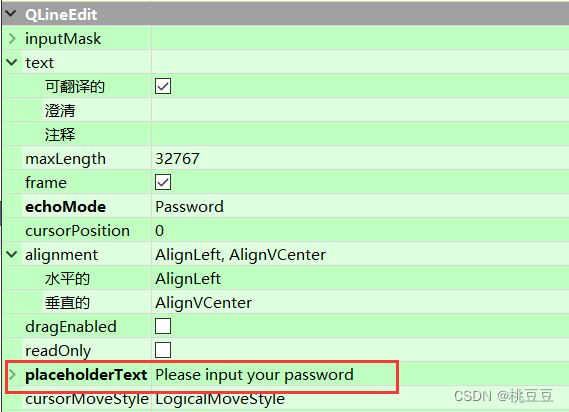
For the password input box, you can also change the echoMode attribute to: Password. In this way, the password entered by the user will become in *** format.
(2) Modify the style sheet
Select different components separately, then right-click the mouse, select "Change Style Sheet", and copy the style sheet code of different components into it
Pushbutton component style sheet:
background-color: qlineargradient(spread:pad, x1:0.52, y1:1, x2:0.54, y2:0,
stop:0.0112994 rgba(64, 145, 252, 255),
stop:1 rgba(255, 255, 255, 255));
color: rgb(255, 255, 255);

border:0px groove gray;border-radius:
7px;padding:2px 4px;
font: 14pt "Candara";
LineEdit component style sheet:
background-color: rgb(247, 247, 247);
border:1px groove gray;border-radius:
7px;padding:2px 4px;
font: 10pt "Candara";
For the Label component, you only need to change its font style. Right-click the component to open its style sheet, click "Add Font", then select a suitable font, set a suitable size, and finally click Apply.
The stylesheet I'm using here is:
font: 87 20pt "Arial Black";
(3) Code writing
Go back to the mainwindow.cpp file, use the code to add the picture we prepared in advance to the Label component, and enter the following code:
#include <QGraphicsDropShadowEffect>
MainWindow::MainWindow(QWidget *parent)
    : QMainWindow(parent)
    , ui(new Ui::MainWindow)
{
    ui->setupUi(this);
    //设置图片
    QPixmap *pix = new QPixmap(":/blue.png");
    QSize sz = ui->label_image->size();
    ui->label_image->setPixmap(pix->scaled(sz));

    //设置图片阴影效果
    QGraphicsDropShadowEffect *shadow = new QGraphicsDropShadowEffect(this);
    shadow->setOffset(-3, 0);
    shadow->setColor(QColor("#888888"));
    shadow->setBlurRadius(30);
    ui->label_image->setGraphicsEffect(shadow);

}
At this point, our login interface is basically completed, you can click Run to view the effect.
2.4 Login using SQLite database
The above roughly completes the login interface, but it achieves the effect of having a border (forgot to write that no border is realized, I am too lazy, and I will make it later). The next step is to create and connect to the database, so that the real login effect can be achieved.
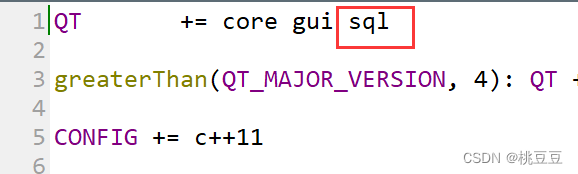
(1) First add the database module to the .pro file :
(2) Add the required header files and a declaration of a database initialization function to the mainwindow.h file:
#include <QSqlDatabase> //数据驱动
#include <QSqlQuery> //数据库执行语句
#include <QMessageBox>//消息盒子
#include <QDebug>
void sqlite_Init();
(3) Then go back to the mainwindow.cpp file and write a database initialization function first, which needs to be called for initialization every time the database needs to be operated. code show as below:
void sqlite_Init()
{

    QSqlDatabase db = QSqlDatabase::addDatabase("QSQLITE");
    db.setDatabaseName("user.db");
    if(!db.open())
    {
        qDebug()<<"open error";
    }
    //create excle
    QString createsql=QString("create table if not exists user(id integer primary key autoincrement,"
                        "username ntext unique not NULL,"
                        "password ntext not NULL)");
    QSqlQuery query;
    if(!query.exec(createsql)){
        qDebug()<<"table create error";
    }
    else{
        qDebug()<<"table create success";
    }
}
(4) Double-click the mainwindow.ui file to open the design mode, select the login button, right-click the mouse, select "Go to slot", then select "clicked()", and click ok. It will automatically go to the writing of the slot function, and enter the following code to achieve the login effect:
void MainWindow::on_btn_signin_clicked()
{
    sqlite_Init();
    QString username = ui->lineEdit_username->text();
    QString password = ui->lineEdit_password->text();
    QString sql=QString("select * from user where username='%1' and password='%2'")
            .arg(username).arg(password);
    //创建执行语句对象
    QSqlQuery query(sql);
    //判断执行结果
    if(!query.next())
    {
        qDebug()<<"Login error";
        QMessageBox::information(this,"登录认证","登录失败,账户或者密码错误");
    }
    else
    {
        qDebug()<<"Login success";
        QMessageBox::information(this,"登录认证","登录成功");
        //登录成功后可以跳转到其他页面
        QWidget *w = new QWidget;
        w->show();
        this->close();
    }
}
Click the run button to see the effect picture. Since we have not yet implemented the registration function, clicking the login button now will prompt failure. But we can see the console output: the prompt information of table create success, indicating that our database is common and successfully inserted a table. We can open the Debug directory generated by this project:
![]()
Then you can see that there is an additional user.db file in this directory, which is the database file we created.
At this point, the login function is basically completed.
3. Registration interface
3.1 Add template
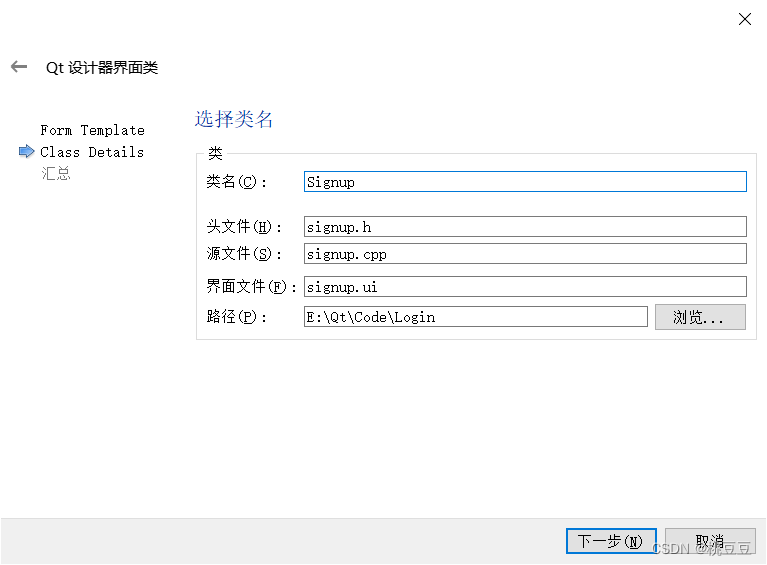
Right-click the project name on the left, select "Add New", and then select the designer class in Qt to add, template selection: Widget.

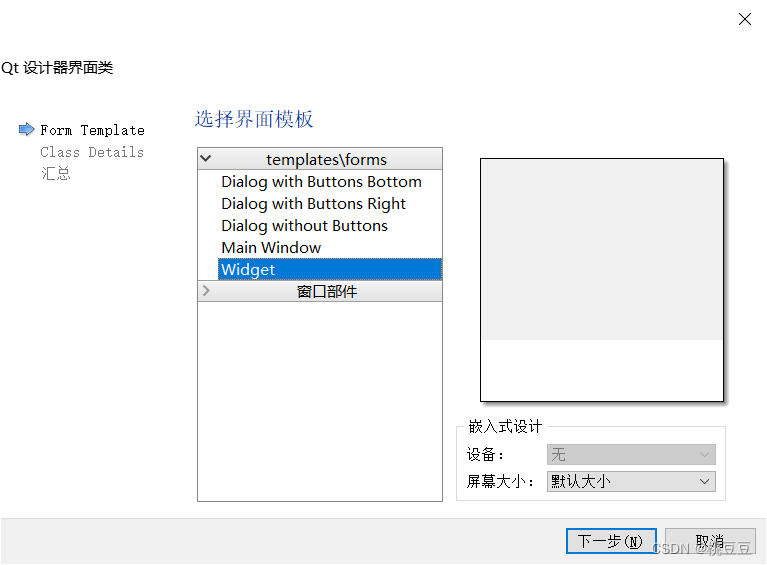
Change its class name to Signup and click Next.
3.2 Design interface
(1) Drag in the component
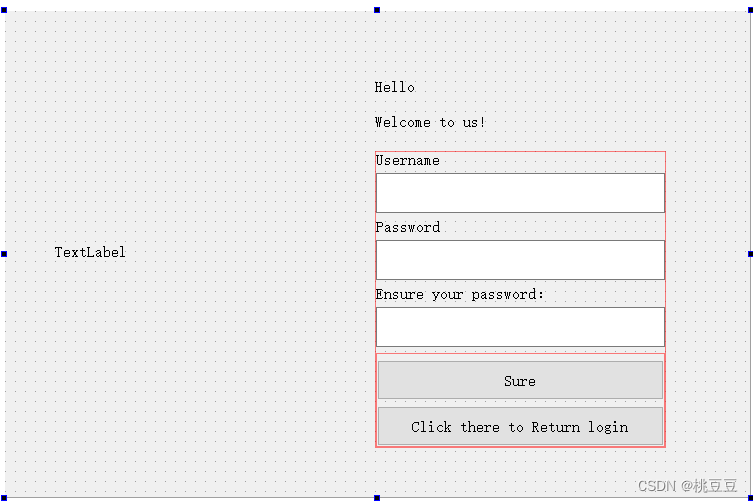
Open and double-click the signup.ui file to enter the design mode, drag in six Label components, three LineEdit components and two Pushbutton components. Arrange them, and modify the display text and objectName at the same time.
(2) Modify the style sheet:
First right-click the design interface, select "Change Style Sheet", then click the small triangle next to "Add Color", and select "background-color". Select the default pure white color to add, and finally click Apply to change the background color to pure white.
Then select different components and add style sheets separately.
Pushbutton component style sheet:
background-color: rgb(29, 123, 255);
color: rgb(255, 255, 255);
font: 25 9pt "Bahnschrift Light";
Style sheet for title Label:
font: 87 20pt "Arial Black";
Enter the style sheet for the prompt Label:
font: 10pt "Arial";
(3) Code writing
Set the picture in the sign.cpp file, the code is as follows:
Signup::Signup(QWidget *parent) :
    QWidget(parent),
    ui(new Ui::Signup)
{
    ui->setupUi(this);
    //设置图片
    QPixmap *pix = new QPixmap(":/girl1.png");
    QSize sz = ui->label_image->size();
    ui->label_image->setPixmap(pix->scaled(sz));
}
At this point, the design of the registration interface is basically completed.
3.3 Use SQLite database to realize registration
(1) Realize the jump between the two interfaces
Click the "Sign up" button from the login interface to jump to the registration interface, and click the "return" button on the registration interface to return to the login interface.
First add the header file " #include "signup.h" " to the mainwindow.cpp file to include the page to be redirected. Double-click the mainwindow.ui file to enter the design mode, select the "Sign up" button, right-click the mouse, select "Go to Slot", and then automatically jump to the writing of the slot function, enter the following code:
void MainWindow::on_btn_signup_clicked()
{
    this->close();
    Signup *s = new Signup;
    s->show();
}
Then add the header file " #include "mainwindow.h" " to the signup.cpp file to include the page to be jumped. Double-click the signup.ui file to enter the design mode, select the "Return login" button, right-click the mouse, select "Go to Slot", and then automatically jump to the writing of the slot function, enter the following code:
void Signup::on_btn_return_clicked()
{
    MainWindow *w = new MainWindow;
    w->show();
    this->close();
}
(2) Realize the registration function
Double-click the signup.ui file to enter the design mode, select the "Sure" button, right-click the mouse, select "Go to Slot", and then automatically jump to the writing of the slot function, enter the following code:
void Signup::on_pushButton_2_clicked()
{
    sqlite_Init();
    QString username = ui->lineEdit_username->text();
    QString password = ui->lineEdit_passwd->text();
    QString surepass = ui->lineEdit_surepasswd->text();
    //判断密码是否一致
    if(password == surepass)
    {
        QString sql=QString("insert into user(username,password) values('%1','%2');")
                .arg(username).arg(password);
        //创建执行语句对象
        QSqlQuery query;
        //判断执行结果
        if(!query.exec(sql))
        {
            qDebug()<<"insert into error";
            QMessageBox::information(this,"注册认证","插入失败!");
        }
        else
        {
            qDebug()<<"insert into success";
            QMessageBox::information(this,"注册认证","插入成功!");
            MainWindow *w = new MainWindow;
            w->show();
            this->close();
        }

    }else{
        QMessageBox::information(this,"注册认证","两次密码输入不一致");
    }
}
So far, the registration function has basically been realized.
Summarize
The above is the login and registration applet implemented using Qt5, but there are still some small bugs, such as the user name and password can be empty. In short, I hope it can be helpful to everyone.
appendix
Full code:
mainwindow.h file code:
#ifndef MAINWINDOW_H
#define MAINWINDOW_H

#include <QMainWindow>
#include <QSqlDatabase> //数据驱动
#include <QSqlQuery> //数据库执行语句
#include <QMessageBox>//消息盒子
#include <QDebug>
void sqlite_Init();

QT_BEGIN_NAMESPACE
namespace Ui { class MainWindow; }
QT_END_NAMESPACE

class MainWindow : public QMainWindow
{
    Q_OBJECT

public:
    MainWindow(QWidget *parent = nullptr);
    ~MainWindow();

private slots:
    void on_btn_signin_clicked();

    void on_btn_signup_clicked();

private:
    Ui::MainWindow *ui;
};
#endif // MAINWINDOW_H
mainwindow.cpp file code:
#include "mainwindow.h"
#include "ui_mainwindow.h"
#include "signup.h"

#include <QGraphicsDropShadowEffect>
MainWindow::MainWindow(QWidget *parent)
    : QMainWindow(parent)
    , ui(new Ui::MainWindow)
{
    ui->setupUi(this);

    QPixmap *pix = new QPixmap(":/blue.png");
    QSize sz = ui->label_image->size();
    ui->label_image->setPixmap(pix->scaled(sz));

    //设置阴影
    QGraphicsDropShadowEffect *shadow = new QGraphicsDropShadowEffect(this);
    shadow->setOffset(-3, 0);
    shadow->setColor(QColor("#888888"));
    shadow->setBlurRadius(30);
    ui->label_image->setGraphicsEffect(shadow);
    //初始化数据库
    sqlite_Init();
}

MainWindow::~MainWindow()
{
    delete ui;
}

void sqlite_Init()
{
    QSqlDatabase db = QSqlDatabase::addDatabase("QSQLITE");
    db.setDatabaseName("user.db");
    if(!db.open())
    {
        qDebug()<<"open error";
    }
    //create excle
    QString createsql=QString("create table if not exists user(id integer primary key autoincrement,"
                        "username ntext unique not NULL,"
                        "password ntext not NULL)");
    QSqlQuery query;
    if(!query.exec(createsql)){
        qDebug()<<"table create error";
    }
    else{
        qDebug()<<"table create success";
    }
}

void MainWindow::on_btn_signin_clicked()
{
    sqlite_Init();
    QString username = ui->lineEdit_username->text();
    QString password = ui->lineEdit_password->text();
    QString sql=QString("select * from user where username='%1' and password='%2'")
            .arg(username).arg(password);
    //创建执行语句对象
    QSqlQuery query(sql);
    //判断执行结果
    if(!query.next())
    {
        qDebug()<<"Login error";
        QMessageBox::information(this,"登录认证","登录失败,账户或者密码错误");
    }
    else
    {
        qDebug()<<"Login success";
        QMessageBox::information(this,"登录认证","登录成功");
        QWidget *w = new QWidget;
        w->show();
        this->close();
    }
}

void MainWindow::on_btn_signup_clicked()
{
    this->close();
    Signup *s = new Signup;
    s->show();
}
signup.h file code:
#ifndef SIGNUP_H
#define SIGNUP_H
#include <QWidget>

namespace Ui {
class Signup;
}

class Signup : public QWidget
{
    Q_OBJECT

public:
    explicit Signup(QWidget *parent = nullptr);
    ~Signup();

private slots:
    void on_pushButton_2_clicked();
    void on_btn_return_clicked();

private:
    Ui::Signup *ui;
};

#endif // SIGNUP_H
signup.cpp file code:
#include "signup.h"
#include "ui_signup.h"
#include "mainwindow.h"

Signup::Signup(QWidget *parent) :
    QWidget(parent),
    ui(new Ui::Signup)
{
    ui->setupUi(this);
    QPixmap *pix = new QPixmap(":/girl1.png");
    QSize sz = ui->label_image->size();
    ui->label_image->setPixmap(pix->scaled(sz));
}

Signup::~Signup()
{
    delete ui;
}

//返回登录按钮
void Signup::on_btn_return_clicked()
{
    MainWindow *w = new MainWindow;
    w->show();
    this->close();
}

//注册按钮
void Signup::on_pushButton_2_clicked()
{
    sqlite_Init();
    QString username = ui->lineEdit_username->text();
    QString password = ui->lineEdit_passwd->text();
    QString surepass = ui->lineEdit_surepasswd->text();
    //判断密码是否一致
    if(password == surepass)
    {
        QString sql=QString("insert into user(username,password) values('%1','%2');")
                .arg(username).arg(password);
        //创建执行语句对象
        QSqlQuery query;
        //判断执行结果
        if(!query.exec(sql))
        {
            qDebug()<<"insert into error";
            QMessageBox::information(this,"注册认证","插入失败!");
        }
        else
        {
            qDebug()<<"insert into success";
            QMessageBox::information(this,"注册认证","插入成功!");
            MainWindow *w = new MainWindow;
            w->show();
            this->close();
        }

    }else{
        QMessageBox::information(this,"注册认证","两次密码输入不一致");
    }
}