OpenCV C++ binocular 3D reconstruction: binocular camera to achieve binocular distance measurement
Table of contents
OpenCV C++ binocular 3D reconstruction: binocular camera to achieve binocular distance measurement
(1) Ubuntu 18.04 configuration development environment
(2) Windows configuration development environment
3. Binocular camera calibration
(1) Binocular camera calibration - Python version
(2) Binocular camera calibration - Matlab version
4. Camera parameter configuration
7. Error description of binocular ranging
8. Binocular 3D reconstruction project code (C/C++ version)
9. Binocular 3D reconstruction project code (Python version)
10. Binocular 3D reconstruction project code (Android version)
This blog post is the continuation of " Binocular 3D Reconstruction System (Binocular Targeting + Stereo Correction + Binocular Ranging + Point Cloud Display) Python ", we will build a binocular 3D version of OpenCV C++ Rebuild the system. Since we only consider 3D reconstruction to achieve the effect of binocular distance measurement, the 3D display effect of PCL and Open3d library is removed, but the visualization effects such as disparity map and depth map are still retained. Users can click on the image with the mouse to get the corresponding world. Coordinates and depth distance information.
From the effect point of view, the binocular distance measurement of the C++ version is almost the same as that of the Python version, with better performance and faster speed. It can basically reach the industrial-level distance measurement accuracy . It can run on the Linux development board and is very suitable for unmanned applications. Scenarios such as machine, smart car ranging and obstacle avoidance.
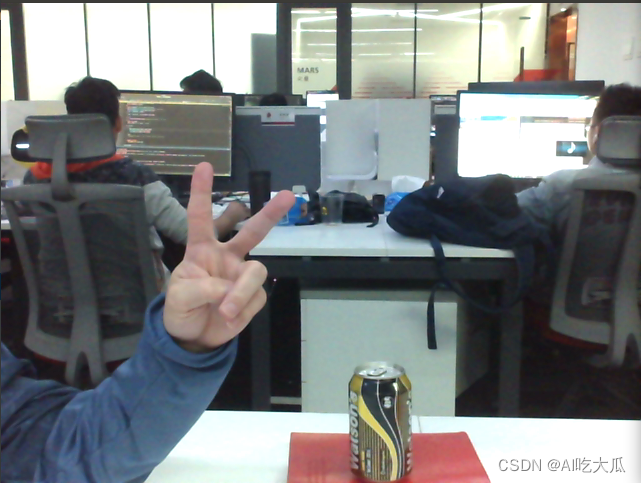
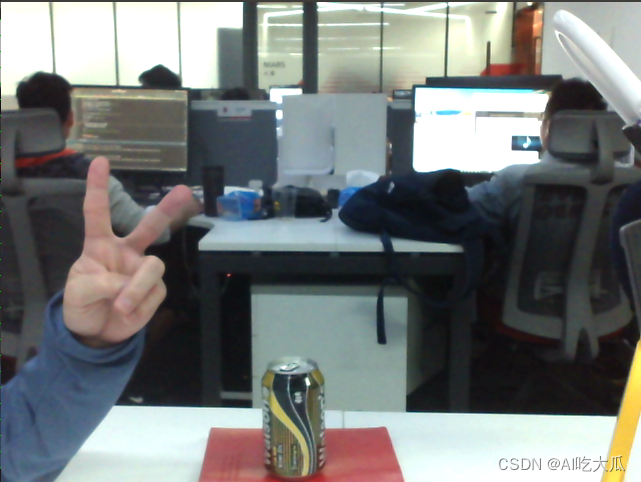
Let's take a look at the rendering of the demo first ( click the mouse, and the terminal will print the corresponding distance information ):

OpenCV C++ binocular camera to achieve binocular distance measurement main support:
- Binocular camera with dual USB cables
- Support for filtering disparity maps using WLS filters
- Support binocular distance measurement (you can get the depth distance by clicking the image with the mouse)
- Provide supporting opencv-4.3.0 and opencv_contrib-4.3.0 source code ( Linux system needs to be compiled by itself; Windows10 system has provided opencv_contrib compiled files, which can be reused directly without recompilation )
- Compared with the Python version, the C++ version has better performance and faster speed, and can run on Linux development boards. It is very suitable for scenarios such as drones and smart cars ranging from obstacle avoidance.
- Support Linux system: The project source code has been verified on Ubuntu 18.04 system ( you need to compile opencv-4.3.0 and opencv_contrib-4.3.0 by yourself )
- Support Windows 10 system: The source code of the project has been verified in Windows 10 system, and it is equipped with Visual Studio 2017 project, which can be used directly
- For other system platform development, please configure the opencv and opencv_contrib development environment
It is true that there are many C++ versions of dual ranging codes on the Internet, but the projects are not very complete, and the effect of restoring the disparity map is also general, and it is difficult to achieve commercial practical applications. The main reasons are as follows:
- The binocular camera quality problem,
- There is a problem with binocular calibration, resulting in large calibration errors
- No WLS filter is used to filter the disparity map, which can greatly improve the effect of the disparity map
|
Binocular Ranging Demo Video |
If you need the Python version of binocular ranging, please check out my other blog " Binocular 3D Reconstruction: Binocular Camera for Binocular Ranging (Python ")
This article will focus on the process of realizing binocular ranging in the OpenCV C++ project. For binocular camera calibration + binocular correction + binocular matching , please check my other blog " Binocular 3D Reconstruction System (Binocular Calibration + Stereo correction + binocular distance measurement + point cloud display)Python 》
[Project source code download address ] OpenCV C++ binocular camera realizes binocular ranging
[Respect the principle, please indicate the source for reprinting] https://blog.csdn.net/guyuealian/article/details/127446435
1. Directory structure
.
├── configs          # 相机参数文件
├── data             # 相机采集的数据
├── docs             # 一些文档图片
├── src              # C++源码
├── build.sh         # 构建build脚本
├── main.cpp         # 主程序
├── CMakeLists.txt   # CMake文件
└── README.md        # 说明文档
2. Dependent library
(1) Ubuntu 18.04 configuration development environment
- System platform: Ubuntu 18.04
- opencv-4.3.0 (opencv-3.4.0 or above is also acceptable)
- opencv_contrib-4.3.0 (opencv_contrib-3.4.0 or above is also acceptable), WLS filter needs to use opencv_contrib library
Ubuntu 18.04 opencv installation tutorial, please refer to the article: Ubuntu18.04 install opencv and opencv_contrib
PS: Make sure that the version numbers of opencv and opencv_contrib are consistent to avoid compilation errors caused by version differences.
(2) Windows configuration development environment
- System platform: Windows10
- opencv-4.3.0 (opencv-3.4.0 or above is also acceptable)
- opencv_contrib-4.3.0 (opencv_contrib-3.4.0 or above is also acceptable), WLS filter needs to use opencv_contrib library
Windows opencv installation tutorial, please refer to the article: Visual Studio 2017 environment cmake compile opencv 4.3.0+opencv_contrib 4.3.0
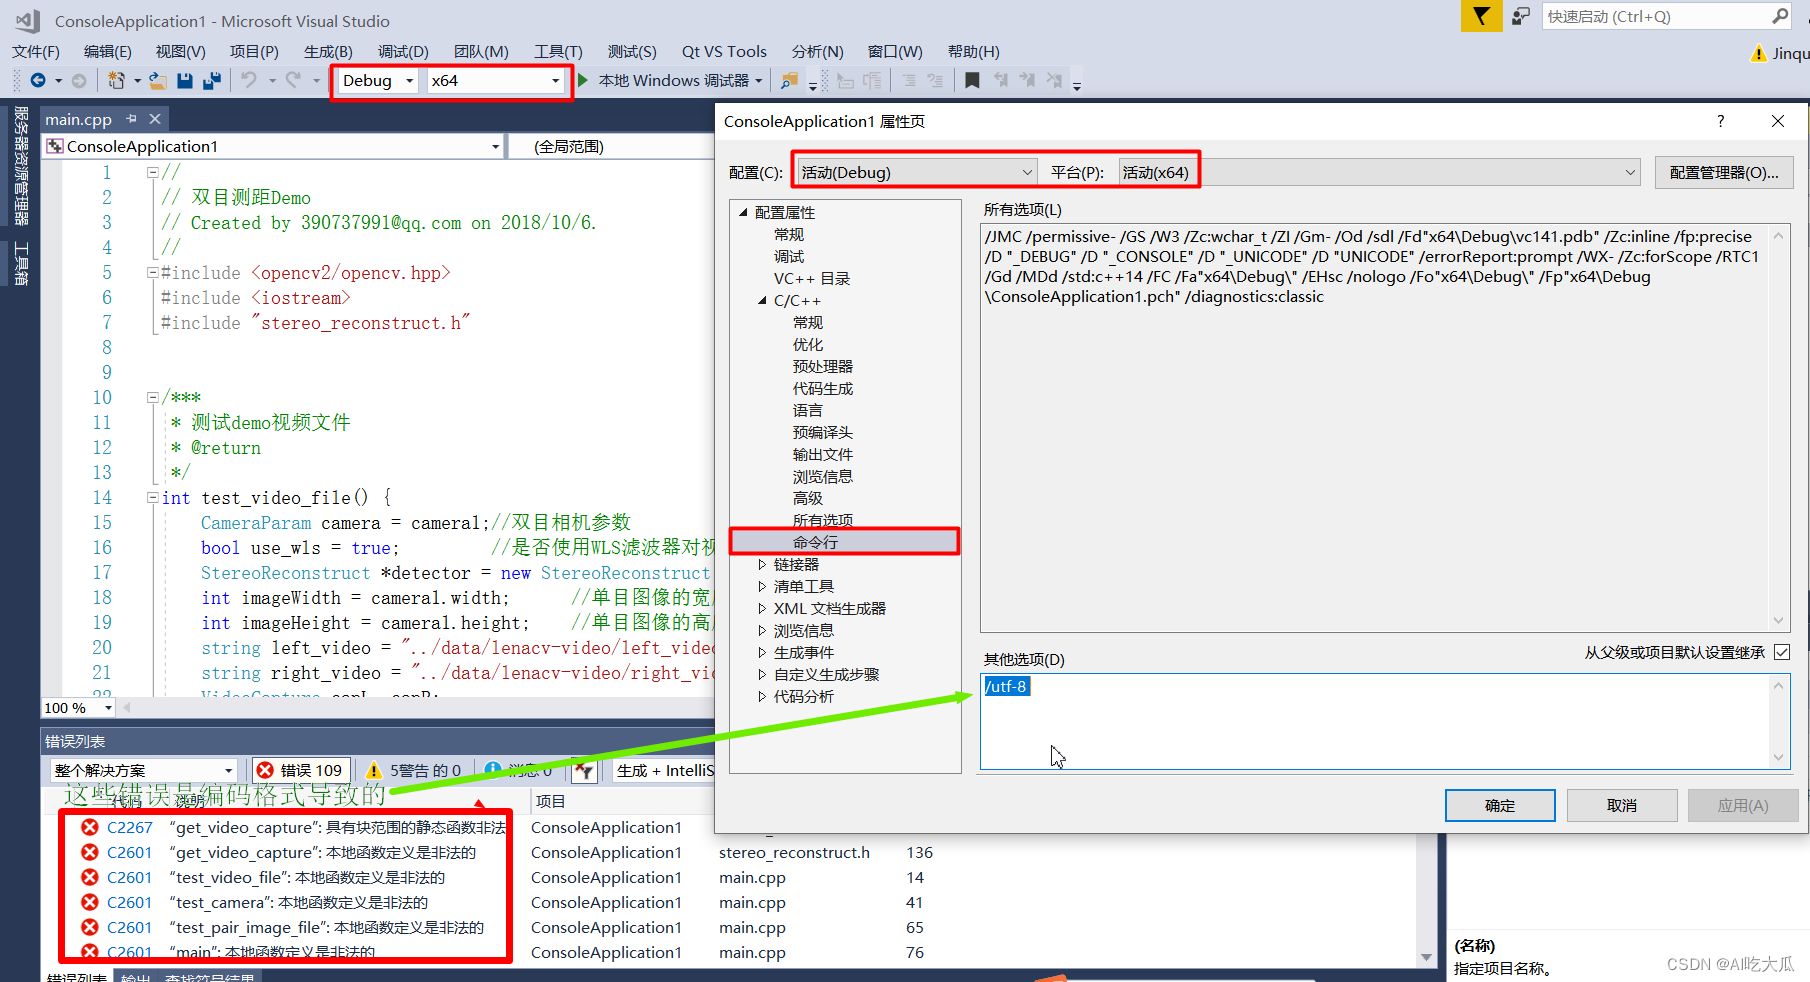
Special Note:
I am using the CLion tool for development on the Ubuntu 18.04 platform (default encoding format utf-8), other platforms may have problems with abnormal encoding formats; pay special attention, if you use Visual Studio for development on the Windows system (default encoding format GBK) , there will be problems such as [local function definition is illegal] syntax error and other problems; the solution is also very simple, just add /utf-8 in the command line of the property page
The source code of the project has been verified on Ubuntu 18.04 and Windows 10 systems; the third-party dependent libraries are only opencv and opencv_contrib, if you develop on other system platforms, please configure the opencv and opencv_contrib development environment by yourself;
3. Binocular camera calibration
(1) Binocular camera calibration - Python version
Please refer to my other blog, camera calibration can be performed without Matlab: binocular 3D reconstruction system (binocular positioning + stereo correction + binocular ranging + point cloud display) Python
After the binocular calibration of this method is completed, a binocular camera internal and external parameter information ( stereo_cam.yml) file will be obtained:
%YAML:1.0
---
size: !!opencv-matrix
   rows: 2
   cols: 1
   dt: d
   data: [ 640., 480. ]
K1: !!opencv-matrix
   rows: 3
   cols: 3
   dt: d
   data: [ 7.6159209686584518e+02, 0., 3.2031427422505453e+02, 0.,
       7.6167321445963728e+02, 2.2467546927337131e+02, 0., 0., 1. ]
D1: !!opencv-matrix
   rows: 1
   cols: 5
   dt: d
   data: [ 3.4834574885170888e-02, -5.5261651661983137e-02,
       5.7491952731614823e-04, -4.2764224824172658e-05,
       1.8477350140315381e-02 ]
K2: !!opencv-matrix
   rows: 3
   cols: 3
   dt: d
   data: [ 7.6327773941976670e+02, 0., 2.8768149948082271e+02, 0.,
       7.6350419442870850e+02, 2.1897333598636970e+02, 0., 0., 1. ]
D2: !!opencv-matrix
   rows: 1
   cols: 5
   dt: d
   data: [ 3.5020972475517692e-02, -4.0770660841280497e-02,
       -4.4231087565750534e-04, -1.0552562170995372e-03,
       -9.7749906830348537e-02 ]
R: !!opencv-matrix
   rows: 3
   cols: 3
   dt: d
   data: [ 9.9999370552351063e-01, 7.8563885326366346e-04,
       3.4600122760633780e-03, -7.9503151737356746e-04,
       9.9999600079883766e-01, 2.7140949167922721e-03,
       -3.4578661403601796e-03, -2.7168286517956050e-03,
       9.9999033095517087e-01 ]
T: !!opencv-matrix
   rows: 3
   cols: 1
   dt: d
   data: [ -6.0005833133148414e+01, 1.7047017063672587e-01,
       6.0300223404957642e-01 ]
E: !!opencv-matrix
   rows: 3
   cols: 3
   dt: d
   data: [ -1.1005724987007073e-04, -6.0346296076620343e-01,
       1.6883191705475561e-01, 3.9550629985097430e-01,
       -1.6255182474732952e-01, 6.0007339329190145e+01,
       -1.2276256904913259e-01, -6.0005727085740176e+01,
       -1.6345135556766910e-01 ]
F: !!opencv-matrix
   rows: 3
   cols: 3
   dt: d
   data: [ -6.7250769136371160e-10, -3.6870834234286016e-06,
       1.6143104894409041e-03, 2.4160347372858321e-06,
       -9.9287680075344234e-07, 2.7862421257891157e-01,
       -1.1014218394645766e-03, -2.7856049650040260e-01, 1. ]
R1: !!opencv-matrix
   rows: 3
   cols: 3
   dt: d
   data: [ 9.9997618806974742e-01, -2.0278309638726887e-03,
       -6.5963016213173775e-03, 2.0367881225372914e-03,
       9.9999701250432615e-01, 1.3514719999064883e-03,
       6.5935413581266105e-03, -1.3648750875444691e-03,
       9.9997733090723306e-01 ]
R2: !!opencv-matrix
   rows: 3
   cols: 3
   dt: d
   data: [ 9.9994547731576255e-01, -2.8407384289991728e-03,
       -1.0048512373976153e-02, 2.8270879178959596e-03,
       9.9999506202764499e-01, -1.3724045434755307e-03,
       1.0052361397026631e-02, 1.3439216883706559e-03,
       9.9994857062992937e-01 ]
P1: !!opencv-matrix
   rows: 3
   cols: 4
   dt: d
   data: [ 7.3741438842621210e+02, 0., 3.1126281356811523e+02, 0., 0.,
       7.3741438842621210e+02, 2.2189782714843750e+02, 0., 0., 0., 1.,
       0. ]
P2: !!opencv-matrix
   rows: 3
   cols: 4
   dt: d
   data: [ 7.3741438842621210e+02, 0., 3.1126281356811523e+02,
       -4.4251577456670653e+04, 0., 7.3741438842621210e+02,
       2.2189782714843750e+02, 0., 0., 0., 1., 0. ]
Q: !!opencv-matrix
   rows: 4
   cols: 4
   dt: d
   data: [ 1., 0., 0., -3.1126281356811523e+02, 0., 1., 0.,
       -2.2189782714843750e+02, 0., 0., 0., 7.3741438842621210e+02, 0.,
       0., 1.6664137886344466e-02, 0. ]
Parameter Description:
- The parameter size corresponds to the image width and height (width, height)
- Parameter K1, corresponding to the internal reference matrix of the left camera (3×3)
- Parameter D1, corresponding to the left-eye camera distortion coefficient matrix (5×1)
- Parameter K2, corresponding to the internal reference matrix of the right-eye camera (3×3)
- Parameter D2, corresponding to the right-eye camera distortion coefficient matrix (5×1)
- Parameter T, corresponding to binocular camera translation vector T(3×1)
- Parameter R, corresponding to binocular camera rotation matrix R(3×3)
- As for the parameters in the configuration file, such as R1, R2, P1, P2, Q and other reprojection matrices, they can be written silently without modification. These will be recalculated at runtime.
(2) Binocular camera calibration - Matlab version
There are already many Matlab binocular camera calibration tutorials on the Internet, please Baidu by yourself; after using the Matlab toolbox to calibrate the binocular camera, please modify the corresponding parameters
It should be noted that the rotation matrix R is a (3×3) two-dimensional matrix, and Matlab gives the rotation vector om(1×3), please use cv2.Rodrigues() to convert the rotation vector into a rotation matrix, refer to the following code to convert
    import cv2
    import numpy as np

    # 定义旋转矩阵R,旋转向量om
    R = [[9.9999370551606337e-01, 7.8563882630048958e-04, 3.4600144345510440e-03],
         [-7.9503149273969136e-04, 9.9999600080163187e-01, 2.7140938945082542e-03],
         [-3.4578682997252063e-03, -2.7168276311286426e-03, 9.9999033095047696e-01]]
    R = np.asarray(R)
    print(f"旋转矩阵R:\n {R}")
    # 把旋转矩阵R转化为旋转向量om
    om, _ = cv2.Rodrigues(R)
    print(f"旋转向量om:\n {om}")
    # 把旋转向量om转换为旋转矩阵R
    R1, _ = cv2.Rodrigues(om)
    print(f"旋转矩阵R1:\n {R1}")
4. Camera parameter configuration
- After the binocular camera calibration is completed, the internal and external parameter information of the camera is obtained
CameraParamJust define C++ according to your own camera parameters- In the following C++ code, the binocular camera CameraParam variable camera1 is defined, and the user needs to modify the corresponding camera internal and external parameters according to his own binocular camera.
/**
 * 双目摄像头的相机参数
 */
struct CameraParam {
int width;           //图像的宽度width
int height;          //图像的高度height
Mat cameraMatrixL;   //左相机内参K1(3×3)
Mat distCoeffL;      //左相机畸变系数D1(5×1)
Mat cameraMatrixR;   //右相机内参K2(3×3)
Mat distCoeffR;      //右相机畸变系数D2(5×1)
Mat T;               //平移向量T(3×1)
Mat R;               //旋转矩阵R(3×3),如果是(3×1)旋转向量,请使用cv::Rodrigues()进行变换转为(3×3)旋转矩阵R
};

/***
 * 设置摄像头参数,需要根据双目摄像头标定结果进行填写
 */
static CameraParam camera1 = {
640,//width
480,//height
(Mat_<double>(3, 3)
<< 7.6159209686633153e+02, 0., 3.2031427422691633e+02, 0., 7.6167321446015626e+02, 2.2467546926913309e+02, 0., 0., 1.),//cameraMatrixL
(Mat_<double>(5, 1)
<< 3.4834574887256914e-02, -5.5261651680159028e-02, 5.7491952534806736e-04, -4.2764223950233445e-05, 1.8477350164208820e-02),//distCoeffL
(Mat_<double>(3, 3)
<< 7.6327773983796783e+02, 0., 2.8768149776326379e+02, 0., 7.6350419482215057e+02, 2.1897333669573928e+02, 0., 0., 1.),
(Mat_<double>(5, 1)
<< 3.5020967512300320e-02, -4.0770565902033332e-02, -4.4231049297594003e-04, -1.0552565496142535e-03, -9.7750314807571667e-02),
(Mat_<double>(3, 1)
<< -6.0005833075452117e+01, 1.7047023105446815e-01, 6.0300273851103448e-01),
(Mat_<double>(3, 3)
<< 9.9999370551606337e-01, 7.8563882630048958e-04, 3.4600144345510440e-03, -7.9503149273969136e-04, 9.9999600080163187e-01, 2.7140938945082542e-03, -3.4578682997252063e-03, -2.7168276311286426e-03, 9.9999033095047696e-01),
};
5. Binocular ranging
The binocular distance measurement of the OpenCV C++ version is almost the same as the binocular distance measurement of the Python version, with better performance and faster speed, and can basically achieve industrial-level distance measurement accuracy . Since we only consider 3D reconstruction to achieve the effect of binocular distance measurement, the 3D display effect of PCL and Open3d library is removed, but the visualization effects such as disparity map and depth map are still retained. Users can click on the image with the mouse to get the corresponding world. Coordinates and depth distance information.
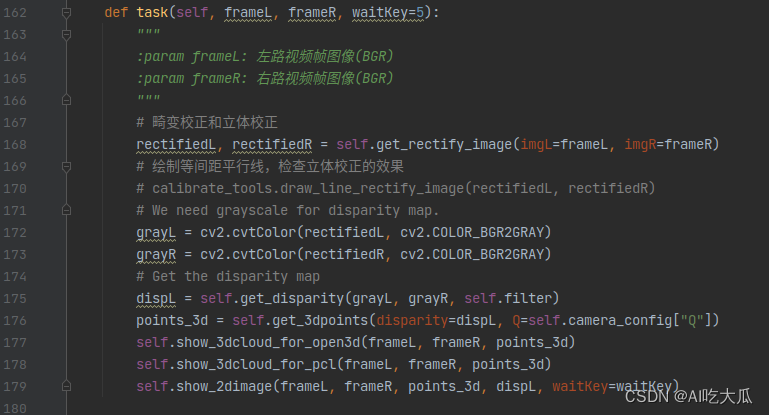
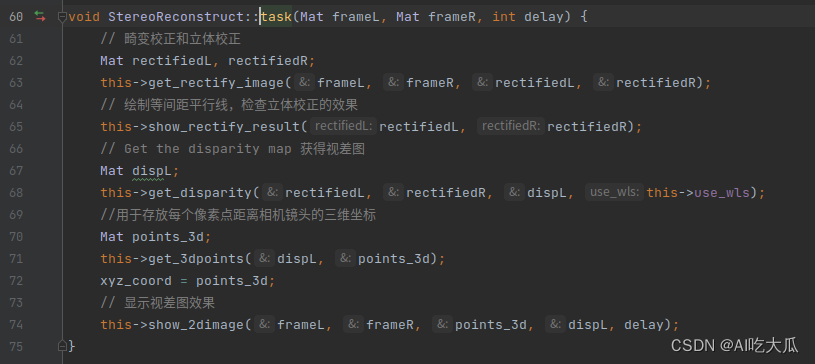
The function interface declaration has already given detailed parameter descriptions. For the convenience of everyone's learning, the function naming and implementation logic are almost consistent with the Python version:
| Python version | C++ version |
 |
 |
//
// Created by [email protected] on 2022/10/6.
//

#ifndef CAMERA_CALIBRATION_RECONSTRUCT_CPP_STEREO_RECONSTRUCT_H
#define CAMERA_CALIBRATION_RECONSTRUCT_CPP_STEREO_RECONSTRUCT_H

#include <opencv2/opencv.hpp>
#include <iostream>

using namespace std;
using namespace cv;

cv::Mat xyz_coord;                                   //用于存放每个像素点距离相机镜头的三维坐标
cv::Point start;                                     //鼠标按下的起始点
cv::Rect buttonRect;                                 //定义矩形选框
bool buttonStatus = false;                           //是否选择对象


/**
 * 双目摄像头的相机参数
 */
struct CameraParam {
    int width;           //图像的宽度width
    int height;          //图像的高度height
    Mat cameraMatrixL;   //左相机内参K1(3×3)
    Mat distCoeffL;      //左相机畸变系数D1(5×1)
    Mat cameraMatrixR;   //右相机内参K2(3×3)
    Mat distCoeffR;      //右相机畸变系数D2(5×1)
    Mat T;               //平移向量T(3×1)
    Mat R;               //旋转矩阵R(3×3),如果是(3×1)旋转向量,请使用cv::Rodrigues()进行变换转为(3×3)旋转矩阵R
};

/***
 * 设置摄像头参数,需要根据双目摄像头标定结果进行填写
 */
static CameraParam camera1 = {640,//width
                              480,//height
                              (Mat_<double>(3, 3)
                                      << 7.6159209686633153e+02, 0., 3.2031427422691633e+02, 0., 7.6167321446015626e+02, 2.2467546926913309e+02, 0., 0., 1.),//cameraMatrixL
                              (Mat_<double>(5, 1)
                                      << 3.4834574887256914e-02, -5.5261651680159028e-02, 5.7491952534806736e-04, -4.2764223950233445e-05, 1.8477350164208820e-02),//distCoeffL
                              (Mat_<double>(3, 3)
                                      << 7.6327773983796783e+02, 0., 2.8768149776326379e+02, 0., 7.6350419482215057e+02, 2.1897333669573928e+02, 0., 0., 1.),
                              (Mat_<double>(5, 1)
                                      << 3.5020967512300320e-02, -4.0770565902033332e-02, -4.4231049297594003e-04, -1.0552565496142535e-03, -9.7750314807571667e-02),
                              (Mat_<double>(3, 1)
                                      << -6.0005833075452117e+01, 1.7047023105446815e-01, 6.0300273851103448e-01),
                              (Mat_<double>(3, 3)
                                      << 9.9999370551606337e-01, 7.8563882630048958e-04, 3.4600144345510440e-03, -7.9503149273969136e-04, 9.9999600080163187e-01, 2.7140938945082542e-03, -3.4578682997252063e-03, -2.7168276311286426e-03, 9.9999033095047696e-01),
};

/***
 * 鼠标响应回调函数
 * @param event
 * @param x
 * @param y
 */
static void onMouse(int event, int x, int y, int, void *) {
    if (buttonStatus) {
        buttonRect.x = MIN(x, start.x);
        buttonRect.y = MIN(y, start.y);
        buttonRect.width = std::abs(x - start.x);
        buttonRect.height = std::abs(y - start.y);
    }

    switch (event) {
        case EVENT_LBUTTONDOWN:             //鼠标左按钮按下的事件
            start = Point(x, y);
            buttonRect = Rect(x, y, 0, 0);
            buttonStatus = true;
            cout << "image(x,y)=" << start;
            cout << " world coords=(x,y,depth)=" << xyz_coord.at<Vec3f>(start) << endl;
            break;
        case EVENT_LBUTTONUP:               //鼠标左按钮释放的事件
            buttonStatus = false;
            if (buttonRect.width > 0 && buttonRect.height > 0)
                break;
    }
}

/***
 * 显示图像
 * @param winname 窗口名称
 * @param image 图像
 * @param delay 显示延迟,0表示阻塞显示
 * @param flags 显示方式
 */
static void show_image(const string &winname, cv::Mat &image, int delay = 0, int flags = cv::WINDOW_AUTOSIZE) {
    cv::namedWindow(winname, flags);
    cv::imshow(winname, image);
    cv::waitKey(delay);
}

/***
 * 读取视频文件
 * @param video_file 视频文件
 * @param cap 视频流对象
 * @param width 设置图像的宽度
 * @param height 设置图像的高度
 * @param fps 设置视频播放频率
 * @return
 */
bool get_video_capture(string video_file, cv::VideoCapture &cap, int width = -1, int height = -1, int fps = -1) {
    //VideoCapture video_cap;
    cap.open(video_file);
    if (width > 0 && height > 0) {
        cap.set(cv::CAP_PROP_FRAME_WIDTH, width); //设置图像的宽度
        cap.set(cv::CAP_PROP_FRAME_HEIGHT, height); //设置图像的高度
    }
    if (fps > 0) {
        cap.set(cv::CAP_PROP_FPS, fps);
    }
    if (!cap.isOpened())//判断是否读取成功
    {
        return false;
    }
    return true;
}

/***
 * 读取摄像头
 * @param camera_id 摄像头ID号,默认从0开始
 * @param cap 视频流对象
 * @param width 设置图像的宽度
 * @param height 设置图像的高度
 * @param fps 设置视频播放频率
 * @return
 */
bool get_video_capture(int camera_id, cv::VideoCapture &cap, int width = -1, int height = -1, int fps = -1) {
    //VideoCapture video_cap;
    cap.open(camera_id);    //摄像头ID号,默认从0开始
    if (width > 0 && height > 0) {
        cap.set(cv::CAP_PROP_FRAME_WIDTH, width); //设置捕获图像的宽度
        cap.set(cv::CAP_PROP_FRAME_HEIGHT, height);  //设置捕获图像的高度
    }
    if (fps > 0) {
        cap.set(cv::CAP_PROP_FPS, fps);
    }
    if (!cap.isOpened()) //判断是否成功打开相机
    {
        return false;
    }
    return true;
}

class StereoReconstruct {
public:

    /***
     * 构造函数,初始化StereoReconstruct
     * @param camera 双目相机参数
     * @param use_wls 是否使用WLS滤波器对视差图进行滤波
     */
    StereoReconstruct(CameraParam camera, bool use_wls = true);

    /***
     * release
     */
    ~StereoReconstruct();

    /***
     * 开始双目测距任务
     * @param frameL
     * @param frameR
     */
    void task(Mat frameL, Mat frameR, int delay = 0);

    /***
     * 畸变校正和立体校正
     * @param imgL 左视图
     * @param imgR 右视图
     * @param rectifiedL 校正后左视图
     * @param rectifiedR 校正后右视图
     */
    void get_rectify_image(Mat &imgL, Mat &imgR, Mat &rectifiedL, Mat &rectifiedR);

    /***
     * 获得视差图
     * @param imgL 畸变校正和立体校正后的左视图
     * @param imgR 畸变校正和立体校正后的右视图
     * @param dispL 返回视差图
     * @param use_wls 是否使用WLS滤波器对视差图进行滤波
     */
    void get_disparity(Mat &imgL, Mat &imgR, Mat &dispL, bool use_wls = true);//SGBM匹配算法

    /***
     * 计算像素点的3D坐标(左相机坐标系下)
     * @param disp 视差图
     * @param points_3d 返回三维坐标points_3d,三个通道分布表示(X,Y,Z),其中Z是深度图depth, 即距离,单位是毫米(mm)
     * @param scale 单位变换尺度,默认scale=1.0,单位为毫米
     */
    void get_3dpoints(Mat &disp, Mat &points_3d, float scale = 1.0);

    /***
     * 将输入深度图转换为伪彩色图,方面可视化
     * @param depth
     * @param colormap
     */
    void get_visual_depth(cv::Mat &depth, cv::Mat &colormap, float clip_max = 6000.0);

    /***
     * 显示矫正效果
     * @param rectifiedL
     * @param rectifiedR
     */
    void show_rectify_result(cv::Mat rectifiedL, cv::Mat rectifiedR);

    /***
     * 可视化视差图和深度图
     * @param frameL
     * @param frameR
     * @param points_3d
     * @param disp
     * @param delay
     */
    void show_2dimage(Mat &frameL, Mat &frameR, Mat &points_3d, Mat &disp, int delay);

    /***
     * 显示Mat的最大最小值
     * @param src
     * @param vmin 最小值下限
     * @param vmax 最大值下限
     */
    void clip(cv::Mat &src, float vmin, float vmax);

    /***
     * 显示Mat的最大最小值
     * @param src
     * @param th
     * @param vmin
     */
    void clip_min(cv::Mat &src, float th, float vmin);


public:
    string depth_windows = "depth-color";             // 深度图的窗口名称
    int use_wls;                                      // 是否使用WLS滤波器对视差图进行滤波
    Size image_size;                                  // 图像宽高(width,height)
    Rect validROIL;                                   // 图像校正之后,会对图像进行裁剪,这里的左视图裁剪之后的区域
    Rect validROIR;                                   // 图像校正之后,会对图像进行裁剪,这里的右视图裁剪之后的区域
    Mat mapLx, mapLy, mapRx, mapRy;                   // 映射表
    Mat Rl, Rr, Pl, Pr, Q;                            // 校正后的旋转矩阵R,投影矩阵P, 重投影矩阵Q
    cv::Ptr<cv::StereoSGBM> sgbm;
};


#endif //CAMERA_CALIBRATION_RECONSTRUCT_CPP_STEREO_RECONSTRUCT_H
6. Run the demo
- The main program main.cpp implements three demos
- Test demo video file: This is a binocular video file recorded by the camera, used to test the effect of binocular distance measurement
- Test the binocular camera (binocular camera with dual USB cables): used to test the binocular camera, you need to modify the ID number according to your own camera
- Test the image effect of a pair of left and right cameras
//
// 双目测距Demo
// Created by AI吃大瓜 on 2022/10/6.
//
#include <opencv2/opencv.hpp>
#include <iostream>
#include "stereo_reconstruct.h"

/***
 * 测试demo视频文件
 * @return
 */
int test_video_file() {
    CameraParam camera = camera1;//双目相机参数
    bool use_wls = true;         //是否使用WLS滤波器对视差图进行滤波
    StereoReconstruct *detector = new StereoReconstruct(camera, use_wls);
    int imageWidth = camera1.width;      //单目图像的宽度
    int imageHeight = camera1.height;    //单目图像的高度
    string left_video = "../data/lenacv-video/left_video.avi";
    string right_video = "../data/lenacv-video/right_video.avi";
    VideoCapture capL, capR;
    bool retL = get_video_capture(left_video, capL, imageWidth, imageHeight);
    bool retR = get_video_capture(right_video, capR, imageWidth, imageHeight);
    Mat frameL, frameR;
    while (retL && retR) {
        capL >> frameL;
        capR >> frameR;
        if (frameL.empty() or frameR.empty()) break;
        detector->task(frameL, frameR, 20);
    }
    capL.release();         //释放对相机的控制
    capR.release();         //释放对相机的控制
    delete detector;
    return 0;

}


/***
 * 测试双目摄像头(双USB连接线的双目摄像头)
 * @return
 */
int test_camera() {
    CameraParam camera = camera1;//双目相机参数
    bool use_wls = true;         //是否使用WLS滤波器对视差图进行滤波
    StereoReconstruct *detector = new StereoReconstruct(camera, use_wls);
    int imageWidth = camera1.width;       //单目图像的宽度
    int imageHeight = camera1.height;     //单目图像的高度
    int camera1 = 0;                      //左摄像头ID号(请修改成自己左摄像头ID号)
    int camera2 = 1;                      //右摄像头ID号(请修改成自己右摄像头ID号)
    VideoCapture capL, capR;
    bool retL = get_video_capture(camera1, capL, imageWidth, imageHeight);
    bool retR = get_video_capture(camera2, capR, imageWidth, imageHeight);
    Mat frameL, frameR;
    while (retL && retR) {
        capL >> frameL;
        capR >> frameR;
        if (frameL.empty() or frameR.empty()) break;
        detector->task(frameL, frameR, 20);
    }
    capL.release();         //释放对相机的控制
    capR.release();         //释放对相机的控制
    delete detector;
    return 0;
}

/***
 * 测试一对左右图像
 * @return
 */
int test_pair_image_file() {
    CameraParam camera = camera1;//双目相机参数
    bool use_wls = true;         //是否使用WLS滤波器对视差图进行滤波
    StereoReconstruct *detector = new StereoReconstruct(camera, use_wls);
    Mat frameL = imread("../data/left.png", IMREAD_COLOR);
    Mat frameR = imread("../data/right.png", IMREAD_COLOR);
    detector->task(frameL, frameR, 0);
    delete detector;
    return 0;
}


int main() {
    //测试一对左右图像
    test_pair_image_file();
    //测试demo视频文件
    test_video_file();
    //测试双目摄像头(双USB连接线的双目摄像头)
    test_camera();
    return 0;
}
- Terminal run script:
bash build.sh
#!/usr/bin/env bash
if [ ! -d "build/" ];then
  mkdir "build"
else
  echo "exist build"
fi
cd build
cmake ..
make -j4
sleep 1
./Demo
7. Error description of binocular ranging
Error and accuracy description of binocular ranging:
- Some netizens reported that the measurement accuracy is poor. Before evaluating the measurement accuracy, please strictly follow the blog post to calibrate the camera. The calibration error cannot exceed 0.1, otherwise the distance measurement error will be large
- In theory, the accuracy of binocular measurement can reach the millimeter (mm) level, but it is not unconditional. According to the above formula, it can be seen that the depth accuracy of a pixel at a certain point depends on the accuracy of the estimated parallax d at that point. Assuming that the error of the parallax d is constant, when the measurement distance is farther, the obtained depth accuracy will be worse, so it is not suitable to use a binocular camera to measure a target that is too far away.
- If you want to get a more reliable depth for distant targets, on the one hand, you need to increase the baseline distance of the camera, but the larger the baseline distance, the smaller the overlapping area of the left and right views, and the larger the content difference, thereby improving stereo matching On the other hand, you can choose a camera with a larger focal length. However, the larger the focal length, the smaller the field of view of the camera, making it difficult to estimate the distance of objects closer to the camera.
- In theory, the measurement error in the depth direction is proportional to the square of the measurement distance, while the error in the X/Y direction is proportional to the distance; and when the distance is very short, it will cause difficult matching problems due to the existence of dead angles ; imagine if you If you place an object in front of you, your left eye can only see the left surface of the object, and your right eye can only see the right surface of the object. At this time, due to registration failure, the parallax calculation fails; the longer the baseline, the the problem is getting worse
- The following figure shows the relationship between the binocular ranging error and the measurement distance. Generally, the effective measurement distance is between 0.6 meters and 6 meters.

8. Binocular 3D reconstruction project code (C/C++ version)
(1) renderings
The binocular distance measurement of the C++ version is almost the same as that of the Python version. Judging from the reconstruction effect, without using WLS filter , there are many holes in the disparity map, and there are many mismatching points; but after using WLS filter, the disparity map becomes smoother, and the overall effect is significantly improved.
| Left view | right elevation |
|---|---|
 |
 |
| Disparity map (unfiltered) | Depth map (unfiltered) |
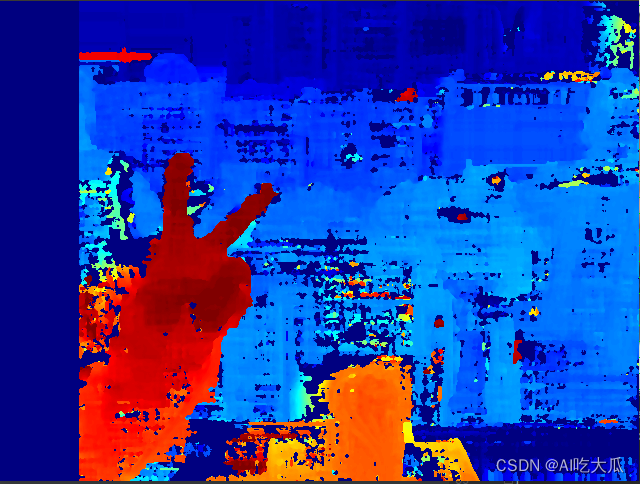 |
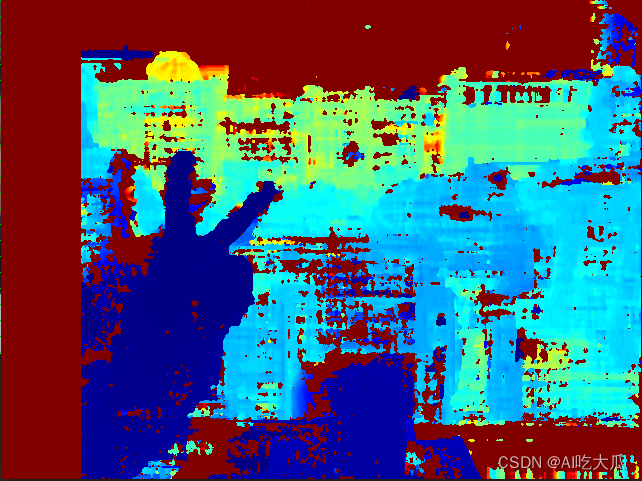 |
| Disparity map (after filtering) | Depth map (filtered) |
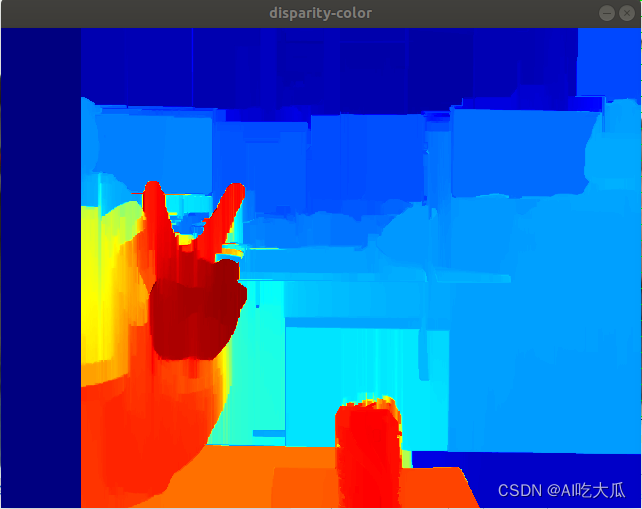 |
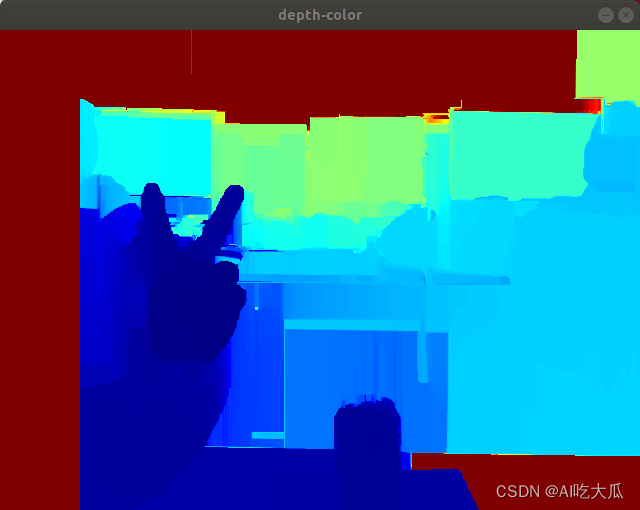 |
- After running the main program, click
depth-colorany area of the image in the window with the mouse, and the terminal will print the corresponding distance information
(2) Source code download
OpenCV C++ version binocular distance measurement project code includes: OpenCV C++ binocular camera to achieve binocular distance measurement

[Project source code download address ] OpenCV C++ binocular camera realizes binocular ranging
- Binocular camera with dual USB cables
- Support for filtering disparity maps using WLS filters
- Support binocular distance measurement (you can get the depth distance by clicking the image with the mouse)
- Provide supporting opencv-4.3.0 and opencv_contrib-4.3.0 source code ( Linux system needs to be compiled by itself; Windows10 system has provided opencv_contrib compiled files, which can be reused directly without recompilation )
- Compared with the Python version, the C++ version has better performance and faster speed, and can run on Linux development boards. It is very suitable for scenarios such as drones and smart cars ranging from obstacle avoidance.
- Support Linux system: The project source code has been verified on Ubuntu 18.04 system ( you need to compile opencv-4.3.0 and opencv_contrib-4.3.0 by yourself )
- Support Windows 10 system: The source code of the project has been verified in Windows 10 system, and it is equipped with Visual Studio 2017 project, which can be used directly
- For other system platform development, please configure the opencv and opencv_contrib development environment
9. Binocular 3D reconstruction project code (Python version)
If you need the Python version of binocular ranging, please check my other blog " Binocular 3D Reconstruction System (Binocular Targeting + Stereo Correction + Binocular Ranging + Point Cloud Display) Python "
|
Binocular Ranging Demo Video |
10. Binocular 3D reconstruction project code (Android version)
If you need the Android version of binocular distance measurement, please check my other blog " Android OpenCV realizes binocular 3D reconstruction: binocular camera realizes binocular distance measurement "


11. References
- OpenCV C++ binocular 3D reconstruction: binocular camera to achieve binocular distance measurement
- Binocular 3D reconstruction: binocular camera to achieve binocular ranging (Python)
- Binocular 3D reconstruction system (binocular positioning + stereo correction + binocular ranging + point cloud display) Python
- Ubuntu18.04 installs opencv and opencv_contrib