Learn Spring's simplified development and framework integration
Table of contents
- IoC (Inversion of Control) Inversion of Control
- DI (Dependency Injection) dependency injection
- Pure annotation development mode
-
- Example: Integrating MyBatis
-
-
-
- 【Pre-work】
- [Step 1] Import Spring to integrate Mybatis dependencies
- [Step 2] Create JdbcConfig to configure DataSource data source
- [Step 3] Create MybatisConfig to integrate mybatis
- [Step 4] Create a SpringConfig main configuration class for package scanning and loading other configuration classes
- [Step 5] Define the test class for testing
-
-
IoC (Inversion of Control) Inversion of Control
When using objects, objects generated by active new are converted to objects created byexternalObjects are provided, and the control of object creation is transferred from the program to the outside during this process. This idea is called inversion of control. In layman's terms, "Give the rights of the new object to Spring, and we can get the object from Spring and use it”
-
Spring technology realizes the idea of IoC
- Spring provides a container calledIoC container, used to act as the "external" in IoC thinking
- The IoC container is responsible for a series of tasks such as object creation and initialization, and the created or managed objects are collectively referred to in the IoC container asBean
DI (Dependency Injection) dependency injection
- The whole process of establishing the dependency relationship between beans in the container is called dependency injection.
- Goal: full decoupling
- Manage beans using the IoC container (IoC)
- Relational binding (DI) of beans with dependencies in the IoC container
- final effect
- When using an object, not only can it be obtained directly from the IoC container, but the acquired bean has already bound all dependencies
The way of dependency injection
- setter injection
- simple type
- reference type
- constructor injection
- simple type
- reference type
way to choose
- Mandatory dependency is performed using the constructor, and there is a probability that the injection will not be performed using the setter injection, resulting in a null object
- Optional dependencies use setter injection for flexibility
- The Spring framework advocates the use of constructors, and most of the third-party frameworks use the form of constructor injection for data initialization, which is relatively rigorous
- If necessary, both can be used at the same time, use constructor injection to complete the injection of mandatory dependencies, and use setter injection to complete the injection of optional dependencies
- In the actual development process, it should be analyzed according to the actual situation. If the controlled object does not provide a setter method, constructor injection must be used.
- Self-developed modules are recommended to use setter injection
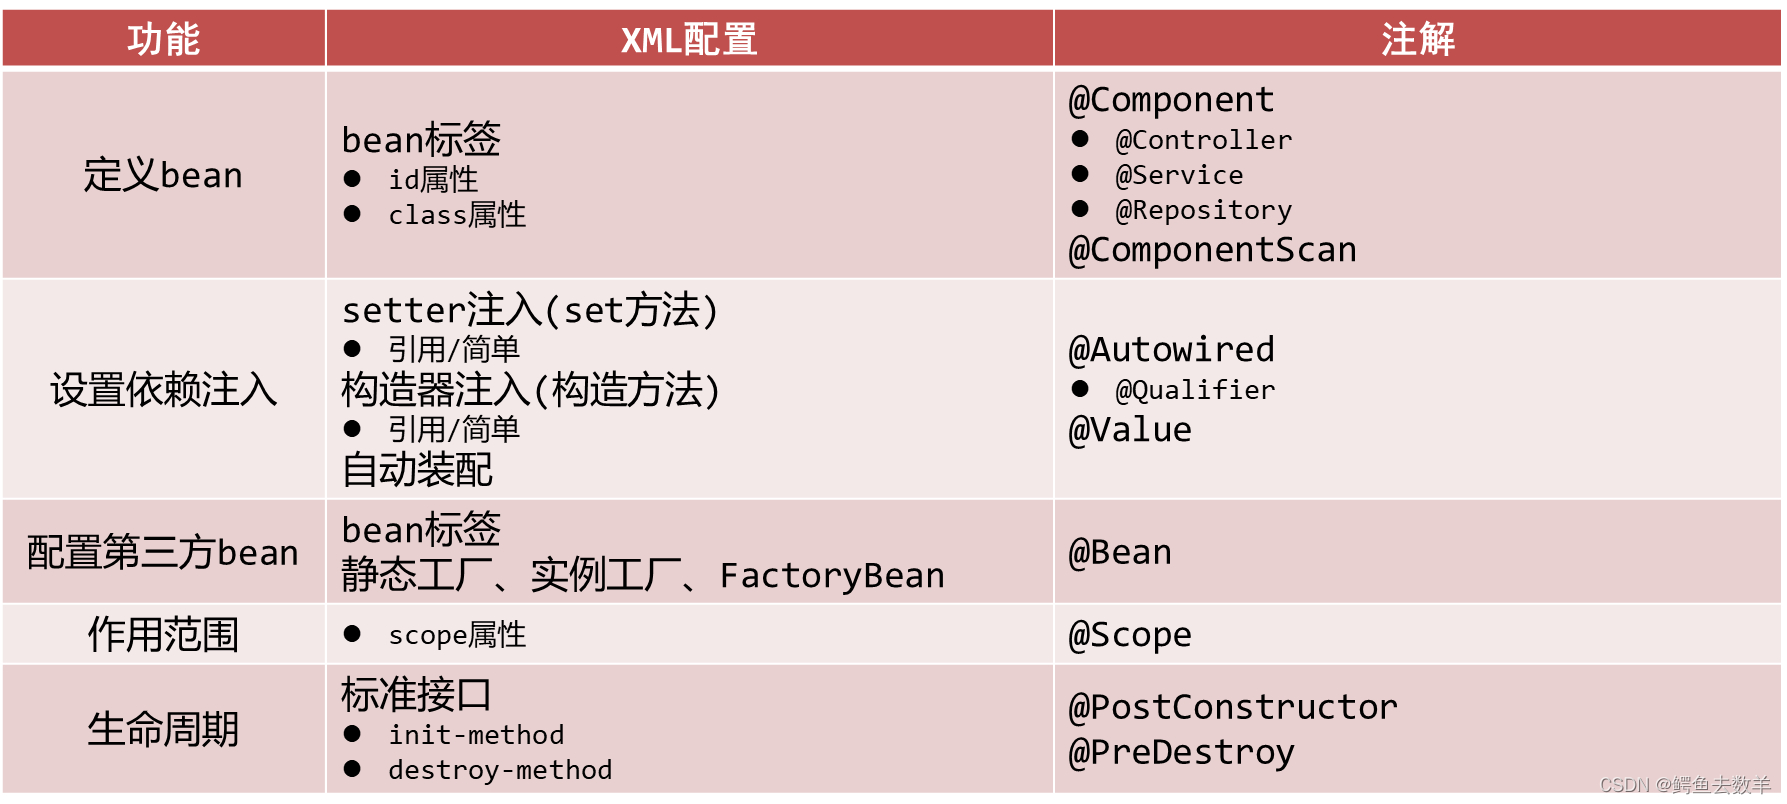
Pure annotation development mode
Spring 3.0 opens the pure annotation development mode, uses Java classes instead of configuration files, and opens the Spring rapid development track, Java classes replace Spring core configuration files
Example: Integrating MyBatis
【Pre-work】
- Add spring-context, druid, mybatis, mysql-connector-java and other basic dependencies in pom.xml.
- Prepare dao and service layer basic code
dao:
public interface AccountDao {


    @Insert("insert into tbl_account(name,money)values(#{name},#{money})")
    void save(Account account);

    @Delete("delete from tbl_account where id = #{id} ")
    void delete(Integer id);

    @Update("update tbl_account set name = #{name} , money = #{money} where id = #{id} ")
    void update(Account account);

    @Select("select * from tbl_account")
    List<Account> findAll();

    @Select("select * from tbl_account where id = #{id} ")
    Account findById(Integer id);

}
service:
AccountService:
public interface AccountService {


    void save(Account account);

    void delete(Integer id);

    void update(Account account);

    List<Account> findAll();

    Account findById(Integer id);

}
AccountServiceImpl:
//标注一个类为Spring容器的Bean
@Service("AccountService")
public class AccountServiceImpl implements AccountService {


    @Autowired//自动装配
    @Qualifier("accountDao")//开启指定名称装配bean
    private AccountDao accountDao;

    public void save(Account account) {


        accountDao.save(account);
    }

    public void update(Account account){


        accountDao.update(account);
    }

    public void delete(Integer id) {


        accountDao.delete(id);
    }

    public Account findById(Integer id) {


        return accountDao.findById(id);
    }

    public List<Account> findAll() {


        return accountDao.findAll();
    }

}
[Step 1] Import Spring to integrate Mybatis dependencies
<dependency>
    <groupId>org.springframework</groupId>
    <artifactId>spring-jdbc</artifactId>
    <version>5.2.10.RELEASE</version>
</dependency>

<dependency>
    <groupId>org.mybatis</groupId>
    <artifactId>mybatis-spring</artifactId>
    <version>1.3.0</version>
</dependency>
[Step 2] Create JdbcConfig to configure DataSource data source
//第三方bean管理
public class JdbcConfig {


    @Value("${jdbc.driver}")
    private String DriverClassName;
    @Value("${jdbc.url}")
    private String Url;
    @Value("${jdbc.username}")
    private String Username;
    @Value("${jdbc.password}")
    private String Password;

    @Bean("dataSource")
    public DataSource dataSource(){


        DruidDataSource source = new DruidDataSource();
        source.setDriverClassName(DriverClassName);
        source.setUrl(Url);
        source.setUsername(Username);
        source.setPassword(Password);
        return source;
    }
}
[Step 3] Create MybatisConfig to integrate mybatis
//Spring整合Mybatis,其实就是通过spring框架接管mybatis框架中核心对象的创建。
// Mybatis的核心对象为: SqlSessionFactory 整合就是通过Spring管理SqlSessionFactory对象的创建。
public class MybatisConfig {


//    返回SqlSessionFactory对象
    @Bean
    public SqlSessionFactoryBean sqlSessionFactory(DataSource dataSource){


        SqlSessionFactoryBean factoryBean = new SqlSessionFactoryBean();
        factoryBean.setTypeAliasesPackage("com.lic.pojo");
        //配druid
        factoryBean.setDataSource(dataSource);
        return factoryBean;
    }
//定义bean,返回MapperScannerConfigurer对象
    @Bean
    public MapperScannerConfigurer mapperScannerConfigurer(){


        MapperScannerConfigurer mapper = new MapperScannerConfigurer();
        mapper.setBasePackage("com.lic.dao");
        return mapper;
    }
}
[Step 4] Create a SpringConfig main configuration class for package scanning and loading other configuration classes
- The @Configuration annotation is used to set the current class as a configuration class
- The @ComponentScan annotation is used to set the scan path, this annotation can only be added once, please use array format for multiple data
- @PropertySource annotation loads properties file
@Configuration//设定当前类为配置类
@ComponentScan("com.lic")//设定扫描路径
@PropertySource("classpath:jdbc.properties")//加载properties文件
@Import({

    JdbcConfig.class,MybatisConfig.class})//导到ioc的组件
public class SpringConfig {


}
[Step 5] Define the test class for testing
public class app {


    public static void main(String[] args) {


        AnnotationConfigApplicationContext context = new AnnotationConfigApplicationContext(SpringConfig.class);

        AccountService bean = context.getBean(AccountService.class);
        List<Account> all = bean.findAll();
        System.out.println(all);
        System.out.println(bean.findById(2));
    }
}
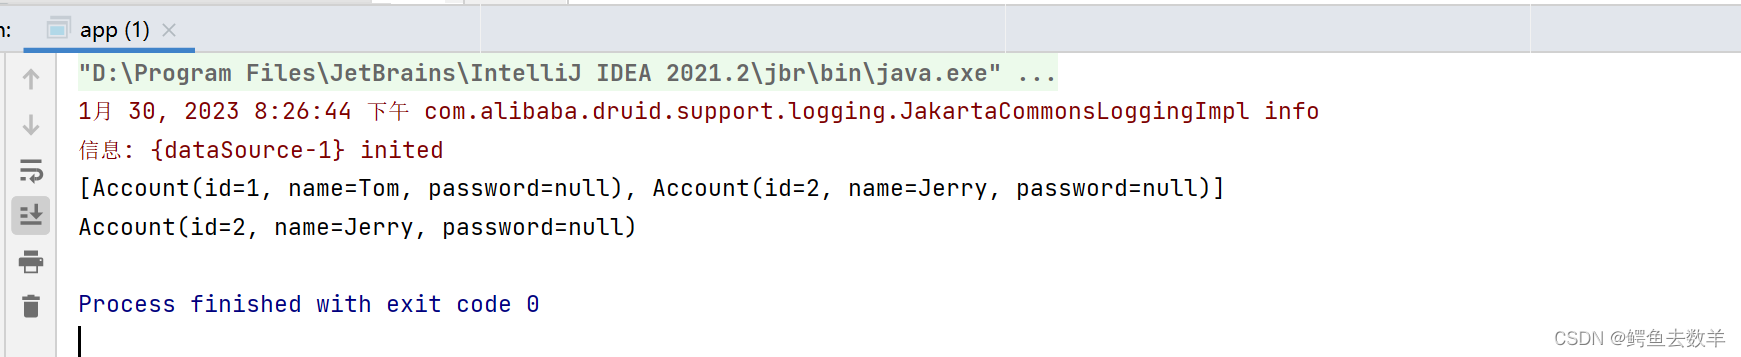
Run the screenshot: