foreword
(1) Learn Linux from Mr. Wei Dongshan, because his speech is so concise that many people can't understand it. Next, I will introduce the second Hello program of Mr. Wei Dongshan's driving experiment class.
(2) Attention, please finish the video before watching this tutorial! This article is for beginners only! For more depth, search other blogs!
(3) Because the previous tutorial has already explained in great detail, many contents will not be repeated, but only the differences will be explained. Therefore, it is recommended to read before reading this tutorial: Wei Dongshan Linux Driver Introduction Experimental Class (1) hello driver
(4) gitee warehouse ; GitHub warehouse ;
The difference between this tutorial and the previous tutorial
The application layer code in this article is exactly the same as the previous one. So all the code in this article is for the driver layer ! If you don't understand the application layer code, you can read the previous blog!
Difference 1---Data interaction between the driver layer and the application layer
Explain the difference
(1)
<1> When we read and wrote the previous program, did we find a problem. That is to say, no matter what we write to the driver, what we finally read is a strange symbol. Why is this?
<2> Because the application layer and the driver layer are completely isolated, the application layer cannot directly access various variables in the driver layer. Because this operating system is intended to be used by many developers, and some of these developers may not be skilled enough, or they want to maliciously destroy it. Then there will be a problem, if these people write some wrong data to the driver, it will easily crash the whole system. Therefore, the driver layer and the application layer are isolated, and the application layer cannot directly access the driver layer. Similarly, the driver layer cannot directly access the application layer .
<3> How are the driver layer and application layer isolated? First, the application layer sends a request to access the driver layer. At this time, this instruction will be passed to the CPU, and the CPU will send the information to the MMU (memory management unit) after reading the instruction. At this time, the MMU will find that the application layer initiates a request to access the driver layer, so the MMU will kill the request.
<4> The application layer and the driver layer are isolated. So what if I force the driver layer to interact with the application layer? So you can use two functions: copy_from_user (the driver layer gets the application layer data); copy_to_user (the driver layer sends data to the application layer)
(3) The application layer and the driver layer have interaction functions. So how does the driver layer interact with the hardware? When we write MCU programs, we can directly use registers to write programs, or we can use official library functions. In Linux, we also have two methods. The first is to use registers for direct control, and the second is to use subsystem functions. Each register has an address, we call this a physical address. But our driver cannot directly use the physical address, it must use the ioremap function to return a virtual address and store it with a pointer. After that, we can manipulate the register through this pointer.

code practice
(1) Here we have two functions that have been changed, which are divided into two parts.
(2)hello_read():
<1>unsigned long len = size > 100 ? 100 : size;
This part is used to judge whether the characters sent by the incoming driver layer to the application layer are greater than 100 characters. If it is greater than 100 characters, only 100 characters will be sent. If the driver layer sends less than 100 characters to the application layer, then send the actual number of characters.
<2>copy_to_user(buf, hello_buf, len);
1. Our copy_to_user() function, which we introduced above, is a function used by the driver layer to send data to the application layer. The first parameter is the data that is finally sent to the application layer, because the second parameter of our hello_read() function is buf, so the first parameter of copy_to_user() is passed into buf.
2. The second parameter of copy_to_user() is the data that the driver layer needs to send to the application layer. This requires us to create an unsigned character array hello_buf[] in the driver layer. The hello_buf[] array is responsible for storing the interaction information between the driver layer and the application layer.
3. The third parameter of copy_to_user() is the number of characters to be transmitted. If the transmitted characters are greater than 100, then only 100 characters are transmitted. If the number of characters to be transmitted is less than 100, then it is transmitted according to the number of characters to be transmitted.
<3> return len; finally returns the number of characters transmitted. The difference from the original return size; is that return size; does not add a limit of up to 100 characters to be transmitted .
(3)hello_write():
<1> Same as hello_read().
<2>copy_from_user(hello_buf, buf, len);
1. The copy_from_user() function is similar to the copy_to_user() function. It's just that the copy_from_user() function is used for the application layer to send signals to the driver layer.
2. The first parameter of copy_from_user() is the destination address, so hello_buf needs to be passed in. The second parameter is the starting address, so buf needs to be passed in. The third parameter is the same as copy_to_user().
<3> The change of the final return value is the same as that of hello_read().
(4) Finally, it is emphasized that this code will have two warnings . ignoring return value of 'copy_from_user', declared with attribute warn_unused_result and ignoring return value of 'copy_to_user', declared with attribute warn_unused_result . These two warnings translate to ignore the return value of ' copy_from_user ' declared with the warn_unused_result attribute and ignore the return value of ' copy_to_user ' declared with the warn_unused_result attribute .
What do these two warnings mean? What is the effect? Very simple copy_from_user and copy_to_user have return values. However, we did not receive the return values of these two functions, so there will be warnings, so ignore them.
static unsigned char hello_buf[100]; //存放驱动层和应用层交互的信息

/*
 *传入参数 :
	 *filp :要读的文件
	 *buf :读的数据放在哪里
	 *size :读多大数据
	 *offset :偏移值(一般不用)
 *返回参数 :读到的数据长度
*/
static ssize_t hello_read (struct file *filp, char __user *buf, size_t size, loff_t *offset)
{
	//判断size是否大于100,如果大于100,len=100,否则len=size
    unsigned long len = size > 100 ? 100 : size;
	/*__FILE__ :表示文件
	 *__FUNCTION__ :当前函数名
	 *__LINE__ :在文件的哪一行
	*/
    printk("%s %s %d\n", __FILE__, __FUNCTION__, __LINE__);
	/* 作用 : 驱动层发数据给应用层
	 * buf  : 应用层数据
	 * hello_buf : 驱动层数据
	 * len  :数据长度
	*/
    copy_to_user(buf, hello_buf, len);

    return len;
}
/*
 *传入参数 :
	 *filp :要写的文件
	 *buf :写入的数据来自于buf
	 *size :写多大数据
	 *offset :偏移值(一般不用)
 *返回参数 :写的数据长度
*/
static ssize_t hello_write(struct file *filp, const char __user *buf, size_t size, loff_t *offset)
{
	//判断size是否大于100,如果大于100,len=100,否则len=size
    unsigned long len = size > 100 ? 100 : size;
	/*__FILE__ :表示文件
	 *__FUNCTION__ :当前函数名
	 *__LINE__ :在文件的哪一行
	*/
    printk("%s %s %d\n", __FILE__, __FUNCTION__, __LINE__);
	/* 作用 : 驱动层得到应用层数据
	 * buf  : 应用层数据
	 * hello_buf : 驱动层数据
	 * len  :数据长度
	*/
    copy_from_user(hello_buf, buf, len);

    return len;
}
Result presentation
(1) The same process as the previous blog:
<1> Compile with make under Ubuntu
<2> Open the development board, input mount -t nfs -o nolock,vers=3 192.168.5.11:/home/book/nfs_rootfs /mnt shared file
<3> Kernel printing can be selected to open or not:
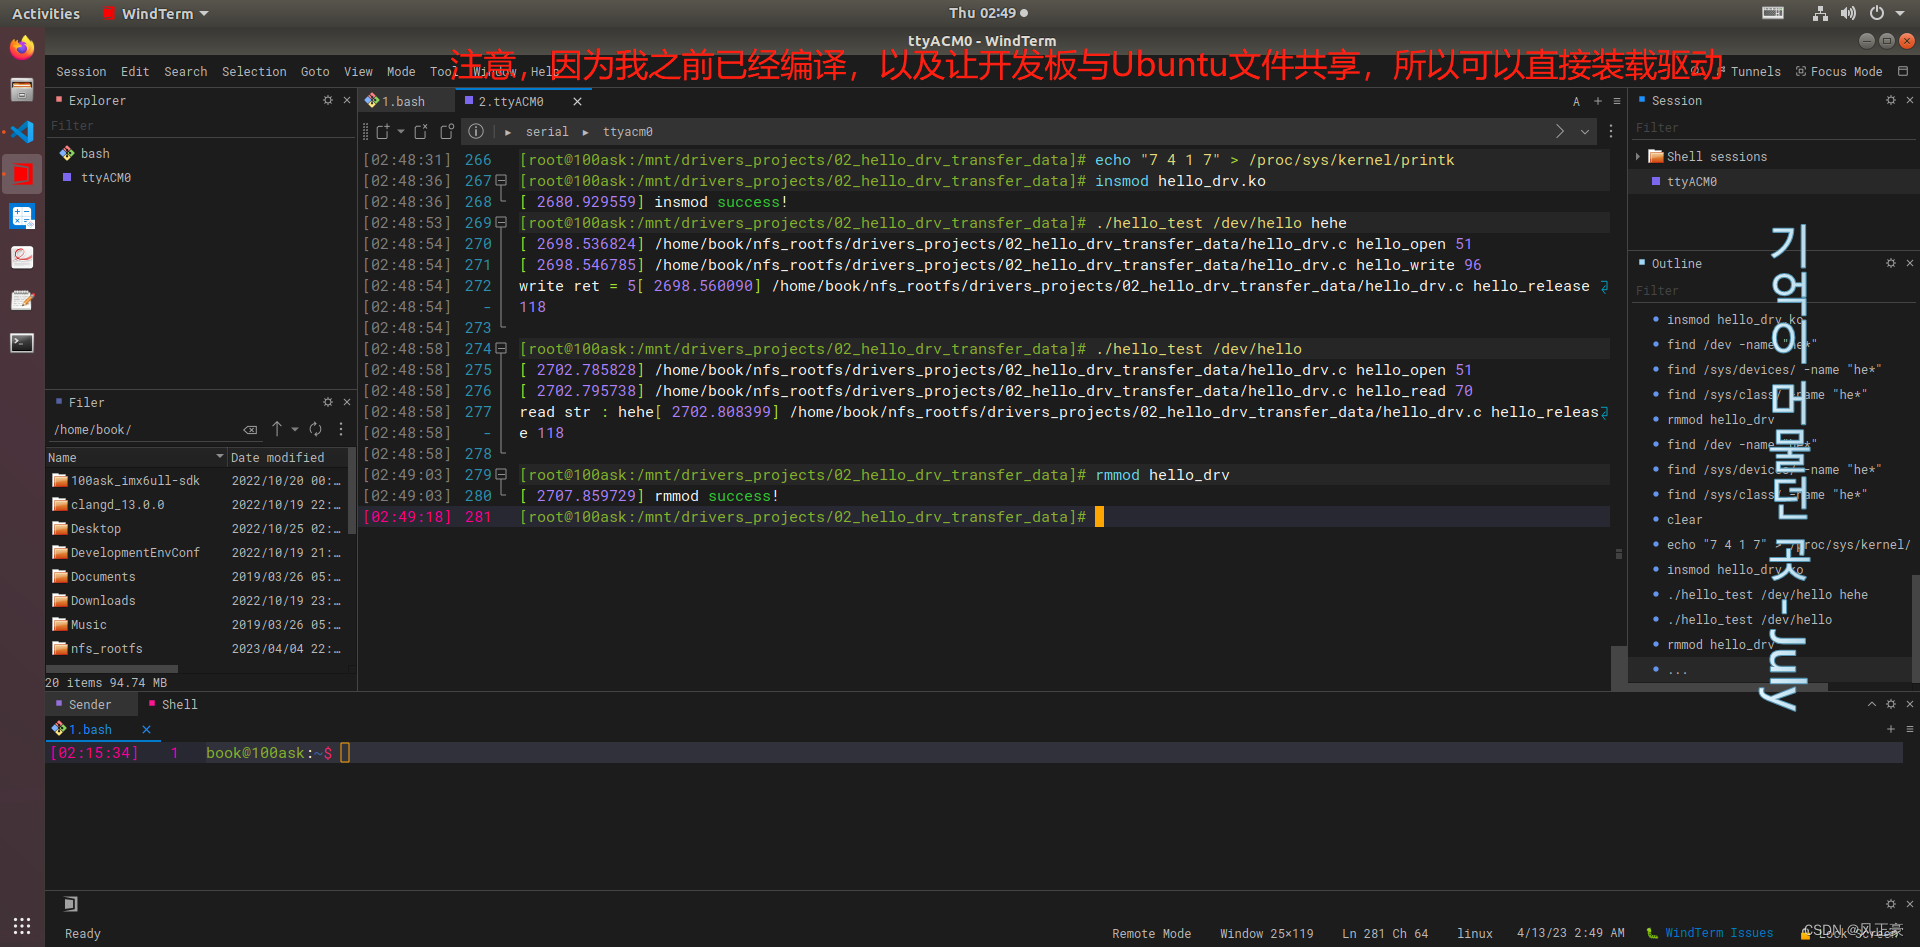
Disable kernel printing: echo "0 4 0 7" > /proc/sys/kernel/printk
Enable kernel printing: echo "7 4 1 7" > /proc/sys/kernel/printk<4> insmod hello_drv.ko loading driver
<5> cat /proc/devices: View the currently used device number (note that it is required to create a device node after the device number here)
<6> mknod /dev/xyz c 240 0 (xyz can be any name, the device number is related to the above, 0 means the secondary device number, fill in whatever you want)
<7> Call the device node at the application layer, such as ./hello_test /dev/xyz 123
<8> Uninstall the driver: rmmod driver
<9> Delete the device node: rm /dev/xyz
(2) Close the kernel and print the demonstration results

(3) Open the kernel and print the demo results

Difference 2---Automatically create device nodes
explain
(1) Did we find a problem that the driver loading process is too long. Can we automatically create a device node and then delete it ourselves? The answer is yes, otherwise I wouldn't mention it.
(2) How to make the system automatically create device nodes? At this time we will talk about two functions. class_create() and device_create().
<1> The class_create() function is used to dynamically create the logic class of the device. The execution effect of this function is to
/sys/classcreate a new folder under the directory. The name of this folder is the second input parameter of this function, but this file Folder is empty . At the same time,/sys/devicesa new empty folder will be created under the directory.<2> The device_create() function is used to create a device node , and the first parameter is the return value of class_create(). The class_create() function does not create an empty folder in /sys/class, the device_create() function creates a link file in this empty folder. At the same time,
/sys/devices/virtualcreate a new logical device directory under the directory. This link file is the device node created by entering the mknod command.(3) After the device node is automatically created, we also need to destroy the device node. Then you need to use two functions again at this time. device_destroy() and class_destroy() .
<1> Because when we create a device node, we first register the driver, then create the logic class, and finally create the device node. So it needs to be reversed when destroying. First destroy the device node, then destroy the logic class, and finally uninstall the driver.
<2> The effect of class_destroy() is to delete
/sys/classthe folder corresponding to the logical class created by the function __class_create() or macro class_create() in the directory. device_destroy() is used to destroy device nodes.
the code
//在命令行输入insmod命令,就是注册驱动程序。之后就会进入这个入口函数
//3,入口函数
static int hello_init(void)
{
	/*将hello_drv这个驱动放在内核的第n项,中间传入的名字不重要,第三个是要告诉内核的驱动
	 *因为我们不知道第n项是否已经存放了其他驱动,就可以放在第0项,然后让系统自动往后遍历存放到空的地方
	 *major为最终存放的第n项,等下卸载程序需要使用。如果不卸载程序,可以不管这个
	*/
    major = register_chrdev(0, "100ask_hello", &hello_drv);
	//如果成功注册驱动,打印
	printk("insmod success!\n");

	/******这里相当于命令行输入 mknod  /dev/hello c 240 0 创建设备节点*****/

	//创建类,为THIS_MODULE模块创建一个类,这个类叫做hello_class
	hello_class = class_create(THIS_MODULE, "hello_class");
	if (IS_ERR(hello_class))  //如果返回错误
	{
		//打印类创建失败
		printk("failed to allocate class\n");
		//返回错误
		return PTR_ERR(hello_class);
	}
	/*在hello_class类下面创建设备
	 *无父设备的指针
	 *MKDEV传入主设备号major和此设备号0
	 *没有私有数据
	 *输入参数是逻辑设备的设备名,即在目录/dev目录下创建的设备名
	*/
    device_create(hello_class, NULL, MKDEV(major, 0), NULL, "hello");  /* /dev/hello */

   return 0;
}

//在命令行输入rmmod命令,就是注册驱动程序。之后就会进入这个出口函数
//4,出口函数
static void hello_exit(void)
{
	//销毁hello_class类下面的设备节点
    device_destroy(hello_class, MKDEV(major, 0));
	//销毁hello_class类
    class_destroy(hello_class);
	//卸载驱动程序
	//第一个参数是主设备号,第二个是名字
    unregister_chrdev(major, "100ask_hello");
	//如果成功卸载驱动,打印
	printk("rmmod success!\n");
}
Effect demonstration
(1) Demonstrate automatic generation of device nodes

(2) Now use the steps required to drive:
<1> Compile with make under Ubuntu
<2> Open the development board, input mount -t nfs -o nolock,vers=3 192.168.5.11:/home/book/nfs_rootfs /mnt shared file
<3> Kernel printing can be selected to open or not:
Disable kernel printing: echo "0 4 0 7" > /proc/sys/kernel/printk
Enable kernel printing: echo "7 4 1 7" > /proc/sys/kernel/printk<4> insmod hello_drv.ko loading driver
<5> Call the device node at the application layer, such as ./hello_test /dev/xyz 123
<6> Uninstall the driver: rmmod driver