gitee: NiterForum trowel
Start
Properties file encoding problem : (46 messages) Intellij IDEA 2018 properties file Unicode to Chinese settings_properties file\u6d4f\u89c8\u5668\u8868\u5355\u5185\u_Program New Horizons Blog-CSDN Blog
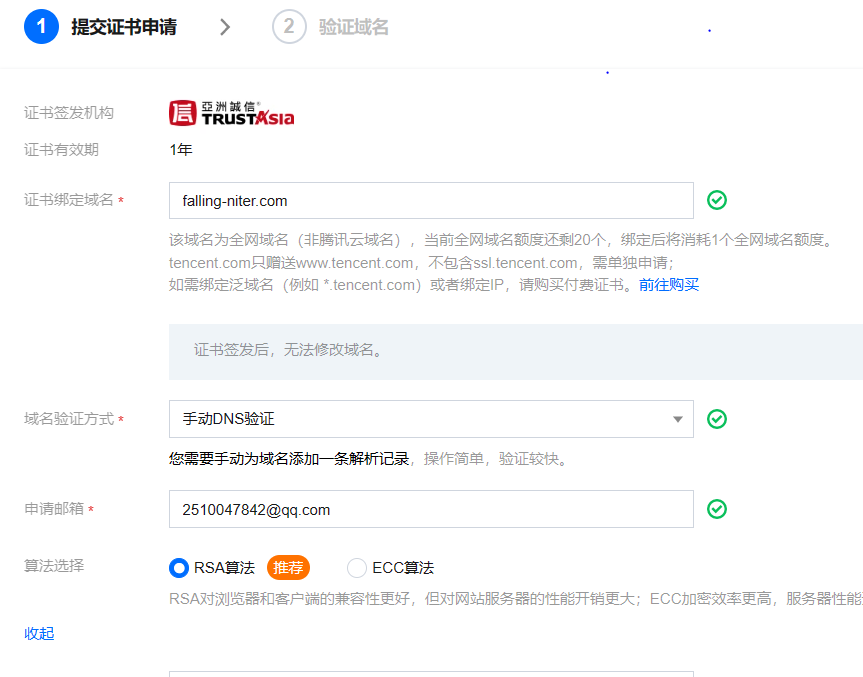
Apply for and download an SSL certificate : Find an SSL certificate service on Alibaba Cloud or Tencent Cloud, and just apply (need to apply for a domain name in advance)
Without HTTPS :
Modify application.properties
#http端口号 80
# server.custom.httpPort=80
#https加密端口号 443
server.port=80
#SSL证书路径 一定要加上classpath:
# server.ssl.key-store=classpath:niter_cn.jks
#SSL证书密码
# server.ssl.key-store-password=***
#证书类型
# server.ssl.key-store-type=JKS
Delete cn/niter/forum/config/HttpsConfig.javathe file or comment out the code in it
Remove the following meta tags resources/templates/common/header.htmlin
<meta http-equiv="Content-Security-Policy" content="upgrade-insecure-requests">
delete cn/niter/forum/util/CookieUtils.javain
cookie.setHttpOnly(true);//通过js脚本是无法获取到cookie的信息的。防止XSS攻击。
Custom information :
Site information, meta tags, contact information, search engine verification tags, user group level names and upper limit points, point names and weights, user behavior point rewards, news consultation interfaces (skippable), gesture verification codes in custom properties files Services (VAPTCHA), SMS-related products, Tencent corporate mailbox (personal mailbox is available), github login
Site Information:
#这项非常重要,请务必准确填写域名、ip或者localhost,不要加http(s)://,以及后面的/。
site.main.domain=localhost
For the verification code service, go to https://www.vaptcha.com/ to create a verification unit. If the domain name is local, fill in localhost, copy VID and KEY to properties
#手势验证码vaptcha的vid与key,请去官网获取https://www.vaptcha.com/ 。也可以使用自己选用验证码服务,但需要修改源码!
vaptcha.vid=***
vaptcha.key=***
#腾讯企业邮箱相关配置信息,请去官网获取https://exmail.qq.com/ 。也可以使用自己的邮箱账号。修改成对应信息即可!
exmail.account=***
exmail.password=***
exmail.smtp.host=smtp.exmail.qq.com
github login
![[External link image transfer failed, the source site may have an anti-leeching mechanism, it is recommended to save the image and upload it directly (img-amFftk78-1681345753492) (C:\Users\Administrator\AppData\Roaming\Typora\typora-user-images\ image-20230403151342356.png)]](https://img-blog.csdnimg.cn/ae86e08e3921419483bad1a82f8fdbe9.png)
#github登录 API配置信息。请去这里创建应用即可,秒审核,轻松配置 https://github.com/settings/applications/new
github.client.id=***
github.client.secret=***
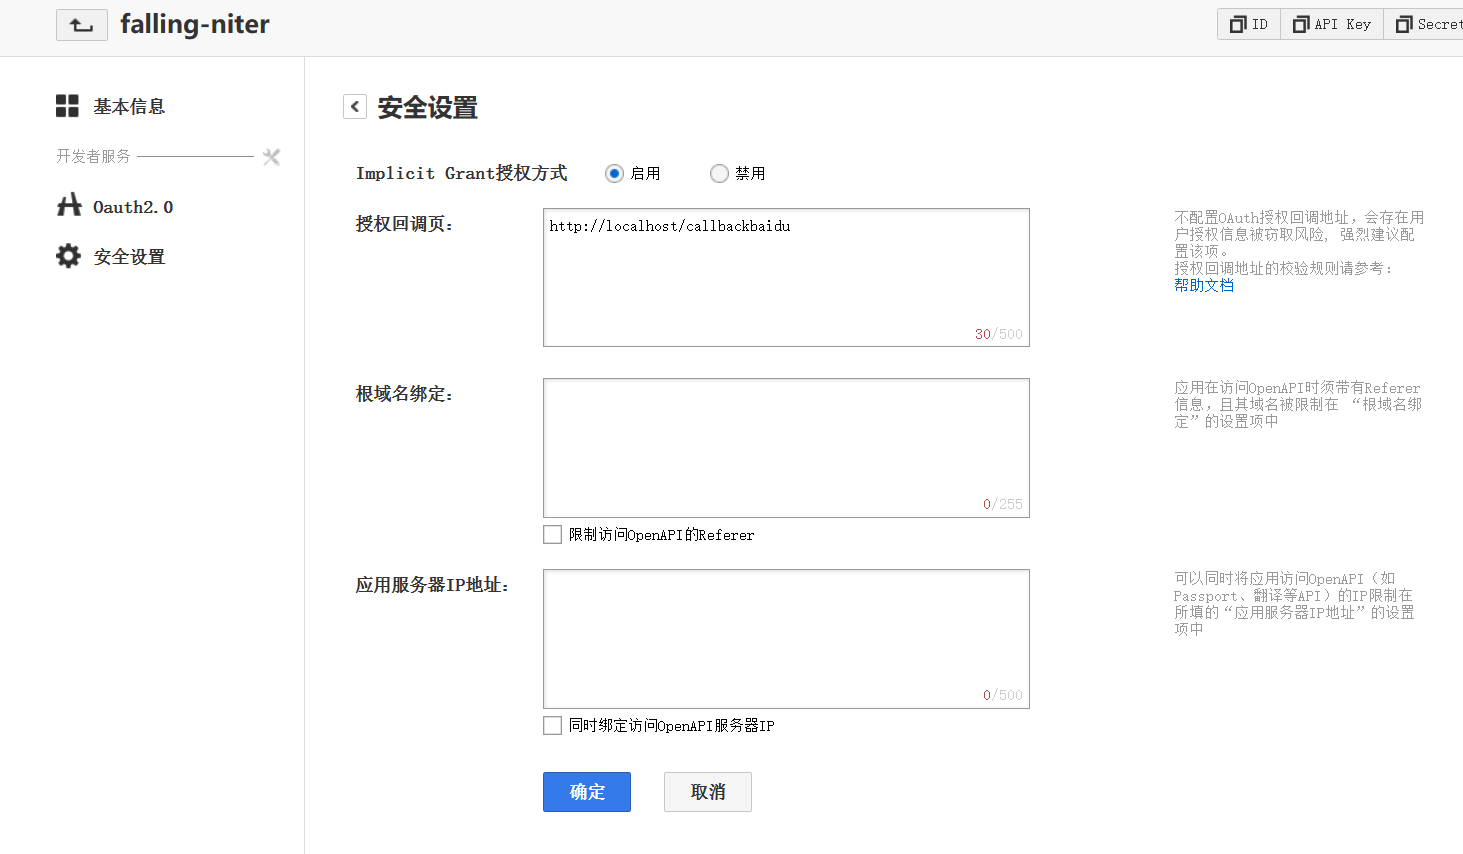
github.redirect.uri=http(s)://localhost/callback
Baidu login
#百度登录 API配置信息。请去这里创建应用即可,秒审核,轻松配置 http://developer.baidu.com/console#app/create
baidu.client.id=***
baidu.client.secret=***
baidu.redirect.uri=http(s)://localhost/callbackbaidu
Weibo login
#微博登录 API配置信息。请去这里创建应用即可,审核需要域名,无需备案  https://open.weibo.com/apps/new?sort=web
weibo.client.id=***
weibo.client.secret=***
weibo.redirect.uri=http://localhost/callbackweibo
QQ login
#QQ登录 API配置信息。请去这里创建应用即可,审核需要域名,如申请国际域名接入,无需备案  https://connect.qq.com/manage.html#/appcreate/web
qq.client.id=***
qq.client.secret=***
qq.redirect.uri=http(s)://yourdomain/callbackqq
Modify the database configuration :
#数据库配置,填写你自己的
spring.datasource.url=jdbc:mysql://localhost:3306/***
spring.datasource.username=***
spring.datasource.password=***

#数据库配置2,按需修改。如不熟悉,不建议修改
spring.datasource.hikari.connection-init-sql=set names utf8mb4;
spring.datasource.driver-class-name=com.mysql.jdbc.Driver
spring.datasource.hikari.minimum-idle=3
spring.datasource.hikari.maximum-pool-size=10
spring.datasource.hikari.max-lifetime =30000
mybatis.configuration.map-underscore-to-camel-case=true
mybatis.type-aliases-package=cn.niter.forum.mapper
mybatis.mapper-locations=classpath:mapper/*.xml
/resource/generatorConfig.xmlModify in :
		<plugin type="org.mybatis.generator.plugins.RowBoundsPlugin"></plugin>
        <jdbcConnection driverClass="com.mysql.jdbc.Driver"
                        connectionURL="jdbc:mysql://localhost:3306/niter"
                        userId="***"
                        password="****">
        </jdbcConnection>
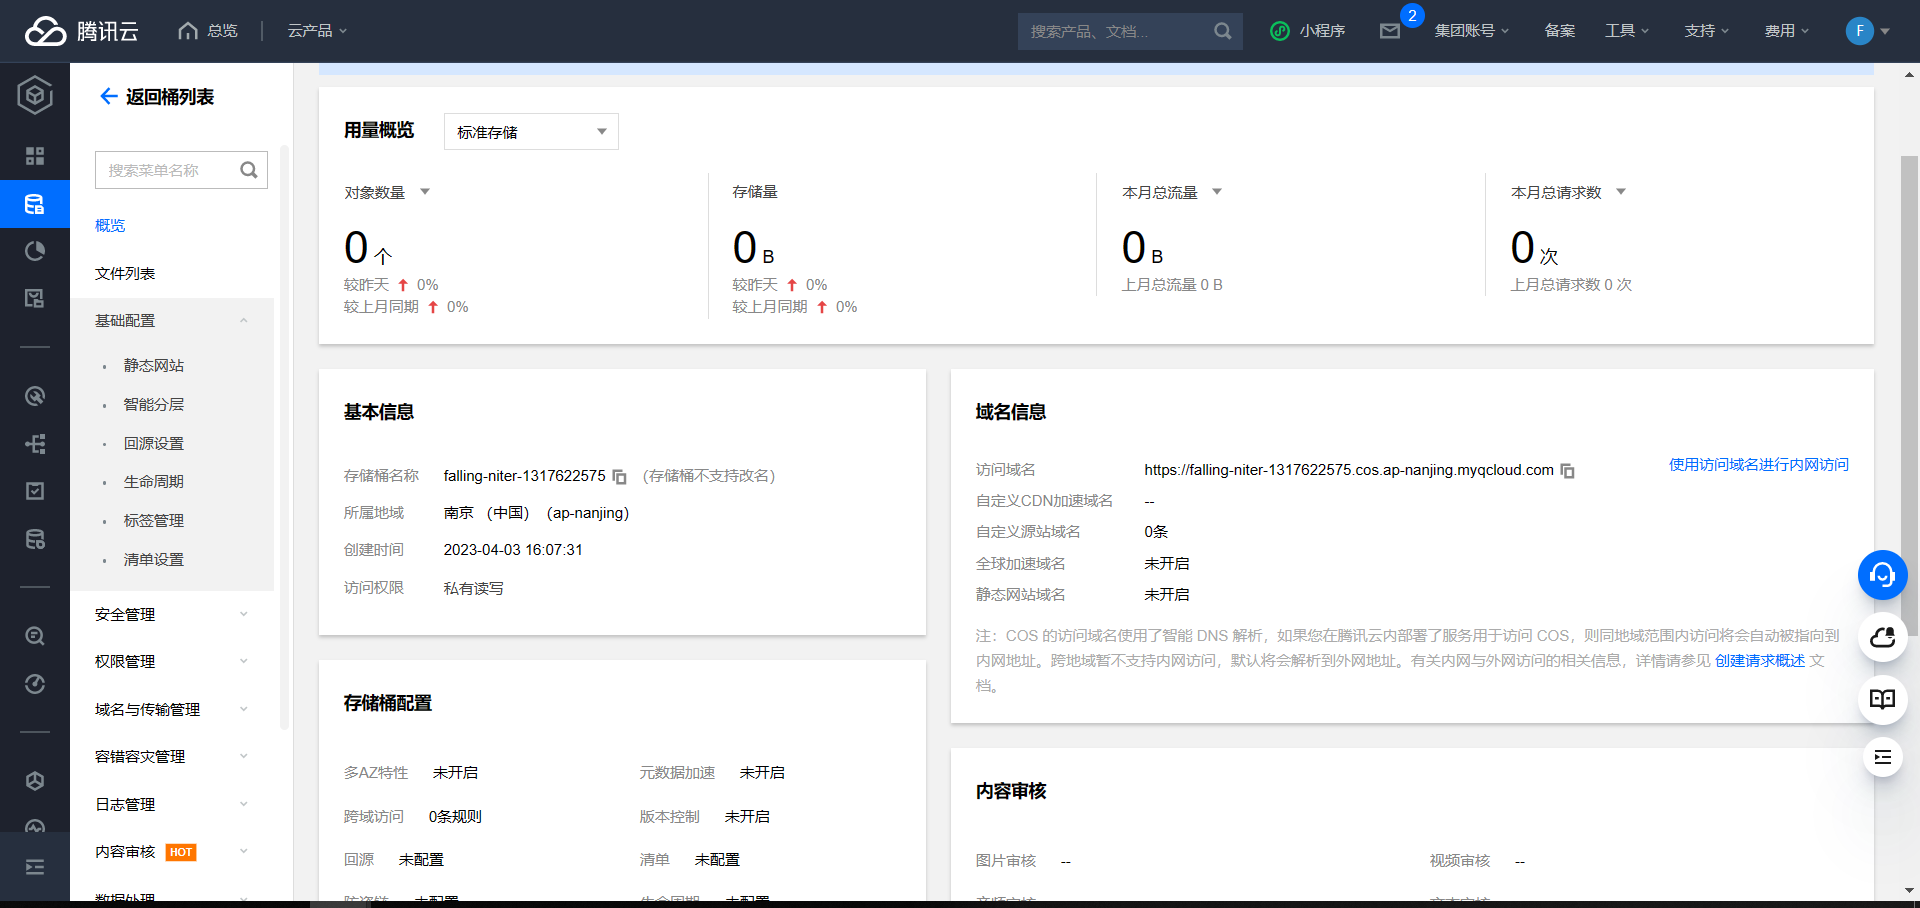
Configure object storage:
#腾讯云账户设置
qcloud.secret-id=***
qcloud.secret-key=***
#是否开启关键字自动生成,enable默认为0关闭;改为1开启
qcloud.keywords.enable=0
#是否开启数据万象功能,enable默认为0关闭;改为1开启。该功能用于上传图片的审核、压缩(仅限jpg)、水印生成,也可用于头像的剪切
qcloud.ci.enable=0
#数据万象的访问域名,最后斜杠不能省
qcloud.ci.objecturl=https://qcdn2.niter.cn/
#腾讯云对象存储配置,修改成你自己的。也可以自选对象存储服务,但需要修改源码!
qcloud.cos.bucket-name=niter-1251590924
qcloud.cos.region=ap-nanjing
#这是你对象存储的访问域名,最后斜杠不能省。
qcloud.cos.objecturl=https://qcdn.niter.cn/
qcloud.sms.appId=1400000000
qcloud.sms.sign=尼特IT
qcloud.sms.tempId=200000
Other configurations:
#是否开启tinify png压缩功能,注意压缩需要时间等待,可配合压缩阈值根据需要开启关闭,默认0关闭,1开启
tinify.enable=0
#请于此处https://tinify.cn/developers 注册开发者账号,即可每月免费压缩500张,填写获取到的key
tinify.key=sadfdg
#压缩阈值,超过这个长度才压缩,否则不压缩,默认1M
tinify.minContentLength=1024000

#百度云内容审核 https://ai.baidu.com/tech/textcensoring
#是否开启内容审核自动生成,enable默认为0关闭;改为1开启
baiducloud.censor.enable=0
baiducloud.censor.appid=12345678
baiducloud.censor.apikey=***
baiducloud.censor.secretkey=***

#其它配置,按需修改,如不熟悉。不建议修改
logging.file=logs/community.log
logging.level.root=info
logging.file.max-history=15
logging.file.max-size=100MB
server.servlet.session.timeout=15552000
spring.mvc.favicon.enabled=false
spring.servlet.multipart.max-file-size=5MB
spring.servlet.multipart.max-request-size=10MB
spring:
thymeleaf:
cache: false
mode: LEGACYHTML5

#resource
# 启用缓存
spring.resources.chain.cache=true
# 资源缓存时间,单位秒-缓存7天
spring.resources.cache.period=604800
Modify the error :
cn.niter.forum.provider.QCloudProviderIn :
// import sun.misc.BASE64Encoder;
import org.apache.commons.codec.binary.Base64;

// String encodeBase64 = new BASE64Encoder().encode(data);
String encodeBase64 = Base64.encodeBase64String(data);
In the project, design to 64-bit encoding. Sometimes the development will use the BASE64 tool that comes with the JDK . But the sun company is not recommended to do so. Especially when the JDK version is updated, the project even has saved information. Can refer to import org.apache.commons.codec.binary.Base64; for replacement
Note that mysql uses version 5
The js of the page is written as a watermark service that requests data Vientiane. If it is not enabled, the wrong request path will be sent
https://.../upload/user/2/img/20230403174530_gh.jpeg # 没开启,正确
https://.../upload/user/2/img/20230403174530_gh.jpeg/water_mark # 没开启,错误
Modification /resource/templates/t/index.html:
// str = str + "<img data-id=" + item.id + "  layer-src=\"" + item.imageUrls[j] + "/watermark_text\" src=\"" + item.imageUrls[j] + "/t_small\">";

str = str + "<img data-id=" + item.id + "  layer-src=\"" + item.imageUrls[j] + "\" src=\"" + item.imageUrls[j] + "\">";
Log in
visit homepage
First enter the IndexController.forum method
Check login status, handle top questions and question lists, popular tags, and registered users use cache (List)
Click Login-Input Information-Human-Machine Verification, and enter the ValidateController#post method ('/validate', post) after passing. post method, submit access token, scene, ip
Here ExpiringMapa to limit the login ip (verification interval):
ExpiringMap<String,String> interval = ExpiringMap.builder() // 存ip, token
    .maxSize(20)//设置最大容量,增大攻击难度,值越大存储的可疑ip越多,过大会占用额外资源
    .expiration(30, TimeUnit.SECONDS)//过期时间30秒
    .expirationPolicy(ExpirationPolicy.CREATED)//每次访问重置过期时间
    .variableExpiration()
    .build();

ExpiringMap<String,Integer> ipScores = ExpiringMap.builder() // 存ip, scene
    .maxSize(100)//设置最大容量,增大攻击难度,值越大存储的可疑ip越多,过大会占用额外资源
    .expiration(1, TimeUnit.DAYS)//过期时间1天
    .expirationPolicy(ExpirationPolicy.CREATED)//每次更新重置过期时间
    .variableExpiration()
    .build();
ExpiringMap function:
1. The Entry in the Map can be set to expire automatically after a period of time.
2. You can set the maximum capacity value of the Map. When the Maximum size is reached, inserting a value again will cause the first value in the Map to expire.
3. You can add a listening event, and schedule a listening function when the Entry expires.
4. Lazy loading can be set to create objects when the get() method is called.
Then use VaptchaProvider.getValidateResult(token,scene,ip)to perform the second man-machine verification
Selected UserService.registerOrLoginWithMailUse Ctrl + Alt + H to view the method call chain, find the SsoApi.registerOrLoginWithMail call, and find the mapping method login for the '/login' request in this class
Here's a gist: use of selectByExample
(48 messages) The use of selectByExample in general Mapper_ccity86155's blog-CSDN blog
/*
Example 查询范例
Criteria 查询标准,Example的静态内部类
*/
Example example=new Example(要查询的表对应的实体类.class);
Example.Criteria criteria=example.createCriteria();//创建查询标准
criteria.andEqualTo("字段","值");//调用方法,编写自己想要查询的条件
List list=userMapper.selectByExample(example);
List list=userMapper.selectByExampleAndRowBounds(example,new RowBounds(0,2));// 指定获取几条特定的查询语句,类似于limit。可以在分页的时候使用
And JWTs :
resultDTO.setData(tokenUtils.getToken(getUserDTO(users.get(0))));
                -----------------^
                |
public String getToken(UserDTO user) {


        String token = "";
        token = JWT.create()
                .withIssuer("NiterUser")
                //.withAudience(""+user.getId())// 将 user id 保存到 token 里面
                .withClaim("name", user.getName())
                .withClaim("id",user.getId())
                //.withClaim("userId",""+user.getId())
                .withClaim("avatarUrl",user.getAvatarUrl())
                .withClaim("groupId",user.getGroupId())
                .withClaim("vipRank",user.getVipRank())
                .withExpiresAt(new Date(System.currentTimeMillis() + 3600000 * 24 * 3))//三天
                .sign(Algorithm.HMAC256(SECRET));// 以 password 作为 token 的签名/密钥
        return token;
}
In the interceptor (AOP programming, intercept "/**"), there is the following code for verifying token:
HandlerMethod handlerMethod=(HandlerMethod)handler;
Method method=handlerMethod.getMethod();
String token=null;
ResultDTO resultDTO=null;
Cookie[] cookies = request.getCookies();
boolean hashToken = false;
if(cookies!=null&&cookies.length!=0){


    for (Cookie cookie : cookies) {


        if(cookie.getName().equals("token")){


            token=cookie.getValue(); // 获取cookie里的tocken
            if(token!=null) {


                hashToken=true; // 标记tocken有值
                resultDTO = tokenUtils.verifyToken(token); // 验证tocken
                if(resultDTO.getCode()==200){

     // 成功
                    UserDTO userDTO = (UserDTO) resultDTO.getData();
                    request.setAttribute("loginUser",userDTO);
                    loginUserCache.putLoginUser(userDTO.getId(),
                                                System.currentTimeMillis());//写入loginCache
                }
            }
            break;
        }
    }
}

if (method.isAnnotationPresent(UserLoginToken.class)) {

     //如果请求的映射方法有自定义注解
    UserLoginToken userLoginToken = method.getAnnotation(UserLoginToken.class);
    if (userLoginToken.required()) {

     // 注解的required属性为true(需要认证)
        // 执行认证
        if ((!hashToken)||resultDTO.getCode()!=200) {


            throw new CustomizeException(CustomizeErrorCode.NO_LOGIN);
        }
    }
}
// 自定义注解
@Target({

    ElementType.METHOD, ElementType.TYPE})
@Retention(RetentionPolicy.RUNTIME)
public @interface UserLoginToken {


    boolean required() default true;
}
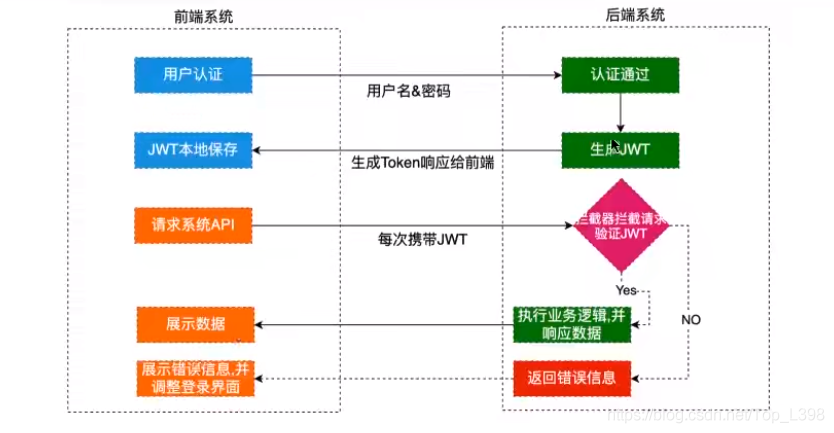
For details, see: JWT Detailed Tutorial and Use_jwt Tutorial_A blog with an ideal moon bird
Then go to the homepage and process the homepage post display and user message prompt (""/api/notification/mine" request)