1. Purpose of the experiment
- Master the definition and loading method of animation;
- Master the jump between activities;
- Complete the development of mobile e-commerce guide pages and advertising pages.
2. Experimental environment
windows system, android studio
3. Experimental steps
(1) Basic introduction:
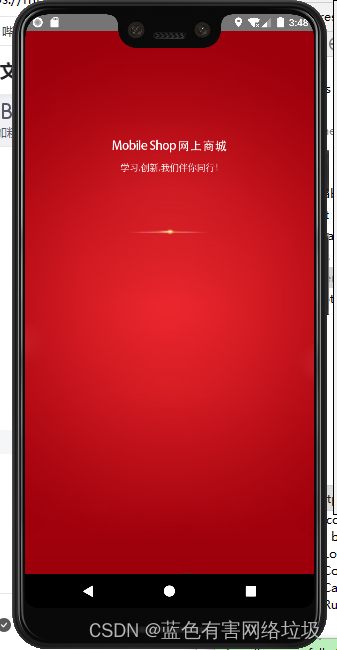
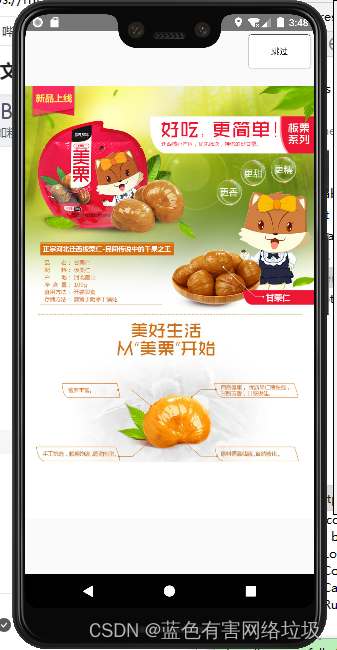
Observe a rendering of what we are going to do, we will add the following two interfaces, namely the guide page and the advertisement page.


To realize these two pages, we will go through the following steps on the basis of project two:
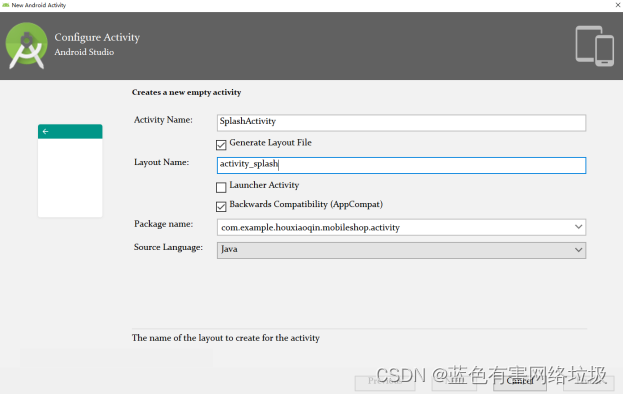
- Create a new Activity, name it "SplashActivity", and the corresponding layout file name is "activity_splash.xml";
- Open the "activity_splash.xml" file, edit and realize the interface design of the guide page;
- Open the "SplashActivity" file to complete the initialization of the control, including the setting of the control ImageView animation, the setting of the animation listener, etc.;
- Create a new Activity, name it "Activity", and the corresponding layout file name is "activity_ad.xml";
- Open the "SplashActivity" file, and add code in the method OnAnimationEnd() of the animation listener to realize the jump from the guide page to the advertisement page;
- Open the "activity_ad.xml" file, edit and realize the interface design of the advertisement page;
- Create an android development tool class - Constants (store global variables), and define the variable AD_TIME_SECOUND;
- Open the "AdActivity" file to complete the initialization of the control, including the setting of the click listener of the control Button, the implementation of the timer method, etc.;
- Open "AndroidManifest.xml" and modify the entry point of the program to SplashActivity,
- exit the program.
- debugging.
Next, we complete the implementation of this function step by step.
(2) Detailed steps
1. Right click on the Activity folder->New->Activity->Empty Activity to open the "New Android Activity" window


2. Open the "activity_splash.xml" file, edit and realize the interface design of the guide page
Add an image resource file:
Resource download: AndroidStudio realizes e-commerce guide page and advertisement page-Android Documentation Resources-CSDN Download

Open the "activity_splash.xml" file to complete the layout design of the guide page interface
<RelativeLayout xmlns:android="http://schemas.android.com/apk/res/android"
xmlns:tools="http://schemas.android.com/tools"
android:layout_width="match_parent"
android:layout_height="match_parent"
android:background="@drawable/splash_bg"
tools:context=".activity.SplashActivity">
<ImageView
android:id="@+id/splash_logo"
android:layout_width="wrap_content"
android:layout_height="wrap_content"
android:layout_centerHorizontal="true"
android:layout_marginTop="120dp"
android:background="@drawable/splash_logo"/>
<RelativeLayout
android:id="@+id/rl_splash_loading_bg"
android:layout_width="wrap_content"
android:layout_height="wrap_content"
android:layout_below="@id/splash_logo"
android:layout_centerHorizontal="true"
android:layout_marginTop="50dp"
android:background="@drawable/splash_loading_bg">
<ImageView
android:id="@+id/iv_splash_loading_item"
android:layout_width="wrap_content"
android:layout_height="wrap_content"
android:layout_alignParentStart="true"
android:src="@drawable/splash_loading_item"/>
</RelativeLayout>
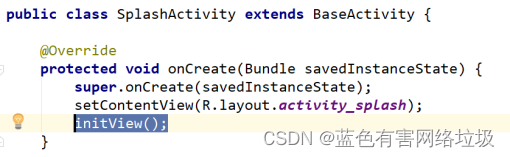
</RelativeLayout>3. Open the "SplashActivity" file to complete the initialization of the control, including the setting of the control ImageView animation, the setting of the animation listener, etc.
Change the base class of the SplashActivity class to BaseActivity:
![]()
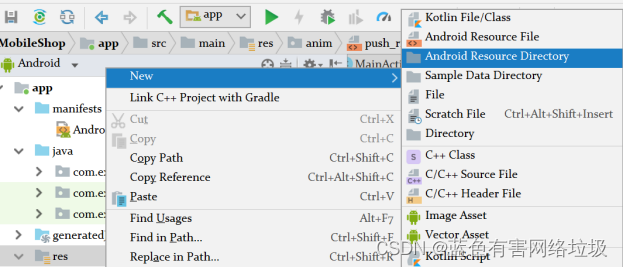
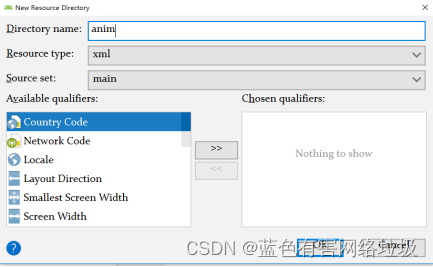
Define the animation resource: right-click the res folder -> New->Android resource directory, open the NewResource Directory window, give the resource type as xml, the folder name is anim and click ok;

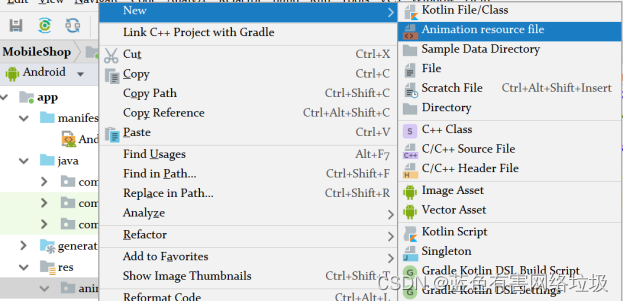
Right-click the anim folder->New->Animation resource file, open the New Resource File window, specify the Fine name as splash_loading, and click OK;


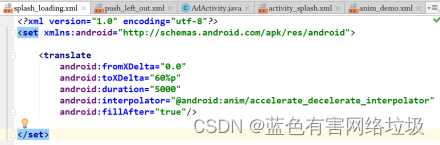
In the splash_loading.xml file, complete the animation definition;
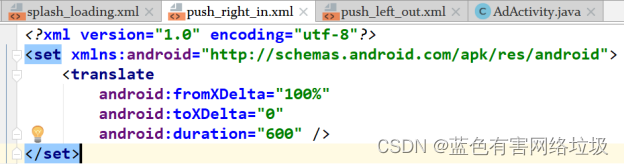
According to the above two steps, define the animation "push_left_out" and "push_right_in";

In the class SplashActivity, add a member method InitView to initialize the control, including the loading of the animation and the setting of the animation listener;
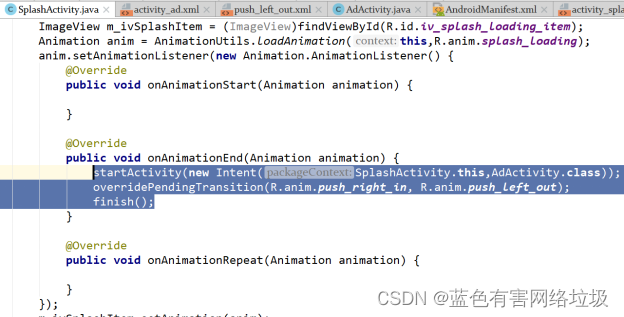
private void initView(){
    ImageView m_ivSplashItem = (ImageView)findViewById(R.id.iv_splash_loading_item);
    Animation anim = AnimationUtils.loadAnimation(this,R.anim.splash_loading);
    anim.setAnimationListener(new Animation.AnimationListener() {
        @Override
        public void onAnimationStart(Animation animation) {

        }

        @Override
        public void onAnimationEnd(Animation animation) {

        }

        @Override
        public void onAnimationRepeat(Animation animation) {

        }
    });
    m_ivSplashItem.startAnimation(anim);
In the method OnCreate(), call the InitView() method;
Define the string variable skip in res/string.xml: <string name="skip">skip</string>
4. According to the method in step 1, create a new Activity , name it "Activity", and the corresponding layout file name is " activity _ad.xml ";
5. Open the " SplashActivity " file, and add code in the method OnAnimationEnd() of the animation listener to realize the jump from the guide page to the advertisement page;
6. Open the " activity _ad.xml " file, edit and realize the interface design of the advertisement page;
<FrameLayout xmlns:android="http://schemas.android.com/apk/res/android"
    xmlns:tools="http://schemas.android.com/tools"
    android:layout_width="match_parent"
    android:layout_height="match_parent"
    tools:context=".activity.AdActivity">

    <LinearLayout
        android:layout_width="match_parent"
        android:layout_height="match_parent"
        android:orientation="vertical">
        <ImageView
            android:id="@+id/iv_ad"
            android:layout_width="wrap_content"
            android:layout_height="wrap_content"
            android:src="@drawable/sample_ad"
            android:layout_gravity="center" />
    </LinearLayout>

    <Button
        android:id="@+id/bt_skip"
        android:layout_width="wrap_content"
        android:layout_height="wrap_content"
        android:background="@drawable/button_selector"
        android:layout_gravity="end"
        android:layout_marginEnd="5dp"
        android:layout_marginTop="5dp"
        android:gravity="center"
        android:text="@string/skip"
        android:textSize="12sp"/>
</FrameLayout>
7. Create an android development tool class - Constants (store global variables), and define the variable AD_TIME_SECOUND;
①Create toolkit utils under the project;
②Right-click the utils package-new-java class, create an android development tool class——Constants (store global variables);
③ Define variables: AD_TIME_SECOUND , EXIT_TIME_SPAN ;
public abstract class Constants {
public static final int AD_TIME_SECOUND=3000; //广告播放时间
public static final int EXIT_TIME_SPAN=1000; //退出间隔时间
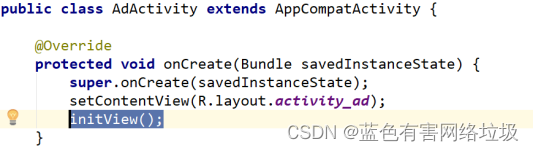
}8. Open the "AdActivity" file to complete the initialization of the control, including the setting of the click listener of the control Button , the implementation of the timer method, etc .;
In the class AdActivity, define member variables ( bSkiped, trTimer) and member method skip(), which are used to jump directly from the guide page to the home page;
private boolean bSkiped=false;
private Thread trTimer=null;

private void skip(){
    if(!bSkiped) {
        bSkiped = true;
        if (trTimer!=null) {
            trTimer.interrupt();
            trTimer = null;
        }
        AdActivity.this.startActivity(new Intent(AdActivity.this, MainActivity.class));
        AdActivity.this.finish();
    }
}
In the class AdActivity, define the member method timer(), which is used to start the timer, and when the time is up, complete the jump from the guide page to the home page;
private void timer(){
    final Handler handler = new Handler(){
        @Override
        public void handleMessage(Message msg) {
            super.handleMessage(msg);
            if(-1 == msg.what){
                skip();
            }
        }
    };

    trTimer = new Thread(){
        @Override
        public void run() {
            try {
                Thread.sleep(Constants.AD_TIME_SECOND);

            }catch (InterruptedException e){
                e.printStackTrace();
            }
            handler.sendEmptyMessage(-1);
        }
    };
    trTimer.start();
}
In the class AdActivity, define the member method InitView to initialize the control;
private void initView(){
    ImageView ivAd = findViewById(R.id.iv_ad);
    Button btSkip = findViewById(R.id.bt_skip);

    //start timer if success to load image resource for ImageView
    if(ivAd.getDrawable() != null){
        timer();
    }else{
        skip();
    }

    //set listener for Button of skip
    btSkip.setOnClickListener(new View.OnClickListener() {
        @Override
        public void onClick(View v) {
            skip();
        }
    });
}
In the OnCreateView() method, call the InitView() method;
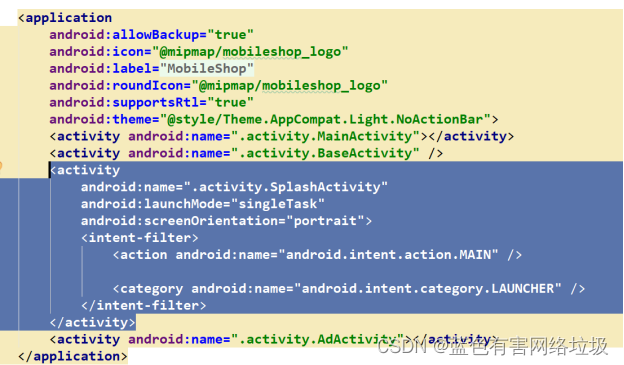
9. Open " AndroidManifest.xml " and modify the entry point of the program to SplashActivity;
10. Exit the program

11. Debug , run