hot key
The shortcut key ctrl+E can quickly open the relevant blueprint class, and directly select the object added to the scene in the scene.
Debug Blueprint
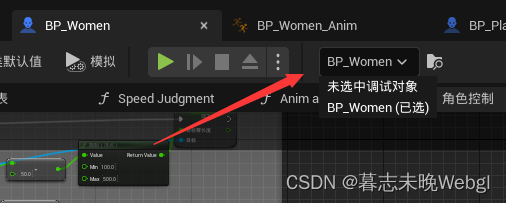
Select the debugging object, select the instance to be debugged, and you can view the status of the current role.
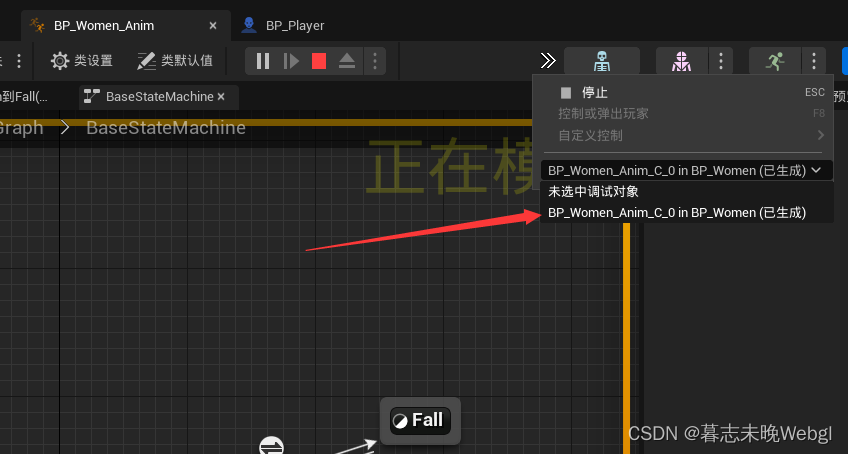
When the animation instance is running, you can also use the arrow on the right to obtain the instance that has been generated in the current scene to view the running status of the current character animation.
Set default entry scene
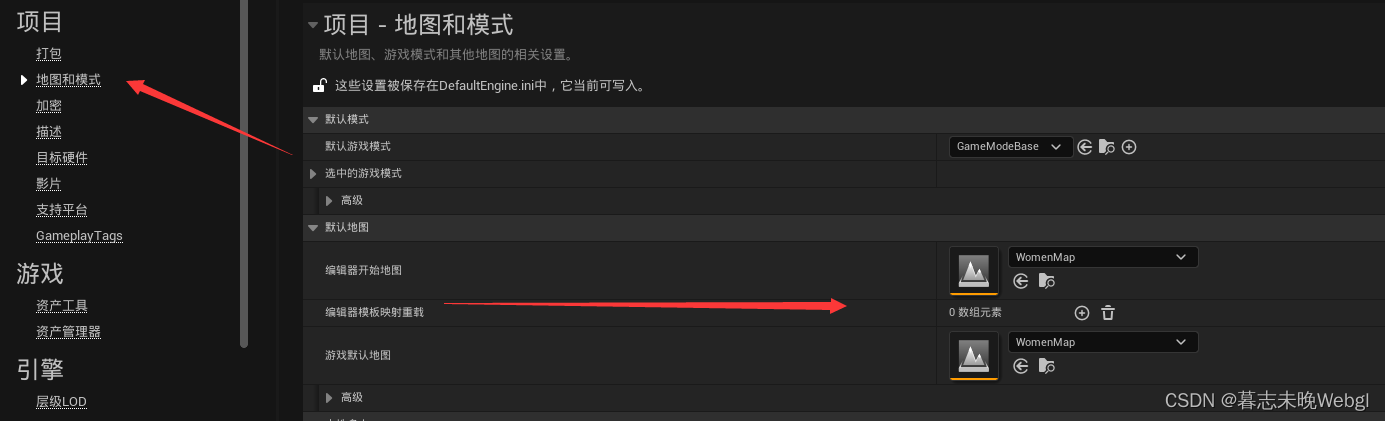
In the project settings, select the map and mode, and the editor will enter the map by default after starting the map and packaging the game.
resource management
The content root directory can be divided into folders such as scenes, character materials, particle effects, blueprints, weapons, sound effects, ui, etc., to store corresponding resources.
input mapping
Input mapping is the input of custom hardware, which can customize the input content of each input device (handle, keyboard, steering wheel, vr, etc.).
There are two main types of mapping: operation mapping and axis mapping.
Operation mapping will be triggered by the corresponding button, and related events such as pressing and lifting can be obtained in the blueprint. It can only be triggered once by pressing it, and it can be triggered again by lifting it up and pressing it again.
Axis mapping will be continuously triggered by a long press, and the engine will continue to listen.
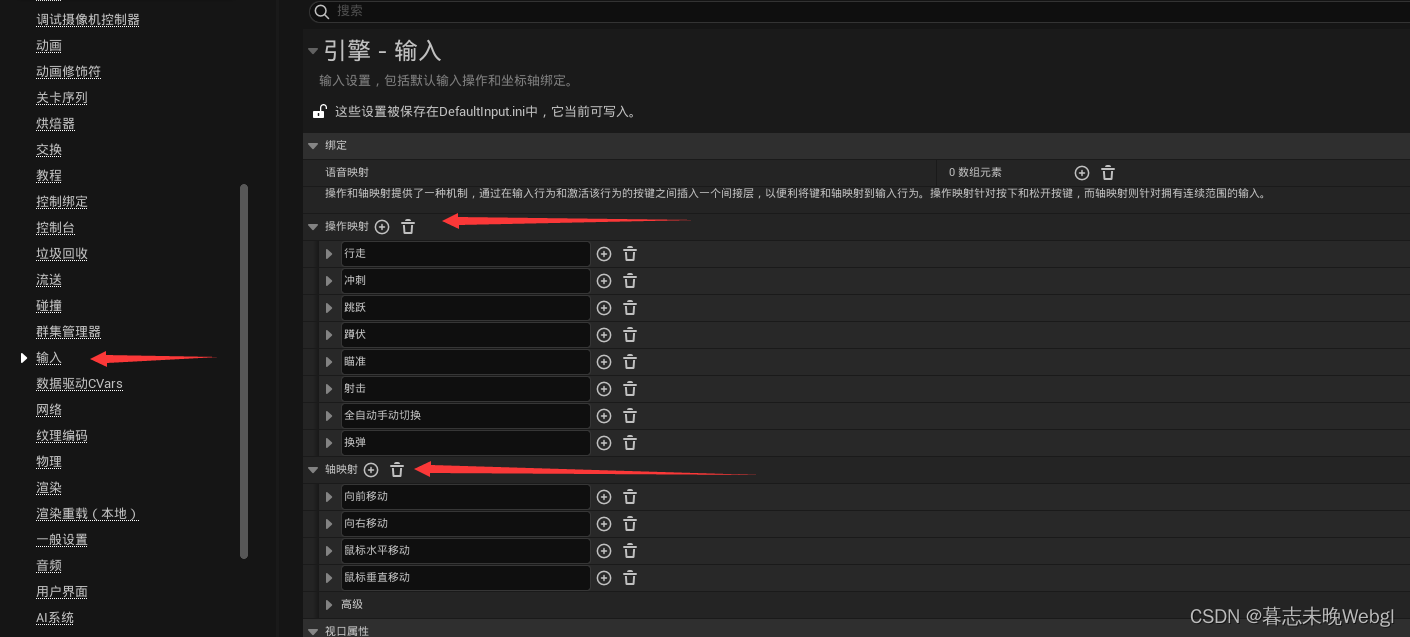
Axis mapping can set the direction of character movement and mouse movement camera
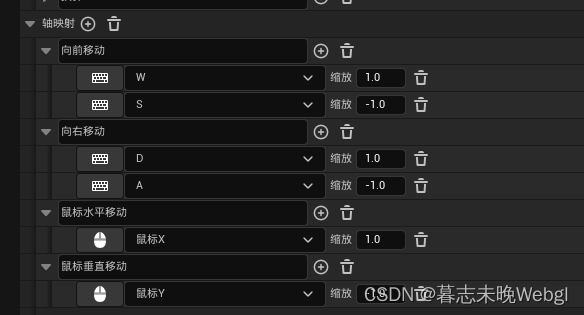
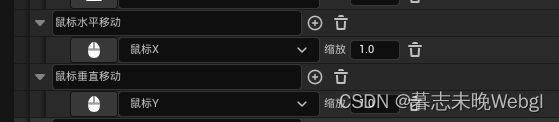
. If it is not convenient to find the corresponding key, you can click the icon on the left, and then press the corresponding key on the keyboard.
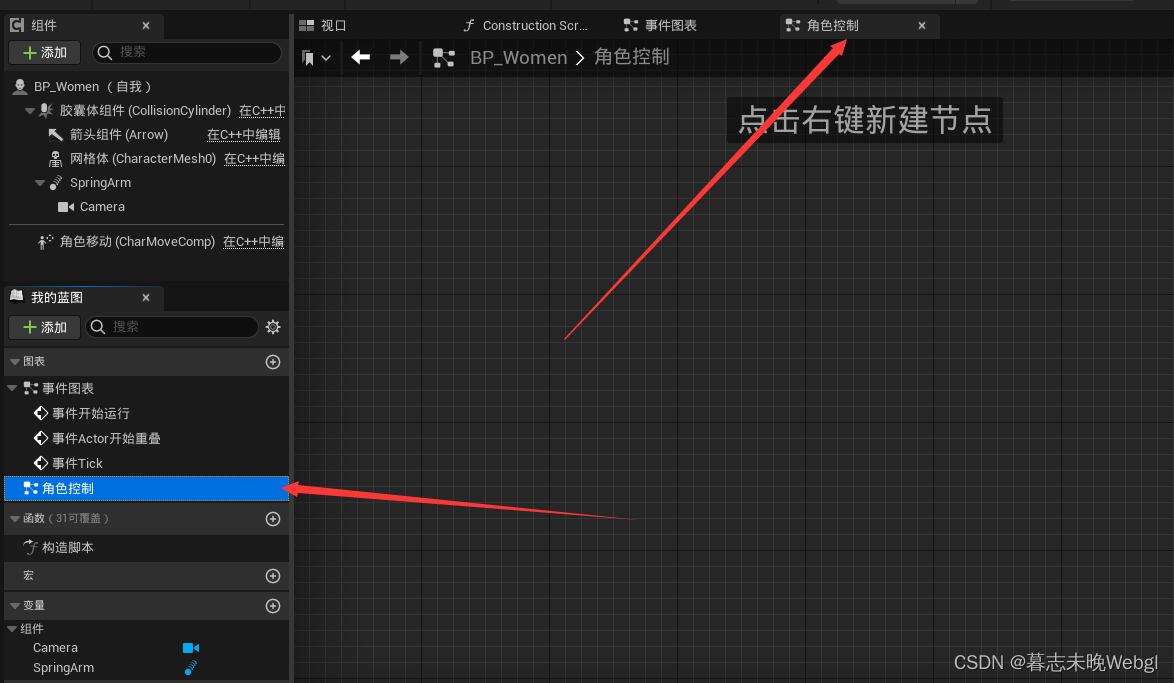
Create a Camera Control Blueprint
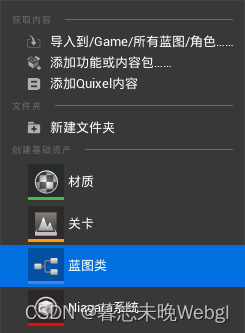
Right-click in the folder, select the blueprint class
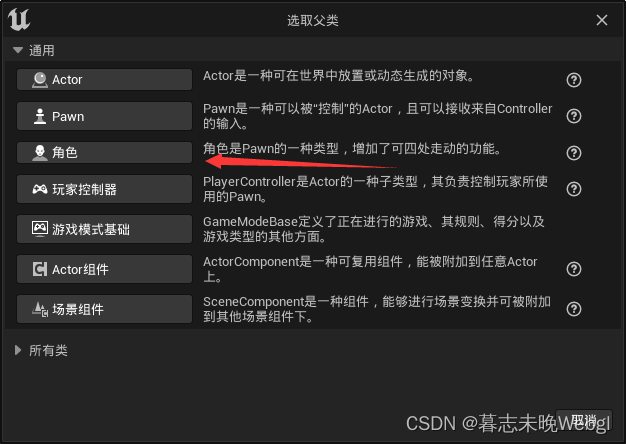
and then select the character blueprint class. This is the built-in basic class of ue. The character blueprint is a blueprint for creating a character base. There are some built-in nodes that allow creators to easily create a character that can move in the scene. The role of , we can expand on this basis.
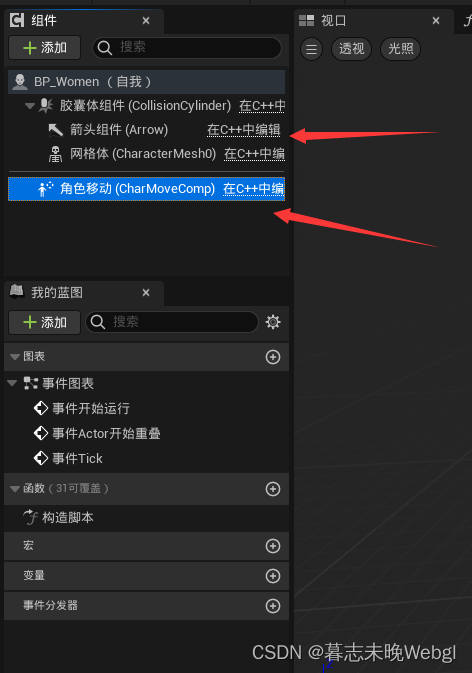
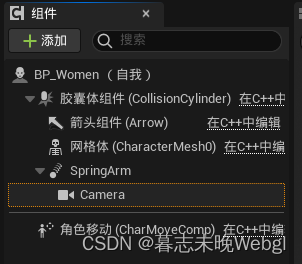
The content of the blueprint is divided into two parts, one part is the node common, which can add collision bodies, models, etc. inside. The other part is the related component script, which is equivalent to the running script mounted by unity, which can add a main function to the blueprint.
We can find the add button in the upper left corner of the component, by selecting to add common components, or custom script components.
The built-in components of the current blueprint: the capsule component is used for collision detection, the arrow component is used to indicate the positive direction, the mesh component is the character model, and the character movement script component is some character properties and settings of the current blueprint.
add camera
The character blueprint does not contain a camera by default. When making a third-person blueprint, the camera will follow the character by default. Therefore, we need to add a follow camera to the blueprint.

Select Add, first add a spring arm component on the blueprint, then add a camera component below the spring arm component.
create chart
Charts are equivalent to logic code files one by one. We can configure running logic, event trigger logic, etc. in the chart.

In my blueprint, add, graph, create a new icon for some input to control character actions.
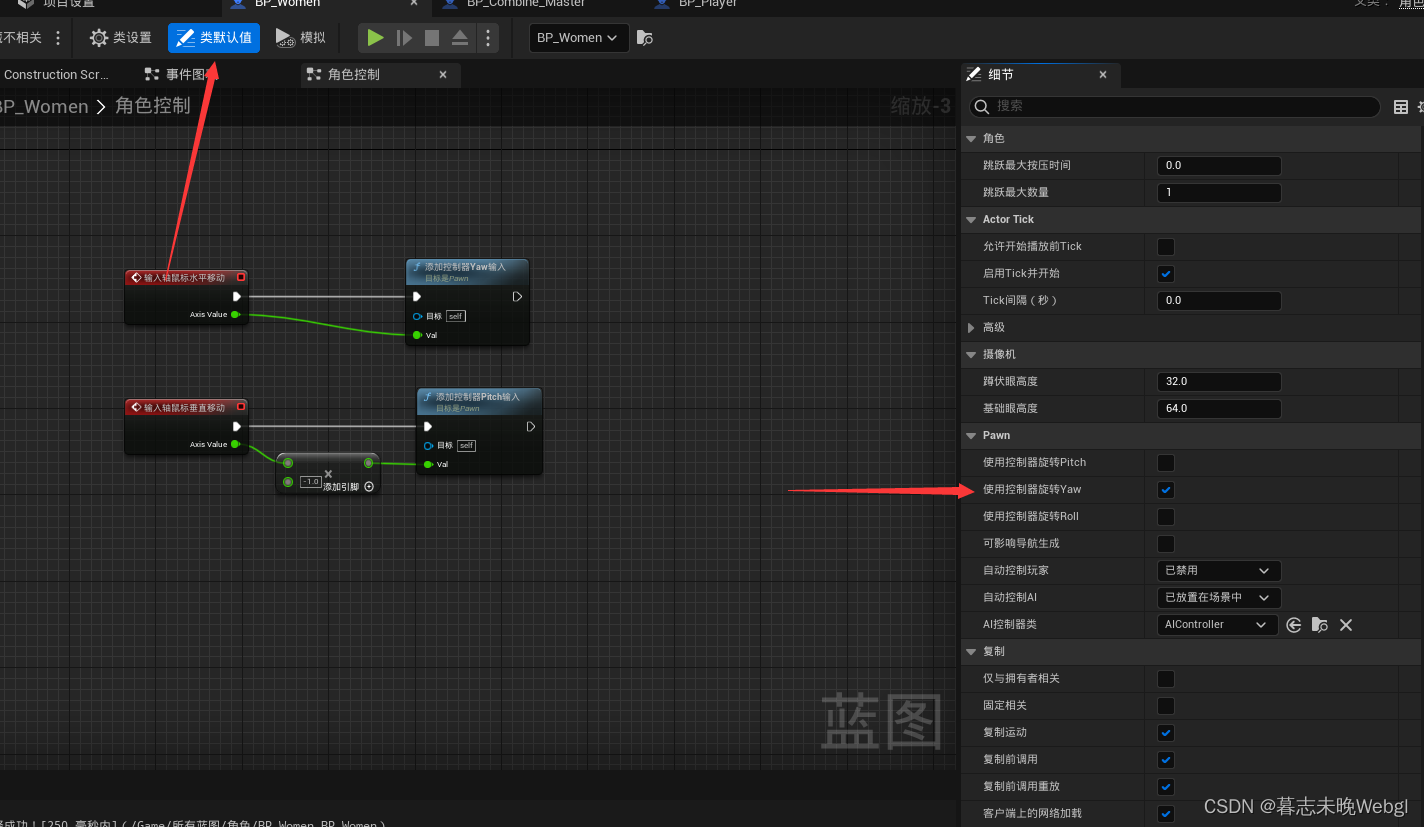
In the blueprint area, search with the right mouse button, you will find that there are two operations with names, one is the coordinate axis event, which is used to trigger the event, and the other is the coordinate axis value. There is a difference between the two, one is the event trigger and
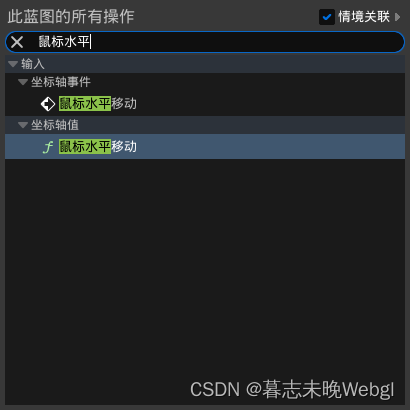
can Get the value, the other can only get the value.
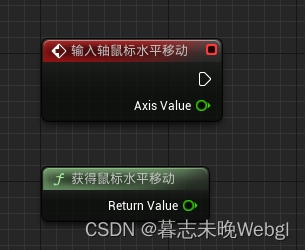
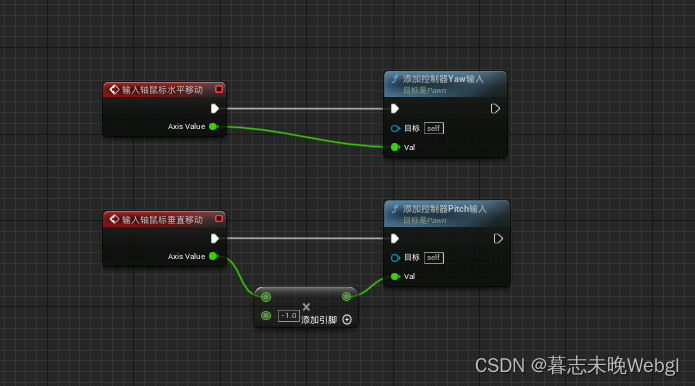
The picture above shows the mouse to control the camera towards the node link.
But the input is the set controller, and the controller does not mean that it can control the movement of the spring arm. Therefore, we need an additional setting to allow the controller to modify the spring arm.
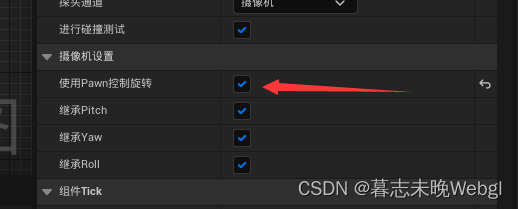
Tick Use Pawn to control rotation to realize its internal event delivery. If we don't choose this attribute, we need to manually control it ourselves
My personal understanding here is that you can also write events to realize the rotation of the spring arm, but there is a default method to achieve it, and there is no special requirement, so there is no need to frequently build wheels.
Also, when we are using a mouse, there is a scaling factor behind it. If you need to adjust the mouse sensitivity in the game, you can directly increase or decrease this factor to adjust the mouse rotation sensitivity.
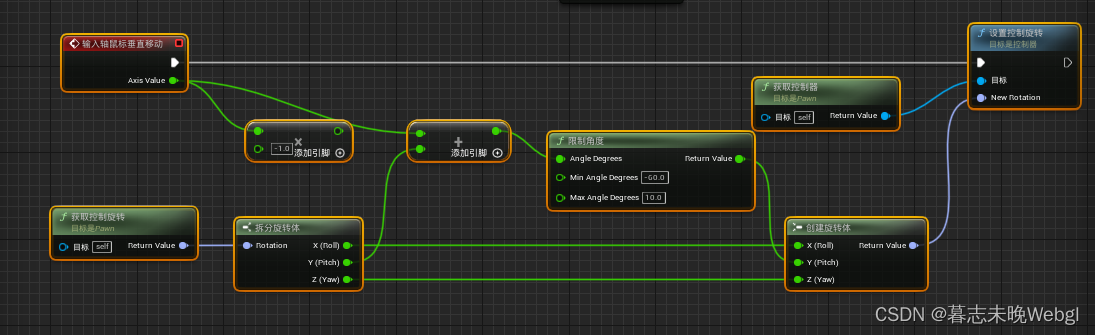
When running, we will find that the character will also rotate horizontally with the camera. The reason is that the default value of the class uses the controller to rotate its yaw by default. We only need to uncheck this.
Modify the Spring Arm
To prevent the camera from being behind the character's head, we need to modify the camera's position so that it is always facing to the right. Here we do it by modifying the spring arm.
First adjust the position of the spring arm to the head position, let the camera rotate around the head, so we need to adjust the position of the spring arm to the head of the character, and then set the spring arm offset. 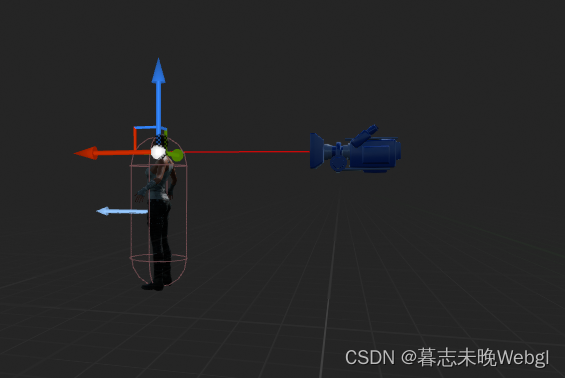
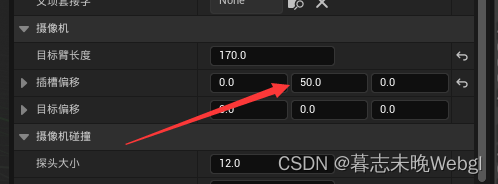
The offset of the spring arm can be modified in the blueprint, such as how much it is offset in the default state, and how much it is offset in the gun state.
Next, we need to realize that the mouse can control the distance of the spring arm. As you can see in the above picture, we only need to find the target arm length on the object and set it. 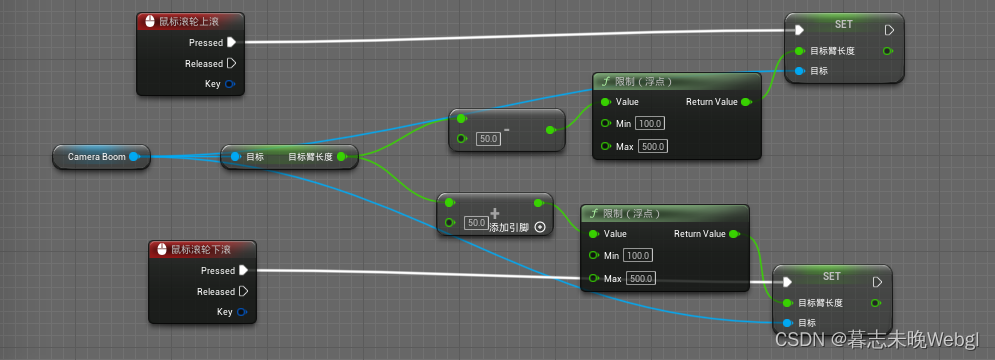
Three new nodes are used above. First, drag the spring arm node into the blueprint, get the target arm length through the blueprint, and set the target arm length node, as well as the first machine range node, and set the event trigger through the scroll wheel.
Control character movement
To control the movement of the character, first obtain the current rotation direction of the controller, and perform front, rear, left, and right rotations based on the direction of the camera.
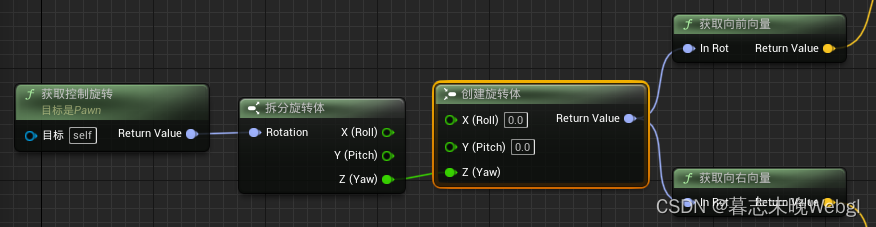
We need to pass the Yaw of the controller, that is, the horizontal direction, not the multiple directions of the controller, so we need to create a new orientation through its Yaw, which is also normalized, and then pass this The rotating body gets the forward direction and the right direction. Then use this direction to trigger the button and then set the movement direction through the built-in method.
This direction is the direction in which the character moves. Then scale the value according to the set button operation to realize the movement.
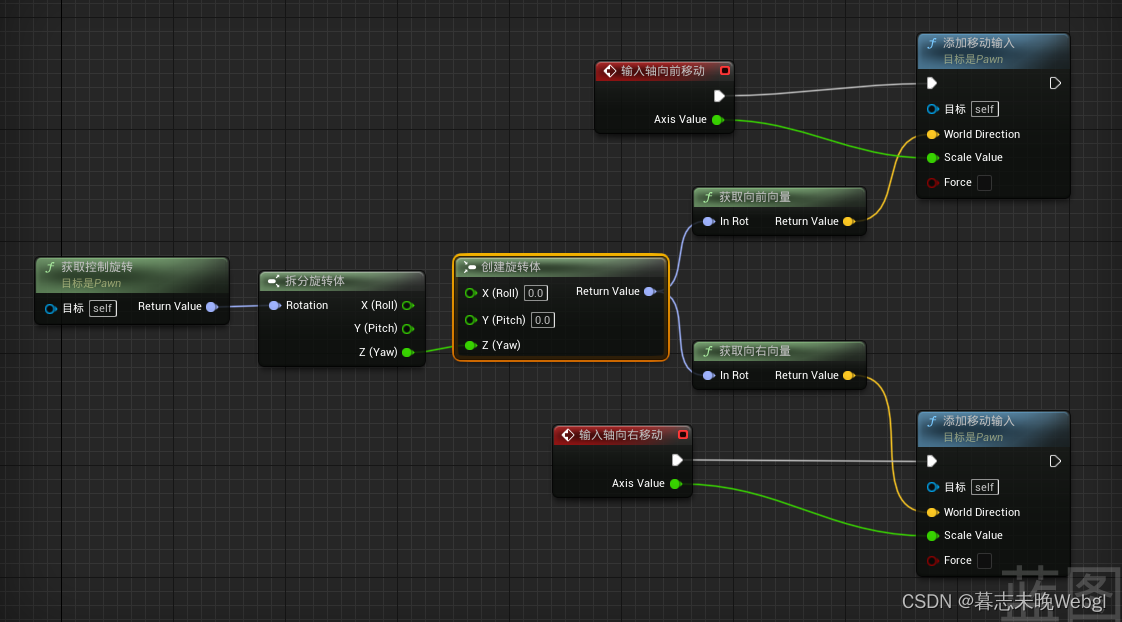
Next, we found that the character's movement direction is not the direction of movement. We need to find the rotation direction in CharacterMovement to realize the direction of the character's movement.
After the setting is complete, it is found that the character will automatically rotate in the direction when moving.
So far, we have learned two ways to control the orientation of the character. The first is to use the controller, which is set in the default value of the class, and the second is to use the motion direction control. If both are turned on, then both will be controlled, and it is easy to get confused.
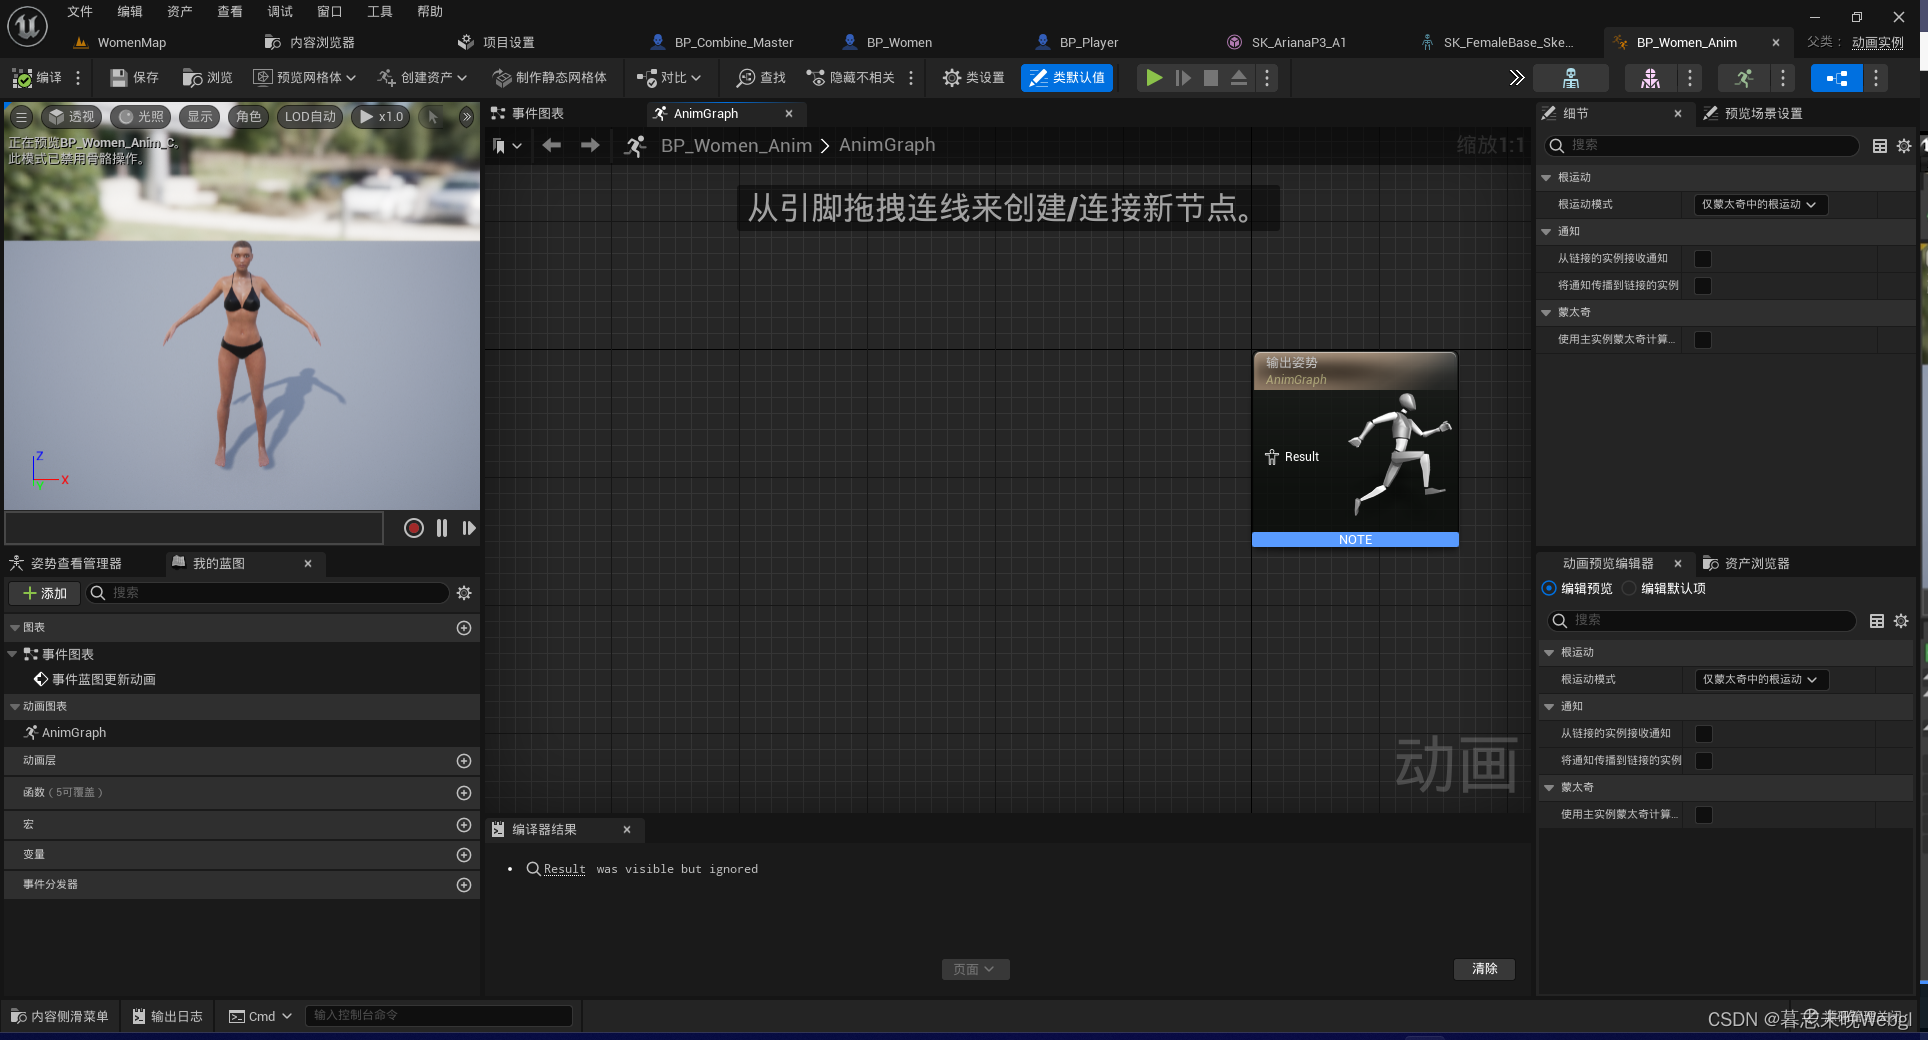
animation blueprint
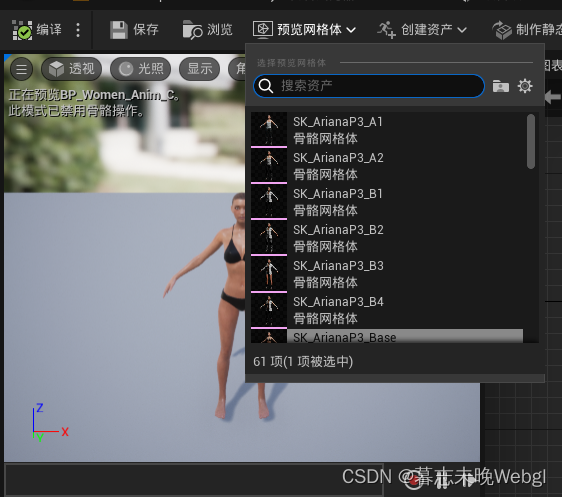
A dedicated Blueprint that controls the animation of a Skeletal Mesh, simply put, a Blueprint dedicated to the calculation of blending between multiple animations. (Note: Be sure to select the corresponding character model bone).
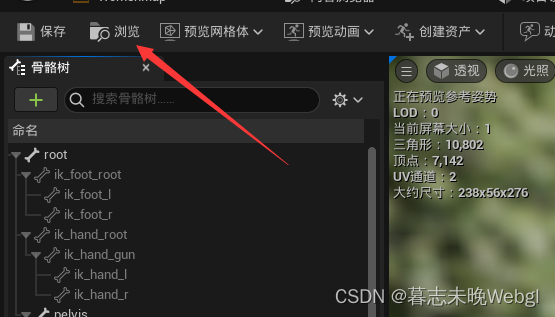
Select the skeletal mesh used by the current character model
, then open the skeletal mesh, find Browse in the upper left corner, and find the corresponding file in the resource list
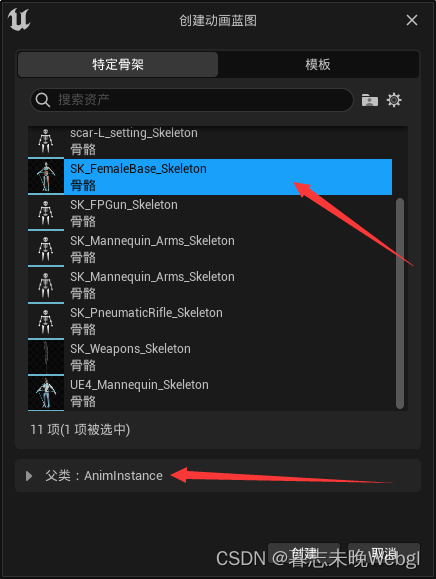
Create an animation blueprint, first right-click the list to find the animation blueprint class
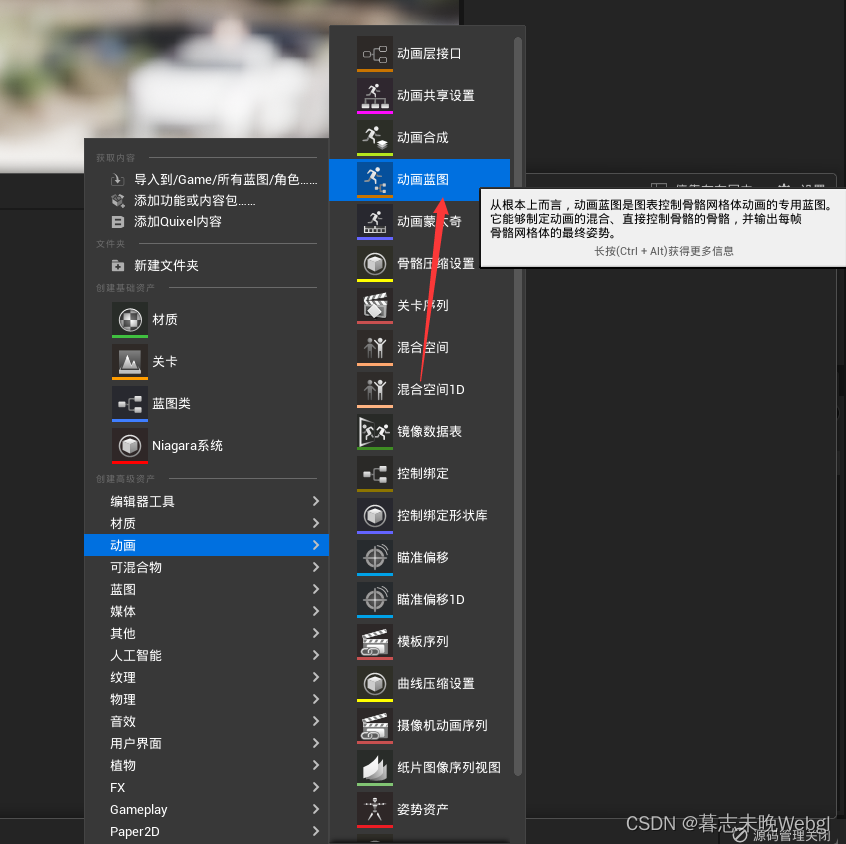
bone and select the bone of the current character For the mesh body, the parent class selects the AnimInstance parent class to create a pure animation blueprint.
After opening, it looks like this.
You can modify the mesh used by the preview through the preview mesh above.
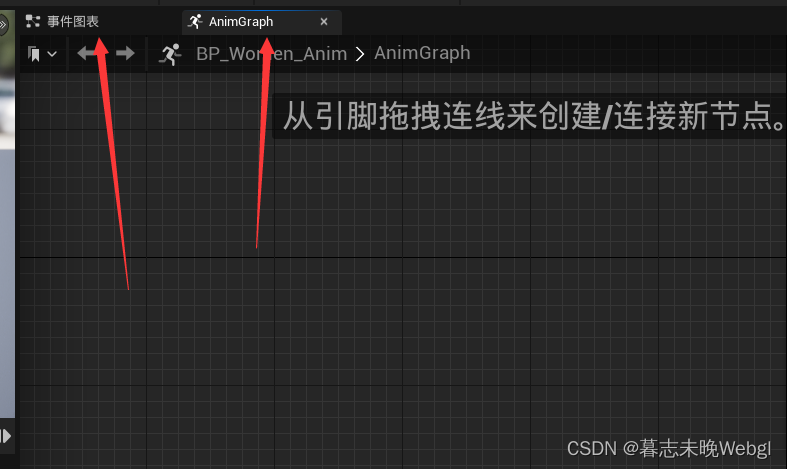
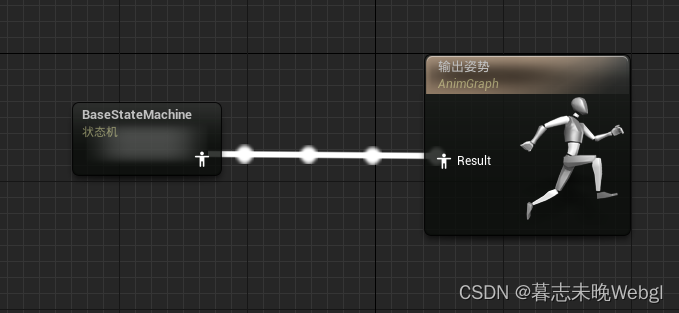
The event icon is used to set the animation switching logic, and AnimGraph is used to switch the animation.
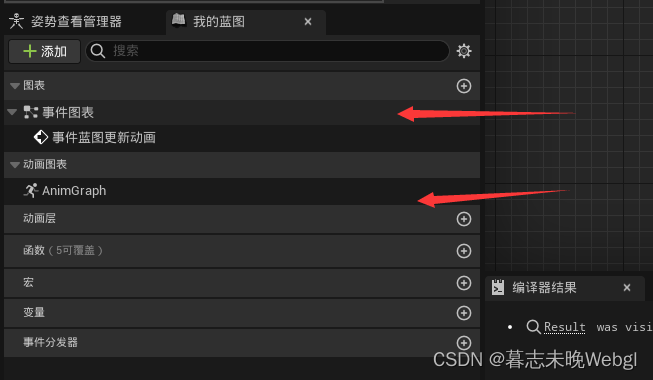
If you accidentally close it, you can double-click on the left to reopen it.
state machine
The state machine contains many different animation states. Different states can be mixed, transitioned, and switched directly, and we can define our own rules.
The state machine only exists for animated icons in AnimGrph.

Right-click to enter the state machine, the first one is to add a new state machine.
mixed space
The blending space allows the animation to blend, such as walking and running. We can use the current movement speed of the character to allow the character to automatically blend from walking to running without rigid switching.
Creating a blend space also requires a corresponding skeletal mesh.
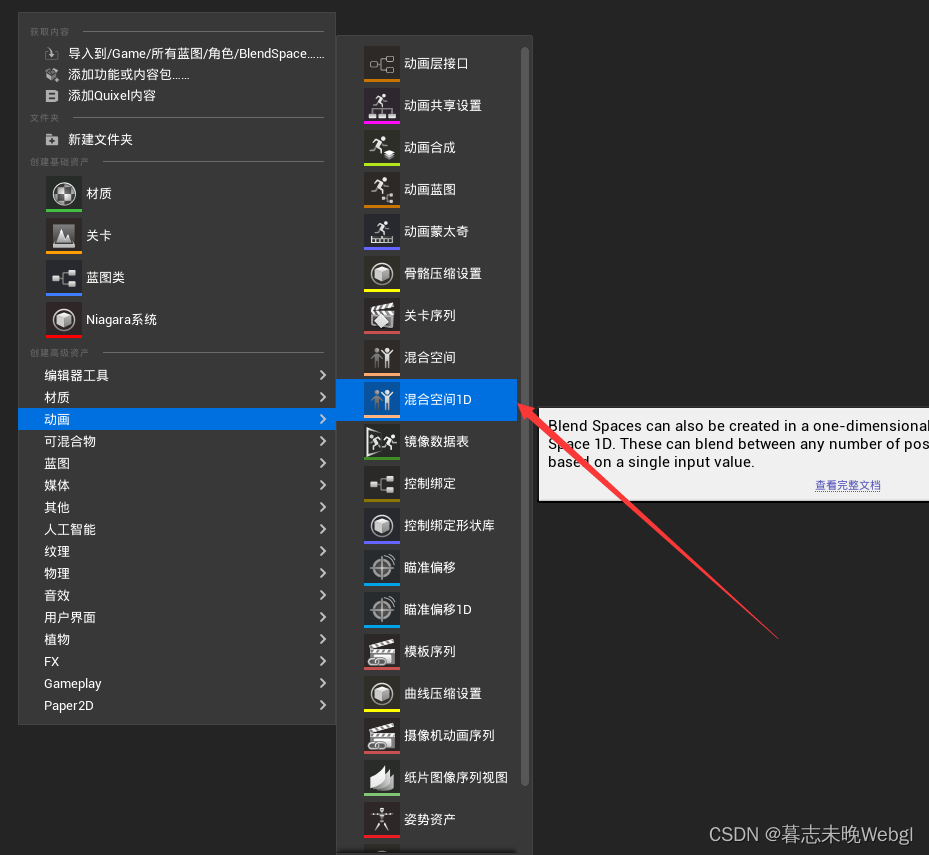
Right-click on the resource list to select animation, and then mix space 1D (animation mixing controlled by a single value) below to create the simplest mixing space.
Next, create a moving blend space.
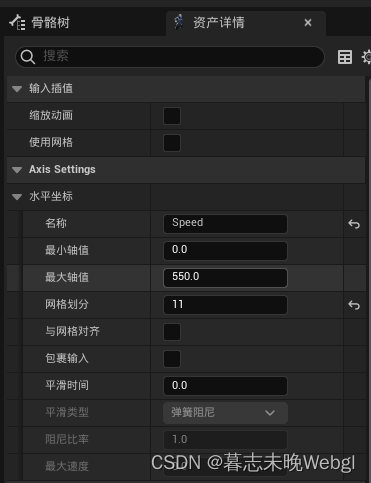
Turn on the horizontal coordinates, set the name, and then set the minimum axis value to 0, and the maximum axis value to the movement value after the character reaches the maximum speed when moving. The mesh division can be set to a value divisible by the maximum speed, which is convenient for placing animation on an integer.
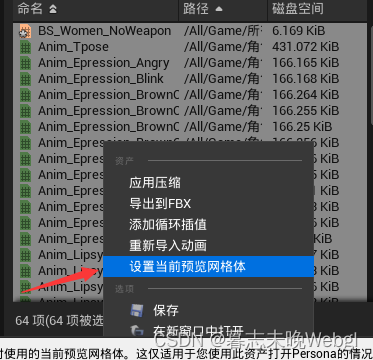
If you want to preview the animation, you can select all the animations, and then set the current preview mesh to view the current animation.
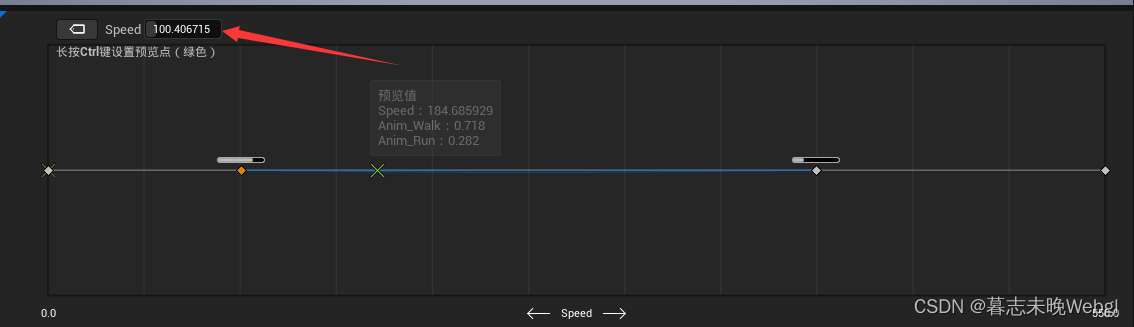
You can drag and drop the played animation to the list below, and you can also set specific values on the selected node.
Long press the ctrl key to set the preview point (green)
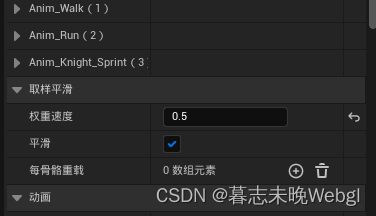
sampling smoothness can be set here, the smaller the value, the slower the mixing speed, generally set it to about 3.
Create an animation machine in the animation icon of the animation blueprint, then double-click the animation machine to enter,
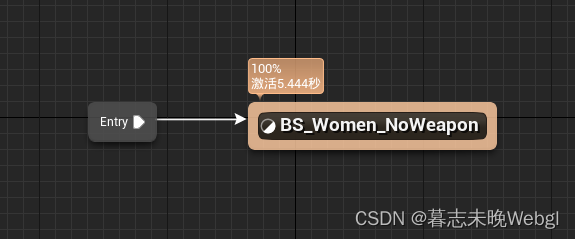
drag the blending space created just now, and link the Entry here. After saving, you can find that the preview animation on the right is the default idle state.
This doesn't switch the current velocity, so we need to create a new state.
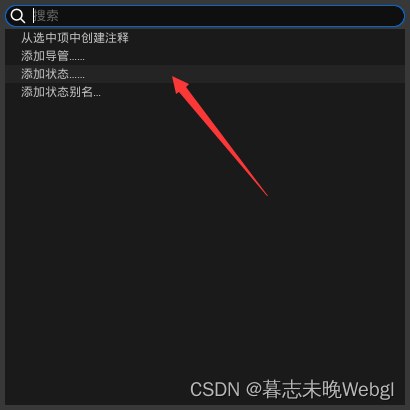
Right-click Add State to create a new state, then double-click to enter.

In this way, we can realize animation switching by setting the value.

How to modify this value, first we promote it to a variable.
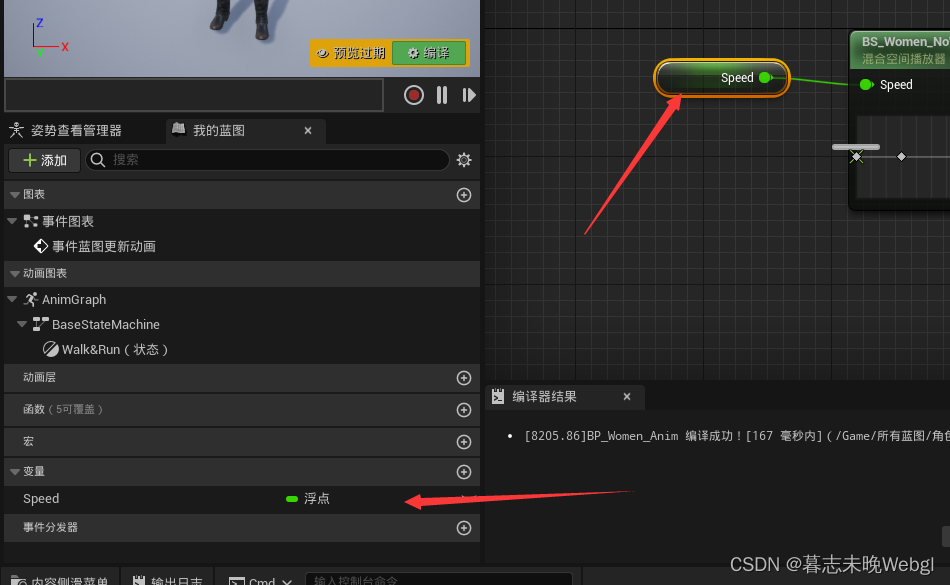
After the promotion is complete, the variable on the left will display the current value, and a pin will appear in front of the value to pass the value of the variable.
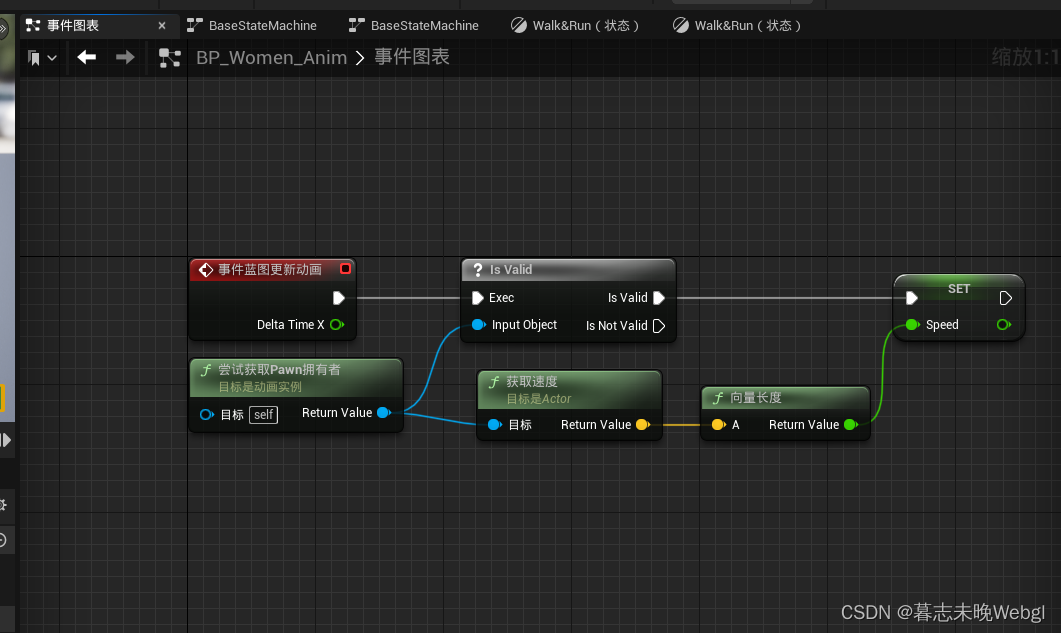
We need to first judge whether the current blueprint has a user in the event graph, and use the Is Valid node to judge, and if so, obtain the speed from the Pawn owner, but the obtained speed is a three-dimensional vector (yellow button), Therefore, we also need to get the length of the vector, and then set it.
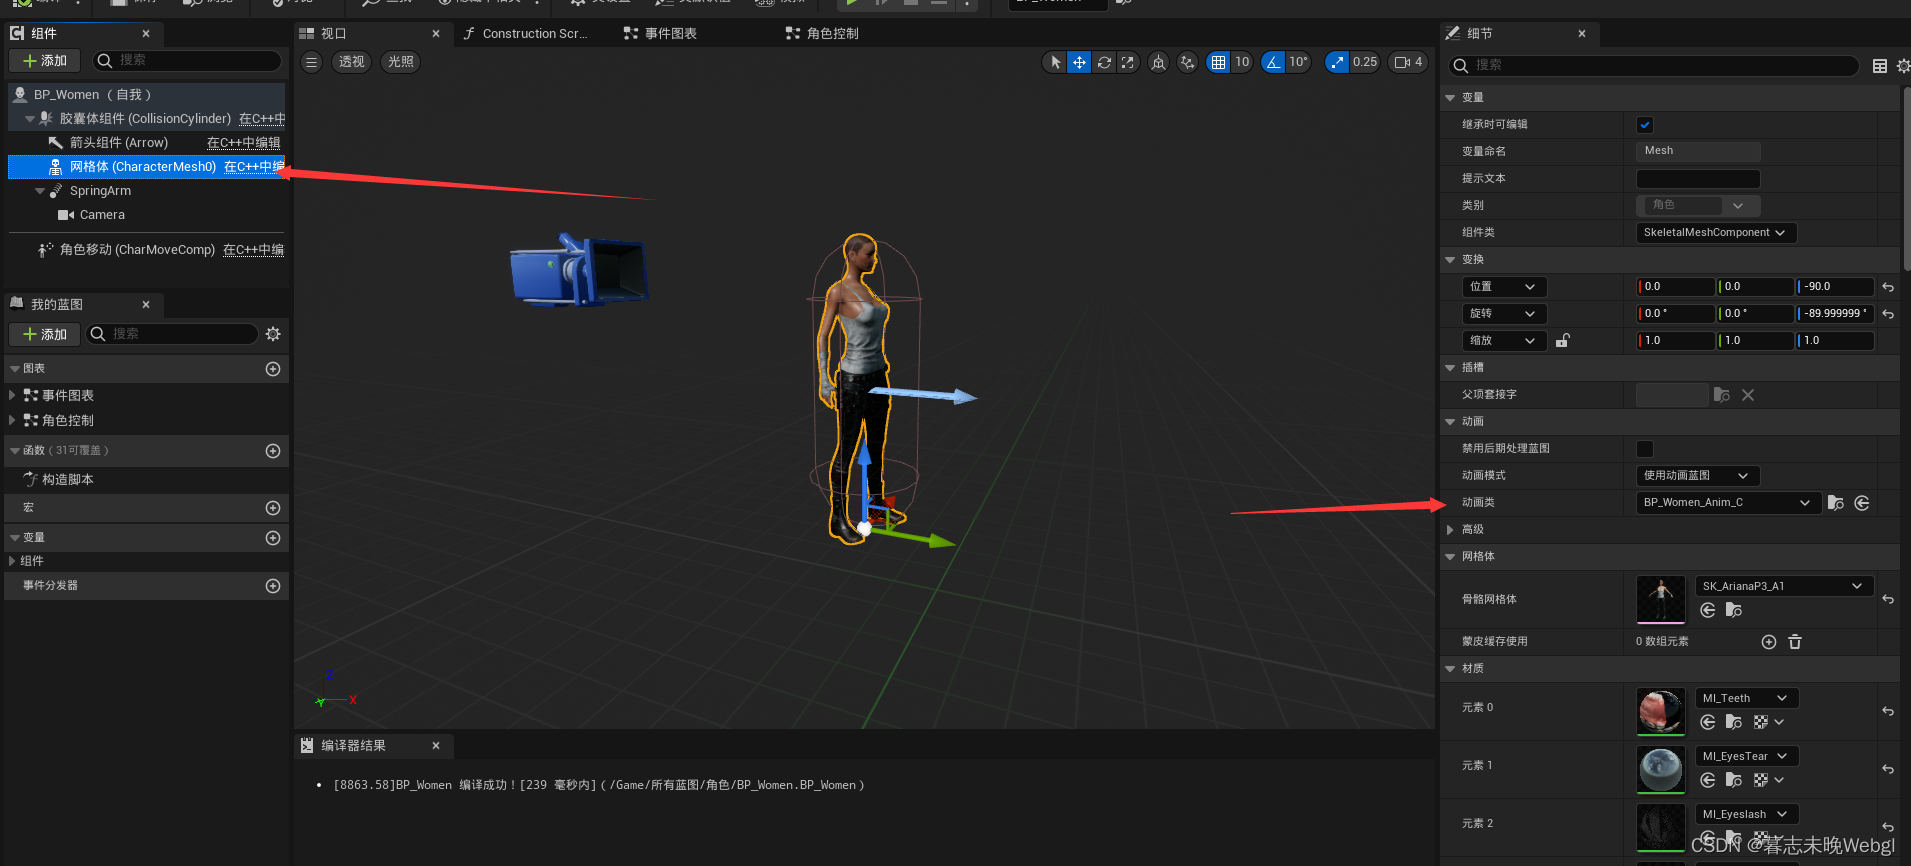
Next, in the character blueprint, select the mesh body, and set the currently created animation blueprint in the animation class on the right to realize the movement animation of the current character.
Realize the character walking, running and sprinting
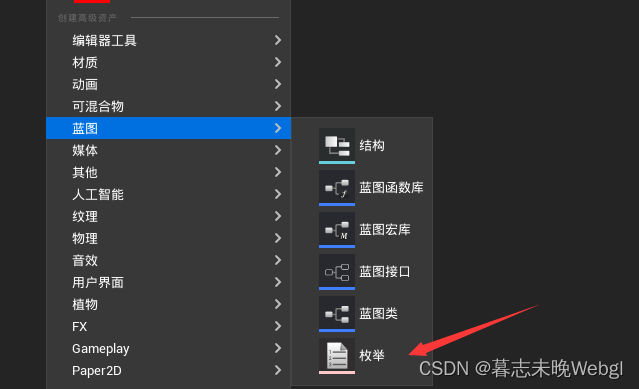
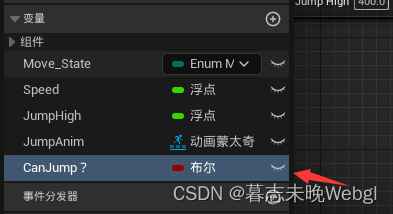
Right click on the blueprint and create an enum.
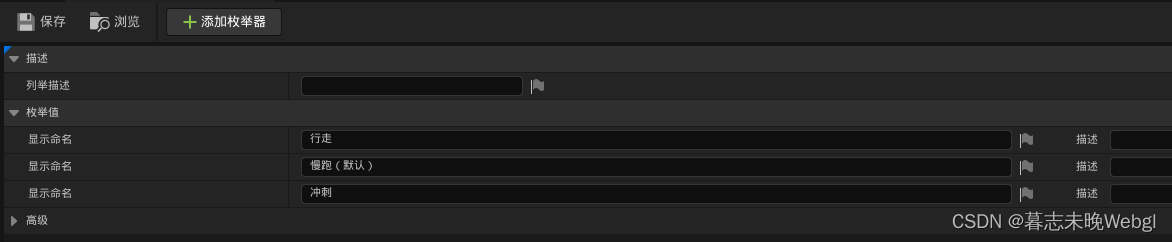
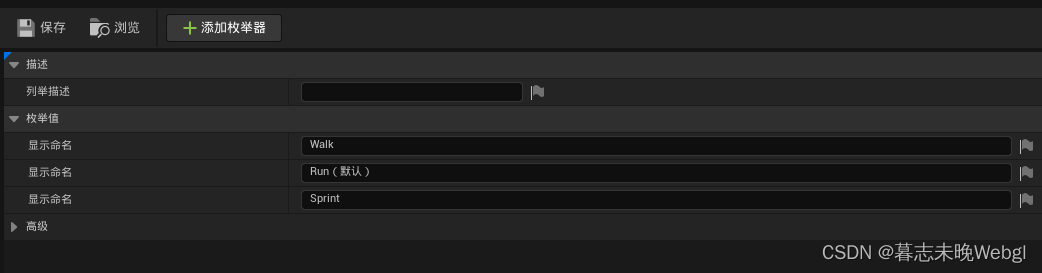
Click Add Enumerator above to add three enumerations to record the current state. Personally recommend the naming prefix of the enumeration plus Enum.
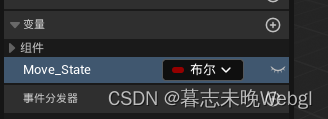
Create a variable in the blueprint class to record the movement state.
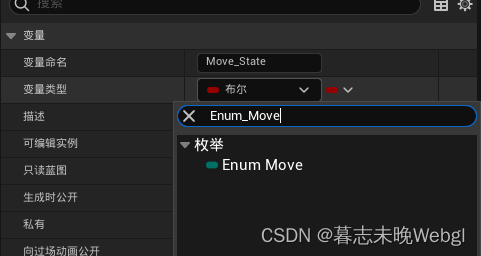
Modify the variable type on the right, search for the enumeration name, and set the current variable type.
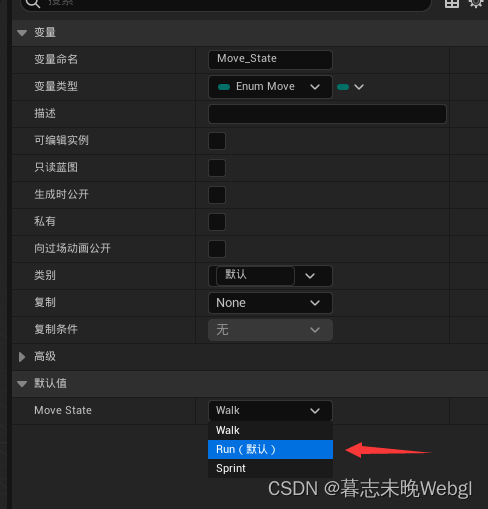
Set the default value of the variable to Run, which needs to be compiled first.
The next step is to realize the judgment of the current variable, and then modify the speed of the character according to the value of the variable. Here, a general function is created to achieve reuse.
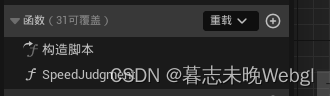
First click the plus sign to create a function.
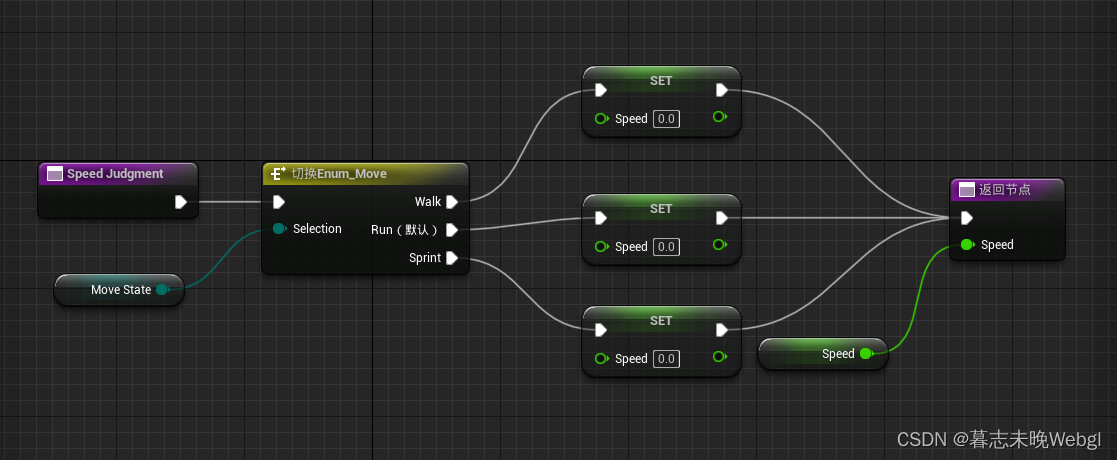
In the function, to judge the enumeration, you can use the switch node, then create a Speed variable, and change the variable type to a floating point number. The switch node can set the value of different variables according to different states, and then add a return node, and return the final value, so that a function is written.
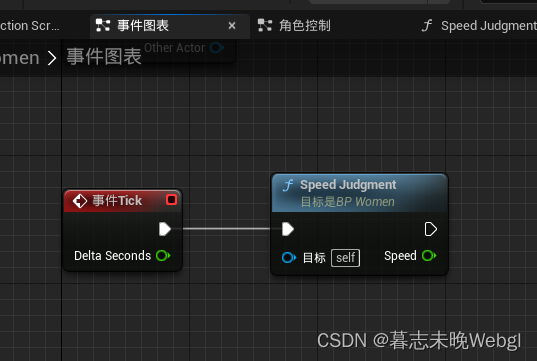
Next, we need to call this function. In order to achieve it quickly, we now use a more performance-intensive method to judge every frame.
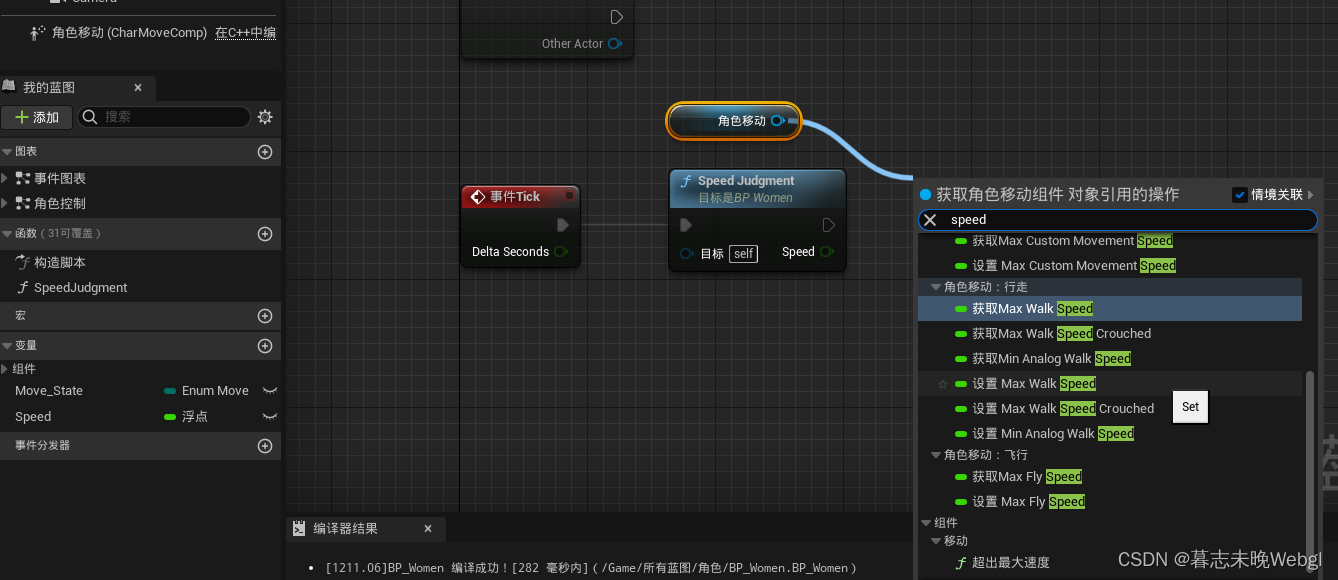
Then move the character on the left and drag it down to find Max Walk Speed, which is the maximum speed setting, to realize the speed setting.
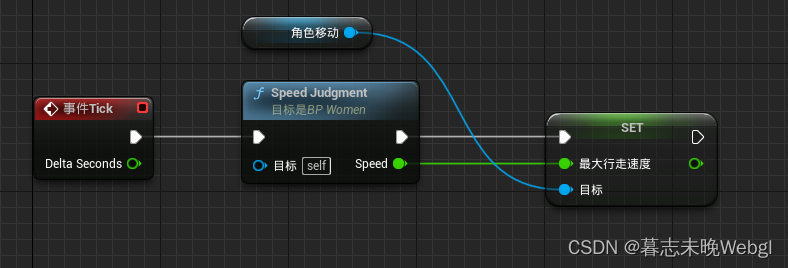
The final link is above.
Then we need to realize the modification of the variables of the state enumeration, which is simple. We have written the triggering of the ctrl and shift keys before.
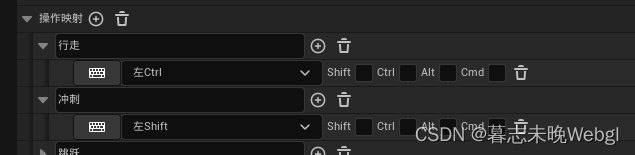
Use these two keys to implement state modification.
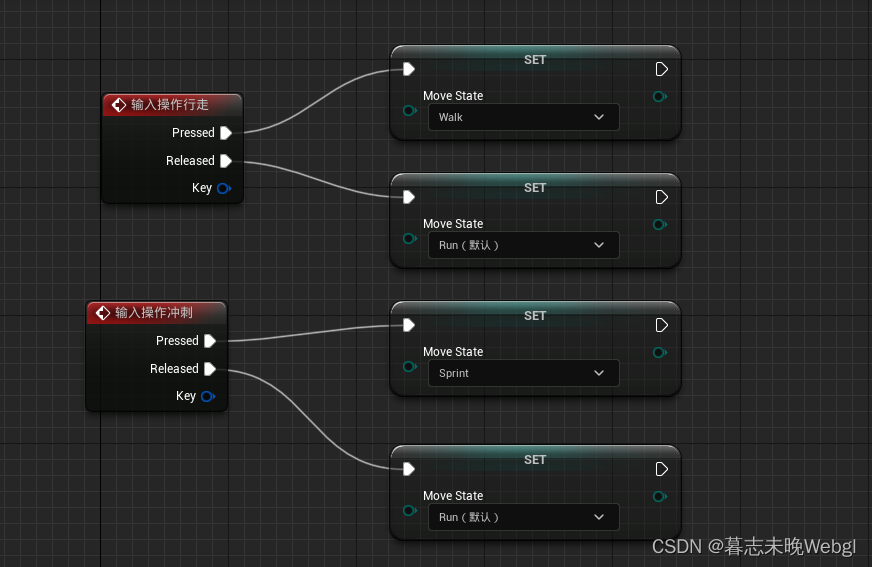
When the current key is pressed, it is changed to the target movement state, and when it is lifted, it is changed to the default state, and the movement state can be switched.
Achieve the jump
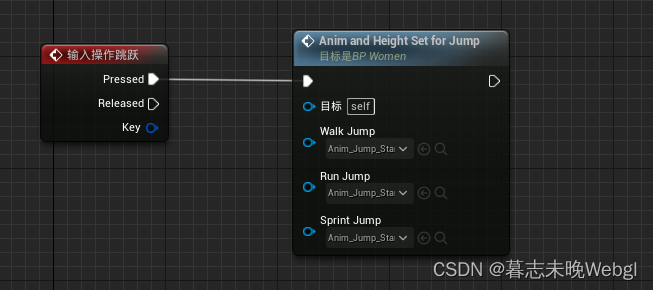
First add a jump button to the input list, and then link the jump event.
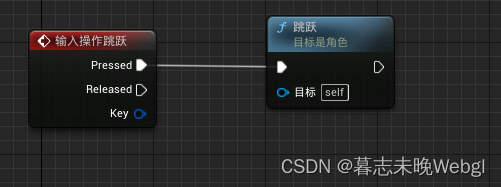
This implements the jump, just without the animation.
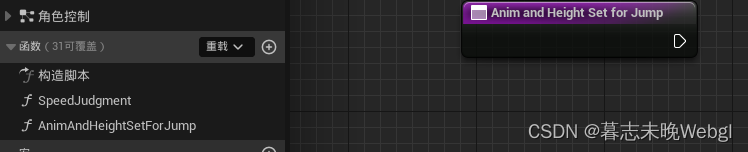
Create a function that animates and heights the jump.
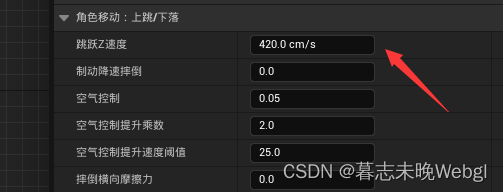
The first is the height setting, we are going to modify the Z speed of the character's jump.
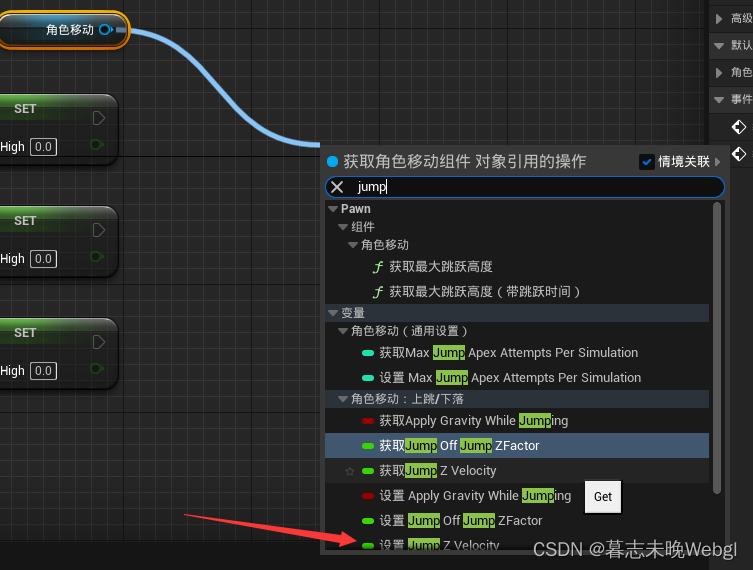
Set it like this inside the function.
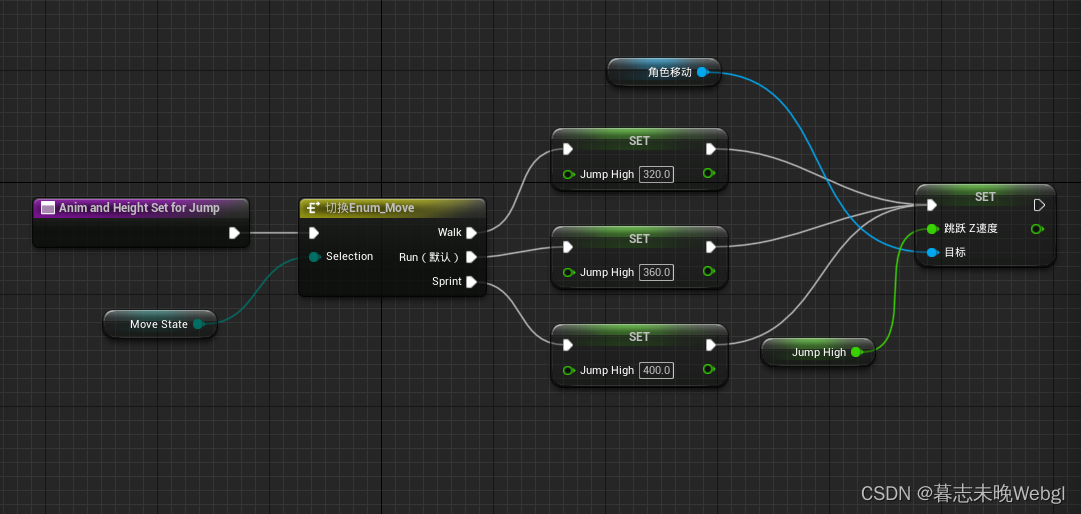
According to different moving speeds, set different jump heights.
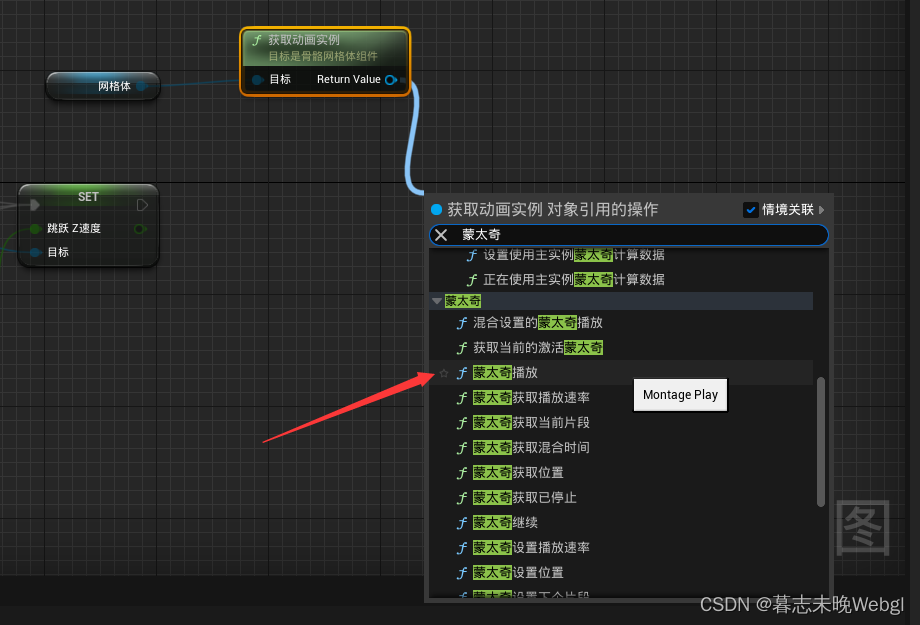
Next we use montage playback to play different jumping animations.
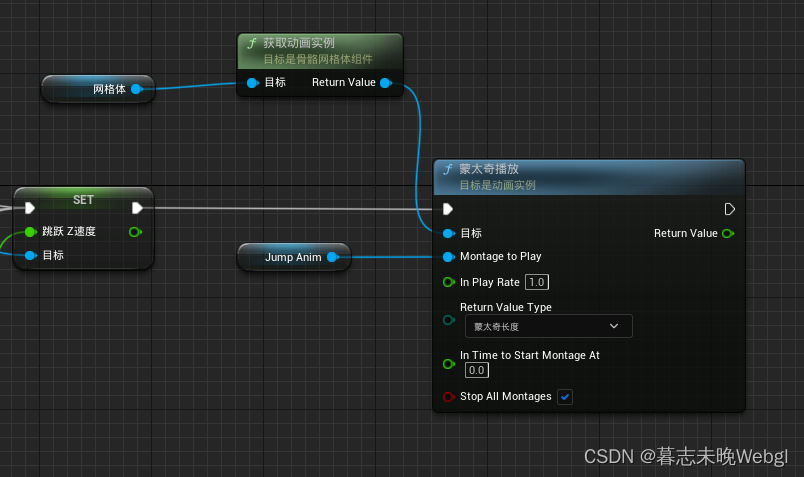
In order to modify the montage playback assets conveniently, we promote the asset nodes to variables for easy modification.

In order to facilitate the modification of each character, the assets used in the montage can be upgraded and set outside the function, which is equivalent to increasing the function value.
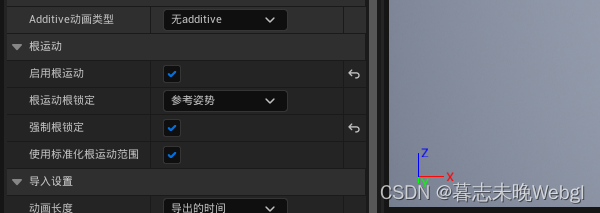
Play In order to prevent the position of the character from shifting, we need to enable the movement of the root node to ensure that the character plays animation at the set position. If the root node itself is moving, don’t set it again. I found that I forced the root movement to be enabled, and the character would jump in place.
Right click on the animation file to create a montage animation.
Next, we're going to create the slot, which lets us know what montage animation we're creating.
A list of animation slots will appear on the right.
Click Add Slot to create a jump slot.
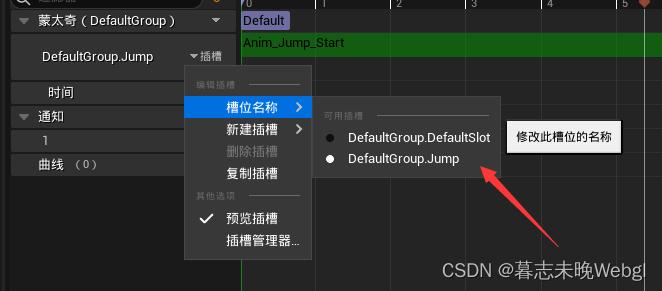
After the setting is complete, select the slot you just set.
Call the function directly in the place set before, and
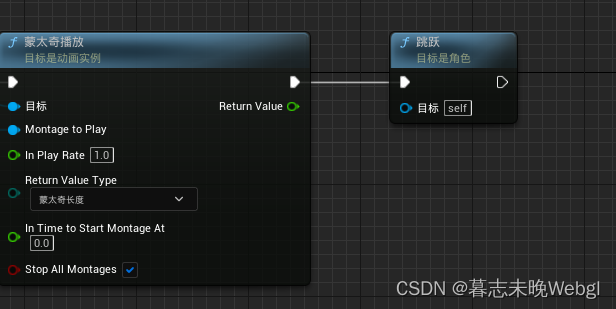
modify the jump trigger to the back of the montage playback.
The slot is created and needs to be used. Now test it directly. After
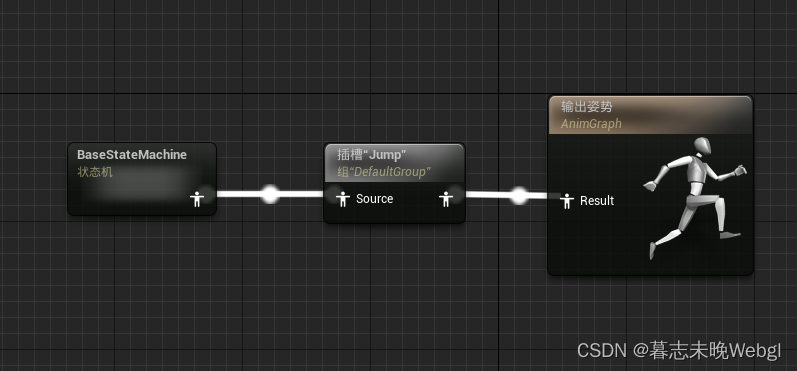
the slot is created, remember to change the slot to a Jump slot on the right.
The slots are there so that when playing the montage's animation, we can choose when to blend.
In order to prevent the character from jumping all the time, we use a variable to judge, and then let the character jump again after jumping and landing.

After jumping, set the variable to false, the branch node can be obtained through if
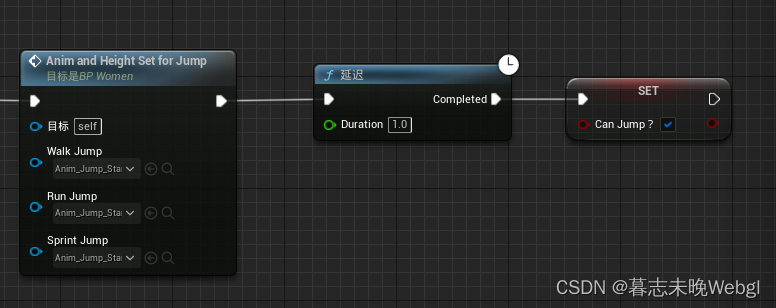
and then the function call is completed, and after a second delay, set the variable to true, that is, you can jump again.
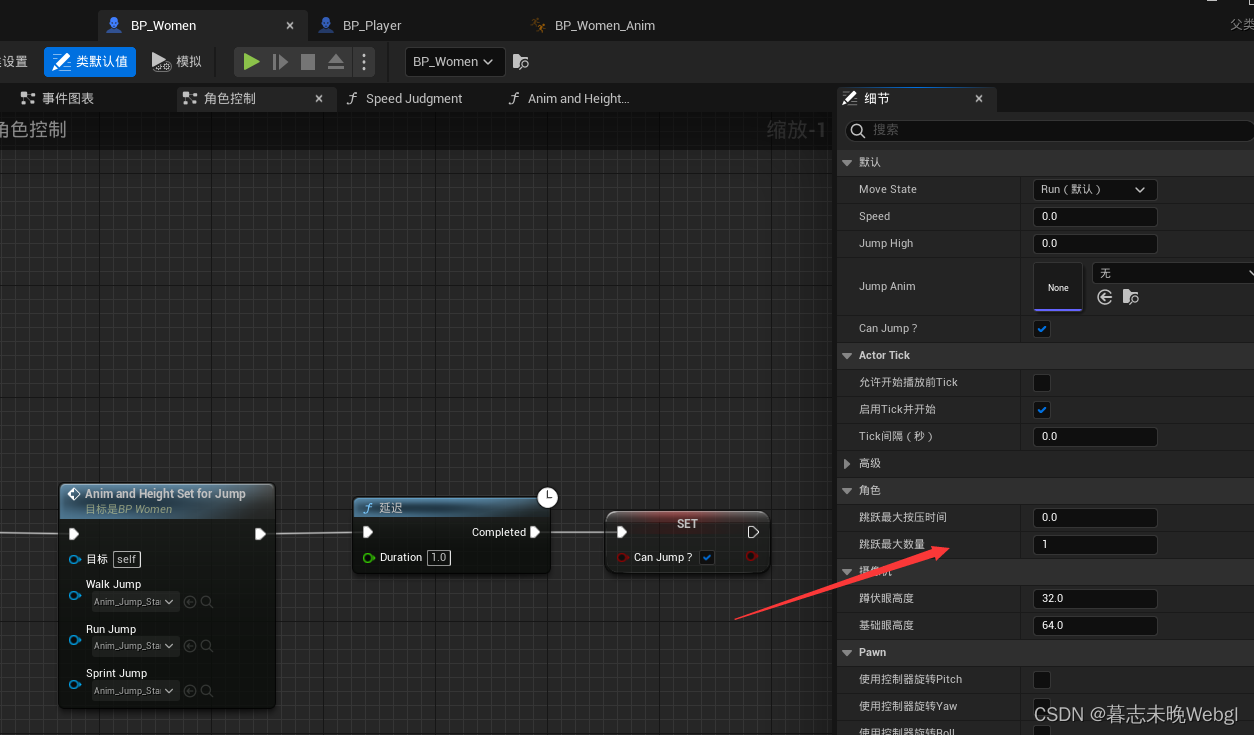
To achieve multi-segment jump, you can find the maximum number of jumps in the default value of the class to set.
Fall animation implementation
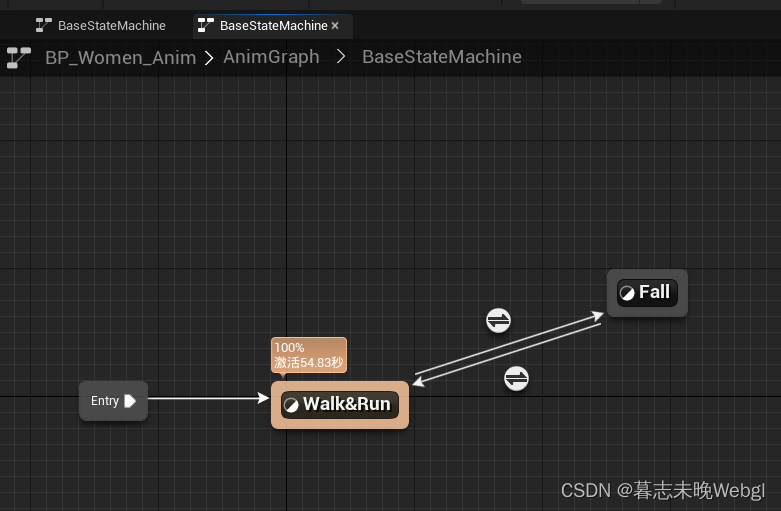
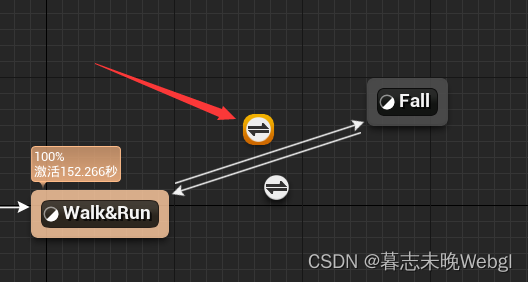
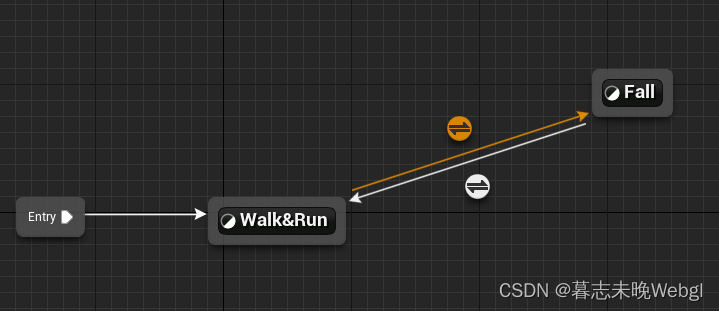
In the basic state machine, a new state is added on the right side of the movement, and the fall is named Fall, and then an arrow is drawn from the Fall node to return to Walk, forming a closed loop.
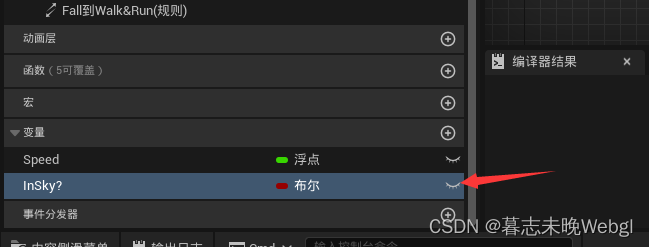
Create a variable on the left to determine whether it is currently in the air.
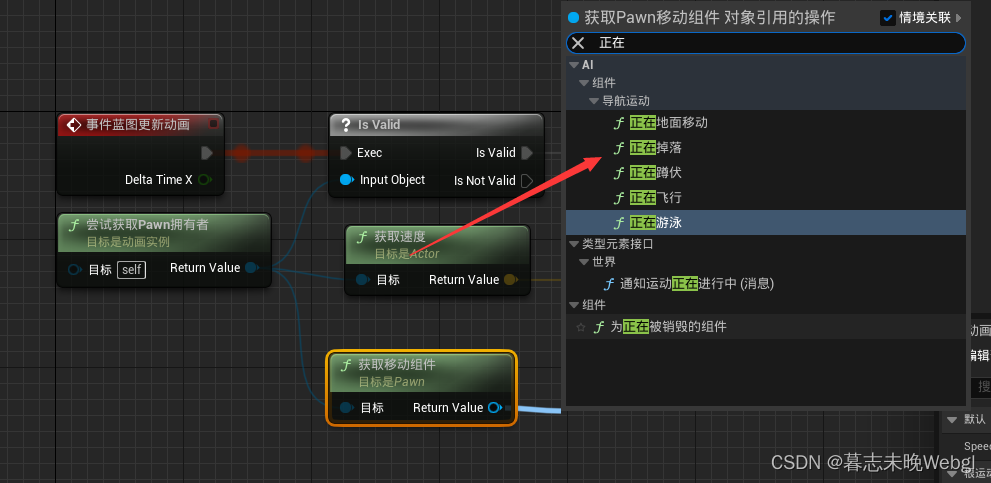
Then get the mobile component from the owner in the animation chart, and get whether it is falling from it.
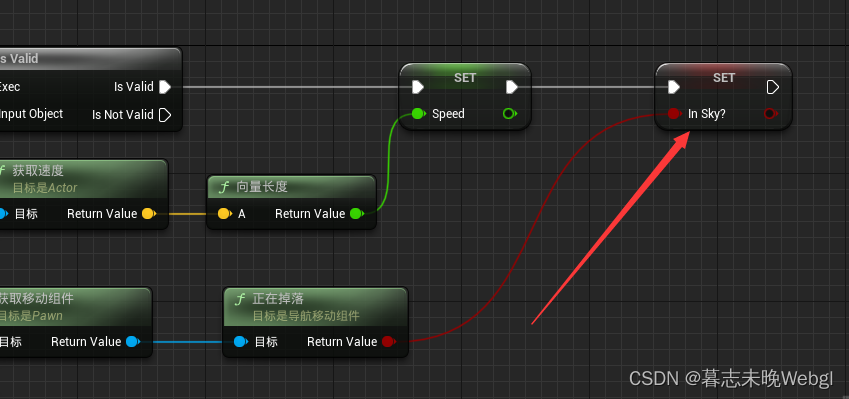
Set the value to the variable. With the variable, we can set the state switch in the state machine switch.
Double-click the switch to enter
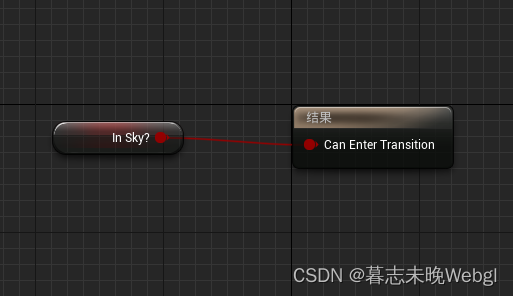
and set the variable to the result. If the value is True, you can switch from moving to falling animation.
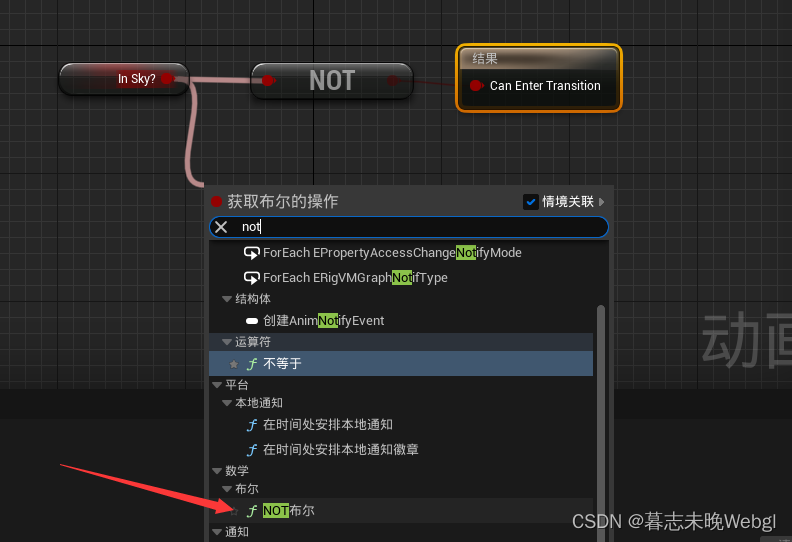
We also need to set the switch back, which is another switch arrow, enter to invert the variable, if it is not in the space, then the result will be true.
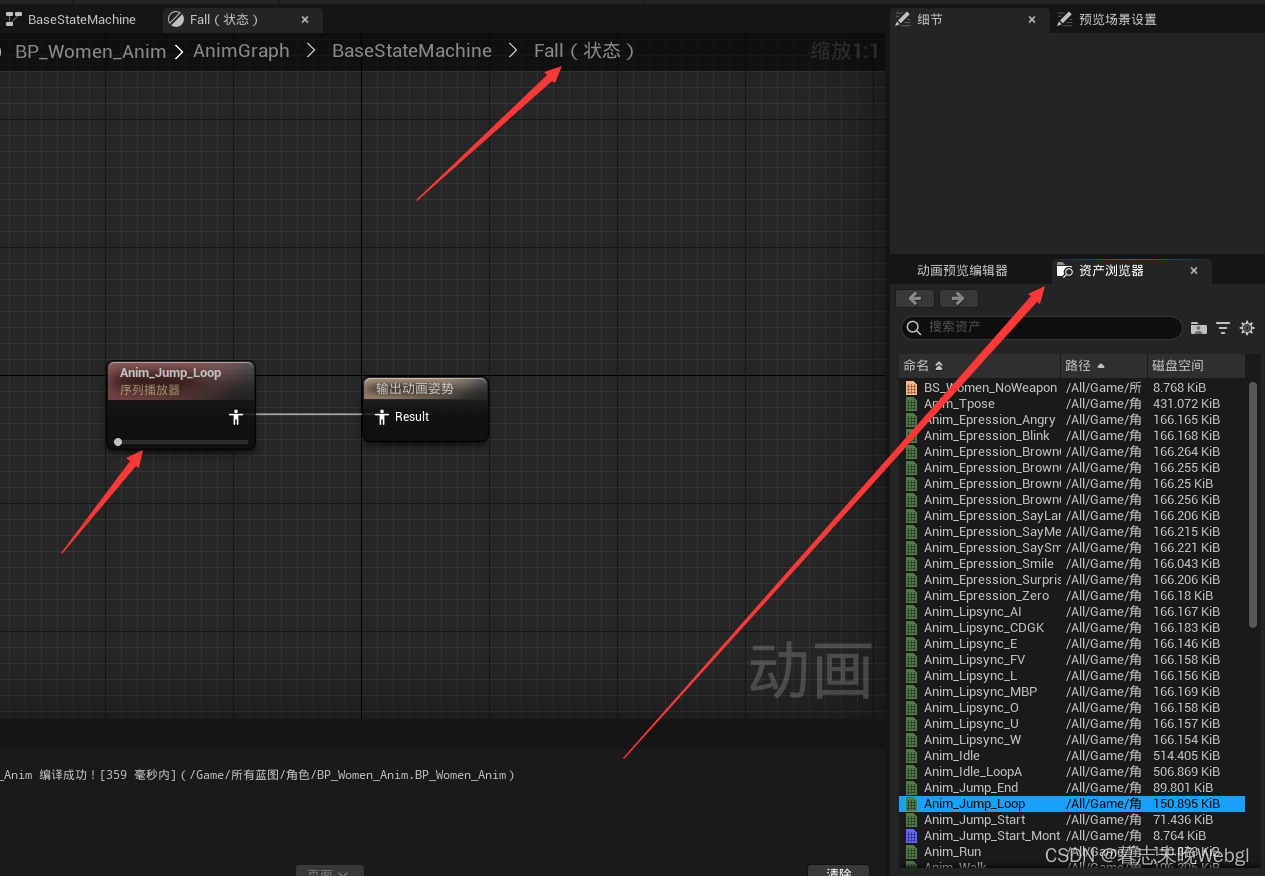
Then enter the Fall state, find the falling animation on the right, and output the animation pose to achieve the falling effect.
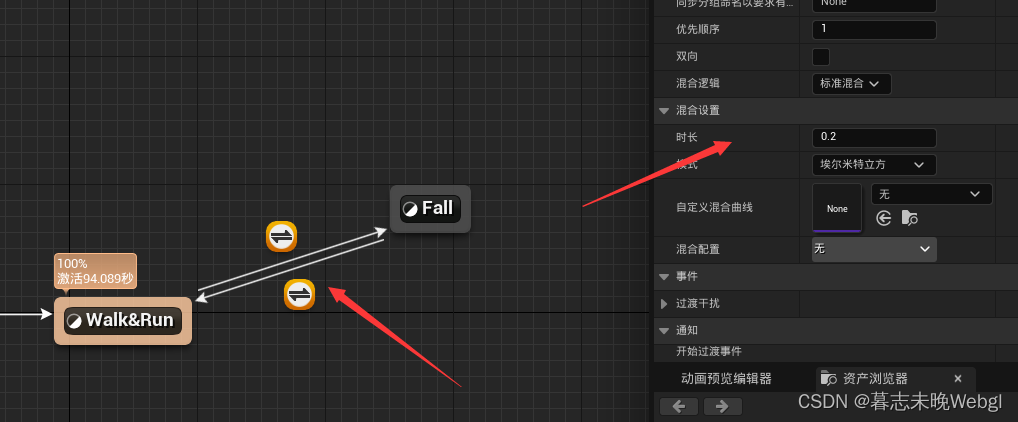
If you feel that the duration of the transition animation is a bit stuck, you can manually adjust the duration of the transition between the two states.
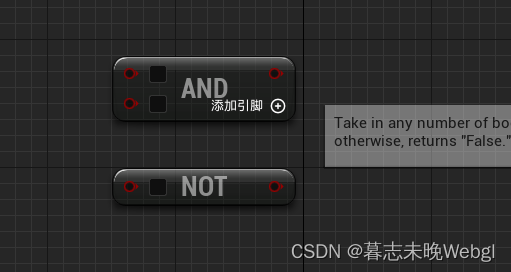
Pay attention to these two, and is a union, not is an intersection, right-click and enter Boolean to find AND nodes, and right-click to enter not Boolean can find NOT nodes
Data transfer between character blueprint and animation blueprint
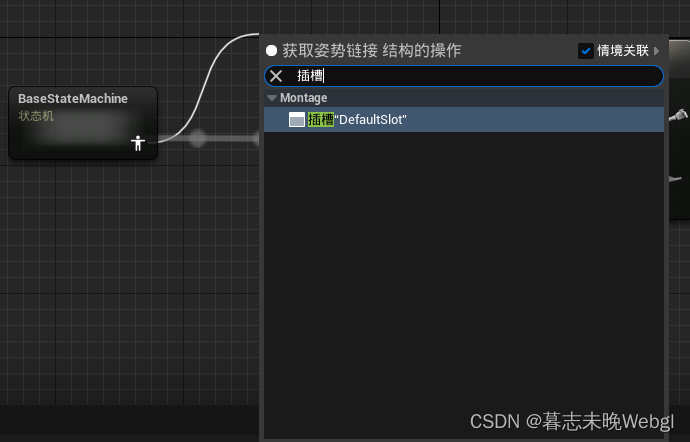
Get the animation instance in the character blueprint.
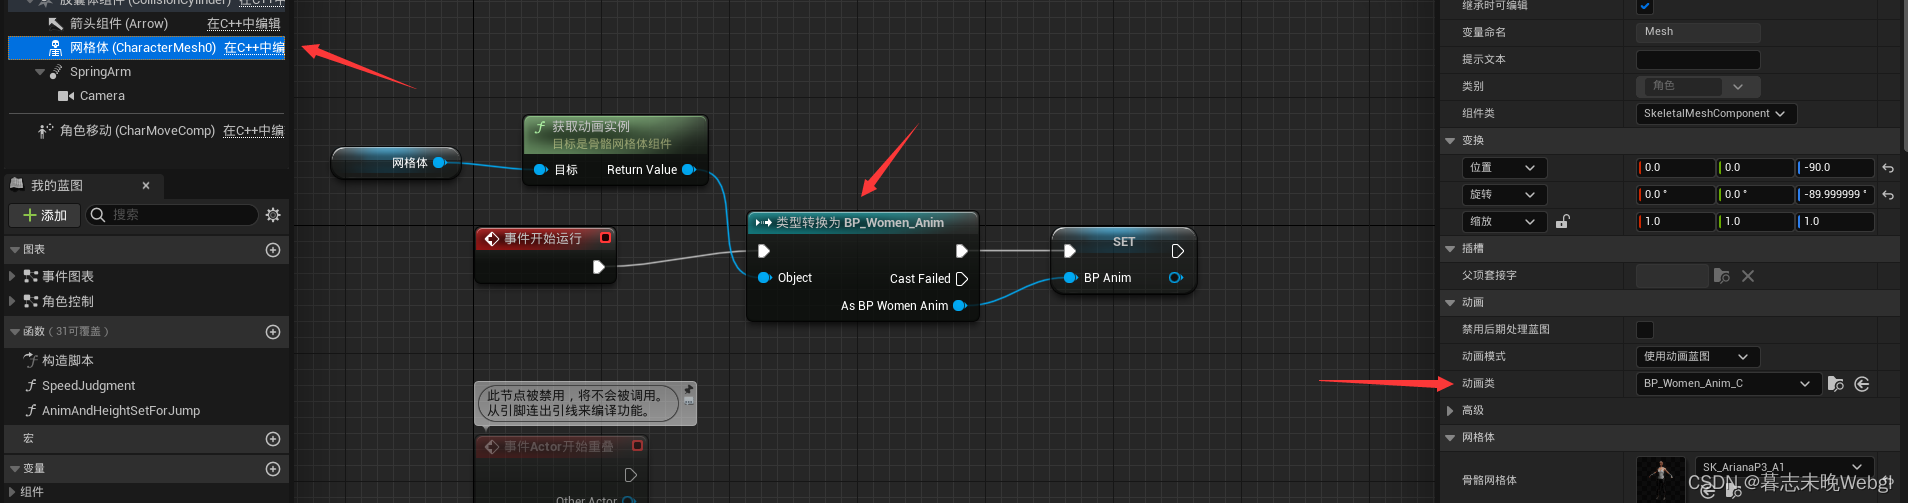
The animation instance is on the character mesh. We can get the animation instance through the orange mesh, and then when the time starts running, judge whether the type is correct and convert the type to the target animation type. And promoting the obtained result to a variable, so that the relevant property in the character can be set with the current blueprint anywhere in the event graph in the character blueprint.
In the previous switching and jumping, we actually used montage to achieve it, but I think the character production in the library is switched through the state machine. Let me talk about the idea here. After walking and jumping, it enters the floating state, and first plays the jumping animation. , the animation does not loop. After completion, switch directly to the floating state. If it is not in the floating state, directly switch to the moving state.
moving ground friction
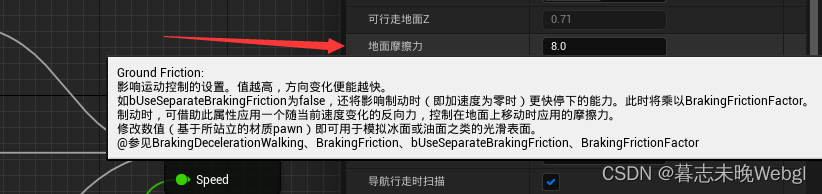
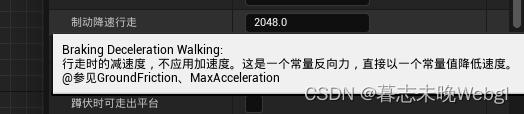
With these two values, we can simulate different ground textures.