Explicit mapping compared with dynamic mapping ( Dynamic mapping ) requires us to define the fields and their types when the index is created. This is the same as our traditional RDMS database. Before we write data into the database, we need to neatly define each field and its type and length. Elasticsearch can use both explicit and dynamic mappings. In many application scenarios, if we know the indexed fields and their types in advance, then the use of explicit mapping will undoubtedly allow us to provide indexing speed, because Elasticsearch will not spend time extrapolating the type of new fields and between nodes synchronization. This will reduce the amount of computation on the master node.
Elasticsearch can intelligently derive mapping information based on our documentation, however, it is possible to end up with the wrong schema definition. Fortunately, Elasticsearch provides the way and means for us (users) to specify mapping definitions in the form of index and mapping APIs the way we want.
Two possible ways to explicitly create (or update) a schema are listed below.
- Indexing API : For this, we can use the create index API (not the mapping API, note) to create a schema definition when creating an index. The Create Index API requires a request containing the desired schema definition in the form of a JSON document. This way, a new index and its mapping definition are created in one go.
- Mapping API : As our data model matures, it is sometimes necessary to update the schema definition with new attributes. Elasticsearch provides a _mapping endpoint to do this, allowing us to add additional fields and their data types. We can also use this API for the first time to add schemas to newly created indexes.
For example, take a look at the figure below, which demonstrates how to create a movies index using these two APIs.

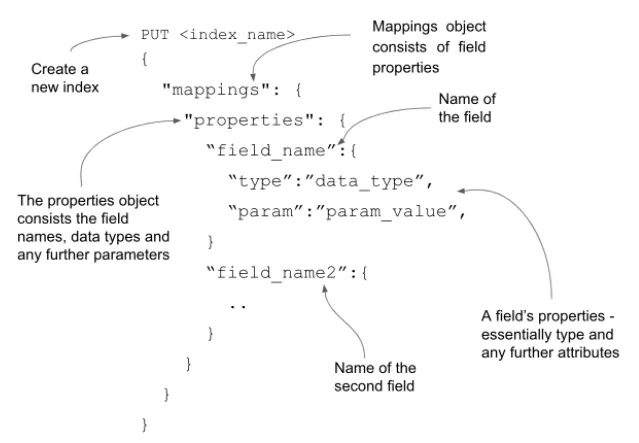
Mapping using the Index API
Creating a mapping definition when creating an index is relatively simple. We simply issue a PUT command after the index name and pass a map object containing all required fields and their details as the body of the request. The diagram below visually explains the ingredients.
Let's develop a mapping schema for the employee model -- employee information is modeled as a bunch of fields such as name, age, email, and address.
We call the mapping API via an HTTP PUT operation to index documents containing these fields into the employees index. The request body encapsulates the properties of our fields, as shown below.
# Creating an employees schema upfront
PUT employees
{
  "mappings": {
    "properties": {
      "name": {
        "type": "text"
      },
      "age": {
        "type": "integer"
      },
      "mmail": {
        "type": "keyword"
      },
      "address": {
        "properties": {
          "street": {
            "type": "text"
          },
          "country": {
            "type": "text"
          }
        }
      }
    }
  }
}
Once the script is ready, use Kibana's DevTools to execute this command. You should receive a successful response indicating that the index was created. In this example, we assigned the type to Elasticsearch; now we can control the schema.
Did you notice the address field in the list? It is an object type consisting of additional fields, street and country. One important thing to note is that the type of the address field is not mentioned as an object type, even though we say it is an object that encapsulates other data fields. The reason for this is that Elasticsearch by default infers the object data type for any internal object. In addition, the subfield properties object contained in the address helps to define more properties of the inner object.
Now that we have our employees index in production, let's say we want to extend the model to have more attributes such as department, phone number, etc. To meet this requirement, we need to add these additional fields using the _mapping API on the live index.
Update the schema using the mapping API
As our project matures, the data model will undoubtedly change as well. For our employee document, we might want to add a few attributes, such as joining_date and phone_number as shown in the following code snippet.
# Additional data to the existing Employee document
{
 "name":"John Smith",
 "joining_date":"01-05-2021",
 "phone_number":"01234567899"
 ...
}
Joining date (joining_date) is a date type, because we want to perform date-related operations, such as sorting employees by joining date. The phone number should be stored as-is, so it conforms to the keyword data type. To modify the schema definition for an existing employee with these additional fields, we call the _mapping endpoint on the existing index, declaring the new field in the request object, as shown in the listing below.
# Updating the existing index with additional fields
PUT employees/_mapping
{
 "properties":{
  "joining_date":{
   "type":"date",
   "format":"dd-mm-yyyy"
   },
  "phone_number":{
   "type":"keyword"
   }
 }
}
If you look closely at the request body, the properties object is defined at the root level, as opposed to the method of creating schemas using the Index API, where the properties object is wrapped in a root-level mappings object.
update empty index
We can also use the same principle to update the schema on an empty index. An empty index is one created without any schema mapping -- for example, executing a PUT books command would create an empty books index with no schema associated.
PUT booksSimilar to the mechanism for updating an index by calling the _mapping endpoint with the desired schema definition, we can use the same approach for empty indexes as well. The following code snippet updates the schema of the departments index with several fields:
# Adding the mapping schema to an empty index
PUT departments/_mapping
{
 "properties":{
  "name":{
   "type":"text"
  }
 }
}
We have already seen the additional case of updating the schema with additional fields. But what if we want to change the data type of an existing field?
Modifying existing fields is not allowed
Once the index is live (the index is created with some data fields and is operational), any modifications to existing fields on the live index are prohibited. For example, if a field is defined as keyword data type and indexed, it cannot be changed to a different data type (for example, from keyword to text data type). Still, there are good reasons for this.
Data is indexed using an existing schema definition and is therefore stored in the index. If the data type has been modified, searches for that field's data will fail, resulting in an incorrect search experience. In order to avoid search failure, Elasticsearch does not allow us to modify existing fields.
So, you might ask, what are the alternatives? Business needs change as technology needs change. How can we fix the datatypes on the live index (maybe, we created them wrongly in the first place)? Reindexing is our friend.
In some cases, add that you have defined a field of type text, but you want to aggregate this field later. So what should you do? You can read the article " Elasticsearch: How to make text fields in Elasticsearch and Kibana aggregateable? " in detail.
reindex data
This is where we use the reindex technique. A reindex operation fetches data from the original index to a new index with an updated schema definition. Our idea is:
- Create a new index with the updated schema definition.
- Use the reindex API to copy data from the old index to the new index. Once the reindex is complete, the new index with the new schema is ready to use. Indexes are open to both read and write operations.
- Once the new index is ready, our application switches to the new index.
- Once we've confirmed that the new index is working as expected, we'll shelve the old index.
Reindexing is a powerful operation. You can read the article " Elasticsearch: Reindex interface " in detail. But let me briefly describe how the API works. Suppose we wish to migrate data from an existing (source) index to a destination (dest) index, we issue a rebuild index call as shown in the following code:
# Migrating data to a new index with new schema
POST _reindex
{
  “source”: {“index”: “orders”},
  “dest”: {“index”: “orders_new”}
}
A new index orders_new was probably created by a change to the schema, then data from the old index (orders) was migrated to this newly created index and the declarations were updated.
Aliases play an important role in migrations
If your application is tightly tied to an existing index, migrating to the new index may require code or configuration changes. For example, in the example above, all queries directed to the orders index will now be executed against the newly created orders_new index -- this may require code changes.
The ideal way to avoid this is to use aliases. An alias is an alternate name given to an index. Aliases help us seamlessly switch between indexes with zero downtime. You can read the article " Elasticsearch: How to easily and safely reindex your data to live Elasticsearch indexing " in detail.
Type coercion - type coercion
Sometimes, when indexing a document, the data may not be of the correct type - a field defined by an integer may be indexed with a string value. Elasticsearch tries to convert this inconsistent type to avoid indexing issues. This is a process called type coercion
For example: a rating field of type float may receive a value enclosed in a string: "rating": "4.9" instead of "rating": 4.9. Elasticsearch is forgiving when encountering values with mismatched data types. It indexes documents by extracting values and storing them in primitive data types. Please read the article " Elasticsearch: Data Enforcing in Elasticsearch " for details.
In this article, we looked at how to control and create mapping schemas for the data models we have.