1. User registration (mobile phone verification code)
At present, mobile phone number registration is the mainstream method, because the collection of mobile phone numbers is extremely valuable for user promotion and business promotion. Combined with the previous article, Aliyun SMS service is used to send mobile phone verification codes. Here, the integration realizes user registration with mobile phone numbers.
Idea: After entering the mobile phone number, the front-end needs to verify the mobile phone number. The user needs to receive the SMS verification code and complete the verification code verification to register successfully. Specific steps:
1. Determine whether the current mobile phone number has been registered;
2. Call the Alibaba Cloud SMS service api to send the verification code;
3. The verification code is sent successfully and stored in the redis cache, and the verification code is realized by using the cache elimination mechanism (setting the effective time) Expired;
4. Verification code verification, if passed, the registration is successful.
1.1 User Entity Class
package com.zhmsky.service_ucenter.entity;

import com.baomidou.mybatisplus.annotation.*;

import java.util.Date;

import java.io.Serializable;
import io.swagger.annotations.ApiModel;
import io.swagger.annotations.ApiModelProperty;
import lombok.Data;
import lombok.EqualsAndHashCode;

/**
 * <p>
 * 会员表
 * </p>
 *
 * @author zhmsky
 * @since 2022-07-16
 */
@Data
@EqualsAndHashCode(callSuper = false)
@ApiModel(value="UcenterMember对象", description="会员表")
public class UcenterMember implements Serializable {


    private static final long serialVersionUID = 1L;

    @ApiModelProperty(value = "会员id")
    @TableId(value = "id", type = IdType.ASSIGN_ID)
    private String id;

    @ApiModelProperty(value = "微信openid")
    private String openid;

    @ApiModelProperty(value = "手机号")
    private String mobile;

    @ApiModelProperty(value = "密码")
    private String password;

    @ApiModelProperty(value = "昵称")
    private String nickname;

    @ApiModelProperty(value = "性别 1 女,2 男")
    private Integer sex;

    @ApiModelProperty(value = "年龄")
    private Integer age;

    @ApiModelProperty(value = "用户头像")
    private String avatar;

    @ApiModelProperty(value = "用户签名")
    private String sign;

    @ApiModelProperty(value = "是否禁用 1(true)已禁用,  0(false)未禁用")
    private Boolean isDisabled;

    @ApiModelProperty(value = "逻辑删除 1(true)已删除, 0(false)未删除")
    private Boolean isDeleted;

    @ApiModelProperty(value = "创建时间")
    @TableField(fill = FieldFill.INSERT)
    private Date createTime;

    @ApiModelProperty(value = "更新时间")
    @TableField(fill = FieldFill.UPDATE)
    private Date updateTime;

}
1.2 Register user view object
package com.zhmsky.service_ucenter.entity.VO;

import io.swagger.annotations.ApiModel;
import io.swagger.annotations.ApiModelProperty;
import lombok.Data;

/**
 * @author zhmsky
 * @date 2022/7/16 17:18
 */
@Data
@ApiModel(value="注册对象", description="注册对象")
public class RegisterVO {


    @ApiModelProperty(value = "昵称")
    private String nickname;

    @ApiModelProperty(value = "手机号")
    private String mobile;

    @ApiModelProperty(value = "密码")
    private String password;

    @ApiModelProperty(value = "验证码")
    private String code;
}
1.3 Sending SMS verification code
Call Alibaba Cloud SMS service to send SMS verification code
package com.zhmsky.msmService.service.impl;

import com.aliyuncs.DefaultAcsClient;
import com.aliyuncs.IAcsClient;
import com.aliyuncs.dysmsapi.model.v20170525.SendSmsRequest;
import com.aliyuncs.dysmsapi.model.v20170525.SendSmsResponse;
import com.aliyuncs.exceptions.ClientException;
import com.aliyuncs.exceptions.ServerException;
import com.aliyuncs.profile.DefaultProfile;
import com.zhmsky.msmService.service.MsmService;
import org.springframework.stereotype.Service;

/**
 * @author zhmsky
 * @date 2022/7/6 21:01
 * 短信验证码实现类
 */
@Service
public class MsmServiceImpl implements MsmService {


    /**
     * 发送短信验证码
     * @param phone 手机号
     * @param code 被发送的验证码
     * @return
     */
    @Override
    public String sendCodeMsg(String phone, String code) {


        String checkCode="";
        DefaultProfile profile = DefaultProfile.getProfile("cn-hangzhou", "LTAI5tDfHQPQ5WA5dBkrfFxu", "eRID7ZigveAH7fMRKbCDq92jjRl68R");


        IAcsClient client = new DefaultAcsClient(profile);

        SendSmsRequest request = new SendSmsRequest();
        request.setSignName("阿里云短信测试");
        request.setTemplateCode("SMS_154950909");
        request.setPhoneNumbers(phone);
        request.setTemplateParam("{\"code\":\""+code+"\"}");

        try {


            SendSmsResponse response = client.getAcsResponse(request);
            checkCode = response.getCode();
        } catch (ServerException e) {


            e.printStackTrace();
        } catch (ClientException e) {


            System.out.println("ErrCode:" + e.getErrCode());
            System.out.println("ErrMsg:" + e.getErrMsg());
            System.out.println("RequestId:" + e.getRequestId());
        }
        return checkCode;
    }
}
SMS verification code sending interface
package com.zhmsky.msmService.controller;

import com.zhmsky.msmService.service.MsmService;
import com.zhmsky.msmService.utils.RandomUtil;
import com.zhmsky.result.Result;
import com.zhmsky.result.ResultUtil;
import io.swagger.annotations.Api;
import io.swagger.annotations.ApiOperation;
import org.springframework.beans.factory.annotation.Autowired;
import org.springframework.data.redis.core.RedisTemplate;
import org.springframework.util.StringUtils;
import org.springframework.web.bind.annotation.*;

import java.util.HashMap;
import java.util.Map;
import java.util.concurrent.TimeUnit;

/**
 * @author zhmsky
 * @date 2022/7/6 20:58
 */
@RestController
@Api("短信注册控制器")
@CrossOrigin
@RequestMapping("/msmService")
public class MsmController {


    @Autowired
    private MsmService msmService;
    @Autowired
    private RedisTemplate<String,String> redisTemplate;

    @GetMapping("/send/{phone}")
    @ApiOperation("发送短信验证码")
    public Result<String> sendMsg(@PathVariable String phone){


        //通过redis设置缓存时间实现验证码过期
        String code = redisTemplate.opsForValue().get(phone);
        if(!StringUtils.isEmpty(code)){


            return new ResultUtil<String>().setSuccessMsg("请勿重复发送!");
        }
        /**  如果缓存里面没有那么就重新发送   **/
        //生成随机验证码
        String fourBitRandom = RandomUtil.getFourBitRandom();
        //调用阿里云api实现短信发送
        String checkCode = msmService.sendCodeMsg(phone, fourBitRandom);
        if("OK".equals(checkCode)){


            //将验证码保存到redis中并设置有效时间为5分钟
            redisTemplate.opsForValue().set(phone,fourBitRandom,5, TimeUnit.MINUTES);
            return new ResultUtil<String>().setData(fourBitRandom,"验证码发送成功!");
        }else{


            return new ResultUtil<String>().setErrorMsg("验证码发送给失败!");
        }
    }

}
1.4 Realization of registration function
1. Interface protection, parameter non-empty judgment;
2. Verify whether the mobile phone number has been registered;
3. Verification code verification;
4. Storage
 /**
     * 用户注册
     * @param registerVO
     * @return
     */
    @Override
    public boolean register(RegisterVO registerVO) {


        //获取注册数据,接口保护,参数校验
        String code = registerVO.getCode();
        String mobile = registerVO.getMobile();
        String nickname = registerVO.getNickname();
        String password = registerVO.getPassword();

        if(StringUtils.isEmpty(mobile)||StringUtils.isEmpty(password)||StringUtils.isEmpty(code)||StringUtils.isEmpty(nickname)){


            throw new MyException(20005,"注册失败!");
        }

        //判断手机号是否已注册
        QueryWrapper<UcenterMember> wrapper = new QueryWrapper<>();
        wrapper.eq("mobile",mobile);
        Long count = baseMapper.selectCount(wrapper);
        if(count>0){


            throw new MyException(20005,"注册失败!");
        }

        //验证码校验
        //先从redis中获取验证码
        String cacheCode = redisTemplate.opsForValue().get(mobile);
        if(!code.equals(cacheCode)){


           throw new MyException(20005,"注册失败!");
        }

        //入库
        UcenterMember ucenterMember = new UcenterMember();
        ucenterMember.setMobile(mobile);
        ucenterMember.setNickname(nickname);
        ucenterMember.setPassword(MD5.encrypt(password));
        ucenterMember.setIsDisabled(false);
        ucenterMember.setAvatar("http://thirdwx.qlogo.cn/mmopen/vi_32/DYAIOgq83eoj0hHXhgJNOTSOFsS4uZs8x1ConecaVOB8eIl115xmJZcT4oCicvia7wMEufibKtTLqiaJeanU2Lpg3w/132");
        int insert = baseMapper.insert(ucenterMember);
        if(insert>0){


            return true;
        }else{


            return false;
        }

    }
2. User login
2.1 Account password login
Login process:
1. Call the login interface and return the token string
2. Put the returned token string into the cookie
3. Create a front-end interceptor to determine whether there is a token string in the cookie, and if so, put the token into the request 4. In the header
, call the interface, obtain user information according to the token and put it in the cookie again (for the first page display)
5. Take out the user information from the cookie for display
Ideas:
1. Interface protection, parameter non-null check;
2. Verify that the account is registered;
3. Verify that the account is disabled;
4. Verify the password;
5. Log in and return the token.
In order to achieve single sign-on, the token token method is used to introduce the jwt
jwt tool class:
package com.zhmsky.jwt;

import io.jsonwebtoken.Claims;
import io.jsonwebtoken.Jws;
import io.jsonwebtoken.Jwts;
import io.jsonwebtoken.SignatureAlgorithm;
import org.springframework.util.StringUtils;

import javax.servlet.http.HttpServletRequest;
import java.util.Date;

/**
 * @author zhmsky
 * @date 2022/7/6 17:53
 */
public class JwtUtils {


    //设置token过期时间
    public static final long EXPIRE = 1000 * 60 * 60 * 24;    //一天
    //签名加密密钥
    public static final String APP_SECRET = "ukc8BDbRigUDaY6pZFfWus2jZWLPHO";

    /**
     * 生成token
     * @param id
     * @param nickname
     * @return
     */
    public static String getJwtToken(String id, String nickname){


        String JwtToken = Jwts.builder()
                //设置头信息
                .setHeaderParam("typ", "JWT")
                .setHeaderParam("alg", "HS256")
                //设置token过期时间
                .setSubject("user")   //随便写
                .setIssuedAt(new Date())
                //当前时间加上设置的过期时间
                .setExpiration(new Date(System.currentTimeMillis() + EXPIRE))
                //设置token主体,可存储用户信息
                .claim("id", id)
                .claim("nickname", nickname)
                //签名哈希
                .signWith(SignatureAlgorithm.HS256, APP_SECRET)
                .compact();

        return JwtToken;
    }

    /**
     * 判断token是否存在与有效
     * @param jwtToken
     * @return
     */
    public static boolean checkToken(String jwtToken) {


        if(StringUtils.isEmpty(jwtToken)) return false;
        try {


            Jwts.parser().setSigningKey(APP_SECRET).parseClaimsJws(jwtToken);
        } catch (Exception e) {


            e.printStackTrace();
            return false;
        }
        return true;
    }

    /**
     * 判断token是否存在与有效
     * @param request
     * @return
     */
    public static boolean checkToken(HttpServletRequest request) {


        try {


            String jwtToken = request.getHeader("token");
            if(StringUtils.isEmpty(jwtToken)) return false;
            Jwts.parser().setSigningKey(APP_SECRET).parseClaimsJws(jwtToken);
        } catch (Exception e) {


            e.printStackTrace();
            return false;
        }
        return true;
    }

    /**
     * 根据token获取会员id
     * @param request
     * @return
     */
    public static String getMemberIdByJwtToken(HttpServletRequest request) {


        String jwtToken = request.getHeader("token");
        if(StringUtils.isEmpty(jwtToken)) return "";
        Jws<Claims> claimsJws = Jwts.parser().setSigningKey(APP_SECRET).parseClaimsJws(jwtToken);
        Claims claims = claimsJws.getBody();
        return (String)claims.get("id");
    }
}
Login business:
 /**
     * 用户登录
     * @param member
     * @return token
     */
    @Override
    public String login(UcenterMember member) {


       //获取账号和密码
        String mobile = member.getMobile();
        String password = member.getPassword();
       if(StringUtils.isEmpty(mobile)||StringUtils.isEmpty(password)){


           throw new MyException(20010,"账号和密码不能为空!");
       }
       //判断账号和密码是否存在
        QueryWrapper<UcenterMember> wrapper = new QueryWrapper<>();
        wrapper.eq("mobile",mobile);
        UcenterMember ucenterMember = baseMapper.selectOne(wrapper);
        if(ObjectUtils.isEmpty(ucenterMember)){


            throw new MyException(20011,"账号不存在,请重新输入!");
        }
        //判断该用户是否被禁用
        Boolean isDisabled = ucenterMember.getIsDisabled();
        if(isDisabled){


            throw new MyException(20013,"该账号已禁用!");
        }
        //判断密码是否正确
        //密码存储肯定是加密的,实际开发中数据库不会存储明文密码
        //先将输入的密码加密,再和数据库密码比较
        //MD5加密
        String realPassword = ucenterMember.getPassword();
        if(!MD5.encrypt(password).equals(realPassword)){


            throw new MyException(20012,"密码错误,请重新输入!");
        }
        //登录成功,返回token(通过查出来的用户数据去生成token)
        return JwtUtils.getJwtToken(ucenterMember.getId(), ucenterMember.getNickname());
    }
Login interface:
    @PostMapping ("/login")
    @ApiOperation("用户登录")
    public Result<String> login(@RequestBody(required = false) UcenterMember ucenterMember){


        //登录生成token并返回
        String token = memberService.login(ucenterMember);
        return new ResultUtil<String>().setData(token);
    }
After the login is successful, each request of the front end carries a token, and the token is obtained from the request object, and then the token is parsed to obtain user information.
    @GetMapping("/getUserInfo")
    @ApiOperation("根据token获取用户信息")
    public Result<UcenterMember> getUserInfo(HttpServletRequest httpServletRequest){


        //从request对象中获取token,再根据token获取用户信息
        String userId = JwtUtils.getMemberIdByJwtToken(httpServletRequest);
        //根据用户id获取用户信息
        UcenterMember ucenterMember = memberService.getById(userId);
        return new ResultUtil<UcenterMember>().setData(ucenterMember);
    }
2.2 WeChat scan code login
2.2.1 Preparations:
The website application WeChat login is a WeChat OAuth2.0 authorized login system based on the OAuth2.0 protocol standard.
Before performing WeChat OAuth2. Before performing WeChat OAuth2.0 authorized login access, register a developer account on the WeChat open platform, have a website application that has been approved, and obtain the corresponding AppID and AppSecret, apply for WeChat login and pass the review After that, the access process can begin.
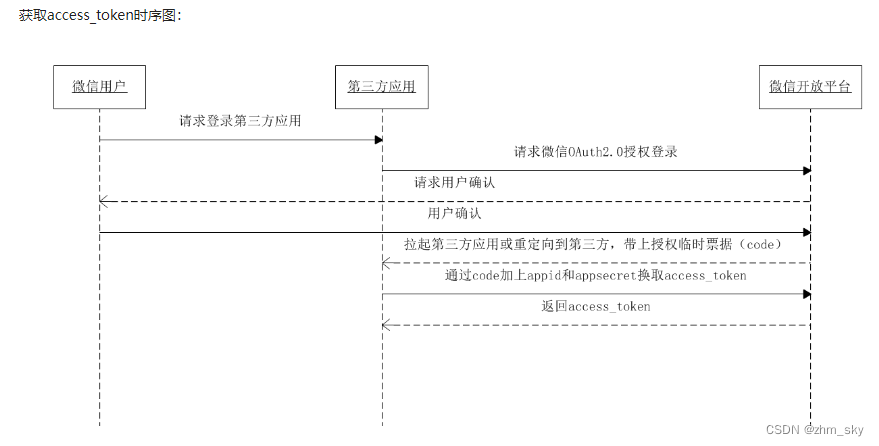
2.2.2 Authorization process
- The third party initiates a WeChat authorization login request. After the WeChat user allows the authorization of the third-party application, WeChat will launch the application or redirect to the third-party website, and bring the authorization temporary ticket code parameter;
- Add AppID and AppSecret through code parameters, etc., and exchange for access_token through API;
- Use the access_token to make interface calls to obtain basic user data resources or help users implement basic operations.
Step 1: Request to generate a WeChat QR code
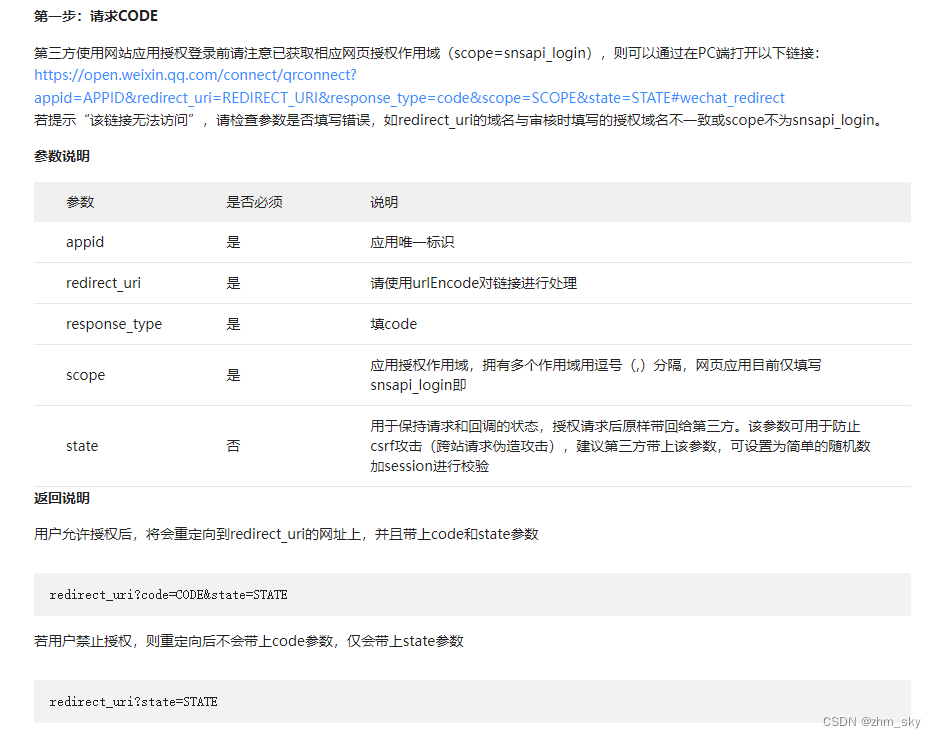
According to official documents, directly request the fixed address of the WeChat open platform https://open.weixin.qq.com/connect/qrconnect?appid=APPID&redirect_uri=REDIRECT_URI&response_type=code&scope=SCOPE&state=STATE#wechat_redirect , which has 4 necessary parameters;
appid: the unique identifier issued after the WeChat open platform application is approved
redirect_uri: the callback address after the WeChat scan code authorization
response_type: code
scope: authorization scope, just fill in snsapi_login for web applications
Prepare the above parameters and complete the initial value setting in the properties file
wx.open.app_id=wxed9954c01bb89b47
wx.open.app_secret=a7482517235173ddb4083788de60b90e
wx.open.redirect_url=http://localhost:8160/api/ucenter/wx/callback
Write a parameter initialization tool class:
package com.zhmsky.service_ucenter.utils;

import org.springframework.beans.factory.InitializingBean;
import org.springframework.beans.factory.annotation.Value;
import org.springframework.stereotype.Component;

/**
 * @author zhmsky
 * @date 2022/7/17 17:06
 */
@Component
public class ConstWxUtil implements InitializingBean {


    @Value("${wx.open.app_id}")
    private String appId;

    @Value("${wx.open.app_secret}")
    private String appSecret;

    @Value("${wx.open.redirect_url}")
    private String redirectUrl;

    public static String WX_OPEN_APP_ID;
    public static String WX_OPEN_APP_SECRET;
    public static String WX_OPEN_REDIRECT_URL;

    @Override
    public void afterPropertiesSet() throws Exception {


        WX_OPEN_APP_ID = appId;
        WX_OPEN_APP_SECRET = appSecret;
        WX_OPEN_REDIRECT_URL = redirectUrl;
    }
}
Two-dimensional code generation interface:
    @GetMapping("/getWxCode")
    @ApiOperation("生成微信二维码")
    public String getWxCode() {


        // 微信开放平台授权baseUrl
        String baseUrl = "https://open.weixin.qq.com/connect/qrconnect" +
                "?appid=%s" +
                "&redirect_uri=%s" +
                "&response_type=code" +
                "&scope=snsapi_login" +
                "&state=%s" +
                "#wechat_redirect";

        // 回调地址
        String redirectUrl = ConstWxUtil.WX_OPEN_REDIRECT_URL;
        try {


            redirectUrl = URLEncoder.encode(redirectUrl, "UTF-8"); //url编码
        } catch (UnsupportedEncodingException e) {


            throw new MyException(20001, e.getMessage());
        }
        String state = "imhelen";
        //生成qrcodeUrl
        String qrcodeUrl = String.format(
                baseUrl,
                ConstWxUtil.WX_OPEN_APP_ID,
                redirectUrl,
                state);

        return "redirect:" + qrcodeUrl;
    }
Step 2: Execute the callback after scanning the QR code on WeChat
    @GetMapping("/callback")
    @ApiOperation("微信扫码确认后执行回调")
    public String callback(String code,String state){


        //TODO
        return "redirect:http://localhost:3000";
    }
Then,
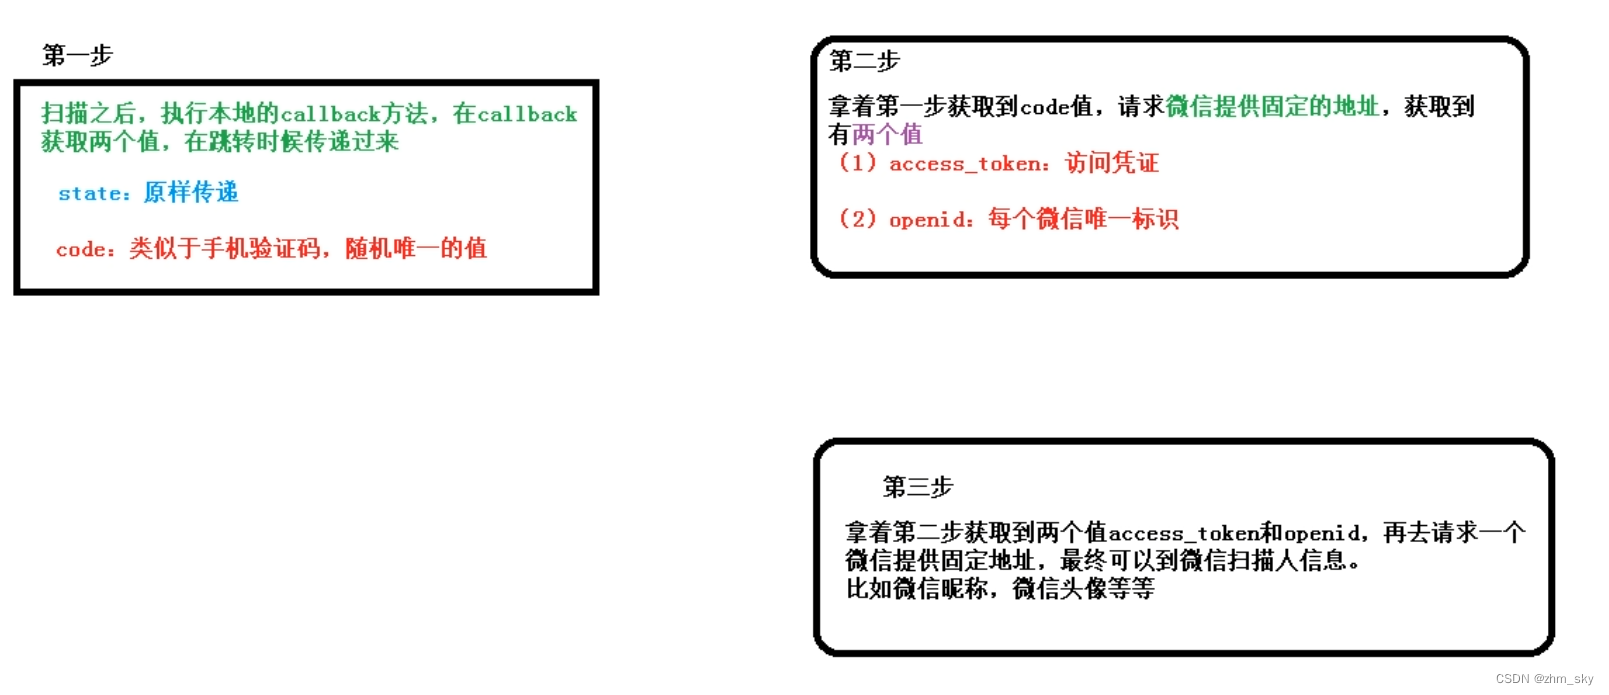
get the random code, request the fixed address of the WeChat resource server to get the accessToken (access credential) and openId (the unique user ID), and then request the fixed address of the WeChat resource server through the accessToken and openId to get the basic information of the code scanner. After the basic information of the user is obtained, the verification can be performed to complete storage and other operations.
   @GetMapping("/callback")
    @ApiOperation("微信扫码确认后执行回调")
    public String callback(String code,String state){


        //1、接收code值
        //用code去请求微信的固定地址,得到accessToken和openId
        //向认证服务器发送请求换取access_token
        String baseAccessTokenUrl = "https://api.weixin.qq.com/sns/oauth2/access_token" +
                "?appid=%s" +
                "&secret=%s" +
                "&code=%s" +
                "&grant_type=authorization_code";

        //带参数的真实认证服务器请求地址
        String accessTokenUrl = String.format(baseAccessTokenUrl,
                ConstWxUtil.WX_OPEN_APP_ID,
                ConstWxUtil.WX_OPEN_APP_SECRET,
                code
        );
        //2、请求认证服务器获取接口调用凭证access_token和用户唯一标识openId
        try {


            String accessTokenInfo = HttpClientUtils.get(accessTokenUrl);
            //将上述json字符串转换成map对象
            /*
            {
                "access_token":"ACCESS_TOKEN",
                "expires_in":7200,
                "refresh_token":"REFRESH_TOKEN",
                "openid":"OPENID",
                "scope":"SCOPE",
                "unionid": "o6_bmasdasdsad6_2sgVt7hMZOPfL"
             }
             */
            Gson gson = new Gson();
            HashMap mapAccessTokenInfo = gson.fromJson(accessTokenInfo, HashMap.class);
            //取出的access_token
            String access_token = (String)mapAccessTokenInfo.get("access_token");
            //取出的openid
            String openid = (String)mapAccessTokenInfo.get("openid");

            //3、再通过获取出来的access_token和openid去请求微信开放平台服务器获取扫码人信息
            //访问微信的资源服务器,获取用户信息
            String baseUserInfoUrl = "https://api.weixin.qq.com/sns/userinfo" +
                    "?access_token=%s" +
                    "&openid=%s";
            String userInfoUrl = String.format(baseUserInfoUrl, access_token, openid);
            //发送请求获取扫码人基本信息
            String userInfo = HttpClientUtils.get(userInfoUrl);
            /*
              {
    "openid":"o3_SC5_eI--mIC9ikI2pvTuZhYnk",
    "nickname":"Kong",
    "sex":0,
    "language":"",
    "city":"",
    "province":"",
    "country":"",
    "headimgurl":"https:\/\/thirdwx.qlogo.cn\/mmopen\/vi_32\/hAqkcbxzEJzic0WYl9pHDglAvYBI4iagLsSLXb2ialcxa3Au6UmwibSiadGMtbQia0oAzmzq26k2f1ES4q1HbS6aIYuA\/132",
    "privilege":[],
    "unionid":"oWgGz1OqVll-tTU4R_DM_zRp7Rjc"
                }
             */
            //将上面的json字符串转换成map对象
            HashMap mapUserInfo = gson.fromJson(userInfo, HashMap.class);
            //扫码人基础信息
            String nickname = (String)mapUserInfo.get("nickname");
            String headImgurl=(String)mapUserInfo.get("headimgurl");
            String openId=(String)mapUserInfo.get("openid");

            //扫码后自动注册(入库)
            //先判断是否已注册
            boolean isExist = memberService.getUserOpenId(openId);
            if(!isExist){


                //入库
                UcenterMember member = new UcenterMember();
                member.setNickname(nickname);
                member.setOpenid(openid);
                member.setAvatar(headImgurl);
                memberService.save(member);
            }
            UcenterMember ucenterMember = memberService.getUserByOpenId(openId);
            String token = JwtUtils.getJwtToken(ucenterMember.getId(), ucenterMember.getNickname());
            //因为端口号不同存在跨域问题,cookie不能跨域,所以这里使用url重写
            return "redirect:http://localhost:3000?token="+token;
        } catch (Exception e) {


            e.printStackTrace();
            throw new MyException(20010,"登录失败!");
        }
    }
Summary:
Implementing WeChat authorized login is like opening a treasure chest. A total of 3 keys are required. The first key is appid (this needs to be registered and certified on the WeChat open platform and issued by the platform); requesting a fixed address through appid can generate a WeChat QR code ; After scanning the QR code for authorization, the user gets the second key code (random unique value); then requests the fixed server address through the code to get the third key openid (user unique identifier) and accessToken (access credential); finally Get the basic information of WeChat users by requesting a fixed address through openid and accessToken.