foreword
When it comes to matrix transformation, the first thing we think of is the complicated things like linear algebra in college. Suddenly, there is an idea that makes people go from getting started to giving up. Don't panic. As a CV engineer at the application layer, in
practice We do not need to calculate the complex calculations of linear algebra in the application. In most cases, we can directly use Matrixthis class or glmthis library.
Regarding the relevant knowledge of matrices and vectors, the rules of addition, subtraction, multiplication, and division of matrices, I will not go into details here. Interested students can consult linear algebra by themselves, but it doesn’t matter if you forget these rules, anyway, there are APIs available.
We know that there are many coordinate systems in Opengl. One of the major functions of the matrix in Opengl is to convert coordinates from one coordinate system to another. At the same time, some deformation effects can be achieved through the matrix. Today we use the
matrix The method is combined with Opengl ES to achieve some deformation transformation effects such as translation, scaling, and rotation.
Generally speaking, the matrix in Opengl ES is a 4X4 matrix, which is a one-dimensional array containing 16 elements.
The following uses Matrixthis class to introduce some common methods of matrix transformation. The coordinate systems referred to in the matrix transformations described below are all the same, as shown in the figure below:
[External link picture transfer failed, the source site may have an anti-theft link mechanism, it is recommended to save the picture and upload it directly (img-p8RRqdaf-1682242193379)(https://flyer-blog.oss-cn-shenzhen.aliyuncs.com/% E7%9F%A9%E9%98%B5%E5%8F%98%E6%8D%A2%E5%8F%82%E8%80%83%E5%9D%90%E6%A0%87%E7% B3%BB.png)]
identity matrix
The so-called unit matrix is a matrix whose diagonal values from the upper left corner to the lower right corner are all 1, and it is also called a unit matrix. Use Matrix.setIdentityMthe method to convert a matrix into an identity matrix.
matrix translation
The method used for matrix translation is Matrix.translateM.
It should be noted that the value of the vertex coordinates in Opengl is between -1 and 1, so the range of translateX can be -2 to 2. why? Because the distance from -1 to 1 is 2, you can move up to 2 to the left, and similarly, you can move up to 2 to the right.
matrix rotation
The method used for matrix rotation is Matrix.rotateMthat the third parameter indicates the angle of the selected rotation, and the next three parameters xyz represent the rotation around that axis. When rotating around that axis, set the parameter of that axis to 1, and the other axes Just set it to 0.
matrix scaling
The method used for matrix scaling isMatrix.scaleM
How to write combination matrix
If there are the following deformation steps, first rotate 90 degrees around the Z axis, then translate 0.5 to the X axis, and finally scale the X axis by 0.9 times, how should the final deformation matrix be calculated? Is it the following way of writing?
Matrix.rotateM(mvpMatrix, 0, 90, 0, 0, 1);
Matrix.translateM(mvpMatrix, 0, 0.5, 0, 0);
Matrix.scaleM(mvpMatrix, 0, 0.9, 1f, 0f);
No, there is a rule for writing the combination matrix, and you must remember this rule:
When combining matrices, the scaling operation is performed first, then the rotation, and finally the displacement, but the writing method needs to be written anyway, that is, first write translateM, then rotateM, and finally scaleM
What happens if you don't write it like this? For example, writing along the way, first write scaleM, then rotateM, and finally write translateM, there will be problems during the test, and the movement direction will be reversed after the rotation exceeds 180 degrees.
So the correct way to write the above example should be like this:
Matrix.translateM(mvpMatrix, 0, 0.5, 0, 0);
Matrix.rotateM(mvpMatrix, 0, 90, 0, 0, 1);
Matrix.scaleM(mvpMatrix, 0, 0.9, 1f, 0f);
show me code
It can be used in Opengl ES to represent a 4X4 matrix, and we pass the total transformation matrix to the shader mat4in the form of calculated in the CPU . In the vertex shader, the result of multiplying the matrix and the vertex coordinates is used as the new vertex output coordinates to complete the matrix transformation.uniform
The following is the detailed code of MatrixTransformOpengl.cpp:
// 顶点着色器
static const char *ver = "#version 300 es\n"
                         "in vec4 aPosition;\n"
                         "in vec2 aTexCoord;\n"
                         "out vec2 TexCoord;\n"
                         "uniform mat4 mvpMatrix;\n"
                         "void main() {\n"
                         "  TexCoord = aTexCoord;\n"
                         "  gl_Position = mvpMatrix * aPosition;\n"
                         "}";

// 片元着色器
static const char *fragment = "#version 300 es\n"
                              "precision mediump float;\n"
                              "out vec4 FragColor;\n"
                              "in vec2 TexCoord;\n"
                              "uniform sampler2D ourTexture;\n"
                              "void main()\n"
                              "{\n"
                              "    FragColor = texture(ourTexture, TexCoord);\n"
                              "}";


// 使用绘制两个三角形组成一个矩形的形式(三角形带)
// 第一第二第三个点组成一个三角形,第二第三第四个点组成一个三角形
const static GLfloat VERTICES[] = {
        1.0f,-1.0f, // 右下
        1.0f,1.0f, // 右上
        -1.0f,-1.0f, // 左下
        -1.0f,1.0f // 左上
};

// 贴图纹理坐标(参考手机屏幕坐标系统,原点在左上角)
//由于对一个OpenGL纹理来说,它没有内在的方向性,因此我们可以使用不同的坐标把它定向到任何我们喜欢的方向上,然而大多数计算机图像都有一个默认的方向,它们通常被规定为y轴向下,X轴向右
const static GLfloat TEXTURE_COORD[] = {
        1.0f,1.0f, // 右下
        1.0f,0.0f, // 右上
        0.0f,1.0f, // 左下
        0.0f,0.0f // 左上
};

MatrixTransformOpengl::MatrixTransformOpengl():BaseOpengl() {
    initGlProgram(ver,fragment);
    positionHandle = glGetAttribLocation(program,"aPosition");
    textureHandle = glGetAttribLocation(program,"aTexCoord");
    textureSampler = glGetUniformLocation(program,"ourTexture");
    matrixHandle = glGetUniformLocation(program,"mvpMatrix");
}

MatrixTransformOpengl::~MatrixTransformOpengl() noexcept {
    LOGD("MatrixTransformOpengl析构函数");
}

void MatrixTransformOpengl::setMvpMatrix(float *mvp) {
    for (int i = 0; i < 16; ++i) {
        mvpMatrix[i] = mvp[i];
    }
}

void MatrixTransformOpengl::setPixel(void *data, int width, int height, int length) {
    LOGD("texture setPixel");
    imageWidth = width;
    imageHeight = height;
    glGenTextures(1, &textureId);

    // 激活纹理,注意以下这个两句是搭配的,glActiveTexture激活的是那个纹理,就设置的sampler2D是那个
    // 默认是0,如果不是0的话,需要在onDraw的时候重新激活一下?
//    glActiveTexture(GL_TEXTURE0);
//    glUniform1i(textureSampler, 0);

// 例如,一样的
    glActiveTexture(GL_TEXTURE2);
    glUniform1i(textureSampler, 2);
    // 绑定纹理
    glBindTexture(GL_TEXTURE_2D, textureId);
    // 为当前绑定的纹理对象设置环绕、过滤方式
    glTexParameteri(GL_TEXTURE_2D, GL_TEXTURE_WRAP_S, GL_REPEAT);
    glTexParameteri(GL_TEXTURE_2D, GL_TEXTURE_WRAP_T, GL_REPEAT);
    glTexParameteri(GL_TEXTURE_2D, GL_TEXTURE_MIN_FILTER, GL_LINEAR);
    glTexParameteri(GL_TEXTURE_2D, GL_TEXTURE_MAG_FILTER, GL_LINEAR);

    glTexImage2D(GL_TEXTURE_2D, 0, GL_RGBA, width, height, 0, GL_RGBA, GL_UNSIGNED_BYTE, data);
    // 生成mip贴图
    glGenerateMipmap(GL_TEXTURE_2D);

    glBindTexture(GL_TEXTURE_2D, textureId);

    // 解绑定
    glBindTexture(GL_TEXTURE_2D, 0);
}

void MatrixTransformOpengl::onDraw() {

//    glViewport(0,0,imageWidth,imageHeight);

    glClearColor(0.0f, 1.0f, 0.0f, 1.0f);
    glClear(GL_COLOR_BUFFER_BIT);
    glUseProgram(program);

    // 激活纹理
    glActiveTexture(GL_TEXTURE2);
    glUniform1i(textureSampler, 2);

    // 绑定纹理
    glBindTexture(GL_TEXTURE_2D, textureId);

    // 设置矩阵
    glUniformMatrix4fv(matrixHandle, 1, GL_FALSE,mvpMatrix);

    /**
     * size 几个数字表示一个点,显示是两个数字表示一个点
     * normalized 是否需要归一化,不用,这里已经归一化了
     * stride 步长,连续顶点之间的间隔,如果顶点直接是连续的,也可填0
     */
    // 启用顶点数据
    glEnableVertexAttribArray(positionHandle);
    glVertexAttribPointer(positionHandle,2,GL_FLOAT,GL_FALSE,0,VERTICES);

    // 纹理坐标
    glEnableVertexAttribArray(textureHandle);
    glVertexAttribPointer(textureHandle,2,GL_FLOAT,GL_FALSE,0,TEXTURE_COORD);

    // 4个顶点绘制两个三角形组成矩形
    glDrawArrays(GL_TRIANGLE_STRIP,0,4);

    glUseProgram(0);

    // 禁用顶点
    glDisableVertexAttribArray(positionHandle);
    if(nullptr != eglHelper){
        eglHelper->swapBuffers();
    }

    glBindTexture(GL_TEXTURE_2D, 0);
}
The MatrixActivity.java instance code of the java layer is as follows:
public class MatrixActivity extends BaseGlActivity {

    private MatrixTransformOpengl matrixTransformOpengl;
    // 遵守先缩放再旋转最后平移的顺序
    // 首先执行缩放,接着旋转,最后才是平移。这就是矩阵乘法的工作方式。
    private final float[] mvpMatrix = new float[16];
    // 因为在Opengl在顶点坐标的值是在-1到1之间,因此translateX的范围可以为-2到2。
    private float translateX = 0;
    private float scaleX = 1;
    private float rotationZ = 0;

    @Override
    public int getLayoutId() {
        return R.layout.activity_gl_matrix;
    }

    @Override
    public BaseOpengl createOpengl() {
        matrixTransformOpengl = new MatrixTransformOpengl();
        return matrixTransformOpengl;
    }

    @Override
    public Bitmap requestBitmap() {
        BitmapFactory.Options options = new BitmapFactory.Options();
        // 不缩放
        options.inScaled = false;
        Bitmap bitmap = BitmapFactory.decodeResource(getResources(), R.mipmap.ic_boy, options);

        // 设置一下矩阵
        Matrix.setIdentityM(mvpMatrix, 0);
        matrixTransformOpengl.setMvpMatrix(mvpMatrix);

        return bitmap;
    }

    @Override
    protected void onCreate(@Nullable Bundle savedInstanceState) {
        super.onCreate(savedInstanceState);
        findViewById(R.id.bt_translate).setOnClickListener(new View.OnClickListener() {
            @Override
            public void onClick(View view) {
                if (null != matrixTransformOpengl) {
                    translateX += 0.1;
                    if(translateX >=2 ){
                        translateX = 0f;
                    }
                    updateMatrix();
                }
            }
        });

        findViewById(R.id.bt_scale).setOnClickListener(new View.OnClickListener() {
            @Override
            public void onClick(View view) {
                if (null != matrixTransformOpengl) {
                    scaleX += 0.1;
                    updateMatrix();
                }
            }
        });

        findViewById(R.id.bt_rotate).setOnClickListener(new View.OnClickListener() {
            @Override
            public void onClick(View view) {
                if (null != matrixTransformOpengl) {
                    rotationZ += 10;
                    updateMatrix();
                }
            }
        });

        findViewById(R.id.bt_reset).setOnClickListener(new View.OnClickListener() {
            @Override
            public void onClick(View view) {
                if (null != matrixTransformOpengl) {
                    translateX = 0;
                    scaleX = 1;
                    rotationZ = 0;
                    updateMatrix();
                }
            }
        });

    }

    private void updateMatrix() {
        Matrix.setIdentityM(mvpMatrix, 0);
        // 重点注释
        // 在组合矩阵时,先进行缩放操作,然后是旋转,最后才是位移,但是写法需要反正写,也就是先写translateM,然后rotateM,最后scaleM
        // 如果不这样写会发生什么呢?例如顺这写,先写scaleM,然后是rotateM,最后写translateM,测试时就会出现问题,旋转超过180度之后再移动,就会出现移动方向相反的情况
        Matrix.translateM(mvpMatrix, 0, translateX, 0, 0);
        Matrix.rotateM(mvpMatrix, 0, rotationZ, 0, 0, 1);
        Matrix.scaleM(mvpMatrix, 0, scaleX, 1f, 0f);
        matrixTransformOpengl.setMvpMatrix(mvpMatrix);
        myGLSurfaceView.requestRender();
    }
}
[External link picture transfer failed, the source site may have an anti-theft link mechanism, it is recommended to save the picture and upload it directly (img-UDgLbBPI-1682242193381)(https://flyer-blog.oss-cn-shenzhen.aliyuncs.com/opengles %E7%9F%A9%E9%98%B5%E5%8F%98%E6%8D%A2.gif)]
Series tutorial source code
study benefits
[Android detailed knowledge point thinking brain map (skill tree)]
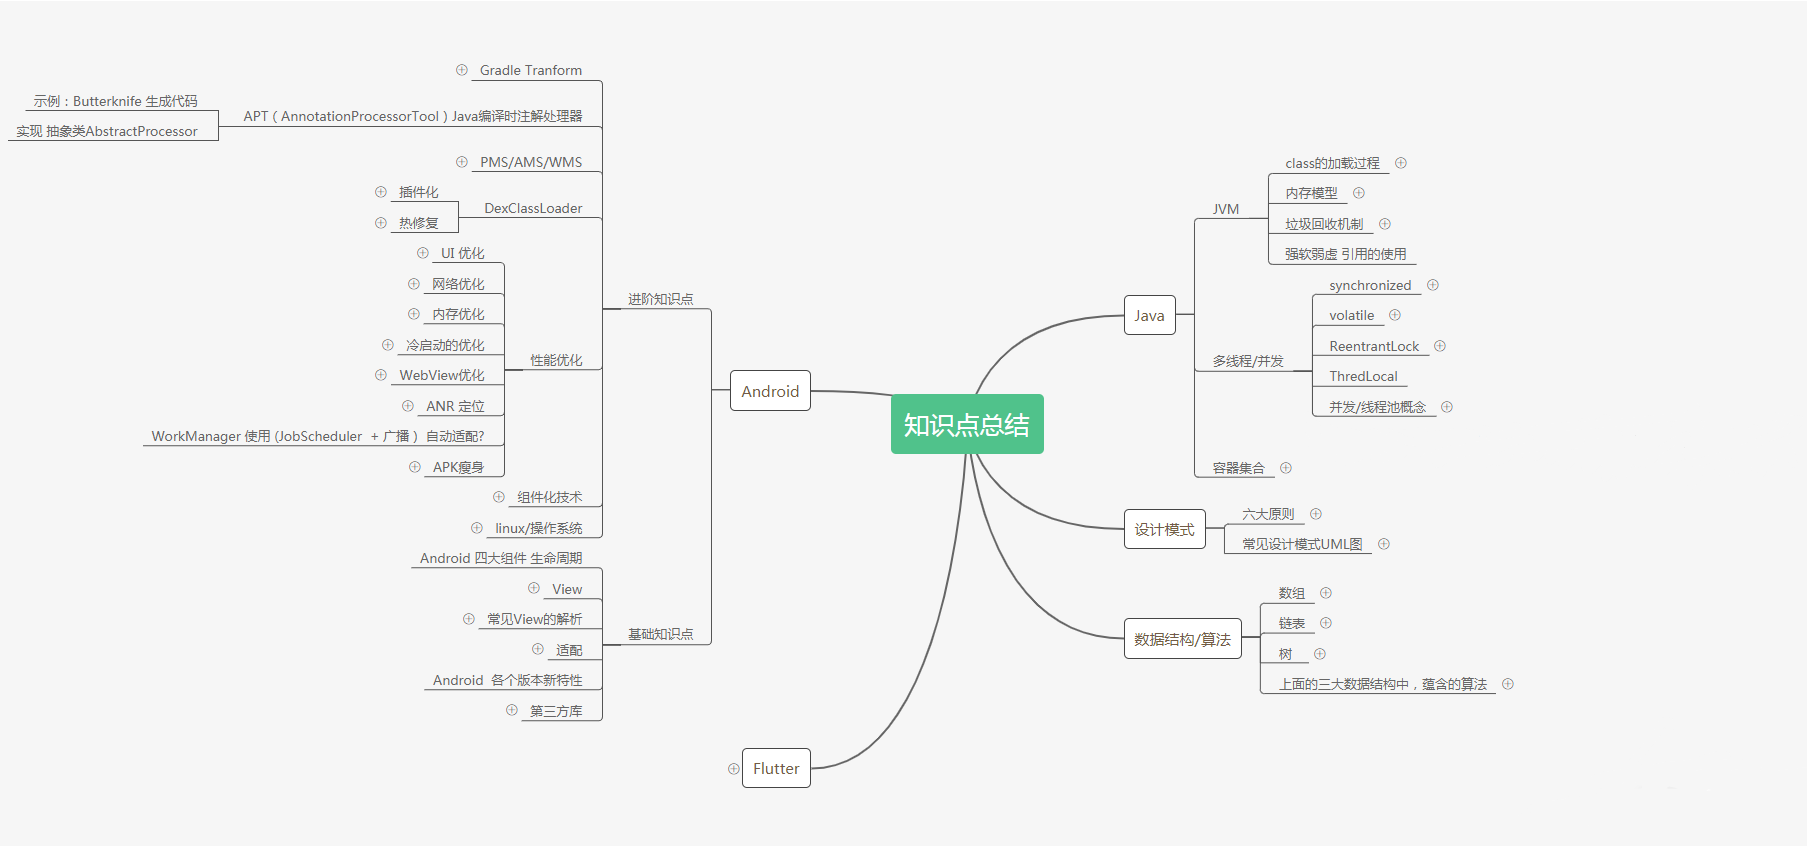
In fact, there are only so many knowledge points in Android development, and there are still so many things to ask in the interview. So there are no other tricks in the interview, it just depends on how well prepared you are for these knowledge points. So, when you go out for an interview, just check which stage you have reviewed.
Although Android is not as hot as it was a few years ago, the era when you can find high-paying jobs with the four major components has passed. This can only show that the positions below the middle level of Android are saturated, and senior engineers are still relatively scarce now . The salaries given by many senior positions are really high (you may not be able to find a suitable one if you have a lot of money), so try to make yourself a senior engineer. is the most important.
Attached here are dozens of sets of ByteDance, JD.com, Xiaomi, Tencent, Toutiao, Ali, Meituan and other companies’ 19-year interview questions related to the above interview questions. Organize the technical points into videos and PDFs (in fact, it took a lot more effort than expected), including knowledge context + many details.
Due to limited space, here is a small part of it in the form of pictures.

Scan the QR code below in detail to receive directly;

Android architecture video + BAT interview topic PDF + study notes
There are a lot of materials for learning Android on the Internet, but if the knowledge you have learned is not systematic, and when you encounter problems, you just taste it and don't study it in depth, then it is difficult to achieve real technical improvement. I hope that this systematic technical system will provide a direction for everyone to refer to.