12. SpringBoot implements master-slave replication
12.1 First install redis on the Linux virtual machine
# 安装包存放目录
cd /usr/local/redis
# 下载最新稳定版
wget https://download.redis.io/releases/redis-6.2.6.tar.gz
# 解压
tar -zxvf redis-6.2.6.tar.gz
# 进入解压后的目录
cd /usr/local/redis/redis-6.2.6/
# 编译
make
# 执行 "make install" 默认会安装到 /usr/local/bin,可通过PREFIX指定安装路径
make install PREFIX=/usr/local/redis
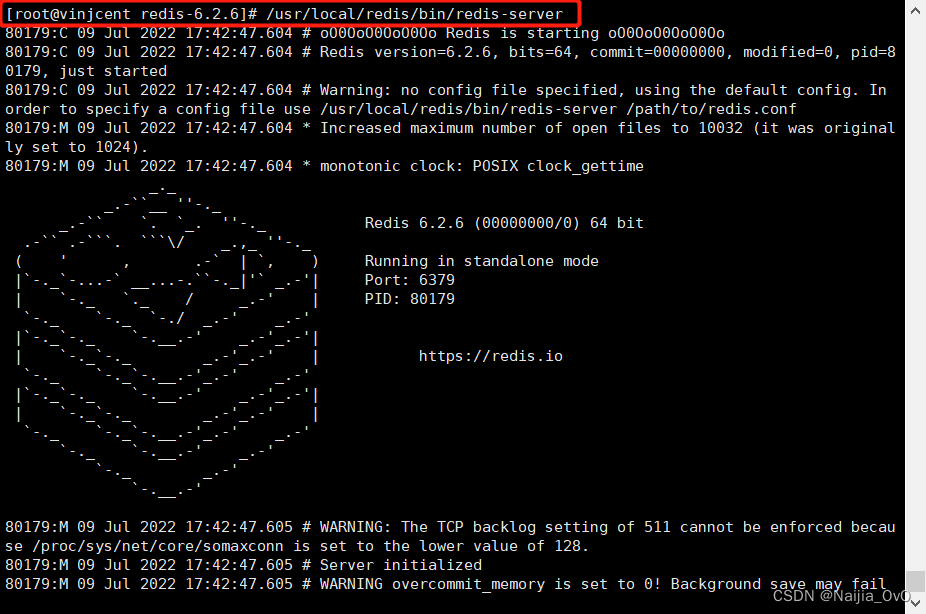
# 测试是否安装成功,执行下面命令
/usr/local/redis/bin/redis-server
- Download the installed file

- Test startup to see if it works normally
12.2 Master-slave and sentinel configuration
brief process
The three redis-server services are all running on our virtual machine. The IP address I set here is 192.168.159.100 (defined according to my own IP address), the ports are 6380, 6381, and 6382, and 6380 is used as the master node. 6381, 6382 as slave nodes
1) Master-slave replication (master&slave)
- Configure
redis.confthe running file

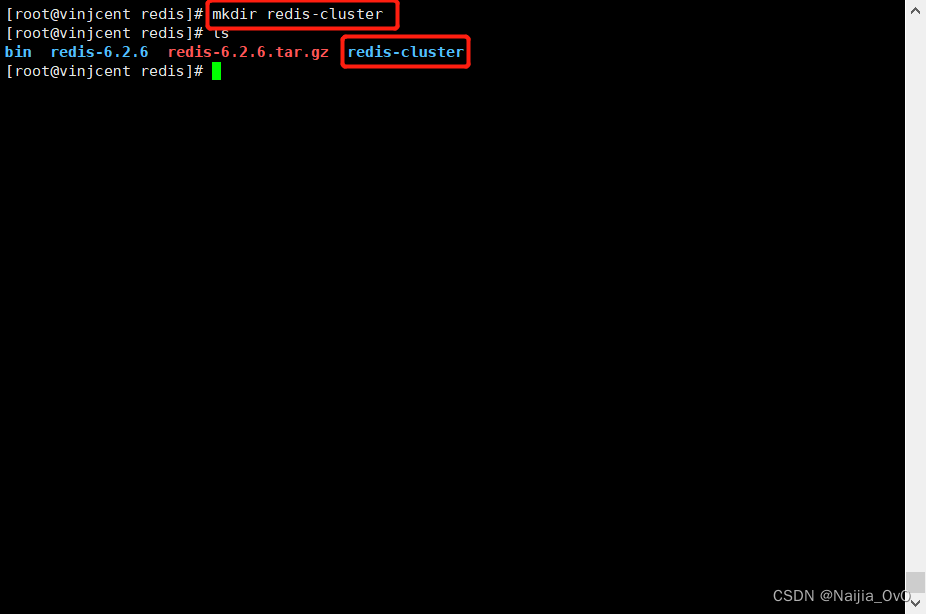
- First create a redis-cluster folder
- Copy three
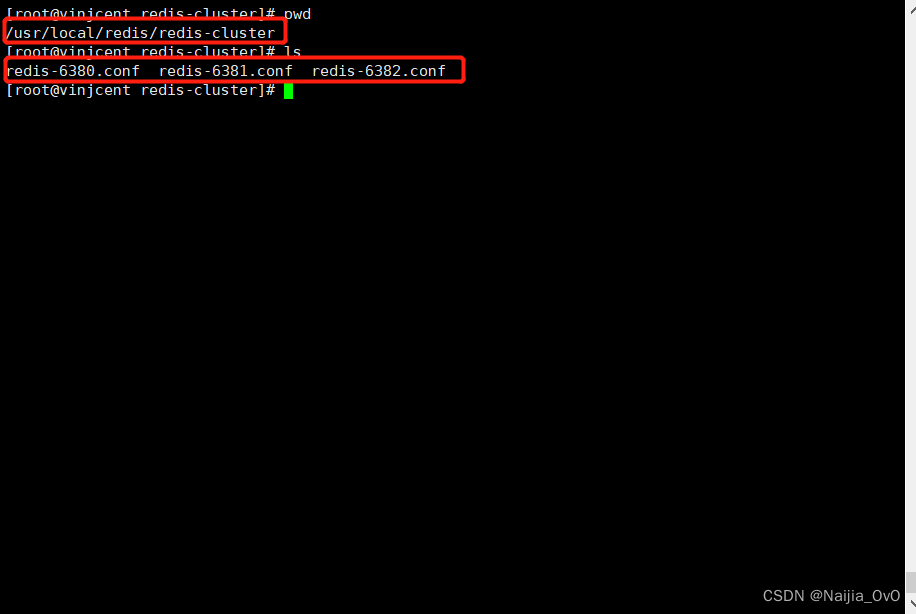
redis.conffiles to the redis-cluster folder directory
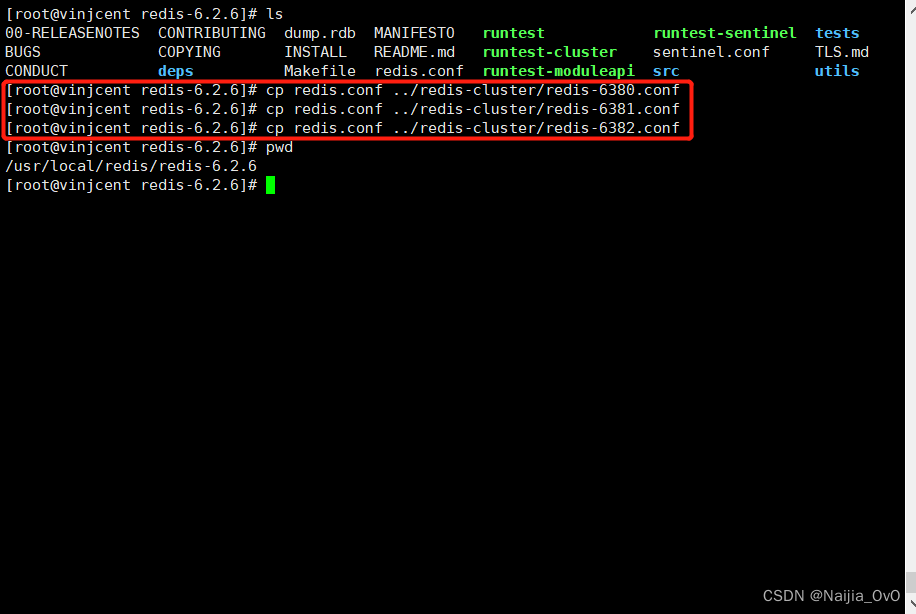
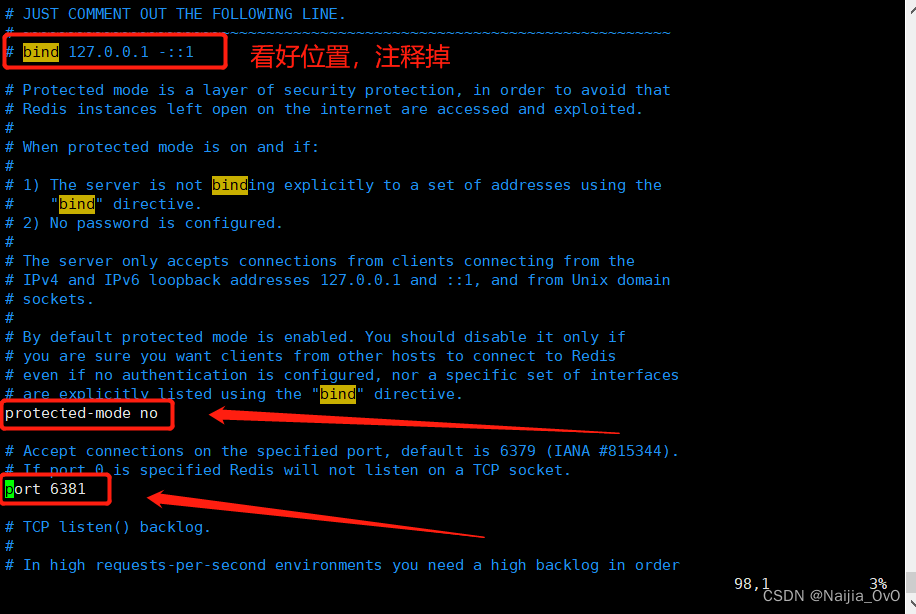
The configuration file can be found in the root directory of the decompressed source code file. Here, the slave node 6381 configuration file is taken as an example, and the other two configuration files are almost the same. First redis.confcopy the configuration file to /usr/local/redis/redis-cluster(The redis-cluster folder needs to be created manually), copy three copies, and then make the following modifications
# (1)设置允许外部ip访问,需要注释掉bind配置,并关掉保护模式
# bind 127.0.0.1 -::1
protected-mode no
# (2)修改端口号
port 6381
# (3)修改为以守护进程模式后台运行
daemonize yes
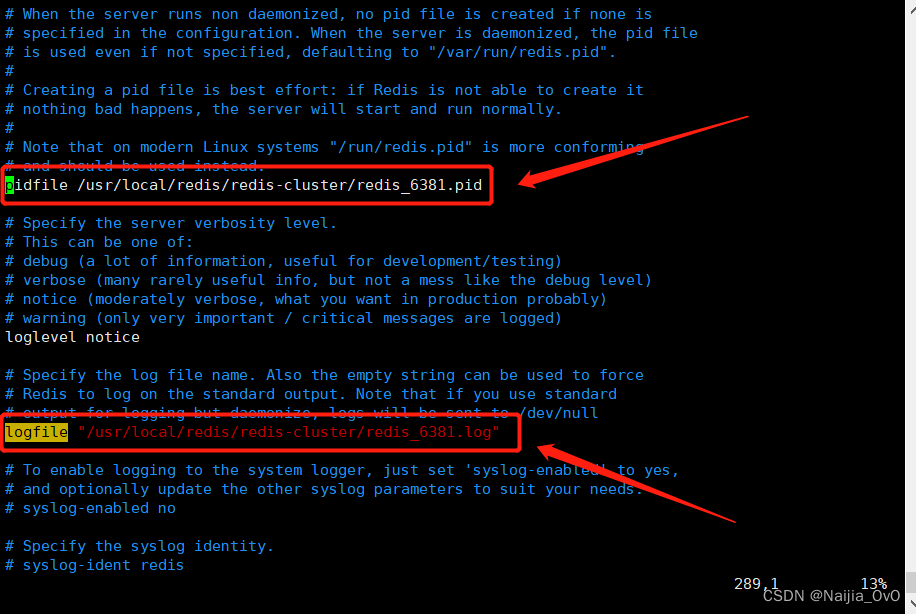
# (4)修改pid文件名,以守护进程运行的时候,会产生pid文件,默认位置为 /run/redis.pid
# 因为这里在同一台机器上运行多个实例,所以需要指定
pidfile /usr/local/redis/redis-cluster/redis_6381.pid
# (5)修改日志文件位置
logfile /usr/local/redis/redis-cluster/redis_6381.log
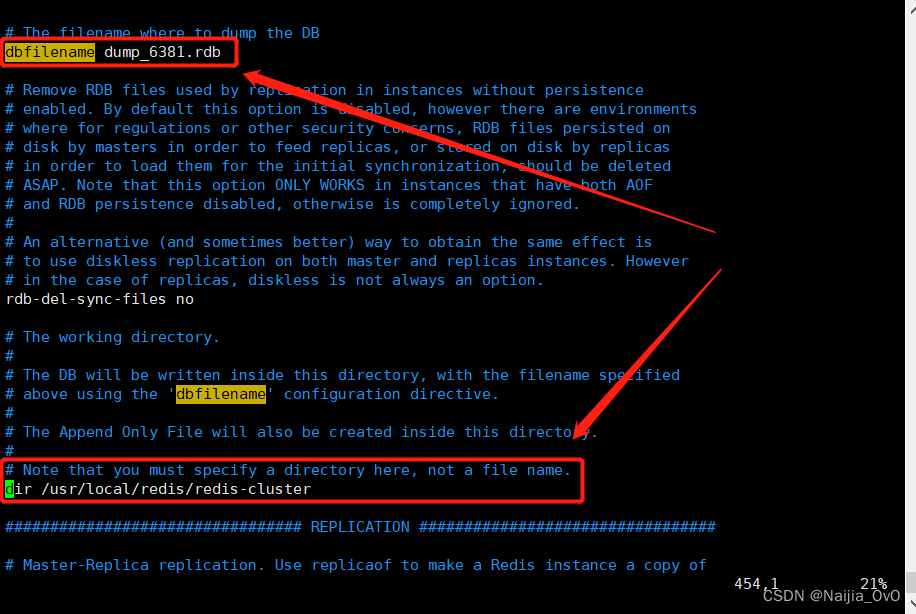
# (6)修改rdb快照文件位置
dir /usr/local/redis/redis-cluster
dbfilename dump_6381.rdb
# (7)修改主节点地址,在部分旧版本中是slaveof命令,主节点6380配置文件中不要加这一行
replicaof 192.168.159.100 6380
# (8)aof可按需要开启,这里我们使用.rdb文件的存储方式,以下不进行配置
appendonly yes
appendfilename appendonly_6381.aof


In the above configuration, 6381 and 6382 are .confthe same, just change the port and address. Among them, 6380 is the master node, and there is no step (7). It is recommended that the three services run in different folders to facilitate viewing of logs and data output. In order to save the time of switching file directories, they are all placed in one folder
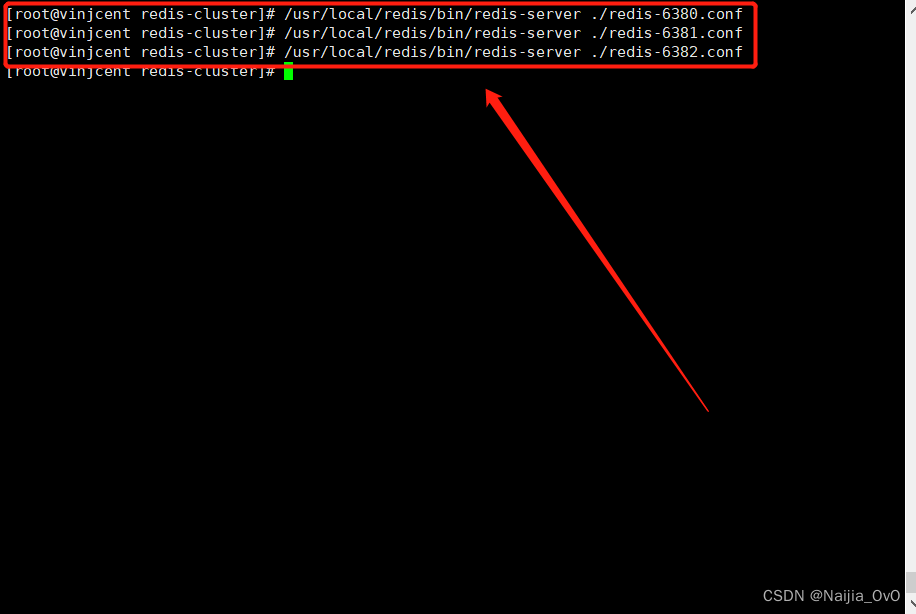
- After the configuration is complete, start three redis-server services respectively according to the configuration file
[root@vinjcent redis-cluster]# /usr/local/redis/bin/redis-server ./redis-6380.conf
[root@vinjcent redis-cluster]# /usr/local/redis/bin/redis-server ./redis-6381.conf
[root@vinjcent redis-cluster]# /usr/local/redis/bin/redis-server ./redis-6382.conf
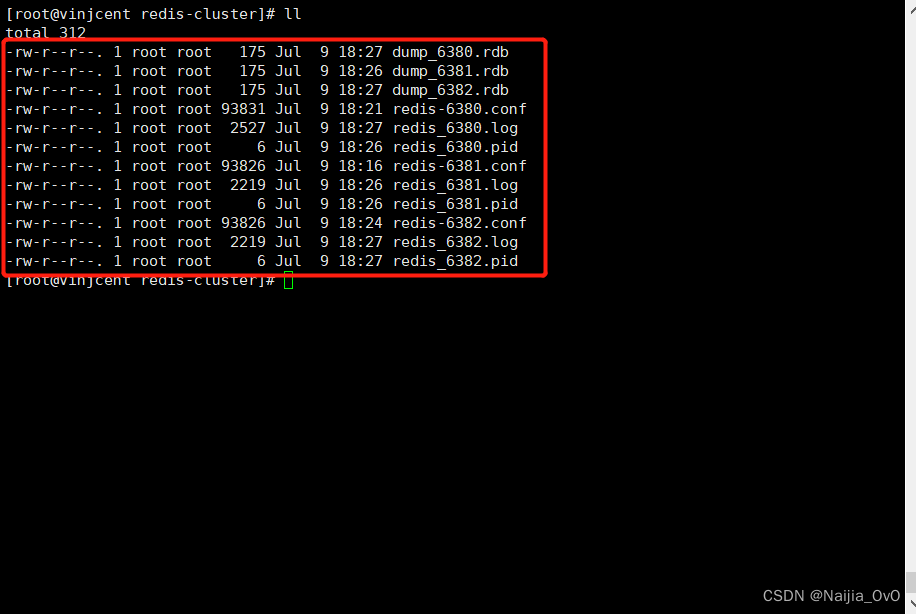
- After the startup is successful, the generated persistent and log files are as shown in the figure below
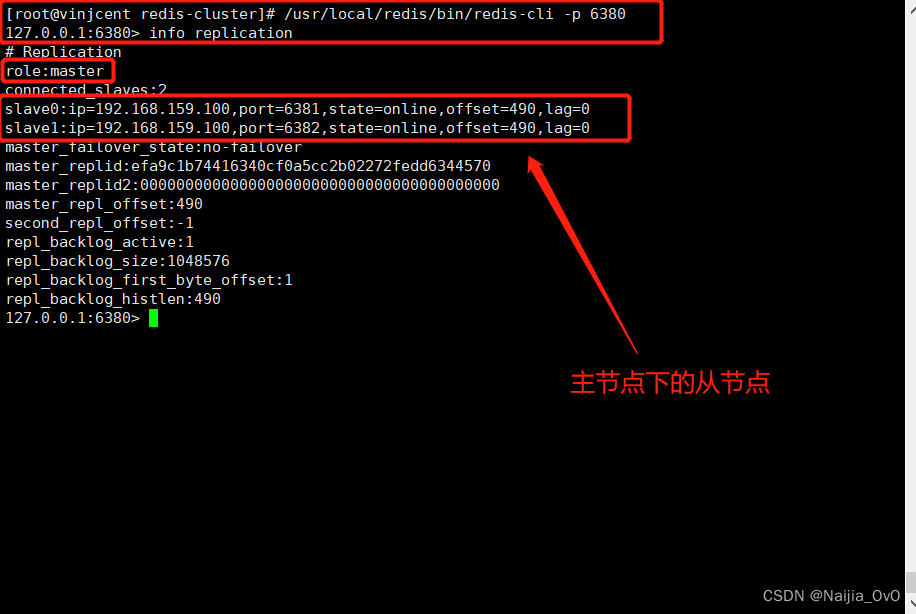
- Enter the master node to view the master-slave status of the instance
# 运行redis客户端 -p 代表进入的是那个端口
[root@vinjcent redis-cluster]# /usr/local/redis/bin/redis-cli -p 6380
# 查看主从信息
127.0.0.1:6380> info replication
# Replication
role:master
connected_slaves:2
slave0:ip=192.168.159.100,port=6381,state=online,offset=490,lag=0
slave1:ip=192.168.159.100,port=6382,state=online,offset=490,lag=0
master_failover_state:no-failover
master_replid:efa9c1b74416340cf0a5cc2b02272fedd6344570
master_replid2:0000000000000000000000000000000000000000
master_repl_offset:490
second_repl_offset:-1
repl_backlog_active:1
repl_backlog_size:1048576
repl_backlog_first_byte_offset:1
repl_backlog_histlen:490
- Test master-slave replication

2) Sentinel configuration (Sentinel)
brief process
Three redis-sentinel services need to be started, running on ports 26380, 26381, and 26382 respectively, and the .conf file also needs to be configured to run the service
- First, you need to
/usr/local/redis/redis-6.2.6copy three sentinel.conf files to the redis-cluster folder in the directory
# 拷贝文件sentinel.conf
[root@vinjcent redis-6.2.6]# cp sentinel.conf ../redis-cluster/sentinel-26380.conf
[root@vinjcent redis-6.2.6]# cp sentinel.conf ../redis-cluster/sentinel-26381.conf
[root@vinjcent redis-6.2.6]# cp sentinel.conf ../redis-cluster/sentinel-26382.conf

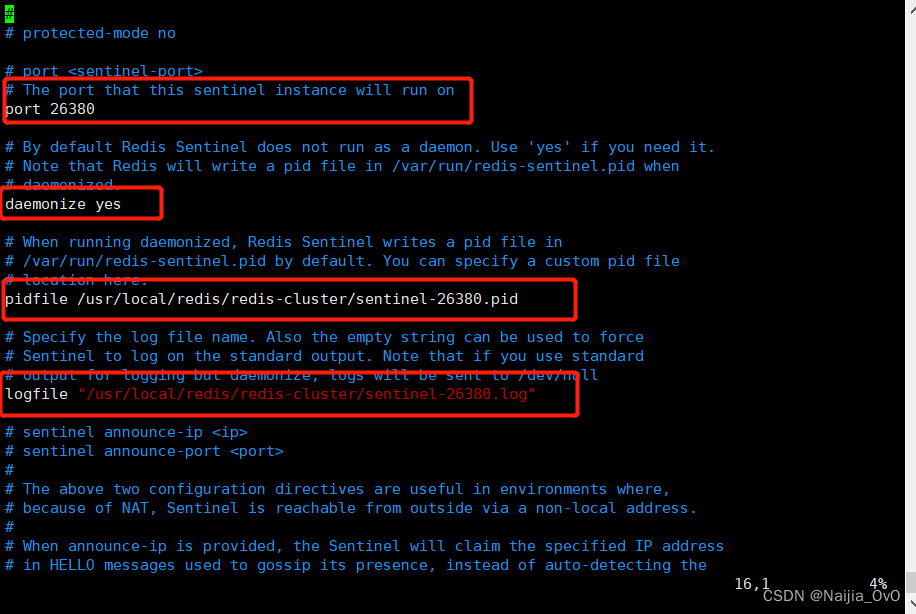
- Modify the copied configuration file. Take this as an example. The configuration information is as follows. The other two configuration files are basically the same. Just
sentinel-26380.confchange the port, pidfile, and logfile
# 配置端口
port 26380
daemonize yes
pidfile /usr/local/redis/redis-cluster/sentinel-26380.pid
logfile /usr/local/redis/redis-cluster/sentinel-26380.log
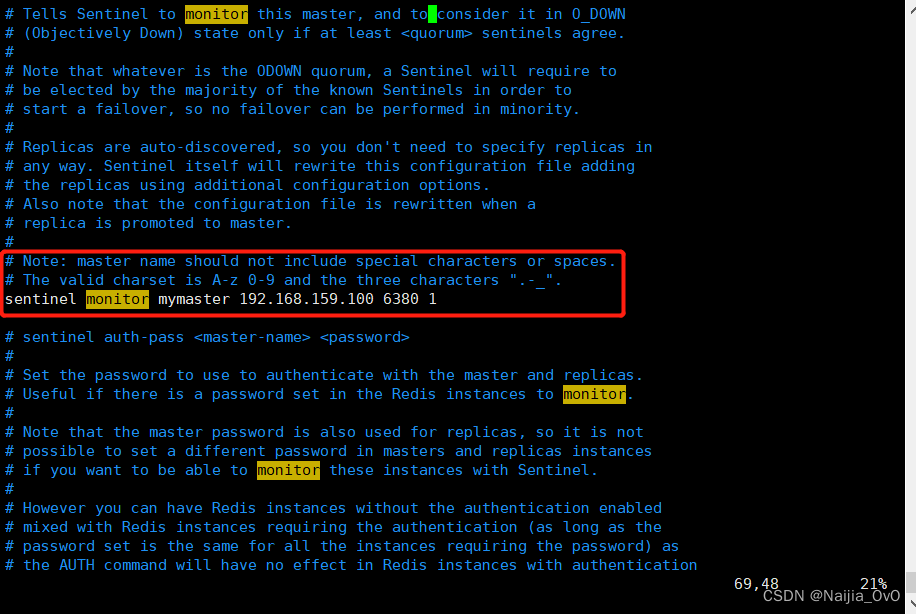
# 监控192.168.159.100:6380的主节点,实例取名为mymaster,当有两个哨兵认为该服务下线后,自动进行故障转移
# 后面的数字1,代表主机宕机了后,slave投票看让谁接替成为主机,票数最多的,就会成为主机,默认是2
sentinel monitor mymaster 192.168.159.100 6380 1
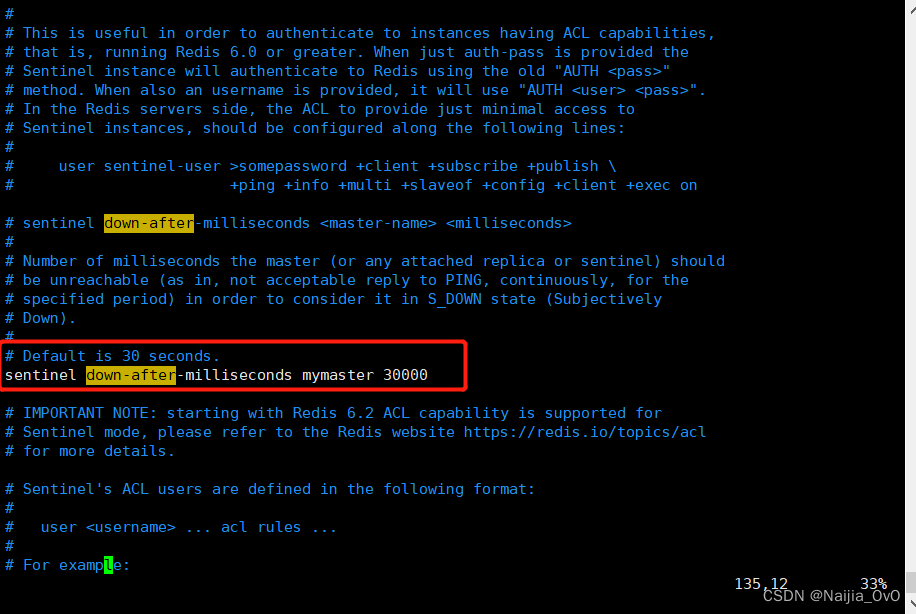
# 设置主节点多长时间没有响应就代表挂了,默认是30s
sentinel down-after-milliseconds mymaster 30000
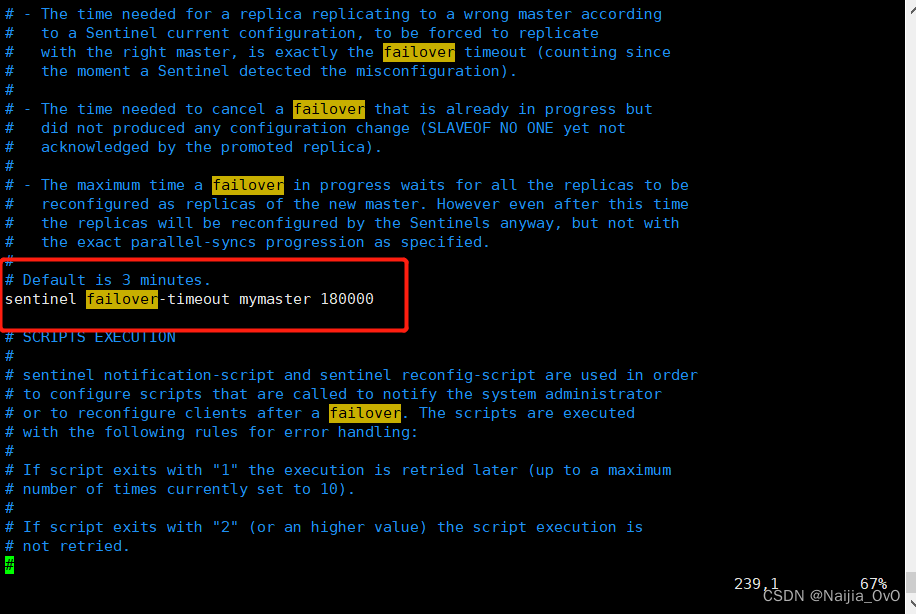
# 故障转移的时间上限,默认是三分钟
sentinel failover-timeout mymaster 180000
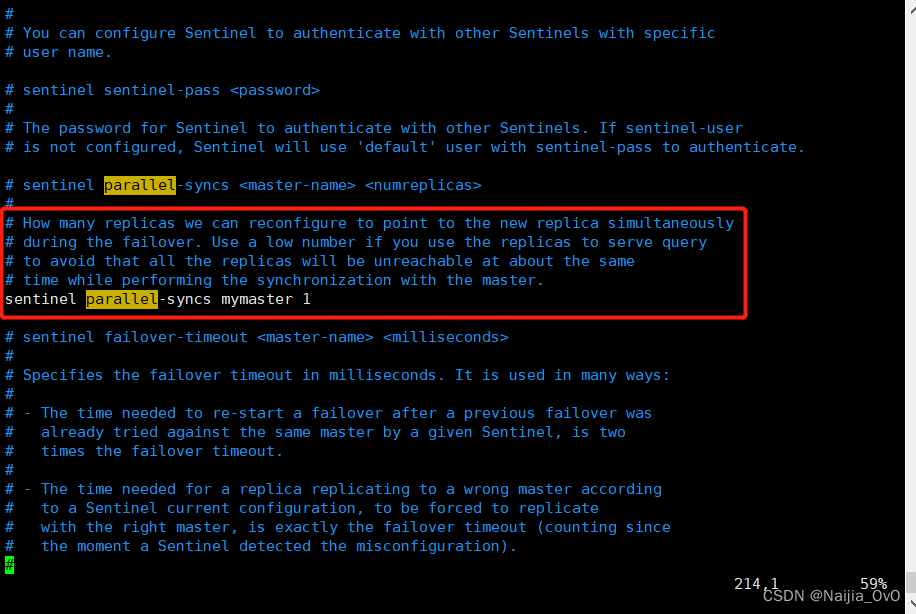
# 此配置值在发生故障时,最多可以有几个slave同时对新的master进行同步,这个数字越小完成故障处理的时间越短
sentinel parallel-syncs mymaster 1
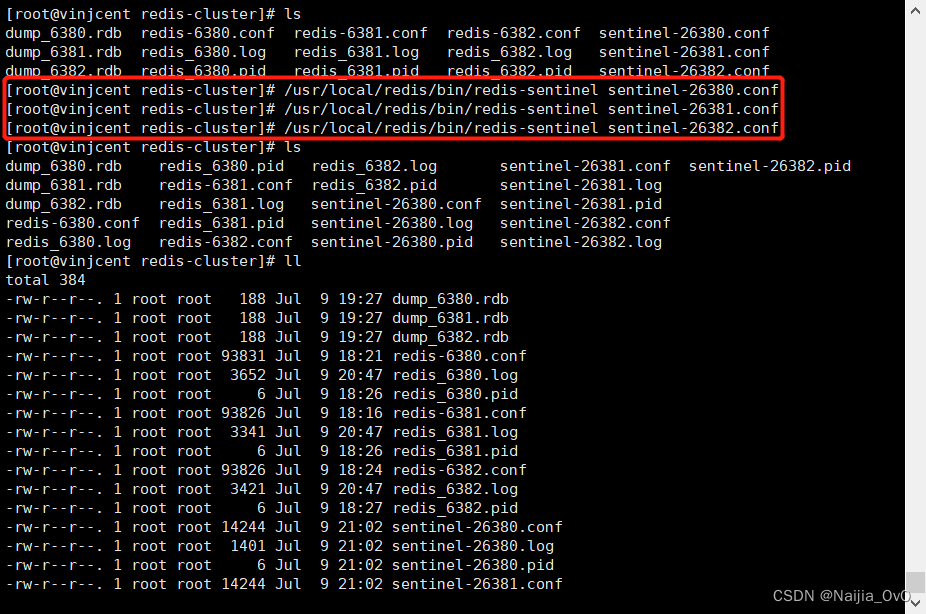
- Start three sentinel services separately
[root@vinjcent redis-cluster]# /usr/local/redis/bin/redis-sentinel sentinel-26380.conf
[root@vinjcent redis-cluster]# /usr/local/redis/bin/redis-sentinel sentinel-26381.conf
[root@vinjcent redis-cluster]# /usr/local/redis/bin/redis-sentinel sentinel-26382.conf

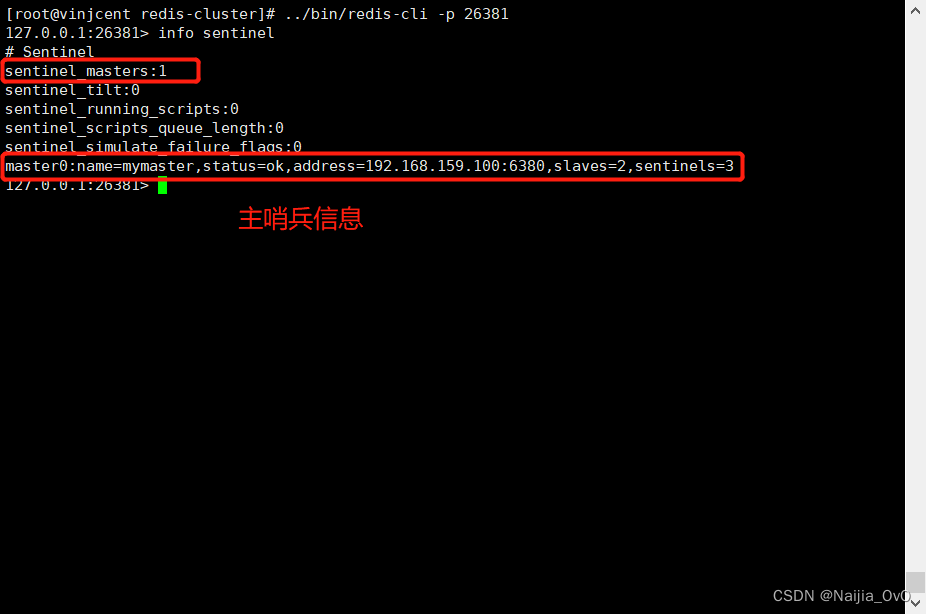
- Feel free to connect to a Sentinel to view Sentinel monitoring information
[root@vinjcent redis-cluster]# ../bin/redis-cli -p 26381
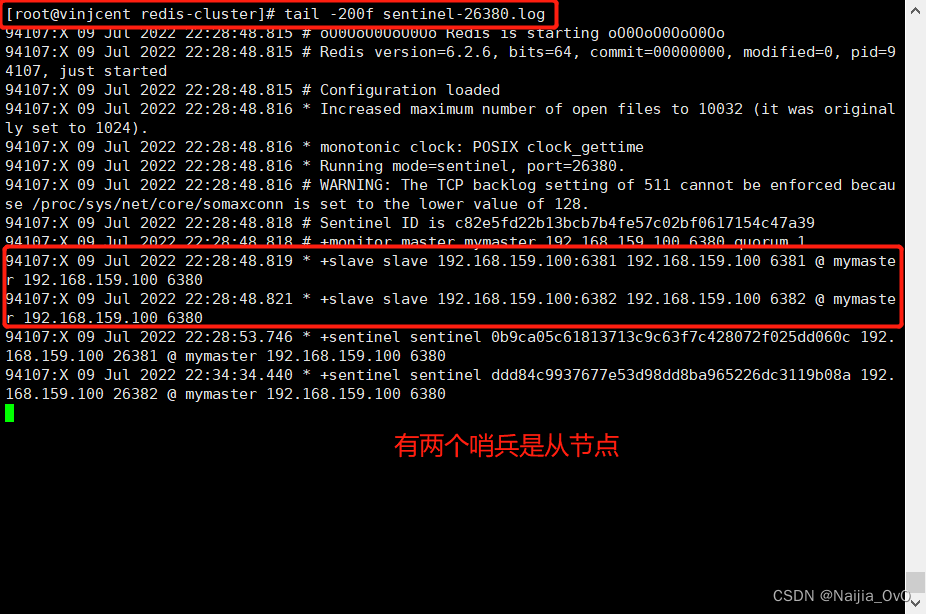
- View sentinel log of node 6380
[root@vinjcent redis-cluster]# tail -200f sentinel-26380.log
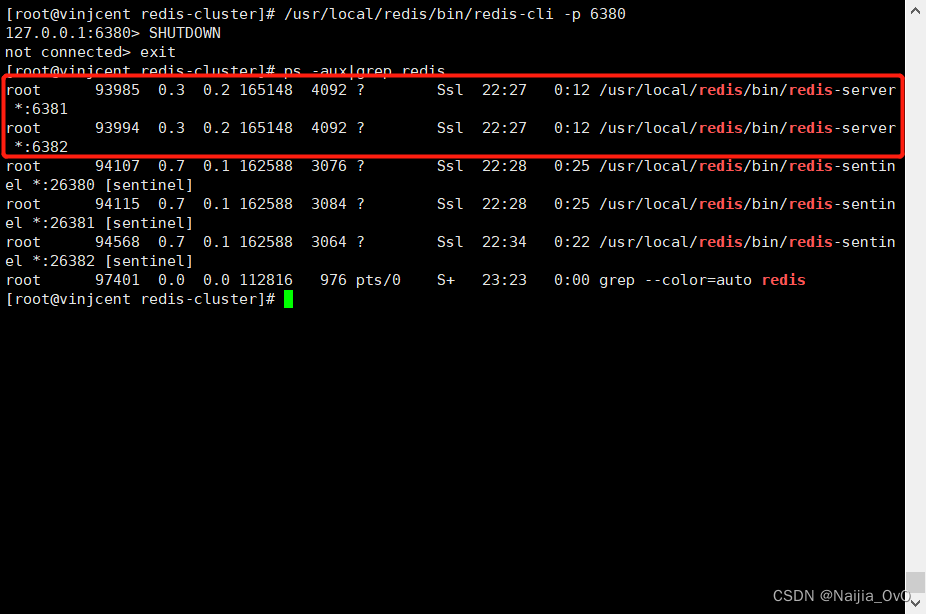
- Test sentry mode
- Shut down the master node 6380, and then look at the sentinel log

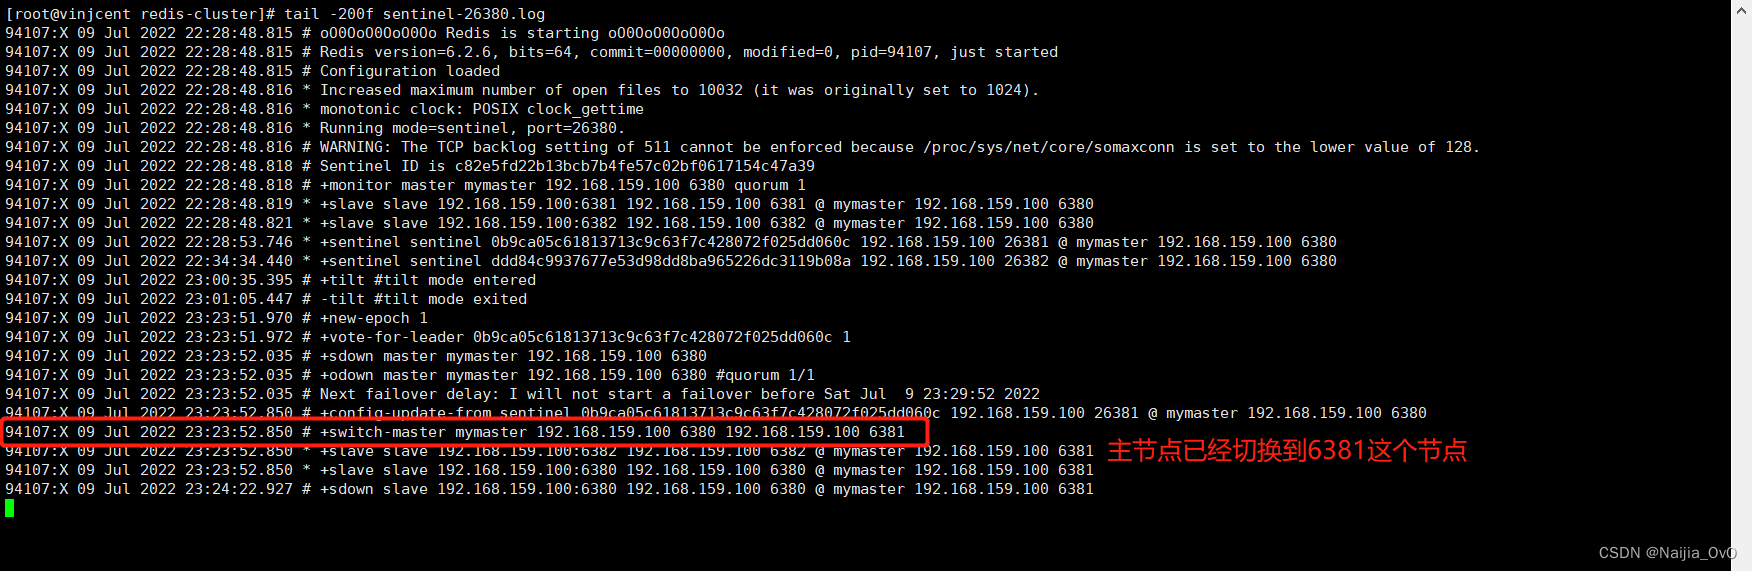
-
From the above log file, we can see the general process of the sentinel voting for the master and switching the master node. At this time, the master node has been switched to the 6381 node
-
At this time, restart the 6380 node, which is the previous master node, and this node will be automatically added to the cluster by the sentinel as a slave node , and sentinel will print the following log
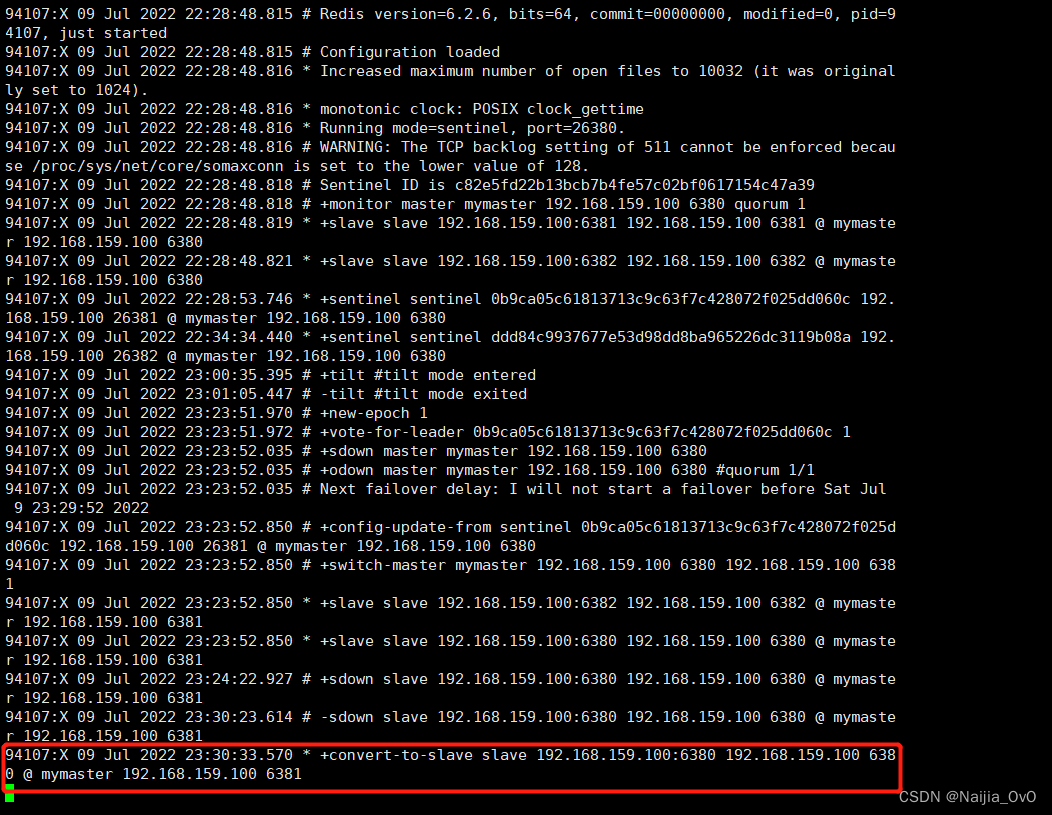

It can be seen that the node 6380 is converted from the master node to the slave node
Before integrating springboot, you must first open the firewall port of the redis cluster, otherwise you will not be able to connect to our redis service
# 开放端口
firewall-cmd --zone=public --add-port=6380/tcp --permanent
firewall-cmd --zone=public --add-port=6381/tcp --permanent
firewall-cmd --zone=public --add-port=6382/tcp --permanent
firewall-cmd --zone=public --add-port=26380/tcp --permanent
firewall-cmd --zone=public --add-port=26381/tcp --permanent
firewall-cmd --zone=public --add-port=26382/tcp --permanent
# 重启防火墙
systemctl restart firewalld.service
# 查看端口
firewall-cmd --list-ports
12.3 springboot configuration redis cluster and read-write separation
-
Create a springboot project
-
import dependencies
- pom.xml
<!--redis-->
<dependency>
    <groupId>org.springframework.boot</groupId>
    <artifactId>spring-boot-starter-data-redis</artifactId>
</dependency>
<!--连接池依赖-->
<dependency>
    <groupId>org.apache.commons</groupId>
    <artifactId>commons-pool2</artifactId>
</dependency>
<!--web-->
<dependency>
    <groupId>org.springframework.boot</groupId>
    <artifactId>spring-boot-starter-web</artifactId>
</dependency>
<!--lombok-->
<dependency>
    <groupId>org.projectlombok</groupId>
    <artifactId>lombok</artifactId>
    <version>1.18.24</version>
</dependency>
- configuration file
application.yml
server:
  port: 3035
spring:
  redis:
    # redis哨兵配置
    sentinel:
      # 主节点名称
      master: mymaster
      nodes:
        - 192.168.159.100:26380
        - 192.168.159.100:26381
        - 192.168.159.100:26382
#    # 集群的部署方式
#    cluster:
#      nodes:
#        - 192.168.158.100:6380
#        - 192.168.158.100:6381
#        - 192.168.158.100:6382
#      # #最大重定向次数(由于集群中数据存储在多个节点,所以在访问数据时需要通过转发进行数据定位)
#      max-redirects: 2
#    lettuce:
#      pool:
#        max-idle: 10   # 连接池中的最大空闲连接
#        max-wait: 500   # 连接池最大阻塞等待时间(使用负值表示没有限制)
#        max-active: 8   # 连接池最大连接数(使用负值表示没有限制)
#        min-idle: 0   # 连接池中的最小空闲连接

  # 服务应用名
  application:
    name: redis-cluster
logging:
  pattern:
    console: '%date{yyyy-MM-dd HH:mm:ss.SSS} | %highlight(%5level) [%green(%16.16thread)] %clr(%-50.50logger{49}){cyan} %4line -| %highlight(%msg%n)'
  level:
    root: info
    io.lettuce.core: debug
    org.springframework.data.redis: debug
- Configure read-write separation and json serialization
package com.vinjcent.config;

import com.fasterxml.jackson.annotation.JsonAutoDetect;
import com.fasterxml.jackson.annotation.PropertyAccessor;
import com.fasterxml.jackson.databind.ObjectMapper;
import com.fasterxml.jackson.databind.jsontype.impl.LaissezFaireSubTypeValidator;
import io.lettuce.core.ReadFrom;
import org.springframework.boot.autoconfigure.data.redis.RedisProperties;
import org.springframework.context.annotation.Bean;
import org.springframework.context.annotation.Configuration;
import org.springframework.context.annotation.Primary;
import org.springframework.data.redis.connection.RedisConnectionFactory;
import org.springframework.data.redis.connection.RedisSentinelConfiguration;
import org.springframework.data.redis.connection.lettuce.LettuceConnectionFactory;
import org.springframework.data.redis.connection.lettuce.LettucePoolingClientConfiguration;
import org.springframework.data.redis.core.RedisTemplate;
import org.springframework.data.redis.serializer.Jackson2JsonRedisSerializer;
import org.springframework.data.redis.serializer.StringRedisSerializer;

import java.text.SimpleDateFormat;
import java.util.HashSet;


@Configuration
public class RedisConfiguration {


    /**
     *
     *  配置redis序列化json
     * @param redisConnectionFactory
     * @return
     */
    @Bean
    @Primary    //若有相同类型的Bean时,优先使用此注解标注的Bean
    public RedisTemplate<String, Object> redisTemplate(RedisConnectionFactory redisConnectionFactory) {


        // 为了开发方便,一般直接使用<String, Object>
        RedisTemplate<String, Object> template = new RedisTemplate<>();
        template.setConnectionFactory(redisConnectionFactory);

        // 配置具体的序列化方式
        // JSON解析任意对象
        Jackson2JsonRedisSerializer jackson2JsonRedisSerializer = new Jackson2JsonRedisSerializer(Object.class);
        ObjectMapper om = new ObjectMapper();
        // 指定要序列化的域,field,get和set,以及修饰符范围,ANY是都有包括private和public
        om.setVisibility(PropertyAccessor.ALL, JsonAutoDetect.Visibility.ANY);
        // 指定序列化输入的类型,类必须是非final修饰的,final修饰的类,比如String,Integer等会跑出异常
        om.activateDefaultTyping(LaissezFaireSubTypeValidator.instance, ObjectMapper.DefaultTyping.NON_FINAL);
        // 设置日期格式
        om.setDateFormat(new SimpleDateFormat("yyyy-MM-dd HH:mm:ss"));
        jackson2JsonRedisSerializer.setObjectMapper(om);
        // String的序列化
        StringRedisSerializer stringRedisSerializer = new StringRedisSerializer();


        //key采用String的序列化
        template.setKeySerializer(stringRedisSerializer);
        //hash的key也采用String的序列化
        template.setHashKeySerializer(stringRedisSerializer);
        //value的序列化方式采用jackson
        template.setValueSerializer(jackson2JsonRedisSerializer);
        //hash的value序列化方式采用jackson
        template.setHashValueSerializer(jackson2JsonRedisSerializer);
        //设置所有配置
        template.afterPropertiesSet();

        return template;
    }

    /**
     * 配置读写分离
     * @param redisProperties
     * @return
     */
    @Bean
    public RedisConnectionFactory lettuceConnectionFactory(RedisProperties redisProperties) {


        // 配置哨兵节点以及主节点
        RedisSentinelConfiguration redisSentinelConfiguration = new RedisSentinelConfiguration(
                redisProperties.getSentinel().getMaster(), new HashSet<>(redisProperties.getSentinel().getNodes())
        );

        // 配置读写分离
        LettucePoolingClientConfiguration lettuceClientConfiguration = LettucePoolingClientConfiguration.builder()
                // 读写分离,这里的ReadFrom是配置Redis的读取策略,是一个枚举,包括下面选择
                // MASTER   仅读取主节点
                // MASTER_PREFERRED   优先读取主节点,如果主节点不可用,则读取从节点
                // REPLICA_PREFERRED   优先读取从节点,如果从节点不可用,则读取主节点
                // REPLICA   仅读取从节点
                // NEAREST   从最近节点读取
                // ANY   从任意一个从节点读取
                .readFrom(ReadFrom.REPLICA_PREFERRED)
                .build();

        return new LettuceConnectionFactory(redisSentinelConfiguration, lettuceClientConfiguration);
    }

}
- Write a test bean
package com.vinjcent.serivce;

import com.vinjcent.utils.RedisUtils;
import lombok.RequiredArgsConstructor;
import lombok.extern.slf4j.Slf4j;
import org.springframework.beans.factory.annotation.Autowired;
import org.springframework.boot.ApplicationArguments;
import org.springframework.boot.ApplicationRunner;
import org.springframework.stereotype.Component;

import java.util.concurrent.TimeUnit;

@SuppressWarnings("all")
@Slf4j
@RequiredArgsConstructor
@Component
public class RedisInit implements ApplicationRunner {


    @Autowired
    private RedisUtils redisUtils;

    @Override
    public void run(ApplicationArguments args) throws Exception {


        for (int i = 0; i < 300; i++) {


            try {


                redisUtils.set("k" + i, "v" + i);
                log.info("set value success: {}", i);

                Object val = redisUtils.get("k" + i);
                log.info("get value success: {}", val);
                TimeUnit.SECONDS.sleep(1);
            } catch (Exception e) {


                log.error("error: {}", e.getMessage());
            }
        }
        log.info("finished...");
    }
}
- Encapsulate redis tool class " RedisTemplate serialization & RedisUtils tool class "
import org.springframework.beans.factory.annotation.Autowired;
import org.springframework.data.redis.core.RedisTemplate;
import org.springframework.stereotype.Component;
import org.springframework.util.CollectionUtils;

import java.util.List;
import java.util.Map;
import java.util.Set;
import java.util.concurrent.TimeUnit;

@SuppressWarnings("all")
@Component
public final class RedisUtils {


    // ......
}
- start the project
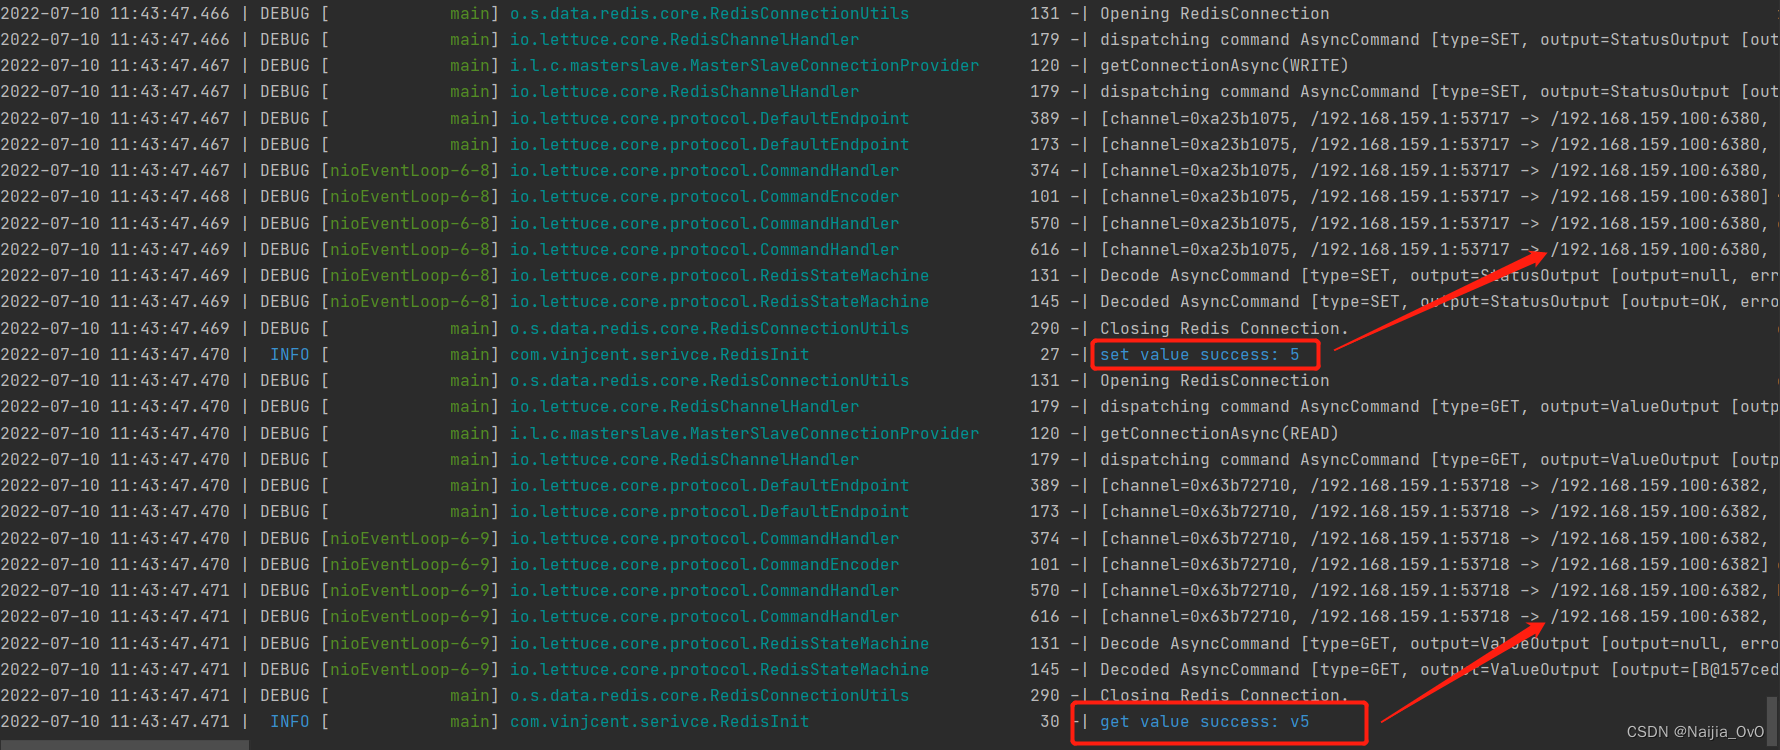
You can see on the console that the write is on the redis server on port 6380, and the read is on the redis server on port 6382
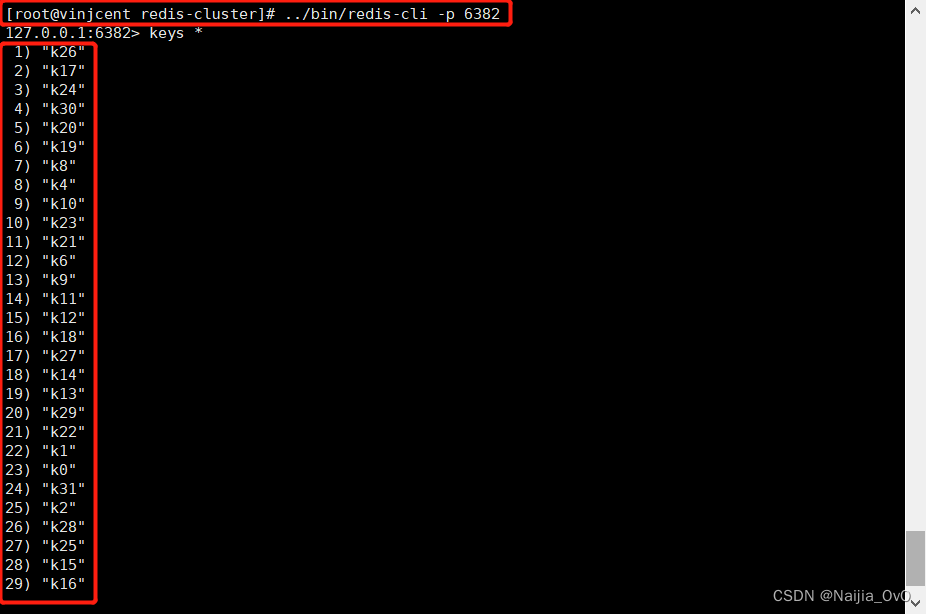
Just enter a redis-cli client, you can see that the master-slave replication is successful!
- Test sentry mode
Stop the redis server of the master node 6380 and check the console


It can be seen that our master node has become the redis server of port 6381, and the slave node becomes the master node to realize the writing function; while the slave node is the server of port 6382