Here is to hardcode the picture of the ID photo, the background color, and the size. You can improve it according to your needs.
The first thing to pay attention to is when saving pictures, you must ensure that
canvas绘制完成Official website tutorial (it is best to look at it together)
Step 1: Add canvas component in WXML
wxml 文件
<view class="border" style="margin: 75rpx">
  <canvas id="myCanvas" type="2d" style="border: 1px solid; width: 600rpx; height: 840rpx;"/>
</view>
-
First you need to add the canvas component in WXML.
-
Specify id="myCanvas" to uniquely identify a canvas for subsequent acquisition of Canvas objects.
-
Specifying type is used to define the canvas type, this example uses type="2d" example.
renderings
Step 2: Get the Canvas object and rendering context
I put the following codes in the life cycle function onLoad, and you can put them in different events as needed, because I just made simple chestnuts
wx.createSelectorQuery()
    .select('#myCanvas') // 在 WXML 中填入的 id
    .fields({

     node: true, size: true })
    .exec((res) => {


        // Canvas 对象
        const canvas = res[0].node
        // 渲染上下文
        const ctx = canvas.getContext('2d')
    })
-
By
SelectorQueryselecting the canvas in the previous step, the Canvas object can be obtained. -
Then
Canvas.getContext, we can get the rendering context RenderingContext. -
Subsequent canvas operations and rendering operations need to be implemented through these two objects.
Step 3: Initialize Canvas
wx.createSelectorQuery()
    .select('#myCanvas') // 在 WXML 中填入的 id
    .fields({

     node: true, size: true })
    .exec((res) => {


        // Canvas 对象
        const canvas = res[0].node
        // 渲染上下文
        const ctx = canvas.getContext('2d')

        // Canvas 画布的实际绘制宽高
        const width = res[0].width
        const height = res[0].height

        // 初始化画布大小
        const dpr = wx.getWindowInfo().pixelRatio
        canvas.width = width * dpr
        canvas.height = height * dpr
        ctx.scale(dpr, dpr)
    })
- The width and height of the canvas are divided into rendering width and height and logical width and height, see the tutorial on the official website (the link above)
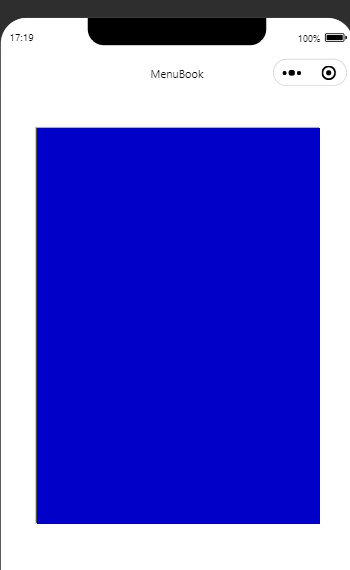
Step 4: Draw the background color
		// ...接上面的代码...
        // 背景颜色
        ctx.fillStyle = 'rgba(0, 0, 200)'
        ctx.fillRect(0, 0, width, height)
renderings
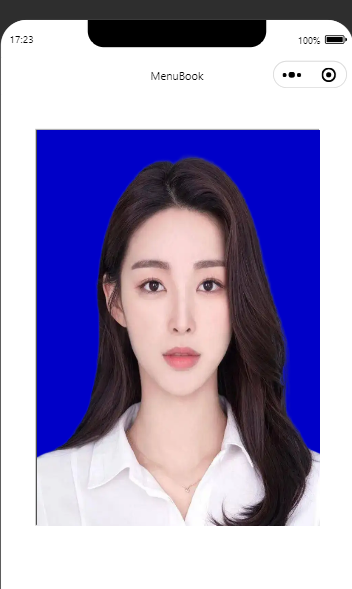
Step 5: Drawing the Picture
// ...接上面的代码...
// 图片对象
const image = canvas.createImage()
// 设置图片src
image.src = 'https://i.postimg.cc/s2d5kHG3/test-2.png'
// 图片加载完成回调
image.onload = () => {


    // 将图片绘制到 canvas 上
    ctx.drawImage(image, 0, 0)
}
renderings
The last step saves the content of the canvas to the local
image.onloadAdd the following code just below
// 图片加载完成回调
        image.onload = () => {


          // 将图片绘制到 canvas 上
          ctx.drawImage(image, 0, 0, width, height)
          console.log('绘制完成')
          // 生成图片
          wx.canvasToTempFilePath({


            // 放在image.onload 里面确保图片绘制完成
            canvas: canvas,
            success: res => {


              // 生成的图片临时文件路径
              const tempFilePath = res.tempFilePath
              wx.saveImageToPhotosAlbum({


                filePath: tempFilePath,
                success(res) {


                  console.log('成功保存到系统相册')
                }
              })
            }
          })
        }
This step is the most critical, (I was also confused for a long time, because I will
canvasToTempFilePathput it outside and only output a pure blue picture, and finally found in the WeChat development community that the canvas drawing has not been completed, so I saved the picture locally)
Key point: willcanvasToTempFilePathbe placed insideimage.onloadthe callback . Make sure the inserted image has been drawn into the canvas