Article directory
- foreword
- 1. What is MHA
- 2. Composition of MHA
- 3. Characteristics of MHA
- 4. Build MHA
-
-
- 1. Idea
- 2. MHA working principle
- 3. Environment
- 4. Install mysql5.7 on Master, Slave1, and Slave2 nodes
- 5. Modify the host names of the Manager Master, Slave1, and Slave2 nodes (easy to operate)
- 6. Modify the Mysql master configuration file /etc/my.cnf of the Master, Slave1, and Slave2 nodes
- 7. Create two soft links on the Master, Slave1, and Slave2 nodes
- 8. Configure mysql one master and two slaves
-
- 8.1 All database nodes perform mysql authorization
- 8.2 View binary files and synchronization points on the Master node
- 8.3 Perform synchronization operations on Slave1 and Slave2 nodes
- 8.4 View data synchronization results on Slave1 and Slave2 nodes
- 8.5 Both slave libraries must be set to read-only mode
- 8.6 Insert data into the main database to test database synchronization
- 9. Install MHA software
- 10. Configure passwordless authentication on all servers
- 11. Configure address mapping for each machine, in order to speed up the network delay of master-slave replication, speed up access speed, and reduce NDS resolution time
- 12. Configure MHA on the manager node (192.168.113.127)
-
- 12.1 Copy relevant scripts to the /usr/local/bin directory on the manager node
- 12.2 Copy the above script of VIP management during automatic switching to /usr/local/bin
- 12.3 The modified content is as follows: (delete the original content, directly copy and modify vip related parameters)
- 12.4 Create the MHA software directory and copy the configuration file, here use the app1.cnf configuration file to manage the mysql node server
- 13. The first configuration needs to manually open the virtual IP (192.168.113.128) on the Master node
- 14. Test ssh passwordless authentication on the manager node
- 15. Test the mysql master-slave connection on the manager node
- 16. Start MHA on the manager node
- 17. View MHA status
- 18. View MHA logs
- 19. Check whether the VIP address 192.168.3.200 of Mysql1 exists
-
- 5. Simulation failure
- 6. Troubleshooting steps
foreword
When building a mysql cluster, although a single master master-slave replication greatly improves the read and write capabilities of the database, once a single point of failure occurs, the entire cluster will be paralyzed. Therefore, we usually configure high availability for the master to improve the performance of the cluster. redundancy
1. What is MHA
- MHA (MasterHigh Availability) is an excellent set of software for failover and master-slave replication in MySQL high availability environment
- The emergence of MHA is to solve the problem of MySQL single point
- During the MySQL failover process, MHA can automatically complete the failover operation within 0-30 seconds
- MHA can ensure data consistency to the greatest extent during the failover process to achieve high availability in the true sense
2. Composition of MHA
-
MHA Node (data node)
MHA Node runs on each MySQL server -
MHA Manager (management node)
MHA Manager can be deployed on an independent machine to manage multiple master-slave clusters; it can also be deployed on a slave node -
MHA Manager will regularly detect the master node in the cluster. When the master fails, it can automatically promote the slave with the latest data as the new master, and then re-point all other slaves to the new master. The entire failover process is completely transparent to the application
3. Characteristics of MHA
-
During the automatic failover process, MHA tries to save the binary log from the downtime master server to ensure that the data is not lost to the greatest extent
-
Using semi-synchronous replication can greatly reduce the risk of data loss. If only one slave has received the latest binary log, MHA can apply the latest binary log to all other slave servers, thus ensuring the data consistency of all nodes
-
At present, MHA supports one master and multiple slaves architecture, at least three servers, that is, one master and two slaves
MHA is to solve failover, save data as much as possible, and achieve consistency of all node logs
4. Build MHA
1. Idea
-
1. MHA architecture
1) Database installation
2) One master and two slaves
3) MHA construction -
2. Fault simulation
1) The main library fails
2) The alternate main library becomes the main library
3) The original faulty main library recovers and rejoins the MHA to become the slave library
2. MHA working principle
1. Save binary log events (binlog events) from the crashed master
2. Identify the latest updated slave log
3. Apply the differential relay log (relay log) to other slaves
4. Apply the binary log events saved from the master
5. Promote a slave to the new master
6. Make the master of other slave connection rows replicate
3. Environment
MHA manager node server:
CentOS7.6(64 bit) manager/192.168.113.127, install MHA node and manager componentsMaster node server: CentOS7.6 (64 bits) mysql1/192.168.113.128, install mysql 5.7, MHA node components
Slave1 node server: CentOS7.6 (64 bits) mysql2/192.168.113.129, install mysql 5.7, MHA node components
Slave2 node server: CentOS7.6 (64 bits) mysql3/192.168.113.130, install mysql 5.7, MHA node components
#所有机器关闭防火墙,核心防护
systemctl stop firewalld
systemctl disable firewalld
setenforce 0
4. Install mysql5.7 on Master, Slave1, and Slave2 nodes
Compile and install mysql, you can read the previous blog
Introduction to MySQL [compile and install]_LEE_September Blog-CSDN Blog
5. Modify the host names of the Manager Master, Slave1, and Slave2 nodes (easy to operate)
[root@localhost ~]# hostnamectl set-hostname manager
[root@localhost ~]# su
[root@manager ~]#
[root@localhost ~]# hostnamectl set-hostname master
[root@localhost ~]# su
[root@master ~]#
[root@localhost ~]# hostnamectl set-hostname slave1
[root@localhost ~]# su
[root@slave1 ~]#
[root@localhost ~]# hostnamectl set-hostname slave2
[root@localhost ~]# su
[root@slave2 ~]#
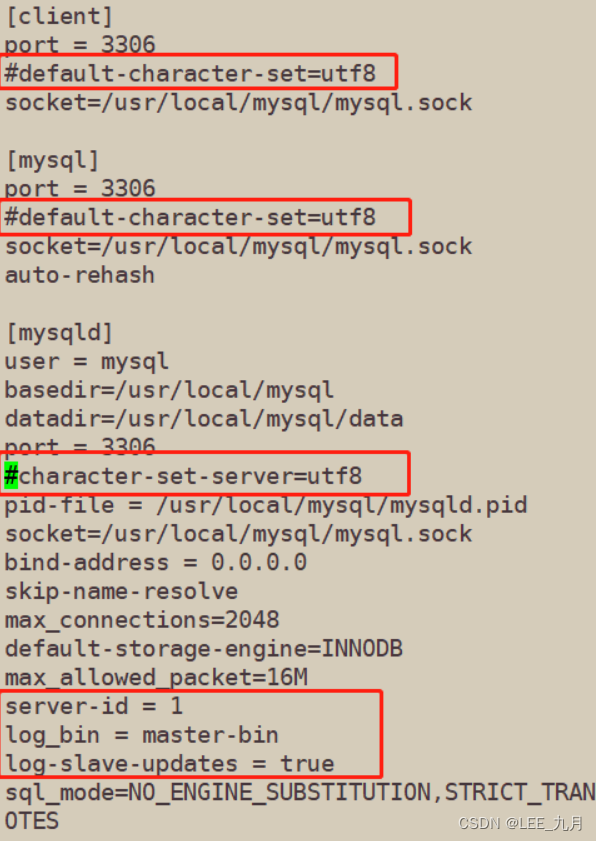
6. Modify the Mysql master configuration file /etc/my.cnf of the Master, Slave1, and Slave2 nodes
Restart the MySQL service on each machine
- Modify master, comment character set
##编辑主配置文件,并且给字符集注释,否则会报错
[root@master ~]# vim /etc/my.cnf
server-id = 1
log_bin = master-bin
log-slave-updates = true

[root@master ~]# systemctl restart mysqld.service
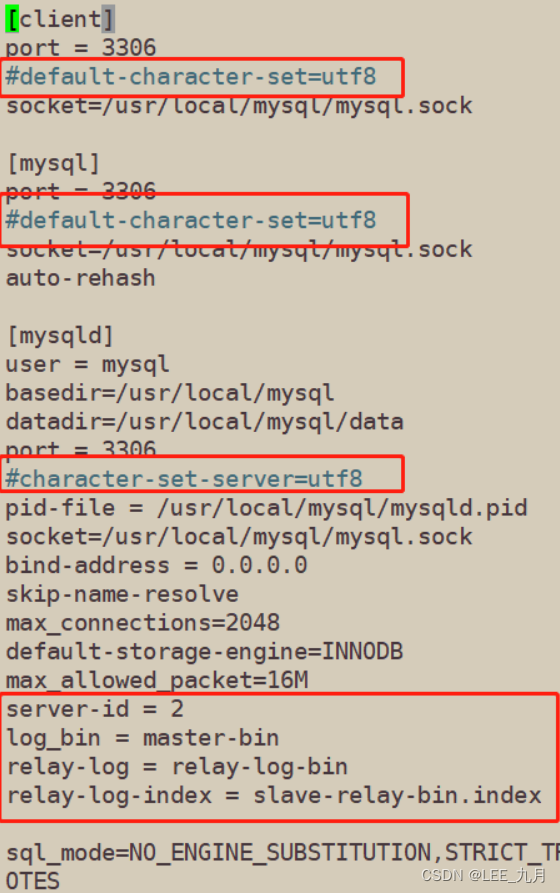
- Modify Slavel 1, the same comment word
[root@slave1 ~]# vim /etc/my.cnf
vim /etc/my.cnf
server-id = 2 						#三台服务器的 server-id 不能一样
log_bin = master-bin
relay-log = relay-log-bin
relay-log-index = slave-relay-bin.index

[root@slave1 ~]# systemctl restart mysqld.service
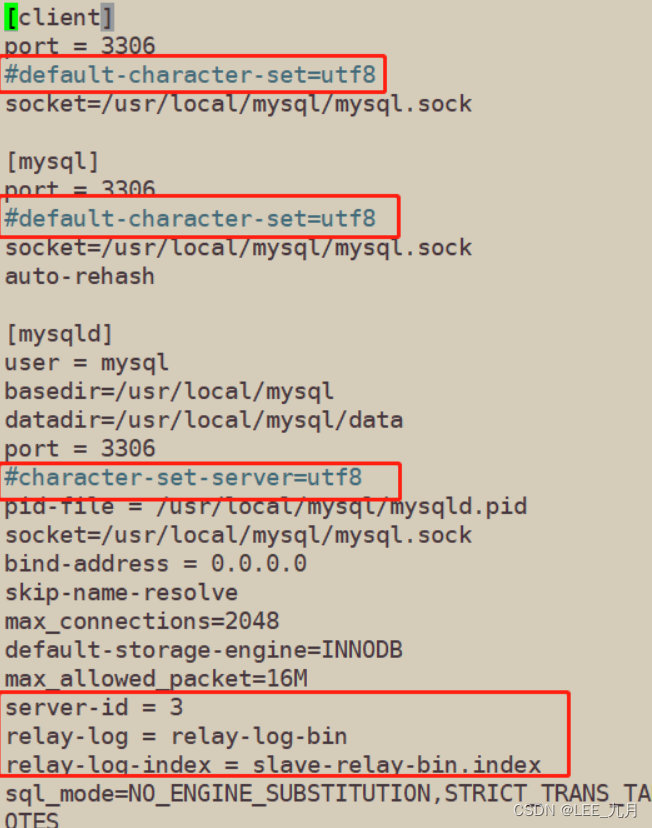
- Modify Slavel 2, also annotate the character set
[root@slave2 ~]# vim /etc/my.cnf
server-id = 3			#三台服务器的 server-id 不能一样
log_bin = master-bin
relay-log = relay-log-bin
relay-log-index = slave-relay-bin.index

[root@slave2 ~]# systemctl restart mysqld.service
7. Create two soft links on the Master, Slave1, and Slave2 nodes
[root@master ~]# ln -s /usr/local/mysql/bin/mysql /usr/sbin/
[root@master ~]# ln -s /usr/local/mysql/bin/mysqlbinlog /usr/sbin/
8. Configure mysql one master and two slaves
8.1 All database nodes perform mysql authorization
##这里就在一台机器上展示了,其他机器也要做
[root@master ~]# mysql -uroot -p123123
mysql> grant replication slave on *.* to 'myslave'@'192.168.113.%' identified by '123123';   #从数据库同步使用

mysql> grant all privileges on *.* to 'mha'@'192.168.113.%' identified by 'manager';    #manager使用

mysql> grant all privileges on *.* to 'mha'@'master' identified by 'manager'   #防止从库通过主机名连接不上主库

mysql> grant all privileges on *.* to 'mha'@'slave1' identified by 'manager';

mysql> grant all privileges on *.* to 'mha'@'slave2' identified by 'manager';

mysql> flush privileges;   #刷新
8.2 View binary files and synchronization points on the Master node
mysql> show master status;
+-------------------+----------+--------------+------------------+-------------------+
| File              | Position | Binlog_Do_DB | Binlog_Ignore_DB | Executed_Gtid_Set |
+-------------------+----------+--------------+------------------+-------------------+
| master-bin.000002 |     1747 |              |                  |                   |
+-------------------+----------+--------------+------------------+-------------------+
1 row in set (0.00 sec)
8.3 Perform synchronization operations on Slave1 and Slave2 nodes
mysql> change master to master_host='192.168.113.128',master_user='myslave',master_password=='123123',master_log_file='master-bin.000002',master_log_pos=1747;

mysql> start slave;
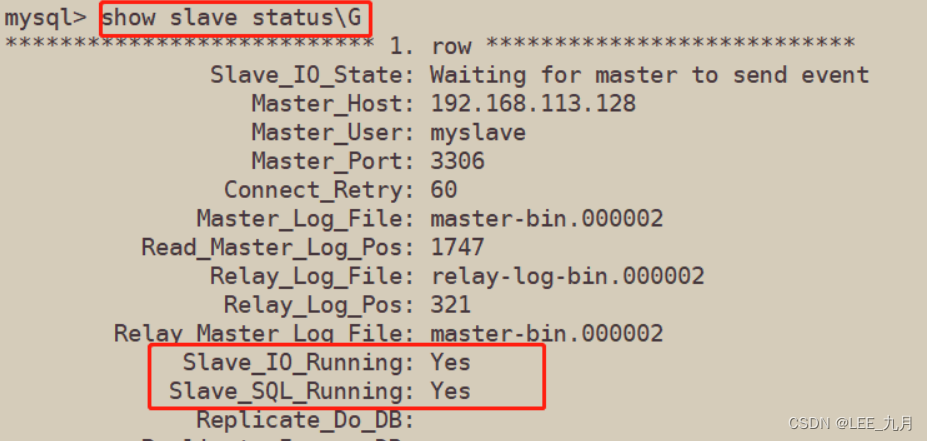
8.4 View data synchronization results on Slave1 and Slave2 nodes
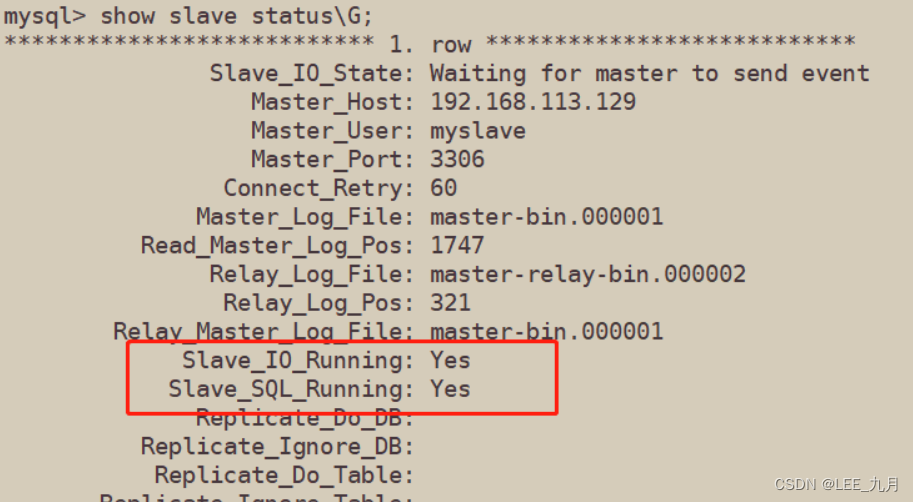
mysql> show slave status\G
#确保 IO 和 SQL 线程都是 Yes,代表同步正常。
Slave_IO_Running: Yes
Slave_SQL_Running: Yes

#一般 Slave_IO_Running: No 的可能性:
1、网络不通
2、my.cnf配置有问题
3、密码、file文件名、pos偏移量不对
4、防火墙没有关闭
8.5 Both slave libraries must be set to read-only mode
mysql> set global read_only=1;
8.6 Insert data into the main database to test database synchronization
mysql> create database qjm_test;

mysql> use qjm_test;

mysql> create table dsj (id int(4),name varchar(20));

mysql> insert into test1 values(1,'A');
mysql> insert into dsj values(2,'B');

mysql> select * from dsj;
+------+------+
| id   | name |
+------+------+
|    1 | A    |
|    2 | B    |
+------+------+
2 rows in set (0.00 sec)
- query from server
mysql> select * from qjm_test.dsj;
+------+------+
| id   | name |
+------+------+
|    1 | A    |
|    2 | B    |
+------+------+
2 rows in set (0.00 sec)
9. Install MHA software
9.1 Install the MHA-dependent environment on all servers, first install the epel source
- Install the dependent environment of epel source and MHA on four servers
##这里就在一台机器上展示了,其他机器也要做
[root@manager opt]# yum install epel-release --nogpgcheck -y   #安装epel源

#安装MHA依赖环境
yum install -y perl-DBD-MySQL \
perl-Config-Tiny \
perl-Log-Dispatch \
perl-Parallel-ForkManager \
perl-ExtUtils-CBuilder \
perl-ExtUtils-MakeMaker \
perl-CPAN
9.2 To install the MHA software package, you must first install the node component on all servers
- For each operating system version is different, here CentOS7.6 chooses version 0.57.
- The node component must be installed on all servers first, and finally the manager component must be installed on the MHA-manager node, because the manager depends on the node component
[root@manager opt]# cd /opt   ##包拖到/opt下准备解压
[root@slave1 mha4mysql-node-0.57]# tar zxvf mha4mysql-node-0.57.tar.gz
[root@slave1 mha4mysql-node-0.57]# cd mha4mysql-node-0.57/
[root@slave1 mha4mysql-node-0.57]# perl Makefile.PL
[root@slave1 mha4mysql-node-0.57]# make && make install
9.3 Install the manager component on the MHA manager node (192.168.113.127)
[root@manager mha4mysql-manager-0.57]# cd /opt  ##包拖到下面解压
[root@manager mha4mysql-manager-0.57]# tar zxvf mha4mysql-manager-0.57.tar.gz
[root@manager opt]# cd mha4mysql-manager-0.57/
[root@manager mha4mysql-manager-0.57]# perl Makefile.PL
[root@manager mha4mysql-manager-0.57]# make && make install
- After the manager component is installed, several tools will be generated under /usr/local/bin, mainly including the following:
[root@manager mha4mysql-manager-0.57]# ls /usr/local/bin/ | grep "^m"
masterha_check_ssh 检查 MHA 的 SSH 配置状况
masterha_check_repl 检查 MySQL 复制状况
masterha_manger 启动 manager的脚本
masterha_check_status 检测当前 MHA 运行状态
masterha_master_monitor 检测 master 是否宕机
masterha_master_switch 控制故障转移(自动或者 手动)
masterha_conf_host 添加或删除配置的 server 信息
masterha_stop  关闭manager
- After the node component is installed, there will be several scripts under /usr/local/bin

#node 组件安装后也会在/usr/local/bin 下面会生成几个脚本(这些工具通常由 MHAManager 的脚本触发,无需人为操作)主要如下:

save_binary_logs      //保存和复制 master 的二进制日志
apply_diff_relay_logs //识别差异的中继日志事件并将其差异的事件应用于其他的 slave
filter_mysqlbinlog    //去除不必要的 ROLLBACK 事件(MHA已不再使用这个工具)
purge_relay_logs      //清除中继日志(不会阻塞SQL线程)
10. Configure passwordless authentication on all servers
#(1)在 manager 节点上配置到所有数据库节点的无密码认证
[root@manager mha4mysql-manager-0.57]# ssh-keygen -t rsa  #一路按回车
[root@manager mha4mysql-manager-0.57]# ssh-copy-id 192.168.113.128		//中途需要yes确认,并输入密码
[root@manager mha4mysql-manager-0.57]# ssh-copy-id 192.168.113.129
[root@manager mha4mysql-manager-0.57]# ssh-copy-id 192.168.113.130

#(2)在 master 上配置到数据库节点 slave1 和 slave2 的无密码认证
[root@master ~]# ssh-keygen -t rsa
[root@master ~]# ssh-copy-id 192.168.113.129
[root@master ~]# ssh-copy-id 192.168.113.130

#(3)在 slave1 上配置到数据库节点 master 和 slave2 的无密码认证
[root@slave1 ~]# ssh-keygen -t rsa
[root@slave1 ~]# ssh-copy-id 192.168.113.128
[root@slave1 ~]# ssh-copy-id 192.168.113.130

#(4)在 slave2 上配置到数据库节点 master 和 slave1 的无密码认证
[root@slave2 ~]# ssh-keygen -t rsa
[root@slave2 ~]# ssh-copy-id 192.168.113.128
[root@slave2 ~]# ssh-copy-id 192.168.113.129
11. Configure address mapping for each machine, in order to speed up the network delay of master-slave replication, speed up access speed, and reduce NDS resolution time
[root@manager ~]# vim /etc/hosts
192.168.113.127  manager
192.168.113.128  master
192.168.113.129  slave1
192.168.113.130  slave2

12. Configure MHA on the manager node (192.168.113.127)
12.1 Copy relevant scripts to the /usr/local/bin directory on the manager node
[root@manager ~]# cp -rp /opt/mha4mysql-manager-0.57/samples/scripts/ /usr/local/bin/
[root@manager ~]# ll /usr/local/bin/scripts/
master_ip_failover  		#自动切换时 VIP 管理的脚本
master_ip_online_change 	#在线切换时 vip 的管理
power_manager 				#故障发生后关闭主机的脚本
send_report 				#因故障切换后发送报警的脚本
12.2 Copy the above script of VIP management during automatic switching to /usr/local/bin
#这里使用master_ip_failover脚本来管理 VIP 和故障切换
[root@manager ~]# cp /usr/local/bin/scripts/master_ip_failover /usr/local/bin/
12.3 The modified content is as follows: (delete the original content, directly copy and modify vip related parameters)
[root@manager ~]# vim /usr/local/bin/master_ip_failover
#!/usr/bin/env perl
use strict;
use warnings FATAL => 'all';

use Getopt::Long;

my (
$command, $ssh_user, $orig_master_host, $orig_master_ip,
$orig_master_port, $new_master_host, $new_master_ip, $new_master_port
);
#############################添加内容部分#########################################
my $vip = '192.168.113.200';									#指定vip的地址
my $brdc = '192.168.113.255';								#指定vip的广播地址
my $ifdev = 'ens33';										#指定vip绑定的网卡
my $key = '1';												#指定vip绑定的虚拟网卡序列号
my $ssh_start_vip = "/sbin/ifconfig ens33:$key $vip";		#代表此变量值为ifconfig ens33:1 192.168.113.200
my $ssh_stop_vip = "/sbin/ifconfig ens33:$key down";		#代表此变量值为ifconfig ens33:1 192.168.113.200 down
my $exit_code = 0;											#指定退出状态码为0
#my $ssh_start_vip = "/usr/sbin/ip addr add $vip/24 brd $brdc dev $ifdev label $ifdev:$key;/usr/sbin/arping -q -A -c 1 -I $ifdev $vip;iptables -F;";
#my $ssh_stop_vip = "/usr/sbin/ip addr del $vip/24 dev $ifdev label $ifdev:$key";
##################################################################################
GetOptions(
'command=s' => \$command,
'ssh_user=s' => \$ssh_user,
'orig_master_host=s' => \$orig_master_host,
'orig_master_ip=s' => \$orig_master_ip,
'orig_master_port=i' => \$orig_master_port,
'new_master_host=s' => \$new_master_host,
'new_master_ip=s' => \$new_master_ip,
'new_master_port=i' => \$new_master_port,
);

exit &main();

sub main {


print "\n\nIN SCRIPT TEST====$ssh_stop_vip==$ssh_start_vip===\n\n";

if ( $command eq "stop" || $command eq "stopssh" ) {


my $exit_code = 1;
eval {


print "Disabling the VIP on old master: $orig_master_host \n";
&stop_vip();
$exit_code = 0;
};
if ($@) {


warn "Got Error: $@\n";
exit $exit_code;
}
exit $exit_code;
}
elsif ( $command eq "start" ) {


my $exit_code = 10;
eval {


print "Enabling the VIP - $vip on the new master - $new_master_host \n";
&start_vip();
$exit_code = 0;
};
if ($@) {


warn $@;
exit $exit_code;
}
exit $exit_code;
}
elsif ( $command eq "status" ) {


print "Checking the Status of the script.. OK \n";
exit 0;
}
else {


&usage();
exit 1;
}
}
sub start_vip() {


`ssh $ssh_user\@$new_master_host \" $ssh_start_vip \"`;
}
## A simple system call that disable the VIP on the old_master
sub stop_vip() {


`ssh $ssh_user\@$orig_master_host \" $ssh_stop_vip \"`;
}

sub usage {


print
"Usage: master_ip_failover --command=start|stop|stopssh|status --orig_master_host=host --orig_master_ip=ip --orig_master_port=port --new_master_host=host --new_master_ip=ip --new_master_port=port\n";
}

## 然后再命令模式下 % s/^#//  删除所有#
#再回到第一行/usr/bin/env perl 前加入 #
12.4 Create the MHA software directory and copy the configuration file, here use the app1.cnf configuration file to manage the mysql node server
[root@manager ~]# mkdir /etc/masterha
[root@manager ~]# cp /opt/mha4mysql-manager-0.57/samples/conf/app1.cnf /etc/masterha/
[root@manager ~]# vim /etc/masterha/app1.cnf
[server default]
manager_log=/var/log/masterha/app1/manager.log
manager_workdir=/var/log/masterha/app1
master_binlog_dir=/usr/local/mysql/data
master_ip_failover_script=/usr/local/bin/master_ip_failover
master_ip_online_change_script=/usr/local/bin/master_ip_online_change
password=manager
ping_interval=1
remote_workdir=/tmp
repl_password=123456
repl_user=myslave
secondary_check_script=/usr/local/bin/masterha_secondary_check -s 192.168.113.129 -s 192.168.113.130
shutdown_script=""
ssh_user=root
user=mha

[server1]
hostname=192.168.113.128
port=3306

[server2]
candidate_master=1
check_repl_delay=0
hostname=192.168.113.129
port=3306

[server3]
hostname=192.168.113.130
port=3306

----------------------------------------------------------------------------------------------------------
[server default]
manager_log=/var/log/masterha/app1/manager.log      #manager日志
manager_workdir=/var/log/masterha/app1            #manager工作目录
master_binlog_dir=/usr/local/mysql/data/         #master保存binlog的位置,这里的路径要与master里配置的binlog的路径一致,以便MHA能找到
master_ip_failover_script=/usr/local/bin/master_ip_failover  #设置自动failover时候的切换脚本,也就是上面的那个脚本
master_ip_online_change_script=/usr/local/bin/master_ip_online_change  #设置手动切换时候的切换脚本
password=manager			#设置mysql中root用户的密码,这个密码是前文中创建监控用户的那个密码
ping_interval=1				#设置监控主库,发送ping包的时间间隔,默认是3秒,尝试三次没有回应的时候自动进行failover
remote_workdir=/tmp			#设置远端mysql在发生切换时binlog的保存位置
repl_password=123			#设置复制用户的密码
repl_user=myslave			#设置复制用户的用户
report_script=/usr/local/send_report     #设置发生切换后发送的报警的脚本
secondary_check_script=/usr/local/bin/masterha_secondary_check -s 192.168.113.129 -s 192.168.113.130#指定检查的从服务器IP地址
shutdown_script=""			#设置故障发生后关闭故障主机脚本(该脚本的主要作用是关闭主机防止发生脑裂,这里没有使用)
ssh_user=root				#设置ssh的登录用户名
user=mha					#设置监控用户root

[server1]
hostname=192.168.113.128
port=3306

[server2]
hostname=192.168.113.129
port=3306
candidate_master=1
#设置为候选master,设置该参数以后,发生主从切换以后将会将此从库提升为主库,即使这个从库不是集群中最新的slave

check_repl_delay=0
#默认情况下如果一个slave落后master 超过100M的relay logs的话,MHA将不会选择该slave作为一个新的master, 因为对于这个slave的恢复需要花费很长时间;通过设置check_repl_delay=0,MHA触发切换在选择一个新的master的时候将会忽略复制延时,这个参数对于设置了candidate_master=1的主机非常有用,因为这个候选主在切换的过程中一定是新的master

[server3]
hostname=192.168.113.130
port=3306
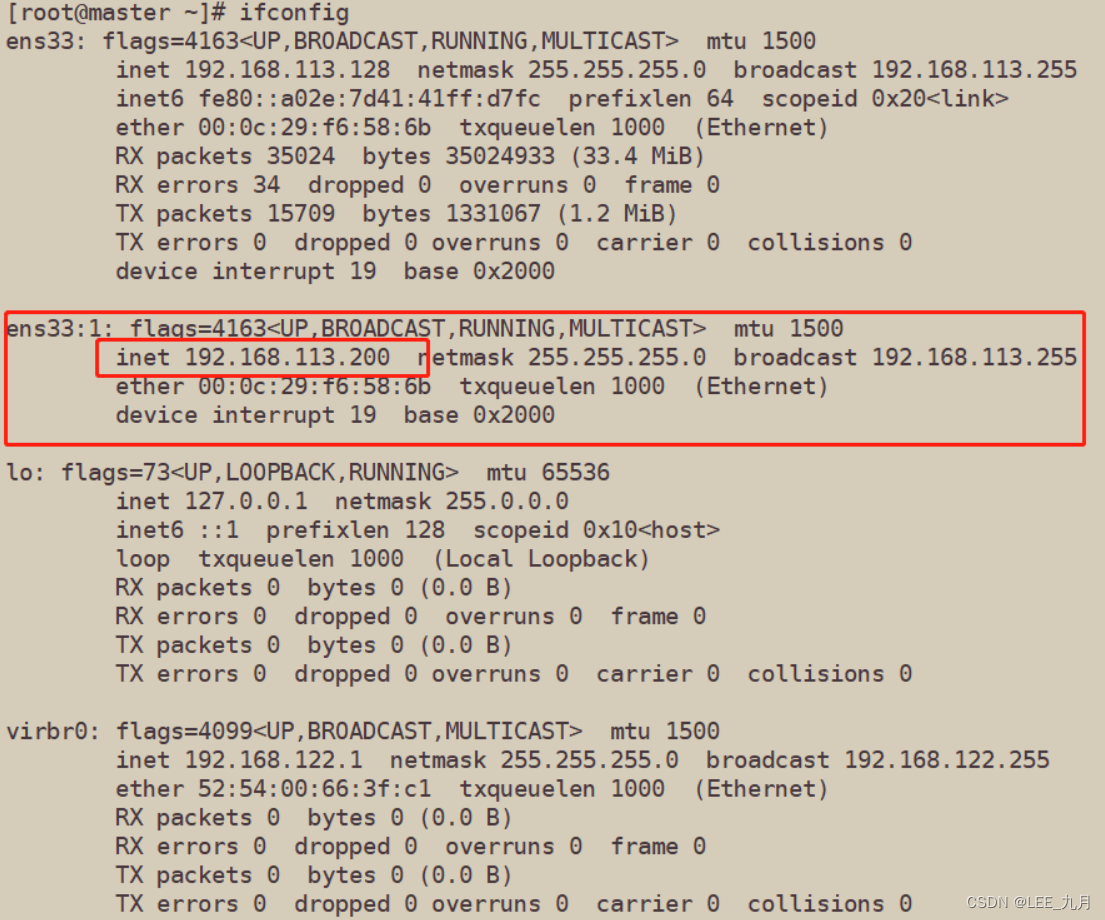
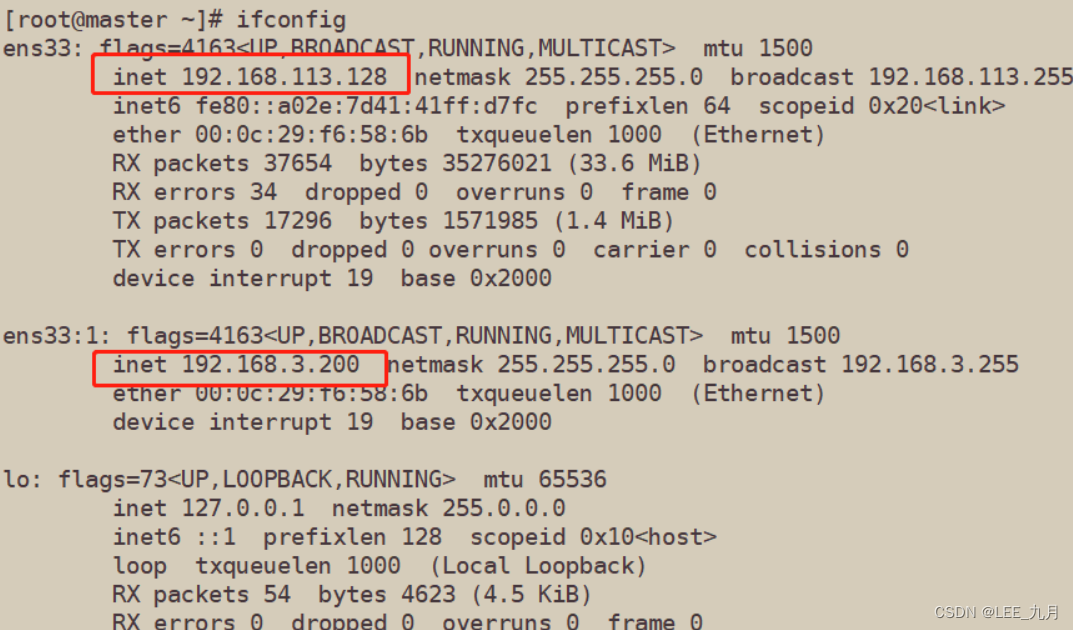
13. The first configuration needs to manually open the virtual IP (192.168.113.128) on the Master node
[root@master ~]# /sbin/ifconfig ens33:1 192.168.113.200/24
[root@master ~]# ifconfig   #查看

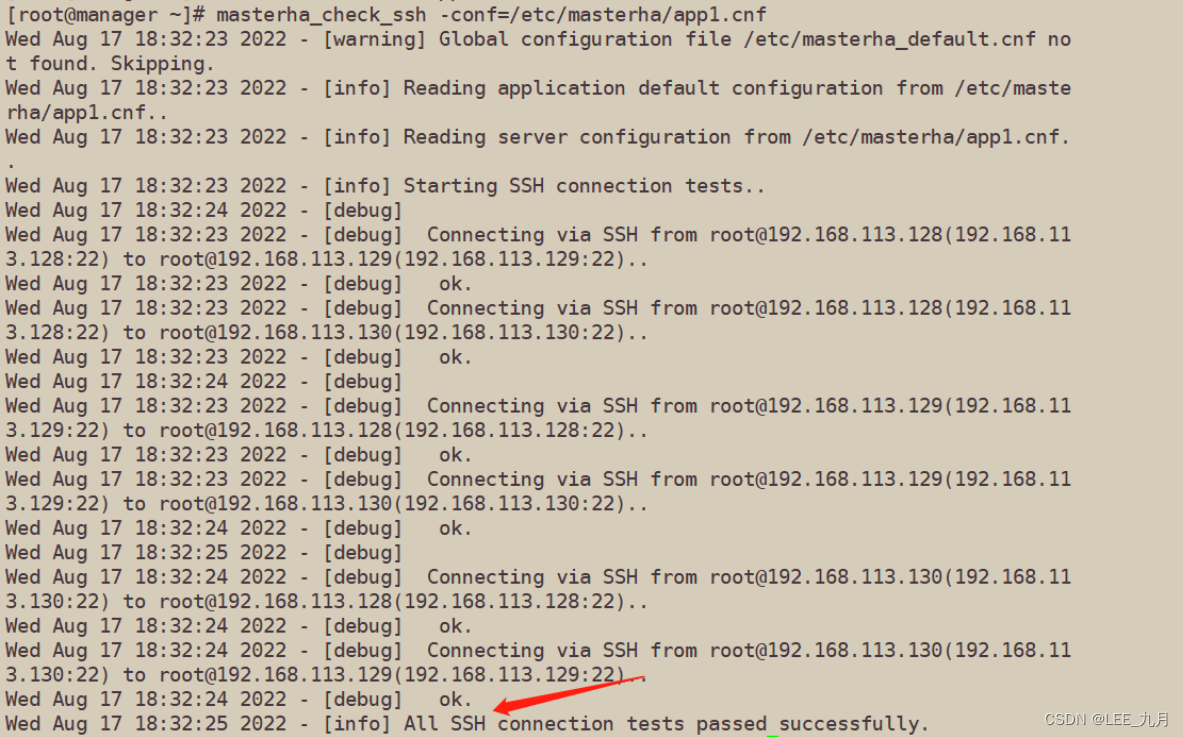
14. Test ssh passwordless authentication on the manager node
- If it is normal, it will output successfully at the end, as shown below
[root@manager ~]# masterha_check_ssh -conf=/etc/masterha/app1.cnf
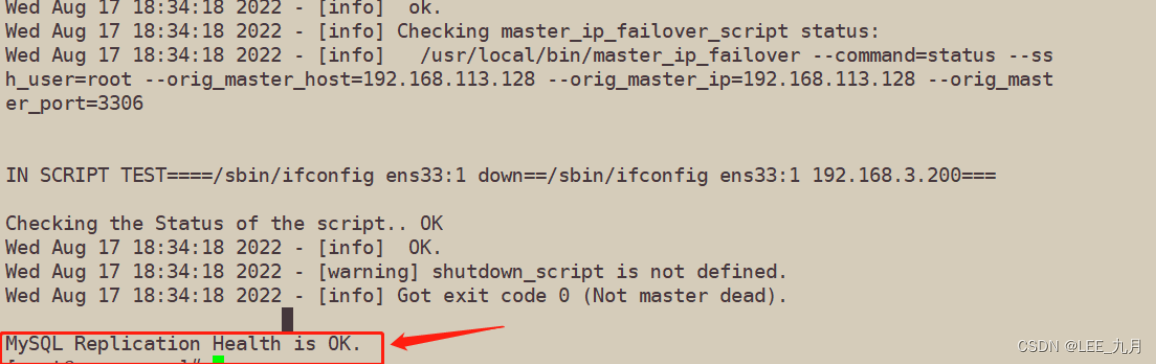
15. Test the mysql master-slave connection on the manager node
- Finally, the words MySQL Replication Health is OK appear, indicating that it is normal. As follows
[root@manager ~]# masterha_check_repl -conf=/etc/masterha/app1.cnf
16. Start MHA on the manager node
[root@manager ~]# nohup masterha_manager --conf=/etc/masterha/app1.cnf --remove_dead_master_conf --ignore_last_failover < /dev/null > /var/log/masterha/app1/manager.log 2>&1 &

-remove_dead_master_conf:该参数代表当发生主从切换后,老的主库的 ip 将会从配置文件中移除

--manger_log:日志存放位置

--ignore_last_failover:在缺省情况下,如果 MHA 检测到连续发生宕机,且两次宕机间隔不足 8 小时的话,则不会进行 Failover, 之所以这样限制是为了避免 ping-pong 效应。该参数代表忽略上次 MHA 触发切换产生的文件,默认情况下,MHA 发生切换后会在日志记录,也就是上面设置的日志app1.failover.complete文件,下次再次切换的时候如果发现该目录下存在该文件将不允许触发切换,除非在第一次切换后收到删除该文件,为了方便,这里设置为--ignore_last_failover
17. View MHA status
- You can see that the current master is the Mysql1 node
[root@manager ~]# masterha_check_status --conf=/etc/masterha/app1.cnf
app1 (pid:55811) is running(0:PING_OK), master:192.168.113.128

18. View MHA logs
- You can also see that the current master is 192.168.113.128, as shown below
[root@manager ~]# cat /var/log/masterha/app1/manager.log | grep "current master"
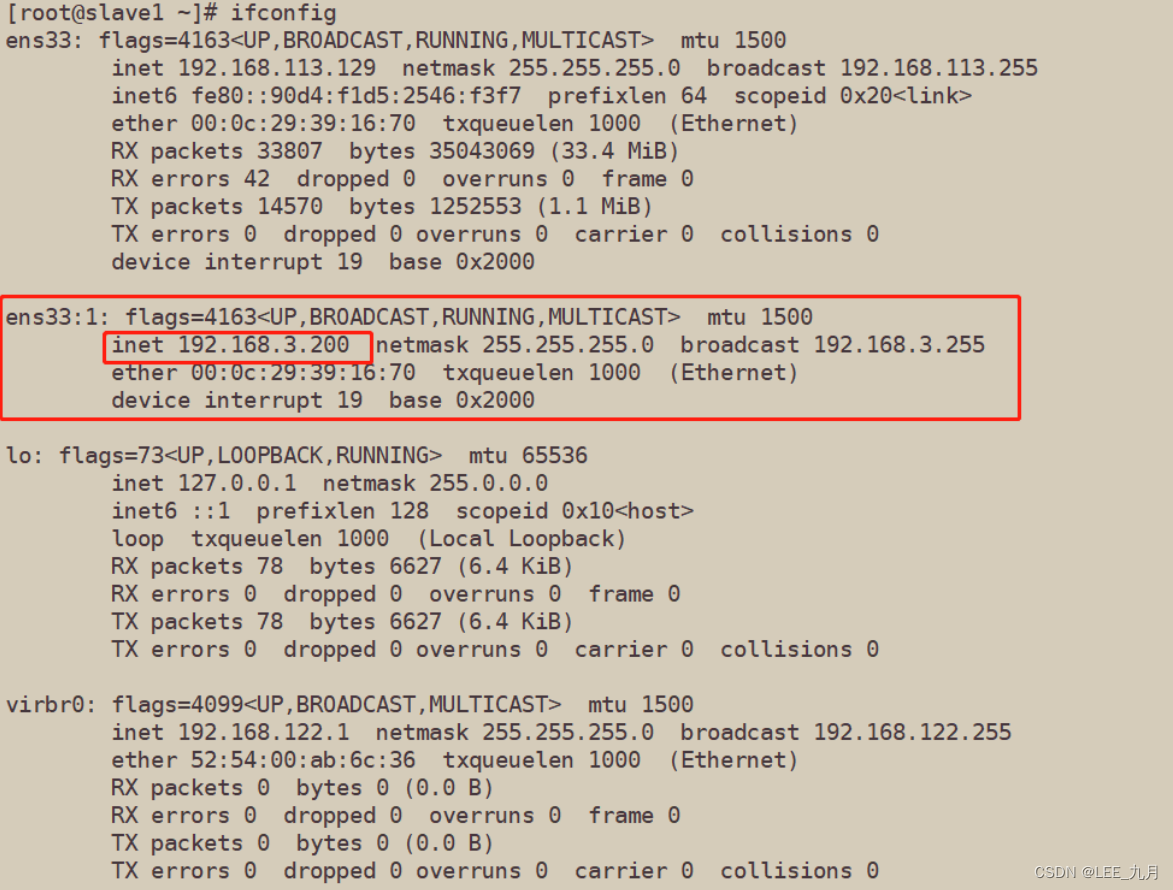
19. Check whether the VIP address 192.168.3.200 of Mysql1 exists
[root@master ~]# ifconfig
- To shut down the manager service, you can use the following command
masterha_stop --conf=/etc/masterha/app1.cnf
或者可以直接采用 kill 进程 ID 的方式关闭
5. Simulation failure
- Monitor and observe logging on the manager node
[root@manager ~]# tail -f /var/log/masterha/app1/manager.log
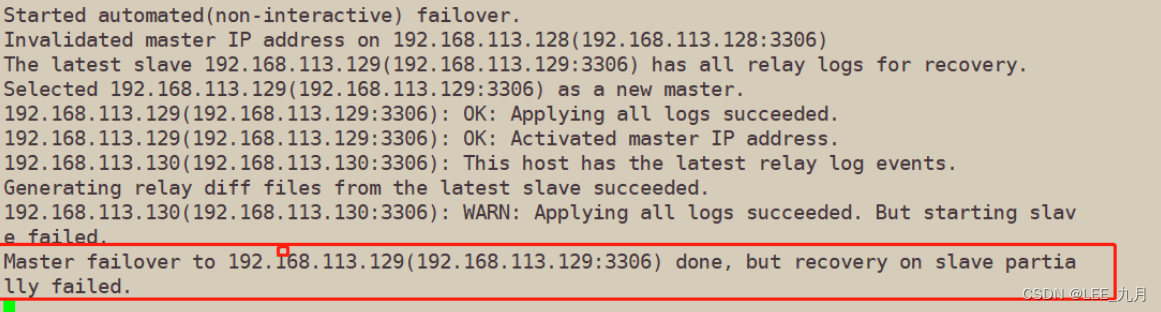
- Stop the mysql service on the Master node Mysql1
[root@master ~]# systemctl stop mysqld.service
或
pkill -9 mysql
- After a normal automatic switching, the MHA process will exit. HMA will automatically modify the content of the app1.cnf file and delete the downtime mysql1 node. Check if mysql2 takes over VIP
- View changes on the manager node
[root@slave1 ~]# ifconfig
-
Algorithm for failover of the standby master library:
1. Generally, the slave library is judged from (position/GTID) to judge whether it is good or bad, and the data is different. The slave closest to the master becomes the candidate master.
2. If the data is consistent, select an alternative main library according to the order of the configuration files
3. Set the weight (candidate_master=1), and force the designation of the candidate master according to the weight
(1) By default, if a slave lags behind the master's relay logs by 100M, even if it has weight, it will fail
(2) If check_repl_delay=0, even if there are many logs behind, it is forced to be selected as the alternative master
6. Troubleshooting steps
6.1 repair mysql
##先开启原先停止的master的数据库
[root@master ~]# systemctl restart mysqld.service
6.2 Repair master-slave
#在现主库服务器 Mysql2 查看二进制文件和同步点(也就是原先的slave1)
[root@slave1 ~]# mysql -uroot -p123123
#在原主库服务器 mysql1 执行同步操作(也就是原先的master)
mysql> change master to master_host='192.168.113.129',master_user='myslave',master_password=='123123',master_log_file='master-bin.000001',master_log_pos=1747;

mysql> start slave;
- Then take a look at whether the master-slave replication is enabled (check it on the source master)
mysql> show slave status\G
6.3 Modify the configuration file app1.cnf on the manager node (add this record, because it will disappear automatically when it detects the failure)
[root@manager ~]# vim /etc/masterha/app1.cnf
......
secondary_check_script=/usr/local/bin/masterha_secondary_check -s 192.168.113.128 -s 192.168.113.130   ##再次更地址更改飘逸点,若现在master(也就是slave1)宕机,再次飘逸到原先的maste
......

[server1]
candidate_master=1
check_repl_delay=0
hostname=192.168.113.128
port=3306

[server2]
hostname=192.168.113.129
port=3306

[server3]
hostname=192.168.113.130
port=3306
6.4 Close and restart MHA on the manager node
[root@manager ~]# masterha_stop --conf=/etc/masterha/app1.cnf ##关闭

[root@manager ~]# nohup masterha_manager --conf=/etc/masterha/app1.cnf --remove_dead_master_conf --ignore_last_failover < /dev/null > /var/log/masterha/app1/manager.log 2>&1 &

##再次验证飘逸,关闭现在mastes,MySQL(也就是原先的slavr)
[root@slave1 ~]# systemctl stop mysqld.service

##再次常看要飘移回的地址是(192.168.113.128)
[root@master ~]# ifconfig
- It is found that the successful drift has passed, and you can repeat the above repair and try to verify the drift
- Solve the problem of incompatibility of Chinese and English characters
dos2unix /usr/local/bin/master_ip_failover