IndexedDB is a local database provided by the browser, which can be created and operated by web scripts. IndexedDB allows storing large amounts of data, provides a search interface, and can also create indexes. These are not available in LocalStorage or Cookie. As far as the database type is concerned, IndexedDB is not a relational database (does not support SQL query statements), but is closer to a NoSQL database.
IndexedDB has the following characteristics:
- Key-value pair storage: IndexedDB internally uses an object store (object store) to store data. All types of data can be directly stored, including JS objects. In the object warehouse, data is stored in the form of "key-value pairs". Each data record corresponds to a primary key. The primary key is unique and cannot be duplicated, otherwise an error will be thrown.
- Asynchronous: IndexedDB will not lock the browser when operating, and users can still perform other operations. This is in contrast to LocalStorage, whose operations are synchronous. The asynchronous design is to prevent the reading and writing of large amounts of data and slow down the performance of web pages.
- Support transaction: IndexedDB supports transaction (transaction), which means that in a series of operation steps, as long as one step fails, the entire transaction will be cancelled, and the database will be rolled back to the state before the transaction occurred, and there will be no situation where only part of the data is rewritten.
- Same-origin restrictions: IndexedDB is subject to same-origin restrictions, and each database corresponds to the domain name where it was created. A webpage can only access databases under its own domain name, but not cross-domain databases.
- Large storage space: The storage space of IndexedDB is much larger than that of LocalStore, generally not less than 250MB, and there is even no upper limit.
- Support for binary storage: IndexedDB can store not only strings, but also binary data (ArrayBuffer objects and Blob objects).
Through the previous explanation, you are already familiar with some basic usage of IndexedDB. Here we will use IndexedDB to write a simple "student management system (local version)". If you don't know the basics of IndexedDB, please read the previous article. The address is as follows:
Local Database IndexedDB - Beginners (1)_Awakening Mage's Blog-CSDN Blog
The technical framework used is Vue.js + element-ui + vuex + axios + sass + indexedDB. The system column categories include: administrator list, grade management, class management, teacher list and student list.
As shown below:
1. Build the project
The construction of the Vue project will not be elaborated here. If you don’t know the vue family bucket, you can read the following articles first:
Vue.js quick start one: installation and configuration
Vue.js Quick Start II: Using the state management tool Vuex - Programmer Sought
Vue.js quick start three: Vue-Router routing - Awakening Mage's Blog - CSDN Blog
Vue.js quick start four: axios installation and use Develop Paper
2. Database creation
After the Vue project is built, you need to create a db directory under the src directory to store and operate IndexedDB database files. For example, database operation files, corresponding table encapsulation classes, etc.
2.1 Definition table
Although IndexedDB does not belong to the "relational database", the definition and association of tables is still carried out according to the "relational database".
Sysadmin table:
| field name | type | describe |
| id | int | ID |
| name | varchar | administrator account |
| password | varchar | password |
| phone | varchar | Phone number |
| createtime | datetime | creation date |
| updatetime | datetime | Updated |
Grade table:
| field name | type | describe |
| id | int | ID |
| name | varchar | grade name |
| createtime | datetime | creation date |
| updatetime | datetime | Updated |
class table:
| field name | type | describe |
| id | int | ID |
| name | varchar | class name |
| mid | varchar | head teacher |
| gid | int | Associated grade |
| ts | Array | Associate Authorized Faculty |
| createtime | datetime | creation date |
| updatetime | datetime | Updated |
Teacher table:
| field name | type | describe |
| id | int | ID |
| name | varchar | teacher name |
| registration | varchar | household registration |
| address | varchar | Living |
| phone | varchar | Phone number |
| cids | char | Associated class IDs, separated by commas |
| birthday | datetime | date of birth |
| createtime | datetime | creation date |
| updatetime | datetime | Updated |
Student table:
| field name | type | describe |
| id | int | ID |
| name | varchar | student name |
| registration | varchar | household registration |
| address | varchar | Living |
| phone | varchar | Phone number |
| cid | int | Associated Class ID |
| birthday | datetime | date of birth |
| createtime | datetime | creation date |
| updatetime | datetime | Updated |
2.2 MD5 encryption
Since IndexedDB is a database in the browser, you can directly view the data in the database after the project is running, and then the privacy-related content needs to be processed through encryption. So before creating the database table, we first create the utils tool class directory under the src directory, and add the md5.js file to encrypt the login password.
The md5.js code is as follows:
/*
 * Configurable variables. You may need to tweak these to be compatible with
 * the server-side, but the defaults work in most cases.
 */
var hexcase = 0;  /* hex output format. 0 - lowercase; 1 - uppercase        */
var b64pad  = ""; /* base-64 pad character. "=" for strict RFC compliance   */
var chrsz   = 8;  /* bits per input character. 8 - ASCII; 16 - Unicode      */

/*
 * These are the functions you'll usually want to call
 * They take string arguments and return either hex or base-64 encoded strings
 */
function hex_md5(s){ return binl2hex(core_md5(str2binl(s), s.length * chrsz));}
function b64_md5(s){ return binl2b64(core_md5(str2binl(s), s.length * chrsz));}
function str_md5(s){ return binl2str(core_md5(str2binl(s), s.length * chrsz));}
function hex_hmac_md5(key, data) { return binl2hex(core_hmac_md5(key, data)); }
function b64_hmac_md5(key, data) { return binl2b64(core_hmac_md5(key, data)); }
function str_hmac_md5(key, data) { return binl2str(core_hmac_md5(key, data)); }

/*
 * Perform a simple self-test to see if the VM is working
 */
function md5_vm_test()
{
  return hex_md5("abc") == "900150983cd24fb0d6963f7d28e17f72";
}

/*
 * Calculate the MD5 of an array of little-endian words, and a bit length
 */
function core_md5(x, len)
{
  /* append padding */
  x[len >> 5] |= 0x80 << ((len) % 32);
  x[(((len + 64) >>> 9) << 4) + 14] = len;

  var a =  1732584193;
  var b = -271733879;
  var c = -1732584194;
  var d =  271733878;

  for(var i = 0; i < x.length; i += 16)
  {
    var olda = a;
    var oldb = b;
    var oldc = c;
    var oldd = d;

    a = md5_ff(a, b, c, d, x[i+ 0], 7 , -680876936);
    d = md5_ff(d, a, b, c, x[i+ 1], 12, -389564586);
    c = md5_ff(c, d, a, b, x[i+ 2], 17,  606105819);
    b = md5_ff(b, c, d, a, x[i+ 3], 22, -1044525330);
    a = md5_ff(a, b, c, d, x[i+ 4], 7 , -176418897);
    d = md5_ff(d, a, b, c, x[i+ 5], 12,  1200080426);
    c = md5_ff(c, d, a, b, x[i+ 6], 17, -1473231341);
    b = md5_ff(b, c, d, a, x[i+ 7], 22, -45705983);
    a = md5_ff(a, b, c, d, x[i+ 8], 7 ,  1770035416);
    d = md5_ff(d, a, b, c, x[i+ 9], 12, -1958414417);
    c = md5_ff(c, d, a, b, x[i+10], 17, -42063);
    b = md5_ff(b, c, d, a, x[i+11], 22, -1990404162);
    a = md5_ff(a, b, c, d, x[i+12], 7 ,  1804603682);
    d = md5_ff(d, a, b, c, x[i+13], 12, -40341101);
    c = md5_ff(c, d, a, b, x[i+14], 17, -1502002290);
    b = md5_ff(b, c, d, a, x[i+15], 22,  1236535329);

    a = md5_gg(a, b, c, d, x[i+ 1], 5 , -165796510);
    d = md5_gg(d, a, b, c, x[i+ 6], 9 , -1069501632);
    c = md5_gg(c, d, a, b, x[i+11], 14,  643717713);
    b = md5_gg(b, c, d, a, x[i+ 0], 20, -373897302);
    a = md5_gg(a, b, c, d, x[i+ 5], 5 , -701558691);
    d = md5_gg(d, a, b, c, x[i+10], 9 ,  38016083);
    c = md5_gg(c, d, a, b, x[i+15], 14, -660478335);
    b = md5_gg(b, c, d, a, x[i+ 4], 20, -405537848);
    a = md5_gg(a, b, c, d, x[i+ 9], 5 ,  568446438);
    d = md5_gg(d, a, b, c, x[i+14], 9 , -1019803690);
    c = md5_gg(c, d, a, b, x[i+ 3], 14, -187363961);
    b = md5_gg(b, c, d, a, x[i+ 8], 20,  1163531501);
    a = md5_gg(a, b, c, d, x[i+13], 5 , -1444681467);
    d = md5_gg(d, a, b, c, x[i+ 2], 9 , -51403784);
    c = md5_gg(c, d, a, b, x[i+ 7], 14,  1735328473);
    b = md5_gg(b, c, d, a, x[i+12], 20, -1926607734);

    a = md5_hh(a, b, c, d, x[i+ 5], 4 , -378558);
    d = md5_hh(d, a, b, c, x[i+ 8], 11, -2022574463);
    c = md5_hh(c, d, a, b, x[i+11], 16,  1839030562);
    b = md5_hh(b, c, d, a, x[i+14], 23, -35309556);
    a = md5_hh(a, b, c, d, x[i+ 1], 4 , -1530992060);
    d = md5_hh(d, a, b, c, x[i+ 4], 11,  1272893353);
    c = md5_hh(c, d, a, b, x[i+ 7], 16, -155497632);
    b = md5_hh(b, c, d, a, x[i+10], 23, -1094730640);
    a = md5_hh(a, b, c, d, x[i+13], 4 ,  681279174);
    d = md5_hh(d, a, b, c, x[i+ 0], 11, -358537222);
    c = md5_hh(c, d, a, b, x[i+ 3], 16, -722521979);
    b = md5_hh(b, c, d, a, x[i+ 6], 23,  76029189);
    a = md5_hh(a, b, c, d, x[i+ 9], 4 , -640364487);
    d = md5_hh(d, a, b, c, x[i+12], 11, -421815835);
    c = md5_hh(c, d, a, b, x[i+15], 16,  530742520);
    b = md5_hh(b, c, d, a, x[i+ 2], 23, -995338651);

    a = md5_ii(a, b, c, d, x[i+ 0], 6 , -198630844);
    d = md5_ii(d, a, b, c, x[i+ 7], 10,  1126891415);
    c = md5_ii(c, d, a, b, x[i+14], 15, -1416354905);
    b = md5_ii(b, c, d, a, x[i+ 5], 21, -57434055);
    a = md5_ii(a, b, c, d, x[i+12], 6 ,  1700485571);
    d = md5_ii(d, a, b, c, x[i+ 3], 10, -1894986606);
    c = md5_ii(c, d, a, b, x[i+10], 15, -1051523);
    b = md5_ii(b, c, d, a, x[i+ 1], 21, -2054922799);
    a = md5_ii(a, b, c, d, x[i+ 8], 6 ,  1873313359);
    d = md5_ii(d, a, b, c, x[i+15], 10, -30611744);
    c = md5_ii(c, d, a, b, x[i+ 6], 15, -1560198380);
    b = md5_ii(b, c, d, a, x[i+13], 21,  1309151649);
    a = md5_ii(a, b, c, d, x[i+ 4], 6 , -145523070);
    d = md5_ii(d, a, b, c, x[i+11], 10, -1120210379);
    c = md5_ii(c, d, a, b, x[i+ 2], 15,  718787259);
    b = md5_ii(b, c, d, a, x[i+ 9], 21, -343485551);

    a = safe_add(a, olda);
    b = safe_add(b, oldb);
    c = safe_add(c, oldc);
    d = safe_add(d, oldd);
  }
  return Array(a, b, c, d);

}

/*
 * These functions implement the four basic operations the algorithm uses.
 */
function md5_cmn(q, a, b, x, s, t)
{
  return safe_add(bit_rol(safe_add(safe_add(a, q), safe_add(x, t)), s),b);
}
function md5_ff(a, b, c, d, x, s, t)
{
  return md5_cmn((b & c) | ((~b) & d), a, b, x, s, t);
}
function md5_gg(a, b, c, d, x, s, t)
{
  return md5_cmn((b & d) | (c & (~d)), a, b, x, s, t);
}
function md5_hh(a, b, c, d, x, s, t)
{
  return md5_cmn(b ^ c ^ d, a, b, x, s, t);
}
function md5_ii(a, b, c, d, x, s, t)
{
  return md5_cmn(c ^ (b | (~d)), a, b, x, s, t);
}

/*
 * Calculate the HMAC-MD5, of a key and some data
 */
function core_hmac_md5(key, data)
{
  var bkey = str2binl(key);
  if(bkey.length > 16) bkey = core_md5(bkey, key.length * chrsz);

  var ipad = Array(16), opad = Array(16);
  for(var i = 0; i < 16; i++)
  {
    ipad[i] = bkey[i] ^ 0x36363636;
    opad[i] = bkey[i] ^ 0x5C5C5C5C;
  }

  var hash = core_md5(ipad.concat(str2binl(data)), 512 + data.length * chrsz);
  return core_md5(opad.concat(hash), 512 + 128);
}

/*
 * Add integers, wrapping at 2^32. This uses 16-bit operations internally
 * to work around bugs in some JS interpreters.
 */
function safe_add(x, y)
{
  var lsw = (x & 0xFFFF) + (y & 0xFFFF);
  var msw = (x >> 16) + (y >> 16) + (lsw >> 16);
  return (msw << 16) | (lsw & 0xFFFF);
}

/*
 * Bitwise rotate a 32-bit number to the left.
 */
function bit_rol(num, cnt)
{
  return (num << cnt) | (num >>> (32 - cnt));
}

/*
 * Convert a string to an array of little-endian words
 * If chrsz is ASCII, characters >255 have their hi-byte silently ignored.
 */
function str2binl(str)
{
  var bin = Array();
  var mask = (1 << chrsz) - 1;
  for(var i = 0; i < str.length * chrsz; i += chrsz)
    bin[i>>5] |= (str.charCodeAt(i / chrsz) & mask) << (i%32);
  return bin;
}

/*
 * Convert an array of little-endian words to a string
 */
function binl2str(bin)
{
  var str = "";
  var mask = (1 << chrsz) - 1;
  for(var i = 0; i < bin.length * 32; i += chrsz)
    str += String.fromCharCode((bin[i>>5] >>> (i % 32)) & mask);
  return str;
}

/*
 * Convert an array of little-endian words to a hex string.
 */
function binl2hex(binarray)
{
  var hex_tab = hexcase ? "0123456789ABCDEF" : "0123456789abcdef";
  var str = "";
  for(var i = 0; i < binarray.length * 4; i++)
  {
    str += hex_tab.charAt((binarray[i>>2] >> ((i%4)*8+4)) & 0xF) +
           hex_tab.charAt((binarray[i>>2] >> ((i%4)*8  )) & 0xF);
  }
  return str;
}

/*
 * Convert an array of little-endian words to a base-64 string
 */
function binl2b64(binarray)
{
  var tab = "ABCDEFGHIJKLMNOPQRSTUVWXYZabcdefghijklmnopqrstuvwxyz0123456789+/";
  var str = "";
  for(var i = 0; i < binarray.length * 4; i += 3)
  {
    var triplet = (((binarray[i   >> 2] >> 8 * ( i   %4)) & 0xFF) << 16)
                | (((binarray[i+1 >> 2] >> 8 * ((i+1)%4)) & 0xFF) << 8 )
                |  ((binarray[i+2 >> 2] >> 8 * ((i+2)%4)) & 0xFF);
    for(var j = 0; j < 4; j++)
    {
      if(i * 8 + j * 6 > binarray.length * 32) str += b64pad;
      else str += tab.charAt((triplet >> 6*(3-j)) & 0x3F);
    }
  }
  return str;
}


export {
  hex_md5,
  b64_md5,
  str_md5
}
In addition to directly quoting the MD5 file, you can also use some package management tools such as npm or yarn to install it using commands. You can choose the method that suits your project yourself.
2.2 Open the database
After all the table structures are defined above, we can encapsulate and operate the database file. Create a db directory under the src directory, and then create a new index.js file, which is used to define the database opening and table structure creation, etc.
In the index.js file, we encapsulate a DBIsLoadSuccess function to determine whether IndexedDB is opened successfully, because the open request does not immediately open the database or start a transaction, but when onsuccess is executed; and combined with Promise, to achieve this function. The specific code is as follows:
let Database;
let Request = window.indexedDB.open("TestDatabase", 2);
let isError = false;

// 数据库打开失败
Request.onerror = function(event) {
  isError = true;
  throw "Why didn't you allow my web app to use IndexedDB?!";
};

// 数据库打开成功
Request.onsuccess = function(event) {
  isError = false;
  Database = event.target.result;
};


let handle = null;

/**
 * 数据库增删改查 封装
 */
export const DBIsLoadSuccess = () => {
  return new Promise((resolve, reject) => {
    //如果数据库打开成功,直接回调resolve函数,并返回实例对象
    if(Database){
      resolve(Database);
    }
    //如果数据库还未打开,添加定时器 进行查询,打开成功后,
    else{
      handle = setInterval(() => {
        if(Database){
          clearInterval(handle);
          resolve(Database);
        }
        //如果数据库打开失败,执行reject函数
        else if(isError){
          clearInterval(handle);
          reject();
        }
      }, 200);
    }
  });
}
2.3 Table structure creation
In the onupgradeneeded event, you are allowed to update the database schema in the processing function; so we create the corresponding table and table structure when onupgradeneeded is executed.
When the administrator table is created, an administrator account needs to be added by default, and the password is processed by hex_md5 before being stored in the user table. When creating an administrator account, there is no need to add an accesstoken key-value pair, because the user has not logged in at this time and there is no token information; if a null value is added by default, there will be a corresponding associated value in the index accesstoken; here the accesstoken index is used to judge the user Whether it is logged in or not is unique, and will only be assigned in the logged in state.
Add the following code to the index.js file:
import { hex_md5 } from '@/utils/md5'

//数据库表名
let usersName = "users";        //用户表
let gradeName = "grade";        //年级表
let classifyName = "classify";  //班级表
let studentName = "student";    //学生表
let teacherName = "teacher";    //老师表
let buildingName = "building";  //楼栋

// 执行success前执行函数
Request.onupgradeneeded = function(e){
  let db = e.target.result;

  //用户表
  if(!db.objectStoreNames.contains(usersName)){
    let store = db.createObjectStore(usersName, {keyPath: "id", autoIncrement: true});
    //创建索引 - 用户名
    store.createIndex('name', 'name', {unique: true});
    //创建索引 - 登录token
    store.createIndex('accesstoken', 'accesstoken', {unique: true});
    //添加默认账号
    store.add({
      name: "admin",
      password: hex_md5('123456'),
      phone: "13233332222",
      cratetime: new Date().getTime(),
      updatetime: new Date().getTime()
    });
  }

  //年级表
  if(!db.objectStoreNames.contains(gradeName)){
    let store = db.createObjectStore(gradeName, {keyPath: "id", autoIncrement: true});

    //创建索引 - 年级名称(年级为唯一,故不能重复)
    store.createIndex('name', 'name', {unique: true});
  }

  //班级表
  if(!db.objectStoreNames.contains(classifyName)){
    let store = db.createObjectStore(classifyName, {keyPath: "id", autoIncrement: true});

    //创建索引 - 班级名称
    store.createIndex('name', 'name', {unique: false});
    //创建索引  - 年级名称
    store.createIndex('grade', 'grade', {unique: true});
  }

  //学生表
  if(!db.objectStoreNames.contains(studentName)){
    let store = db.createObjectStore(studentName, {keyPath: "id", autoIncrement: true});

    //创建索引 - 学生姓名
    store.createIndex('name', 'name', {unique: false});
  }

  //老师表
  if(!db.objectStoreNames.contains(teacherName)){
    let store = db.createObjectStore(teacherName, {keyPath: "id", autoIncrement: true});

    //创建索引 - 老师姓名
    store.createIndex('name', 'name', {unique: false});
  }

  //楼栋表
  if(!db.objectStoreNames.contains(buildingName)){
    let store = db.createObjectStore(buildingName, {keyPath: "id", autoIncrement: true});

    //创建索引 - 楼栋名称
    store.createIndex('name', 'name', {unique: true, multiEntry: true});
  }
  //if end
}
Note: onupgradeneeded will only be triggered when the database is opened for the first time. If you want to trigger the onupgradeneeded listening event later, you need to modify the version number of the second parameter in open.
We reference the index.js file in the project and execute it. At this time, we F12 to display the console and switch to "Application". In IndexedDB, we can see the TestDatabase database and create corresponding tables and indexes.
As shown below:

3. Project structure
In the project, create the corresponding project file in the src directory as shown below.
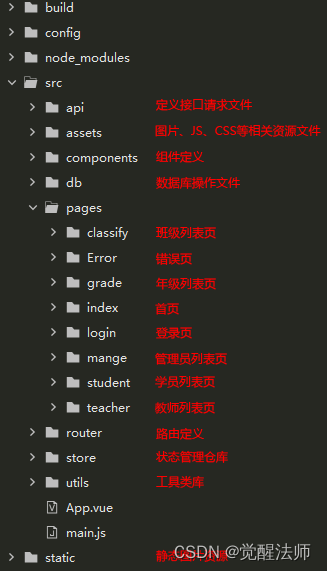
The part above the router will be explained in detail later. Here we first talk about how to define routing and state management warehouses.
3.1 vue-ls
Vue-ls is used to control data storage in localStorage or sessionStorage, and can control its storage timeliness.
Install:
npm install vue-ls --saveIntroduced in main.js:
import Storage from 'vue-ls'

Vue.use(Storage, {
  namespace: 'system_',
  name: 'ls',
  storeage: 'local'
});
The basic usage is as follows:
 //存储数据
Vue.ls.set('foo', 'boo', 60 * 60 * 1000); //缓存1小时
Vue.ls.get('foo');
Vue.ls.get('boo', 10); //如果没有获取到boo数据,默认返回10

Vue.ls.on('foo', callback) //监听foo值变化,触发Callback回调函数
Vue.ls.off('foo', callback) //卸载foo监听事件

//移除foo对应缓存数据
Vue.ls.remove('foo');
3.2 store state management
Vuex is a state management pattern + library developed specifically for Vue.js applications. It uses a centralized storage to manage the state of all components of the application, and the corresponding rules ensure that the state changes in a predictable way.
Under what circumstances will Vuex be used: such as logged-in user information, unified access tokens for interfaces, etc., data that is frequently used and common to the entire site can be stored in the state manager.
Now create the corresponding file in the store directory:
3.2.1 Create state.js file
code show as below:
/**
 * 状态,变量库
 */
const state = {
  /**
   * 访问令牌
   */
  token: "",
  /**
   * 用户信息
   */
  userInfo: null
}

export default state;
3.2.2 Create mutationsType.js file
code show as below:
/**
 * 用户信息
 */
export const USERINFO = "USERINFO";

/**
 * 访问令牌
 */
export const TOKEN = "TOKEN";
3.2.3 Create mutations.js file
code show as below:
import { USERINFO, TOKEN } from './mutationsType'

const mutations = {
  /**
   * 修改访问令牌信息
   */
  [TOKEN](state, param){
    state.token = param;
  },
  /**
   * 修改用户信息
   */
  [USERINFO](state, param){
    state.userInfo = param;
  }
}
export default mutations;
3.2.4 Create getters.js file
code show as below:
const getters = {
  /**
   * 用户信息
   */
  userInfo(state){
    return state.userInfo;
  },
  /**
   * 访问令牌
   */
  accessToken(state){
    return state.token;
  }
}
export default getters;
3.2.5 Create actions.js file
code show as below:
import Vue from 'vue'
import { USERINFO, TOKEN } from './mutationsType'

/**
 * 业务层
 */
const actions = {
  /**
   * 检查是否登录
   */
  checkIsLogin(){
    let token = Vue.ls.get(TOKEN);
    return new Promise((resolve, reject) => {
      if(token){
        resolve();
      }else{
        reject();
      }
    });
  },
  /**
   * 保存登录信息
   */
  saveLoginInfo({commit}, param){
    if(param['token']) {
      commit(TOKEN, param.token);
      Vue.ls.set(TOKEN, param.token);
    }
    if(param['userinfo']) {
      commit(USERINFO, param.userinfo);
      Vue.ls.set(USERINFO, param.userinfo);
    }
  },
  /**
   * 退出登录
   */
  exitLogin({commit}, param){
    commit(TOKEN, '');
    commit(USERINFO, '');
    Vue.ls.remove(TOKEN);
    Vue.ls.remove(USERINFO);
  }
}

export default actions;
3.2.6 Create index.js file
code show as below:
import Vue from 'vue'
import Vuex from 'vuex'
import state from './state'
import getters from './getters'
import actions from './actions'
import mutations from './mutations'

Vue.use(Vuex);

export default new Vuex.Store({
  state,
  getters,
  actions,
  mutations
})
3.2.7 Introduced in main.js
code show as below:
import Vue from 'vue'
import App from './App'
import elementUI from 'element-ui'
import 'element-ui/lib/theme-chalk/index.css'
import 'element-ui/lib/theme-chalk/base.css'
import Storage from 'vue-ls'
import store from '@/store/index'

Vue.use(elementUI);

Vue.use(Storage, {
  namespace: 'system_',
  name: 'ls',
  storeage: 'local'
});

Vue.config.productionTip = false

/* eslint-disable no-new */
new Vue({
  el: '#app',
  store,
  components: { App },
  template: '<App/>'
})
Here the file in the store local state manager is created and defined, and you can directly use this.$store to call it later.
3.3 router routing definition
Before defining the route, first create all page files in the pages directory, such as administrator list page, grade list page, class list page, teacher list page, student list page, error page and login page.
In addition, we need to create a new Layout.vue file in the components component to define the menu and content area as the public part. code show as below:
html code part:
<template>
  <div class="layout-wrap">
    <el-container class="container">
      <el-aside width="200px" class="aside-box">
        <div class="title">
          <h3>学员管理系统</h3>
        </div>
        <el-menu default-active="1" class="el-menu-vertical" :router="true">
          <el-menu-item index="1" :route="{path: '/sys/mange'}">
            <i class="el-icon-s-custom"></i>
            <span slot="title">管理员列表</span>
          </el-menu-item>
          <el-menu-item index="2" :route="{path: '/sys/grade'}">
            <i class="el-icon-house"></i>
            <span slot="title">年级管理</span>
          </el-menu-item>
          <el-menu-item index="3" :route="{path: '/sys/classify'}">
            <i class="el-icon-collection-tag"></i>
            <span slot="title">班级管理</span>
          </el-menu-item>
          <el-menu-item index="4" :route="{path: '/sys/teacher'}">
            <i class="el-icon-user"></i>
            <span slot="title">教师列表</span>
          </el-menu-item>
          <el-menu-item index="5" :route="{path: '/sys/student'}">
            <i class="el-icon-user"></i>
            <span slot="title">学员列表</span>
          </el-menu-item>
        </el-menu>
        <div class="btn-box">
          <el-button type="danger" size="mini" @click="logoutEvent">退出登录</el-button>
        </div>
      </el-aside>
      <el-main>
        <transition name="el-zoom-in-center">
          <router-view />
        </transition>
      </el-main>
    </el-container>
  </div>
</template>
JS part:
<script>
export default {
  name: 'Layout',
  data () {
    return { }
  },
  methods: {
    /**
     * 退出登录
     */
    logoutEvent(){

    }
  }
}
</script>
Style section:
<style lang="scss" scoped>
 .container{ height: 100vh; }

  .el-menu{ border-right: 0; }

  .el-menu-vertical{ height: 100%; }

  .aside-box{
    position: relative;
    padding-top: 80px;
    border-right: 1px solid #e6e6e6;

    .title{
      width: 100%;
      padding: 30px 0;
      text-align: center;
      position: absolute;
      left: 0;
      top: 0;
      z-index: 10;

      h3{
        font-size: 20px;
        color: #409EFF;
      }
    }
  }
</style>
After these pages are successfully created, we will introduce these modules in router/index.js to define the page jump routing path, the code is as follows:
import Vue from 'vue'
import Router from 'vue-router'
import Layout from '@/components/Layout'
import Error404 from '@/pages/Error/err404'
import Index from '@/pages/index'
import Student from '@/pages/student'
import Mange from '@/pages/mange'
import Grade from '@/pages/grade'
import Classify from '@/pages/classify'
import Teacher from '@/pages/teacher'
import Login from '@/pages/login'
import store from '@/store'

Vue.use(Router);

let _router = new Router({
  routes: [
    {
      path: '/',
      name: "Home",
      component: Layout,
      redirect: '/sys/index',
      children: [
        {
          path: '/sys/index',
          name: 'Index',
          component: Index,
        },
        {
          path: '/sys/student',
          name: 'Student',
          component: Student,
        },
        {
          path: '/sys/mange',
          name: 'Mange',
          component: Mange,
        },
        {
          path: '/sys/grade',
          name: 'Grade',
          component: Grade,
        },
        {
          path: '/sys/classify',
          name: 'Classify',
          component: Classify,
        },
        {
          path: '/sys/teacher',
          name: 'Teacher',
          component: Teacher,
        }
      ]
    },
    {
      path: '/login',
      name: 'Login',
      component: Login,
    },
    {
      path: '*',
      name: 'Error404',
      component: Error404,
    },
  ]
});

_router.beforeEach((toRoute, fromRoute, next) => {
  next();
});

export default _router;
At this point, we can click the menu on the left side of the page to jump to the page. About the login function and the login page jump, we will continue to explain it later.
4. Login function
4.1 Permission verification
We defined the routing-related jump path earlier, so how do we jump to the login page. At this point, you can look forward to "3.2.5 Creating the actions.js file", which defines the checkIsLogin function to determine whether the user is logged in. In it, we can slightly adjust the routing guard in router/index.js, the code is as follows:
_router.beforeEach((toRoute, fromRoute, next) => {
  store.dispatch('checkIsLogin').then(() => {
    next();
  }).catch(() => {
    if(toRoute.path=='/login'){
      next();
    }else{
      next('/login');
    }
  });
});
By executing the checkIsLogin function, it is judged whether the user has logged in. If logged in, it will directly jump to the next routing page, otherwise it will jump to the login page. After the login is completed, the system page can be accessed normally. Why do we judge here, because all page visits have to go through the "routing guard", the system login is time-sensitive, and once the token expires, it will automatically become invalid; so when the token fails, the user clicks on the next operation, it will Automatically redirect to the login page.
Also, since Promise is referenced here, I get the following error:
vue-router Uncaught (in promise) NavigationDuplicated: Avoided redundant navigation to current
At this time, you can modify it as follows:
//存储push
let originPush=Router.prototype.push
let originReplace=Router.prototype.replace

//重写
Router.prototype.push=function(location,resole,reject){
    if(resole&&reject){
        originPush.call(this,location,resole,reject)
    }else{
        originPush.call(this,location,()=>{},()=>{})
    }
}
Router.prototype.replace=function(location,resole,reject){
    if(resole&&reject){
        originReplace.call(this,location,resole,reject)
    }else{
        originReplace.call(this,location,()=>{},()=>{})
    }
}

_router.beforeEach((toRoute, fromRoute, next) => {
  store.dispatch('checkIsLogin').then(() => {
    next();
  }).catch(() => {
    if(toRoute.path=='/login'){
      next();
    }else{
      next('/login');
    }
  });
});
4.2 Login page
At this point, start to complete the code of the login page, and paste the code directly here.
html part:
<template>
  <div class="login-box">
  	<h3>学员管理系统</h3>
  	<h4><span>———</span> <span class="tit">安全登录</span> <span>———</span></h4>
  	<el-form :model="ruleForm" status-icon :rules="rules" ref="ruleForm" label-width="100px" class="demo-ruleForm">
  		<el-form-item label="用户名" prop="username">
  			<el-input type="text" v-model="ruleForm.username" autocomplete="off"></el-input>
  		</el-form-item>
  		<el-form-item label="密码" prop="password">
  			<el-input type="password" v-model="ruleForm.password" autocomplete="off"></el-input>
  		</el-form-item>
  		<el-form-item>
  			<el-button type="primary" :disabled="disabledButton" @click="submitForm('ruleForm')">登录</el-button>
  			<el-button :disabled="disabledButton" @click="resetForm('ruleForm')">重置</el-button>
  		</el-form-item>
  	</el-form>
  </div>
</template>
js part:
<script>
  export default {
    data(){
      var validateUsername = (rule, value, callback) => {
      	if (value === '') {
      		callback(new Error('请输入用户名'));
      	} else {
      		callback();
      	}
      };
      var validatePass = (rule, value, callback) => {
      	if (value === '') {
      		callback(new Error('请输入密码'));
      	} else {
      		if (this.ruleForm.checkPass !== '') {
      			this.$refs.ruleForm.validateField('checkPass');
      		}
      		callback();
      	}
      };
      return {
        disabledButton: false,    //是否禁用按钮
      	ruleForm: {
      		username: '',
      		password: '',
      	},
      	rules: {
      		username: [
      			{ validator: validateUsername, trigger: 'blur' }
      		],
      		password: [
      			{ validator: validatePass, trigger: 'blur' }
      		]
      	},
      }
    },
    methods: {
      /**
       * 提交数据
       * @param {Object} formName
       */
      submitForm(formName) {
      	this.$refs[formName].validate((valid) => {
      		if (valid) {
      			console.log(this.ruleForm);
      		} else {
      			console.log('error submit!!');
      			return false;
      		}
      	});
      },
      /**
       * 重置表单
       * @param {Object} formName
       */
      resetForm(formName) {
      	this.$refs[formName].resetFields();
      }
    }
  }
</script>
Style section:
.login-box{
width: 600px;
height: 390px;
padding: 50px 70px;
box-sizing: border-box;
box-shadow: 0 0 10px rgba(0, 0, 0, .1);
border-radius: 10px;
overflow: hidden;
position: absolute;
left: 50%;
top: 50%;
margin-left: -300px;
margin-top: -200px;
z-index: 10;
h3, h4{
font-family: "Microsoft YaHei","微软雅黑",Arial,sans-serif;
text-align: center;
}
h3{
font-size: 26px;
color: #409eff;
}
h4{
font-size: 14px;
color: #999999;
font-weight: normal;
padding: 10px 0 40px;
span{
display: inline-block;
vertical-align: middle;
&.tit{
padding: 0 26px;
}
}
}
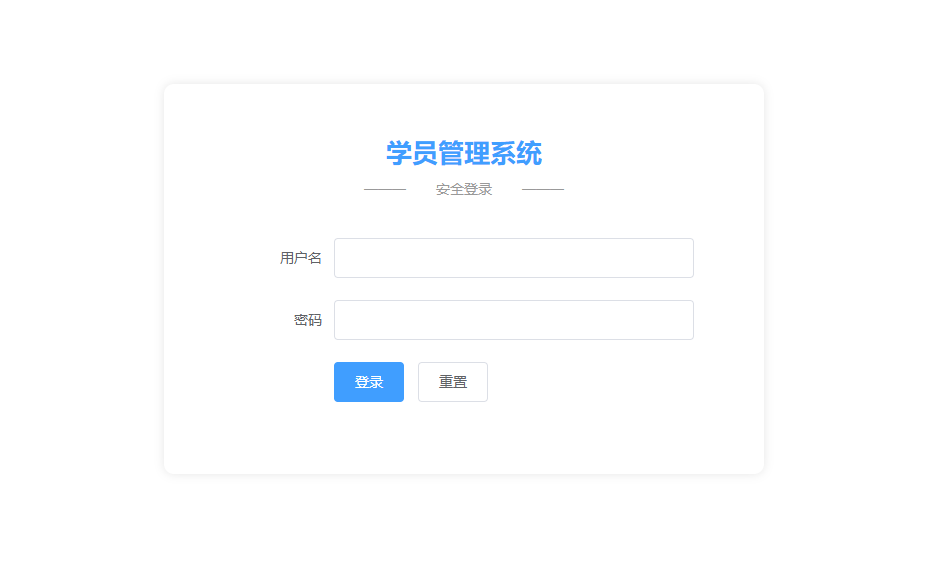
}The login page interface is as follows:
4.3 Add open transaction function
In 2.2, we completed the "database open" operation file code. At this time, we need to add two execution functions to open the transaction internally, as well as a constant value for reading and writing (there is a corresponding constant value in IndexedDB, but it has been discarded. Here I am Just define it), add the following code in the db/index.js file:
/**
 * 返回是只读或读写模式
 */
export const CONST_READ = {
  READONLY: "readonly",
  READWRITE: "readwrite"
}

/**
 * 打开索引用户名游标
 */
export const openTransactionIndex = (storeName, indexName, mode) => {
  if(!storeName){
    throw '请指定打开事务的表名!';
  }
  if(!indexName){
    throw '请指定需查询索引名!';
  }
  mode = mode || CONST_READ.READONLY;
  //开启事务
   let transaction = Database.transaction([storeName], mode);
   //连接对象仓库
   let store = transaction.objectStore(storeName);
   //获取对应索引
   let index = store.index(indexName);
   //返回游标
   let cursor = index.openCursor();
   return {
     store,
     index,
     cursor
   }
}
4.4 API request definition
Create a new api/index.js file in the src directory to define the interface request function. We first create user.js in the db/model directory to operate the addition, deletion, modification and query of the administrator table; after creation, define the login and ogout functions to handle the login and logout functions. The code is as follows:
/**
 * 通过索引获取对应数据
 */
export const  login = data => {}

/**
 * 退出登录
 */
export const logout = token => {}
After db/model/user.js is created, we can define login and logout interface requests in api/index.js, the code is as follows:
import { login, logout } from '@/db/model/user'

/**
 * 登录
 */
export const loginInfo = (params) => {
  return login(params);
}

/**
 * 退出
 */
export const logoutInfo = params => {
  return logout(params);
}
4.5 Login and logout business functions
In 4.3, we added an index transaction function to db/index.js, and we introduced it into the db/model/user.js table to implement login user query and accesstoken information query.
In addition, the user password is encrypted by md5 when saving, so when matching the user password when logging in, the md5 processing function also needs to be used, which also needs to be introduced here.
When the user logs in successfully, a random string of accesstoken needs to be generated. Here we put this kind of function in the utils/utils.js tool class; and after all data requests are successful, a unified data format JSON file needs to be returned. We Also define a rJson function in the tool class file, the tool class file code is as follows:
/**
 * 随机生成字符串
 * @param {*} _len
 */
export const randomStrName = _len => {
  let _string = 'abcdefghijklmnopqrstuvwxyzABCDEFJHIJKLMNOPQRSTUVWXYZ1234567890',
      _returnStr = '';
  _len = 'number'===typeof _len ? _len : 50;
  for(var i = 0; i < _len; i++){
    _returnStr += _string.charAt( Math.floor(Math.random() * (_string.length-2)) )
  }
  return _returnStr;
}

/**
 * 返回数据对象
 * @param code 状态码, 0 表示错误, 1表示正常
 * @param data 返回数据集
 * @param msg 返回提示信息
 */
export const rJson = (code, data, msg) => {
  code = code || '0';
  data = data || null;
  msg = msg || '';

  return {
    code,
    data,
    msg
  }
}
After the above preparation tools are ready, we need to define the storeName in the user.js file and specify the table for the current file operation. In the implementation of login and logout functions, Promise is used to operate asynchronously, which makes the callback data more flexible.
code show as below:
import { openTransactionIndex, CONST_READ } from '@/db'
import { rJson, randomStrName } from '@/utils/utils'
import { hex_md5 } from '@/utils/md5'

let storeName = 'users';

/**
 * 通过索引获取对应数据
 */
export const  login = data => {
  return new Promise((resolve, reject) => {

  });
}

/**
 * 退出登录
 */
export const logout = token => {
   return new Promise((resolve, reject) => {

   });
}
4.6 Realize the login function
Now that the files of various relationships have been created and associated, we can find the js part of "4.2 Login Page" and import loginInfo in api/index.js to upload and verify login data. In addition, in "3.2.5 Create actions.js file", the login and save user information service function saveLoginInfo is defined. After successful login, this function needs to be called to save the user information and accesstoken as global variables, and to cache local storage middle. Open the pages/login/index.vue file, the code is as follows:
<script>
  import { loginInfo } from '@/api'
  export default {
    data(){
      // ...

      return {
        disabledButton: false,    //是否禁用按钮
      	ruleForm: {
      		username: '',
      		password: '',
      	},
      	rules: {
      		username: [
      			{ validator: validateUsername, trigger: 'blur' }
      		],
      		password: [
      			{ validator: validatePass, trigger: 'blur' }
      		]
      	},
      }
    },
    methods: {
      /**
       * 提交数据
       */
      submitForm(formName) {
      	this.$refs[formName].validate((valid) => {
      		if (valid) {
                loginInfo(this.ruleForm).then(res => {
                  if(res.code==1){
                    //缓存数据
                    this.$store.dispatch('saveLoginInfo', {
                      token: res.data.accesstoken,
                      userinfo: res.data.userinfo
                    })
                  }
                  this.$message.success(res.msg);
                  this.$router.push('/');
                }).catch(e => {
                  this.$message.error(e.msg);
                  this.resetForm('ruleForm');
                });
      		} else {
      			return false;
      		}
      	});
      },

      // ...
    }
  }
</script>
Enter the user name and password to log in here, but no data is returned, because we have not yet implemented the database query function, now everyone opens the db/model/user.js file to implement part of the login function code.
In the previous "2.3 Table Structure Creation", two indexes of name and accesstoken were created; and in "4.3 Adding Transaction Functions", new functions related to transaction creation were added, which we can use here. First, the login user name is unique. Here, the matching query is performed through the name index. Here, the openTransactionIndex function obtains the corresponding processing object.
code show as below:
export const login = data => {
return new Promise((resolve, reject) => {
//打开事务
let { index, store } = openTransactionIndex(storeName, 'name', CONST_READ.READWRITE);
//通过用户名,获取用户数据
let indexData = index.get(data.username);
indexData.onerror = function(e){
reject(
rJson(0, e, '查询出错了~')
);
}
indexData.onsuccess = function(e){
let result = e.target.result;
if(result){
//判断密码是否一致
if(result.password==hex_md5(data.password)){
let accesstoken = randomStrName(80);
//记录token值
result['accesstoken'] = accesstoken;
//保存token
store.put(result);
//返回结果数据
resolve(
rJson(1, {
accesstoken,
userinfo: {
id: result.id,
username: result.name,
phone: result.phone
}
}, '登录成功~')
)
}else{
reject(
rJson(0, null, '密码错误~')
)
}
}else{
reject(
rJson(0, null, '用户名错误~')
)
}
//if end
}
});
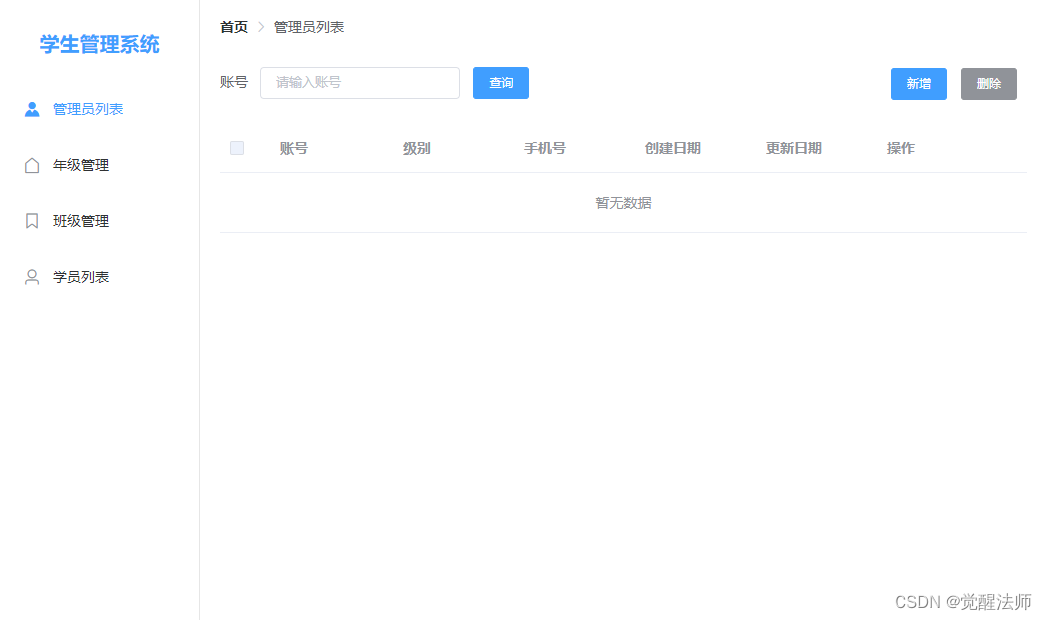
}After the above functions are completed, we can log in. At this time, we enter the user name and password on the login interface, and then we can jump to the home page. In "2.3 Table Structure Creation", the admin account is added by default. You can log in to the system through this account temporarily. After login, the interface is as follows:

4.7 Implement the exit function
In the JS part of "3.3 router routing definition", we call the exit interface to complete the exit function, and clear the local cache data through the exitLogin function defined in "3.2.5 Create actions.js file". code show as below:
<script>
import { logoutInfo } from '@/api'
import { TOKEN } from '@/store/mutationsType'
export default {
  name: 'Layout',
  data () {
    return { }
  },
  methods: {
    /**
     * 退出登录
     */
    logoutEvent(){
      this.$confirm('确认好退出登录吗?', '提示', {
        confirmButtonText: '退出',
        cancelButtonText: '取消',
        type: 'warning'
      }).then(() => {
        logoutInfo(this.$ls.get(TOKEN)).then(res => {
          this.$store.dispatch('exitLogin');
          this.$message.success(res.msg);
          this.$router.push('/login');
        }).catch(e => {
          this.$message.error(e.msg);
          this.$router.push('/login');
        })
      }).catch(() => {
        this.$message({
          type: 'info',
          message: '已取消退出'
        })
      })
    }
  }
}
</script>
Similarly, clicking the logout button will not get a response now, and the logout function in db/model/user.js needs to be implemented before the logout function can be truly realized.
code show as below:
export const logout = token => {
   return new Promise((resolve, reject) => {
      //打开事务
      let {index} = openTransactionIndex(storeName, 'accesstoken', CONST_READ.READWRITE);
      //通过token,获取对应用户数据
      let indexData = index.get(token);

      indexData.onerror = function(e){
       reject(
         rJson(0, e, '查询出错了~')
       );
      }

      indexData.onsuccess = function(e){
        let result = e.target.result,
            source = e.target.source;
          if(result){
            let store = source.objectStore;
            //判断token信息是否匹配
            if(result.accesstoken == token){
              //删除accesstoken
              delete result['accesstoken'];
              //更新数据
              store.put(result);
              resolve(
                rJson(1, null, '退出成功~')
              );
            }else{
              reject(
                rJson(0, null, '登录失效~')
              )
            }
          } else{
            reject(
              rJson(0, null, '未查询到登录信息~')
            )
          }

      }
   });
}
Here we are in the login state, click the logout button, and after successful logout, we will directly jump to the login interface.
4.8 Verify login information in cached data
We have to go back to "3.2.5 Create actions.js file", why did we define the function in the fixed area to judge the invalidation of the token, instead of directly putting it in the routing health to obtain the token and make the judgment directly; because here, in addition to verification Whether the token information is cached locally, and at the same time, it is also necessary to determine whether the token exists or is invalid in the database. Without further ado, just upload the code directly.
Add the checkToken function in db/model/user.js, the code is as follows:
/**
 * 校验token是否存在
 */
export const checkToken = token => {

}
Add the tokenIsFailure function in api/index.js, the code is as follows:
import { login, logout, checkToken } from '@/db/model/user'

/**
 * 判断数据库中token是否失效
 */
export const tokenIsFailure = token => {
  return checkToken(token);
}
The checkIsLogin in the store/actions.js file is modified, the code is as follows:
checkIsLogin(){
    let token = Vue.ls.get(TOKEN);
    return new Promise((resolve, reject) => {
      if(token){
        tokenIsFailure(token).then(() => {
          resolve();
        }).catch(() => {
          commit(TOKEN, '');
          Vue.ls.remove(TOKEN);
          reject();
        });
      }else{
        reject();
      }
    });
  }
After reading the token information in the local cache, database verification is also required; if it does not exist in the database, it will directly jump to the login page and clear the token information in the local cache.
In addition, we defined the DBIsLoadSuccess function in "2.2 Opening the Database" before, because the open() function of IndexedDB does not return the instance object after execution, so it is very likely that the instance object will be empty just after entering the system. At this time, we need to be very careful. Before calling the transaction, first determine whether the database instance object exists.
Next, let us complete the checkToken function in db/model/user.js, the code is as follows:
export const checkToken = token => {
  return new Promise((resolve, reject) => {
    //判断数据库是否打开
    DBIsLoadSuccess().then(() => {
      //打开事务
      let {index} = openTransactionIndex(storeName, 'accesstoken');
      //通过token,查询数据
      let indexKey = index.getKey(token);
      indexKey.onerror = function(e){
        reject(
          rJson(0, e, '查询出错了~')
        );
      }

      indexKey.onsuccess = function(e){
        let result = e.target.result;
        if(result){
          resolve(
            rJson(1, e, '校验成功~')
          )
        }else{
          reject(
            rJson(0, e, '登录失效~')
          );
        }

      }
    }).catch(() => {
      reject(
        rJson(0, e, '数据库打开失败~')
      );
    })

  });
}
Here we first manually clear the accesstoken in the data table, and then click any page to jump. At this time, we will find that the page jumps directly to the login page.
Under normal circumstances, the token created when logging in is time-sensitive, so I won’t go into details here, and you can improve this part through your own understanding.
So far, the content of this article has been explained. For other functions of the system, please refer to the subsequent articles.
Next address: Local Database IndexedDB - List Management of Student Management System (2)_Awakening Mage's Blog-CSDN Blog