IndexedDB is a local database provided by the browser, which can be created and operated by web scripts. IndexedDB allows storing large amounts of data, provides a search interface, and can also create indexes. These are not available in LocalStorage or Cookie. As far as the database type is concerned, IndexedDB is not a relational database (does not support SQL query statements), but is closer to a NoSQL database.
In the previous two articles, we explained the addition, deletion, modification and query functions of system login and list; some people may also want to upload avatars, here we can convert the obtained pictures into base64 images or Blob binary for storage, because not only text can be saved in IndexedDB Or Object object data can also store binary data, so this provides us with technically feasible support for the upload function.
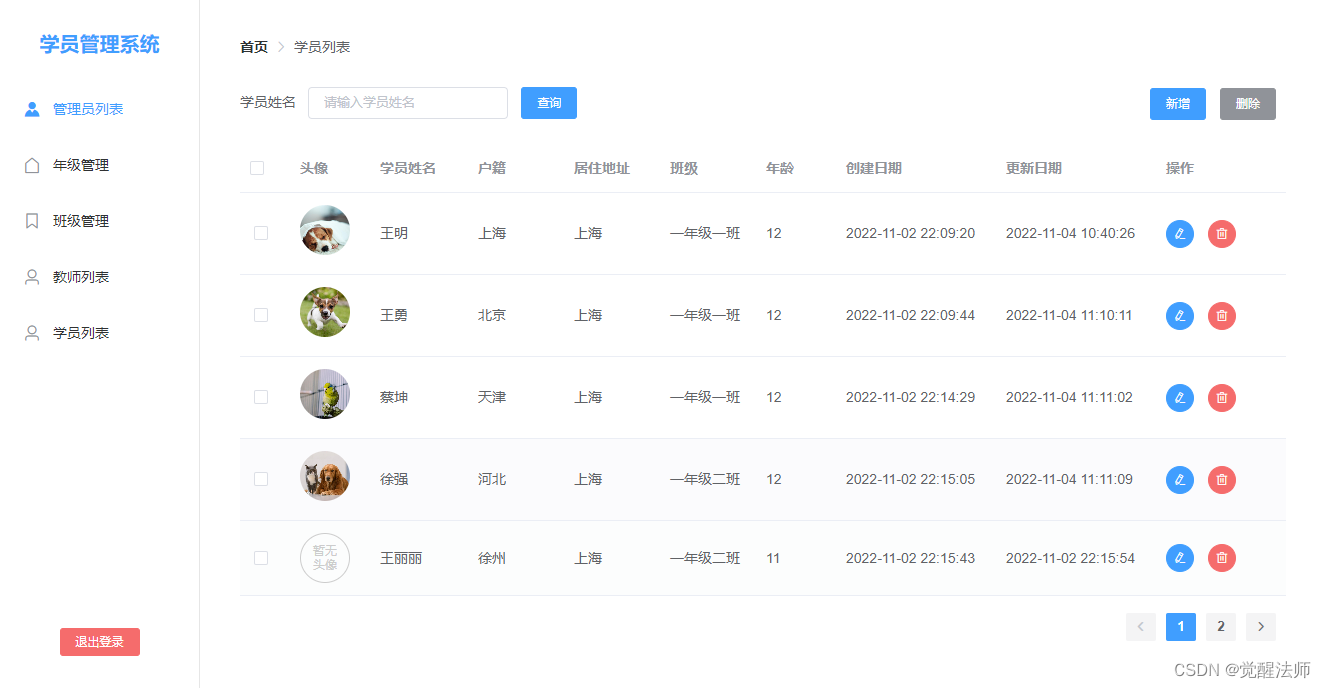
The effect diagram after realization is as follows:
We implement the avatar upload function in the student list, and we will make two modifications: one is to add the avatar display on the list page, and the other is to add the upload avatar function in the new or edit pop-up box. There is no pop-up upload requirement here. If no avatar is uploaded, no avatar will be displayed in the list.
The content mentioned here will not be described in detail, but only the positions that need to be adjusted will be selected and explained. If you haven't read the previous chapters, friends who don't know the whole system, you can read the previous chapters, the address is as follows:
1. Base64 image storage
First of all, we first convert the uploaded image into a base64 image to realize the upload function. Regardless of whether it is Base64 or Blob binary, the implementation method is actually relatively simple.
1.1 List add avatar display
Here we add an avatar avatar display column in the list, and judge whether the user avatar exists, and display the words "no avatar" if it does not exist. Open pages/student/index.vue and add the html code as follows:
<div class="table-wrap">
    <el-table
      @selection-change="selectionChange"
      :data="tableList"
      style="width: 100%">
      <el-table-column type="selection" label="选择" width="50"> </el-table-column>
      <el-table-column prop="avatar" label="头像" width="80">
        <template slot-scope="scope">
          <img :src="scope.row.avatar" alt="" class="avatar" v-if="scope.row.avatar" />
          <span v-else class="avatar-empty">暂无头像</span>
        </template>
      </el-table-column>

      ...

    </el-table>

    <div class="right-box">
      <el-pagination
        background
        layout="prev, pager, next"
        @current-change="currentChange"
        :current-page="page"
        :page-size="pageSize"
        :total="pageTotal">
      </el-pagination>
    </div>
  </div>
Open the pages/student/index.scss style file, and add the style code as follows:
.right-box{
  text-align: right;
  padding-top: 15px;
}

.avatar{
  width: 50px;
  height: 50px;
  border-radius: 50px;
  object-fit: cover;
  overflow: hidden;
}

.avatar-empty{
  display: block;
  width: 50px;
  height: 50px;
  overflow: hidden;
  border-radius: 50px;
  font-size: 12px;
  color: #ccc;
  text-align: center;
  padding: 10px;
  box-sizing: border-box;
  line-height: 14px;
  border: 1px solid #ccc;
}
The js part of the code on the list page has not been modified, so there is no need to do anything here.
1.2 Add or edit pop-up boxes
Add the fileToBase64() function in the tool class src/utils/utils/js in advance, the code is as follows:
/**
 * file 转 base64
 */
export const fileToBase64 = file => {
  return new Promise((resolve, reject) => {
    const fileReader = new FileReader();
    fileReader.onload = (e) => {
      resolve(e.target.result);
    };

    fileReader.readAsDataURL(file);
    fileReader.onerror = () => {
      reject(new Error('fileToBase64 error'));
    };
  });
}
1.3 Add avatar upload function
Open components/studentDialog/index.vue and add the el-upload component of element. Since this is not uploaded to the server, but stored locally, the action block can be left blank. The html code is as follows:
<template>
  <el-dialog :title="uid!=0?'编辑':'新增'" :visible="visible" @close="closeEvent" width="420px" class="dialog-wrap">

    <el-form :model="form" :rules="rules"  status-icon ref="ruleForm">
      <el-form-item label="头像" :label-width="formLabelWidth">
        <el-upload
          action=""
          class="avatar-uploader"
          :show-file-list="false"
          :before-upload="beforeAvatarUpload">
          <img v-if="imageUrl" :src="imageUrl" class="avatar">
          <i v-else class="el-icon-plus avatar-uploader-icon"></i>
        </el-upload>
      </el-form-item>

      ...

    </el-form>

    <div slot="footer" class="dialog-footer">
      <el-button size="small" @click="closeEvent">取 消</el-button>
      <el-button size="small" type="primary" @click="submitForm">保 存</el-button>
    </div>

  </el-dialog>
</template>
Introduce the fileToBase64() function into the utils toolkit; define the imageUrl variable in data; define the beforeAvatarUpload() function in methods to receive upload parameters, and convert them into base64 images and assign them to imageUrl variables; add an avatar field to getParams() in methods , just assign the imageUrl value when saving; if it is in the editing state, when updateStudentInfo() is executed, to obtain the detailed data, it is necessary to judge whether the avatar field has a value, and if it exists, it needs to be reassigned to imageUrl. The js code is as follows:
<script>
  import { toggleStudentInfo, loadStudentById, gradeAllList, getClassByKey } from '@/api'
  import { formatDate, fileToBase64 } from '@/utils/utils'
  export default {
    props: {
      //学员ID
      uid: {
        type: Number,
        default: () => 0
      },
      visible: {
        type: Boolean,
        default: () => false
      }
    },
    data(){
      return {
        //用户头像
        imageUrl: '',
        formLabelWidth: '80px',

        //...
      }
    },
    watch: {
      uid(){
        if(this.uid!=0){
          this.updateStudentInfo();
        }
      }
    },
    created() {
      this.updateGradeInfo();
    },
    methods: {
      /**
       * 上传用户头像
       * @param {Object} file
       */
      beforeAvatarUpload(file) {
        const isJPG = file.type === 'image/jpeg' || file.type === 'image/png';
        const isLt2M = file.size / 1024 / 1024 < 2;

        if (!isJPG) {
          this.$message.error('上传头像图片只能是 JPG 或 PNG 格式!');
        }
        if (!isLt2M) {
          this.$message.error('上传头像图片大小不能超过 2MB!');
        }
        fileToBase64(file).then(res => {
          this.imageUrl = res;
        })
        return isJPG && isLt2M;
      },

      //...

      /**
       * 获取班级
       */
      updateStudentInfo(){
        loadStudentById(this.uid).then(res => {
          if(res.code==1){
            let data = res.data,
                tmpData = {
                  name: res.data['name'],
                  registration: res.data['registration'],
                  phone: res.data['phone'],
                  address: res.data['address'],
                  birthday: res.data['birthday']
                };

            if(data['gid']){
              tmpData['gid'] = data.gid;
            }
            if(data['cid']){
              tmpData['cid'] = data.cid;
            }
            this.form = tmpData;

            if(data['avatar']){
              this.imageUrl = data.avatar;
            }

            if(data['gid']){
              this.updateClassInfo();
            }
          }
        }).catch(e => {
          console.error(e);
        })
      },
      /**
       * 获取保存数据
       */
      getParams(){
        let { name, registration,  phone, address, birthday, gid, cid } = this.form;
        return {
          name, registration, phone, address, birthday, gid, cid,
          avatar: this.imageUrl
        }
      },

      //...
    }
  }
</script>
At this time, after editing the avatar by adding or modifying it, the corresponding avatar can be displayed on the list, as shown below:
2. Blob binary storage
To upload pictures through binary storage, you only need to make a few modifications in base64. You can also compare according to actual needs to see which method suits your business needs.
2.1 Define storage file variable
First, you need to add the uploadFile variable in data to store the Blob binary file stream. The code is as follows:
 export default {

    //...

    data(){
      return {
        //用户头像
        imageUrl: '',
        //存储二进制流Blob
        uploadFile: "",

        //...

      }
    }
  }
2.2 beforeAvatarUpload() function modification
Next, we need to call the upload function function beforeAvatarUpload(), the code is as follows:
fileToBase64(file).then(res => {
    this.imageUrl = res;
})

// 将上部分代码,替换为下面内容即可

this.uploadFile = new Blob([file]);
this.imageUrl = URL.createObjectURL(this.uploadFile);
2.3 getParams() function modification
Just modify the previously assigned imageUrl to uploadFile, the code is as follows:
getParams(){
    let { name, registration,  phone, address, birthday, gid, cid } = this.form;
    return {
        name, registration, phone, address, birthday, gid, cid,
        avatar: this.uploadFile
    }
},
2.4 updateStudentInfo() function modification
Since the Blob binary cannot be displayed directly, the obtained avatar needs to be converted by URL.createObjectURL(Blob) when editing, the code is as follows:
if(data['avatar']){
    this.imageUrl = URL.createObjectURL(data.avatar);
}
At this point, we can add or edit the avatar of the student, and now save it to the avatar in the database, the Blob binary data, as shown in the figure below:

Note: If it was stored as a base64 image before, you need to convert all avatar values into Blob binary through the editing function, and then modify the list data, otherwise the obtained base64 will not be converted into a normal URL object.
Since the list page has not converted the Blob binary stream into a displayable URL object, the list effect is as follows:

2.5 List page modification
For the list page, we only need to convert the internally obtained avatar value into a displayable URL object after the updateList() function is executed. The code is as follows:
methods: {

   //...

   updateList(){
      getStudentPageList(this.keyword, {
        page: this.page,
        pageSize: this.pageSize
      }).then(res => {
        if(res.code==1){
          this.pageTotal = res.data['total'];
          this.tableList = res.data['list'].map(item => {
            item['createtime'] = formatDate(item.createtime);
            item['updatetime'] = formatDate(item.updatetime);

            //将Blob二进制转成可显示的URL对象
            if(item['avatar']){
              item.avatar = URL.createObjectURL(item.avatar);
            }
            return item;
          });
        }
      }).catch(e => {
        console.error(e);
      })
    },

    //...

}
Now the list looks like this:
