1. Definition and use
The oncontextmenu event fires when the user right-clicks the mouse on an element and opens the context menu.
Note: All browsers support the oncontextmenu event, and the contextmenu element is only supported by the Firefox browser.
2. Grammar
In HTML:
<element oncontextmenu="myScript">In JavaScript:
object.oncontextmenu=function(){myScript};In JavaScript, use the addEventListener() method:
object.addEventListener("contextmenu", myScript);In jQuery, use on to listen to events
$(document).on('contextmenu', myScript);Note: Internet Explorer 8 and earlier IE browser versions do not support addEventListener().
3. Use details
Whether to support bubbling: |
Yes |
Is it possible to cancel: |
Yes |
event type: |
MouseEvent |
Supported HTML tags: |
All HTML elements |
4. Case
This is done through a small case. In the attendance statistics list, each row corresponds to the daily attendance data of an employee in this month; if a record needs to be deleted, right-click on the record to display the delete menu, and the operation will be easier. For convenience. As shown below:
4.1 Customize the right-click delete menu steps
Listen to mouse click events through DOM objects
Trigger the mouse click event to get the current browser position of the mouse
Reposition the custom contextmenu according to the current position
Show custom contextmenu
4.2 Technical points
The Vue technical framework is used here to do this case. The statistical list uses the table component in element-ui. Event monitoring and data acquisition are realized through jquery. Please install it through npm before development.
//安装element-ui
npm i element-ui -S
//安装jquery
npm i jquery -S4.3 html code
Here, the isDate in the column data is used to judge whether the column is rendered as the corresponding date column. When rendering the attendance record corresponding to the date, it is necessary to add data-prop and data-id for data transfer, which will be used in subsequent deletion operations.
<template>
  <div class="list-wrap">
    <el-table
          stripe
          :data="tableData"
                class="list-table"
          style="width: 100%">
                <el-table-column type="selection" width="55" fixed="left"></el-table-column>
                <template v-for="(item, index) in tableColumn">
                    <el-table-column :prop="item.prop" :label="item.name" :key="index" :width="item.width" v-if="item.isDate">
                        <template slot-scope="scope">
                            <span class="date-cell" v-html="scope.row[item.prop]"
                                        :data-prop="item.prop"
                                        :data-id="scope.row['id_'+item.prop]"></span>
                        </template>
                    </el-table-column>
                    <el-table-column :prop="item.prop" :label="item.name" :key="index" :width="item.width" v-else fixed="left"></el-table-column>
                </template>
        </el-table>
  </div>
</template>

<style lang="scss">
@import './index.scss';
</style>
4.4 CSS styles
The .date-cell class selector modifies the style of the attendance record data, changes the mouse to a small hand icon, and prohibits the selection of text content, in order to avoid misoperation of the selected content when right-clicking later.
The .menu-box class selector adds basic styling to the right-click menu.
.date-cell{ cursor: pointer;
  -moz-user-select:none; /*火狐*/
  -webkit-user-select:none; /*webkit浏览器*/
  -ms-user-select:none; /*IE10*/
  -khtml-user-select:none; /*早期浏览器*/
  user-select:none;
}

.menu-box{
  position: absolute;

  ul.list{
    background-color: #fff;
    border: 1px solid #ccc;
    li{
      border-top: 1px solid #ccc;
      padding: 6px 15px;
      font-size: 14px;
      line-height: 1.5;
      color: #666;
      list-style: none;
      cursor: pointer;

      &:first-child{
        border-top: 0;
      }
    }
  }
}
4.5 Basic Data
The variable tableData is used to store employee attendance data, and the variable tableColumn is used to store the header data definition of the table column. After obtaining the attendance record, dynamically append the date column to the variable tableColumn.
<script>
  export default {
    data(){
      return {
        tableData: [],
        tableColumn: [
            {prop: "name", name: "姓名", width: "80px"},
            {prop: "workday", name: "实际到岗/天", width: "100px"},
        ]
      }
    },
    created() {

    },
    methods: {

    }
  }
</script>
At this time, the page style is as follows:
4.6 Simulation data
Here, create a new demo.json file in the directory location, and copy the following data into it.
[
  {"id":1482,"name":"张三","record":["08:30","18:00"],"recorddate":"2023-01-01"},
  {"id":1481,"name":"张三","record":["08:30","18:00"],"recorddate":"2023-01-02"},
  {"id":1480,"name":"张三","record":["08:30","18:00"],"recorddate":"2023-01-03"},
  {"id":1479,"name":"张三","record":["08:30","18:00"],"recorddate":"2023-01-04"},
  {"id":1478,"name":"张三","record":["08:30","18:00"],"recorddate":"2023-01-05"},
  {"id":1477,"name":"张三","record":["08:30","18:00"],"recorddate":"2023-01-06"},
  {"id":1476,"name":"张三","record":["08:30","18:00"],"recorddate":"2023-01-07"},
  {"id":1475,"name":"张三","record":["08:30","18:00"],"recorddate":"2023-01-08"},
  {"id":1474,"name":"张三","record":["08:30","18:00"],"recorddate":"2023-01-09"},
  {"id":1473,"name":"张三","record":["08:30","18:00"],"recorddate":"2023-01-10"},
  {"id":1472,"name":"张三","record":["08:30","18:00"],"recorddate":"2023-01-11"},
  {"id":1471,"name":"张三","record":["08:30","18:00"],"recorddate":"2023-01-12"},
  {"id":1470,"name":"张三","record":["08:30","18:00"],"recorddate":"2023-01-13"},
  {"id":1469,"name":"张三","record":["08:30","18:00"],"recorddate":"2023-01-14"},
  {"id":1468,"name":"张三","record":["08:30","18:00"],"recorddate":"2023-01-15"},
  {"id":1467,"name":"张三","record":["08:30","18:00"],"recorddate":"2023-01-16"},
  {"id":1466,"name":"张三","record":["08:30","18:00"],"recorddate":"2023-01-17"},
  {"id":1465,"name":"张三","record":["08:30","18:00"],"recorddate":"2023-01-18"},
  {"id":1464,"name":"张三","record":["08:30","18:00"],"recorddate":"2023-01-19"},
  {"id":1463,"name":"张三","record":["08:30","18:00"],"recorddate":"2023-01-20"},
  {"id":1462,"name":"张三","record":["08:30","18:00"],"recorddate":"2023-01-21"},
  {"id":1461,"name":"张三","record":["08:30","18:00"],"recorddate":"2023-01-22"},
  {"id":1382,"name":"李四","record":["08:30","18:00"],"recorddate":"2023-01-01"},
  {"id":1381,"name":"李四","record":["08:30","18:00"],"recorddate":"2023-01-07"},
  {"id":1380,"name":"李四","record":["08:30","18:00"],"recorddate":"2023-01-08"},
  {"id":1379,"name":"李四","record":["08:30","18:00"],"recorddate":"2023-01-15"},
  {"id":1378,"name":"李四","record":["08:30","18:00"],"recorddate":"2023-01-21"},
  {"id":1377,"name":"李四","record":["08:30","18:00"],"recorddate":"2023-01-22"},
  {"id":1376,"name":"王五","record":["08:30","18:00"],"recorddate":"2023-01-05"},
  {"id":1375,"name":"王五","record":["08:30","18:00"],"recorddate":"2023-01-06"},
  {"id":1374,"name":"王五","record":["08:30","18:00"],"recorddate":"2023-01-09"},
  {"id":1373,"name":"王五","record":["08:30","18:00"],"recorddate":"2023-01-11"},
  {"id":1372,"name":"王五","record":["08:30","18:00"],"recorddate":"2023-01-10"},
  {"id":1371,"name":"王五","record":["08:30","18:00"],"recorddate":"2023-01-04"},
  {"id":1370,"name":"王五","record":["08:30","18:00"],"recorddate":"2023-01-03"},
  {"id":1369,"name":"王五","record":["08:30","18:00"],"recorddate":"2023-01-02"}
]
4.7 Add date column
Import the demo.json file just created to generate simulated data. The variable tableData is used to store attendance data, and the variable tableColumn is used to store table column data. After the updateList() function is executed, all unique date data and all user data are obtained and stored in tableData and tableColumn variables respectively.
Since this is the functional effect achieved by simulating data, in the later stage of the project, the corresponding data is obtained through interface query.
<script>
  import DemoData from './demo.json'

  export default {
    data(){
      return {
        tableData: [],
        tableColumn: [
            {prop: "name", name: "姓名", width: "80px"},
            {prop: "workday", name: "实际到岗/天", width: "100px"},
        ]
      }
    },
    created() {
      this.updateList();
    },
    methods: {

      //加载列表数据
      updateList(){
        //获取日期列表
        let dateColumn = [],
            employeeList = [];

        //循环获取唯一 列日期 和 唯一 员工信息
        DemoData.map(item => {
          if(!dateColumn.includes(item.recorddate)){
            dateColumn.push(item.recorddate);
          }
          if(!employeeList.includes(item.name)){
            employeeList.push(item.name);
          }
        });
        //升序排序
        dateColumn.sort();
        //修改列长度,以免name和workday固定列被替换
        this.tableColumn.length = 2;
        //追加日期列
        this.tableColumn = this.tableColumn.concat(dateColumn.map(item => {
          return {
            prop: item,
            name: item,
            width: "100px",
            isDate: true
          }
        }));
      }
      //end
    }
  }
</script>
After the above code is completed, the date column can be displayed normally, as shown in the figure below:

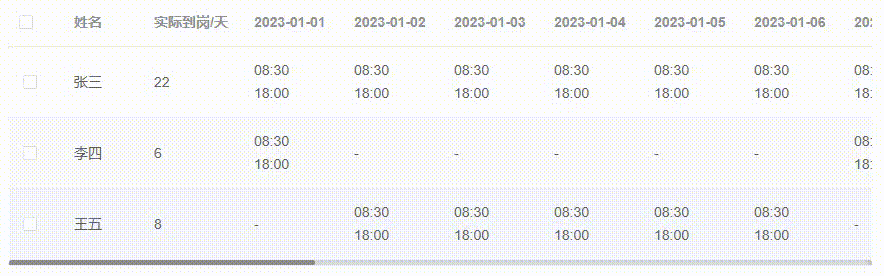
4.8 Reorganizing row data
Through the employee information stored in the variable employeeList, traverse and query the corresponding attendance records in the simulation data, and use the date stored in the variable dateColumn as the key to store it in the corresponding employee information.
<script>
  import DemoData from './demo.json'

  export default {
    data(){
      return {
        tableData: [],
        tableColumn: [
            {prop: "name", name: "姓名", width: "80px"},
            {prop: "workday", name: "实际到岗/天", width: "100px"},
        ]
      }
    },
    created() {
      this.updateList();
    },
    methods: {

      //加载列表数据
      updateList(){
        //获取日期列表
        let dateColumn = [],
            employeeList = [];

        //循环获取唯一 列日期 和 唯一 员工信息
        DemoData.map(item => {
          if(!dateColumn.includes(item.recorddate)){
            dateColumn.push(item.recorddate);
          }
          if(!employeeList.includes(item.name)){
            employeeList.push(item.name);
          }
        });
        //升序排序
        dateColumn.sort();
        //修改列长度,以免name和workday固定列被替换
        this.tableColumn.length = 2;
        //追加列
        this.tableColumn = this.tableColumn.concat(dateColumn.map(item => {
          return {
            prop: item,
            name: item,
            width: "100px",
            isDate: true
          }
        }));

        //重组员工考勤数据,一行显示考勤记录
        this.tableData = employeeList.map(item => {
          let nData = {},
              tmp = null,
              realWorkSize = 0;

          //获取对应员工的考勤记录
          dateColumn.forEach(key => {
            tmp = DemoData.filter(sub => sub.name == item && sub.recorddate == key);
            if(tmp.length==1&&tmp[0]['record'].length==2){
              //记录考勤数据
              nData[key] = tmp[0]['record'][0] + '<br />' + tmp[0]['record'][1];
              //保存对应考勤记录的ID
              nData['id_'+key] = tmp[0]['id'];
              //统计到岗天数
              realWorkSize++;
            }else{
              nData[key] = '-';
            }
          })

          return {
           name: item,
           workday: realWorkSize,
           ...nData
          }
        });
      }
      //end
    }
  }
</script>
At this point, the attendance records in the simulated data are normally displayed on the page, as shown in the figure below:

5. Customize the right-click menu
At this point, we can implement the custom right-click menu. Here we simply explain the implementation method and steps. If there is actual demand, this function can be packaged. Here, we first implement this function with bulk code.
5.1 Preparations
First introduce jquery, and add a mouse event that disables the right-click menu, the code is as follows:
<script>
  import DemoData from './demo.json'
  import $ from 'jquery'

  //记录是否悬浮在指定单元格上
  let isHoverCell = false;
  //记录悬浮位置考勤记录对象
  let hoverData = null;
  //右击菜单Dom对象
  let MenuBox = null;
  //记录上一个数据的ID,用于判断是否需要新打开一个窗口
  let tmpPreId = 0;

  export default {
    data(){
      return {
        tableData: [],
        tableColumn: [
            {prop: "name", name: "姓名", width: "80px"},
            {prop: "workday", name: "实际到岗/天", width: "100px"},
        ]
      }
    },
    created() {
      this.updateList();

      //右击菜单事件
      window.oncontextmenu = function(e){
        if(isHoverCell){
          //取消默认的浏览器自带右键
          e.preventDefault();
        }
      }
      //event end
    },
    methods: {
      //...
      //end
    }
  }
</script>
After binding the oncontextmenu event, when the mouse hovers over the attendance record, the value of the variable isHoverCell is true, and the right-click disable will take effect at this time.
5.2 Determine the mouse position
Create a new cellAddEvent() function in methods, place it at the end of the updateList() function execution, and execute it after a delay of 100 seconds, in case the data is not rendered and jquery cannot query the DOM nodes of all attendance records.
In addition, the attendance data will be re-rendered due to operations such as adding, deleting, modifying and checking, so each cell binding event will also be released after re-rendering, and the event needs to be re-bound after rendering, so the cellAddEvent() function should be placed updateList () function execution.
<script>
  import DemoData from './demo.json'
  import $ from 'jquery'

  //记录是否悬浮在指定单元格上
  let isHoverCell = false;
  //记录悬浮位置考勤记录对象
  let hoverData = null;
  //右击菜单Dom对象
  let MenuBox = null;
  //记录上一个数据的ID,用于判断是否需要新打开一个窗口
  let tmpPreId = 0;

  export default {
    data(){
      return {
        tableData: [],
        tableColumn: [
            {prop: "name", name: "姓名", width: "80px"},
            {prop: "workday", name: "实际到岗/天", width: "100px"},
        ]
      }
    },
    created() {
      this.updateList();

      //右击菜单事件
      window.oncontextmenu = function(e){
        if(isHoverCell){
          //取消默认的浏览器自带右键
          e.preventDefault();
        }
      }
      //event end
    },
    methods: {
      /**
       * 为考勤记录添加相应监听事件
       */
      cellAddEvent(){
        let that = this,
            propData = "";
        //悬浮事件
        $('.date-cell').hover(function(){
          isHoverCell = true;

          let id = $(this).data('id'),
              filterData = DemoData.filter(item => item.id == id);

          if(filterData.length==1){
            hoverData = {
              prop: $(this).data('prop'),
              data: filterData[0]
            }
          }
          //if end
        }, function(){
          isHoverCell = false;
          hoverData = null;
        });

      },
      //加载列表数据
      updateList(){
        //获取日期列表
        let dateColumn = [],
            employeeList = [];

        //循环获取唯一 列日期 和 唯一 员工信息
        DemoData.map(item => {
          if(!dateColumn.includes(item.recorddate)){
            dateColumn.push(item.recorddate);
          }
          if(!employeeList.includes(item.name)){
            employeeList.push(item.name);
          }
        });
        //升序排序
        dateColumn.sort();
        //修改列长度,以免name和workday固定列被替换
        this.tableColumn.length = 2;
        //追加列
        this.tableColumn = this.tableColumn.concat(dateColumn.map(item => {
          return {
            prop: item,
            name: item,
            width: "100px",
            isDate: true
          }
        }));

        //重组员工考勤数据,一行显示考勤记录
        this.tableData = employeeList.map(item => {
          let nData = {},
              tmp = null,
              realWorkSize = 0;

          //获取对应员工的考勤记录
          dateColumn.forEach(key => {
            tmp = DemoData.filter(sub => sub.name == item && sub.recorddate == key);
            if(tmp.length==1&&tmp[0]['record'].length==2){
              //记录考勤数据
              nData[key] = tmp[0]['record'][0] + '<br />' + tmp[0]['record'][1];
              //保存对应考勤记录的ID
              nData['id_'+key] = tmp[0]['id'];
              //统计到岗天数
              realWorkSize++;
            }else{
              nData[key] = '-';
            }
          })

          return {
           name: item,
           workday: realWorkSize,
           ...nData
          }
        });

        setTimeout(() => {
          this.cellAddEvent();
        }, 100);
      }
      //end
    }
  }
</script>
此时大家会发现,鼠标在页面其他位置可以正常右击显示默认菜单,但放到考勤记录上时,右击菜单则失效无法显示了。
5.3 添加自定义菜单
当变量isHoverCell为true时,右击执行rightMenuInitial()函数,通过jquery创建菜单容器后,追加到body中。此时右击则能看到删除按钮了。
<script>
  import DemoData from './demo.json'
  import $ from 'jquery'

  //记录是否悬浮在指定单元格上
  let isHoverCell = false;
  //记录悬浮位置考勤记录对象
  let hoverData = null;
  //右击菜单Dom对象
  let MenuBox = null;
  //记录上一个数据的ID,用于判断是否需要新打开一个窗口
  let tmpPreId = 0;

  export default {
    data(){
      return {
        tableData: [],
        tableColumn: [
            {prop: "name", name: "姓名", width: "80px"},
            {prop: "workday", name: "实际到岗/天", width: "100px"},
        ]
      }
    },
    created() {
      this.updateList();

      let that = this;
      //右击菜单事件
      window.oncontextmenu = function(e){
        if(isHoverCell){
          //取消默认的浏览器自带右键
          e.preventDefault();
          that.rightMenuInitial(e);
        }
      }
      //event end
    },
    methods: {
        /**
       * 右击初始化弹框事件
       * @param e 右击事件
       */
      rightMenuInitial(e){
        if(null==hoverData||'undefined'===typeof hoverData.data){
          this.$message.info("数据读取失败,刷新后再试~");
          return;
        }

        if(null!=MenuBox) {
          //上一个右击区域未变化,则结束后续操作
          if(tmpPreId==hoverData.data.id) return;
        };

        //记录当前ID
        tmpPreId = hoverData.data.id;

        //创建右击菜单容器
        MenuBox = $('<div />').addClass('menu-box');

        let that = this,
            listData = [
              {id: 1, name: "删除", style: "delete"}
            ],
            ulBox = $('<ul />').addClass('list');

        //添加列表
        MenuBox.append(ulBox);

        //循环生成右击菜单列表
        for(var i in listData){
          ulBox.append($('<li />').text(listData[i]['name']).addClass(listData[i]['style']));
        }
        //for end

        //添加位置
        MenuBox.css({
          'position': 'absolute',
          'left': e.clientX,
          'top': e.clientY,
          'z-index': 10
        });

        ulBox.hover(function(){
          isHoverCell = true;
        }, function(){
          isHoverCell = false;
        });

        /**
         * 添加删除事件
         */
        ulBox.on('click', 'li.delete', function(){
          that.$confirm('确定删除'+ hoverData.data.name + '的' + hoverData.prop+'考勤记录吗?', '提示', {
            confirmButtonText: '确定',
            cancelButtonText: '取消',
            type: 'warning'
          }).then(() => {
            //查询源数据对应位置,将其删除(这里Demo演示,真实环境需要将删除数据ID传给后台进行操作)
            let index = DemoData.indexOf(hoverData.data);
            DemoData.splice(index, 1);

            that.updateList();
          }).catch(() => {
            that.$message({
              type: 'info',
              message: '已取消删除'
            });
          });
        });

        //追加到页面中
        $('body').append(MenuBox);
      },

      //...
      //end
    }
  }
</script>
5.4 增加移除菜单功能
增加removeMenuBox()函数,用于在不同情况下,需要移除自定义菜单。代码如下:
<script>
  import DemoData from './demo.json'
  import $ from 'jquery'

  //记录是否悬浮在指定单元格上
  let isHoverCell = false;
  //记录悬浮位置考勤记录对象
  let hoverData = null;
  //右击菜单Dom对象
  let MenuBox = null;
  //记录上一个数据的ID,用于判断是否需要新打开一个窗口
  let tmpPreId = 0;

  export default {
    data(){
      return {
        tableData: [],
        tableColumn: [
            {prop: "name", name: "姓名", width: "80px"},
            {prop: "workday", name: "实际到岗/天", width: "100px"},
        ]
      }
    },
    created() {
      this.updateList();

      let that = this;
      //右击菜单事件
      window.oncontextmenu = function(e){
        if(isHoverCell){
          //取消默认的浏览器自带右键
          e.preventDefault();

          that.rightMenuInitial(e);
        }
      }
      //event end
    },
    methods: {
      /**
       * 删除右击菜单
       * @date 2023/1/30
       */
      removeMenuBox(){
        if(!MenuBox) return;
        MenuBox.remove();
        MenuBox = null;
      },
      /**
       * 右击初始化弹框事件
       * @param e 右击事件
       */
      rightMenuInitial(e){
        if(null==hoverData||'undefined'===typeof hoverData.data){
          this.$message.info("数据读取失败,刷新后再试~");
          return;
        }

        if(null!=MenuBox) {
          this.removeMenuBox();
          //上一个右击区域未变化,则结束后续操作
          if(tmpPreId==hoverData.data.id) return;
        };

        //记录当前ID
        tmpPreId = hoverData.data.id;

        //创建右击菜单容器
        MenuBox = $('<div />').addClass('menu-box');

        let that = this,
            listData = [
              {id: 1, name: "删除", style: "delete"}
            ],
            ulBox = $('<ul />').addClass('list');

        //添加列表
        MenuBox.append(ulBox);

        //循环生成右击菜单列表
        for(var i in listData){
          ulBox.append($('<li />').text(listData[i]['name']).addClass(listData[i]['style']));
        }
        //for end

        //添加位置
        MenuBox.css({
          'position': 'absolute',
          'left': e.clientX,
          'top': e.clientY,
          'z-index': 10
        });
        //自定义菜单悬浮事件监听
        ulBox.hover(function(){
          isHoverCell = true;
        }, function(){
          isHoverCell = false;
        });

        /**
         * 添加删除事件
         */
        ulBox.on('click', 'li.delete', function(){
          that.$confirm('确定删除'+ hoverData.data.name + '的' + hoverData.prop+'考勤记录吗?', '提示', {
            confirmButtonText: '确定',
            cancelButtonText: '取消',
            type: 'warning'
          }).then(() => {
            //查询源数据对应位置,将其删除(这里Demo演示,真实环境需要将删除数据ID传给后台进行操作)
            let index = DemoData.indexOf(hoverData.data);
            DemoData.splice(index, 1);

            that.removeMenuBox();
            that.updateList();
          }).catch(() => {
            that.removeMenuBox();
            that.$message({
              type: 'info',
              message: '已取消删除'
            });
          });
        });

        //追加到页面中
        $('body').append(MenuBox);
      },
      /**
       * 为考勤记录添加相应监听事件
       */
      cellAddEvent(){
        let that = this,
            propData = "";
        //悬浮事件
        $('.date-cell').hover(function(){
          isHoverCell = true;

          let id = $(this).data('id'),
              filterData = DemoData.filter(item => item.id == id);

          if(filterData.length==1){
            hoverData = {
              prop: $(this).data('prop'),
              data: filterData[0]
            }
          }
          // console.log('id', id);e
          //if end
        }, function(){
          isHoverCell = false;
        });

        //鼠标移出事件,关闭删除菜单
        $(document).off('click').on('click', function(){
          if(!isHoverCell&&null!=MenuBox){
            that.removeMenuBox();
          }
        });
      },
      //加载列表数据
      updateList(){
        //获取日期列表
        let dateColumn = [],
            employeeList = [];

        //循环获取唯一 列日期 和 唯一 员工信息
        DemoData.map(item => {
          if(!dateColumn.includes(item.recorddate)){
            dateColumn.push(item.recorddate);
          }
          if(!employeeList.includes(item.name)){
            employeeList.push(item.name);
          }
        });
        //升序排序
        dateColumn.sort();
        //修改列长度,以免name和workday固定列被替换
        this.tableColumn.length = 2;
        //追加列
        this.tableColumn = this.tableColumn.concat(dateColumn.map(item => {
          return {
            prop: item,
            name: item,
            width: "100px",
            isDate: true
          }
        }));

        //重组员工考勤数据,一行显示考勤记录
        this.tableData = employeeList.map(item => {
          let nData = {},
              tmp = null,
              realWorkSize = 0;

          //获取对应员工的考勤记录
          dateColumn.forEach(key => {
            tmp = DemoData.filter(sub => sub.name == item && sub.recorddate == key);
            if(tmp.length==1&&tmp[0]['record'].length==2){
              //记录考勤数据
              nData[key] = tmp[0]['record'][0] + '<br />' + tmp[0]['record'][1];
              //保存对应考勤记录的ID
              nData['id_'+key] = tmp[0]['id'];
              //统计到岗天数
              realWorkSize++;
            }else{
              nData[key] = '-';
            }
          })

          return {
           name: item,
           workday: realWorkSize,
           ...nData
          }
        });

        setTimeout(() => {
          this.cellAddEvent();
        }, 100);
      }
      //end
    }
  }
</script>
5.5 追加菜单内容
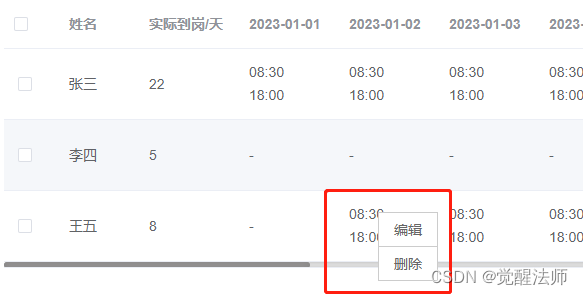
在自定义右击菜单时,已预留了增加更多菜单项位置,如下代码,在变量listData中添加菜单内容即可。
rightMenuInitial(e){
    if(null==hoverData||'undefined'===typeof hoverData.data){
      this.$message.info("数据读取失败,刷新后再试~");
      return;
    }

    if(null!=MenuBox) {
      this.removeMenuBox();
      //上一个右击区域未变化,则结束后续操作
      if(tmpPreId==hoverData.data.id) return;
    };

    //记录当前ID
    tmpPreId = hoverData.data.id;

    //创建右击菜单容器
    MenuBox = $('<div />').addClass('menu-box');

    let that = this,
        listData = [
          {id: 1, name: "编辑", style: "edit"},
          {id: 2, name: "删除", style: "delete"}
        ],
        ulBox = $('<ul />').addClass('list');
    //...
}
如下图,右击时自定义菜单中则出现“编辑”项了,这块功能这里就不作详解,大家可以自行操作。这里就简单讲解下自定义右击菜单和删除功能,仅供大家参考,如有不足之处请见谅!