1. Convolution Layers
Since the image is two-dimensional, basically the most commonly used is the two-dimensional convolution class: torch.nn.Conv2d, official document: torch.nn.Conv2d .
Conv2dThe main parameters are as follows:
in_channels: The number of channels of the input image, color images are generally three channels.out_channels: The number of channels of the output image produced by convolution.kernel_size: It can be a number or a tuple, indicating the size of the convolution kernel. The parameters of the convolution kernel are sampled from the distribution of the data. It does not matter how many these numbers are, because these parameters are used during the training of the neural network. Make constant adjustments.stride: step size.padding:filling.padding_mode: Filling mode, there arezeros,reflect,replicate,circular, the default iszeros.dilation: It can be a number or a tuple, indicating the distance between each element of the convolution kernel.group: Generally set to 1, basically not used.bias: Bias, generally set to True.
For example, the following code builds a neural network with only one convolutional layer. The input and output channels of the convolutional layer are both three channels, the convolution kernel size is 3*3, the step size is 1, and there is no padding. Then use CIFAR10 test data set for testing:
from torchvision import transforms, datasets
from torch.utils.data import DataLoader
from torch.utils.tensorboard import SummaryWriter
import torch.nn as nn

test_set = datasets.CIFAR10('dataset/CIFAR10', train=False, transform=transforms.ToTensor())

data_loader = DataLoader(test_set, batch_size=64)

class Network(nn.Module):
    def __init__(self):
        super(Network, self).__init__()
        self.conv1 = nn.Conv2d(in_channels=3, out_channels=3, kernel_size=3, stride=1, padding=0)

    def forward(self, input):
        output = self.conv1(input)
        return output

network = Network()
print(network)  # Network((conv1): Conv2d(3, 6, kernel_size=(3, 3), stride=(1, 1)))

writer = SummaryWriter('logs')

for step, data in enumerate(data_loader):
    imgs, targets = data
    output = network(imgs)
    writer.add_images('input', imgs, step)
    writer.add_images('output', output, step)

writer.close()
The test results are as follows:

It can be seen that the convolution operation can extract different features of the input image . The first convolutional layer may only extract some low-level features such as edges, lines, and corners. More layers of networks can iteratively extract more low-level features. complex features.
2. Pooling Layers
The official documentation for the introduction of Pooling Layers related functions: Pooling Layers .
Among them MaxPool, means maximum pooling, also called upsampling; MaxUnpoolmeans minimum pooling, also called downsampling; AvgPoolmeans average pooling. The most commonly used one is MaxPool2dthe official document: torch.nn.MaxPool2d .
The steps of max pooling are shown in the figure below:
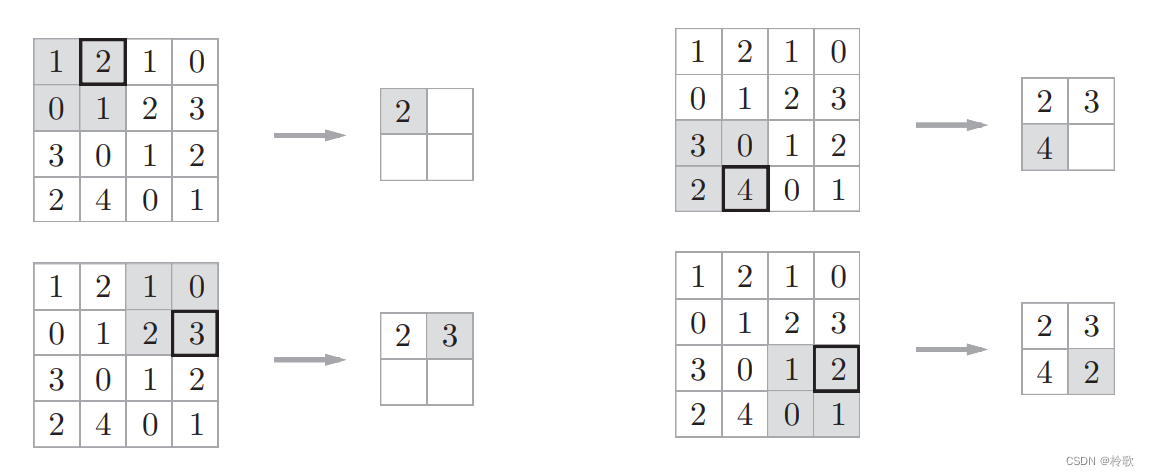
MaxPool2dThe main parameters are as follows:
kernel_size: The window (pooling kernel) size used to take the maximum value is similar to the previous convolution kernel.stride: step size, note that the default value iskernel_size.padding: Padding,Conv2dsame as .dilation: The distance between each element in the pooling kernel, theConv2dsame as .return_indices: If True, indicates that the return value contains the index of the maximum position. Note that this maximum value refers to the maximum value generated in all windows. If there are a total of 5 maximum values generated by the window, there will be 5 return values.ceil_mode: If it is True, it means that when calculating the shape of the output result, round up is used, otherwise it is rounded down by default.
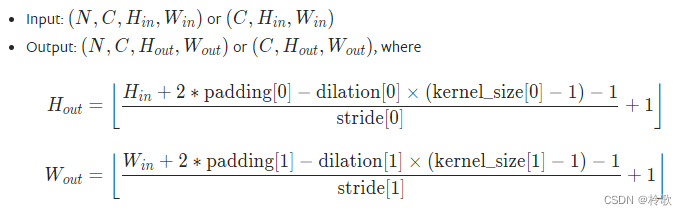
The calculation formula of the output result shape is as follows:
Next we implement this pooling layer in code:
from torchvision import transforms, datasets
from torch.utils.data import DataLoader
from torch.utils.tensorboard import SummaryWriter
import torch.nn as nn
import torch

class Network(nn.Module):
    def __init__(self):
        super(Network, self).__init__()
        self.maxpool1 = nn.MaxPool2d(kernel_size=2)

    def forward(self, input):
        output = self.maxpool1(input)
        return output

input = torch.tensor([
    [1, 2, 1, 0],
    [0, 1, 2, 3],
    [3, 0, 1, 2],
    [2, 4, 0, 1]
], dtype=torch.float32)  # 注意池化层读入的数据需要为浮点型

input = torch.reshape(input, (1, 1, 4, 4))

network = Network()
print(network)  # Network((maxpool1): MaxPool2d(kernel_size=2, stride=2, padding=0, dilation=1, ceil_mode=False))

output = network(input)
print(output)
# tensor([[[[2., 3.],
#           [4., 2.]]]])
Let's try the effect with an image:
from torchvision import transforms, datasets
from torch.utils.data import DataLoader
from torch.utils.tensorboard import SummaryWriter
import torch.nn as nn

test_set = datasets.CIFAR10('dataset/CIFAR10', train=False, transform=transforms.ToTensor())

data_loader = DataLoader(test_set, batch_size=64)

class Network(nn.Module):
    def __init__(self):
        super(Network, self).__init__()
        self.maxpool1 = nn.MaxPool2d(kernel_size=2)

    def forward(self, input):
        output = self.maxpool1(input)
        return output

network = Network()

writer = SummaryWriter('logs')

for step, data in enumerate(data_loader):
    imgs, targets = data
    output = network(imgs)
    writer.add_images('input', imgs, step)
    writer.add_images('output', output, step)

writer.close()
The test results are as follows:

It can be seen that the purpose of maximum pooling is to preserve the characteristics of the input data while reducing the amount of data of the characteristics .