what is websocket
-
WebSocket is a network communication protocol. RFC6455 defines its communication standard.
-
WebSocket is a new protocol under HTML5 (the websocket protocol is essentially a tcp-based protocol)
-
It realizes the full-duplex communication between the browser and the server, which can better save server resources and bandwidth and achieve the purpose of real-time communication
-
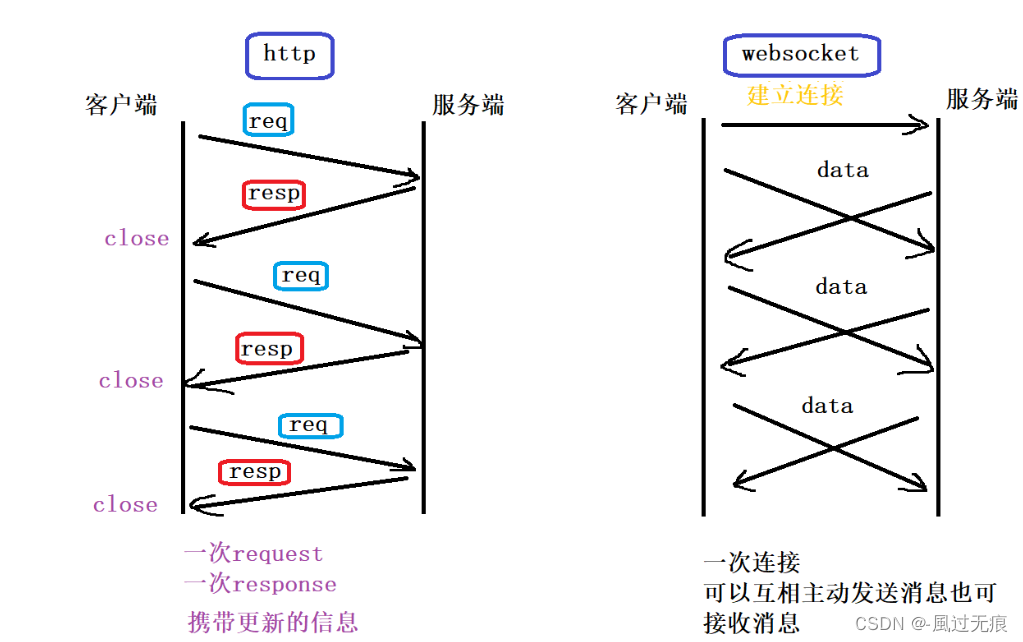
HTTP is a stateless, connectionless, one-way application layer protocol. It adopts a request/response model. Communication requests can only be initiated by the client, and the server responds to the request. Such disadvantages are obviously very big. As long as the status of the server changes continuously, the client must respond in real time, polling through javascript and ajax, which is obviously very troublesome. At the same time, the efficiency of polling is low and it is very wasteful. Resources (http always open, repeated connections).
-
So there is websocket. Websocket is a persistent protocol. It is a network technology for full-duplex communication. Any party can establish a connection to push data to the other party. Websocket only needs to establish a connection once to maintain it
websocket principle
-
Websocket stipulates a communication specification. Through a handshake mechanism, a TCP-like connection can be established between the client and the server, thereby facilitating the communication between them.
-
Before the emergence of websockets, web interactions were generally short or long connections based on the http protocol
-
websocket is a brand new protocol, not part of http stateless protocol, the protocol name is "ws"
-
It is said that it is TCP transmission, which is mainly reflected in the fact that after a long connection is established, the browser can send data to the server, and the server can also send requests to the browser. Of course, its data format is not defined by itself, but the outer layer of the data to be transmitted has an outer layer package stipulated by the ws protocol.
The relationship between websocket and http
-
Same point:
-
Both are based on tcp, are reliable transmission protocols, and are all application layer protocols
-
difference:
-
WebSocket is a two-way communication protocol, simulating the Socket protocol, which can send or receive information in both directions
-
HTTP is one-way
-
WebSocket requires a handshake between the browser and the server to establish a connection
-
And http is a connection initiated by the browser to the server, and the server does not know this connection in advance.
-
connect
-
When WebSocket establishes the handshake, the data is transmitted through HTTP. But after the establishment, the HTTP protocol is not required for real transmission
-
relation chart

actual development
-
We have a requirement that after the alarm data arrives, the alarm will be processed at the front end. Without using websocket, the interface can only be called every 3 seconds by polling, and the data retrieved from the bar will be judged. If there are too many, the interface will be adjusted to continue the operation. This is a waste of resources.
-
After using websocket, after the connection is established. After the back-end detects the data change, it notifies the front-end through its send method, and the front-end calls it through the onmessage prompt, and can directly call the query data interface to continue the operation.
-
We are here to establish a connection and notify the front-end through the back-end of other data changes. The front-end has a method that will be executed. We call our query interface in this method, or the back-end can send this data back for us to process, depending on the actual situation. .
backend code
Our backend is containerized and distributed, the main code is as follows
public class WebSocketConfig {
/**
* 如果使用Springboot默认内置的tomcat容器,则必须注入ServerEndpoint的bean;
* 如果使用外置的web容器,则不需要提供ServerEndpointExporter,下面的注入可以注解掉
*/
@Bean
public ServerEndpointExporter serverEndpointExporter(){
return new ServerEndpointExporter();
}
}
public class WebSocketServer {
//与某个客户端的连接会话,需要通过它来给客户端发送数据
private Session session;
private static CopyOnWriteArraySet<WebSocketServer> webSockets = new CopyOnWriteArraySet<>();
//用来存放每个客户端对应的WebSocket对象。
private static Map<String,Session> sessionPool = new HashMap<>();
/**
* 连接成功后调用的方法
* @param session
* @param key
*/
@OnOpen
public void onOpen(Session session, @PathParam("key") String key) throws IOException {
//key为前端传给后端的token
this.session = session;
//从token中获取到userid当做区分websocket客户端的key
Long userId = JwtHelper.getUserId(key);
sessionPool.put(String.valueOf(userId),session);
if (sessionPool.get(String.valueOf(userId))==null){
webSockets.add(this);
}
webSockets.add(this);
System.out.println("webSocket连接成功");
System.out.println("WebSocket有新的连接,连接总数为:"+webSockets.size());
}
/**
* 连接关闭调用的方法
*/
@OnClose
public void onClose() {
webSockets.remove(this);
System.out.println("webSocket连接关闭");
}
/**
* 收到客户端消息后调用的方法,根据业务要求进行处理,这里就简单地将收到的消息直接群发推送出去
* @param message 客户端发送过来的消息
*/
@OnMessage
public void onMessage(String message) {
//心跳检测
int beginIndex = 10;
if ("HeartBeat".equals(message.substring(0,9))){
String token = message.substring(beginIndex);
System.out.println("token1"+token);
if (!"".equals(token)){
System.out.println("token2"+token);
Long userId = JwtHelper.getUserId(token);
sendTextMessage(String.valueOf(userId),"ok");
}
}
System.out.println("WebSocket收到客户端消息:"+message);
}
/**
* 发生错误时的回调函数
* @param session
* @param error
*/
@OnError
public void onError(Session session, Throwable error) {
log.error("发生错误");
error.printStackTrace();
}
/**
* 实现服务器主动推送消息
*/
//单点消息发送
public void sendTextMessage(String key,String message){
Session session = sessionPool.get(key);
if (session!=null){
try {
session.getBasicRemote().sendText(message);
}catch (Exception e){
e.printStackTrace();
}
}
}
}
front-end code
1. Create a websocket.js import file in src/utils. This websocket is global and can be used on any page through login and exit control.
// 提示信息
import { Message } from 'element-ui'
// 引入token 解析用户id在后端处理
import { getToken } from '@/utils/auth'
var url = 'ws://后端地址/equipment/websocket/'
var ws
var tt
var lockReconnect = false //避免重复连接
var clientId = getToken() //cookies中获取token值
var websocket = {
// 建立连接
Init: function (clientId) {
if ('WebSocket' in window) {
ws = new WebSocket(url + clientId)
} else if ('MozWebSocket' in window) {
ws = new MozWebSocket(url + clientId)
} else {
// console.log('您的浏览器不支持 WebSocket!')
return
}
// websocket 生命周期根据websocket状态自己会执行
// websocket 成功 失败 错误 断开 这里会自动执行
// 这个方法后端通过send调用 这个方法会执行和接收参数
ws.onmessage = function (e) {
// console.log('接收消息:' + e.data)
heartCheck.start()
if (e.data == 'ok') {
//心跳消息不做处理
return
}
Message({
message: e.data,
type: 'success'
})
//messageHandle(e.data)
}
ws.onclose = function () {
console.log('连接已关闭')
Message({
message: '报警功能连接已关闭',
type: 'error'
})
reconnect(clientId)
}
ws.onopen = function () {
// console.log('连接成功')
Message({
message: '报警功能连接成功',
type: 'success'
})
heartCheck.start()
}
ws.onerror = function (e) {
// console.log('数据传输发生错误')
Message({
message: '数据传输发生错误',
type: 'error'
})
reconnect(clientId)
}
},
// 我们单独写了一个方法 调用ws的关闭方法,这样就可以在退出登录的时候主动关闭连接
//关闭连接
onClose: function () {
console.log('主动关闭连接!')
//关闭websocket连接和关闭断开重连机制
lockReconnect = true
// 调用 上面的websocket关闭方法
ws.close()
},
// 前端的send给后端发信息
Send: function (sender, reception, body, flag) {
let data = {
sender: sender,
reception: reception,
body: body,
flag: flag
}
let msg = JSON.stringify(data)
// console.log('发送消息:' + msg)
ws.send(msg)
},
// 返回ws对象
getWebSocket () {
return ws
},
// websocket 自带的状态码意思提示
getStatus () {
if (ws.readyState == 0) {
return '未连接'
} else if (ws.readyState == 1) {
return '已连接'
} else if (ws.readyState == 2) {
return '连接正在关闭'
} else if (ws.readyState == 3) {
return '连接已关闭'
}
}
}
// 刷新页面后需要重连
if (window.performance.navigation.type == 1 && getToken() != null) {
//刷新后重连
// reconnect(clientId);
websocket.Init(clientId)
//如果websocket没连接成功,则开始延迟连接
if (ws == null) {
reconnect(clientId)
}
}
export default websocket
//根据消息标识做不同的处理
function messageHandle (message) {
let msg = JSON.parse(message)
switch (msg.flag) {
case 'command':
// console.log('指令消息类型')
break
case 'inform':
// console.log('通知')
break
default:
// console.log('未知消息类型')
}
}
// 重连方法 刷新页面 连接错误 连接关闭时调用
function reconnect (sname) {
if (lockReconnect) {
return
}
lockReconnect = true
//没连接上会一直重连,设置延迟避免请求过多
tt && clearTimeout(tt)
tt = setTimeout(function () {
// console.log('执行断线重连...')
websocket.Init(sname)
lockReconnect = false
}, 4000)
}
//心跳检测 跟后端是对应的 会进行处理
// 连接成功 和后端推消息时调用
var heartCheck = {
timeout: 1000 * 60 * 3,
timeoutObj: null,
serverTimeoutObj: null,
start: function () {
// console.log('开始心跳检测')
var self = this
this.timeoutObj && clearTimeout(this.timeoutObj)
this.serverTimeoutObj && clearTimeout(this.serverTimeoutObj)
this.timeoutObj = setTimeout(function () {
//这里发送一个心跳,后端收到后,返回一个心跳消息,
//onmessage拿到返回的心跳就说明连接正常
// console.log('心跳检测...')
ws.send('HeartBeat:' + clientId)
self.serverTimeoutObj = setTimeout(function () {
if (ws.readyState != 1) {
ws.close()
}
// createWebSocket();
}, self.timeout)
}, this.timeout)
}
}
2. When logging in and logging out, websocket is used to establish and close the connection, which is to call this method in vuex (src/store/modules/user.js) (detailed Vuex login homepage article will be available).
// 引入外部文件
import websocket from '@/utils/websocket'
// 请求
const actions = {
  // 登录
  async login (ctx, data) {
    // 调用mutations里的方法存到state
    // 登录成功后创建websocket连接
    // res.data 是token
    websocket.Init(res.data)
    ctx.commit('SET_TOKEN', res.data)
  },

  // 退出登录
  logout (ctx) {
   // 主动关闭连接
    websocket.onClose()
    Message.success('退出成功,请重新登录')
  }
}
3. When you need to use websocket, we use it on the home page here.
// 引入websocket文件
import websocket from '@/utils/websocket'
// 登录成功一进到页面的时候调用
created() {
this.getWebSocket()
},
// getWebSocket()方法
method: {
// websocket 接受消息
getWebSocket() {
// websocket.getWebSocket()这个是websocket里面方法返回ws对象(websocket.js)
let ws = websocket.getWebSocket()
// 通过ws这个对象获取这个websocket里面后端推消息前端执行的方法onmessage。
// 给他赋给我们自己方法 this.websocketonmessage
websocketonmessage(e)就会执行
ws.onmessage = this.websocketonmessage
},
//接收到消息的回调函数
websocketonmessage(e) {
// e后端传回来参数
// console.log(e.data);
// 防止心跳监测,返回来的ok 对方法执行的影响(心跳监测方法也会执行一次)
if (e.data == 'ok') {
//心跳消息不做处理
return
}
// 需要监测的接口 我们查询数据的接口 在进行处理
this.alarmerlist()
},
}
Details: After logging in and creating a connection, the backend detects the data change, and pushes us a message through its send method. The onmessage method of our front-end websocket.js file will call and execute by itself and will accept parameters. We introduce the use of websocket on the required page. Assign it to the method we wrote ourselves, so that once the data changes, we will call the query interface once for processing, which greatly saves performance (http needs to use polling to call the query interface all the time).
Summarize:
After this process, I believe you also have a preliminary deep impression on the use of WebSocket in the front and back ends of Vue, but the situation we encounter in actual development must be different, so we must understand its principle, and it will never change. Its case. Come on, hit the workers!
Please point out any deficiencies, thank you -- Fengguowuhen