文章目录
- 1,设计模式概述
- 2,UML图
- 3,软件设计原则
- 4,创建者模式
- 5. Structural mode
- 6. Behavioral model
- 6. Behavioral model
- 7. Customize the Spring framework
-
- 7.1 spring usage review
- 7.2 Spring core function structure
- 7.3 Spring IOC related interface analysis
- 7.4 Custom Spring IOC
1. Overview of Design Patterns
1.1 The background of software design pattern
"Design pattern" did not originally appear in software design, but was used in the design of the architectural field.
In 1977, the famous American architect and the director of the Environmental Structure Center of the University of California, Berkeley 克里斯托夫·亚历山大(Christopher Alexander)described some common architectural design problems in his book "Architectural Pattern Language: Towns, Buildings, and Structures", and put forward 253 kinds of problems for towns and neighborhoods. , houses, gardens and rooms, etc. to design the basic pattern.
In 1990, the software engineering community began to discuss the topic of design patterns, and later held many seminars on design patterns. Until 1995, Eric Gamma (Erich Gamma), Richard Helm (Richard Helm), Ralph Johnson (Ralph Johnson, John Vlissides) etc. 4 The author co-published the book "Design Patterns: The Foundation of Reusable Object-Oriented Software", which included 23 design patterns. This is a milestone event in the field of design patterns, leading to a breakthrough in software design patterns. These four authors are also known in the field of software development as their "Gang of Four" (GoF).
1.2 The concept of software design pattern
Software Design Pattern (Software Design Pattern), also known as design pattern, is a summary of code design experience that has been classified and cataloged and is known to most people. It describes some recurring problems in the software design process, and the solutions to the problems. That is to say, it is a series of routines to solve specific problems, and it is a summary of the code design experience of the predecessors. It has certain universality and can be used repeatedly.
1.3 The Necessity of Learning Design Patterns
The essence of design patterns is the practical application of object-oriented design principles, and a full understanding of the encapsulation, inheritance, and polymorphism of classes, as well as the association and composition relationships of classes.
Proper use of design patterns has the following advantages.
- It can improve the programmer's thinking ability, programming ability and design ability.
- The program design is more standardized, the code compilation is more engineering, the software development efficiency is greatly improved, and the software development cycle is shortened.
- The designed code has high reusability, strong readability, high reliability, good flexibility and strong maintainability.
1.4 Classification of Design Patterns
-
Creational patterns
It is used to describe "how to create objects", and its main feature is "separation of object creation and use". The GoF (Group of Four) book provides 5 creational patterns, including singleton, prototype, factory method, abstract factory, and builder.
-
structural pattern
It is used to describe how to combine classes or objects into a larger structure according to a certain layout. The GoF (Group of Four) book provides 7 structural patterns such as proxy, adapter, bridge, decoration, appearance, flyweight, and combination.
-
behavioral model
It is used to describe how classes or objects cooperate with each other to accomplish tasks that a single object cannot accomplish alone, and how to assign responsibilities. The GoF (Group of Four) book provides 11 behavioral patterns such as template methods, strategies, commands, responsibility chains, states, observers, mediators, iterators, visitors, memos, and interpreters.
2. UML diagram
The Unified Modeling Language (UML) is a visual modeling language for designing software. It is characterized by simplicity, unity, graphics, and the ability to express dynamic and static information in software design.
Starting from different perspectives of the target system, UML defines nine types of diagrams, including use case diagrams, class diagrams, object diagrams, state diagrams, activity diagrams, sequence diagrams, collaboration diagrams, component diagrams, and deployment diagrams.
2.1 Class Diagram Overview
A class diagram (Class diagram) shows the static structure of the model, especially the classes that exist in the model, the internal structure of the classes, and their relationship with other classes. Class diagrams do not display transient information. Class diagrams are a major component of object-oriented modeling.
2.2 The role of class diagrams
- In software engineering, a class diagram is a static structural diagram that describes the collection of classes of the system, the attributes of classes and the relationship between classes, which can simplify people's understanding of the system;
- The class diagram is an important product of the system analysis and design phase, and an important model for system coding and testing.
2.3 Class Diagram Notation
2.3.1 Representation of classes
In a UML class diagram, a class is represented by a rectangle containing a class name, an attribute (field) and a method (method) with a dividing line. For example, the following figure represents an Employee class, which contains three attributes: name, age and address , and the work() method.
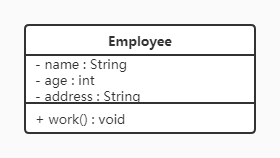
The plus sign and minus sign added before the attribute/method name indicate the visibility of this attribute/method. There are three symbols for visibility in UML class diagrams:
-
+: means public
-
-: Indicates private
-
#: means protected
The full representation of the property is: VisibilityName:Type[=DefaultValue]
The full representation of a method is: VisibilityName(argument-list)[:return-type]
Notice:
1. The content in square brackets indicates that it is optional
2. There are also types that are placed in front of the variable name, and the return value type is placed in front of the method name
Take a chestnut:

The Demo class above defines three methods:
- method() method: the modifier is public, there are no parameters, and there is no return value.
- method1() method: the modifier is private, there are no parameters, and the return value type is String.
- method2() method: the modifier is protected, it receives two parameters, the first parameter type is int, the second parameter type is String, and the return value type is int.
2.3.2 Representation of relationships between classes
2.3.2.1 Relationship
An association relationship is a reference relationship between objects, which is used to represent the connection between one type of object and another type of object, such as teacher and student, master and apprentice, husband and wife, etc. Association relationship is the most commonly used relationship between classes, which can be divided into general association relationship, aggregation relationship and combination relationship. We start with general associations.
Association can be divided into one-way association, two-way association, self-association.
1. One-way association
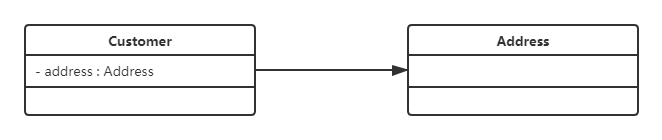
A unidirectional association is represented by a solid line with an arrow in a UML class diagram. The figure above shows that each customer has an address, which is realized by letting the Customer class hold a member variable class of type Address.
2. Two-way association

From the above figure, we can easily see that the so-called two-way association means that both parties hold member variables of each other's type.
In a UML class diagram, a bidirectional association is represented by a straight line without an arrow. In the above figure, a List<Product> is maintained in the Customer class, indicating that a customer can purchase multiple products; a member variable of the Customer type is maintained in the Product class to indicate which customer purchased the product.
3. Self-association
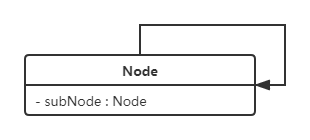
A self-association is represented in a UML class diagram by a line with an arrow pointing towards itself. The above picture means that the Node class contains member variables of type Node, that is, "self-contains itself".
2.3.2.2 Aggregation relationship
An aggregation relationship is a kind of association relationship, a strong association relationship, and a relationship between a whole and a part.
Aggregation is also implemented through member objects, where member objects are part of the overall object, but member objects can exist independently from the overall object. For example, the relationship between the school and the teacher, the school contains the teacher, but if the school is closed, the teacher still exists.
In a UML class diagram, an aggregation relationship can be represented by a solid line with a hollow diamond pointing towards the whole. The following figure shows the relationship between universities and teachers:

2.3.2.3 Composition relationship
Composition represents a whole-part relationship between classes, but it is a stronger aggregation relationship.
In the combination relationship, the overall object can control the life cycle of the partial object. Once the overall object does not exist, the partial object will also disappear, and the partial object cannot exist without the overall object. For example, the relationship between the head and the mouth, without the head, the mouth would not exist.
In a UML class diagram, a composition relationship is represented by a solid line with a solid diamond pointing towards the whole. The following figure shows the relationship between the head and the mouth:
2.3.2.4 Dependencies
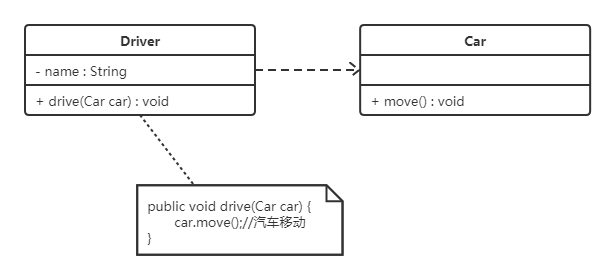
Dependency relationship is a usage relationship, which is the weakest coupling between objects, and it is a temporary relationship. In the code, a method of a class accesses some methods in another class (dependent class) through local variables, method parameters, or calls to static methods to complete some responsibilities.
In UML class diagrams, dependencies are represented by dashed lines with arrows pointing from consuming classes to dependent classes. The following figure shows the relationship between the driver and the car, and the driver drives the car:
2.3.2.5 Inheritance relationship
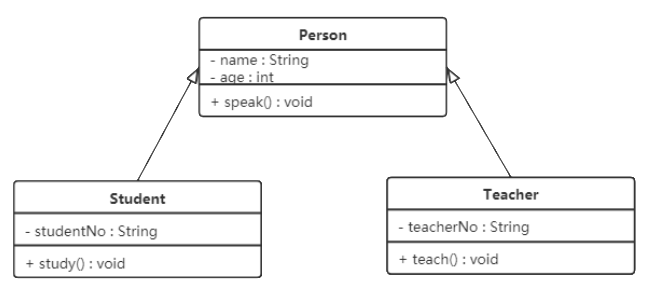
The inheritance relationship is the most coupled relationship between objects, expressing the general and special relationship, the relationship between the parent class and the subclass, and an inheritance relationship.
In a UML class diagram, a generalization relationship is represented by a solid line with a hollow triangular arrow pointing from a child class to a parent class. When implementing the code, use the object-oriented inheritance mechanism to realize the generalization relationship. For example, both the Student class and the Teacher class are subclasses of the Person class, and their class diagrams are shown in the following figure:
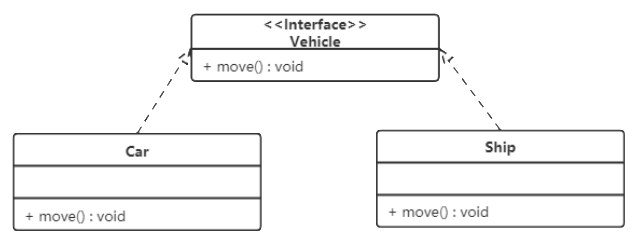
2.3.2.6 Implementing Relationships
The implementation relationship is the relationship between the interface and the implementing class. In this relationship, the class implements the interface, and the operations in the class implement all the abstract operations declared in the interface.
In UML class diagrams, the implementation relationship is represented by a dashed line with a hollow triangular arrow pointing from the implementing class to the interface. For example, cars and boats implement vehicles, and their class diagrams are shown in Figure 9.
3. Software Design Principles
In software development, in order to improve the maintainability and reusability of the software system and increase the scalability and flexibility of the software, programmers should try their best to develop programs according to the six principles, so as to improve the efficiency of software development and save software development. costs and maintenance costs.
3.1 Opening and closing principle
Open for extension, closed for modification . When the program needs to be expanded, the original code cannot be modified to achieve a hot-swap effect. In short, it is to make the program scalable and easy to maintain and upgrade.
To achieve this effect, we need to use interfaces and abstract classes.
Because the abstraction has good flexibility and wide adaptability, as long as the abstraction is reasonable, the stability of the software architecture can be basically maintained. The changeable details in the software can be extended from the implementation class derived from the abstraction. When the software needs to change, it is only necessary to re-derived an implementation class to expand according to the requirements.
Let's 搜狗输入法take the skin of as an example to introduce the application of the open-close principle.
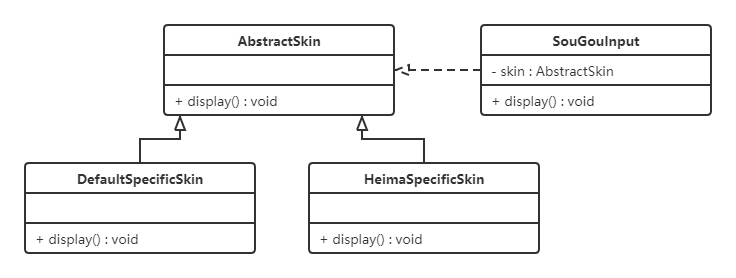
[Example] 搜狗输入法skin design.
Analysis: 搜狗输入法The skin of the input method is a combination of elements such as the background image of the input method, the color of the window, and the sound. Users can change the skin of their input method according to their preferences, and can also download new skins from the Internet. These skins have common characteristics, and an abstract class (AbstractSkin) can be defined for it, and each specific skin (DefaultSpecificSkin and HeimaSpecificSkin) is its subclass. The user form can select or add new themes as needed without modifying the original code, so it satisfies the principle of opening and closing.
3.2 Liskov substitution principle
The Liskov substitution principle is one of the basic principles of object-oriented design.
Liskov Substitution Principle: Wherever a base class can appear, a subclass must appear. Popular understanding: subclasses can extend the functions of the parent class, but cannot change the original functions of the parent class. In other words, when a subclass inherits from a parent class, try not to override the methods of the parent class except for adding new methods to complete new functions.
If the new function is completed by rewriting the method of the parent class, although it is simple to write, the reusability of the entire inheritance system will be relatively poor, especially when polymorphism is used frequently, the probability of program running errors will be very high .
Let's look at a classic example of the Liskov substitution principle
【Example】A square is not a rectangle.
In the field of mathematics, a square is undoubtedly a rectangle, which is a rectangle with equal length and width. Therefore, a software system related to geometric figures developed by us can logically allow squares to inherit from rectangles.
![\n)]](https://img-blog.csdnimg.cn/d894faaf1f9943f8955bbd601aac0900.png)
code show as below:
Rectangle class (Rectangle):
public class Rectangle {


    private double length;
    private double width;

    public double getLength() {


        return length;
    }

    public void setLength(double length) {


        this.length = length;
    }

    public double getWidth() {


        return width;
    }

    public void setWidth(double width) {


        this.width = width;
    }
}
Square:
Since the length and width of the square are the same, in the methods setLength and setWidth, the length and width need to be assigned the same value.
public class Square extends Rectangle {


    public void setWidth(double width) {


        super.setLength(width);
        super.setWidth(width);
    }

    public void setLength(double length) {


        super.setLength(length);
        super.setWidth(length);
    }
}
The class RectangleDemo is a component in our software system. It has a resize method that depends on the base class Rectangle. The resize method is a method in the RectandleDemo class to achieve the effect of gradually increasing the width.
public class RectangleDemo {


    public static void resize(Rectangle rectangle) {


        while (rectangle.getWidth() <= rectangle.getLength()) {


            rectangle.setWidth(rectangle.getWidth() + 1);
        }
    }

    //打印长方形的长和宽
    public static void printLengthAndWidth(Rectangle rectangle) {


        System.out.println(rectangle.getLength());
        System.out.println(rectangle.getWidth());
    }

    public static void main(String[] args) {


        Rectangle rectangle = new Rectangle();
        rectangle.setLength(20);
        rectangle.setWidth(10);
        resize(rectangle);
        printLengthAndWidth(rectangle);

        System.out.println("============");

        Rectangle rectangle1 = new Square();
        rectangle1.setLength(10);
        resize(rectangle1);
        printLengthAndWidth(rectangle1);
    }
}
我们运行一下这段代码就会发现,假如我们把一个普通长方形作为参数传入resize方法,就会看到长方形宽度逐渐增长的效果,当宽度大于长度,代码就会停止,这种行为的结果符合我们的预期;假如我们再把一个正方形作为参数传入resize方法后,就会看到正方形的宽度和长度都在不断增长,代码会一直运行下去,直至系统产生溢出错误。所以,普通的长方形是适合这段代码的,正方形不适合。
我们得出结论:在resize方法中,Rectangle类型的参数是不能被Square类型的参数所代替,如果进行了替换就得不到预期结果。因此,Square类和Rectangle类之间的继承关系违反了里氏代换原则,它们之间的继承关系不成立,正方形不是长方形。
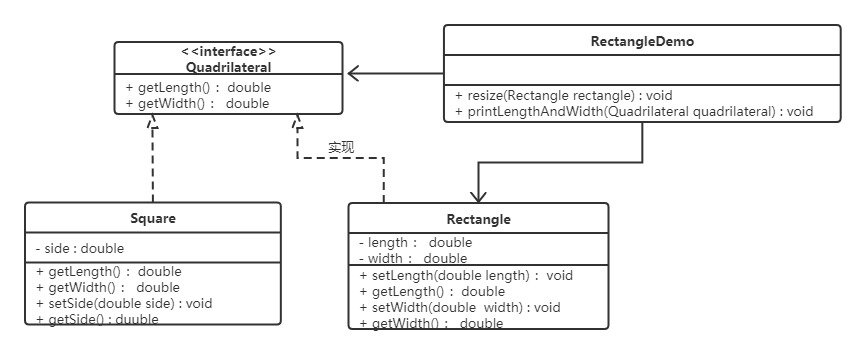
如何改进呢?此时我们需要重新设计他们之间的关系。抽象出来一个四边形接口(Quadrilateral),让Rectangle类和Square类实现Quadrilateral接口
3.3 依赖倒转原则
高层模块不应该依赖低层模块,两者都应该依赖其抽象;抽象不应该依赖细节,细节应该依赖抽象。简单的说就是要求对抽象进行编程,不要对实现进行编程,这样就降低了客户与实现模块间的耦合。
下面看一个例子来理解依赖倒转原则
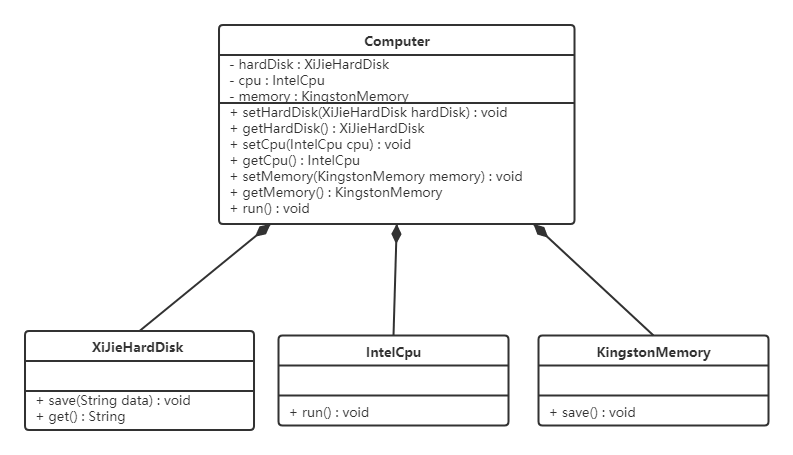
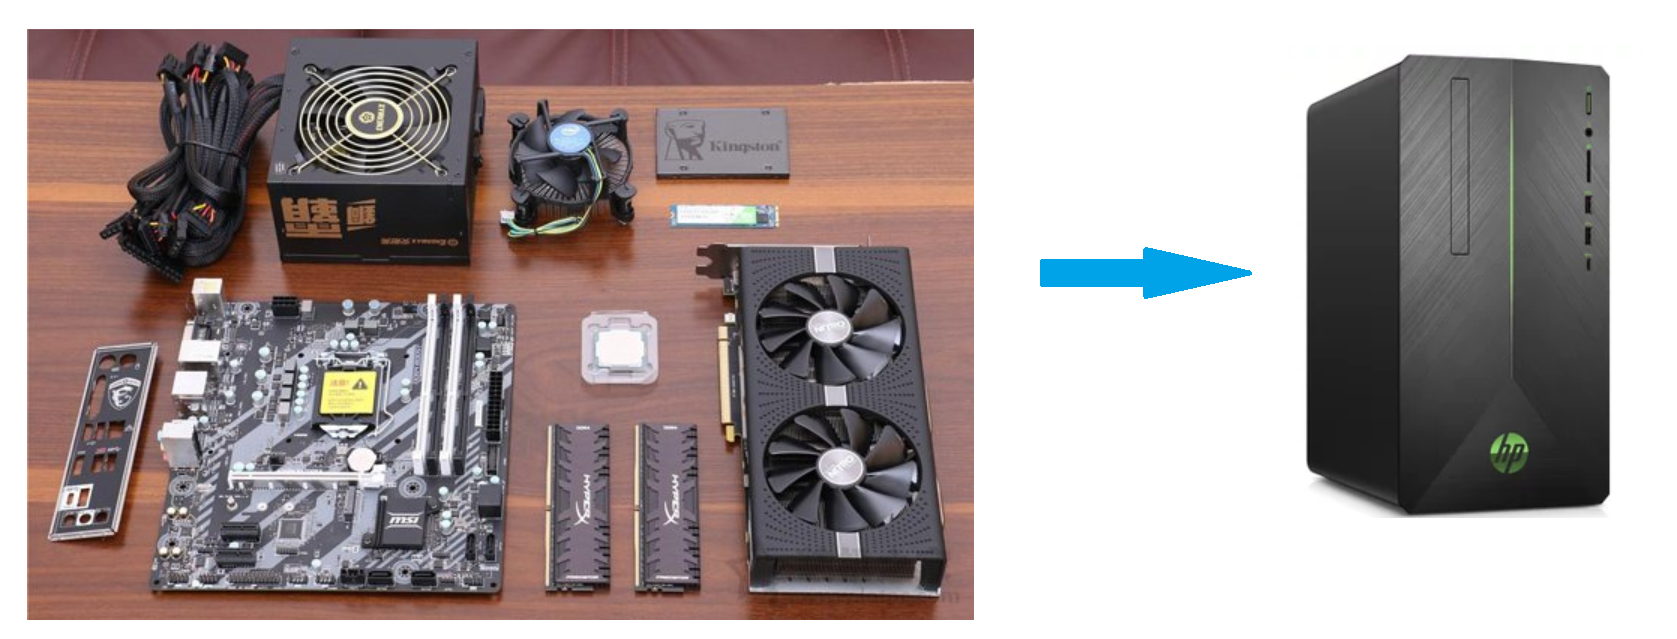
【例】组装电脑
现要组装一台电脑,需要配件cpu,硬盘,内存条。只有这些配置都有了,计算机才能正常的运行。选择cpu有很多选择,如Intel,AMD等,硬盘可以选择希捷,西数等,内存条可以选择金士顿,海盗船等。
类图如下:
代码如下:
希捷硬盘类(XiJieHardDisk):
public class XiJieHardDisk implements HardDisk {


    public void save(String data) {


        System.out.println("使用希捷硬盘存储数据" + data);
    }

    public String get() {


        System.out.println("使用希捷希捷硬盘取数据");
        return "数据";
    }
}
Intel处理器(IntelCpu):
public class IntelCpu implements Cpu {


    public void run() {


        System.out.println("使用Intel处理器");
    }
}
金士顿内存条(KingstonMemory):
public class KingstonMemory implements Memory {


    public void save() {


        System.out.println("使用金士顿作为内存条");
    }
}
电脑(Computer):
public class Computer {


    private XiJieHardDisk hardDisk;
    private IntelCpu cpu;
    private KingstonMemory memory;

    public IntelCpu getCpu() {


        return cpu;
    }

    public void setCpu(IntelCpu cpu) {


        this.cpu = cpu;
    }

    public KingstonMemory getMemory() {


        return memory;
    }

    public void setMemory(KingstonMemory memory) {


        this.memory = memory;
    }

    public XiJieHardDisk getHardDisk() {


        return hardDisk;
    }

    public void setHardDisk(XiJieHardDisk hardDisk) {


        this.hardDisk = hardDisk;
    }

    public void run() {


        System.out.println("计算机工作");
        cpu.run();
        memory.save();
        String data = hardDisk.get();
        System.out.println("从硬盘中获取的数据为:" + data);
    }
}
测试类(TestComputer):
测试类用来组装电脑。
public class TestComputer {


    public static void main(String[] args) {


        Computer computer = new Computer();
        computer.setHardDisk(new XiJieHardDisk());
        computer.setCpu(new IntelCpu());
        computer.setMemory(new KingstonMemory());

        computer.run();
    }
}
上面代码可以看到已经组装了一台电脑,但是似乎组装的电脑的cpu只能是Intel的,内存条只能是金士顿的,硬盘只能是希捷的,这对用户肯定是不友好的,用户有了机箱肯定是想按照自己的喜好,选择自己喜欢的配件。
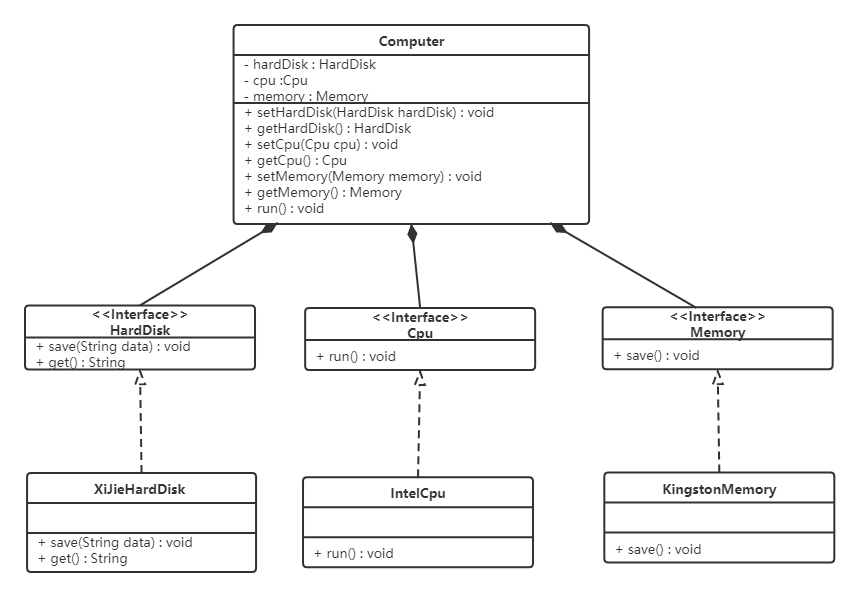
Improve according to the principle of dependency inversion:
For the code, we only need to modify the Computer class, so that the Computer class depends on the abstraction (the interface of each accessory), instead of depending on the specific implementation class of each component.
The class diagram is as follows:
Computer:
public class Computer {


    private HardDisk hardDisk;
    private Cpu cpu;
    private Memory memory;

    public HardDisk getHardDisk() {


        return hardDisk;
    }

    public void setHardDisk(HardDisk hardDisk) {


        this.hardDisk = hardDisk;
    }

    public Cpu getCpu() {


        return cpu;
    }

    public void setCpu(Cpu cpu) {


        this.cpu = cpu;
    }

    public Memory getMemory() {


        return memory;
    }

    public void setMemory(Memory memory) {


        this.memory = memory;
    }

    public void run() {


        System.out.println("计算机工作");
    }
}
Object-oriented development solves this problem very well. Generally, the probability of abstract change is very small, so that user programs depend on abstraction, and implementation details also depend on abstraction. Even if the implementation details are constantly changing, as long as the abstraction remains the same, the client program does not need to change. This greatly reduces the coupling between client programs and implementation details.
3.4 Interface Segregation Principle
A client should not be forced to depend on methods it doesn't use; dependencies of one class on another should be based on the smallest possible interface.
Let's look at an example to understand the interface isolation principle
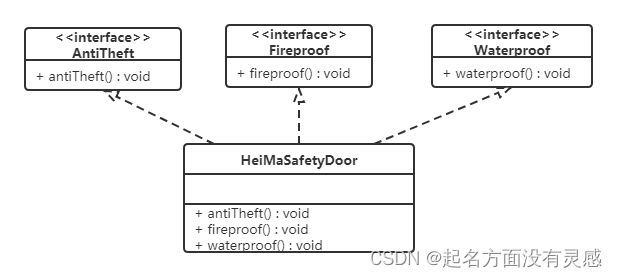
[Example] Safety door case
We need to create a 黑马branded security door that is fireproof, waterproof, and anti-theft. Fireproof, waterproof, and anti-theft functions can be extracted into one interface to form a set of specifications. The class diagram is as follows:
![[外E6%8E%A5%E5%8F%A3%E9%9A%94%E7%A6%BB%E5%8E%9F%E5%88%99.png)]](https://img-blog.csdnimg.cn/4cc7ba7e44ed4d5291f3187bcee13ce8.png)
We found the problems in the above design. The security door of Heima brand has the functions of anti-theft, waterproof and fire prevention. Now what if we need to create another safety door of Chuanzhi brand, but the safety door only has anti-theft and waterproof functions? Obviously, if implementing the SafetyDoor interface violates the interface isolation principle, how do we modify it? See the following class diagram:
code show as below:
AntiTheft (interface):
public interface AntiTheft {


    void antiTheft();
}
Fireproof (interface):
public interface Fireproof {


    void fireproof();
}
Waterproof (interface):
public interface Waterproof {


    void waterproof();
}
HeiMaSafetyDoor(类):
public class HeiMaSafetyDoor implements AntiTheft,Fireproof,Waterproof {


    public void antiTheft() {


        System.out.println("防盗");
    }

    public void fireproof() {


        System.out.println("防火");
    }


    public void waterproof() {


        System.out.println("防水");
    }
}
ItcastSafetyDoor (class):
public class ItcastSafetyDoor implements AntiTheft,Fireproof {


    public void antiTheft() {


        System.out.println("防盗");
    }

    public void fireproof() {


        System.out.println("防火");
    }
}
3.5 Law of Demeter
Demeter's law is also called the principle of least knowledge.
Talk only to your immediate friends and not to strangers.
Its meaning is: if two software entities do not need to communicate directly, then there should be no direct mutual call, and the call can be forwarded by a third party. Its purpose is to reduce the degree of coupling between classes and improve the relative independence of modules.
The "friend" in Dimit's law refers to: the current object itself, the member objects of the current object, the objects created by the current object, the method parameters of the current object, etc. These objects are associated, aggregated or combined with the current object, and can be Methods for direct access to these objects.
Let's look at an example to understand Dimit's law
[Example] An example of the relationship between a celebrity and an agent
Because stars devote themselves to art, many daily affairs are handled by managers, such as meetings with fans, business negotiations with media companies, etc. The agents here are friends of the stars, while the fans and media companies are strangers, so Dimiter's Law is suitable.
The class diagram is as follows:
code show as below:
Star class (Star)
public class Star {


    private String name;

    public Star(String name) {


        this.name=name;
    }

    public String getName() {


        return name;
    }
}
Fans (Fans)
public class Fans {


    private String name;

    public Fans(String name) {


        this.name=name;
    }

    public String getName() {


        return name;
    }
}
Media company (Company)
public class Company {


    private String name;

    public Company(String name) {


        this.name=name;
    }

    public String getName() {


        return name;
    }
}
Broker class (Agent)
public class Agent {


    private Star star;
    private Fans fans;
    private Company company;

    public void setStar(Star star) {


        this.star = star;
    }

    public void setFans(Fans fans) {


        this.fans = fans;
    }

    public void setCompany(Company company) {


        this.company = company;
    }

    public void meeting() {


        System.out.println(fans.getName() + "与明星" + star.getName() + "见面了。");
    }

    public void business() {


        System.out.println(company.getName() + "与明星" + star.getName() + "洽淡业务。");
    }
}
3.6 Principles of composite reuse
The principle of composite reuse means: try to use association relationship such as combination or aggregation to realize it first, and then consider using inheritance relationship to realize it.
Generally, the reuse of classes is divided into two types: inheritance reuse and composition reuse.
Although inheritance reuse has the advantages of simplicity and ease of implementation, it also has the following disadvantages:
- Inheritance reuse destroys the encapsulation of classes. Because inheritance will expose the implementation details of the parent class to the subclass, and the parent class is transparent to the subclass, this kind of reuse is also called "white box" reuse.
- The subclass is highly coupled to the parent class. Any change in the implementation of the parent class will lead to changes in the implementation of the subclass, which is not conducive to the extension and maintenance of the class.
- It limits the flexibility of reuse. The implementation inherited from the parent class is static and defined at compile time, so it cannot be changed at runtime.
When using combination or aggregate reuse, existing objects can be incorporated into new objects to make them part of new objects, and new objects can call functions of existing objects. It has the following advantages:
- It maintains the encapsulation of the class. Because the internal details of the constituent objects are invisible to the new objects, this type of reuse is also known as "black box" reuse.
- The coupling between objects is low. Abstractions can be declared at member positions of a class.
- The flexibility of reuse is high. This reuse can be done dynamically at runtime, and new objects can dynamically reference objects of the same type as the constituent objects.
Let's look at an example to understand the principle of composition reuse
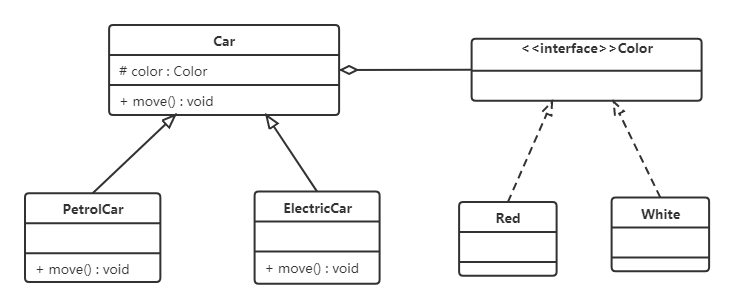
[Example] Auto classification management program
Cars can be divided into gasoline cars, electric cars, etc. according to "power source"; they can be divided into white cars, black cars and red cars, etc. according to "color". If these two classifications are considered at the same time, there are many combinations. The class diagram is as follows:
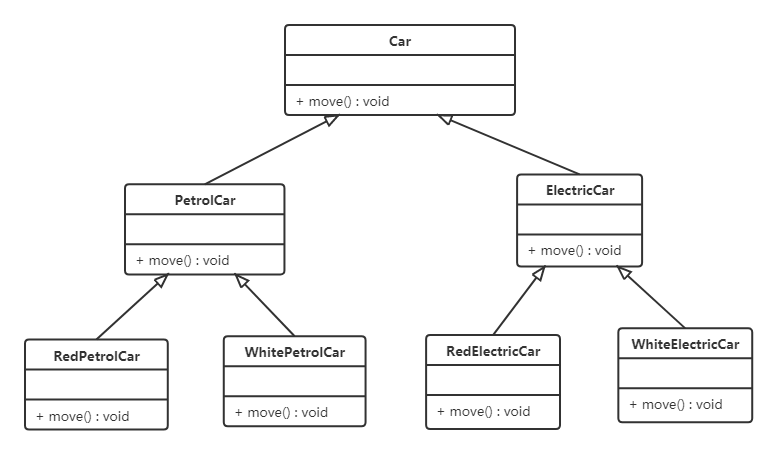
From the above class diagram, we can see that many subclasses have been generated by using inheritance and reuse. If there are new power sources or new colors now, new classes need to be defined. Let's try to change inheritance reuse to aggregation reuse.
4. Creator mode
The main focus of the creational pattern is "how to create objects?", and its main feature is "separation of object creation and use".
This can reduce the coupling of the system, and users do not need to pay attention to the details of object creation.
Creational patterns are divided into:
- singleton pattern
- factory method pattern
- abstract engineering pattern
- prototype pattern
- builder mode
4.1 Singleton design pattern
Singleton Pattern (Singleton Pattern) is one of the simplest design patterns in Java. This type of design pattern is a creational pattern, which provides an optimal way to create objects.
This pattern involves a single class that is responsible for creating its own objects while ensuring that only a single object is created. This class provides a way to access its only object, directly, without instantiating an object of this class.
4.1.1 The structure of the singleton pattern
The main roles of the singleton mode are as follows:
- Singleton class. A class that can only create one instance
- access class. use singleton class
4.1.2 Implementation of singleton mode
There are two types of singleton design patterns:
Hungry Chinese style: class loading will cause the single instance object to be created
Lazy style: class loading will not cause the single instance object to be created, but will only be created when the object is used for the first time
-
Hungry Chinese Style - Mode 1 (Static Variable Mode)
/**
 * 饿汉式
 *      静态变量创建类的对象
 */
public class Singleton {


    //私有构造方法
    private Singleton() {

      }

    //在成员位置创建该类的对象
    private static Singleton instance = new Singleton();

    //对外提供静态方法获取该对象
    public static Singleton getInstance() {


        return instance;
    }
}
illustrate:
This method declares a static variable of the Singleton type at the member position and creates an object instance of the Singleton class. The instance object is created as the class is loaded. If the object is large enough, it will cause a waste of memory if it has not been used.
-
Hungry Chinese style - method 2 (static code block method)
/**
 * 恶汉式
 *      在静态代码块中创建该类对象
 */
public class Singleton {


    //私有构造方法
    private Singleton() {

      }

    //在成员位置创建该类的对象
    private static Singleton instance;

    static {


        instance = new Singleton();
    }

    //对外提供静态方法获取该对象
    public static Singleton getInstance() {


        return instance;
    }
}
illustrate:
This method declares a static variable of the Singleton type at the member position, and the creation of the object is in the static code block, which is also created for the loading of the class. Therefore, it is basically the same as method 1 of the hungry Chinese style. Of course, this method also has the problem of memory waste.
-
Lazy style - way 1 (thread unsafe)
/**
 * 懒汉式
 *  线程不安全
 */
public class Singleton {


    //私有构造方法
    private Singleton() {

      }

    //在成员位置创建该类的对象
    private static Singleton instance;

    //对外提供静态方法获取该对象
    public static Singleton getInstance() {


        if(instance == null) {


            instance = new Singleton();
        }
        return instance;
    }
}
illustrate:
From the above code, we can see that this method declares a static variable of type Singleton in the member position, and does not perform object assignment, so when is it assigned? When the getInstance() method is called to obtain the object of the Singleton class, the object of the Singleton class is created, thus achieving the effect of lazy loading. However, if it is a multi-threaded environment, there will be thread safety issues.
-
Lazy style - way 2 (thread safety)
/**
 * 懒汉式
 *  线程安全
 */
public class Singleton {


    //私有构造方法
    private Singleton() {

      }

    //在成员位置创建该类的对象
    private static Singleton instance;

    //对外提供静态方法获取该对象
    public static synchronized Singleton getInstance() {


        if(instance == null) {


            instance = new Singleton();
        }
        return instance;
    }
}
illustrate:
This method also achieves the effect of lazy loading, and at the same time solves the problem of thread safety. However, the synchronized keyword is added to the getInstance() method, which causes the execution effect of this method to be particularly low. From the above code, we can see that the thread safety problem only occurs when the instance is initialized, and it does not exist once the initialization is completed.
-
懒汉式-方式3(双重检查锁)
再来讨论一下懒汉模式中加锁的问题,对于
getInstance()方法来说,绝大部分的操作都是读操作,读操作是线程安全的,所以我们没必让每个线程必须持有锁才能调用该方法,我们需要调整加锁的时机。由此也产生了一种新的实现模式:双重检查锁模式/** * 双重检查方式 */ public class Singleton { //私有构造方法 private Singleton() { } private static Singleton instance; //对外提供静态方法获取该对象 public static Singleton getInstance() { //第一次判断,如果instance不为null,不进入抢锁阶段,直接返回实例 if(instance == null) { synchronized (Singleton.class) { //抢到锁之后再次判断是否为null if(instance == null) { instance = new Singleton(); } } } return instance; } }双重检查锁模式是一种非常好的单例实现模式,解决了单例、性能、线程安全问题,上面的双重检测锁模式看上去完美无缺,其实是存在问题,在多线程的情况下,可能会出现空指针问题,出现问题的原因是JVM在实例化对象的时候会进行优化和指令重排序操作。
要解决双重检查锁模式带来空指针异常的问题,只需要使用
volatile关键字,volatile关键字可以保证可见性和有序性。/** * 双重检查方式 */ public class Singleton { //私有构造方法 private Singleton() { } private static volatile Singleton instance; //对外提供静态方法获取该对象 public static Singleton getInstance() { //第一次判断,如果instance不为null,不进入抢锁阶段,直接返回实际 if(instance == null) { synchronized (Singleton.class) { //抢到锁之后再次判断是否为空 if(instance == null) { instance = new Singleton(); } } } return instance; } }小结:
添加
volatile关键字之后的双重检查锁模式是一种比较好的单例实现模式,能够保证在多线程的情况下线程安全也不会有性能问题。 -
懒汉式-方式4(静态内部类方式)
静态内部类单例模式中实例由内部类创建,由于 JVM 在加载外部类的过程中, 是不会加载静态内部类的, 只有内部类的属性/方法被调用时才会被加载, 并初始化其静态属性。静态属性由于被
static修饰,保证只被实例化一次,并且严格保证实例化顺序。/** * 静态内部类方式 */ public class Singleton { //私有构造方法 private Singleton() { } private static class SingletonHolder { private static final Singleton INSTANCE = new Singleton(); } //对外提供静态方法获取该对象 public static Singleton getInstance() { return SingletonHolder.INSTANCE; } }说明:
第一次加载Singleton类时不会去初始化INSTANCE,只有第一次调用getInstance,虚拟机加载SingletonHolder
并初始化INSTANCE,这样不仅能确保线程安全,也能保证 Singleton 类的唯一性。
小结:
静态内部类单例模式是一种优秀的单例模式,是开源项目中比较常用的一种单例模式。在没有加任何锁的情况下,保证了多线程下的安全,并且没有任何性能影响和空间的浪费。
-
枚举方式
The enumeration class implements the singleton mode is a highly recommended singleton implementation mode, because the enumeration type is thread-safe and will only be loaded once. The designer makes full use of this feature of the enumeration to implement the singleton mode. The enumeration The writing method is very simple, and the enumeration type is the only singleton implementation mode that cannot be destroyed in the singleton implementation used.
/**
 * 枚举方式
 */
public enum Singleton {


    INSTANCE;
}
illustrate:
The enumeration method is a villainous method.
4.1.3 Existing problems
4.1.3.1 Problem Demonstration
Destroying the singleton pattern:
Make the singleton class (Singleton) defined above can create multiple objects, except for the enumeration method. There are two ways, serialization and reflection.
-
serialization deserialization
Singleton class:
public class Singleton implements Serializable {


    //私有构造方法
    private Singleton() {

      }

    private static class SingletonHolder {


        private static final Singleton INSTANCE = new Singleton();
    }

    //对外提供静态方法获取该对象
    public static Singleton getInstance() {


        return SingletonHolder.INSTANCE;
    }
}
Test class:
public class Test {


    public static void main(String[] args) throws Exception {


        //往文件中写对象
        //writeObject2File();
        //从文件中读取对象
        Singleton s1 = readObjectFromFile();
        Singleton s2 = readObjectFromFile();

        //判断两个反序列化后的对象是否是同一个对象
        System.out.println(s1 == s2);
    }

    private static Singleton readObjectFromFile() throws Exception {


        //创建对象输入流对象
        ObjectInputStream ois = new ObjectInputStream(new FileInputStream("C:\\Users\\Think\\Desktop\\a.txt"));
        //第一个读取Singleton对象
        Singleton instance = (Singleton) ois.readObject();

        return instance;
    }

    public static void writeObject2File() throws Exception {


        //获取Singleton类的对象
        Singleton instance = Singleton.getInstance();
        //创建对象输出流
        ObjectOutputStream oos = new ObjectOutputStream(new FileOutputStream("C:\\Users\\Think\\Desktop\\a.txt"));
        //将instance对象写出到文件中
        oos.writeObject(instance);
    }
}
The result of running the above code
falseshows that serialization and deserialization have broken the singleton design pattern. -
reflection
Singleton class:
public class Singleton {


    //私有构造方法
    private Singleton() {

      }

    private static volatile Singleton instance;

    //对外提供静态方法获取该对象
    public static Singleton getInstance() {


        if(instance != null) {


            return instance;
        }

        synchronized (Singleton.class) {


            if(instance != null) {


                return instance;
            }
            instance = new Singleton();
            return instance;
        }
    }
}
Test class:
public class Test {


    public static void main(String[] args) throws Exception {


        //获取Singleton类的字节码对象
        Class clazz = Singleton.class;
        //获取Singleton类的私有无参构造方法对象
        Constructor constructor = clazz.getDeclaredConstructor();
        //取消访问检查
        constructor.setAccessible(true);

        //创建Singleton类的对象s1
        Singleton s1 = (Singleton) constructor.newInstance();
        //创建Singleton类的对象s2
        Singleton s2 = (Singleton) constructor.newInstance();

        //判断通过反射创建的两个Singleton对象是否是同一个对象
        System.out.println(s1 == s2);
    }
}
The result of running the above code is
falsethat serialization and deserialization have broken the singleton design pattern
Note: These two problems will not occur with the enumeration method.
4.1.3.2 Problem solving
-
The solution to the destruction of the singleton mode by serialization and deserialization
Add a method to the Singleton class
readResolve(), which is called by reflection during deserialization. If this method is defined, the value of this method will be returned. If it is not defined, the newly created object will be returned.Singleton class:
public class Singleton implements Serializable {


    //私有构造方法
    private Singleton() {

      }

    private static class SingletonHolder {


        private static final Singleton INSTANCE = new Singleton();
    }

    //对外提供静态方法获取该对象
    public static Singleton getInstance() {


        return SingletonHolder.INSTANCE;
    }

    /**
     * 下面是为了解决序列化反序列化破解单例模式
     */
    private Object readResolve() {


        return SingletonHolder.INSTANCE;
    }
}
Source code analysis:
ObjectInputStream class
public final Object readObject() throws IOException, ClassNotFoundException{ ... // if nested read, passHandle contains handle of enclosing object int outerHandle = passHandle; try { Object obj = readObject0(false);//重点查看readObject0方法 ..... } private Object readObject0(boolean unshared) throws IOException { ... try { switch (tc) { ... case TC_OBJECT: return checkResolve(readOrdinaryObject(unshared));//重点查看readOrdinaryObject方法 ... } } finally { depth--; bin.setBlockDataMode(oldMode); } } private Object readOrdinaryObject(boolean unshared) throws IOException { ... //isInstantiable 返回true,执行 desc.newInstance(),通过反射创建新的单例类, obj = desc.isInstantiable() ? desc.newInstance() : null; ... // 在Singleton类中添加 readResolve 方法后 desc.hasReadResolveMethod() 方法执行结果为true if (obj != null && handles.lookupException(passHandle) == null && desc.hasReadResolveMethod()) { // 通过反射调用 Singleton 类中的 readResolve 方法,将返回值赋值给rep变量 // 这样多次调用ObjectInputStream类中的readObject方法,继而就会调用我们定义的readResolve方法,所以返回的是同一个对象。 Object rep = desc.invokeReadResolve(obj); ... } return obj; } -
The solution to cracking singletons by reflection
public class Singleton {


    //私有构造方法
    private Singleton() {


        /*
           反射破解单例模式需要添加的代码
        */
        if(instance != null) {


            throw new RuntimeException();
        }
    }

    private static volatile Singleton instance;

    //对外提供静态方法获取该对象
    public static Singleton getInstance() {


        if(instance != null) {


            return instance;
        }

        synchronized (Singleton.class) {


            if(instance != null) {


                return instance;
            }
            instance = new Singleton();
            return instance;
        }
    }
}
illustrate:
This way is easier to understand. When the constructor is created by calling the reflection method, an exception is thrown directly. Do not run this operation.
4.1.4 JDK source code analysis - Runtime class
The Runtime class is the singleton design pattern used.
-
See which singleton mode is used through the source code
public class Runtime {


    private static Runtime currentRuntime = new Runtime();

    /**
     * Returns the runtime object associated with the current Java application.
     * Most of the methods of class <code>Runtime</code> are instance
     * methods and must be invoked with respect to the current runtime object.
     *
     * @return  the <code>Runtime</code> object associated with the current
     *          Java application.
     */
    public static Runtime getRuntime() {


        return currentRuntime;
    }

    /** Don't let anyone else instantiate this class */
    private Runtime() {

      }
    ...
}
From the source code above, it can be seen that the Runtime class uses a villainous (static attribute) method to implement the singleton mode.
-
Use the methods in the Runtime class
public class RuntimeDemo {


    public static void main(String[] args) throws IOException {


        //获取Runtime类对象
        Runtime runtime = Runtime.getRuntime();

        //返回 Java 虚拟机中的内存总量。
        System.out.println(runtime.totalMemory());
        //返回 Java 虚拟机试图使用的最大内存量。
        System.out.println(runtime.maxMemory());

        //创建一个新的进程执行指定的字符串命令,返回进程对象
        Process process = runtime.exec("ipconfig");
        //获取命令执行后的结果,通过输入流获取
        InputStream inputStream = process.getInputStream();
        byte[] arr = new byte[1024 * 1024* 100];
        int b = inputStream.read(arr);
        System.out.println(new String(arr,0,b,"gbk"));
    }
}
4.2 Factory pattern
4.2.1 Overview
Requirements: Design a coffee shop ordering system.
Design a coffee class (Coffee) and define its two subclasses (American Coffee [AmericanCoffee] and Latte Coffee [LatteCoffee]); then design a coffee shop class (CoffeeStore), the coffee shop has the function of ordering coffee.
The specific classes are designed as follows:
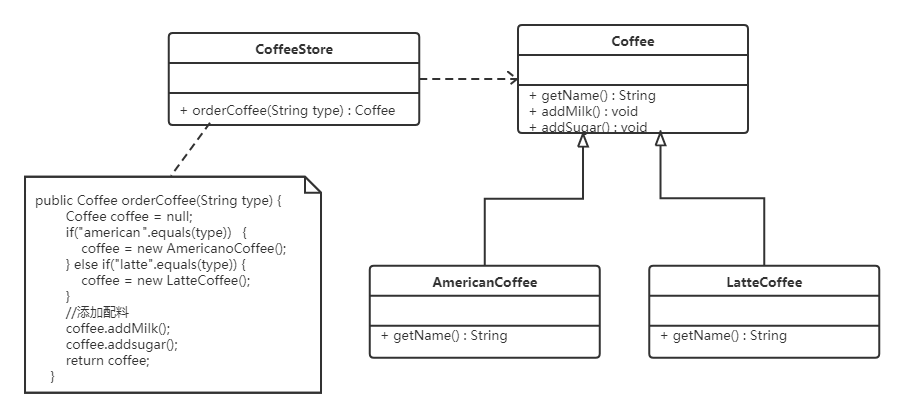
在java中,万物皆对象,这些对象都需要创建,如果创建的时候直接new该对象,就会对该对象耦合严重,假如我们要更换对象,所有new对象的地方都需要修改一遍,这显然违背了软件设计的开闭原则。如果我们使用工厂来生产对象,我们就只和工厂打交道就可以了,彻底和对象解耦,如果要更换对象,直接在工厂里更换该对象即可,达到了与对象解耦的目的;所以说,工厂模式最大的优点就是:解耦。
在本教程中会介绍三种工厂的使用
- 简单工厂模式(不属于GOF的23种经典设计模式)
- 工厂方法模式
- 抽象工厂模式
4.2.2 简单工厂模式
简单工厂不是一种设计模式,反而比较像是一种编程习惯。
4.2.2.1 结构
简单工厂包含如下角色:
- 抽象产品 :定义了产品的规范,描述了产品的主要特性和功能。
- 具体产品 :实现或者继承抽象产品的子类
- 具体工厂 :提供了创建产品的方法,调用者通过该方法来获取产品。
4.2.2.2 实现
现在使用简单工厂对上面案例进行改进,类图如下:
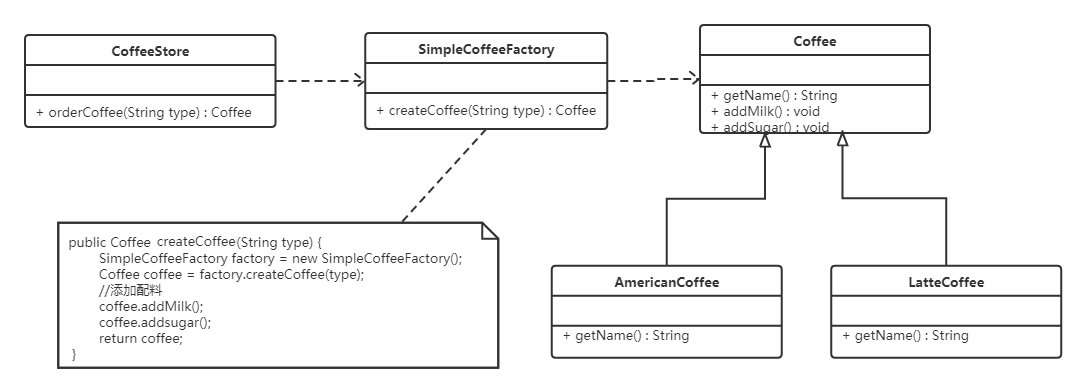
工厂类代码如下:
public class SimpleCoffeeFactory {


    public Coffee createCoffee(String type) {


        Coffee coffee = null;
        if("americano".equals(type)) {


            coffee = new AmericanoCoffee();
        } else if("latte".equals(type)) {


            coffee = new LatteCoffee();
        }
        return coffee;
    }
}
工厂(factory)处理创建对象的细节,一旦有了SimpleCoffeeFactory,CoffeeStore类中的orderCoffee()就变成此对象的客户,后期如果需要Coffee对象直接从工厂中获取即可。这样也就解除了和Coffee实现类的耦合,同时又产生了新的耦合,CoffeeStore对象和SimpleCoffeeFactory工厂对象的耦合,工厂对象和商品对象的耦合。
后期如果再加新品种的咖啡,我们势必要需求修改SimpleCoffeeFactory的代码,违反了开闭原则。工厂类的客户端可能有很多,比如创建美团外卖等,这样只需要修改工厂类的代码,省去其他的修改操作。
4.2.2.4 优缺点
优点:
封装了创建对象的过程,可以通过参数直接获取对象。把对象的创建和业务逻辑层分开,这样以后就避免了修改客户代码,如果要实现新产品直接修改工厂类,而不需要在原代码中修改,这样就降低了客户代码修改的可能性,更加容易扩展。
shortcoming:
When adding new products, it is still necessary to modify the code of the factory class, which violates the "open and close principle".
4.2.2.3 Extensions
static factory
In development, some people also define the function of creating objects in the factory class as static. This is the static factory pattern, and it is not one of the 23 design patterns. code show as below:
public class SimpleCoffeeFactory {


    public static Coffee createCoffee(String type) {


        Coffee coffee = null;
        if("americano".equals(type)) {


            coffee = new AmericanoCoffee();
        } else if("latte".equals(type)) {


            coffee = new LatteCoffee();
        }
        return coffe;
    }
}
4.2.3 Factory method pattern
For the shortcomings in the above example, using the factory method pattern can perfectly solve it, and fully follow the principle of opening and closing.
4.2.3.1 Concept
Define an interface for creating objects and let subclasses decide which product class object to instantiate. Factory methods defer instantiation of a product class to its factory subclasses.
4.2.3.2 Structure
The main role of the factory method pattern:
- Abstract Factory (Abstract Factory): Provides an interface for creating products, and the caller uses it to access the factory method of the specific factory to create products.
- Concrete Factory (ConcreteFactory): It mainly implements the abstract method in the abstract factory to complete the creation of specific products.
- Abstract product (Product): defines the specification of the product and describes the main features and functions of the product.
- Concrete Product (ConcreteProduct): implements the interface defined by the abstract product role, and is created by a specific factory, and it corresponds to a specific factory one-to-one.
4.2.3.3 Implementation
Use the factory method pattern to improve the above example, the class diagram is as follows:
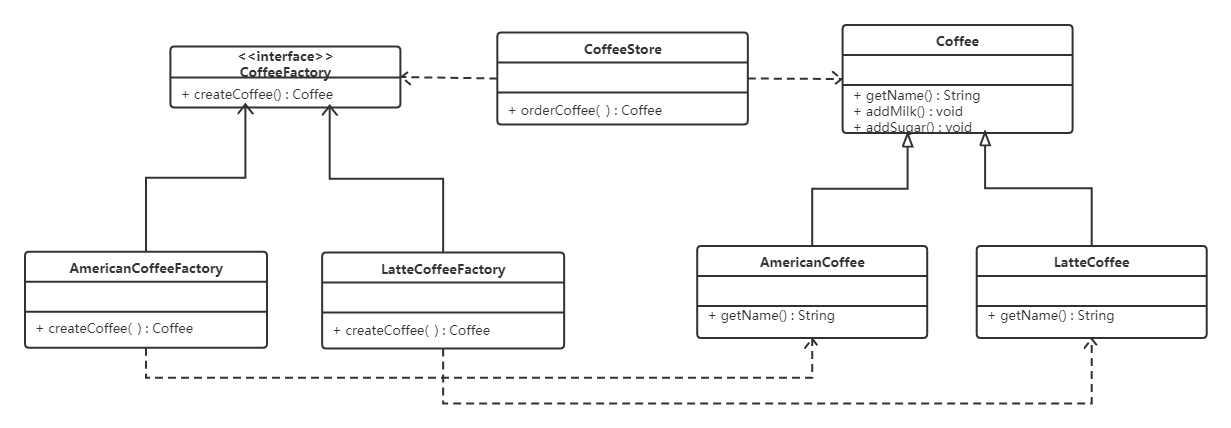
code show as below:
Abstract factory:
public interface CoffeeFactory {


    Coffee createCoffee();
}
Specific factory:
public class LatteCoffeeFactory implements CoffeeFactory {


    public Coffee createCoffee() {


        return new LatteCoffee();
    }
}

public class AmericanCoffeeFactory implements CoffeeFactory {


    public Coffee createCoffee() {


        return new AmericanCoffee();
    }
}
Coffee shop category:
public class CoffeeStore {


    private CoffeeFactory factory;

    public CoffeeStore(CoffeeFactory factory) {


        this.factory = factory;
    }

    public Coffee orderCoffee(String type) {


        Coffee coffee = factory.createCoffee();
        coffee.addMilk();
        coffee.addsugar();
        return coffee;
    }
}
From the code written above, we can see that when adding product categories, factory categories should be added accordingly, and there is no need to modify the code of the factory category, which solves the shortcomings of the simple factory model.
The factory method pattern is a further abstraction of the simple factory pattern. Due to the use of polymorphism, the factory method pattern maintains the advantages of the simple factory pattern and overcomes its shortcomings.
4.2.3.4 Advantages and disadvantages
advantage:
- Users only need to know the name of the specific factory to get the product they want, without knowing the specific creation process of the product;
- When adding new products to the system, it is only necessary to add specific product categories and corresponding specific factory categories, without any modification to the original factory, and to meet the principle of opening and closing;
shortcoming:
- Every time a product is added, a specific product category and a corresponding specific factory category must be added, which increases the complexity of the system.
4.2.4 Abstract factory pattern
The factory method model introduced above considers the production of one type of product, such as livestock farms that only raise animals, TV factories that only produce TVs, and Chuanzhi podcasts that only train students majoring in computer software.
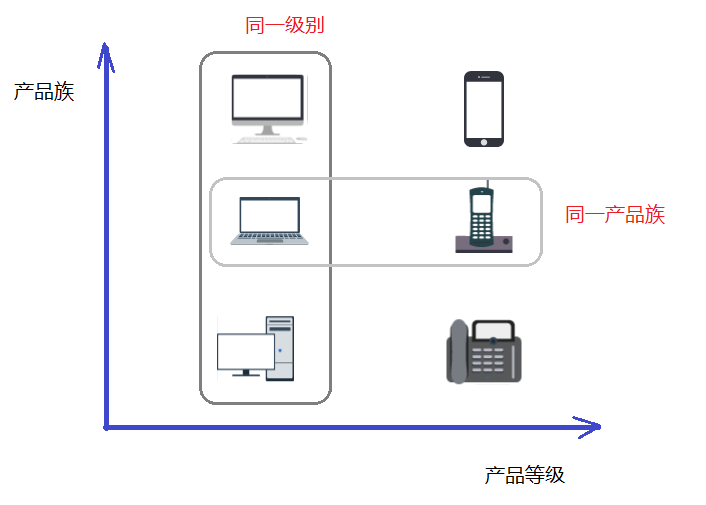
这些工厂只生产同种类产品,同种类产品称为同等级产品,也就是说:工厂方法模式只考虑生产同等级的产品,但是在现实生活中许多工厂是综合型的工厂,能生产多等级(种类) 的产品,如电器厂既生产电视机又生产洗衣机或空调,大学既有软件专业又有生物专业等。
本节要介绍的抽象工厂模式将考虑多等级产品的生产,将同一个具体工厂所生产的位于不同等级的一组产品称为一个产品族,下图所示横轴是产品等级,也就是同一类产品;纵轴是产品族,也就是同一品牌的产品,同一品牌的产品产自同一个工厂。

4.2.4.1 概念
是一种为访问类提供一个创建一组相关或相互依赖对象的接口,且访问类无须指定所要产品的具体类就能得到同族的不同等级的产品的模式结构。
抽象工厂模式是工厂方法模式的升级版本,工厂方法模式只生产一个等级的产品,而抽象工厂模式可生产多个等级的产品。
4.2.4.2 结构
抽象工厂模式的主要角色如下:
- 抽象工厂(Abstract Factory):提供了创建产品的接口,它包含多个创建产品的方法,可以创建多个不同等级的产品。
- 具体工厂(Concrete Factory):主要是实现抽象工厂中的多个抽象方法,完成具体产品的创建。
- 抽象产品(Product):定义了产品的规范,描述了产品的主要特性和功能,抽象工厂模式有多个抽象产品。
- 具体产品(ConcreteProduct):实现了抽象产品角色所定义的接口,由具体工厂来创建,它 同具体工厂之间是多对一的关系。
4.2.4.2 实现
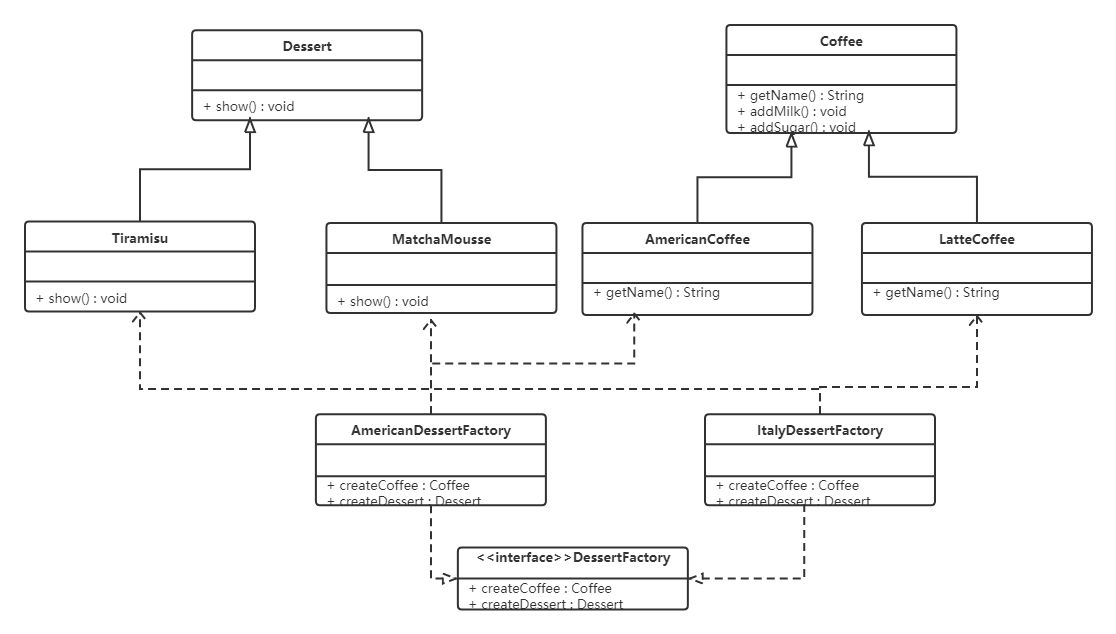
现咖啡店业务发生改变,不仅要生产咖啡还要生产甜点,如提拉米苏、抹茶慕斯等,要是按照工厂方法模式,需要定义提拉米苏类、抹茶慕斯类、提拉米苏工厂、抹茶慕斯工厂、甜点工厂类,很容易发生类爆炸情况。其中拿铁咖啡、美式咖啡是一个产品等级,都是咖啡;提拉米苏、抹茶慕斯也是一个产品等级;拿铁咖啡和提拉米苏是同一产品族(也就是都属于意大利风味),美式咖啡和抹茶慕斯是同一产品族(也就是都属于美式风味)。所以这个案例可以使用抽象工厂模式实现。类图如下:
代码如下:
抽象工厂:
public interface DessertFactory {


    Coffee createCoffee();

    Dessert createDessert();
}
具体工厂:
//美式甜点工厂
public class AmericanDessertFactory implements DessertFactory {


    public Coffee createCoffee() {


        return new AmericanCoffee();
    }

    public Dessert createDessert() {


        return new MatchaMousse();
    }
}
//意大利风味甜点工厂
public class ItalyDessertFactory implements DessertFactory {


    public Coffee createCoffee() {


        return new LatteCoffee();
    }

    public Dessert createDessert() {


        return new Tiramisu();
    }
}
If you want to add the same product family, you only need to add a corresponding factory class, and you don't need to modify other classes.
4.2.4.3 Advantages and disadvantages
advantage:
When multiple objects in a product family are designed to work together, it guarantees that clients always use only objects from the same product family.
shortcoming:
When a new product needs to be added to the product family, all factory classes need to be modified.
4.2.4.4 Usage scenarios
-
When the objects to be created are a series of interrelated or interdependent product families, such as TV sets, washing machines, and air conditioners in electrical appliances factories.
-
There are multiple product families in the system, but only one of them is used at a time. For example, someone only likes to wear clothes and shoes of a certain brand.
-
The product class library is provided in the system, and all products have the same interface, and the client does not depend on the creation details and internal structure of the product instance.
Such as: change the skin of the input method, and change the whole set together. Generate programs for different operating systems.
4.2.5 Schema extensions
Simple factory + configuration file decoupling
The coupling of factory objects and product objects can be decoupled through factory mode + configuration file. Load the full class name in the configuration file in the factory class, and create an object for storage. If the client needs the object, it can be obtained directly.
Step 1: Define the configuration file
For the convenience of demonstration, we use the properties file as the configuration file, named bean.properties
american=com.itheima.pattern.factory.config_factory.AmericanCoffee
latte=com.itheima.pattern.factory.config_factory.LatteCoffee
Step 2: Improve the factory class
public class CoffeeFactory {


    private static Map<String,Coffee> map = new HashMap();

    static {


        Properties p = new Properties();
        InputStream is = CoffeeFactory.class.getClassLoader().getResourceAsStream("bean.properties");
        try {


            p.load(is);
            //遍历Properties集合对象
            Set<Object> keys = p.keySet();
            for (Object key : keys) {


                //根据键获取值(全类名)
                String className = p.getProperty((String) key);
                //获取字节码对象
                Class clazz = Class.forName(className);
                Coffee obj = (Coffee) clazz.newInstance();
                map.put((String)key,obj);
            }
        } catch (Exception e) {


            e.printStackTrace();
        }
    }

    public static Coffee createCoffee(String name) {


        return map.get(name);
    }
}
Static member variables are used to store created objects (the key stores the name, and the value stores the corresponding object), while reading configuration files and creating objects are written in static code blocks, so that they only need to be executed once.
4.2.6 JDK source code analysis - Collection.iterator method
public class Demo {


    public static void main(String[] args) {


        List<String> list = new ArrayList<>();
        list.add("令狐冲");
        list.add("风清扬");
        list.add("任我行");

        //获取迭代器对象
        Iterator<String> it = list.iterator();
        //使用迭代器遍历
        while(it.hasNext()) {


            String ele = it.next();
            System.out.println(ele);
        }
    }
}
You should be familiar with the above code, using iterators to traverse the collection and get the elements in the collection. The method of obtaining iterators for single-column collections uses the factory method pattern. Let's look at the structure through the class diagram:
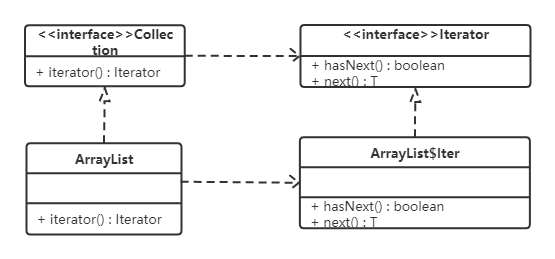
The Collection interface is an abstract factory class, ArrayList is a concrete factory class; the Iterator interface is an abstract commodity class, and the Iter internal class in the ArrayList class is a concrete commodity class. In the specific factory class, the iterator() method creates an object of the specific commodity class.
Other:
1. The getInstance() method in the DateFormt class uses the factory pattern;
2. The getInstance() method in the Calendar class uses the factory pattern;
4.3 Prototype pattern
4.3.1 Overview
Use an already created instance as a prototype, and create a new object identical to the prototype object by copying the prototype object.
4.3.2 Structure
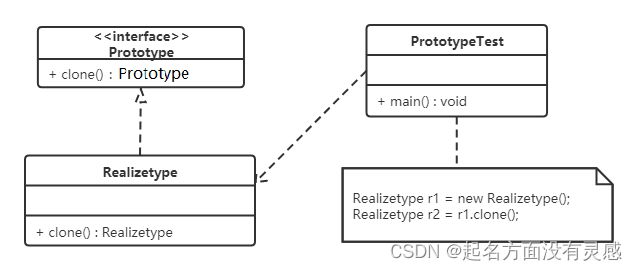
The Prototype pattern contains the following roles:
- Abstract prototype class: specifies the clone() method that the concrete prototype object must implement.
- Concrete prototype class: implement the clone() method of the abstract prototype class, which is an object that can be copied.
- Access class: use the clone() method in the concrete prototype class to copy the new object.
The interface class diagram is as follows:
4.3.3 Implementation
Prototype mode cloning is divided into shallow cloning and deep cloning.
Shallow clone: create a new object, the attributes of the new object are exactly the same as the original object, and for non-basic type attributes, it still points to the memory address of the object pointed to by the original attribute.
Deep clone: When a new object is created, other objects referenced in the attribute will also be cloned and no longer point to the original object address.
The Object class in Java provides clone()methods to implement shallow cloning. The Cloneable interface is the abstract prototype class in the above class diagram, and the sub-implementation class that implements the Cloneable interface is the concrete prototype class. code show as below:
Realizetype (concrete prototype class):
public class Realizetype implements Cloneable {


    public Realizetype() {


        System.out.println("具体的原型对象创建完成!");
    }

    @Override
    protected Realizetype clone() throws CloneNotSupportedException {


        System.out.println("具体原型复制成功!");
        return (Realizetype) super.clone();
    }
}
PrototypeTest (test access class):
public class PrototypeTest {


    public static void main(String[] args) throws CloneNotSupportedException {


        Realizetype r1 = new Realizetype();
        Realizetype r2 = r1.clone();

        System.out.println("对象r1和r2是同一个对象?" + (r1 == r2));
    }
}
4.3.4 Case
Generating "Three Good Students" Award Certificates with Prototype Mode
The "Three Good Students" certificates of the same school are the same except for the names of the winners. You can use the prototype mode to copy multiple "Three Good Students" certificates, and then modify the names on the certificates.
The class diagram is as follows:
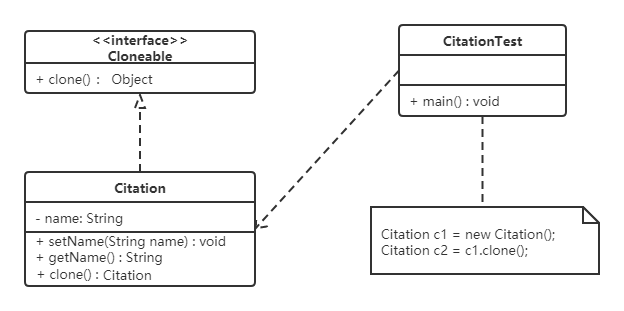
code show as below:
//奖状类
public class Citation implements Cloneable {


    private String name;

    public void setName(String name) {


        this.name = name;
    }

    public String getName() {


        return (this.name);
    }

    public void show() {


        System.out.println(name + "同学:在2020学年第一学期中表现优秀,被评为三好学生。特发此状!");
    }

    @Override
    public Citation clone() throws CloneNotSupportedException {


        return (Citation) super.clone();
    }
}

//测试访问类
public class CitationTest {


    public static void main(String[] args) throws CloneNotSupportedException {


        Citation c1 = new Citation();
        c1.setName("张三");

        //复制奖状
        Citation c2 = c1.clone();
        //将奖状的名字修改李四
        c2.setName("李四");

        c1.show();
        c2.show();
    }
}
4.3.5 Usage Scenarios
- The creation of objects is very complicated, and you can use the prototype mode to quickly create objects.
- Performance and security requirements are relatively high.
4.3.6 Extension (deep clone)
Change the name attribute of the Citation class in the case of the "Three Good Students" certificate above to an attribute of the Student type. code show as below:
//奖状类
public class Citation implements Cloneable {


    private Student stu;

    public Student getStu() {


        return stu;
    }

    public void setStu(Student stu) {


        this.stu = stu;
    }

    void show() {


        System.out.println(stu.getName() + "同学:在2020学年第一学期中表现优秀,被评为三好学生。特发此状!");
    }

    @Override
    public Citation clone() throws CloneNotSupportedException {


        return (Citation) super.clone();
    }
}

//学生类
public class Student {


    private String name;
    private String address;

    public Student(String name, String address) {


        this.name = name;
        this.address = address;
    }

    public Student() {


    }

    public String getName() {


        return name;
    }

    public void setName(String name) {


        this.name = name;
    }

    public String getAddress() {


        return address;
    }

    public void setAddress(String address) {


        this.address = address;
    }
}

//测试类
public class CitationTest {


    public static void main(String[] args) throws CloneNotSupportedException {


        Citation c1 = new Citation();
        Student stu = new Student("张三", "西安");
        c1.setStu(stu);

        //复制奖状
        Citation c2 = c1.clone();
        //获取c2奖状所属学生对象
        Student stu1 = c2.getStu();
        stu1.setName("李四");

        //判断stu对象和stu1对象是否是同一个对象
        System.out.println("stu和stu1是同一个对象?" + (stu == stu1));

        c1.show();
        c2.show();
    }
}
The result of the operation is:

illustrate:
The stu object and the stu1 object are the same object, and the value of the name attribute in the stu1 object will be changed to "Li Si", and the two Citation (certificate) objects will display Li Si. This is the effect of shallow cloning, copying the attributes of the reference type in the concrete prototype class (Citation). This situation requires the use of deep cloning, and deep cloning requires the use of object streams. code show as below:
public class CitationTest1 {


    public static void main(String[] args) throws Exception {


        Citation c1 = new Citation();
        Student stu = new Student("张三", "西安");
        c1.setStu(stu);

        //创建对象输出流对象
        ObjectOutputStream oos = new ObjectOutputStream(new FileOutputStream("C:\\Users\\Think\\Desktop\\b.txt"));
        //将c1对象写出到文件中
        oos.writeObject(c1);
        oos.close();

        //创建对象出入流对象
        ObjectInputStream ois = new ObjectInputStream(new FileInputStream("C:\\Users\\Think\\Desktop\\b.txt"));
        //读取对象
        Citation c2 = (Citation) ois.readObject();
        //获取c2奖状所属学生对象
        Student stu1 = c2.getStu();
        stu1.setName("李四");

        //判断stu对象和stu1对象是否是同一个对象
        System.out.println("stu和stu1是同一个对象?" + (stu == stu1));

        c1.show();
        c2.show();
    }
}
The result of the operation is:

Note: The Citation class and the Student class must implement the Serializable interface, otherwise a NotSerializableException will be thrown.
4.5 Builder mode
4.4.1 Overview
Separate the construction and representation of a complex object so that the same construction process can create different representations.
- The construction of components (responsible by Builder) and assembly (responsible by Director) are separated. Thus complex objects can be constructed. This pattern is suitable for situations where the construction process of an object is complex.
- Due to the decoupling of construction and assembly. Different builders and the same assembly can make different objects; the same builder and different assembly sequences can also make different objects. That is to say, the decoupling of the construction algorithm and assembly algorithm is realized, and better reuse is realized.
- The builder pattern can separate parts from their assembly process and create a complex object step by step. The user only needs to specify the type of the complex object to get the object without knowing the details of its internal construction.
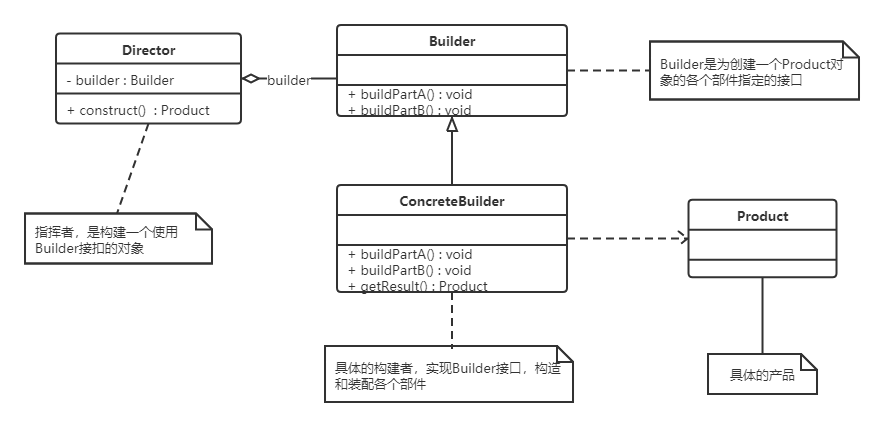
4.4.2 Structure
The Builder pattern includes the following roles:
-
Abstract builder class (Builder): This interface stipulates the creation of those parts of the complex object, and does not involve the creation of specific component objects.
-
Concrete Builder Class (ConcreteBuilder): implements the Builder interface to complete the specific creation methods of each component of a complex product. After the construction process is complete, an instance of the product is provided.
-
Product class (Product): The complex object to be created.
-
Director class (Director): Call the specific builder to create each part of the complex object. The director does not involve the information of the specific product, and is only responsible for ensuring that the parts of the object are created completely or in a certain order.
The class diagram is as follows:
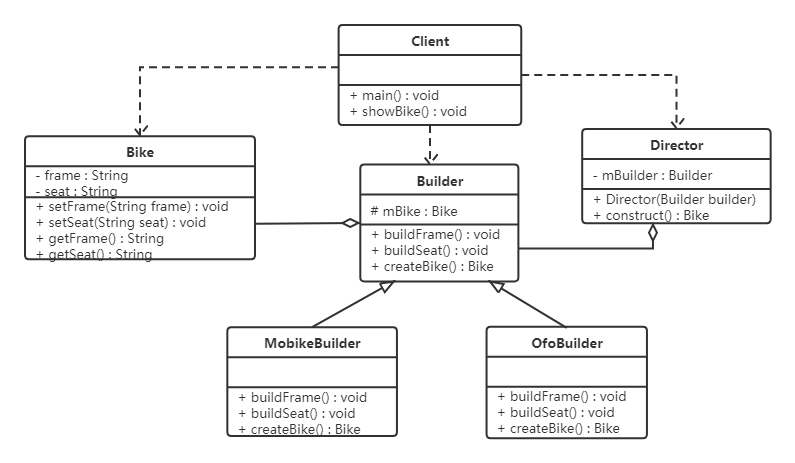
4.4.3 Examples
Create a shared bike
Producing a bicycle is a complex process that includes the production of components such as the frame and saddle. The frame is made of carbon fiber, aluminum alloy and other materials, and the seat is made of rubber, leather and other materials. For the production of bicycles, the builder pattern can be used.
Here Bike is a product, including components such as frame and seat; Builder is an abstract builder, MobikeBuilder and OfoBuilder are concrete builders; Director is a commander. The class diagram is as follows:
The specific code is as follows:
//自行车类
public class Bike {


    private String frame;
    private String seat;

    public String getFrame() {


        return frame;
    }

    public void setFrame(String frame) {


        this.frame = frame;
    }

    public String getSeat() {


        return seat;
    }

    public void setSeat(String seat) {


        this.seat = seat;
    }
}

// 抽象 builder 类
public abstract class Builder {


    protected Bike mBike = new Bike();

    public abstract void buildFrame();
    public abstract void buildSeat();
    public abstract Bike createBike();
}

//摩拜单车Builder类
public class MobikeBuilder extends Builder {


    @Override
    public void buildFrame() {


        mBike.setFrame("铝合金车架");
    }

    @Override
    public void buildSeat() {


        mBike.setSeat("真皮车座");
    }

    @Override
    public Bike createBike() {


        return mBike;
    }
}

//ofo单车Builder类
public class OfoBuilder extends Builder {


    @Override
    public void buildFrame() {


        mBike.setFrame("碳纤维车架");
    }

    @Override
    public void buildSeat() {


        mBike.setSeat("橡胶车座");
    }

    @Override
    public Bike createBike() {


        return mBike;
    }
}

//指挥者类
public class Director {


    private Builder mBuilder;

    public Director(Builder builder) {


        mBuilder = builder;
    }

    public Bike construct() {


        mBuilder.buildFrame();
        mBuilder.buildSeat();
        return mBuilder.createBike();
    }
}

//测试类
public class Client {


    public static void main(String[] args) {


        showBike(new OfoBuilder());
        showBike(new MobikeBuilder());
    }
    private static void showBike(Builder builder) {


        Director director = new Director(builder);
        Bike bike = director.construct();
        System.out.println(bike.getFrame());
        System.out.println(bike.getSeat());
    }
}
Notice:
The above example is a regular usage of the Builder mode. The director class Director plays a very important role in the builder mode. It is used to guide the specific builder how to build the product, control the order of calls, and return the complete product class to the caller. But in some cases it is necessary to simplify the system structure, you can combine the commander class with the abstract builder
// 抽象 builder 类
public abstract class Builder {


    protected Bike mBike = new Bike();

    public abstract void buildFrame();
    public abstract void buildSeat();
    public abstract Bike createBike();

    public Bike construct() {


        this.buildFrame();
        this.BuildSeat();
        return this.createBike();
    }
}
illustrate:
This does simplify the system structure, but it also increases the responsibility of the abstract constructor class, and it does not conform to the single responsibility principle. If construct() is too complicated, it is recommended to encapsulate it in Director.
4.4.4 Advantages and disadvantages
advantage:
- The encapsulation of the builder pattern is very good. Using the builder mode can effectively encapsulate changes. In the scenario of using the builder mode, the general product class and the builder class are relatively stable. Therefore, encapsulating the main business logic in the commander class can achieve overall Relatively good stability.
- In the builder mode, the client does not need to know the details of the internal composition of the product, and the product itself is decoupled from the product creation process, so that the same creation process can create different product objects.
- The product creation process can be controlled more finely. Decomposing the creation steps of complex products into different methods makes the creation process clearer and more convenient to use programs to control the creation process.
- The builder pattern is easy to extend. If there is a new requirement, it can be completed by implementing a new builder class, basically without modifying the code that has been tested before, so it will not introduce risks to the original function. Comply with the principle of opening and closing.
shortcoming:
The products created by the builder mode generally have more in common, and their components are similar. If the products are very different, it is not suitable to use the builder mode, so its scope of use is limited.
4.4.5 Usage Scenarios
The builder (Builder) pattern creates complex objects, and the various parts of its products often face drastic changes, but the algorithm that combines them is relatively stable, so it is usually used in the following situations.
- The created object is complex and consists of multiple parts, each part faces complex changes, but the construction sequence between the components is stable.
- The algorithm for creating a complex object is independent of the constituent parts of that object and how they are assembled, i.e. the construction process and final representation of the product are independent.
4.4.6 Schema Extensions
In addition to the above uses, the builder mode also has a common use in development, that is, when a class constructor needs to pass in many parameters, if an instance of this class is created, the code readability will be very poor, and it will be difficult to It is easy to introduce errors, and at this time, the builder pattern can be used for refactoring.
The code before refactoring is as follows:
public class Phone {


    private String cpu;
    private String screen;
    private String memory;
    private String mainboard;

    public Phone(String cpu, String screen, String memory, String mainboard) {


        this.cpu = cpu;
        this.screen = screen;
        this.memory = memory;
        this.mainboard = mainboard;
    }

    public String getCpu() {


        return cpu;
    }

    public void setCpu(String cpu) {


        this.cpu = cpu;
    }

    public String getScreen() {


        return screen;
    }

    public void setScreen(String screen) {


        this.screen = screen;
    }

    public String getMemory() {


        return memory;
    }

    public void setMemory(String memory) {


        this.memory = memory;
    }

    public String getMainboard() {


        return mainboard;
    }

    public void setMainboard(String mainboard) {


        this.mainboard = mainboard;
    }

    @Override
    public String toString() {


        return "Phone{" +
                "cpu='" + cpu + '\'' +
                ", screen='" + screen + '\'' +
                ", memory='" + memory + '\'' +
                ", mainboard='" + mainboard + '\'' +
                '}';
    }
}

public class Client {


    public static void main(String[] args) {


        //构建Phone对象
        Phone phone = new Phone("intel","三星屏幕","金士顿","华硕");
        System.out.println(phone);
    }
}
The above constructs the Phone object in the client code and passes four parameters. What if there are more parameters? The readability of the code and the cost of use are relatively high.
Code after refactoring:
public class Phone {


    private String cpu;
    private String screen;
    private String memory;
    private String mainboard;

    private Phone(Builder builder) {


        cpu = builder.cpu;
        screen = builder.screen;
        memory = builder.memory;
        mainboard = builder.mainboard;
    }

    public static final class Builder {


        private String cpu;
        private String screen;
        private String memory;
        private String mainboard;

        public Builder() {

    }

        public Builder cpu(String val) {


            cpu = val;
            return this;
        }
        public Builder screen(String val) {


            screen = val;
            return this;
        }
        public Builder memory(String val) {


            memory = val;
            return this;
        }
        public Builder mainboard(String val) {


            mainboard = val;
            return this;
        }
        public Phone build() {


            return new Phone(this);}
    }
    @Override
    public String toString() {


        return "Phone{" +
                "cpu='" + cpu + '\'' +
                ", screen='" + screen + '\'' +
                ", memory='" + memory + '\'' +
                ", mainboard='" + mainboard + '\'' +
                '}';
    }
}

public class Client {


    public static void main(String[] args) {


        Phone phone = new Phone.Builder()
                .cpu("intel")
                .mainboard("华硕")
                .memory("金士顿")
                .screen("三星")
                .build();
        System.out.println(phone);
    }
}
The refactored code is more convenient to use and can also improve development efficiency to some extent. From the perspective of software design, the requirements for programmers are relatively high.
4.6 Creator mode comparison
4.6.1 Factory method pattern vs builder pattern
The factory method pattern focuses on the creation of the overall object; while the builder pattern focuses on the process of component construction, intending to create a complex object through precise construction step by step.
Let's give a simple example to illustrate the difference between the two. If you want to make a superman, if you use the factory method model, you will directly produce a superman with infinite strength, ability to fly, and wear underwear; if you use the builder model, You need to assemble the hands, head, feet, torso and other parts, and then wear the underwear outside, so a superman was born.
4.6.2 Abstract Factory Pattern VS Builder Pattern
The abstract factory pattern realizes the creation of product families. A product family is such a series of products: a product combination with different classification dimensions. The abstract factory pattern does not need to care about the construction process, but only cares about which products are produced by which factories. .
The builder mode requires building products according to a specified blueprint, and its main purpose is to produce a new product by assembling spare parts.
If the abstract factory pattern is regarded as an auto parts production factory, which produces a product family of products, then the builder pattern is a car assembly factory, which can return a complete car through the assembly of parts.
5. Structural mode
Structural patterns describe how to organize classes or objects into larger structures in a certain layout. It is divided into class structure pattern and object structure pattern. The former uses inheritance mechanism to organize interfaces and classes, and the latter uses combination or aggregation to combine objects.
Since the combination or aggregation relationship is less coupled than the inheritance relationship and satisfies the "principle of composite reuse", the object structure model has greater flexibility than the class structure model.
Structural patterns are divided into the following seven types:
- Proxy mode
- adapter pattern
- decorator pattern
- bridge mode
- appearance mode
- combination mode
- Flyweight mode
5.1 Proxy mode
5.1.1 Overview
For some reason it is necessary to provide an object with a proxy to control access to that object. At this time, the access object is not suitable or cannot directly refer to the target object, and the proxy object acts as an intermediary between the access object and the target object.
Proxies in Java are divided into static proxies and dynamic proxies according to the generation time of proxy classes. The static proxy class is generated at compile time, while the dynamic proxy class is dynamically generated at Java runtime. There are two types of dynamic proxy: JDK proxy and CGLib proxy.
5.1.2 Structure
The Proxy mode is divided into three roles:
- Abstract subject (Subject) class: Declare the business methods implemented by real subjects and proxy objects through interfaces or abstract classes.
- Real Subject (Real Subject) class: realizes the specific business in the abstract subject, is the real object represented by the proxy object, and is the final object to be referenced.
- Proxy (Proxy) class: Provides the same interface as the real theme, which contains references to the real theme, which can access, control or extend the functions of the real theme.
5.1.3 Static proxy
Let's take a look at the static proxy through a case.
[Example] selling tickets at a train station
If you want to buy a train ticket, you need to go to the train station to buy the ticket, take the train to the train station, wait in line and wait for a series of operations, which is obviously more troublesome. And the railway station has sales offices in many places, so it is much more convenient for us to go to the sales offices to buy tickets. This example is actually a typical agent model, the train station is the target object, and the sales agency is the agent object. The class diagram is as follows:

code show as below:
//卖票接口
public interface SellTickets {


    void sell();
}

//火车站  火车站具有卖票功能,所以需要实现SellTickets接口
public class TrainStation implements SellTickets {


    public void sell() {


        System.out.println("火车站卖票");
    }
}

//代售点
public class ProxyPoint implements SellTickets {


    private TrainStation station = new TrainStation();

    public void sell() {


        System.out.println("代理点收取一些服务费用");
        station.sell();
    }
}

//测试类
public class Client {


    public static void main(String[] args) {


        ProxyPoint pp = new ProxyPoint();
        pp.sell();
    }
}
It can be seen from the above code that the test class directly accesses the ProxyPoint class object, that is to say, the ProxyPoint acts as an intermediary between the access object and the target object. At the same time, the sell method has also been enhanced (agents charge some service fees).
5.1.4 JDK dynamic proxy
Next, we use dynamic proxies to implement the above case. First, let's talk about the dynamic proxies provided by JDK. Java provides a dynamic proxy class Proxy. Proxy is not the class of the proxy object we mentioned above, but provides a static method (newProxyInstance method) to create a proxy object to obtain the proxy object.
code show as below:
//卖票接口
public interface SellTickets {


    void sell();
}

//火车站  火车站具有卖票功能,所以需要实现SellTickets接口
public class TrainStation implements SellTickets {


    public void sell() {


        System.out.println("火车站卖票");
    }
}

//代理工厂,用来创建代理对象
public class ProxyFactory {


    private TrainStation station = new TrainStation();

    public SellTickets getProxyObject() {


        //使用Proxy获取代理对象
        /*
            newProxyInstance()方法参数说明:
                ClassLoader loader : 类加载器,用于加载代理类,使用真实对象的类加载器即可
                Class<?>[] interfaces : 真实对象所实现的接口,代理模式真实对象和代理对象实现相同的接口
                InvocationHandler h : 代理对象的调用处理程序
         */
        SellTickets sellTickets = (SellTickets) Proxy.newProxyInstance(station.getClass().getClassLoader(),
                station.getClass().getInterfaces(),
                new InvocationHandler() {


                    /*
                        InvocationHandler中invoke方法参数说明:
                            proxy : 代理对象
                            method : 对应于在代理对象上调用的接口方法的 Method 实例
                            args : 代理对象调用接口方法时传递的实际参数
                     */
                    public Object invoke(Object proxy, Method method, Object[] args) throws Throwable {


                        System.out.println("代理点收取一些服务费用(JDK动态代理方式)");
                        //执行真实对象
                        Object result = method.invoke(station, args);
                        return result;
                    }
                });
        return sellTickets;
    }
}

//测试类
public class Client {


    public static void main(String[] args) {


        //获取代理对象
        ProxyFactory factory = new ProxyFactory();

        SellTickets proxyObject = factory.getProxyObject();
        proxyObject.sell();
    }
}
Using dynamic proxy, we think about the following questions:
-
Is ProxyFactory a proxy class?
ProxyFactory is not the proxy class mentioned in the proxy mode, but the proxy class is a class dynamically generated in memory during the running of the program. View the structure of the proxy class through Alibaba's open source Java diagnostic tool (Arthas [Alsace]):
package com.sun.proxy;

import com.itheima.proxy.dynamic.jdk.SellTickets;
import java.lang.reflect.InvocationHandler;
import java.lang.reflect.Method;
import java.lang.reflect.Proxy;
import java.lang.reflect.UndeclaredThrowableException;

public final class $Proxy0 extends Proxy implements SellTickets {


    private static Method m1;
    private static Method m2;
    private static Method m3;
    private static Method m0;

    public $Proxy0(InvocationHandler invocationHandler) {


        super(invocationHandler);
    }

    static {


        try {


            m1 = Class.forName("java.lang.Object").getMethod("equals", Class.forName("java.lang.Object"));
            m2 = Class.forName("java.lang.Object").getMethod("toString", new Class[0]);
            m3 = Class.forName("com.itheima.proxy.dynamic.jdk.SellTickets").getMethod("sell", new Class[0]);
            m0 = Class.forName("java.lang.Object").getMethod("hashCode", new Class[0]);
            return;
        }
        catch (NoSuchMethodException noSuchMethodException) {


            throw new NoSuchMethodError(noSuchMethodException.getMessage());
        }
        catch (ClassNotFoundException classNotFoundException) {


            throw new NoClassDefFoundError(classNotFoundException.getMessage());
        }
    }

    public final boolean equals(Object object) {


        try {


            return (Boolean)this.h.invoke(this, m1, new Object[]{

      object});
        }
        catch (Error | RuntimeException throwable) {


            throw throwable;
        }
        catch (Throwable throwable) {


            throw new UndeclaredThrowableException(throwable);
        }
    }

    public final String toString() {


        try {


            return (String)this.h.invoke(this, m2, null);
        }
        catch (Error | RuntimeException throwable) {


            throw throwable;
        }
        catch (Throwable throwable) {


            throw new UndeclaredThrowableException(throwable);
        }
    }

    public final int hashCode() {


        try {


            return (Integer)this.h.invoke(this, m0, null);
        }
        catch (Error | RuntimeException throwable) {


            throw throwable;
        }
        catch (Throwable throwable) {


            throw new UndeclaredThrowableException(throwable);
        }
    }

    public final void sell() {


        try {


            this.h.invoke(this, m3, null);
            return;
        }
        catch (Error | RuntimeException throwable) {


            throw throwable;
        }
        catch (Throwable throwable) {


            throw new UndeclaredThrowableException(throwable);
        }
    }
}
From the above class, we can see the following information:
- The proxy class ($Proxy0) implements SellTickets. This also confirms what we said before that the real class and the proxy class implement the same interface.
- The proxy class ($Proxy0) passes the anonymous inner class object we provided to the parent class.
-
What is the execution process of dynamic proxy?
The following is the key code extracted:
//程序运行过程中动态生成的代理类
public final class $Proxy0 extends Proxy implements SellTickets {


    private static Method m3;

    public $Proxy0(InvocationHandler invocationHandler) {


        super(invocationHandler);
    }

    static {


        m3 = Class.forName("com.itheima.proxy.dynamic.jdk.SellTickets").getMethod("sell", new Class[0]);
    }

    public final void sell() {


        this.h.invoke(this, m3, null);
    }
}

//Java提供的动态代理相关类
public class Proxy implements java.io.Serializable {


	protected InvocationHandler h;

	protected Proxy(InvocationHandler h) {


        this.h = h;
    }
}

//代理工厂类
public class ProxyFactory {


    private TrainStation station = new TrainStation();

    public SellTickets getProxyObject() {


        SellTickets sellTickets = (SellTickets) Proxy.newProxyInstance(station.getClass().getClassLoader(),
                station.getClass().getInterfaces(),
                new InvocationHandler() {


                    public Object invoke(Object proxy, Method method, Object[] args) throws Throwable {


                        System.out.println("代理点收取一些服务费用(JDK动态代理方式)");
                        Object result = method.invoke(station, args);
                        return result;
                    }
                });
        return sellTickets;
    }
}


//测试访问类
public class Client {


    public static void main(String[] args) {


        //获取代理对象
        ProxyFactory factory = new ProxyFactory();
        SellTickets proxyObject = factory.getProxyObject();
        proxyObject.sell();
    }
}
The execution process is as follows:
1. 在测试类中通过代理对象调用sell()方法
2. 根据多态的特性,执行的是代理类($Proxy0)中的sell()方法
3. 代理类($Proxy0)中的sell()方法中又调用了InvocationHandler接口的子实现类对象的invoke方法
4. invoke方法通过反射执行了真实对象所属类(TrainStation)中的sell()方法
5.1.5 CGLIB Dynamic Proxy
In the same case as above, we again use CGLIB proxy implementation.
If the SellTickets interface is not defined, only TrainStation (train station class) is defined. Obviously, the JDK proxy cannot be used, because the JDK dynamic proxy requires that the interface must be defined to proxy the interface.
CGLIB is a powerful, high-performance code generation package. It provides proxies for classes that do not implement interfaces, and provides a good complement to JDK's dynamic proxies.
CGLIB is a package provided by a third party, so the coordinates of the jar package need to be introduced:
<dependency>
    <groupId>cglib</groupId>
    <artifactId>cglib</artifactId>
    <version>2.2.2</version>
</dependency>
code show as below:
//火车站
public class TrainStation {


    public void sell() {


        System.out.println("火车站卖票");
    }
}

//代理工厂
public class ProxyFactory implements MethodInterceptor {


    private TrainStation target = new TrainStation();

    public TrainStation getProxyObject() {


        //创建Enhancer对象,类似于JDK动态代理的Proxy类,下一步就是设置几个参数
        Enhancer enhancer =new Enhancer();
        //设置父类的字节码对象
        enhancer.setSuperclass(target.getClass());
        //设置回调函数
        enhancer.setCallback(this);
        //创建代理对象
        TrainStation obj = (TrainStation) enhancer.create();
        return obj;
    }

    /*
        intercept方法参数说明:
            o : 代理对象
            method : 真实对象中的方法的Method实例
            args : 实际参数
            methodProxy :代理对象中的方法的method实例
     */
    public TrainStation intercept(Object o, Method method, Object[] args, MethodProxy methodProxy) throws Throwable {


        System.out.println("代理点收取一些服务费用(CGLIB动态代理方式)");
        TrainStation result = (TrainStation) methodProxy.invokeSuper(o, args);
        return result;
    }
}

//测试类
public class Client {


    public static void main(String[] args) {


        //创建代理工厂对象
        ProxyFactory factory = new ProxyFactory();
        //获取代理对象
        TrainStation proxyObject = factory.getProxyObject();

        proxyObject.sell();
    }
}
5.1.6 Comparison of three agents
-
jdk proxy and CGLIB proxy
Use CGLib to implement dynamic proxy. The bottom layer of CGLib adopts ASM bytecode generation framework, and bytecode technology is used to generate proxy classes. Before JDK1.6, it is more efficient than using Java reflection. The only thing to note is that CGLib cannot proxy a class or method declared as final, because the principle of CGLib is to dynamically generate subclasses of the proxy class.
After JDK1.6, JDK1.7, and JDK1.8 gradually optimized JDK dynamic proxy, the efficiency of JDK proxy is higher than that of CGLib proxy when the number of calls is small. Only when a large number of calls are made, JDK1.6 and JDK1.7 is a little less efficient than CGLib proxy, but when it comes to JDK1.8, JDK proxy is more efficient than CGLib proxy. So if there is an interface use JDK dynamic proxy, if there is no interface use CGLIB proxy.
-
Dynamic Proxy and Static Proxy
Compared with static proxy, the biggest advantage of dynamic proxy is that all methods declared in the interface are transferred to a centralized method of invocation handler (InvocationHandler.invoke). In this way, when there are a large number of interface methods, we can handle them flexibly, without needing to transfer each method like a static proxy.
If the interface adds a method, in addition to all implementation classes needing to implement this method in the static proxy mode, all proxy classes also need to implement this method. Increased the complexity of code maintenance. This problem does not occur with dynamic proxies
5.1.7 Advantages and disadvantages
advantage:
- The proxy mode plays an intermediary role between the client and the target object and protects the target object;
- The proxy object can extend the functionality of the target object;
- The proxy mode can separate the client from the target object, reducing the coupling of the system to a certain extent;
shortcoming:
- Increased system complexity;
5.1.8 Usage Scenarios
-
Remote proxy
Local services request remote services over the network. In order to achieve local-to-remote communication, we need to implement network communication and handle possible exceptions. For good code design and maintainability, we hide the network communication part and only expose an interface to the local service, through which the functions provided by the remote service can be accessed without paying too much attention to the details of the communication part.
-
Firewall proxy
When you configure your browser to use the proxy function, the firewall forwards your browser's request to the Internet; when the Internet returns a response, the proxy server forwards it to your browser.
-
Protect or Access agent
Control access to an object and, if desired, provide different levels of access to different users.
5.2 Adapter mode
5.2.1 Overview
If you travel to European countries, their sockets are the far left of the picture below, which is the European standard. And the plug we use is the one on the far right in the picture below. Therefore, our laptops and mobile phones cannot be directly charged locally. So we need a socket converter. The first side of the converter is plugged into the local socket, and the second side is for us to charge, so that our plug can be used locally. There are many such examples in life, mobile phone chargers (converting 220v to 5v voltage), card readers, etc., are actually using the adapter mode.
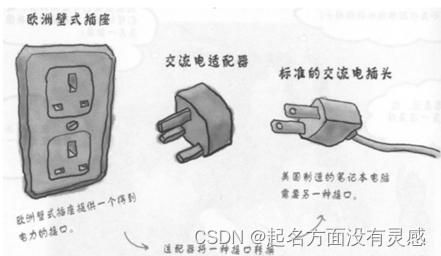
definition:
Convert the interface of a class into another interface that the client wants, so that those classes that could not work together due to incompatible interfaces can work together.
Adapter mode is divided into class adapter mode and object adapter mode. The former has a higher degree of coupling between classes than the latter, and requires programmers to understand the internal structure of related components in the existing component library, so there are relatively few applications.
5.2.2 Structure
Adapter pattern (Adapter) contains the following main roles:
- Target (Target) interface: the interface expected by the current system business, which can be an abstract class or an interface.
- Adaptee class: It is the component interface in the existing component library to be accessed and adapted.
- Adapter (Adapter) class: It is a converter that converts the adapter interface into the target interface by inheriting or referencing the adapter object, allowing customers to access the adapter in the format of the target interface.
5.2.3 Class Adapter Pattern
Implementation method: define an adapter class to realize the business interface of the current system, and at the same time inherit the existing components in the existing component library.
[Example] card reader
An existing computer can only read the SD card, but if you want to read the content in the TF card, you need to use the adapter mode. Create a card reader to read the contents of the TF card.
The class diagram is as follows:
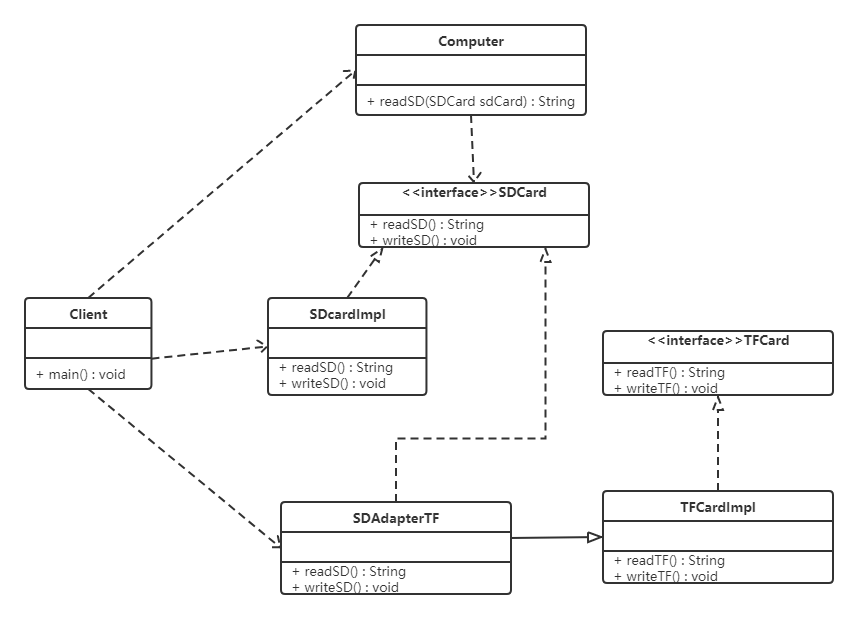
code show as below:
//SD卡的接口
public interface SDCard {


    //读取SD卡方法
    String readSD();
    //写入SD卡功能
    void writeSD(String msg);
}

//SD卡实现类
public class SDCardImpl implements SDCard {


    public String readSD() {


        String msg = "sd card read a msg :hello word SD";
        return msg;
    }

    public void writeSD(String msg) {


        System.out.println("sd card write msg : " + msg);
    }
}

//电脑类
public class Computer {


    public String readSD(SDCard sdCard) {


        if(sdCard == null) {


            throw new NullPointerException("sd card null");
        }
        return sdCard.readSD();
    }
}

//TF卡接口
public interface TFCard {


    //读取TF卡方法
    String readTF();
    //写入TF卡功能
    void writeTF(String msg);
}

//TF卡实现类
public class TFCardImpl implements TFCard {


    public String readTF() {


        String msg ="tf card read msg : hello word tf card";
        return msg;
    }

    public void writeTF(String msg) {


        System.out.println("tf card write a msg : " + msg);
    }
}

//定义适配器类(SD兼容TF)
public class SDAdapterTF extends TFCardImpl implements SDCard {


    public String readSD() {


        System.out.println("adapter read tf card ");
        return readTF();
    }

    public void writeSD(String msg) {


        System.out.println("adapter write tf card");
        writeTF(msg);
    }
}

//测试类
public class Client {


    public static void main(String[] args) {


        Computer computer = new Computer();
        SDCard sdCard = new SDCardImpl();
        System.out.println(computer.readSD(sdCard));

        System.out.println("------------");

        SDAdapterTF adapter = new SDAdapterTF();
        System.out.println(computer.readSD(adapter));
    }
}
The Class Adapter pattern violates the principle of compositional reuse. A class adapter is available if the client class has an interface specification, and not otherwise.
5.2.4 Object Adapter Pattern
Implementation method: The object adapter mode can be used to introduce the components already implemented in the existing component library into the adapter class, and this class realizes the business interface of the current system at the same time.
[Example] card reader
We use the object adapter pattern to rewrite the case of the card reader. The class diagram is as follows:
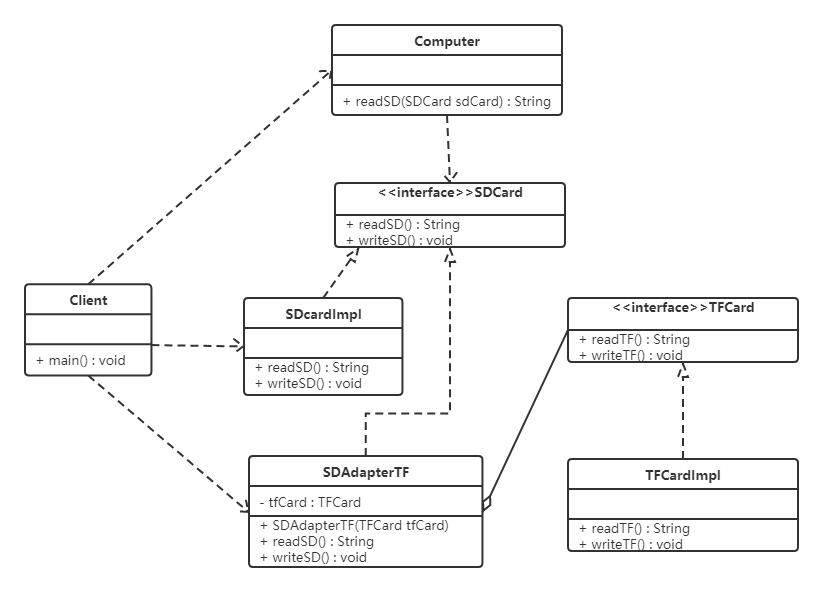
code show as below:
For the code of the class adapter pattern, we only need to modify the adapter class (SDAdapterTF) and the test class.
//创建适配器对象(SD兼容TF)
public class SDAdapterTF  implements SDCard {


    private TFCard tfCard;

    public SDAdapterTF(TFCard tfCard) {


        this.tfCard = tfCard;
    }

    public String readSD() {


        System.out.println("adapter read tf card ");
        return tfCard.readTF();
    }

    public void writeSD(String msg) {


        System.out.println("adapter write tf card");
        tfCard.writeTF(msg);
    }
}

//测试类
public class Client {


    public static void main(String[] args) {


        Computer computer = new Computer();
        SDCard sdCard = new SDCardImpl();
        System.out.println(computer.readSD(sdCard));

        System.out.println("------------");

        TFCard tfCard = new TFCardImpl();
        SDAdapterTF adapter = new SDAdapterTF(tfCard);
        System.out.println(computer.readSD(adapter));
    }
}
Note: Another adapter pattern is the interface adapter pattern. When you don't want to implement all the methods in an interface, you can create an abstract class Adapter to implement all the methods. At this time, we only need to inherit the abstract class.
5.2.5 Application scenarios
- The previously developed system has classes that meet the functional requirements of the new system, but its interface is inconsistent with the interface of the new system.
- Use the components provided by the third party, but the component interface definition is different from the interface definition required by yourself.
5.2.6 JDK source code analysis
The adaptation of Reader (character stream) and InputStream (byte stream) uses InputStreamReader.
InputStreamReader inherits from Reader in the java.io package, and implements the abstract unimplemented methods in it. like:
public int read() throws IOException {


    return sd.read();
}

public int read(char cbuf[], int offset, int length) throws IOException {


    return sd.read(cbuf, offset, length);
}
For sd (StreamDecoder class object) in the above code, in Sun's JDK implementation, the actual method implementation is the call encapsulation of the method with the same name of the sun.nio.cs.StreamDecoder class. The class structure diagram is as follows:
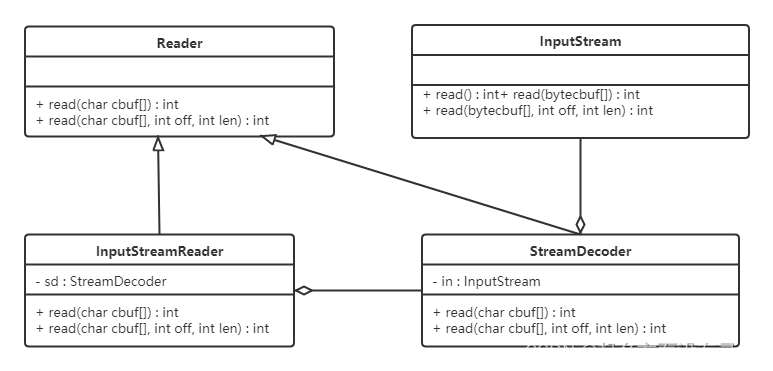
As can be seen from the figure above:
- InputStreamReader is an encapsulation of StreamDecoder which also implements Reader.
- StreamDecoder is not part of the Java SE API, but its own implementation given by Sun JDK. But we know that they encapsulate the byte stream class (InputStream) in the construction method, and use this class to perform decoding conversion between byte stream and character stream.
in conclusion:
From the superficial point of view, InputStreamReader converts the InputStream byte stream class to the Reader character stream. It can be seen from the implementation class relationship structure in Sun JDK above that the design and implementation of StreamDecoder actually adopts the adapter mode.
5.3 Decorator pattern
5.3.1 Overview
Let's start with an example of a fast food restaurant.
Fast food restaurants offer fast food such as fried noodles and fried rice. Additional side dishes such as eggs, ham, and bacon can be added. Of course, additional side dishes need to be charged. The price of each side dish is usually different, so calculating the total price will be more troublesome.
![[External link 8%E5%89%8D.png)]](https://img-blog.csdnimg.cn/86374b4986894c04b6368f7b7e8270be.png)
Problems with using inheritance:
-
poor scalability
If we want to add another ingredient (ham sausage), we will find that we need to define a subclass for FriedRice and FriedNoodles respectively. If you want to add a fast food category (fried rice noodles), you need to define more subcategories.
-
too many subclasses
definition:
Refers to the mode of dynamically adding some responsibilities (that is, adding additional functions) to the object without changing the structure of the existing object.
5.3.2 Structure
Roles in Decorator mode:
- Abstract component (Component) role: define an abstract interface to standardize the object ready to receive additional responsibilities.
- Concrete Component role: implement an abstract component and add some responsibilities to it by decorating the role.
- Abstract decoration (Decorator) role: Inherit or implement abstract components, and contain instances of concrete components, and can extend the functions of concrete components through its subclasses.
- Concrete Decorator (ConcreteDecorator) role: implements related methods of abstract decoration, and adds additional responsibilities to concrete component objects.
5.3.3 Case
We use the decorator pattern to improve the fast food restaurant case and experience the essence of the decorator pattern.
The class diagram is as follows:
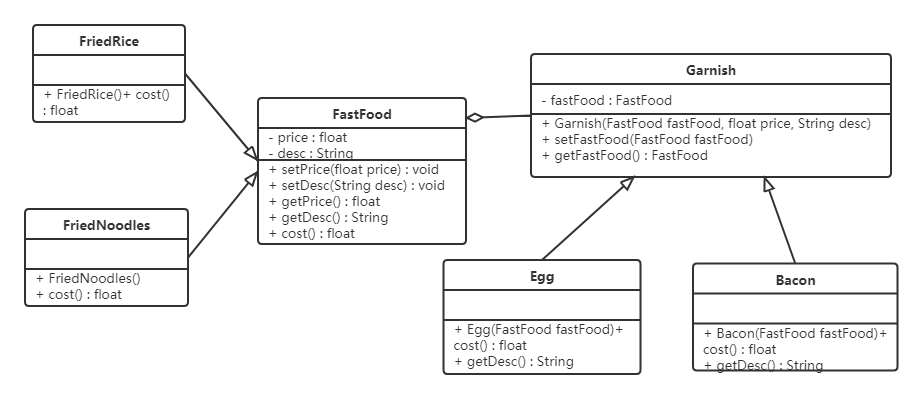
code show as below:
//快餐接口
public abstract class FastFood {


    private float price;
    private String desc;

    public FastFood() {


    }

    public FastFood(float price, String desc) {


        this.price = price;
        this.desc = desc;
    }

    public void setPrice(float price) {


        this.price = price;
    }

    public float getPrice() {


        return price;
    }

    public String getDesc() {


        return desc;
    }

    public void setDesc(String desc) {


        this.desc = desc;
    }

    public abstract float cost();  //获取价格
}

//炒饭
public class FriedRice extends FastFood {


    public FriedRice() {


        super(10, "炒饭");
    }

    public float cost() {


        return getPrice();
    }
}

//炒面
public class FriedNoodles extends FastFood {


    public FriedNoodles() {


        super(12, "炒面");
    }

    public float cost() {


        return getPrice();
    }
}

//配料类
public abstract class Garnish extends FastFood {


    private FastFood fastFood;

    public FastFood getFastFood() {


        return fastFood;
    }

    public void setFastFood(FastFood fastFood) {


        this.fastFood = fastFood;
    }

    public Garnish(FastFood fastFood, float price, String desc) {


        super(price,desc);
        this.fastFood = fastFood;
    }
}

//鸡蛋配料
public class Egg extends Garnish {


    public Egg(FastFood fastFood) {


        super(fastFood,1,"鸡蛋");
    }

    public float cost() {


        return getPrice() + getFastFood().getPrice();
    }

    @Override
    public String getDesc() {


        return super.getDesc() + getFastFood().getDesc();
    }
}

//培根配料
public class Bacon extends Garnish {


    public Bacon(FastFood fastFood) {


        super(fastFood,2,"培根");
    }

    @Override
    public float cost() {


        return getPrice() + getFastFood().getPrice();
    }

    @Override
    public String getDesc() {


        return super.getDesc() + getFastFood().getDesc();
    }
}

//测试类
public class Client {


    public static void main(String[] args) {


        //点一份炒饭
        FastFood food = new FriedRice();
        //花费的价格
        System.out.println(food.getDesc() + " " + food.cost() + "元");

        System.out.println("========");
        //点一份加鸡蛋的炒饭
        FastFood food1 = new FriedRice();

        food1 = new Egg(food1);
        //花费的价格
        System.out.println(food1.getDesc() + " " + food1.cost() + "元");

        System.out.println("========");
        //点一份加培根的炒面
        FastFood food2 = new FriedNoodles();
        food2 = new Bacon(food2);
        //花费的价格
        System.out.println(food2.getDesc() + " " + food2.cost() + "元");
    }
}
benefit:
-
饰者模式可以带来比继承更加灵活性的扩展功能,使用更加方便,可以通过组合不同的装饰者对象来获取具有不同行为状态的多样化的结果。装饰者模式比继承更具良好的扩展性,完美的遵循开闭原则,继承是静态的附加责任,装饰者则是动态的附加责任。
-
装饰类和被装饰类可以独立发展,不会相互耦合,装饰模式是继承的一个替代模式,装饰模式可以动态扩展一个实现类的功能。
5.3.4 使用场景
-
当不能采用继承的方式对系统进行扩充或者采用继承不利于系统扩展和维护时。
不能采用继承的情况主要有两类:
- 第一类是系统中存在大量独立的扩展,为支持每一种组合将产生大量的子类,使得子类数目呈爆炸性增长;
- 第二类是因为类定义不能继承(如final类)
-
在不影响其他对象的情况下,以动态、透明的方式给单个对象添加职责。
-
当对象的功能要求可以动态地添加,也可以再动态地撤销时。
5.3.5 JDK源码解析
IO流中的包装类使用到了装饰者模式。BufferedInputStream,BufferedOutputStream,BufferedReader,BufferedWriter。
我们以BufferedWriter举例来说明,先看看如何使用BufferedWriter
public class Demo {


    public static void main(String[] args) throws Exception{


        //创建BufferedWriter对象
        //创建FileWriter对象
        FileWriter fw = new FileWriter("C:\\Users\\Think\\Desktop\\a.txt");
        BufferedWriter bw = new BufferedWriter(fw);

        //写数据
        bw.write("hello Buffered");

        bw.close();
    }
}
使用起来感觉确实像是装饰者模式,接下来看它们的结构:
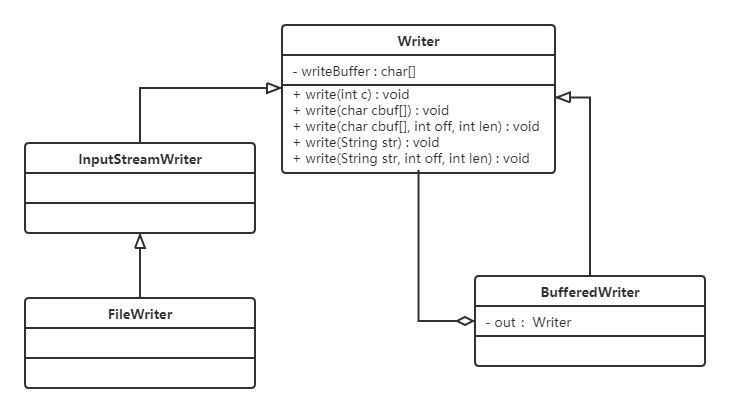
小结:
BufferedWriter使用装饰者模式对Writer子实现类进行了增强,添加了缓冲区,提高了写数据的效率。
5.3.6 代理和装饰者的区别
静态代理和装饰者模式的区别:
- 相同点:
- 都要实现与目标类相同的业务接口
- 在两个类中都要声明目标对象
- 都可以在不修改目标类的前提下增强目标方法
- 不同点:
- 目的不同
装饰者是为了增强目标对象
静态代理是为了保护和隐藏目标对象 - 获取目标对象构建的地方不同
装饰者是由外界传递进来,可以通过构造方法传递
静态代理是在代理类内部创建,以此来隐藏目标对象
- 目的不同
5.4 桥接模式
5.4.1 概述
Now there is a need to create different graphics, and each graphics may have different colors. We can use inheritance to design the relationship of classes:

We can find that there are many classes. If we add another shape or another color, we need to create more classes.
Just imagine, in a system with multiple dimensions that may change, using inheritance will cause class explosion and inflexible expansion. Every time a concrete implementation is added to a dimension, multiple subclasses are added. In order to design the system more flexibly, we can consider using the bridge mode at this time.
definition:
Separating the abstraction from the implementation so that they can vary independently. It is implemented by replacing the inheritance relationship with the composition relationship, thereby reducing the coupling degree of the two variable dimensions of abstraction and implementation.
5.4.2 Structure
Bridge mode contains the following main roles:
- Abstraction role: Defines an abstract class and contains a reference to an implementing object.
- Extended abstraction (Refined Abstraction) role: it is a subclass of the abstraction role, implements the business method in the parent class, and calls the business method in the realized role through the composition relationship.
- Implementor role: Define the interface of the implementor role, which can be called by the extended abstract role.
- Concrete Implementor role: Gives the concrete implementation of the implementor role interface.
5.4.3 Case
[Example] Video player
It is necessary to develop a cross-platform video player that can play video files in various formats on different operating system platforms (such as Windows, Mac, Linux, etc.). Common video formats include RMVB, AVI, WMV, etc. The player contains two dimensions, suitable for use in bridge mode.
The class diagram is as follows:
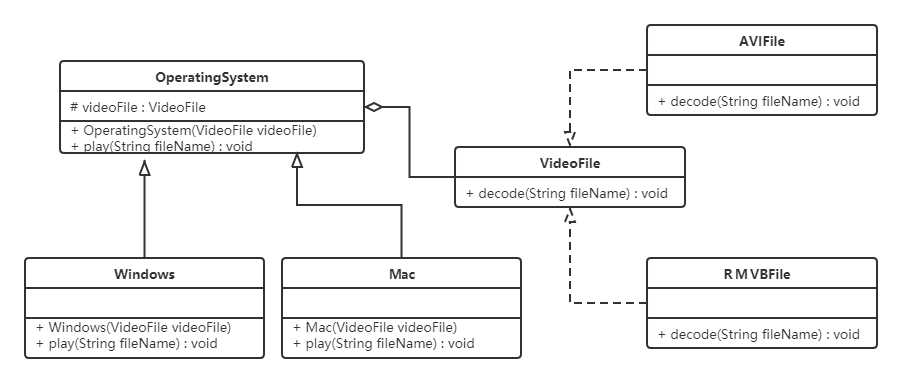
code show as below:
//视频文件
public interface VideoFile {


    void decode(String fileName);
}

//avi文件
public class AVIFile implements VideoFile {


    public void decode(String fileName) {


        System.out.println("avi视频文件:"+ fileName);
    }
}

//rmvb文件
public class REVBBFile implements VideoFile {


    public void decode(String fileName) {


        System.out.println("rmvb文件:" + fileName);
    }
}

//操作系统版本
public abstract class OperatingSystemVersion {


    protected VideoFile videoFile;

    public OperatingSystemVersion(VideoFile videoFile) {


        this.videoFile = videoFile;
    }

    public abstract void play(String fileName);
}

//Windows版本
public class Windows extends OperatingSystem {


    public Windows(VideoFile videoFile) {


        super(videoFile);
    }

    public void play(String fileName) {


        videoFile.decode(fileName);
    }
}

//mac版本
public class Mac extends OperatingSystemVersion {


    public Mac(VideoFile videoFile) {


        super(videoFile);
    }

    public void play(String fileName) {


		videoFile.decode(fileName);
    }
}

//测试类
public class Client {


    public static void main(String[] args) {


        OperatingSystem os = new Windows(new AVIFile());
        os.play("战狼3");
    }
}
benefit:
-
The bridging mode improves the scalability of the system. Any expansion of one of the two change dimensions does not require modification of the original system.
For example: if there is still a video file type wmv, we only need to define another class to implement the VideoFile interface, and other classes do not need to be changed.
-
Implementation details are transparent to customers
5.4.4 Usage Scenarios
- When a class has two independently changing dimensions, and both dimensions need to be extended.
- When a system does not want to use inheritance or when the number of system classes increases dramatically due to multi-level inheritance.
- When a system needs to add more flexibility between the abstract and concrete roles of components. Avoid establishing static inheritance links between the two levels, and they can establish an association relationship at the abstract level through the bridge mode.
5.5 Appearance mode
5.5.1 Overview
Some people may have traded in stocks, but in fact, most of them don’t know much about it. It is easy to lose money in stocks without sufficient knowledge of securities. When you first start trading in stocks, you will definitely think that if you have a knowledgeable helper Well, in fact, the fund is a good helper. There are many funds in Alipay. It gathers the scattered funds of investors, manages them by professional managers, and invests in stocks, bonds, foreign exchange and other fields. Fund investment The income of the token belongs to the holder, and the management agency charges a certain percentage of custody management fees.
definition:
Also known as the facade pattern, it is a pattern that makes these subsystems easier to access by providing a consistent interface for multiple complex subsystems. This mode has a unified interface to the outside world, and the external application program does not need to care about the specific details of the internal subsystem, which will greatly reduce the complexity of the application program and improve the maintainability of the program.
Facade mode is a typical application of "Dimit's Law"
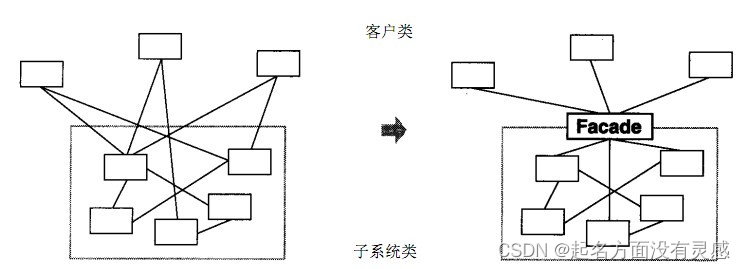
5.5.2 Structure
The Facade pattern has the following main roles:
- Facade role: Provide a common interface for multiple subsystems.
- Subsystem (Sub System) role: implements some functions of the system, and customers can access it through the facade role.
5.5.3 Case
【Example】Smart home appliance control
Xiao Ming's grandfather is 60 years old and lives alone at home: every time he needs to turn on the lights, turn on the TV, and turn on the air conditioner; turn off the lights, turn off the TV, and turn off the air conditioner when he sleeps; it is more troublesome to operate. So Xiao Ming bought a smart speaker for his grandfather, who can directly control the opening and closing of these smart home appliances through voice. The class diagram is as follows:

code show as below:
//灯类
public class Light {


    public void on() {


        System.out.println("打开了灯....");
    }

    public void off() {


        System.out.println("关闭了灯....");
    }
}

//电视类
public class TV {


    public void on() {


        System.out.println("打开了电视....");
    }

    public void off() {


        System.out.println("关闭了电视....");
    }
}

//控制类
public class AirCondition {


    public void on() {


        System.out.println("打开了空调....");
    }

    public void off() {


        System.out.println("关闭了空调....");
    }
}

//智能音箱
public class SmartAppliancesFacade {


    private Light light;
    private TV tv;
    private AirCondition airCondition;

    public SmartAppliancesFacade() {


        light = new Light();
        tv = new TV();
        airCondition = new AirCondition();
    }

    public void say(String message) {


        if(message.contains("打开")) {


            on();
        } else if(message.contains("关闭")) {


            off();
        } else {


            System.out.println("我还听不懂你说的!!!");
        }
    }

    //起床后一键开电器
    private void on() {


        System.out.println("起床了");
        light.on();
        tv.on();
        airCondition.on();
    }

    //睡觉一键关电器
    private void off() {


        System.out.println("睡觉了");
        light.off();
        tv.off();
        airCondition.off();
    }
}

//测试类
public class Client {


    public static void main(String[] args) {


        //创建外观对象
        SmartAppliancesFacade facade = new SmartAppliancesFacade();
        //客户端直接与外观对象进行交互
        facade.say("打开家电");
        facade.say("关闭家电");
    }
}
benefit:
- The degree of coupling between the subsystem and the client is reduced, so that the change of the subsystem will not affect the client class that calls it.
- The subsystem components are shielded from the client, reducing the number of objects handled by the client and making the subsystem easier to use.
shortcoming:
- It does not conform to the principle of opening and closing, and it is very troublesome to modify
5.5.4 Usage Scenarios
- When building hierarchical systems, using the facade pattern to define entry points for each layer in a subsystem simplifies dependencies between subsystems.
- When a complex system has many subsystems, the appearance mode can design a simple interface for the system to be accessed by the outside world.
- When there is a large connection between the client and multiple subsystems, the introduction of the facade pattern can separate them, thereby improving the independence and portability of the subsystems.
5.5.5 Source Code Analysis
When using tomcat as the web container, when receiving the request sent by the browser, tomcat will encapsulate the request information into a ServletRequest object, as shown in Figure 1 below. But everyone thinks that ServletRequest is an interface, and it also has a sub-interface HttpServletRequest, and we know that the request object must be a sub-implementation class object of the HttpServletRequest object. Which class object is it? By outputting the request object, we will find that it is an object of a class named RequestFacade.

The RequestFacade class uses the facade pattern. Look at the structure diagram first:
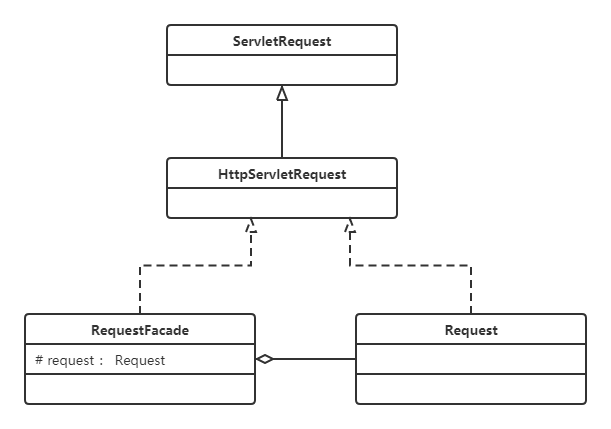
Why use facade mode here?
Define the RequestFacade class, implement ServletRequest respectively, and define the private member variable Request at the same time, and the implementation of the method calls the implementation of Request. Then, convert the RequestFacade to ServletRequest and pass it to the service method of the servlet, so that even if it is converted to RequestFacade in the servlet, the method in the private member variable object cannot be accessed. It not only uses Request, but also prevents its methods from being unreasonably accessed.
5.6 Combination mode
5.6.1 Overview
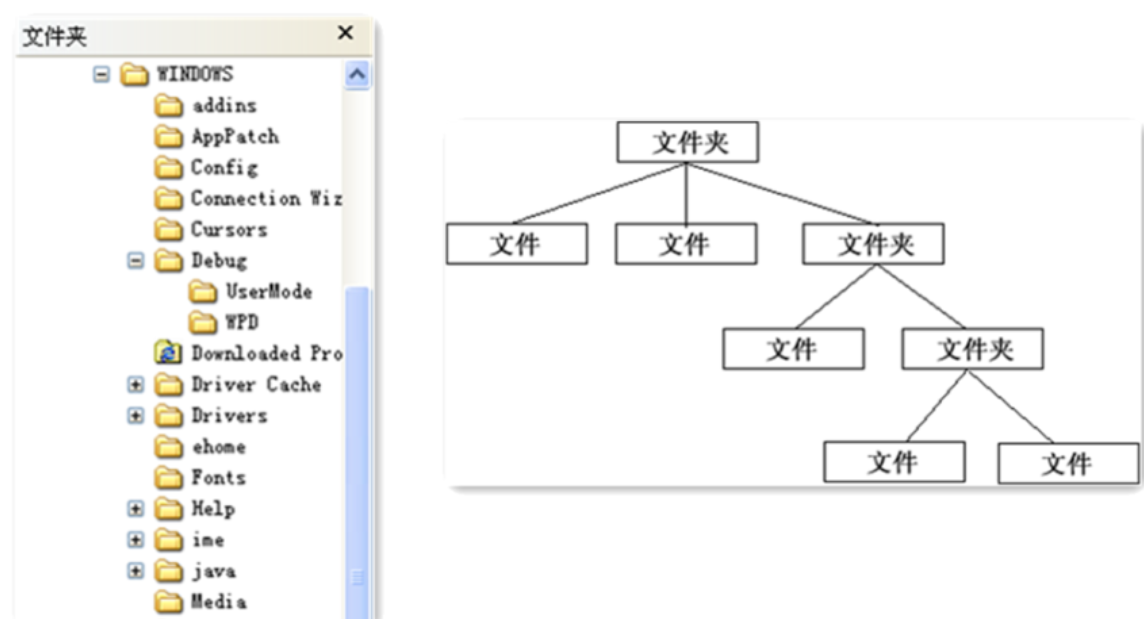
You must be very familiar with this picture. We can regard the above picture as a file system. We call this structure a tree structure. In the tree structure, the entire tree can be traversed by calling a certain method. When we find a leaf node, we can perform related operations on the leaf node. This tree can be understood as a large container, which contains many member objects, and these member objects can be container objects or leaf objects. However, due to the difference in function between container objects and leaf objects, we must distinguish between container objects and leaf objects during use, but this will bring unnecessary trouble to customers. As a customer, it always hopes to be able to Treat container objects and leaf objects consistently.
definition:
Also known as the partial whole pattern, it is used to treat a group of similar objects as a single object. The Composite pattern composes objects according to a tree structure, used to represent part and whole hierarchies. This type of design pattern is a structural pattern, which creates a tree structure of groups of objects.
5.6.2 Structure
Combination mode mainly includes three roles:
- Abstract root node (Component): defines the common methods and properties of objects at all levels of the system, and can pre-define some default behaviors and properties.
- Branch node (Composite): Define the behavior of the branch node, store child nodes, and combine the branch nodes and leaf nodes to form a tree structure.
- Leaf node (Leaf): Leaf node object, there is no branch under it, and it is the smallest unit of system hierarchy traversal.
5.6.3 Case implementation
[Example] Software menu
As shown in the figure below, when we visit some other management systems, we can often see similar menus. A menu can contain menu items (menu items refer to menu items that no longer contain other content), and can also contain menus with other menu items, so it is appropriate to use the combination mode to describe the menu. Our requirement is for a menu. Prints out all the menus it contains, along with the names of the menu items.

To implement this case, we first draw a class diagram:
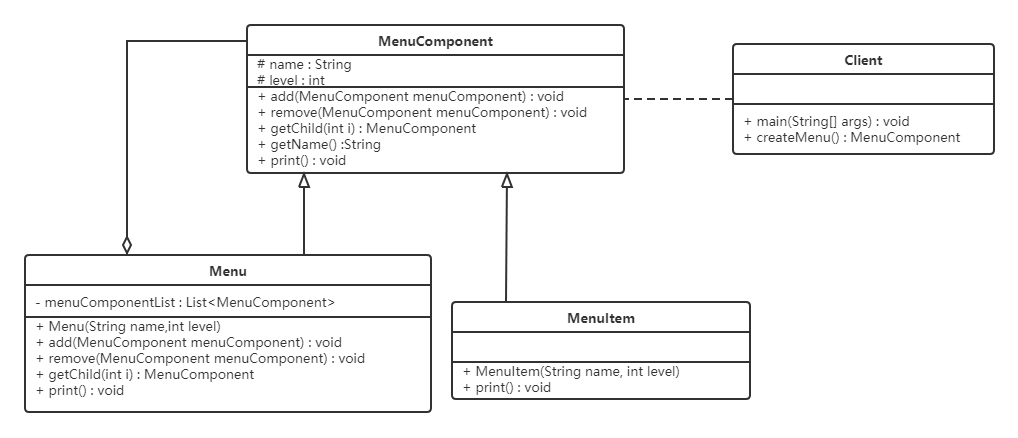
Code:
Whether it is a menu or a menu item, it should inherit from a unified interface, and here we will call this unified interface a menu component.
//菜单组件  不管是菜单还是菜单项,都应该继承该类
public abstract class MenuComponent {


    protected String name;
    protected int level;

    //添加菜单
    public void add(MenuComponent menuComponent){


        throw new UnsupportedOperationException();
    }

    //移除菜单
    public void remove(MenuComponent menuComponent){


        throw new UnsupportedOperationException();
    }

    //获取指定的子菜单
    public MenuComponent getChild(int i){


        throw new UnsupportedOperationException();
    }

    //获取菜单名称
    public String getName(){


        return name;
    }

    public void print(){


        throw new UnsupportedOperationException();
    }
}
The MenuComponent here is defined as an abstract class, because there are some common properties and behaviors to be implemented in this class, and the Menu and MenuItem classes can only cover the methods they are interested in, without having to deal with unnecessary or uninteresting methods. For example Say, the Menu class can contain submenus, so you need to override the add(), remove(), getChild() methods, but MenuItem should not have these methods. The default implementation given here is to throw an exception, and you can also rewrite the default implementation according to your needs.
public class Menu extends MenuComponent {


    private List<MenuComponent> menuComponentList;

    public Menu(String name,int level){


        this.level = level;
        this.name = name;
        menuComponentList = new ArrayList<MenuComponent>();
    }

    @Override
    public void add(MenuComponent menuComponent) {


        menuComponentList.add(menuComponent);
    }

    @Override
    public void remove(MenuComponent menuComponent) {


        menuComponentList.remove(menuComponent);
    }

    @Override
    public MenuComponent getChild(int i) {


        return menuComponentList.get(i);
    }

    @Override
    public void print() {


        for (int i = 1; i < level; i++) {


            System.out.print("--");
        }
        System.out.println(name);
        for (MenuComponent menuComponent : menuComponentList) {


            menuComponent.print();
        }
    }
}
The Menu class has implemented all methods except the getName method, because the Menu class has the functions of adding menu, removing menu and getting submenus.
public class MenuItem extends MenuComponent {


    public MenuItem(String name,int level) {


        this.name = name;
        this.level = level;
    }

    @Override
    public void print() {


        for (int i = 1; i < level; i++) {


            System.out.print("--");
        }
        System.out.println(name);
    }
}
MenuItem is a menu item and cannot have submenus, so the functions of adding menu, removing menu and getting submenu cannot be realized.
5.6.4 Classification of combined modes
When using the combination mode, according to the definition form of the abstract component class, we can divide the combination mode into two forms: transparent combination mode and safe combination mode.
-
Transparent Composite Mode
In the transparent composition mode, all the methods used to manage member objects are declared in the abstract root node role, such as the , , and methods
MenuComponentare declared in the example. The advantage of this is to ensure that all component classes have the same interface. The transparent composite mode is also the standard form of composite mode.addremovegetChildThe disadvantage of the transparent combination mode is that it is not safe enough, because the leaf object and the container object are essentially different, and the leaf object cannot have objects at the next level, that is, it is impossible to contain member objects, so add(), remove () and other methods are meaningless, which will not cause errors during the compilation phase, but may cause errors if these methods are called during the runtime phase (if no corresponding error handling code is provided)
-
Security Composite Mode
In the security composite mode, no method for managing member objects is declared in the abstract component role, but these methods are declared and implemented in the branch node
Menuclass . The disadvantage of the safe composition mode is that it is not transparent enough, because the leaf component and the container component have different methods, and those methods used to manage member objects in the container component are not defined in the abstract component class, so the client cannot completely program against the abstraction, and must Treat leaf widgets and container widgets differently.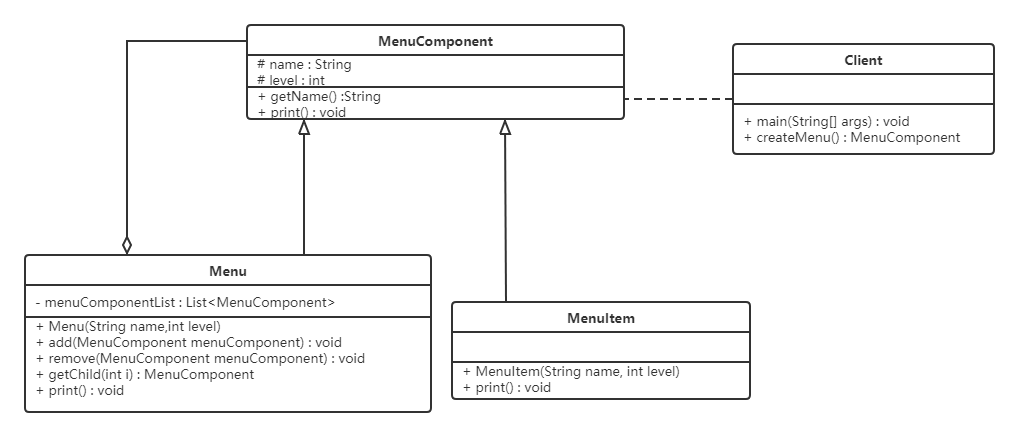
5.6.5 Advantages
- Composite mode can clearly define hierarchical complex objects, expressing all or part of the object's hierarchy, which allows the client to ignore the differences in hierarchy, and facilitates the control of the entire hierarchy.
- The client can use a composite structure or a single object in it consistently, regardless of whether it is dealing with a single object or the entire composite structure, which simplifies the client code.
- It is very convenient to add new branch nodes and leaf nodes in the combination mode without any modification to the existing class library, which conforms to the "opening and closing principle".
- Combination mode provides a flexible solution for the object-oriented realization of tree structure. Through the recursive combination of leaf nodes and branch nodes, a complex tree structure can be formed, but the control of the tree structure is very simple.
5.6.6 Usage Scenarios
The combination mode is born in response to the tree structure, so the usage scenario of the combination mode is where the tree structure appears. For example: file directory display, multi-level directory presentation and other tree structure data operations.
5.7 Flyweight mode
5.7.1 Overview
definition:
Use sharing technology to effectively support the reuse of a large number of fine-grained objects. It greatly reduces the number of objects that need to be created by sharing existing objects, and avoids the overhead of a large number of similar objects, thereby improving the utilization of system resources.
5.7.2 Structure
There are two states in Flyweight mode:
- Internal state, that is, a shareable part that does not change as the environment changes.
- External state refers to the non-shareable part that changes as the environment changes. The implementation essentials of Flyweight mode is to distinguish these two states in the application and externalize the external state.
The Flyweight mode mainly has the following roles:
- Abstract flyweight role (Flyweight): usually an interface or an abstract class, which declares the public methods of the specific flyweight class in the abstract flyweight class. These methods can provide the internal data (internal state) of the flyweight object to the outside world, and at the same time External data (external state) can also be set via these methods.
- Concrete Flyweight role: It implements the abstract flyweight class, called a flyweight object; it provides storage space for the internal state in the concrete flyweight class. Usually we can combine the singleton mode to design specific flyweight classes, and provide unique flyweight objects for each specific flyweight class.
- Unsharable Flyweight role: Not all subclasses of the abstract flyweight class need to be shared, subclasses that cannot be shared can be designed as non-shared concrete flyweight classes; when a non-shared concrete flyweight class is required Objects can be created directly by instantiation.
- Flyweight Factory role: responsible for creating and managing flyweight roles. When a customer object requests a flyweight object, the flyweight factory checks whether there is a flyweight object that meets the requirements in the system, and if it exists, it will be provided to the client; if it does not exist, a new flyweight object will be created.
5.7.3 Case implementation
[Example] Tetris
The picture below is a block in the well-known Tetris. If in the Tetris game, each different block is an instance object, these objects will take up a lot of memory space. The Flyweight mode is used below to implement .
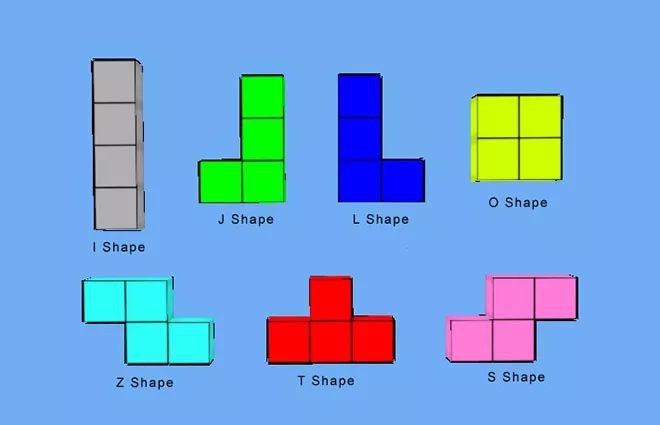
First look at the class diagram:
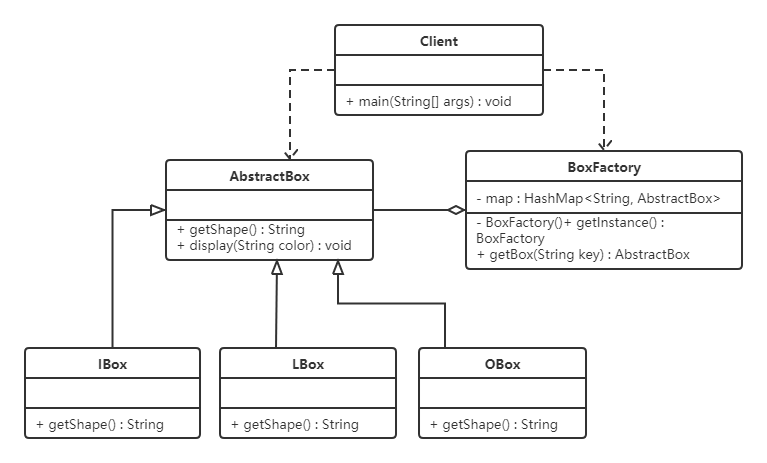
code show as below:
Tetris has different shapes, and we can extract AbstractBox from these shapes to define common properties and behaviors.
public abstract class AbstractBox {


    public abstract String getShape();

    public void display(String color) {


        System.out.println("方块形状:" + this.getShape() + " 颜色:" + color);
    }
}
The next step is to define different shapes, such as IBox class, LBox class, OBox class, etc.
public class IBox extends AbstractBox {


    @Override
    public String getShape() {


        return "I";
    }
}

public class LBox extends AbstractBox {


    @Override
    public String getShape() {


        return "L";
    }
}

public class OBox extends AbstractBox {


    @Override
    public String getShape() {


        return "O";
    }
}
A factory class (BoxFactory) is provided to manage flyweight objects (that is, AbstractBox subclass objects). Only one factory class object is needed, so the singleton mode can be used. And provide the factory class with a method to get the shape.
public class BoxFactory {


    private static HashMap<String, AbstractBox> map;

    private BoxFactory() {


        map = new HashMap<String, AbstractBox>();
        AbstractBox iBox = new IBox();
        AbstractBox lBox = new LBox();
        AbstractBox oBox = new OBox();
        map.put("I", iBox);
        map.put("L", lBox);
        map.put("O", oBox);
    }

    public static final BoxFactory getInstance() {


        return SingletonHolder.INSTANCE;
    }

    private static class SingletonHolder {


        private static final BoxFactory INSTANCE = new BoxFactory();
    }

    public AbstractBox getBox(String key) {


        return map.get(key);
    }
}
5.7.5 Advantages, disadvantages and usage scenarios
1. Advantages
- Greatly reduce the number of similar or identical objects in memory, save system resources and improve system performance
- The external state in Flyweight mode is relatively independent and does not affect the internal state
2. Disadvantages:
In order to make the object shareable, it is necessary to externalize part of the state of the flyweight object, separate the internal state and the external state, and complicate the program logic
3. Usage scenario:
- A system has a large number of identical or similar objects, resulting in a large amount of memory consumption.
- Most of the state of an object can be externalized, and these external states can be passed into the object.
- When using the Flyweight mode, it is necessary to maintain a Flyweight pool for storing the Flyweight objects, which consumes certain system resources. Therefore, it is worth using the Flyweight mode when the Flyweight objects need to be reused many times.
5.7.6 JDK source code analysis
The Integer class uses the Flyweight pattern. Let's look at the following example first:
public class Demo {


    public static void main(String[] args) {


        Integer i1 = 127;
        Integer i2 = 127;

        System.out.println("i1和i2对象是否是同一个对象?" + (i1 == i2));

        Integer i3 = 128;
        Integer i4 = 128;

        System.out.println("i3和i4对象是否是同一个对象?" + (i3 == i4));
    }
}
Run the above code, the result is as follows:

Why does the first output statement output true and the second output statement output false? Decompile by decompiler software, the code is as follows:
public class Demo {


    public static void main(String[] args) {


        Integer i1 = Integer.valueOf((int)127);
        Integer i2 Integer.valueOf((int)127);
        System.out.println((String)new StringBuilder().append((String)"i1\u548ci2\u5bf9\u8c61\u662f\u5426\u662f\u540c\u4e00\u4e2a\u5bf9\u8c61\uff1f").append((boolean)(i1 == i2)).toString());
        Integer i3 = Integer.valueOf((int)128);
        Integer i4 = Integer.valueOf((int)128);
        System.out.println((String)new StringBuilder().append((String)"i3\u548ci4\u5bf9\u8c61\u662f\u5426\u662f\u540c\u4e00\u4e2a\u5bf9\u8c61\uff1f").append((boolean)(i3 == i4)).toString());
    }
}
As you can see from the above code, the bottom layer of the operation of directly assigning a value to a variable of the Integer type to a basic data type is used valueOf(), so you only need to look at this method
public final class Integer extends Number implements Comparable<Integer> {


	public static Integer valueOf(int i) {


        if (i >= IntegerCache.low && i <= IntegerCache.high)
            return IntegerCache.cache[i + (-IntegerCache.low)];
        return new Integer(i);
    }

    private static class IntegerCache {


        static final int low = -128;
        static final int high;
        static final Integer cache[];

        static {


            int h = 127;
            String integerCacheHighPropValue =
                sun.misc.VM.getSavedProperty("java.lang.Integer.IntegerCache.high");
            if (integerCacheHighPropValue != null) {


                try {


                    int i = parseInt(integerCacheHighPropValue);
                    i = Math.max(i, 127);
                    // Maximum array size is Integer.MAX_VALUE
                    h = Math.min(i, Integer.MAX_VALUE - (-low) -1);
                } catch( NumberFormatException nfe) {


                }
            }
            high = h;
            cache = new Integer[(high - low) + 1];
            int j = low;
            for(int k = 0; k < cache.length; k++)
                cache[k] = new Integer(j++);
            // range [-128, 127] must be interned (JLS7 5.1.7)
            assert IntegerCache.high >= 127;
        }

        private IntegerCache() {

    }
    }
}
You can see that Integerby default objects-128 ~ 127 between are first created and cached. When calling , if the parameter is between , the subscript is calculated and returned from the cache, otherwise a new object is created.IntegervalueOf-128 ~ 127Integer
6. Behavioral model
Behavioral patterns are used to describe the complex flow control of programs at runtime, that is, to describe how multiple classes or objects cooperate with each other to complete tasks that cannot be completed by a single object alone. It involves the allocation of responsibilities between algorithms and objects.
Behavioral patterns are divided into class behavior patterns and object behavior patterns. The former uses the inheritance mechanism to distribute behavior among classes, and the latter uses composition or aggregation to distribute behavior among objects. Since the combination relationship or aggregation relationship is less coupled than the inheritance relationship and satisfies the "principle of composite reuse", the object behavior pattern has greater flexibility than the class behavior pattern.
Behavioral patterns are divided into:
- template method pattern
- strategy pattern
- command mode
- Chain of Responsibility Pattern
- state mode
- Observer pattern
- mediator pattern
- iterator pattern
- visitor pattern
- memo mode
- interpreter mode
Among the above 11 behavioral patterns, except for the template method pattern and the interpreter pattern which are class behavioral patterns, all others belong to the object behavioral pattern.
6.1 Template method pattern
6.1.1 Overview
In the process of object-oriented programming, programmers often encounter this situation: when designing a system, they know the key steps required by the algorithm and determine the execution order of these steps, but the specific implementation of some steps is still unknown. In other words, the implementation of certain steps is related to the specific environment.
For example, going to a bank to handle business generally goes through the following four processes: taking a number, queuing up, handling specific businesses, and rating bank staff, among which the business of taking a number, queuing up, and rating bank staff is important for each customer. The same can be implemented in the parent class, but the specific business is different from person to person. It may be deposits, withdrawals or transfers, etc., which can be delayed to subclasses.
definition:
Define the algorithm skeleton in an operation, and defer some steps of the algorithm to subclasses, so that subclasses can redefine some specific steps of the algorithm without changing the structure of the algorithm.
6.1.2 Structure
The Template Method pattern contains the following main roles:
-
Abstract Class: Responsible for giving the outline and skeleton of an algorithm. It consists of a template method and several basic methods.
-
Template method: defines the skeleton of the algorithm, and calls the basic methods it contains in a certain order.
-
Basic method: It is the method to realize each step of the algorithm, and it is an integral part of the template method. There are three basic methods:
-
Abstract Method: An abstract method is declared by an abstract class and implemented by its concrete subclasses.
-
Concrete Method: A concrete method is declared and implemented by an abstract class or a concrete class, and its subclasses can be overwritten or directly inherited.
-
Hook Method: It has been implemented in the abstract class, including logical methods for judgment and empty methods that need to be rewritten by subclasses.
Generally, the hook method is a logical method for judging. The name of this type of method is generally isXxx, and the return value type is boolean.
-
-
-
Concrete Class: Implement the abstract methods and hook methods defined in the abstract class, which are the steps of a top-level logic.
6.1.3 Case Implementation
【Example】Stir-fry
The steps of cooking are fixed, divided into steps such as pouring oil, heating oil, pouring vegetables, pouring seasonings, and stir-frying. It is now simulated in code through the template method pattern. The class diagram is as follows:
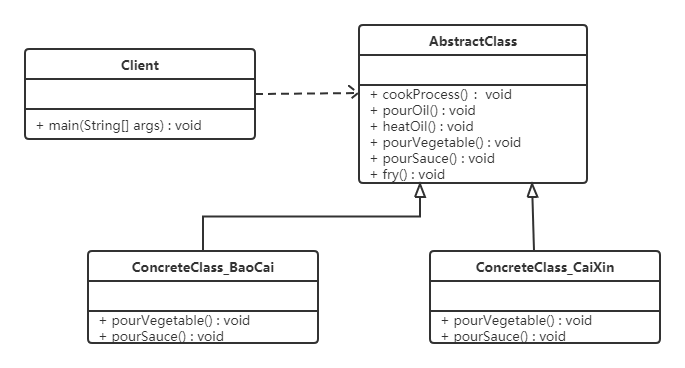
code show as below:
public abstract class AbstractClass {


    public final void cookProcess() {


        //第一步:倒油
        this.pourOil();
        //第二步:热油
        this.heatOil();
        //第三步:倒蔬菜
        this.pourVegetable();
        //第四步:倒调味料
        this.pourSauce();
        //第五步:翻炒
        this.fry();
    }

    public void pourOil() {


        System.out.println("倒油");
    }

    //第二步:热油是一样的,所以直接实现
    public void heatOil() {


        System.out.println("热油");
    }

    //第三步:倒蔬菜是不一样的(一个下包菜,一个是下菜心)
    public abstract void pourVegetable();

    //第四步:倒调味料是不一样
    public abstract void pourSauce();


    //第五步:翻炒是一样的,所以直接实现
    public void fry(){


        System.out.println("炒啊炒啊炒到熟啊");
    }
}

public class ConcreteClass_BaoCai extends AbstractClass {


    @Override
    public void pourVegetable() {


        System.out.println("下锅的蔬菜是包菜");
    }

    @Override
    public void pourSauce() {


        System.out.println("下锅的酱料是辣椒");
    }
}

public class ConcreteClass_CaiXin extends AbstractClass {


    @Override
    public void pourVegetable() {


        System.out.println("下锅的蔬菜是菜心");
    }

    @Override
    public void pourSauce() {


        System.out.println("下锅的酱料是蒜蓉");
    }
}

public class Client {


    public static void main(String[] args) {


        //炒手撕包菜
        ConcreteClass_BaoCai baoCai = new ConcreteClass_BaoCai();
        baoCai.cookProcess();

        //炒蒜蓉菜心
        ConcreteClass_CaiXin caiXin = new ConcreteClass_CaiXin();
        caiXin.cookProcess();
    }
}
Note: In order to prevent malicious operations, general template methods are added with the final keyword.
6.1.3 Advantages and disadvantages
advantage:
-
Improve code reusability
Put the same part of the code in the abstract parent class, and put the different code in different subclasses.
-
reverse control
Calling the operation of its subclasses through a parent class, and extending different behaviors through the specific implementation of the subclasses, realizes reverse control and conforms to the "opening and closing principle".
shortcoming:
- For each different implementation, a subclass needs to be defined, which will lead to an increase in the number of classes, a larger system, and a more abstract design.
- The abstract method in the parent class is implemented by the subclass, and the execution result of the subclass will affect the result of the parent class, which leads to a reverse control structure, which increases the difficulty of code reading.
6.1.4 Applicable scenarios
- The overall steps of the algorithm are fixed, but when individual parts are volatile, the template method pattern can be used at this time to abstract the volatile parts for subclasses to implement.
- It is necessary to determine whether a step in the parent class algorithm is executed through the subclass, so as to realize the reverse control of the subclass to the parent class.
6.1.5 JDK source code analysis
The InputStream class uses the template method pattern. Multiple read()methods , as follows:
public abstract class InputStream implements Closeable {


    //抽象方法,要求子类必须重写
    public abstract int read() throws IOException;

    public int read(byte b[]) throws IOException {


        return read(b, 0, b.length);
    }

    public int read(byte b[], int off, int len) throws IOException {


        if (b == null) {


            throw new NullPointerException();
        } else if (off < 0 || len < 0 || len > b.length - off) {


            throw new IndexOutOfBoundsException();
        } else if (len == 0) {


            return 0;
        }

        int c = read(); //调用了无参的read方法,该方法是每次读取一个字节数据
        if (c == -1) {


            return -1;
        }
        b[off] = (byte)c;

        int i = 1;
        try {


            for (; i < len ; i++) {


                c = read();
                if (c == -1) {


                    break;
                }
                b[off + i] = (byte)c;
            }
        } catch (IOException ee) {


        }
        return i;
    }
}
As can be seen from the above code, read()the method is an abstract method, which must be implemented by subclasses. read(byte b[])The method calls read(byte b[], int off, int len)the method, so the method to focus on here is the method with three parameters.
In the 18th and 27th lines of this method, you can see that the abstract read()method .
The summary is as follows: The method of reading a byte array data has been defined in the InputStream parent class is to read one byte at a time, store it in the first index position of the array, and read len bytes of data . Specifically how to read a byte of data? Implemented by subclasses.
6.2 Strategy Pattern
6.2.1 Overview
Let’s look at the picture below first. There are many modes of travel for us to choose from. We can ride a bicycle, take a car, take a train, or take an airplane.
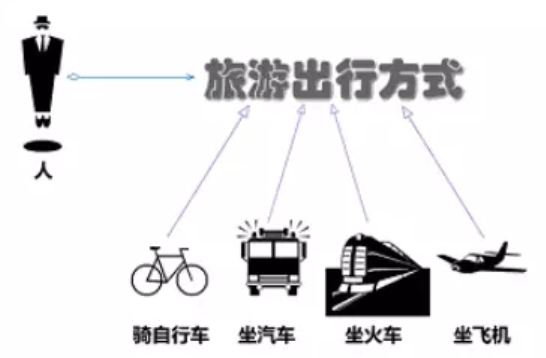
As a programmer, you need to choose a development tool for development. Of course, there are many tools for code development. You can choose Idea for development, you can also use eclipse for development, and you can also use some other development tools.
definition:
This mode defines a series of algorithms and encapsulates each algorithm so that they can be replaced with each other, and changes in algorithms will not affect customers who use the algorithms. The strategy pattern belongs to the object behavior pattern. It encapsulates the algorithm, separates the responsibility of using the algorithm from the realization of the algorithm, and delegates to different objects to manage these algorithms.
6.2.2 Structure
The main roles of the Strategy pattern are as follows:
- Abstract Strategy (Strategy) class: This is an abstract role, usually implemented by an interface or abstract class. This role gives all interfaces required by the concrete strategy classes.
- Concrete Strategy (Concrete Strategy) class: implements the interface defined by the abstract strategy, and provides specific algorithm implementation or behavior.
- Environment (Context) class: Holds a reference to a strategy class, which is eventually called by the client.
6.2.3 Case implementation
【Example】Promotion
A department store is having an annual sales promotion. Launch different promotional activities for different festivals (Spring Festival, Mid-Autumn Festival, Christmas), and the promoters will show the promotional activities to customers. The class diagram is as follows:
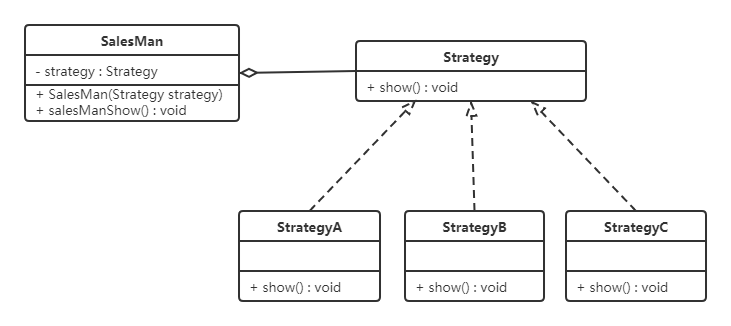
code show as below:
Define a common interface for all promotions in a department store
public interface Strategy {


    void show();
}
Define specific strategic roles (Concrete Strategy): specific promotional activities for each festival
//为春节准备的促销活动A
public class StrategyA implements Strategy {


    public void show() {


        System.out.println("买一送一");
    }
}

//为中秋准备的促销活动B
public class StrategyB implements Strategy {


    public void show() {


        System.out.println("满200元减50元");
    }
}

//为圣诞准备的促销活动C
public class StrategyC implements Strategy {


    public void show() {


        System.out.println("满1000元加一元换购任意200元以下商品");
    }
}
Define the role of the environment (Context): used to connect the context, that is, to sell promotional activities to customers, here it can be understood as a salesperson
public class SalesMan {


    //持有抽象策略角色的引用
    private Strategy strategy;

    public SalesMan(Strategy strategy) {


        this.strategy = strategy;
    }

    //向客户展示促销活动
    public void salesManShow(){


        strategy.show();
    }
}
6.2.4 Advantages and disadvantages
1. Advantages:
-
Freely switch between strategy classes
Since the strategy classes all implement the same interface, they can be switched freely.
-
easy to expand
To add a new strategy, you only need to add a specific strategy class, and basically do not need to change the original code, which conforms to the "open and close principle"
-
Avoid using multiple conditional selection statements (if else), fully embody the object-oriented design idea.
2. Disadvantages:
- Clients must be aware of all policy classes and decide for themselves which one to use.
- The strategy pattern will generate many strategy classes, and the number of objects can be reduced to a certain extent by using the flyweight pattern.
6.2.5 Usage Scenarios
- When a system needs to dynamically select one of several algorithms, each algorithm can be encapsulated into a strategy class.
- A class defines multiple behaviors, and these behaviors appear in the form of multiple conditional statements in the operation of this class. Instead of these conditional statements, each conditional branch can be moved into its own strategy class.
- Each algorithm in the system is completely independent of each other, and it is required to hide the implementation details of the specific algorithm from the client.
- When the system requires that clients using the algorithm should not know the data it operates on, the strategy pattern can be used to hide the data structures associated with the algorithm.
- The only difference between multiple classes is that they behave differently. You can use the strategy mode to dynamically select the specific behavior to be executed at runtime.
6.2.6 JDK source code analysis
Comparatorstrategy pattern in . There is a sort()method , as follows:
public class Arrays{


    public static <T> void sort(T[] a, Comparator<? super T> c) {


        if (c == null) {


            sort(a);
        } else {


            if (LegacyMergeSort.userRequested)
                legacyMergeSort(a, c);
            else
                TimSort.sort(a, 0, a.length, c, null, 0, 0);
        }
    }
}
Arrays is an environment role class. The sort method can pass a new strategy to make Arrays sort according to this strategy. For example, the following test class.
public class demo {


    public static void main(String[] args) {


        Integer[] data = {

    12, 2, 3, 2, 4, 5, 1};
        // 实现降序排序
        Arrays.sort(data, new Comparator<Integer>() {


            public int compare(Integer o1, Integer o2) {


                return o2 - o1;
            }
        });
        System.out.println(Arrays.toString(data)); //[12, 5, 4, 3, 2, 2, 1]
    }
}
Here, when we call the sort method of Arrays, the second parameter is the sub-implementation class object of the Comparator interface. So Comparator acts as an abstract strategy role, while the specific sub-implementation class acts as a concrete strategy role. Ambient role classes (Arrays) should hold references to abstract policies to invoke. So, does the sort method of the Arrays class use compare()the method ? Let us continue to look at sort()the method , the code is as follows:
class TimSort<T> {


    static <T> void sort(T[] a, int lo, int hi, Comparator<? super T> c,
                         T[] work, int workBase, int workLen) {


        assert c != null && a != null && lo >= 0 && lo <= hi && hi <= a.length;

        int nRemaining  = hi - lo;
        if (nRemaining < 2)
            return;  // Arrays of size 0 and 1 are always sorted

        // If array is small, do a "mini-TimSort" with no merges
        if (nRemaining < MIN_MERGE) {


            int initRunLen = countRunAndMakeAscending(a, lo, hi, c);
            binarySort(a, lo, hi, lo + initRunLen, c);
            return;
        }
        ...
    }

    private static <T> int countRunAndMakeAscending(T[] a, int lo, int hi,Comparator<? super T> c) {


        assert lo < hi;
        int runHi = lo + 1;
        if (runHi == hi)
            return 1;

        // Find end of run, and reverse range if descending
        if (c.compare(a[runHi++], a[lo]) < 0) {

     // Descending
            while (runHi < hi && c.compare(a[runHi], a[runHi - 1]) < 0)
                runHi++;
            reverseRange(a, lo, runHi);
        } else {

                                  // Ascending
            while (runHi < hi && c.compare(a[runHi], a[runHi - 1]) >= 0)
                runHi++;
        }

        return runHi - lo;
    }
}
The above code will eventually run into countRunAndMakeAscending()this method. We can see that only the compare method is used, so when calling the Arrays.sort method, only the class object of the specific compare override method is passed. This is also a method that must be implemented by subclasses in the Comparator interface.
6.3 Command Mode
6.3.1 Overview
In daily life, when we go out to eat, we will encounter the following scenes.

definition:
Encapsulating a request as an object separates the responsibility for making the request from the responsibility for executing it. In this way, the two communicate through the command object, which is convenient for storing, transferring, calling, adding and managing the command object.
6.3.2 Structure
The command pattern consists of the following main roles:
- Abstract command class (Command) role: Define the interface of the command and declare the method of execution.
- Concrete Command (Concrete Command) role: a specific command that implements the command interface; usually holds the receiver and calls the function of the receiver to complete the operation to be performed by the command.
- Realizer/Receiver (Receiver) role: Receiver, the object that actually executes the command. Any class may become a receiver, as long as it can realize the corresponding functions required by the order.
- Invoker/Requester (Invoker) role: requires the command object to execute the request, usually holds the command object, and can hold many command objects. This is where the client actually triggers the command and requires the command to perform the corresponding operation, that is to say, it is equivalent to the entry of using the command object.
6.3.3 Case implementation
To implement the above case with code, we need to analyze who plays the role of command mode in this case.
Waiter: It is the role of the caller, who initiates the order.
Senior Chef: It is the role of the receiver, the person who actually executes the order.
Order: The order is included in the command.
The class diagram is as follows:
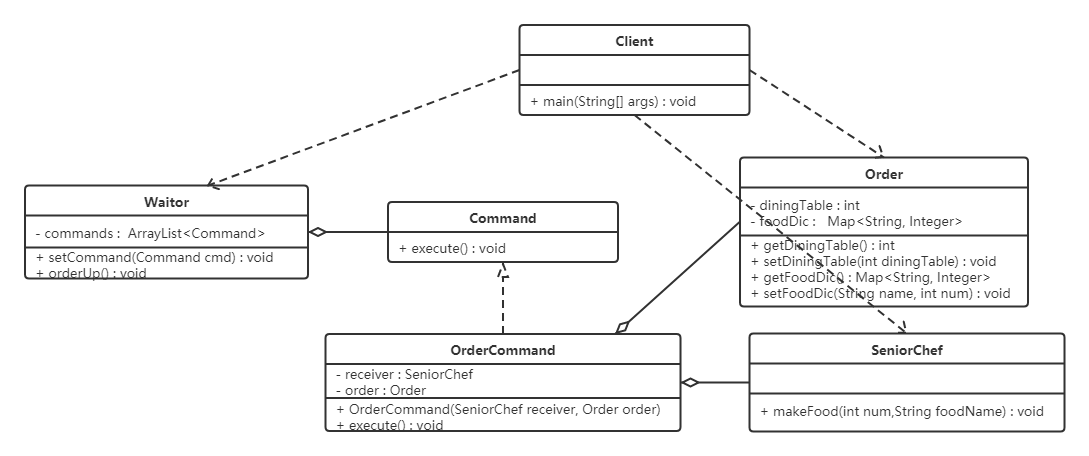
code show as below:
public interface Command {


    void execute();//只需要定义一个统一的执行方法
}

public class OrderCommand implements Command {


    //持有接受者对象
    private SeniorChef receiver;
    private Order order;

    public OrderCommand(SeniorChef receiver, Order order){


        this.receiver = receiver;
        this.order = order;
    }

    public void execute()  {


        System.out.println(order.getDiningTable() + "桌的订单:");
        Set<String> keys = order.getFoodDic().keySet();
        for (String key : keys) {


            receiver.makeFood(order.getFoodDic().get(key),key);
        }

        try {


            Thread.sleep(100);//停顿一下 模拟做饭的过程
        } catch (InterruptedException e) {


            e.printStackTrace();
        }


        System.out.println(order.getDiningTable() + "桌的饭弄好了");
    }
}

public class Order {


    // 餐桌号码
    private int diningTable;

    // 用来存储餐名并记录份数
    private Map<String, Integer> foodDic = new HashMap<String, Integer>();

    public int getDiningTable() {


        return diningTable;
    }

    public void setDiningTable(int diningTable) {


        this.diningTable = diningTable;
    }

    public Map<String, Integer> getFoodDic() {


        return foodDic;
    }

    public void setFoodDic(String name, int num) {


        foodDic.put(name,num);
    }
}

// 资深大厨类 是命令的Receiver
public class SeniorChef {


    public void makeFood(int num,String foodName) {


        System.out.println(num + "份" + foodName);
    }
}

public class Waitor {


    private ArrayList<Command> commands;//可以持有很多的命令对象

    public Waitor() {


        commands = new ArrayList();
    }

    public void setCommand(Command cmd){


        commands.add(cmd);
    }

    // 发出命令 喊 订单来了,厨师开始执行
    public void orderUp() {


        System.out.println("美女服务员:叮咚,大厨,新订单来了.......");
        for (int i = 0; i < commands.size(); i++) {


            Command cmd = commands.get(i);
            if (cmd != null) {


                cmd.execute();
            }
        }
    }
}

public class Client {


    public static void main(String[] args) {


        //创建2个order
        Order order1 = new Order();
        order1.setDiningTable(1);
        order1.getFoodDic().put("西红柿鸡蛋面",1);
        order1.getFoodDic().put("小杯可乐",2);

        Order order2 = new Order();
        order2.setDiningTable(3);
        order2.getFoodDic().put("尖椒肉丝盖饭",1);
        order2.getFoodDic().put("小杯雪碧",1);

        //创建接收者
        SeniorChef receiver=new SeniorChef();
        //将订单和接收者封装成命令对象
        OrderCommand cmd1 = new OrderCommand(receiver, order1);
        OrderCommand cmd2 = new OrderCommand(receiver, order2);
        //创建调用者 waitor
        Waitor invoker = new Waitor();
        invoker.setCommand(cmd1);
        invoker.setCommand(cmd2);

        //将订单带到柜台 并向厨师喊 订单来了
        invoker.orderUp();
    }
}
6.3.4 Advantages and disadvantages
1. Advantages:
- Reduce system coupling. The command pattern decouples the object that invokes the operation from the object that implements the operation.
- Adding or removing commands is very convenient. Using the command mode to add and delete commands will not affect other classes, it satisfies the "open and close principle", and is more flexible for expansion.
- Macro commands can be implemented. The command mode can be combined with the combination mode to assemble multiple commands into a combined command, that is, a macro command.
- It is convenient to implement Undo and Redo operations. The command mode can be combined with the memo mode described later to realize command revocation and restoration.
2. Disadvantages:
- Using the command pattern may result in some systems having too many concrete command classes.
- The system structure is more complicated.
6.3.5 Usage Scenarios
- The system needs to decouple the request caller and request receiver so that the caller and receiver do not interact directly.
- The system needs to specify requests, queue them, and execute them at different times.
- The system needs to support the command's undo (Undo) operation and recovery (Redo) operation.
6.3.6 JDK source code analysis
Runable is a typical command mode. Runnable acts as a command, Thread acts as a caller, and the start method is its execution method.
//命令接口(抽象命令角色)
public interface Runnable {


	public abstract void run();
}

//调用者
public class Thread implements Runnable {


    private Runnable target;

    public synchronized void start() {


        if (threadStatus != 0)
            throw new IllegalThreadStateException();

        group.add(this);

        boolean started = false;
        try {


            start0();
            started = true;
        } finally {


            try {


                if (!started) {


                    group.threadStartFailed(this);
                }
            } catch (Throwable ignore) {


            }
        }
    }

    private native void start0();
}
It will call a native method start0(), call the system method, and start a thread. The receiver is open to programmers, who can define the receiver themselves.
/**
 * jdk Runnable 命令模式
 *		TurnOffThread : 属于具体
 */
public class TurnOffThread implements Runnable{


     private Receiver receiver;

     public TurnOffThread(Receiver receiver) {


     	this.receiver = receiver;
     }
     public void run() {


     	receiver.turnOFF();
     }
}
/**
 * 测试类
 */
public class Demo {


     public static void main(String[] args) {


         Receiver receiver = new Receiver();
         TurnOffThread turnOffThread = new TurnOffThread(receiver);
         Thread thread = new Thread(turnOffThread);
         thread.start();
     }
}
6.4 Chain of Responsibility Model
6.4.1 Overview
In real life, there are often such cases: a request can be processed by multiple objects, but the processing conditions or permissions of each object are different. For example, if a company employee asks for leave, the leaders who can approve the leave include the department head, deputy general manager, general manager, etc., but the number of days that each leader can approve is different. Employees must find different leaders to sign according to the number of days they want to ask for leave. That is to say, employees must remember information such as the name, phone number and address of each leader, which increases the difficulty. There are many other examples like this, such as seeking reimbursement for business trips from leaders, and the game of "drumming and passing flowers" in daily life.
definition:
Also known as the responsibility chain mode, in order to avoid coupling the request sender with multiple request handlers, all request handlers are connected into a chain by remembering the reference of the next object through the previous object; when a request occurs , the request can be passed down the chain until an object handles it.
6.4.2 Structure
The Chain of Responsibility pattern mainly includes the following roles:
- Abstract handler (Handler) role: defines an interface for processing requests, including abstract processing methods and a subsequent connection.
- Concrete Handler (Concrete Handler) role: implement the processing method of the abstract handler, judge whether the request can be processed, if it can handle the request, process it, otherwise transfer the request to its successor.
- Client class (Client) role: Create a processing chain and submit a request to the specific processor object at the head of the chain. It does not care about the processing details and the delivery process of the request.
6.4.3 Case Implementation
Now it is necessary to develop a leave process control system. A leave of less than one day only needs the approval of the team leader; a leave of 1 to 3 days requires the approval of the department manager; a request of 3 to 7 days requires the approval of the general manager.
The class diagram is as follows:

code show as below:
//请假条
public class LeaveRequest {


    private String name;//姓名
    private int num;//请假天数
    private String content;//请假内容

    public LeaveRequest(String name, int num, String content) {


        this.name = name;
        this.num = num;
        this.content = content;
    }

    public String getName() {


        return name;
    }

    public int getNum() {


        return num;
    }

    public String getContent() {


        return content;
    }
}

//处理者抽象类
public abstract class Handler {


    protected final static int NUM_ONE = 1;
    protected final static int NUM_THREE = 3;
    protected final static int NUM_SEVEN = 7;

    //该领导处理的请假天数区间
    private int numStart;
    private int numEnd;

    //领导上面还有领导
    private Handler nextHandler;

    //设置请假天数范围 上不封顶
    public Handler(int numStart) {


        this.numStart = numStart;
    }

    //设置请假天数范围
    public Handler(int numStart, int numEnd) {


        this.numStart = numStart;
        this.numEnd = numEnd;
    }

    //设置上级领导
    public void setNextHandler(Handler nextHandler){


        this.nextHandler = nextHandler;
    }

    //提交请假条
    public final void submit(LeaveRequest leave){


        if(0 == this.numStart){


            return;
        }

        //如果请假天数达到该领导者的处理要求
        if(leave.getNum() >= this.numStart){


            this.handleLeave(leave);

            //如果还有上级 并且请假天数超过了当前领导的处理范围
            if(null != this.nextHandler && leave.getNum() > numEnd){


                this.nextHandler.submit(leave);//继续提交
            } else {


                System.out.println("流程结束");
            }
        }
    }

    //各级领导处理请假条方法
    protected abstract void handleLeave(LeaveRequest leave);
}

//小组长
public class GroupLeader extends Handler {


    public GroupLeader() {


        //小组长处理1-3天的请假
        super(Handler.NUM_ONE, Handler.NUM_THREE);
    }

    @Override
    protected void handleLeave(LeaveRequest leave) {


        System.out.println(leave.getName() + "请假" + leave.getNum() + "天," + leave.getContent() + "。");
        System.out.println("小组长审批:同意。");
    }
}

//部门经理
public class Manager extends Handler {


    public Manager() {


        //部门经理处理3-7天的请假
        super(Handler.NUM_THREE, Handler.NUM_SEVEN);
    }

    @Override
    protected void handleLeave(LeaveRequest leave) {


        System.out.println(leave.getName() + "请假" + leave.getNum() + "天," + leave.getContent() + "。");
        System.out.println("部门经理审批:同意。");
    }
}

//总经理
public class GeneralManager extends Handler {


    public GeneralManager() {


        //部门经理处理7天以上的请假
        super(Handler.NUM_SEVEN);
    }

    @Override
    protected void handleLeave(LeaveRequest leave) {


        System.out.println(leave.getName() + "请假" + leave.getNum() + "天," + leave.getContent() + "。");
        System.out.println("总经理审批:同意。");
    }
}

//测试类
public class Client {


    public static void main(String[] args) {


        //请假条来一张
        LeaveRequest leave = new LeaveRequest("小花",5,"身体不适");

        //各位领导
        GroupLeader groupLeader = new GroupLeader();
        Manager manager = new Manager();
        GeneralManager generalManager = new GeneralManager();

        groupLeader.setNextHandler(manager);//小组长的领导是部门经理
        manager.setNextHandler(generalManager);//部门经理的领导是总经理
        //之所以在这里设置上级领导,是因为可以根据实际需求来更改设置,如果实战中上级领导人都是固定的,则可以移到领导实现类中。

        //提交申请
        groupLeader.submit(leave);
    }
}
6.4.4 Advantages and disadvantages
1. Advantages:
-
Reduced coupling between objects
This pattern reduces the coupling between request sender and receiver.
-
Enhanced system scalability
New request processing classes can be added as needed to meet the principle of opening and closing.
-
Enhanced flexibility in assigning responsibilities to objects
When the workflow changes, you can dynamically change the members in the chain or modify their order, and you can also dynamically add or delete responsibilities.
-
Chain of Responsibility simplifies the connection between objects
An object only needs to keep a reference pointing to its successor, and does not need to keep references to all other handlers, which avoids the use of numerous if or if···else statements.
-
responsibility sharing
Each class only needs to handle the work that it should handle, and pass the unhandled ones to the next object to complete, clarify the scope of responsibility of each class, and conform to the single responsibility principle of the class.
2. Disadvantages:
- There is no guarantee that every request will be processed. Since a request has no clear receiver, there is no guarantee that it will be processed, and the request may go all the way down the chain without being processed.
- Compared with a long chain of responsibility, the processing of the request may involve multiple processing objects, and the system performance will be affected to a certain extent.
- The rationality of the establishment of the chain of responsibility depends on the client, which increases the complexity of the client, and may cause system errors due to incorrect settings of the chain of responsibility, such as circular calls.
6.4.5 Source Code Analysis
In javaWeb application development, FilterChain is a typical application of the chain of responsibility (filter) pattern. The following is the simulation implementation analysis of Filter:
-
Simulate web request Request and web response Response
public interface Request{ } public interface Response{ } -
Analog web filter Filter
public interface Filter { public void doFilter(Request req,Response res,FilterChain c); } -
Simulate implementation of concrete filters
public class FirstFilter implements Filter { @Override public void doFilter(Request request, Response response, FilterChain chain) { System.out.println("过滤器1 前置处理"); // 先执行所有request再倒序执行所有response chain.doFilter(request, response); System.out.println("过滤器1 后置处理"); } } public class SecondFilter implements Filter { @Override public void doFilter(Request request, Response response, FilterChain chain) { System.out.println("过滤器2 前置处理"); // 先执行所有request再倒序执行所有response chain.doFilter(request, response); System.out.println("过滤器2 后置处理"); } } -
Simulate the implementation of the filter chain FilterChain
public class FilterChain { private List<Filter> filters = new ArrayList<Filter>(); private int index = 0; // 链式调用 public FilterChain addFilter(Filter filter) { this.filters.add(filter); return this; } public void doFilter(Request request, Response response) { if (index == filters.size()) { return; } Filter filter = filters.get(index); index++; filter.doFilter(request, response, this); } } -
test class
public class Client {


    public static void main(String[] args) {


        Request  req = null;
        Response res = null ;

        FilterChain filterChain = new FilterChain();
        filterChain.addFilter(new FirstFilter()).addFilter(new SecondFilter());
        filterChain.doFilter(req,res);
    }
}
6. Behavioral model
6.5 State Mode
6.5.1 Overview
[Example] The state of an elevator is controlled by buttons. An elevator has a door-opening state, a door-closing state, a stop state, and a running state. For each state change, it is possible to update the processing according to other states. For example, if the elevator door is in the running state, the door opening operation cannot be performed, but if the elevator door is in the stopped state, the door opening operation can be performed.
The class diagram is as follows:
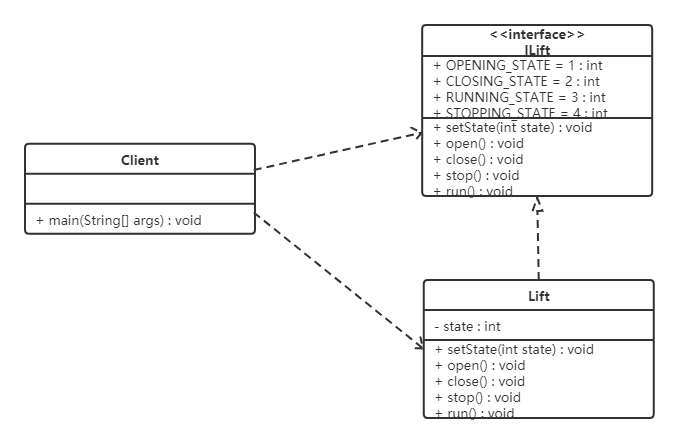
code show as below:
public interface ILift {


    //电梯的4个状态
    //开门状态
    public final static int OPENING_STATE = 1;
    //关门状态
    public final static int CLOSING_STATE = 2;
    //运行状态
    public final static int RUNNING_STATE = 3;
    //停止状态
    public final static int STOPPING_STATE = 4;

    //设置电梯的状态
    public void setState(int state);

    //电梯的动作
    public void open();
    public void close();
    public void run();
    public void stop();
}

public class Lift implements ILift {


    private int state;

    @Override
    public void setState(int state) {


        this.state = state;
    }

    //执行关门动作
    @Override
    public void close() {


        switch (this.state) {


            case OPENING_STATE:
                System.out.println("电梯关门了。。。");//只有开门状态可以关闭电梯门,可以对应电梯状态表来看
                this.setState(CLOSING_STATE);//关门之后电梯就是关闭状态了
                break;
            case CLOSING_STATE:
                //do nothing //已经是关门状态,不能关门
                break;
            case RUNNING_STATE:
                //do nothing //运行时电梯门是关着的,不能关门
                break;
            case STOPPING_STATE:
                //do nothing //停止时电梯也是关着的,不能关门
                break;
        }
    }

    //执行开门动作
    @Override
    public void open() {


        switch (this.state) {


            case OPENING_STATE://门已经开了,不能再开门了
                //do nothing
                break;
            case CLOSING_STATE://关门状态,门打开:
                System.out.println("电梯门打开了。。。");
                this.setState(OPENING_STATE);
                break;
            case RUNNING_STATE:
                //do nothing 运行时电梯不能开门
                break;
            case STOPPING_STATE:
                System.out.println("电梯门开了。。。");//电梯停了,可以开门了
                this.setState(OPENING_STATE);
                break;
        }
    }

    //执行运行动作
    @Override
    public void run() {


        switch (this.state) {


            case OPENING_STATE://电梯不能开着门就走
                //do nothing
                break;
            case CLOSING_STATE://门关了,可以运行了
                System.out.println("电梯开始运行了。。。");
                this.setState(RUNNING_STATE);//现在是运行状态
                break;
            case RUNNING_STATE:
                //do nothing 已经是运行状态了
                break;
            case STOPPING_STATE:
                System.out.println("电梯开始运行了。。。");
                this.setState(RUNNING_STATE);
                break;
        }
    }

    //执行停止动作
    @Override
    public void stop() {


        switch (this.state) {


            case OPENING_STATE: //开门的电梯已经是是停止的了(正常情况下)
                //do nothing
                break;
            case CLOSING_STATE://关门时才可以停止
                System.out.println("电梯停止了。。。");
                this.setState(STOPPING_STATE);
                break;
            case RUNNING_STATE://运行时当然可以停止了
                System.out.println("电梯停止了。。。");
                this.setState(STOPPING_STATE);
                break;
            case STOPPING_STATE:
                //do nothing
                break;
        }
    }
}

public class Client {


    public static void main(String[] args) {


        Lift lift = new Lift();
        lift.setState(ILift.STOPPING_STATE);//电梯是停止的
        lift.open();//开门
        lift.close();//关门
        lift.run();//运行
        lift.stop();//停止
    }
}
problem analysis:
- A lot of judgments such as switch...case are used (the same is true for if...else), which makes the readability of the program worse.
- Scalability is poor. If a new power-off state is added, we need to modify the above judgment logic
definition:
For stateful objects, the complex "judgment logic" is extracted into different state objects, allowing state objects to change their behavior when their internal state changes.
6.5.2 Structure
The State pattern contains the following main roles.
- Environment (Context) role: also known as context, it defines the interface required by the client program, maintains a current state, and delegates state-related operations to the current state object for processing.
- Abstract state (State) role: Define an interface to encapsulate the behavior corresponding to a specific state in the environment object.
- Concrete State role: implement the behavior corresponding to the abstract state.
6.5.3 Case Implementation
Improvements are made to the above elevator case using the state model. The class diagram is as follows:
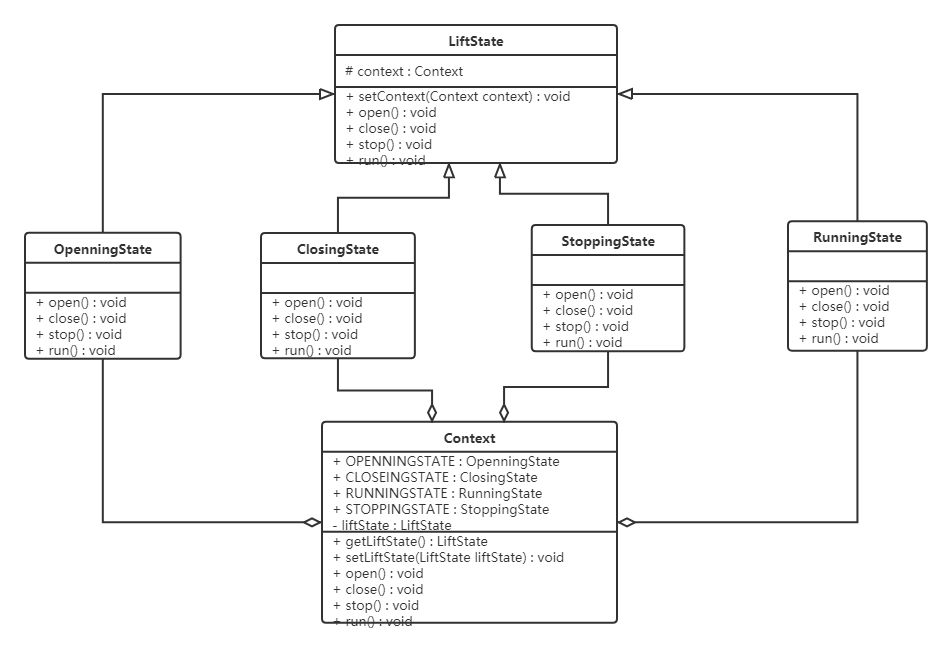
code show as below:
//抽象状态类
public abstract class LiftState {


    //定义一个环境角色,也就是封装状态的变化引起的功能变化
    protected Context context;

    public void setContext(Context context) {


        this.context = context;
    }

    //电梯开门动作
    public abstract void open();

    //电梯关门动作
    public abstract void close();

    //电梯运行动作
    public abstract void run();

    //电梯停止动作
    public abstract void stop();
}

//开启状态
public class OpenningState extends LiftState {


    //开启当然可以关闭了,我就想测试一下电梯门开关功能
    @Override
    public void open() {


        System.out.println("电梯门开启...");
    }

    @Override
    public void close() {


        //状态修改
        super.context.setLiftState(Context.closeingState);
        //动作委托为CloseState来执行,也就是委托给了ClosingState子类执行这个动作
        super.context.getLiftState().close();
    }

    //电梯门不能开着就跑,这里什么也不做
    @Override
    public void run() {


        //do nothing
    }

    //开门状态已经是停止的了
    @Override
    public void stop() {


        //do nothing
    }
}

//运行状态
public class RunningState extends LiftState {


    //运行的时候开电梯门?你疯了!电梯不会给你开的
    @Override
    public void open() {


        //do nothing
    }

    //电梯门关闭?这是肯定了
    @Override
    public void close() {

    //虽然可以关门,但这个动作不归我执行
        //do nothing
    }

    //这是在运行状态下要实现的方法
    @Override
    public void run() {


        System.out.println("电梯正在运行...");
    }

    //这个事绝对是合理的,光运行不停止还有谁敢做这个电梯?!估计只有上帝了
    @Override
    public void stop() {


        super.context.setLiftState(Context.stoppingState);
        super.context.stop();
    }
}

//停止状态
public class StoppingState extends LiftState {


    //停止状态,开门,那是要的!
    @Override
    public void open() {


        //状态修改
        super.context.setLiftState(Context.openningState);
        //动作委托为CloseState来执行,也就是委托给了ClosingState子类执行这个动作
        super.context.getLiftState().open();
    }

    @Override
    public void close() {

    //虽然可以关门,但这个动作不归我执行
        //状态修改
        super.context.setLiftState(Context.closeingState);
        //动作委托为CloseState来执行,也就是委托给了ClosingState子类执行这个动作
        super.context.getLiftState().close();
    }

    //停止状态再跑起来,正常的很
    @Override
    public void run() {


        //状态修改
        super.context.setLiftState(Context.runningState);
        //动作委托为CloseState来执行,也就是委托给了ClosingState子类执行这个动作
        super.context.getLiftState().run();
    }

    //停止状态是怎么发生的呢?当然是停止方法执行了
    @Override
    public void stop() {


        System.out.println("电梯停止了...");
    }
}

//关闭状态
public class ClosingState extends LiftState {


    @Override
    //电梯门关闭,这是关闭状态要实现的动作
    public void close() {


        System.out.println("电梯门关闭...");
    }

    //电梯门关了再打开,逗你玩呢,那这个允许呀
    @Override
    public void open() {


        super.context.setLiftState(Context.openningState);
        super.context.open();
    }


    //电梯门关了就跑,这是再正常不过了
    @Override
    public void run() {


        super.context.setLiftState(Context.runningState);
        super.context.run();
    }

    //电梯门关着,我就不按楼层
    @Override
    public void stop() {


        super.context.setLiftState(Context.stoppingState);
        super.context.stop();
    }
}

//环境角色
public class Context {


    //定义出所有的电梯状态
    public final static OpenningState openningState = new OpenningState();//开门状态,这时候电梯只能关闭
    public final static ClosingState closeingState = new ClosingState();//关闭状态,这时候电梯可以运行、停止和开门
    public final static RunningState runningState = new RunningState();//运行状态,这时候电梯只能停止
    public final static StoppingState stoppingState = new StoppingState();//停止状态,这时候电梯可以开门、运行


    //定义一个当前电梯状态
    private LiftState liftState;

    public LiftState getLiftState() {


        return this.liftState;
    }

    public void setLiftState(LiftState liftState) {


        //当前环境改变
        this.liftState = liftState;
        //把当前的环境通知到各个实现类中
        this.liftState.setContext(this);
    }

    public void open() {


        this.liftState.open();
    }

    public void close() {


        this.liftState.close();
    }

    public void run() {


        this.liftState.run();
    }

    public void stop() {


        this.liftState.stop();
    }
}

//测试类
public class Client {


    public static void main(String[] args) {


        Context context = new Context();
        context.setLiftState(new ClosingState());

        context.open();
        context.close();
        context.run();
        context.stop();
    }
}
6.5.4 Advantages and disadvantages
1. Advantages:
- Put all the behaviors related to a certain state into a class, and you can easily add new states, and you only need to change the state of the object to change the behavior of the object.
- Allows state transition logic to be integrated into the state object, rather than a giant block of conditional statements.
2. Disadvantages:
- The use of state mode will inevitably increase the number of system classes and objects.
- The structure and implementation of the state pattern are relatively complicated, and if used improperly, it will lead to confusion in the program structure and code.
- The state pattern does not support the "open-closed principle" very well.
6.5.5 Usage Scenarios
- The State pattern can be considered when the behavior of an object depends on its state and it must change its behavior at runtime based on the state.
- An operation contains a huge branch structure, and these branches depend on the state of the object.
6.6 Observer pattern
6.6.1 Overview
definition:
Also known as the publish-subscribe (Publish/Subscribe) pattern, it defines a one-to-many dependency relationship, allowing multiple observer objects to listen to a certain topic object at the same time. The subject object notifies all observer objects of state changes, enabling them to update themselves automatically.
6.6.2 Structure
In the observer mode, there are the following roles:
- Subject: abstract subject (abstract observed), the abstract subject role saves all observer objects in a collection, each subject can have any number of observers, abstract subject provides an interface, you can add and delete observer objects .
- ConcreteSubject: Specific subject (specific observer), this role stores the relevant state into the specific observer object, and sends a notification to all registered observers when the internal state of the specific subject changes.
- Observer: Abstract observer is an abstract class of observer, which defines an update interface, so that it updates itself when it is notified of theme changes.
- ConcrereObserver: Concrete observer, which implements the update interface defined by the abstract observer, so as to update its own state when it is notified of topic changes.
6.6.3 Case implementation
[Example] WeChat official account
When using the WeChat official account, everyone will have such an experience. When there is a new content update in the official account you follow, it will be pushed to the WeChat client who follows the official account. We use the Observer mode to simulate such a scenario. The WeChat user is the observer, and the WeChat official account is the observed. There are multiple WeChat users who follow the official account of Program Ape.
The class diagram is as follows:
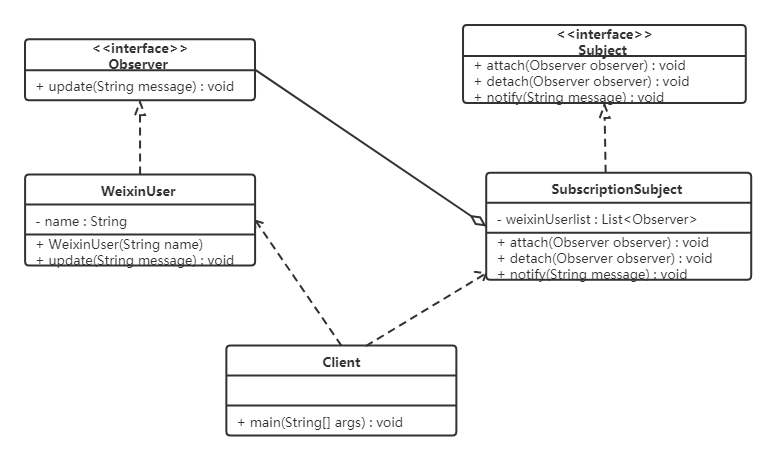
code show as below:
Define an abstract observer class, which defines an update method
public interface Observer {


    void update(String message);
}
Define a specific observer class. Wechat users are observers, and the update method is implemented in it
public class WeixinUser implements Observer {


    // 微信用户名
    private String name;

    public WeixinUser(String name) {


        this.name = name;
    }
    @Override
    public void update(String message) {


        System.out.println(name + "-" + message);
    }
}
Define an abstract theme class and provide three methods: attach, detach, and notify
public interface Subject {


    //增加订阅者
    public void attach(Observer observer);

    //删除订阅者
    public void detach(Observer observer);

    //通知订阅者更新消息
    public void notify(String message);
}
The WeChat official account is a specific topic (specifically the observed person), which stores the WeChat users who subscribe to the official account, and implements the methods in the abstract topic
public class SubscriptionSubject implements Subject {


    //储存订阅公众号的微信用户
    private List<Observer> weixinUserlist = new ArrayList<Observer>();

    @Override
    public void attach(Observer observer) {


        weixinUserlist.add(observer);
    }

    @Override
    public void detach(Observer observer) {


        weixinUserlist.remove(observer);
    }

    @Override
    public void notify(String message) {


        for (Observer observer : weixinUserlist) {


            observer.update(message);
        }
    }
}
client program
public class Client {


    public static void main(String[] args) {


        SubscriptionSubject mSubscriptionSubject=new SubscriptionSubject();
        //创建微信用户
        WeixinUser user1=new WeixinUser("孙悟空");
        WeixinUser user2=new WeixinUser("猪悟能");
        WeixinUser user3=new WeixinUser("沙悟净");
        //订阅公众号
        mSubscriptionSubject.attach(user1);
        mSubscriptionSubject.attach(user2);
        mSubscriptionSubject.attach(user3);
        //公众号更新发出消息给订阅的微信用户
        mSubscriptionSubject.notify("传智黑马的专栏更新了");
    }
}
6.6.4 Advantages and disadvantages
1. Advantages:
- The coupling relationship between the target and the observer is reduced, and there is an abstract coupling relationship between the two.
- The observed person sends a notification, and all registered observers will receive the information [Broadcast mechanism can be realized]
2. Disadvantages:
- If there are many observers, it will take time for all observers to receive notifications from the observed
- If the observer has a circular dependency, the notification sent by the observer will cause the observer to call circularly, which will cause the system to crash
6.6.5 Usage Scenarios
- There is a one-to-many relationship between objects, and changes in the state of one object will affect other objects.
- When an abstract model has two aspects, one of which depends on the other.
6.6.6 Implementations provided in the JDK
In Java, the observer pattern is defined through the java.util.Observable class and the java.util.Observer interface, as long as their subclasses are implemented, observer pattern instances can be written.
1. Observable class
The Observable class is an abstract target class (observed). It has a Vector collection member variable for saving all observer objects to be notified. Let's introduce its three most important methods.
-
void addObserver(Observer o) method: used to add a new observer object to the collection.
-
void notifyObservers(Object arg) method: Call the update method of all observer objects in the collection to notify them of data changes. Usually observers who joined the set later will be notified earlier.
-
void setChange() method: used to set an internal flag of type boolean, indicating that the target object has changed. notifyObservers() will only notify observers when it is true.
2. Observer interface
The Observer interface is an abstract observer that monitors changes in the target object. When the target object changes, the observer is notified and calls the update method to perform corresponding work.
【Example】The police caught a thief
The observer pattern can also be used for the police to catch the thief. The police are the observers, and the thief is the observed. code show as below:
The thief is an observer, so it needs to inherit the Observable class
public class Thief extends Observable {


    private String name;

    public Thief(String name) {


        this.name = name;
    }

    public void setName(String name) {


        this.name = name;
    }

    public String getName() {


        return name;
    }

    public void steal() {


        System.out.println("小偷:我偷东西了,有没有人来抓我!!!");
        super.setChanged(); //changed  = true
        super.notifyObservers();
    }
}
The police is an observer, so it needs to implement the Observer interface
public class Policemen implements Observer {


    private String name;

    public Policemen(String name) {


        this.name = name;
    }
    public void setName(String name) {


        this.name = name;
    }

    public String getName() {


        return name;
    }

    @Override
    public void update(Observable o, Object arg) {


        System.out.println("警察:" + ((Thief) o).getName() + ",我已经盯你很久了,你可以保持沉默,但你所说的将成为呈堂证供!!!");
    }
}
client code
public class Client {


    public static void main(String[] args) {


        //创建小偷对象
        Thief t = new Thief("隔壁老王");
        //创建警察对象
        Policemen p = new Policemen("小李");
        //让警察盯着小偷
        t.addObserver(p);
        //小偷偷东西
        t.steal();
    }
}
6.7 Intermediary mode
6.7.1 Overview
Generally speaking, the relationship between colleague classes is relatively complicated. When multiple colleague classes are related to each other, the relationship between them will appear as a complex network structure. This is an over-coupling architecture, that is, not It is conducive to the reuse of classes and is not stable. For example, in the left picture below, there are six colleagues class objects, if object 1 changes, then 4 objects will be affected. If object 2 changes, then 5 objects will be affected. That said, the design of direct associations between coworker classes is bad.
If the intermediary model is introduced, the relationship between colleagues will become a star structure. As can be seen from the figure on the right below, any change in a class will only affect the class itself and the intermediary, thus reducing the system coupling. A good design will not encapsulate all object relationship processing logic in this class, but use a special class to manage those behaviors that do not belong to itself.
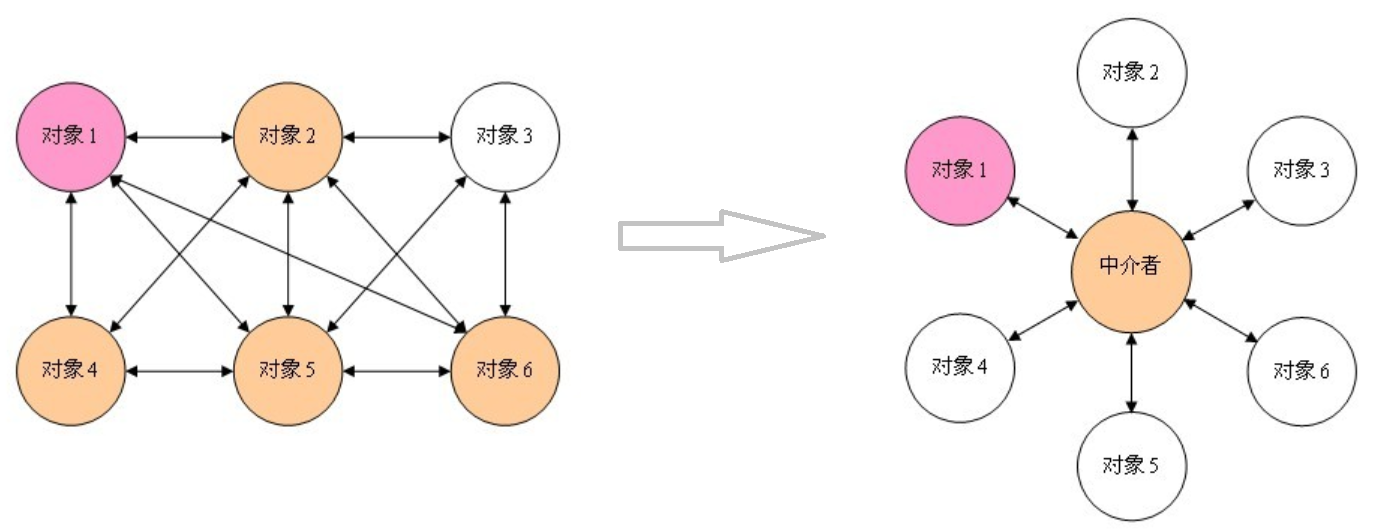
definition:
Also known as the mediation mode, an intermediary role is defined to encapsulate the interaction between a series of objects, so that the coupling between the original objects is loose, and the interaction between them can be changed independently.
6.7.2 Structure
The Mediator pattern contains the following main roles:
-
Abstract mediator (Mediator) role: it is the interface of the mediator, which provides an abstract method for registering and forwarding the information of colleague objects.
-
Specific mediator (ConcreteMediator) role: implement the mediator interface, define a List to manage colleague objects, and coordinate the interaction between each colleague role, so it depends on the colleague role.
-
Abstract colleague class (Colleague) role: define the interface of the colleague class, save the intermediary object, provide the abstract method for the interaction of the colleague object, and realize the public functions of all the colleague classes that interact with each other.
-
Concrete Colleague (Concrete Colleague) role: It is the implementer of the abstract colleague class. When it needs to interact with other colleague objects, the intermediary object is responsible for the subsequent interaction.
6.7.3 Case implementation
[Example] Renting a house
Now renting a house is basically through a housing intermediary, the homeowner entrusts the house to the housing intermediary, and the renter obtains housing information from the housing intermediary. A real estate agent acts as an intermediary between renters and homeowners.
The class diagram is as follows:
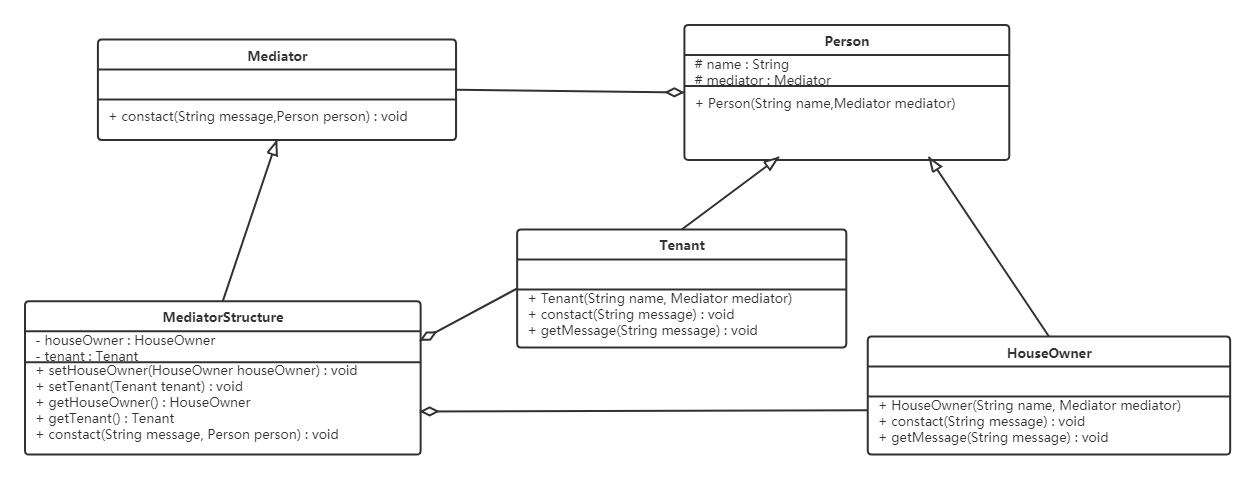
code show as below:
//抽象中介者
public abstract class Mediator {


    //申明一个联络方法
    public abstract void constact(String message,Person person);
}

//抽象同事类
public abstract class Person {


    protected String name;
    protected Mediator mediator;

    public Person(String name,Mediator mediator){


        this.name = name;
        this.mediator = mediator;
    }
}

//具体同事类 房屋拥有者
public class HouseOwner extends Person {


    public HouseOwner(String name, Mediator mediator) {


        super(name, mediator);
    }

    //与中介者联系
    public void constact(String message){


        mediator.constact(message, this);
    }

    //获取信息
    public void getMessage(String message){


        System.out.println("房主" + name +"获取到的信息:" + message);
    }
}

//具体同事类 承租人
public class Tenant extends Person {


    public Tenant(String name, Mediator mediator) {


        super(name, mediator);
    }

    //与中介者联系
    public void constact(String message){


        mediator.constact(message, this);
    }

    //获取信息
    public void getMessage(String message){


        System.out.println("租房者" + name +"获取到的信息:" + message);
    }
}

//中介机构
public class MediatorStructure extends Mediator {


    //首先中介结构必须知道所有房主和租房者的信息
    private HouseOwner houseOwner;
    private Tenant tenant;

    public HouseOwner getHouseOwner() {


        return houseOwner;
    }

    public void setHouseOwner(HouseOwner houseOwner) {


        this.houseOwner = houseOwner;
    }

    public Tenant getTenant() {


        return tenant;
    }

    public void setTenant(Tenant tenant) {


        this.tenant = tenant;
    }

    public void constact(String message, Person person) {


        if (person == houseOwner) {

              //如果是房主,则租房者获得信息
            tenant.getMessage(message);
        } else {

           //反正则是房主获得信息
            houseOwner.getMessage(message);
        }
    }
}

//测试类
public class Client {


    public static void main(String[] args) {


        //一个房主、一个租房者、一个中介机构
        MediatorStructure mediator = new MediatorStructure();

        //房主和租房者只需要知道中介机构即可
        HouseOwner houseOwner = new HouseOwner("张三", mediator);
        Tenant tenant = new Tenant("李四", mediator);

        //中介结构要知道房主和租房者
        mediator.setHouseOwner(houseOwner);
        mediator.setTenant(tenant);

        tenant.constact("需要租三室的房子");
        houseOwner.constact("我这有三室的房子,你需要租吗?");
    }
}
6.7.4 Advantages and disadvantages
1. Advantages:
-
loose coupling
The intermediary mode encapsulates the interaction between multiple coworker objects into the intermediary object, so that the coworker objects are loosely coupled and can basically achieve complementary dependencies. In this way, colleagues objects can be changed and reused independently, instead of "moving the whole body with one place" as before.
-
centralized control interaction
The interaction of multiple colleagues objects is encapsulated in the intermediary object for centralized management, so that when these interaction behaviors change, only the intermediary object needs to be modified. Of course, if the system is already completed, then the intermediary should be extended Object, and each colleague class does not need to be modified.
-
Convert one-to-many association to one-to-one association
When the intermediary mode is not used, the relationship between colleague objects is usually one-to-many. After the intermediary object is introduced, the relationship between intermediary objects and colleague objects usually becomes a two-way one-to-one, which makes the relationship between objects Easier to understand and implement.
2. Disadvantages:
When there are too many colleagues, the responsibility of the mediator will be large, and it will become complex and large, so that the system is difficult to maintain.
6.7.5 Usage Scenarios
- There are complex reference relationships between objects in the system, and the system structure is confusing and difficult to understand.
- When you want to create an object that runs between multiple classes, but you don't want to generate new subclasses.
6.8 The Iterator Pattern
6.8.1 Overview
definition:
Provides an object to sequentially access a range of data in an aggregate object without exposing the aggregate object's internal representation.
6.8.2 Structure
The iterator pattern mainly includes the following roles:
-
Abstract Aggregate (Aggregate) role: defines the interface for storing, adding, and removing aggregated elements, and creating iterator objects.
-
ConcreteAggregate (ConcreteAggregate) role: implement the abstract aggregate class and return an instance of a concrete iterator.
-
Abstract iterator (Iterator) role: defines the interface for accessing and traversing aggregate elements, usually including hasNext(), next() and other methods.
-
Concrete iterator (Concretelterator) role: implement the method defined in the abstract iterator interface, complete the traversal of the aggregated object, and record the current position of the traversal.
6.8.3 Case implementation
[Example] Define a container object that can store student objects, and hand over the function of traversing the container to an iterator. The classes involved are as follows:
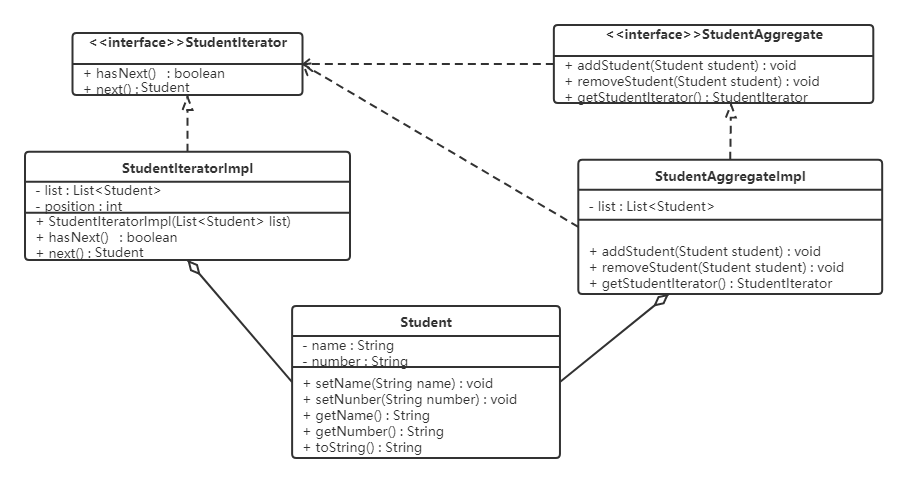
code show as below:
Define the iterator interface and declare the hasNext and next methods
public interface StudentIterator {


    boolean hasNext();
    Student next();
}
Define a concrete iterator class and override all abstract methods
public class StudentIteratorImpl implements StudentIterator {


    private List<Student> list;
    private int position = 0;

    public StudentIteratorImpl(List<Student> list) {


        this.list = list;
    }

    @Override
    public boolean hasNext() {


        return position < list.size();
    }

    @Override
    public Student next() {


        Student currentStudent = list.get(position);
        position ++;
        return currentStudent;
    }
}
Define an abstract container class, including methods for adding elements, removing elements, and obtaining iterator objects
public interface StudentAggregate {


    void addStudent(Student student);

    void removeStudent(Student student);

    StudentIterator getStudentIterator();
}
Define a specific container class and override all methods
public class StudentAggregateImpl implements StudentAggregate {


    private List<Student> list = new ArrayList<Student>();  // 学生列表

    @Override
    public void addStudent(Student student) {


        this.list.add(student);
    }

    @Override
    public void removeStudent(Student student) {


        this.list.remove(student);
    }

    @Override
    public StudentIterator getStudentIterator() {


        return new StudentIteratorImpl(list);
    }
}
6.8.4 Advantages and disadvantages
1. Advantages:
- It supports traversing an aggregate object in different ways, and multiple traversal methods can be defined on the same aggregate object. In the iterator mode, we only need to replace the original iterator with a different iterator to change the traversal algorithm. We can also define subclasses of iterators to support new traversal methods.
- Iterators simplify aggregation classes. Due to the introduction of iterators, there is no need to provide methods such as data traversal in the original aggregation objects, which can simplify the design of aggregation classes.
- In the iterator mode, due to the introduction of the abstraction layer, it is very convenient to add new aggregation classes and iterator classes without modifying the original code, which meets the requirements of the "open-close principle".
2. Disadvantages:
The number of classes has been increased, which increases the complexity of the system to a certain extent.
6.8.5 Usage Scenarios
- When you need to provide multiple traversal methods for aggregate objects.
- When it is necessary to provide a unified interface for traversing different aggregation structures.
- When accessing the contents of an aggregate object without exposing its representation of internal details.
6.8.6 JDK source code analysis
The iterator mode is widely used in many collection classes of JAVA. Next, let's see how the iterator mode is used in the JAVA source code.
List<String> list = new ArrayList<>();
Iterator<String> iterator = list.iterator(); //list.iterator()方法返回的肯定是Iterator接口的子实现类对象
while (iterator.hasNext()) {


    System.out.println(iterator.next());
}
After reading this code, is it familiar to you? It is basically similar to our code above. Iterators are used in single-column collections, and we use ArrayList as an example to illustrate
- List: abstract aggregation class
- ArrayList: concrete aggregation class
- Iterator: abstract iterator
- list.iterator(): Returns a specific iterator object that implements
Iteratorthe interface
Take a look at the code implementation of ArrayList in detail
public class ArrayList<E> extends AbstractList<E>
        implements List<E>, RandomAccess, Cloneable, java.io.Serializable {


    public Iterator<E> iterator() {


        return new Itr();
    }

    private class Itr implements Iterator<E> {


        int cursor;       // 下一个要返回元素的索引
        int lastRet = -1; // 上一个返回元素的索引
        int expectedModCount = modCount;

        Itr() {

    }

        //判断是否还有元素
        public boolean hasNext() {


            return cursor != size;
        }

        //获取下一个元素
        public E next() {


            checkForComodification();
            int i = cursor;
            if (i >= size)
                throw new NoSuchElementException();
            Object[] elementData = ArrayList.this.elementData;
            if (i >= elementData.length)
                throw new ConcurrentModificationException();
            cursor = i + 1;
            return (E) elementData[lastRet = i];
        }
        ...
}
This part of the code is relatively simple, iteratorroughly returning an instantiated Iteratorobject in the method. Itr is an inner class that implements Iteratorthe interface and overrides the abstract methods in it.
Notice:
When we are developing in JAVA, if we want to use the iterator mode, we just need to let our self-defined container class implement
java.util.Iterableand implement the iterator() method in it to returnjava.util.Iteratoran implementation class.
6.9 Visitor pattern
6.9.1 Overview
definition:
Encapsulate some operations that act on elements in a certain data structure, and it can define new operations that act on these elements without changing the data structure.
6.9.2 Structure
The Visitor pattern contains the following main roles:
(Element)Abstract visitor (Visitor) role: defines the behavior of visiting each element , its parameters are elements that can be accessed, and its number of methods is theoretically the same as the number of element classes (the number of Element implementation classes) Yes, it is not difficult to see from this point that the visitor pattern requires that the number of element classes cannot be changed.- Specific visitor (ConcreteVisitor) role: gives the specific behavior that occurs when visiting each element class.
- Abstract element (Element) role: defines a method to accept visitors (
accept), which means that each element must be accessible by visitors. - Concrete Element (ConcreteElement) role: Provide a specific implementation of the access method, and this specific implementation usually uses the method provided by the visitor to access the element class.
- Object Structure (Object Structure) role: the object structure mentioned in the definition, the object structure is an abstract expression, the specific point can be understood as a class with container properties or compound object characteristics, it will contain a set of elements ( ),
Elementand These elements can be iterated for access by the visitor.
6.9.3 Case implementation
【Example】Feed a pet
Nowadays, there are a lot of people who keep pets. Let’s take this as an example. Of course, pets are divided into dogs, cats, etc. If you want to feed the pets, the owner can feed them, and other people can also feed them.
- Visitor role: person who feeds pets
- Specific Visitor Roles: Owner, Others
- Abstract element role: animal abstract class
- Specific element roles: pet dog, pet cat
- Structural Object Role: Host
The class diagram is as follows:
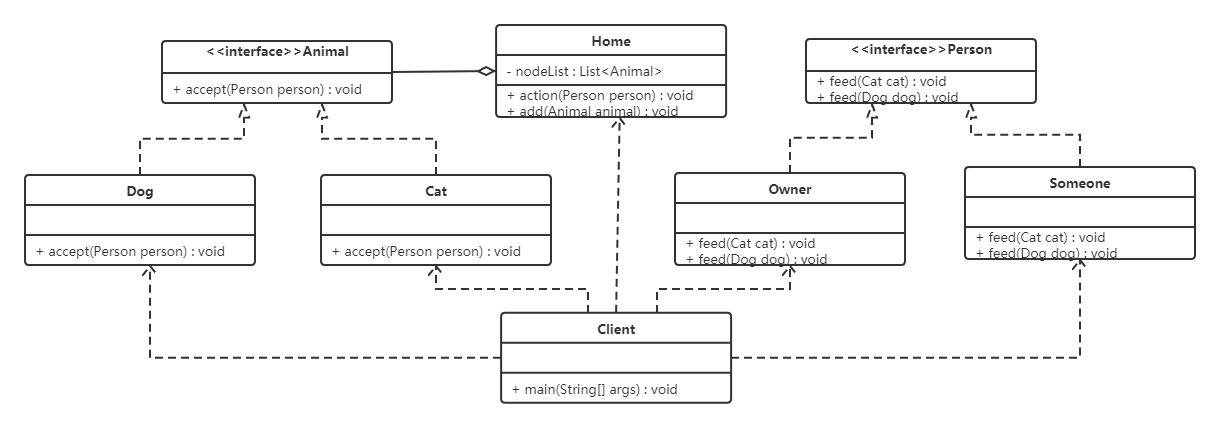
code show as below:
Create an abstract visitor interface
public interface Person {


    void feed(Cat cat);

    void feed(Dog dog);
}
To create different concrete visitor roles (master and others), all need to implement Personthe interface
public class Owner implements Person {


    @Override
    public void feed(Cat cat) {


        System.out.println("主人喂食猫");
    }

    @Override
    public void feed(Dog dog) {


        System.out.println("主人喂食狗");
    }
}

public class Someone implements Person {


    @Override
    public void feed(Cat cat) {


        System.out.println("其他人喂食猫");
    }

    @Override
    public void feed(Dog dog) {


        System.out.println("其他人喂食狗");
    }
}
Define abstract node - pet
public interface Animal {


    void accept(Person person);
}
Define Animalconcrete nodes (elements) that implement the interface
public class Dog implements Animal {


    @Override
    public void accept(Person person) {


        person.feed(this);
        System.out.println("好好吃,汪汪汪!!!");
    }
}

public class Cat implements Animal {


    @Override
    public void accept(Person person) {


        person.feed(this);
        System.out.println("好好吃,喵喵喵!!!");
    }
}
Defines the object structure, in this case the master's home
public class Home {


    private List<Animal> nodeList = new ArrayList<Animal>();

    public void action(Person person) {


        for (Animal node : nodeList) {


            node.accept(person);
        }
    }

    //添加操作
    public void add(Animal animal) {


        nodeList.add(animal);
    }
}
test class
public class Client {


    public static void main(String[] args) {


        Home home = new Home();
        home.add(new Dog());
        home.add(new Cat());

        Owner owner = new Owner();
        home.action(owner);

        Someone someone = new Someone();
        home.action(someone);
    }
}
6.9.4 Advantages and disadvantages
1. Advantages:
-
Good scalability
Add new functionality to elements in an object structure without modifying the elements in the object structure.
-
Good reusability
The visitor is used to define functions common to the entire object structure, thereby increasing the degree of reuse.
-
Separation of irrelevant behavior
Use visitors to separate irrelevant behaviors, and encapsulate related behaviors to form a visitor, so that the function of each visitor is relatively single.
2. Disadvantages:
-
Object structure changes are difficult
In the visitor mode, every time a new element class is added, corresponding specific operations must be added to each specific visitor class, which violates the "opening and closing principle".
-
Violates the Dependency Inversion Principle
The visitor pattern relies on concrete classes, not abstract classes.
6.9.5 Usage Scenarios
-
A program whose object structure is relatively stable, but whose operation algorithm changes frequently.
-
The objects in the object structure need to provide many different and unrelated operations, and the changes of these operations should not affect the structure of the object.
6.9.6 Extensions
The visitor pattern uses a technique of double dispatch.
1. Dispatch:
The type when the variable is declared is called the static type of the variable, and some people call the static type the obvious type; and the real type of the object referenced by the variable is also called the actual type of the variable. For example Map map = new HashMap(), the static type of the map variable is Map, and the actual type is HashMap. The choice of method according to the type of object is dispatch (Dispatch), and dispatch (Dispatch) is divided into two types, namely static dispatch and dynamic dispatch.
Static dispatch (Static Dispatch) occurs at compile time, and dispatch occurs based on static type information. Static dispatch is no stranger to us, and method overloading is static dispatch.
Dynamic dispatch (Dynamic Dispatch) occurs at runtime, and dynamic dispatch dynamically replaces a method. Java supports dynamic dispatch through method rewriting.
2. Dynamic allocation:
Dynamic dispatch is supported through method overriding.
public class Animal {


    public void execute() {


        System.out.println("Animal");
    }
}

public class Dog extends Animal {


    @Override
    public void execute() {


        System.out.println("dog");
    }
}

public class Cat extends Animal {


     @Override
    public void execute() {


        System.out.println("cat");
    }
}

public class Client {


   	public static void main(String[] args) {


        Animal a = new Dog();
        a.execute();

        Animal a1 = new Cat();
        a1.execute();
    }
}
You should be able to tell the result of the above code directly, isn't this just polymorphism! What is executed is the method in the subclass.
The Java compiler does not always know which code will be executed at compile time, because the compiler only knows the static type of the object, not the real type of the object; and the method call is based on the real type of the object, not the static type. type.
3. Static assignment:
Static dispatch is supported through method overloading.
public class Animal {


}

public class Dog extends Animal {


}

public class Cat extends Animal {


}

public class Execute {


    public void execute(Animal a) {


        System.out.println("Animal");
    }

    public void execute(Dog d) {


        System.out.println("dog");
    }

    public void execute(Cat c) {


        System.out.println("cat");
    }
}

public class Client {


    public static void main(String[] args) {


        Animal a = new Animal();
        Animal a1 = new Dog();
        Animal a2 = new Cat();

        Execute exe = new Execute();
        exe.execute(a);
        exe.execute(a1);
        exe.execute(a2);
    }
}
operation result:

This result may surprise some people, why?
The assignment of overloaded methods is performed according to the static type, and the assignment process is completed at compile time.
4. Double dispatch:
The so-called double-dispatch technology means that when choosing a method, it is not only based on the runtime difference of the message receiver (receiver), but also according to the runtime difference of the parameters.
public class Animal {


    public void accept(Execute exe) {


        exe.execute(this);
    }
}

public class Dog extends Animal {


    public void accept(Execute exe) {


        exe.execute(this);
    }
}

public class Cat extends Animal {


    public void accept(Execute exe) {


        exe.execute(this);
    }
}

public class Execute {


    public void execute(Animal a) {


        System.out.println("animal");
    }

    public void execute(Dog d) {


        System.out.println("dog");
    }

    public void execute(Cat c) {


        System.out.println("cat");
    }
}

public class Client {


    public static void main(String[] args) {


        Animal a = new Animal();
        Animal d = new Dog();
        Animal c = new Cat();

        Execute exe = new Execute();
        a.accept(exe);
        d.accept(exe);
        c.accept(exe);
    }
}
In the above code, the client passes the Execute object as a parameter to the method called by the variable of the Animal type. Here, the first dispatch is completed. Here is the method rewriting, so it is dynamic dispatch, that is, the method in the actual type is executed. At the same time 将自己this作为参数传递进去,这里就完成了第二次分派, there are multiple overloaded methods in the Execute class here, and what is passed is this, which is an object of a specific actual type.
Having said that, we've seen what double dispatch is all about, but what effect does it have? That is, dynamic binding of methods can be realized, and we can modify the above program.
The result of the operation is as follows:
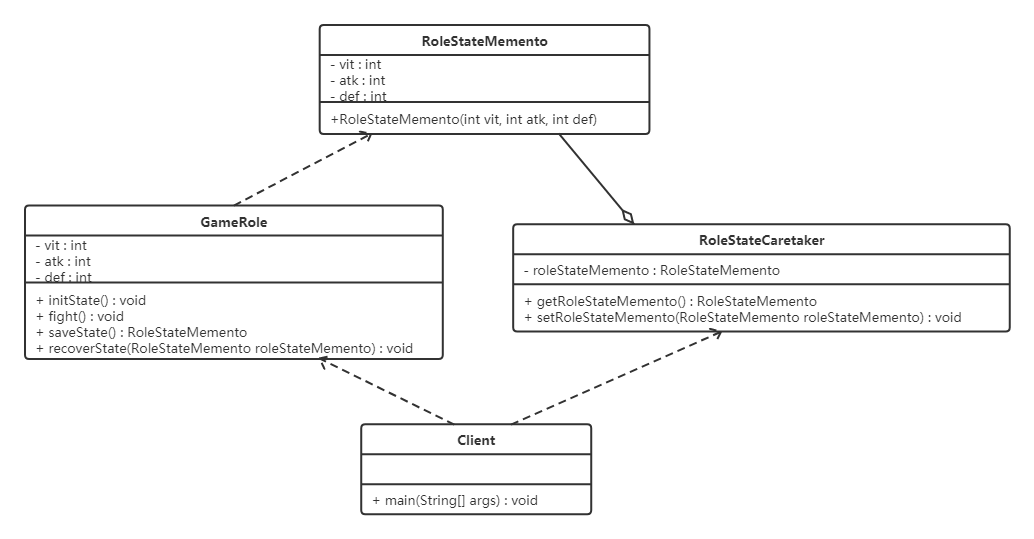
The essence of double dispatch to realize dynamic binding is to add the overriding link in the inheritance system in front of the overloaded method delegation. Since the overriding is dynamic, the overloading is dynamic.
6.10 Memo mode
6.10.1 Overview
The memo mode provides a mechanism for state recovery, allowing users to easily return to a specific historical step. When the new state is invalid or has problems, the state can be restored using the temporarily stored memo. Many software provides Undo (Undo) operation, such as Word, Notepad, Photoshop, IDEA and other software, can undo the current operation when pressing the Ctrl+Z key combination during editing, and restore the document to the previous state; there is also the back key in the browser , the rollback operation in database transaction management, the intermediate result archiving function when playing games, the backup operation of database and operating system, the regret function in board games, etc. all belong to this category.
definition:
Also known as the snapshot mode, it captures the internal state of an object without breaking the encapsulation, and saves this state outside the object, so that the object can be restored to the original saved state when needed later.
6.10.2 Structure
The main roles of the memento pattern are as follows:
- Originator role: Record the internal status information at the current moment, provide the functions of creating memo and restoring memo data, and realize other business functions. It can access all the information in the memo.
- Memento role: Responsible for storing the internal state of the initiator, and providing these internal states to the initiator when needed.
- Manager (Caretaker) role: manages the memo, provides the function of saving and obtaining the memo, but cannot access and modify the content of the memo.
Memento has two equivalent interfaces:
- Narrow interface : The caretaker object (and any object other than the initiator object) sees the narrow interface of the memo, which only allows him to pass the memo object to other objects.
- Wide Interface : Contrary to the narrow interface seen by the manager, the initiator object can see a wide interface (wide Interface), which allows it to read all the data in order to restore the internal state of the initiator object based on this data .
6.10.3 Case implementation
[Example] Game Challenge BOSS
In a certain scene in the game, a game character has data such as vitality, attack power, defense power, etc., which must be different before and after fighting the boss. We allow players to restore the game to The state before the duel.
To achieve the above case, there are two ways:
- "White Box" memo pattern
- "Black box" memo mode
6.10.3.1 "White Box" memo mode
The memo role provides an interface to any object, that is, a wide interface, and the state stored inside the memo role is exposed to all objects. The class diagram is as follows:
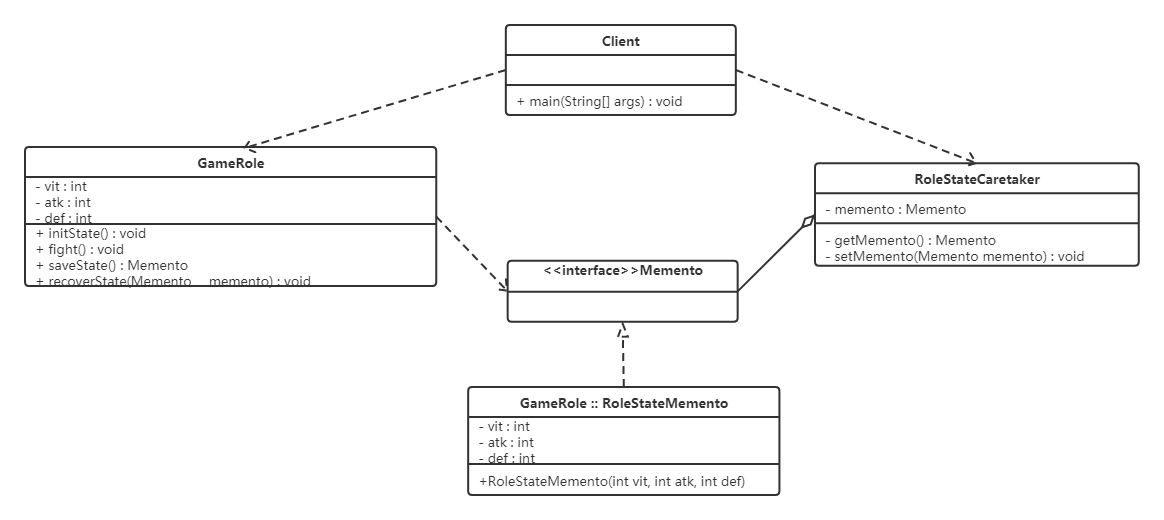
code show as below:
//游戏角色类
public class GameRole {


    private int vit; //生命力
    private int atk; //攻击力
    private int def; //防御力

    //初始化状态
    public void initState() {


        this.vit = 100;
        this.atk = 100;
        this.def = 100;
    }

    //战斗
    public void fight() {


        this.vit = 0;
        this.atk = 0;
        this.def = 0;
    }

    //保存角色状态
    public RoleStateMemento saveState() {


        return new RoleStateMemento(vit, atk, def);
    }

    //回复角色状态
    public void recoverState(RoleStateMemento roleStateMemento) {


        this.vit = roleStateMemento.getVit();
        this.atk = roleStateMemento.getAtk();
        this.def = roleStateMemento.getDef();
    }

    public void stateDisplay() {


        System.out.println("角色生命力:" + vit);
        System.out.println("角色攻击力:" + atk);
        System.out.println("角色防御力:" + def);
    }

    public int getVit() {


        return vit;
    }

    public void setVit(int vit) {


        this.vit = vit;
    }

    public int getAtk() {


        return atk;
    }

    public void setAtk(int atk) {


        this.atk = atk;
    }

    public int getDef() {


        return def;
    }

    public void setDef(int def) {


        this.def = def;
    }
}

//游戏状态存储类(备忘录类)
public class RoleStateMemento {


    private int vit;
    private int atk;
    private int def;

    public RoleStateMemento(int vit, int atk, int def) {


        this.vit = vit;
        this.atk = atk;
        this.def = def;
    }

    public int getVit() {


        return vit;
    }

    public void setVit(int vit) {


        this.vit = vit;
    }

    public int getAtk() {


        return atk;
    }

    public void setAtk(int atk) {


        this.atk = atk;
    }

    public int getDef() {


        return def;
    }

    public void setDef(int def) {


        this.def = def;
    }
}

//角色状态管理者类
public class RoleStateCaretaker {


    private RoleStateMemento roleStateMemento;

    public RoleStateMemento getRoleStateMemento() {


        return roleStateMemento;
    }

    public void setRoleStateMemento(RoleStateMemento roleStateMemento) {


        this.roleStateMemento = roleStateMemento;
    }
}

//测试类
public class Client {


    public static void main(String[] args) {


        System.out.println("------------大战Boss前------------");
        //大战Boss前
        GameRole gameRole = new GameRole();
        gameRole.initState();
        gameRole.stateDisplay();

        //保存进度
        RoleStateCaretaker roleStateCaretaker = new RoleStateCaretaker();
        roleStateCaretaker.setRoleStateMemento(gameRole.saveState());

        System.out.println("------------大战Boss后------------");
        //大战Boss时,损耗严重
        gameRole.fight();
        gameRole.stateDisplay();
        System.out.println("------------恢复之前状态------------");
        //恢复之前状态
        gameRole.recoverState(roleStateCaretaker.getRoleStateMemento());
        gameRole.stateDisplay();

    }
}
Analysis: The white box memo pattern is encapsulation-breaking. But through programmer self-discipline, most of the intentions of the pattern can also be realized to a certain extent.
6.10.3.2 "Black box" memo mode
The Memento role provides a wide interface to the initiator object and a narrow interface to other objects. In the Java language, the way to achieve a dual interface is to design the memo class as an internal member class that initiates humans .
RoleStateMementoSet as GameRolethe internal class of to encapsulate RoleStateMementothe object GameRoleinside; provide an identification interface outside Mementofor RoleStateCaretakerand other objects to use. In this way, what GameRolethe class sees is RoleStateMementoall the interfaces, and what RoleStateCaretakerthe class and other objects see are only the interfaces exposed Mementoby , thus maintaining the encapsulation type. The class diagram is as follows:
code show as below:
Narrow interface Memento, which is an identification interface, so no methods are defined
public interface Memento {


}
Define the initiator class GameRole, and define the memo inner class internally RoleStateMemento(the inner class is set as private)
/游戏角色类
public class GameRole {


    private int vit; //生命力
    private int atk; //攻击力
    private int def; //防御力

    //初始化状态
    public void initState() {


        this.vit = 100;
        this.atk = 100;
        this.def = 100;
    }

    //战斗
    public void fight() {


        this.vit = 0;
        this.atk = 0;
        this.def = 0;
    }

    //保存角色状态
    public Memento saveState() {


        return new RoleStateMemento(vit, atk, def);
    }

    //回复角色状态
    public void recoverState(Memento memento) {


        RoleStateMemento roleStateMemento = (RoleStateMemento) memento;
        this.vit = roleStateMemento.getVit();
        this.atk = roleStateMemento.getAtk();
        this.def = roleStateMemento.getDef();
    }

    public void stateDisplay() {


        System.out.println("角色生命力:" + vit);
        System.out.println("角色攻击力:" + atk);
        System.out.println("角色防御力:" + def);

    }

    public int getVit() {


        return vit;
    }

    public void setVit(int vit) {


        this.vit = vit;
    }

    public int getAtk() {


        return atk;
    }

    public void setAtk(int atk) {


        this.atk = atk;
    }

    public int getDef() {


        return def;
    }

    public void setDef(int def) {


        this.def = def;
    }

    private class RoleStateMemento implements Memento {


        private int vit;
        private int atk;
        private int def;

        public RoleStateMemento(int vit, int atk, int def) {


            this.vit = vit;
            this.atk = atk;
            this.def = def;
        }

        public int getVit() {


            return vit;
        }

        public void setVit(int vit) {


            this.vit = vit;
        }

        public int getAtk() {


            return atk;
        }

        public void setAtk(int atk) {


            this.atk = atk;
        }

        public int getDef() {


            return def;
        }

        public void setDef(int def) {


            this.def = def;
        }
    }
}
RoleStateCaretakerThe memo object that can be obtained by the person in charge role class is Mementobased on the interface. Since this interface is only an identification interface, it is impossible for the person in charge to change the content of the memo object
//角色状态管理者类
public class RoleStateCaretaker {


    private Memento memento;

    public Memento getMemento() {


        return memento;
    }

    public void setMemento(Memento memento) {


        this.memento = memento;
    }
}
client test class
public class Client {


    public static void main(String[] args) {


        System.out.println("------------大战Boss前------------");
        //大战Boss前
        GameRole gameRole = new GameRole();
        gameRole.initState();
        gameRole.stateDisplay();

        //保存进度
        RoleStateCaretaker roleStateCaretaker = new RoleStateCaretaker();
        roleStateCaretaker.setMemento(gameRole.saveState());

        System.out.println("------------大战Boss后------------");
        //大战Boss时,损耗严重
        gameRole.fight();
        gameRole.stateDisplay();
        System.out.println("------------恢复之前状态------------");
        //恢复之前状态
        gameRole.recoverState(roleStateCaretaker.getMemento());
        gameRole.stateDisplay();
    }
}
6.10.4 Advantages and disadvantages
1. Advantages:
- Provides a mechanism by which state can be restored. When users need it, it is more convenient to restore the data to a certain historical state.
- Encapsulation of internal state is achieved. No object other than the initiator that created it has access to this state information.
- Simplified initiating humans. The initiator does not need to manage and save individual backups of its internal state, all state information is saved in the memo and managed by the manager, which complies with the single responsibility principle.
2. Disadvantages:
- Resource consumption is high. If the internal state information to be saved is too much or very frequent, it will take up relatively large memory resources.
6.10.5 Usage Scenarios
-
Scenarios that need to save and restore data, such as the archive function of intermediate results when playing games.
-
It is necessary to provide a rollback operation scenario, such as Word, Notepad, Photoshop, idea and other software, press Ctrl+Z key combination when editing, and transaction operations in the database.
6.11 Interpreter mode
6.11.1 Overview

As shown above, design a software to perform addition and subtraction calculations. Our first idea is to use the tool class to provide the corresponding tool methods for addition and subtraction.
//用于两个整数相加
public static int add(int a,int b){


    return a + b;
}

//用于两个整数相加
public static int add(int a,int b,int c){


    return a + b + c;
}

//用于n个整数相加
public static int add(Integer ... arr) {


    int sum = 0;
    for (Integer i : arr) {


        sum += i;
    }
    return sum;
}
The above form is relatively single and limited. If the form changes a lot, this does not meet the requirements, because of addition and subtraction operations, the two operators and values can have infinite combinations. Such as 1+2+3+4+5, 1+2+3-4 and so on.
Clearly, there is a need for a translation recognition machine capable of parsing legal sequences of operations consisting of numbers and + - symbols. If operators and numbers are regarded as nodes, they can read and analyze nodes one by one. This is the thinking of the interpreter mode.
definition:
Given a language, define its grammatical representation, and define an interpreter that uses this identifier to interpret sentences in the language.
In the interpreter mode, we need to extract the rules from the problem to be solved and abstract it into a "language". For example, addition and subtraction operations, the rules are: a legal sequence composed of numeric values and ± symbols, "1+3-2" is a sentence in this language.
The interpreter is to parse out the meaning of the statement. But how to describe the rules?
Grammar (grammar) rules:
A grammar is the formal rules used to describe the grammatical structure of a language.
expression ::= value | plus | minus
plus ::= expression ‘+’ expression
minus ::= expression ‘-’ expression
value ::= integer
Note: The symbol "::=" here means "defined as", the vertical bar | means or, one of the left and right, the character itself is inside the quotation marks, and the syntax is outside the quotation marks.
The above rules are described as:
An expression can be a value, or a plus or minus operation, and plus and minus are composed of expressions combined with operators, and the type of value is an integer.
Abstract syntax tree:
In computer science, an abstract syntax tree (AbstractSyntaxTree, AST), or simply a syntax tree (Syntax tree), is an abstract representation of the grammatical structure of source code. It represents the grammatical structure of the programming language in the form of a tree, and each node on the tree represents a structure in the source code.
Use a tree to represent sentences that conform to grammatical rules.

6.11.2 Structure
The Interpreter pattern contains the following main roles.
-
Abstract Expression (Abstract Expression) role: define the interface of the interpreter, agree on the interpretation operation of the interpreter, mainly including the interpretation method interpret().
-
Terminal Expression (Terminal Expression) role: It is a subclass of abstract expression, which is used to implement terminal-related operations in the grammar. Each terminal in the grammar has a specific terminal expression corresponding to it.
-
Nonterminal Expression (Nonterminal Expression) role: It is also a subclass of abstract expression, used to implement operations related to nonterminal symbols in the grammar, and each rule in the grammar corresponds to a nonterminal expression.
-
Environment (Context) role: usually contains data or common functions required by each interpreter, and is generally used to pass data shared by all interpreters, and subsequent interpreters can obtain these values from here.
-
Client (Client): The main task is to convert the sentence or expression that needs to be analyzed into an abstract syntax tree described by the interpreter object, and then call the interpreter's interpretation method. Of course, the interpreter's interpretation method can also be indirectly accessed through the environment role .
6.11.3 Case implementation
[Example] Designing software for addition and subtraction
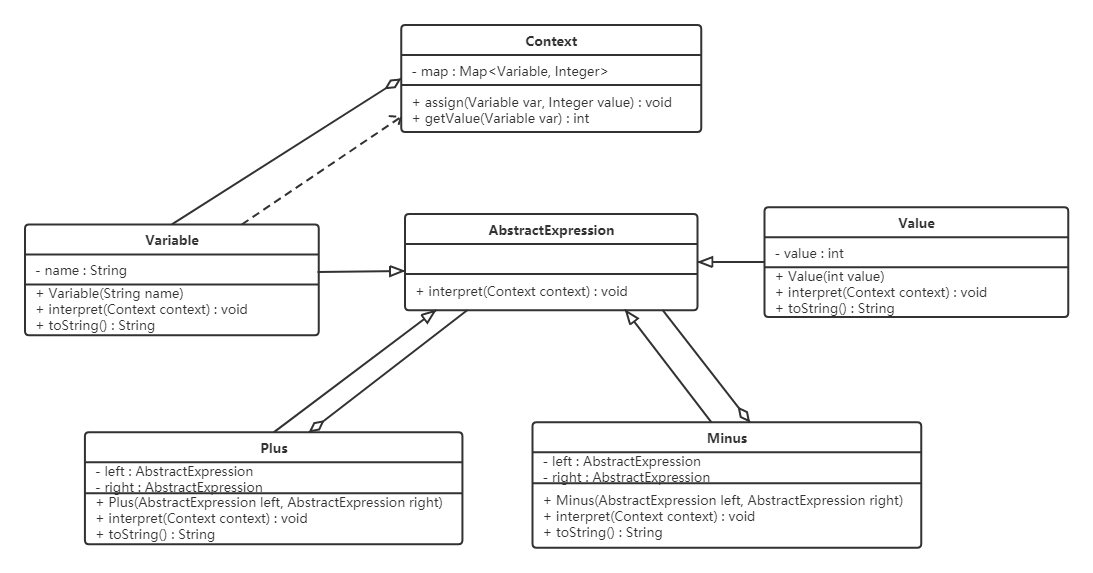
code show as below:
//抽象角色AbstractExpression
public abstract class AbstractExpression {


    public abstract int interpret(Context context);
}

//终结符表达式角色
public class Value extends AbstractExpression {


    private int value;

    public Value(int value) {


        this.value = value;
    }

    @Override
    public int interpret(Context context) {


        return value;
    }

    @Override
    public String toString() {


        return new Integer(value).toString();
    }
}

//非终结符表达式角色  加法表达式
public class Plus extends AbstractExpression {


    private AbstractExpression left;
    private AbstractExpression right;

    public Plus(AbstractExpression left, AbstractExpression right) {


        this.left = left;
        this.right = right;
    }

    @Override
    public int interpret(Context context) {


        return left.interpret(context) + right.interpret(context);
    }

    @Override
    public String toString() {


        return "(" + left.toString() + " + " + right.toString() + ")";
    }
}

///非终结符表达式角色 减法表达式
public class Minus extends AbstractExpression {


    private AbstractExpression left;
    private AbstractExpression right;

    public Minus(AbstractExpression left, AbstractExpression right) {


        this.left = left;
        this.right = right;
    }

    @Override
    public int interpret(Context context) {


        return left.interpret(context) - right.interpret(context);
    }

    @Override
    public String toString() {


        return "(" + left.toString() + " - " + right.toString() + ")";
    }
}

//终结符表达式角色 变量表达式
public class Variable extends AbstractExpression {


    private String name;

    public Variable(String name) {


        this.name = name;
    }

    @Override
    public int interpret(Context ctx) {


        return ctx.getValue(this);
    }

    @Override
    public String toString() {


        return name;
    }
}

//环境类
public class Context {


    private Map<Variable, Integer> map = new HashMap<Variable, Integer>();

    public void assign(Variable var, Integer value) {


        map.put(var, value);
    }

    public int getValue(Variable var) {


        Integer value = map.get(var);
        return value;
    }
}

//测试类
public class Client {


    public static void main(String[] args) {


        Context context = new Context();

        Variable a = new Variable("a");
        Variable b = new Variable("b");
        Variable c = new Variable("c");
        Variable d = new Variable("d");
        Variable e = new Variable("e");
        //Value v = new Value(1);

        context.assign(a, 1);
        context.assign(b, 2);
        context.assign(c, 3);
        context.assign(d, 4);
        context.assign(e, 5);

        AbstractExpression expression = new Minus(new Plus(new Plus(new Plus(a, b), c), d), e);

        System.out.println(expression + "= " + expression.interpret(context));
    }
}
6.11.4 Advantages and disadvantages
1. Advantages:
-
Grammars are easy to change and extend.
Since classes are used in the interpreter mode to represent the grammatical rules of the language, the grammar can be changed or extended through mechanisms such as inheritance. Each grammar rule can be expressed as a class, so a simple language can be implemented conveniently.
-
Implementing the grammar is easier.
The implementation of each expression node class in the abstract syntax tree is similar, and the code writing of these classes is not particularly complicated.
-
It is convenient to add new interpretation expressions.
If the user needs to add a new interpretation expression, it only needs to add a new terminal expression or non-terminal expression class, and the original expression class code does not need to be modified, which conforms to the "opening and closing principle".
2. Disadvantages:
-
Difficult to maintain for complex grammars.
In interpreter mode, each rule needs to define at least one class, so if a language contains too many grammar rules, the number of classes will increase dramatically, making the system difficult to manage and maintain.
-
The execution efficiency is low.
Due to the use of a large number of loops and recursive calls in the interpreter mode, it is very slow when interpreting more complex sentences, and the debugging process of the code is also troublesome.
6.11.5 Usage Scenarios
-
When the grammar of the language is relatively simple, and execution efficiency is not a critical issue.
-
When the problem is recurring and can be expressed in a simple language.
-
When a language needs to be interpreted and executed, and the sentences in the language can be represented as an abstract syntax tree.
7. Customize the Spring framework
7.1 spring usage review
Before customizing the spring framework, review the use of the spring framework to analyze the core of spring and simulate the core functions.
-
data access layer. Define the UserDao interface and its sub-implementation classes
public interface UserDao { public void add(); } public class UserDaoImpl implements UserDao { public void add() { System.out.println("userDaoImpl ...."); } } -
Business logic layer. Define the UserService interface and its sub-implementation classes
public interface UserService { public void add(); } public class UserServiceImpl implements UserService { private UserDao userDao; public void setUserDao(UserDao userDao) { this.userDao = userDao; } public void add() { System.out.println("userServiceImpl ..."); userDao.add(); } } -
Define the UserController class and use the main method to simulate the controller layer
public class UserController { public static void main(String[] args) { //创建spring容器对象 ApplicationContext applicationContext = new ClassPathXmlApplicationContext("applicationContext.xml"); //从IOC容器中获取UserService对象 UserService userService = applicationContext.getBean("userService", UserService.class); //调用UserService对象的add方法 userService.add(); } } -
Write configuration files. Write a configuration file named ApplicationContext.xml under the class path
<?xml version="1.0" encoding="UTF-8"?>
<beans xmlns:xsi="http://www.w3.org/2001/XMLSchema-instance"
       xmlns="http://www.springframework.org/schema/beans"
       xmlns:context="http://www.springframework.org/schema/context"
       xsi:schemaLocation="http://www.springframework.org/schema/beans
        http://www.springframework.org/schema/beans/spring-beans.xsd
        http://www.springframework.org/schema/context
        http://www.springframework.org/schema/context/spring-context.xsd">

    <bean id="userService" class="com.itheima.service.impl.UserServiceImpl">
        <property name="userDao" ref="userDao"></property>
    </bean>

    <bean id="userDao" class="com.itheima.dao.impl.UserDaoImpl"></bean>

</beans>
The result of running the code is as follows:
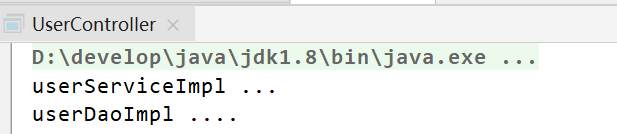
From the above code and results, we can see that:
- The userService object is obtained from the applicationContext container object, that is, the userService object is managed by spring.
- From the above results, we can see that the add method in the UserDao object is called, which means that the UserDao sub-implementation class object is also managed by spring.
- We have not assigned a value to the userDao variable in UserService, but it can be used normally, indicating that spring has assigned the UserDao object to the userDao variable.
The above three points reflect the IOC (Inversion of Control) and DI (Dependency Injection, DI) of the Spring framework
7.2 Spring core function structure
Spring has about 20 modules and consists of more than 1300 different files. These modules can be divided into:
Core container, AOP and device support, data access and integration, Web components, communication messages and integration testing, etc. The following is the overall architecture diagram of the Spring framework:
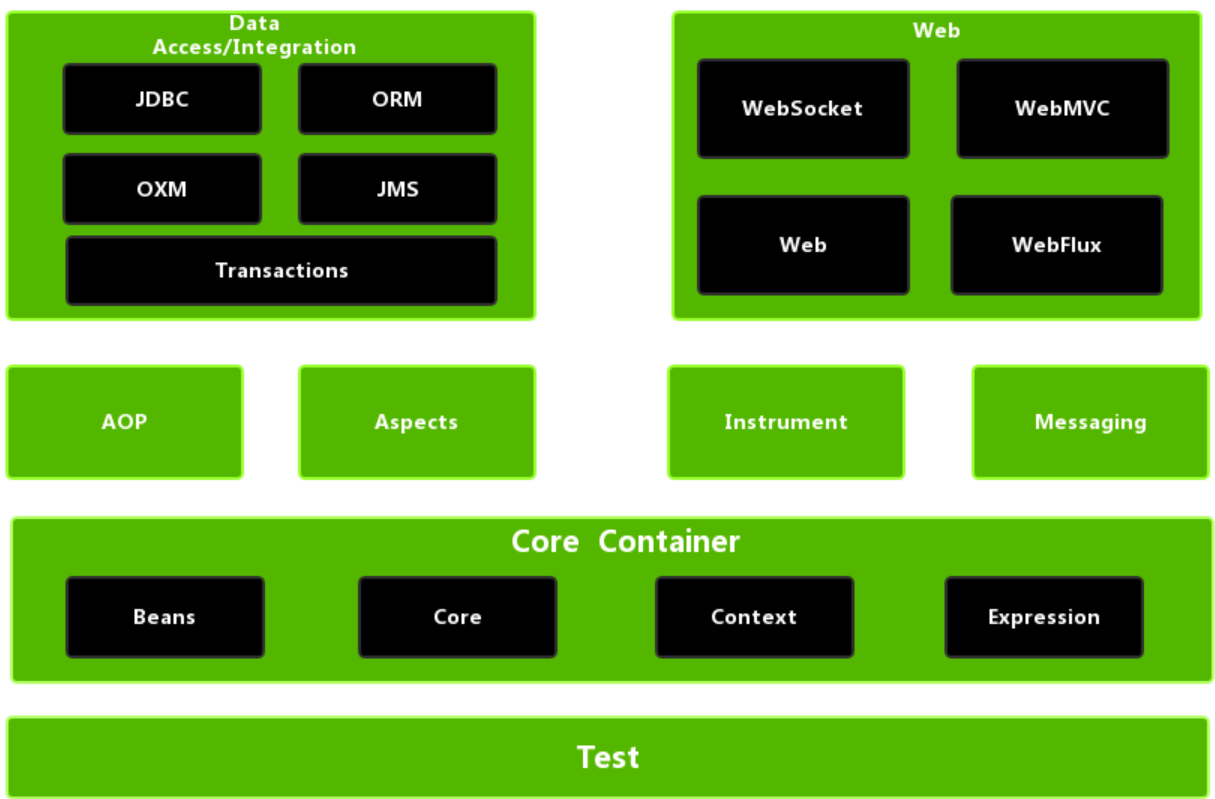
The core container consists of four modules: beans, core, context and expression (Spring Expression Language, SpEL).
- The spring-beans and spring-core modules are the core modules of the Spring framework, including Inversion of Control (IOC) and Dependency Injection (DI). The BeanFactory uses inversion of control to separate the application's configuration and dependency specification from the actual application code. The BeanFactory belongs to delayed loading, which means that the Bean will not be instantiated automatically after the container object is instantiated. Only when the Bean is used, the BeanFactory will instantiate the Bean and assemble the dependencies.
- The spring-context module is built on top of the core module, which extends BeanFactory and adds functions such as Bean lifecycle control, framework event system, and resource loading transparency. In addition, this module also provides many enterprise-level supports, such as mail access, remote access, task scheduling, etc. ApplicationContext is the core interface of this module, and its superclass is BeanFactory. Different from BeanFactory, ApplicationContext will automatically instantiate all single-instance beans and assemble dependencies after instantiation, making them in a standby state.
- The spring-context-support module is an extended support for Spring IoC containers and IoC sub-containers.
- The spring-context-indexer module is Spring's class management component and Classpath scanning component.
- The spring-expression module is an extension module of the Unified Expression Language (EL), which can query and manage running objects, and can also conveniently call object methods, and operate arrays, collections, etc. Its syntax is similar to traditional EL, but provides additional features, most notably function calls and template functions for simple strings. The characteristics of EL are designed based on the requirements of Spring products, and it is very convenient to interact with Spring IoC.
7.1.1 Overview of beans
Spring is Bean BeanOriented Programming (BOP, Bean Oriented Programming), and Bean is at the core of Spring. The meaning of Bean to Spring is the same as that of Object to OOP. Without Bean in Spring, there is no meaning of Spring. The Spring IoC container manages the dependencies between bean objects through configuration files or annotations.
Beans in spring are used to encapsulate a class. Such as the following configuration:
<bean id="userService" class="com.itheima.service.impl.UserServiceImpl">
    <property name="userDao" ref="userDao"></property>
</bean>
<bean id="userDao" class="com.itheima.dao.impl.UserDaoImpl"></bean>
Why is Bean so important?
- Spring hands over bean objects to a container called IOC for management.
- The dependencies between bean objects are reflected in the configuration file and completed by spring.
7.3 Spring IOC related interface analysis
7.3.1 BeanFactory analysis
The creation of beans in Spring is a typical factory pattern. This series of Bean factories, namely IoC containers, provide developers with a lot of convenience and basic services for managing dependencies between objects. There are many implementations of IoC containers in Spring for The user selects, and the relationship between them is shown in the figure below.

Among them, BeanFactory, as the top-level interface, defines the basic functional specifications of the IoC container. BeanFactory has three important sub-interfaces: ListableBeanFactory, HierarchicalBeanFactory and AutowireCapableBeanFactory. But from the class diagram, we can find that the final default implementation class is DefaultListableBeanFactory, which implements all interfaces.
So why define so many levels of interfaces?
Each interface has its use occasions, mainly to distinguish the transfer and transformation of objects during the internal operation of Spring, and the restrictions on data access of objects. For example,
- The ListableBeanFactory interface indicates that these beans can be listable.
- HierarchicalBeanFactory indicates that these beans have an inheritance relationship, that is, each bean may have a parent bean
- AutowireCapableBeanFactory interface defines Bean autowiring rules.
These three interfaces jointly define the collection of beans, the relationship between beans and the behavior of beans. The most basic IoC container interface is BeanFactory, take a look at its source code:
public interface BeanFactory {


	String FACTORY_BEAN_PREFIX = "&";

	//根据bean的名称获取IOC容器中的的bean对象
	Object getBean(String name) throws BeansException;
	//根据bean的名称获取IOC容器中的的bean对象,并指定获取到的bean对象的类型,这样我们使用时就不需要进行类型强转了
	<T> T getBean(String name, Class<T> requiredType) throws BeansException;
	Object getBean(String name, Object... args) throws BeansException;
	<T> T getBean(Class<T> requiredType) throws BeansException;
	<T> T getBean(Class<T> requiredType, Object... args) throws BeansException;

	<T> ObjectProvider<T> getBeanProvider(Class<T> requiredType);
	<T> ObjectProvider<T> getBeanProvider(ResolvableType requiredType);

	//判断容器中是否包含指定名称的bean对象
	boolean containsBean(String name);
	//根据bean的名称判断是否是单例
	boolean isSingleton(String name) throws NoSuchBeanDefinitionException;
	boolean isPrototype(String name) throws NoSuchBeanDefinitionException;
	boolean isTypeMatch(String name, ResolvableType typeToMatch) throws NoSuchBeanDefinitionException;
	boolean isTypeMatch(String name, Class<?> typeToMatch) throws NoSuchBeanDefinitionException;
	@Nullable
	Class<?> getType(String name) throws NoSuchBeanDefinitionException;
	String[] getAliases(String name);
}
In BeanFactory, only the basic behavior of the IoC container is defined, and it doesn't care how your Bean is defined and loaded. Just as we only care about what products we can get from the factory, we don't care how the factory produces these products.
BeanFactory has a very important sub-interface, which is the ApplicationContext interface. This interface is mainly used to regulate the non-delayed loading of bean objects in the container, that is, when the container object is created, the object bean is initialized and stored in a container.

To know how the factory generates objects, we need to look at the specific IoC container implementation. Spring provides many IoC container implementations, such as:
- ClasspathXmlApplicationContext : Load the xml configuration file according to the classpath and create an IOC container object.
- FileSystemXmlApplicationContext: Load the xml configuration file according to the system path and create an IOC container object.
- AnnotationConfigApplicationContext: Load annotation class configuration and create IOC container.
7.3.2 BeanDefinition Parsing
The Spring IoC container manages the various Bean objects we define and their interrelationships, and the Bean objects are described by BeanDefinition in the Spring implementation, as shown in the following configuration file
<bean id="userDao" class="com.itheima.dao.impl.UserDaoImpl"></bean>

bean标签还有很多属性:
	scope、init-method、destory-method等。
Its inheritance system is shown in the figure below.

7.3.3 BeanDefinitionReader Parsing
The bean parsing process is very complicated, and the functions are divided into fine pieces, because there are many places that need to be extended, and sufficient flexibility must be ensured to cope with possible changes. The analysis of beans is mainly the analysis of Spring configuration files. This parsing process is mainly done through BeanDefinitionReader. Look at the class structure diagram of BeanDefinitionReader in Spring, as shown in the figure below.

Look at the functions defined by the BeanDefinitionReader interface to understand its specific role:
public interface BeanDefinitionReader {


	//获取BeanDefinitionRegistry注册器对象
	BeanDefinitionRegistry getRegistry();

	@Nullable
	ResourceLoader getResourceLoader();

	@Nullable
	ClassLoader getBeanClassLoader();

	BeanNameGenerator getBeanNameGenerator();

	/*
		下面的loadBeanDefinitions都是加载bean定义,从指定的资源中
	*/
	int loadBeanDefinitions(Resource resource) throws BeanDefinitionStoreException;
	int loadBeanDefinitions(Resource... resources) throws BeanDefinitionStoreException;
	int loadBeanDefinitions(String location) throws BeanDefinitionStoreException;
	int loadBeanDefinitions(String... locations) throws BeanDefinitionStoreException;
}
7.3.4 BeanDefinitionRegistry Parsing
BeanDefinitionReader is used to parse bean definitions and encapsulate BeanDefinition objects. Many bean tags are defined in the configuration file we defined, so there is a question, where are the parsed BeanDefinition objects stored? The answer is the registration center of BeanDefinition, and the top-level interface of the registration center is BeanDefinitionRegistry.
public interface BeanDefinitionRegistry extends AliasRegistry {


	//往注册表中注册bean
	void registerBeanDefinition(String beanName, BeanDefinition beanDefinition)
			throws BeanDefinitionStoreException;

	//从注册表中删除指定名称的bean
	void removeBeanDefinition(String beanName) throws NoSuchBeanDefinitionException;

	//获取注册表中指定名称的bean
	BeanDefinition getBeanDefinition(String beanName) throws NoSuchBeanDefinitionException;

	//判断注册表中是否已经注册了指定名称的bean
	boolean containsBeanDefinition(String beanName);

	//获取注册表中所有的bean的名称
	String[] getBeanDefinitionNames();

	int getBeanDefinitionCount();
	boolean isBeanNameInUse(String beanName);
}
The inheritance structure diagram is as follows:

From the above class diagram, we can see that the sub-implementation classes of the BeanDefinitionRegistry interface mainly include the following:
-
DefaultListableBeanFactory
The following code is defined in this class, which is used to register beans
private final Map<String, BeanDefinition> beanDefinitionMap = new ConcurrentHashMap<>(256); -
SimpleBeanDefinitionRegistry
The following code is defined in this class, which is used to register beans
private final Map<String, BeanDefinition> beanDefinitionMap = new ConcurrentHashMap<>(64);
7.3.5 Create container
The loading of Bean configuration resources by ClassPathXmlApplicationContext starts from the refresh() method. The refresh() method is a template method, which specifies the startup process of the IoC container, and some logic should be handed over to its subclasses for implementation. It loads Bean configuration resources, and ClassPathXmlApplicationContext starts the process of loading Bean definitions by the entire IoC container by calling the refresh() method of its parent class AbstractApplicationContext.
7.4 Custom Spring IOC
Now it is necessary to parse the following configuration files, and customize the IOC of the Spring framework to manage the involved objects.
<?xml version="1.0" encoding="UTF-8"?>
<beans>
    <bean id="userService" class="com.itheima.service.impl.UserServiceImpl">
        <property name="userDao" ref="userDao"></property>
    </bean>
    <bean id="userDao" class="com.itheima.dao.impl.UserDaoImpl"></bean>
</beans>
7.4.1 Define bean-related pojo classes
7.4.1.1 PropertyValue class
It is used to encapsulate the properties of the bean, reflected in the above configuration file is the sub-label property label data of the package bean label.
public class PropertyValue {


  private String name;
  private String ref;
  private String value;

  public PropertyValue() {


  }

  public PropertyValue(String name, String ref,String value) {


    this.name = name;
    this.ref = ref;
    this.value = value;
  }

  public String getName() {


    return name;
  }

  public void setName(String name) {


    this.name = name;
  }

  public String getRef() {


    return ref;
  }

  public void setRef(String ref) {


    this.ref = ref;
  }

  public String getValue() {


    return value;
  }

  public void setValue(String value) {


    this.value = value;
  }
}
7.4.1.2 MutablePropertyValues类
A bean tag can have multiple property sub-tags, so define a MutablePropertyValues class to store and manage multiple PropertyValue objects.
public class MutablePropertyValues implements Iterable<PropertyValue> {


    private final List<PropertyValue> propertyValueList;

    public MutablePropertyValues() {


        this.propertyValueList = new ArrayList<PropertyValue>();
    }

    public MutablePropertyValues(List<PropertyValue> propertyValueList) {


        this.propertyValueList = (propertyValueList != null ? propertyValueList : new ArrayList<PropertyValue>());
    }

    public PropertyValue[] getPropertyValues() {


        return this.propertyValueList.toArray(new PropertyValue[0]);
    }

    public PropertyValue getPropertyValue(String propertyName) {


        for (PropertyValue pv : this.propertyValueList) {


            if (pv.getName().equals(propertyName)) {


                return pv;
            }
        }
        return null;
    }

    @Override
    public Iterator<PropertyValue> iterator() {


        return propertyValueList.iterator();
    }

    public boolean isEmpty() {


        return this.propertyValueList.isEmpty();
    }

    public MutablePropertyValues addPropertyValue(PropertyValue pv) {


        for (int i = 0; i < this.propertyValueList.size(); i++) {


            PropertyValue currentPv = this.propertyValueList.get(i);
            if (currentPv.getName().equals(pv.getName())) {


                this.propertyValueList.set(i, new PropertyValue(pv.getName(),pv.getRef(), pv.getValue()));
                return this;
            }
        }
        this.propertyValueList.add(pv);
        return this;
    }

    public boolean contains(String propertyName) {


        return getPropertyValue(propertyName) != null;
    }
}
7.4.1.3 BeanDefinition class
The BeanDefinition class is used to encapsulate bean information, mainly including id (that is, the name of the bean object), class (the full class name of the class that needs to be managed by spring) and sub-label property data.
public class BeanDefinition {


    private String id;
    private String className;

    private MutablePropertyValues propertyValues;

    public BeanDefinition() {


        propertyValues = new MutablePropertyValues();
    }

    public String getId() {


        return id;
    }

    public void setId(String id) {


        this.id = id;
    }

    public String getClassName() {


        return className;
    }

    public void setClassName(String className) {


        this.className = className;
    }

    public void setPropertyValues(MutablePropertyValues propertyValues) {


        this.propertyValues = propertyValues;
    }

    public MutablePropertyValues getPropertyValues() {


        return propertyValues;
    }
}
7.4.2 Define registry related classes
7.4.2.1 BeanDefinitionRegistry interface
The BeanDefinitionRegistry interface defines the related operations of the registry, and defines the following functions:
- Register the BeanDefinition object into the registry
- Deletes the BeanDefinition object with the specified name from the registry
- Get the BeanDefinition object from the registry by name
- Determine whether the BeanDefinition object with the specified name is contained in the registry
- Get the number of BeanDefinition objects in the registry
- Get the names of all BeanDefinitions in the registry
public interface BeanDefinitionRegistry {


    //注册BeanDefinition对象到注册表中
    void registerBeanDefinition(String beanName, BeanDefinition beanDefinition);

    //从注册表中删除指定名称的BeanDefinition对象
    void removeBeanDefinition(String beanName) throws Exception;

    //根据名称从注册表中获取BeanDefinition对象
    BeanDefinition getBeanDefinition(String beanName) throws Exception;

    boolean containsBeanDefinition(String beanName);

    int getBeanDefinitionCount();

    String[] getBeanDefinitionNames();
}
7.4.2.2 SimpleBeanDefinitionRegistry class
This class implements the BeanDefinitionRegistry interface and defines the Map collection as the registry container.
public class SimpleBeanDefinitionRegistry implements BeanDefinitionRegistry {


    private Map<String, BeanDefinition> beanDefinitionMap = new HashMap<String, BeanDefinition>();

    @Override
    public void registerBeanDefinition(String beanName, BeanDefinition beanDefinition) {


        beanDefinitionMap.put(beanName,beanDefinition);
    }

    @Override
    public void removeBeanDefinition(String beanName) throws Exception {


        beanDefinitionMap.remove(beanName);
    }

    @Override
    public BeanDefinition getBeanDefinition(String beanName) throws Exception {


        return beanDefinitionMap.get(beanName);
    }

    @Override
    public boolean containsBeanDefinition(String beanName) {


        return beanDefinitionMap.containsKey(beanName);
    }

    @Override
    public int getBeanDefinitionCount() {


        return beanDefinitionMap.size();
    }

    @Override
    public String[] getBeanDefinitionNames() {


        return beanDefinitionMap.keySet().toArray(new String[1]);
    }
}
7.4.3 Define parser-related classes
7.4.3.1 BeanDefinitionReader interface
BeanDefinitionReader is used to parse configuration files and register beans in the registry. Two specifications are defined:
- Obtain the function of the registry, so that the outside world can obtain the registry object through this object.
- Load the configuration file and register the bean data.
public interface BeanDefinitionReader {


	//获取注册表对象
    BeanDefinitionRegistry getRegistry();
	//加载配置文件并在注册表中进行注册
    void loadBeanDefinitions(String configLocation) throws Exception;
}
7.4.3.2 XmlBeanDefinitionReader class
The XmlBeanDefinitionReader class is dedicated to parsing xml configuration files. This class implements the BeanDefinitionReader interface and implements two functions in the interface.
public class XmlBeanDefinitionReader implements BeanDefinitionReader {


    private BeanDefinitionRegistry registry;

    public XmlBeanDefinitionReader() {


        this.registry = new SimpleBeanDefinitionRegistry();
    }

    @Override
    public BeanDefinitionRegistry getRegistry() {


        return registry;
    }

    @Override
    public void loadBeanDefinitions(String configLocation) throws Exception {


        InputStream is = this.getClass().getClassLoader().getResourceAsStream(configLocation);
        SAXReader reader = new SAXReader();
        Document document = reader.read(is);
        Element rootElement = document.getRootElement();
        //解析bean标签
        parseBean(rootElement);
    }

    private void parseBean(Element rootElement) {


        List<Element> elements = rootElement.elements();
        for (Element element : elements) {


            String id = element.attributeValue("id");
            String className = element.attributeValue("class");
            BeanDefinition beanDefinition = new BeanDefinition();
            beanDefinition.setId(id);
            beanDefinition.setClassName(className);
            List<Element> list = element.elements("property");
            MutablePropertyValues mutablePropertyValues = new MutablePropertyValues();
            for (Element element1 : list) {


                String name = element1.attributeValue("name");
                String ref = element1.attributeValue("ref");
                String value = element1.attributeValue("value");
                PropertyValue propertyValue = new PropertyValue(name,ref,value);
                mutablePropertyValues.addPropertyValue(propertyValue);
            }
            beanDefinition.setPropertyValues(mutablePropertyValues);

            registry.registerBeanDefinition(id,beanDefinition);
        }
    }
}
7.4.4 IOC container related classes
7.4.4.1 BeanFactory interface
The uniform specification for defining the IOC container in this interface is to obtain the bean object.
public interface BeanFactory {


	//根据bean对象的名称获取bean对象
    Object getBean(String name) throws Exception;
	//根据bean对象的名称获取bean对象,并进行类型转换
    <T> T getBean(String name, Class<? extends T> clazz) throws Exception;
}
7.4.4.2 ApplicationContext interface
All sub-implementation classes of this interface are non-delayed in the creation of bean objects, so refresh()the method . This method mainly completes the following two functions:
- Load the configuration file.
- The bean object is created according to the data encapsulated by the BeanDefinition object in the registry.
public interface ApplicationContext extends BeanFactory {


	//进行配置文件加载并进行对象创建
    void refresh() throws IllegalStateException, Exception;
}
7.4.4.3 AbstractApplicationContext类
-
As a subclass of the ApplicationContext interface, this class is also non-delayed loading, so you need to define a Map collection in this class as a container for bean object storage.
-
Declare a variable of type BeanDefinitionReader for parsing the xml configuration file, in line with the principle of single responsibility.
The creation of objects of type BeanDefinitionReader is implemented by subclasses, because only subclasses clearly define which subclass object of BeanDefinitionReader to create.
public abstract class AbstractApplicationContext implements ApplicationContext {


    protected BeanDefinitionReader beanDefinitionReader;
    //用来存储bean对象的容器   key存储的是bean的id值,value存储的是bean对象
    protected Map<String, Object> singletonObjects = new HashMap<String, Object>();

    //存储配置文件的路径
    protected String configLocation;

    public void refresh() throws IllegalStateException, Exception {


        //加载BeanDefinition
        beanDefinitionReader.loadBeanDefinitions(configLocation);

        //初始化bean
        finishBeanInitialization();
    }

    //bean的初始化
    private void finishBeanInitialization() throws Exception {


        BeanDefinitionRegistry registry = beanDefinitionReader.getRegistry();
        String[] beanNames = registry.getBeanDefinitionNames();

        for (String beanName : beanNames) {


            BeanDefinition beanDefinition = registry.getBeanDefinition(beanName);
            getBean(beanName);
        }
    }
}
Note: The getBean() method is called in the finishBeanInitialization() method of this class to use the template method pattern.
7.4.4.4 ClassPathXmlApplicationContext类
This class mainly loads configuration files under the class path and creates bean objects. It mainly completes the following functions:
- In the constructor, create a BeanDefinitionReader object.
- In the construction method, call the refresh() method to load the configuration file, create a bean object and store it in the container.
- Rewrite the getBean() method in the parent interface and implement dependency injection operations.
public class ClassPathXmlApplicationContext extends AbstractApplicationContext{


    public ClassPathXmlApplicationContext(String configLocation) {


        this.configLocation = configLocation;
        //构建XmlBeanDefinitionReader对象
        beanDefinitionReader = new XmlBeanDefinitionReader();
        try {


            this.refresh();
        } catch (Exception e) {


        }
    }

    //根据bean的id属性值获取bean对象
    @Override
    public Object getBean(String name) throws Exception {


        //return singletonObjects.get(name);
        Object obj = singletonObjects.get(name);
        if(obj != null) {


            return obj;
        }

        BeanDefinitionRegistry registry = beanDefinitionReader.getRegistry();
        BeanDefinition beanDefinition = registry.getBeanDefinition(name);
        if(beanDefinition == null) {


            return null;
        }
        String className = beanDefinition.getClassName();
        Class<?> clazz = Class.forName(className);
        Object beanObj = clazz.newInstance();
        MutablePropertyValues propertyValues = beanDefinition.getPropertyValues();
        for (PropertyValue propertyValue : propertyValues) {


            String propertyName = propertyValue.getName();
            String value = propertyValue.getValue();
            String ref = propertyValue.getRef();
            if(ref != null && !"".equals(ref)) {


                Object bean = getBean(ref);
                String methodName = StringUtils.getSetterMethodNameByFieldName(propertyName);
                Method[] methods = clazz.getMethods();
                for (Method method : methods) {


                    if(method.getName().equals(methodName)) {


                        method.invoke(beanObj,bean);
                    }
                }
            }

            if(value != null && !"".equals(value)) {


                String methodName = StringUtils.getSetterMethodNameByFieldName(propertyName);
                Method method = clazz.getMethod(methodName, String.class);
                method.invoke(beanObj,value);
            }
        }
        singletonObjects.put(name,beanObj);
        return beanObj;
    }

    @Override
    public <T> T getBean(String name, Class<? extends T> clazz) throws Exception {


        Object bean = getBean(name);
        if(bean != null) {


            return clazz.cast(bean);
        }
        return null;
    }
}
7.4.5 Summary of Custom Spring IOC
7.4.5.1 Design patterns used
- factory pattern. This uses the factory mode + configuration file.
- Singleton pattern. The bean objects managed by Spring IOC are all singletons. The singleton here is not controlled by the constructor, but the spring framework creates only one object for each bean.
- Template method pattern. The finishBeanInitialization() method in the AbstractApplicationContext class calls the getBean() method of the subclass, because the implementation of getBean() is closely related to the environment.
- Iterator pattern. The iterator mode is used for the definition of the MutablePropertyValues class, because this class stores and manages PropertyValue objects and also belongs to a container, so it provides a traversal method for the container.
The spring framework actually uses many design patterns, such as AOP uses proxy mode, chooses JDK proxy or CGLIB proxy to use strategy mode, as well as adapter mode, decorator mode, observer mode, etc.
7.4.5.2 Comply with most design principles
7.4.5.3 There is still a certain difference between the whole design and Spring's design
The bottom layer of the spring framework is very complex, it has been encapsulated very deeply, and it provides good scalability to the outside world. And we customize SpringIOC for the following purposes:
-
Understand the general management mechanism of Spring's underlying objects.
-
Understand the use of design patterns in specific development.
Information. Two specifications are defined: -
Obtain the function of the registry, so that the outside world can obtain the registry object through this object.
-
Load the configuration file and register the bean data.
public interface BeanDefinitionReader {


	//获取注册表对象
    BeanDefinitionRegistry getRegistry();
	//加载配置文件并在注册表中进行注册
    void loadBeanDefinitions(String configLocation) throws Exception;
}
7.4.3.2 XmlBeanDefinitionReader class
The XmlBeanDefinitionReader class is dedicated to parsing xml configuration files. This class implements the BeanDefinitionReader interface and implements two functions in the interface.
public class XmlBeanDefinitionReader implements BeanDefinitionReader {


    private BeanDefinitionRegistry registry;

    public XmlBeanDefinitionReader() {


        this.registry = new SimpleBeanDefinitionRegistry();
    }

    @Override
    public BeanDefinitionRegistry getRegistry() {


        return registry;
    }

    @Override
    public void loadBeanDefinitions(String configLocation) throws Exception {


        InputStream is = this.getClass().getClassLoader().getResourceAsStream(configLocation);
        SAXReader reader = new SAXReader();
        Document document = reader.read(is);
        Element rootElement = document.getRootElement();
        //解析bean标签
        parseBean(rootElement);
    }

    private void parseBean(Element rootElement) {


        List<Element> elements = rootElement.elements();
        for (Element element : elements) {


            String id = element.attributeValue("id");
            String className = element.attributeValue("class");
            BeanDefinition beanDefinition = new BeanDefinition();
            beanDefinition.setId(id);
            beanDefinition.setClassName(className);
            List<Element> list = element.elements("property");
            MutablePropertyValues mutablePropertyValues = new MutablePropertyValues();
            for (Element element1 : list) {


                String name = element1.attributeValue("name");
                String ref = element1.attributeValue("ref");
                String value = element1.attributeValue("value");
                PropertyValue propertyValue = new PropertyValue(name,ref,value);
                mutablePropertyValues.addPropertyValue(propertyValue);
            }
            beanDefinition.setPropertyValues(mutablePropertyValues);

            registry.registerBeanDefinition(id,beanDefinition);
        }
    }
}
7.4.4 IOC container related classes
7.4.4.1 BeanFactory interface
The uniform specification for defining the IOC container in this interface is to obtain the bean object.
public interface BeanFactory {


	//根据bean对象的名称获取bean对象
    Object getBean(String name) throws Exception;
	//根据bean对象的名称获取bean对象,并进行类型转换
    <T> T getBean(String name, Class<? extends T> clazz) throws Exception;
}
7.4.4.2 ApplicationContext interface
All sub-implementation classes of this interface are non-delayed in the creation of bean objects, so refresh()the method . This method mainly completes the following two functions:
- Load the configuration file.
- The bean object is created according to the data encapsulated by the BeanDefinition object in the registry.
public interface ApplicationContext extends BeanFactory {


	//进行配置文件加载并进行对象创建
    void refresh() throws IllegalStateException, Exception;
}
7.4.4.3 AbstractApplicationContext类
-
As a subclass of the ApplicationContext interface, this class is also non-delayed loading, so you need to define a Map collection in this class as a container for bean object storage.
-
Declare a variable of type BeanDefinitionReader for parsing the xml configuration file, in line with the principle of single responsibility.
The creation of objects of type BeanDefinitionReader is implemented by subclasses, because only subclasses clearly define which subclass object of BeanDefinitionReader to create.
public abstract class AbstractApplicationContext implements ApplicationContext {


    protected BeanDefinitionReader beanDefinitionReader;
    //用来存储bean对象的容器   key存储的是bean的id值,value存储的是bean对象
    protected Map<String, Object> singletonObjects = new HashMap<String, Object>();

    //存储配置文件的路径
    protected String configLocation;

    public void refresh() throws IllegalStateException, Exception {


        //加载BeanDefinition
        beanDefinitionReader.loadBeanDefinitions(configLocation);

        //初始化bean
        finishBeanInitialization();
    }

    //bean的初始化
    private void finishBeanInitialization() throws Exception {


        BeanDefinitionRegistry registry = beanDefinitionReader.getRegistry();
        String[] beanNames = registry.getBeanDefinitionNames();

        for (String beanName : beanNames) {


            BeanDefinition beanDefinition = registry.getBeanDefinition(beanName);
            getBean(beanName);
        }
    }
}
Note: The getBean() method is called in the finishBeanInitialization() method of this class to use the template method pattern.
7.4.4.4 ClassPathXmlApplicationContext类
This class mainly loads configuration files under the class path and creates bean objects. It mainly completes the following functions:
- In the constructor, create a BeanDefinitionReader object.
- In the construction method, call the refresh() method to load the configuration file, create a bean object and store it in the container.
- Rewrite the getBean() method in the parent interface and implement dependency injection operations.
public class ClassPathXmlApplicationContext extends AbstractApplicationContext{


    public ClassPathXmlApplicationContext(String configLocation) {


        this.configLocation = configLocation;
        //构建XmlBeanDefinitionReader对象
        beanDefinitionReader = new XmlBeanDefinitionReader();
        try {


            this.refresh();
        } catch (Exception e) {


        }
    }

    //根据bean的id属性值获取bean对象
    @Override
    public Object getBean(String name) throws Exception {


        //return singletonObjects.get(name);
        Object obj = singletonObjects.get(name);
        if(obj != null) {


            return obj;
        }

        BeanDefinitionRegistry registry = beanDefinitionReader.getRegistry();
        BeanDefinition beanDefinition = registry.getBeanDefinition(name);
        if(beanDefinition == null) {


            return null;
        }
        String className = beanDefinition.getClassName();
        Class<?> clazz = Class.forName(className);
        Object beanObj = clazz.newInstance();
        MutablePropertyValues propertyValues = beanDefinition.getPropertyValues();
        for (PropertyValue propertyValue : propertyValues) {


            String propertyName = propertyValue.getName();
            String value = propertyValue.getValue();
            String ref = propertyValue.getRef();
            if(ref != null && !"".equals(ref)) {


                Object bean = getBean(ref);
                String methodName = StringUtils.getSetterMethodNameByFieldName(propertyName);
                Method[] methods = clazz.getMethods();
                for (Method method : methods) {


                    if(method.getName().equals(methodName)) {


                        method.invoke(beanObj,bean);
                    }
                }
            }

            if(value != null && !"".equals(value)) {


                String methodName = StringUtils.getSetterMethodNameByFieldName(propertyName);
                Method method = clazz.getMethod(methodName, String.class);
                method.invoke(beanObj,value);
            }
        }
        singletonObjects.put(name,beanObj);
        return beanObj;
    }

    @Override
    public <T> T getBean(String name, Class<? extends T> clazz) throws Exception {


        Object bean = getBean(name);
        if(bean != null) {


            return clazz.cast(bean);
        }
        return null;
    }
}
7.4.5 Summary of Custom Spring IOC
7.4.5.1 Design patterns used
- factory pattern. This uses the factory mode + configuration file.
- Singleton pattern. The bean objects managed by Spring IOC are all singletons. The singleton here is not controlled by the constructor, but the spring framework creates only one object for each bean.
- Template method pattern. The finishBeanInitialization() method in the AbstractApplicationContext class calls the getBean() method of the subclass, because the implementation of getBean() is closely related to the environment.
- Iterator pattern. The iterator mode is used for the definition of the MutablePropertyValues class, because this class stores and manages PropertyValue objects and also belongs to a container, so it provides a traversal method for the container.
The spring framework actually uses many design patterns, such as AOP uses proxy mode, chooses JDK proxy or CGLIB proxy to use strategy mode, as well as adapter mode, decorator mode, observer mode, etc.
7.4.5.2 Comply with most design principles
7.4.5.3 There is still a certain difference between the whole design and Spring's design
The bottom layer of the spring framework is very complex, it has been encapsulated very deeply, and it provides good scalability to the outside world. And we customize SpringIOC for the following purposes:
- Understand the general management mechanism of Spring's underlying objects.
- Understand the use of design patterns in specific development.
- After learning the spring source code, through the realization of this case, the entry cost of spring learning can be reduced.