Table of contents
1. Introduction to the mall system
2.2. The difference between template technology and front-end framework
3. Integrate thymeleaf to render the home page of the mall
3.1.1, [commodity module] import thymeleaf and hot deployment dependencies
3.1.2. Add static resources to the product module
3.1.3, the controller package is renamed app, and the web package is added
3.1.4, yml closes thymeleaf cache
3.2. Develop home page jump function
3.3. Write an interface for querying the first-level directory list
3.4. Classification of the first-level rendering of the homepage of the mall
3.5. The expected response JSON of the second and third-level classification of commodities
3.6.1. New Catalog2Vo entity class
3.6.3. Newly query the List collection whose parent ID is parent_cid
3.6.5. Restart the service and test
3.7. Summary of springboot page jump
4. nginx builds domain name access environment
4.3.1, hosts file configuration domain name and ip mapping
4.3.3. Configure /etc/nginx/conf.d/gulimall.conf
4.3.4, gateway configuration "gulimall.com" routing rules
4.3.7 Summary, reverse proxy process
1. Introduction to the mall system
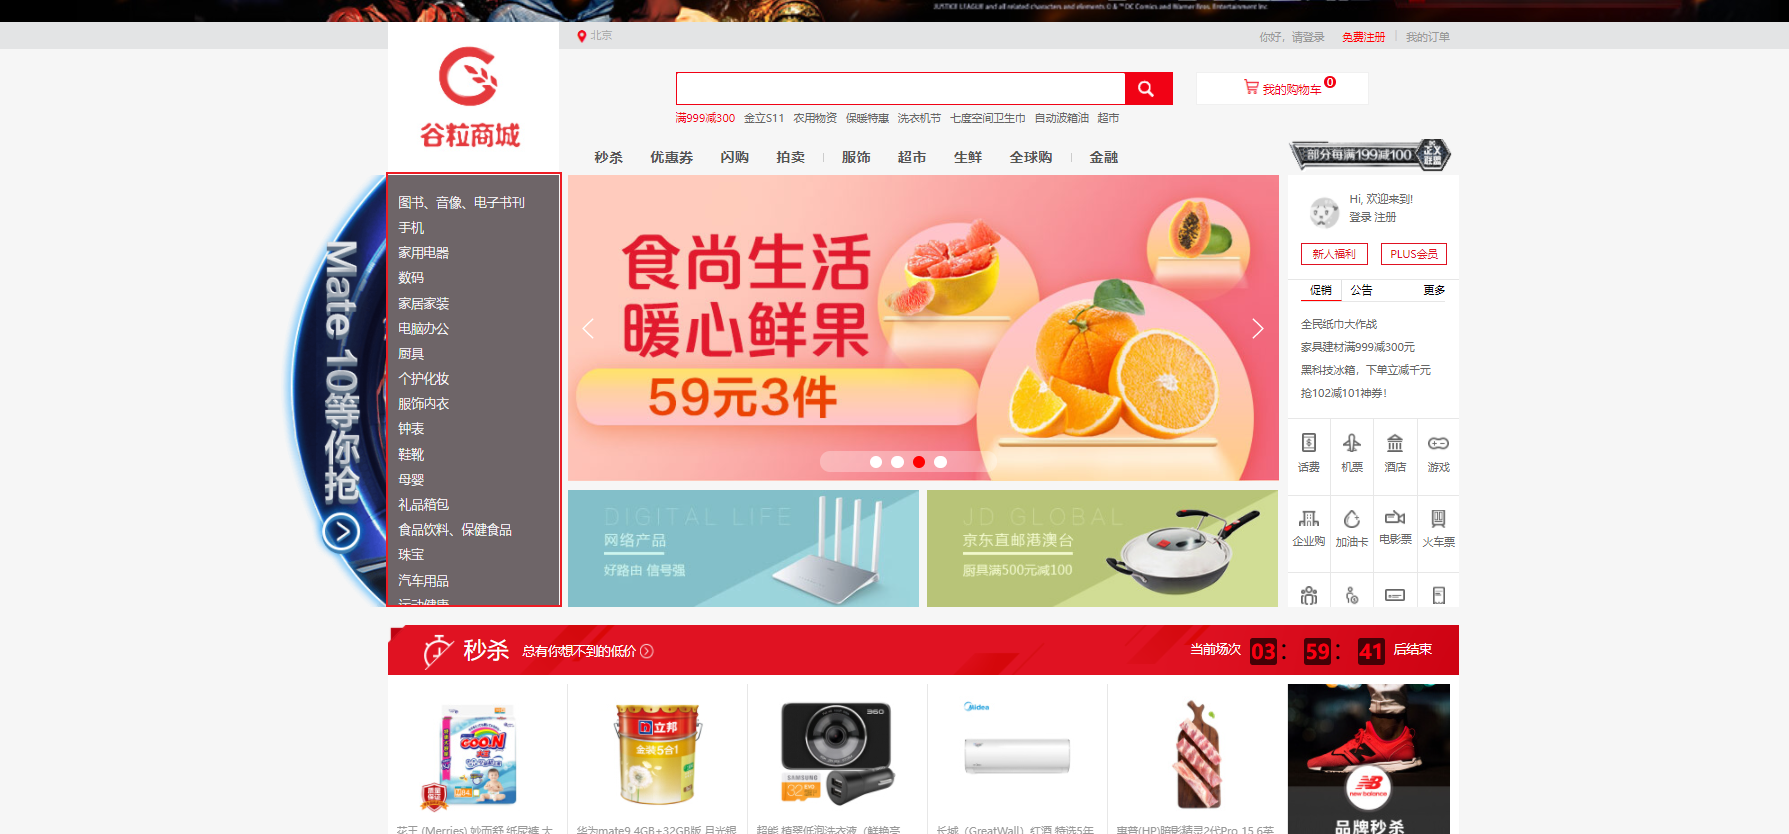
Our mall system should also be separated from the front and back ends , just like the background management system. However, for teaching considerations, if the front and back ends are separated, many details will be blocked, so we develop server-side page rendering (somewhat similar to freemarker )
Dynamic and static separation: When nginx is deployed later, we can deploy the static resources of the pages in the microservice to nginx. Share the pressure of microservices.
Static refers to static resources such as pictures, js, css (in the form of actual files)
Each microservice only manages its own pages , and finally each microservice can be deployed, run, and upgraded independently .
Each microservice is independent and autonomous , and the database and technology of each microservice are autonomous. Commodities and services are not necessarily developed with java, but with php and js. They are independent and autonomous in terms of technology, architecture and business.
The user first accesses Nginx, and the Nginx reverse proxy forwards the request to the gateway, which routes the request to various services. The gateway can request routing, authentication, current limiting, etc.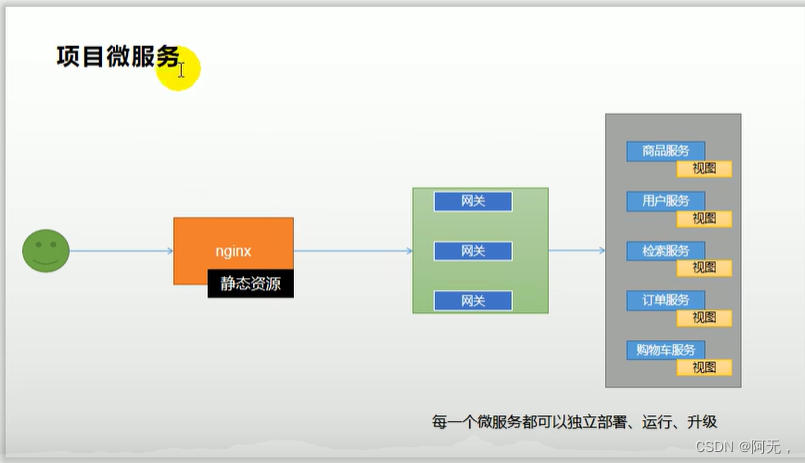
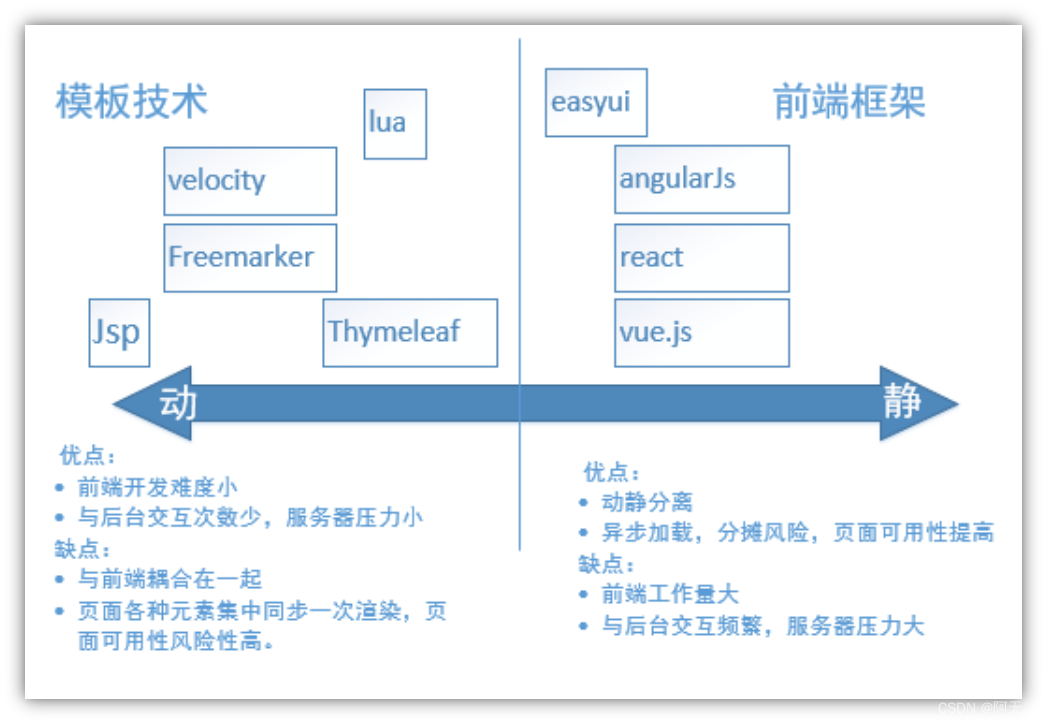
2. Template technology
2.1. Introduction
Template technology: replace the static data in the page with the data from the background database.
This operation can be achieved with jsp. However, the Spring boot architecture does not recommend the use of Jsp, and the support is not good, so if you use spring boot, generally use Freemarker or Thymeleaf.
The Thymeleaf template engine is a natural language, and the front end of the written page can be used directly.
2.2. The difference between template technology and front-end framework
3. Integrate thymeleaf to render the home page of the mall
3.1. Environment preparation
3.1.1, [commodity module] import thymeleaf and hot deployment dependencies
<!--        页面渲染我们使用thymeleaf,这应该和freemarker是差不多的,都是模板引擎-->
<!--        优点:它是一个自然化语言,编写的语言前端可以直接使用,方便前后人员的分工合作-->
<!--        缺点:性能比其他模板引擎要低一点,但是我们在生产环境开启了它的缓存功能,性能也是很高的-->
        <dependency>
            <groupId>org.springframework.boot</groupId>
            <artifactId>spring-boot-starter-thymeleaf</artifactId>
        </dependency>
<!--热部署-->
        <dependency>
            <groupId>org.springframework.boot</groupId>
            <artifactId>spring-boot-devtools</artifactId>
            <optional>true</optional>
        </dependency>
3.1.2. Add static resources to the product module
Copy static resources to static, index.html to templates.
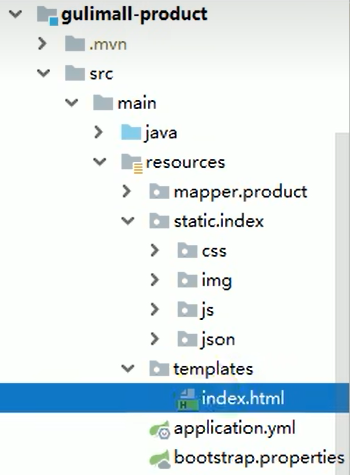
3.1.3, the controller package is renamed app, and the web package is added
Rename the controller package to app, and add a web package. In the future, all rest interfaces will be provided from the app package, and all controllers will be provided from the web package.
The controller under the web package is returned to thymeleaf. Its default prefix and suffix are classpath:/templates/and respectively .html. When springboot accesses the project, it will automatically find index.html
3.1.4, yml closes thymeleaf cache
# 关闭thymeleaf缓存,以便于修改代码后刷新页面能看出修改
spring:
  thymeleaf:
    cache: false
3.1.5, start the test
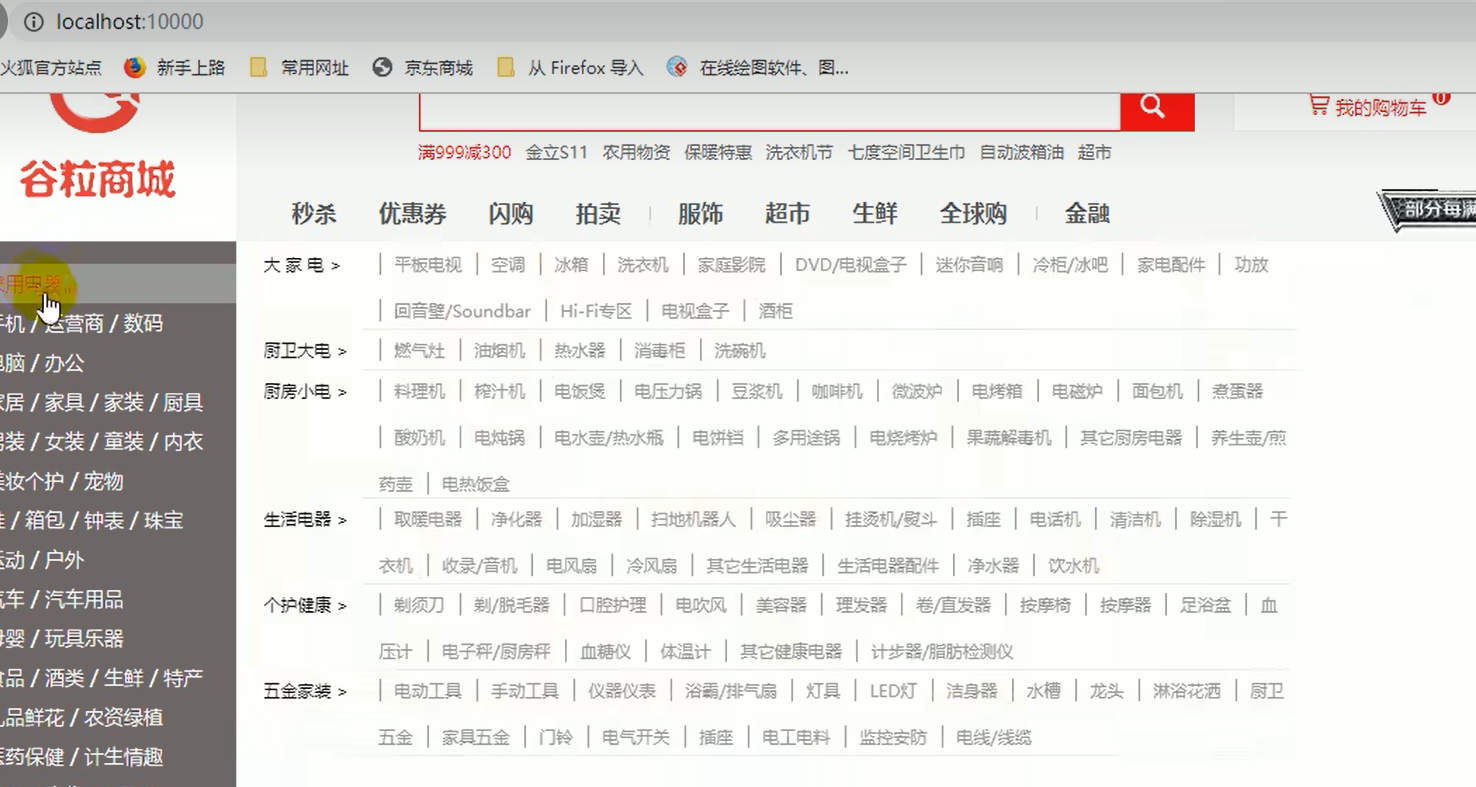
Start the commodity module, and you can find that all static resources are accessible. springboot accesses index.html by default.
3.2. Develop home page jump function
Added gulimall/product/web/IndexController.java to the product module
package xx.xx.gulimall.product.web;

@Controller
public class IndexController {
    @Autowired
    CategoryService categoryService;

    @GetMapping({"/","index.html"})
    public String indexPage(Model model){    //传参Model类
        // TODO 1、查出所有1级分类
        List<CategoryEntity> categoryEntitys = categoryService.getLevel1Categorys();
        model.addAttribute("categories",categoryEntities);
        return "index";    //相当于return "index.html"; 拦截GetMapping路径后转到首页
    }
}
3.3. Write an interface for querying the first-level directory list
gulimall-product/src/main/java/site/zhourui/gulimall/product/service/CategoryService.java
new interface
List<CategoryEntity> getLevel1Categorys();
gulimall-product/src/main/java/site/zhourui/gulimall/product/service/impl/CategoryServiceImpl.java
Implement the new interface
  /**
     * 查询一级分类。
     * 父ID是0, 或者  层级是1
     */
    @Override
    public List<CategoryEntity> getLevel1Categorys() {
        System.out.println("调用了 getLevel1Categorys  查询了数据库........【一级分类】");
        return baseMapper.selectList(new QueryWrapper<CategoryEntity>().eq("parent_cid", 0));
    }
3.4. Classification of the first-level rendering of the homepage of the mall
Home using thymeleaf
Add xmlns:th="http://www.thymeleaf.org" to the html tag
<html lang="en" xmlns:th="http://www.thymeleaf.org">
Traverse the categories passed by IndexController
       <div class="header_main_left">
          <ul>
            <li th:each=" category : ${categorys}">
              <a href="http://search.gulimall.com/" class="header_main_left_a" th:attr="ctg-data=${category.catId}"><b th:text="${category.name}">家用电器</b></a>
            </li>
          </ul>

        </div>
Restart commodity service
The first-level directory becomes the directory queried by the database
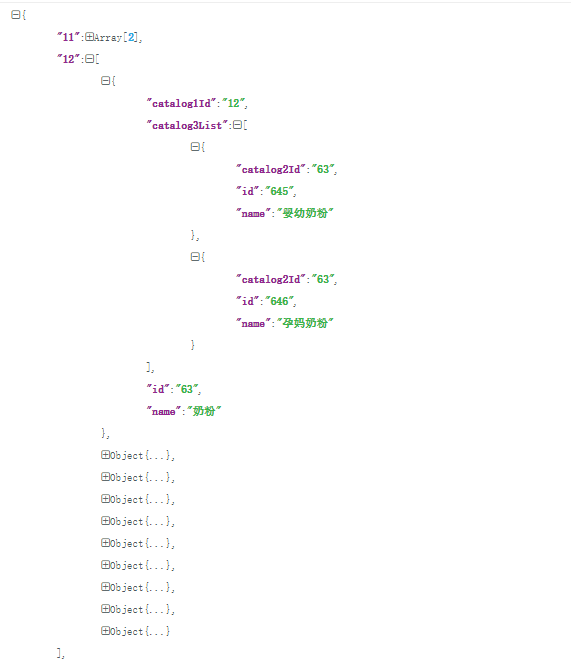
3.5. The expected response JSON of the second and third-level classification of commodities
The data of the second-level and third-level classification of commodities is in gulimall-product/src/main/resources/static/index/json/catalog.json
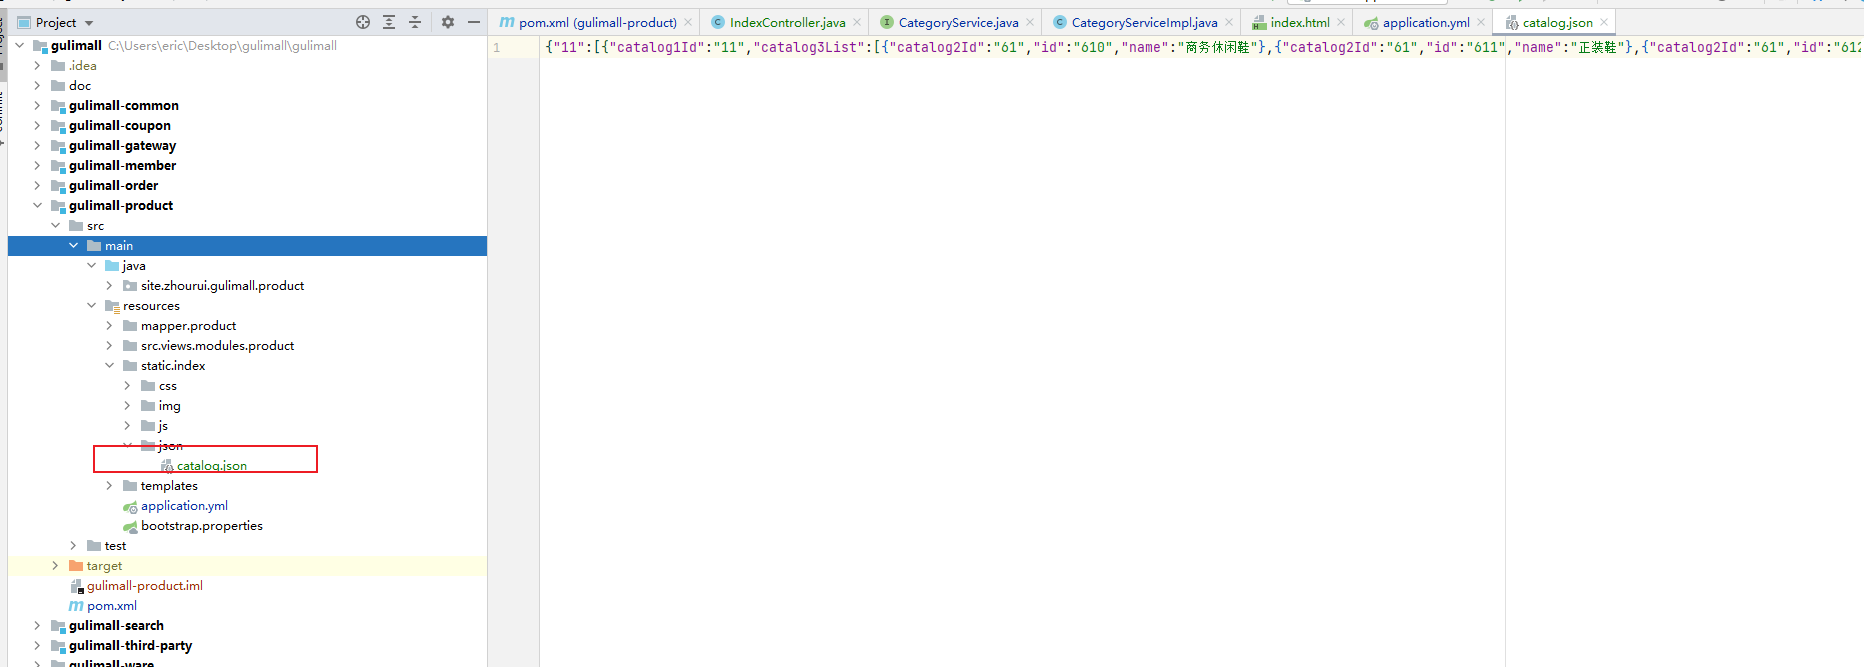
We need to encapsulate data with the same structure as catalog.json
Format catalog.json
It is found that it is a map type structure. The key is the value of the first-level category id, and the value is an array of all the second-level directories under the first-level category.
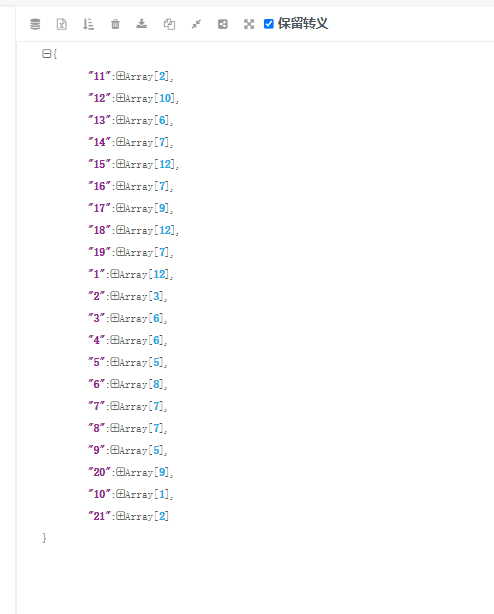
Open the secondary directory array
Find an array of objects, each object represents a secondary classification, and catalog3List is the collection of the three-level classification of the second-level classification
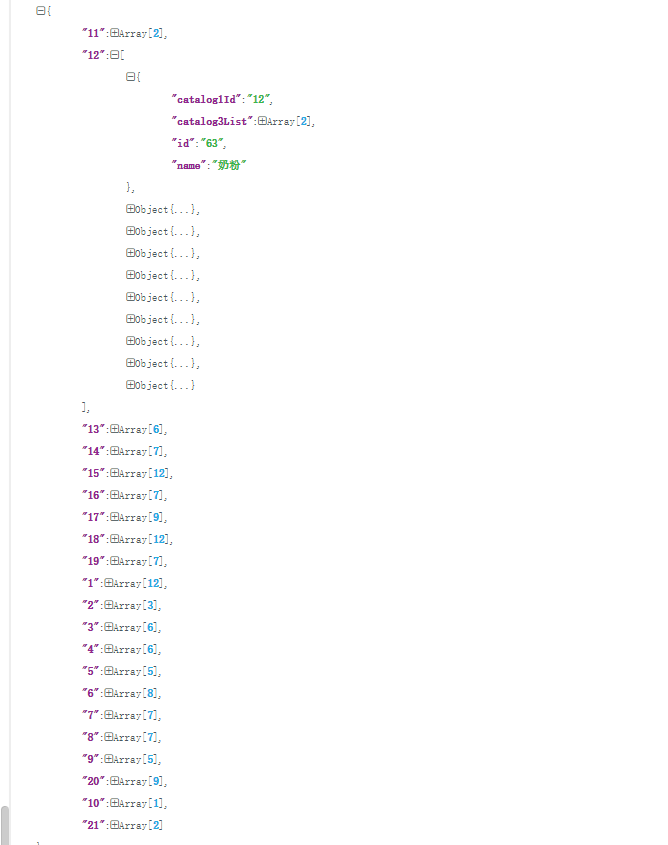
Open catalog3List
is a three-level classification
3.6. Query the second-level and third-level categories according to the id of the first-level category
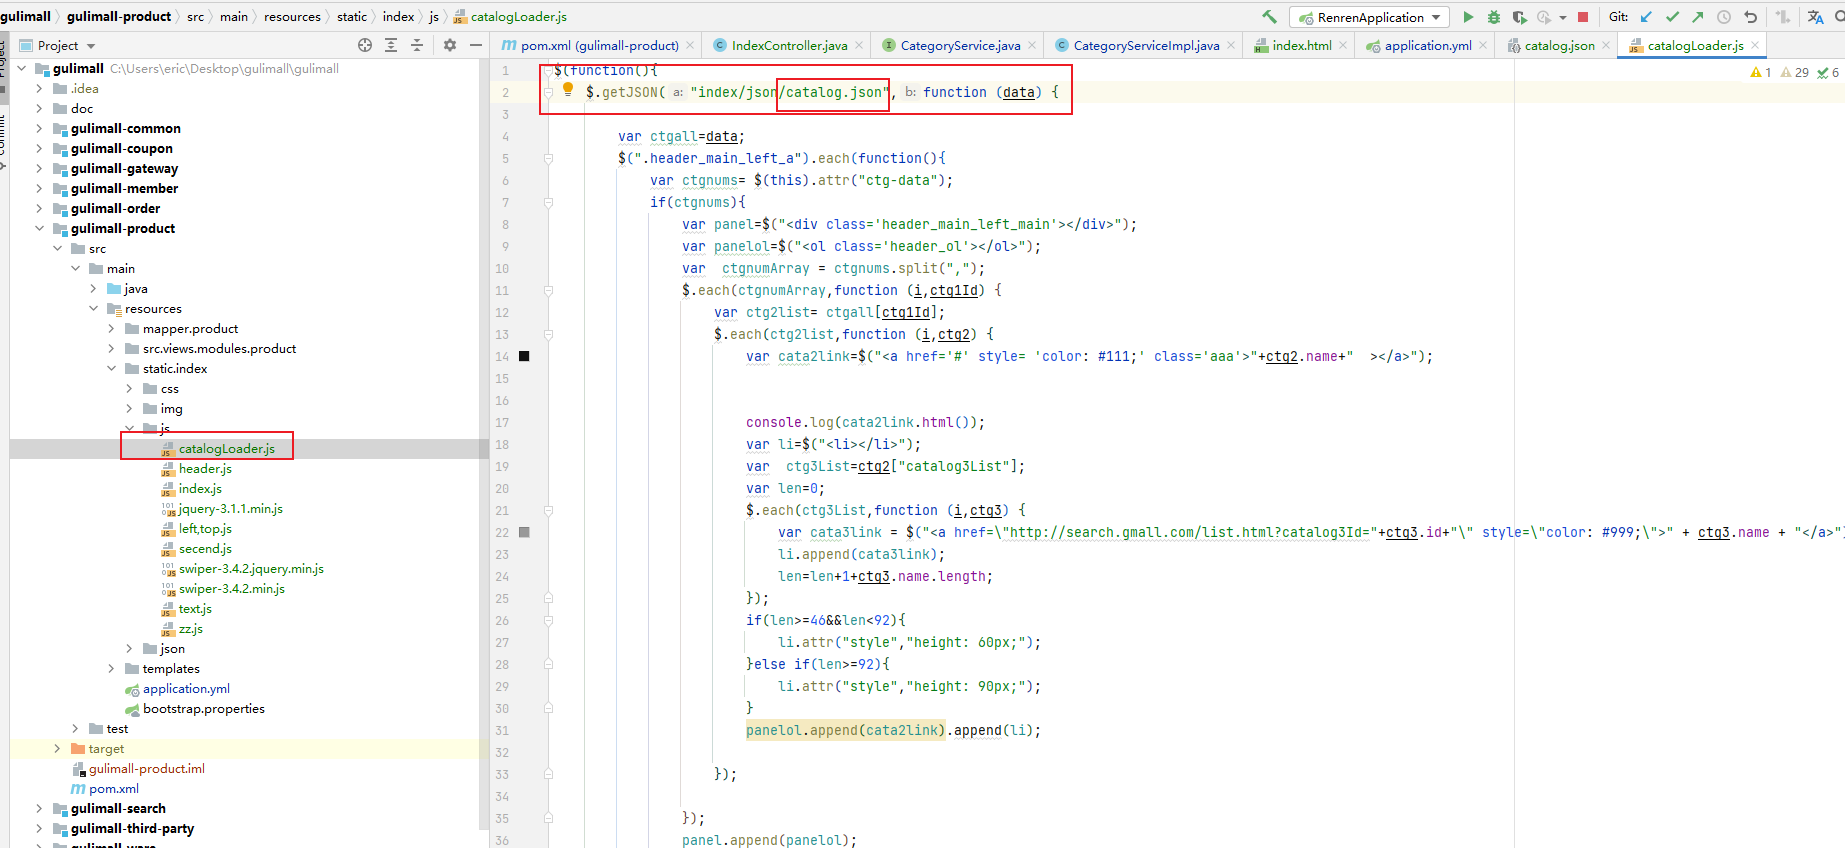
It is found that catalog.json is called at gulimall-product/src/main/resources/static/index/js/catalogLoader.js
3.6.1. New Catalog2Vo entity class
Created according to the structure analyzed in Chapter 8
package xx.xx.gulimall.product.vo;
@NoArgsConstructor
@AllArgsConstructor
@Data
public class Catalog2Vo {

    private String catalog1Id;  // 1级父分类ID
    private List<Catalog3Vo> catalog3List;// 3级子分类集合
    private String id;  // 2级分类ID
    private String name;  // 2级分类name

    /**
     * 三级分类Vo
     */
    @NoArgsConstructor
    @AllArgsConstructor
    @Data
    public static class Catalog3Vo {
        private String catalog2Id;  // 2级父分类ID
        private String id;  // 3级分类ID
        private String name;  // 3级分类name
    }
}
3.6.2, new interface
/**
 * 查出三级分类
 * 1级分类作为key,2级引用List
 */
@ResponseBody
@GetMapping("/index/catalog.json")
public Map<String, List<Catalog2Vo>> getCatalogJson() {
    Map<String, List<Catalog2Vo>> map = categoryService.getCatalogJson();
    return map;
}
gulimall-product/src/main/java/com/atguigu/gulimall/product/service/CategoryService.java
Map<String, List<Catalog2Vo>> getCatalogJson();
gulimall-product/src/main/java/com/atguigu/gulimall/product/service/impl/CategoryServiceImpl.java
@Override
    public Map<String, List<Catalog2Vo>> getCatalogJson() {
        // 一次性获取所有 数据
        List<CategoryEntity> selectList = baseMapper.selectList(null);
        System.out.println("调用了 getCatalogJson  查询了数据库........【三级分类】");
        // 1)、所有1级分类
        List<CategoryEntity> level1Categorys = getParent_cid(selectList, 0L);

        // 2)、封装数据
        Map<String, List<Catalog2Vo>> collect = level1Categorys.stream().collect(Collectors.toMap(k -> k.getCatId().toString(), level1 -> {
            // 查到当前1级分类的2级分类
            List<CategoryEntity> category2level = getParent_cid(selectList, level1.getCatId());
            List<Catalog2Vo> catalog2Vos = null;
            if (category2level != null) {
                catalog2Vos = category2level.stream().map(level12 -> {
                    // 查询当前2级分类的3级分类
                    List<CategoryEntity> category3level = getParent_cid(selectList, level12.getCatId());
                    List<Catalog2Vo.Catalog3Vo> catalog3Vos = null;
                    if (category3level != null) {
                        catalog3Vos = category3level.stream().map(level13 -> {
                            return new Catalog2Vo.Catalog3Vo(level12.getCatId().toString(), level13.getCatId().toString(), level13.getName());
                        }).collect(Collectors.toList());
                    }
                    return new Catalog2Vo(level1.getCatId().toString(), catalog3Vos, level12.getCatId().toString(), level12.getName());
                }).collect(Collectors.toList());
            }
            return catalog2Vos;
        }));
        return collect;
    }
3.6.3. Newly query the List collection whose parent ID is parent_cid
gulimall-product/src/main/java/com/atguigu/gulimall/product/service/impl/CategoryServiceImpl.java
/**
     * 查询出父ID为 parent_cid的List集合
     */
    private List<CategoryEntity> getParent_cid(List<CategoryEntity> selectList, Long parent_cid) {
        return selectList.stream().filter(item -> item.getParentCid() == parent_cid).collect(Collectors.toList());
        //return baseMapper.selectList(new QueryWrapper<CategoryEntity>().eq("parent_cid", level.getCatId()));
    }
3.6.4. Modification request
gulimall-product/src/main/resources/static/index/js/catalogLoader.js
Modify the request path to the new interface path index/catalog.json in Chapter 9
3.6.5. Restart the service and test
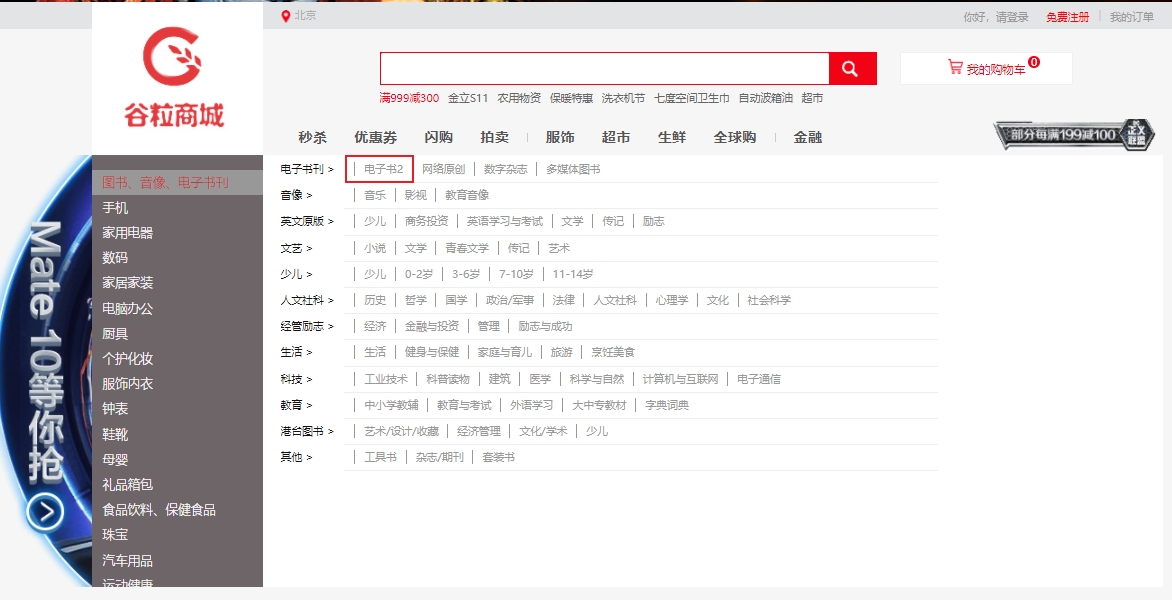
Database modification three-level taxonomy name
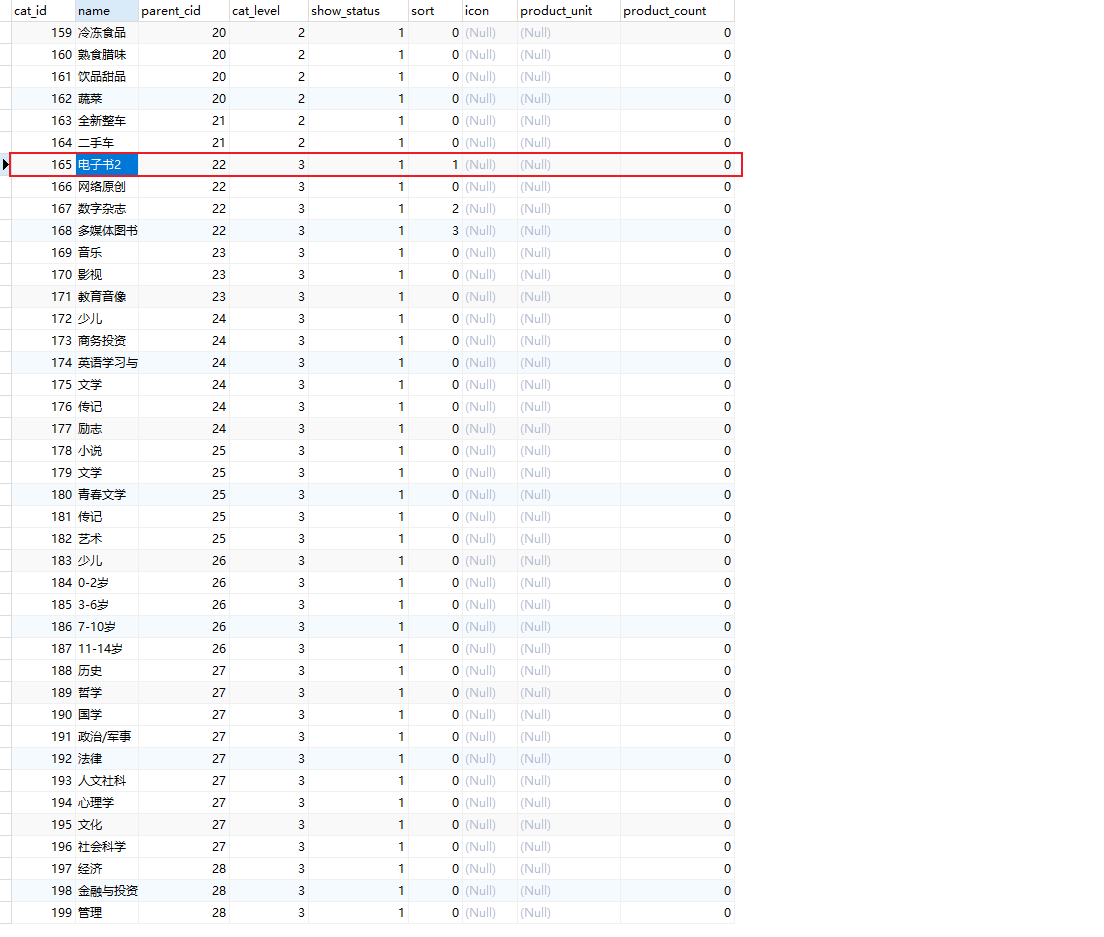
After the page is refreshed, it also changes accordingly, indicating that the data from the background is used
3.7. Summary of springboot page jump
Static pages do not require any acquisition of background data, simply acquire this page, and vice versa for dynamic pages.
In the html under the springboot project template, it is not possible to use a click event to jump to the page from the background controller.
There are two folders under src/main/resources, static and templates. Springboot puts static pages and static resource files in static by default, and dynamic pages in templates. Dynamic page access requires Thymeleaf dependencies, and dynamic pages need to be accessed from the background . Controller jumps , and the static page is directly similar to: http://127.0.0.1:8080/index.html to access; if the static page cannot be accessed, first of all, you must ensure that your access to these files will not be accessed interceptor kill
In the static directory and templates directory of the SpringBoot project, static resource files are placed in static by default, such as: img, js, css, font, etc. If static HTML pages are placed under static, one can be directly accessed as static resources; in addition, if there is a In this case, if the page is placed under static and also needs to be redirected from the controller, then redirection can be used, because the default template of spring boot is stored under /resource/templates and will not go to the static directory to find . Redirect is actually redirecting to external resources; in fact, dynamic pages are placed under templates, and everyone knows that they need to be accessed from the Controller. These are some configurations that are customary in SpringBoot;
3.7.1. Static pages
Static pages can be accessed directly. Create a new hello.html in the static directory to directly access http://localhost:8080/hello.html in the browser, or jump through the controller layer.
@Controller
public class HelloController {
    @RequestMapping("/hello")
    public String hello() { return "hello.html"; }
}
The return value here is the page. If the method is annotated with @ResponseBody, the return value is a string.
3.7.2. Dynamic pages
The access of dynamic pages needs to request the server first, access the application in the background, and then turn to the access page.
Spring boot uses thymeleaf as a dynamic page by default. It is recommended not to use jsp. The following is how spring boot integrates thymeleaf
<dependency>
	<groupId>org.springframework.boot</groupId>
	<artifactId>spring-boot-starter-thymeleaf</artifactId>
</dependency>
-
Create a new hello.html file in the tempates directory. At this time, if you directly access http://localhost:8080/hello.html to access hello.html in the static folder (static directory), then access static through the controller layer jump 500 error will be reported, this is because
- The return of a static page defaults to jumping to the static directory
- When thymeleaf is introduced, the dynamic jump will override the default static jump
- Dynamic jump jumps to the templates directory by default
- The difference between the return codes of the two: dynamic jumps are available with or without the .html suffix
The controller layer after using thymeleaf
@Controller
public class HelloController {
    @RequestMapping("/hello")
    public String hello() { return "hello"; }
}
If you want to jump to /static/index.html when using a dynamic page, use redirection return "redirect:/index.html"
4. nginx builds domain name access environment
4.1. Demand
Visit "gulimall.com", Nginx reverse proxy to the gateway address " http://localhost:88/# ", display the product page.
Gateway port is 88.
4.2. Review of reverse proxy
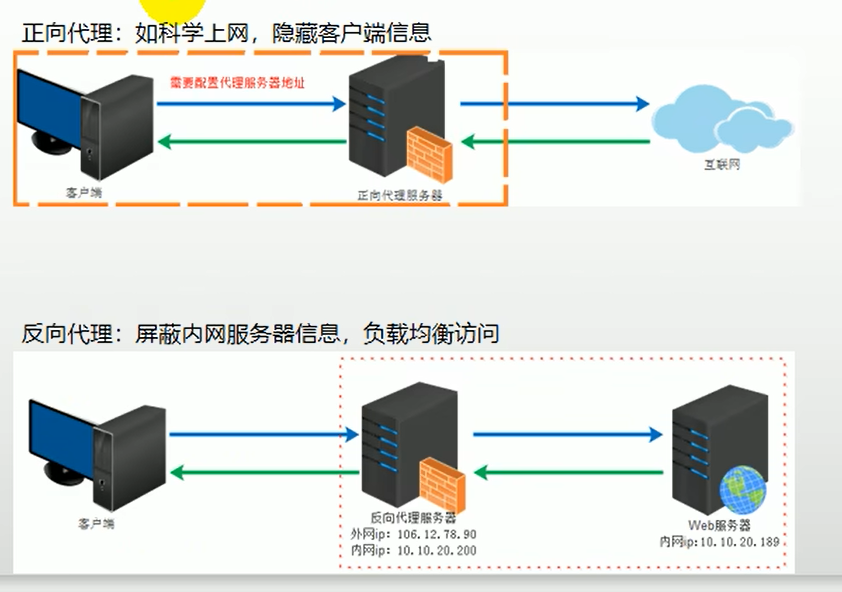
Forward proxy: The client sends a request to the proxy server and specifies the target server, and the proxy forwards the request to the target server and returns the obtained content to the client.
Reverse proxy: Users can directly access the reverse proxy server to obtain the resources of the target server. The reverse proxy server unifies the access entrance.
4.3, configure reverse proxy
4.3.1, hosts file configuration domain name and ip mapping
Method 1: Direct modification
Windows domain name resolution will first find the hosts file under C:\Windows\System32\drivers\etc, and then find the dns server
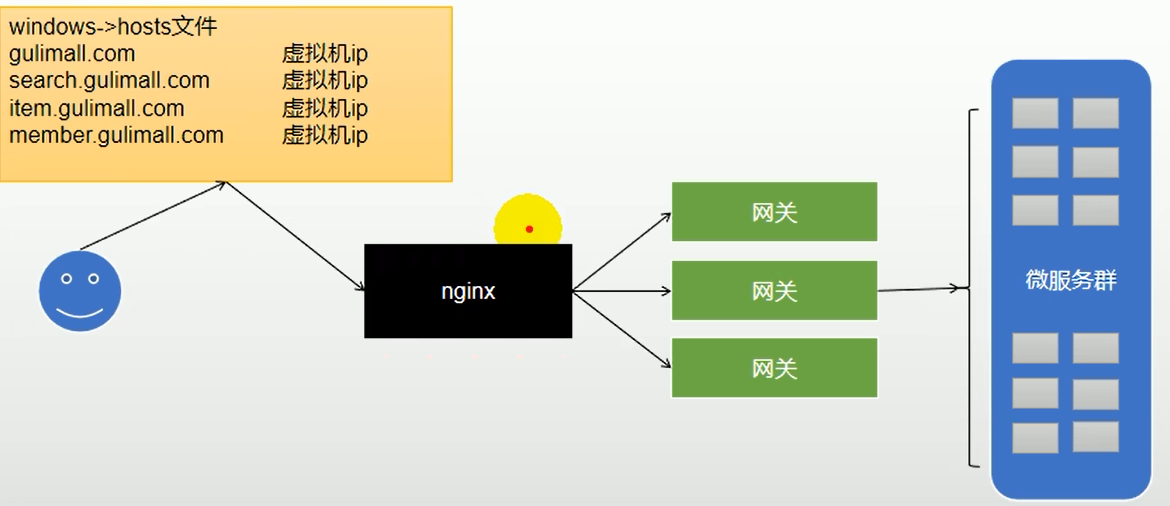
When we enter gulimall.com in the browser, we will find our virtual machine. At this time, if nginx in the virtual machine is running, we can access nginx, because nginx listens to port 80
192.168.56.10 gulimall.com
Method 2: Open the software SwitchHosts as an administrator and add a new scheme:
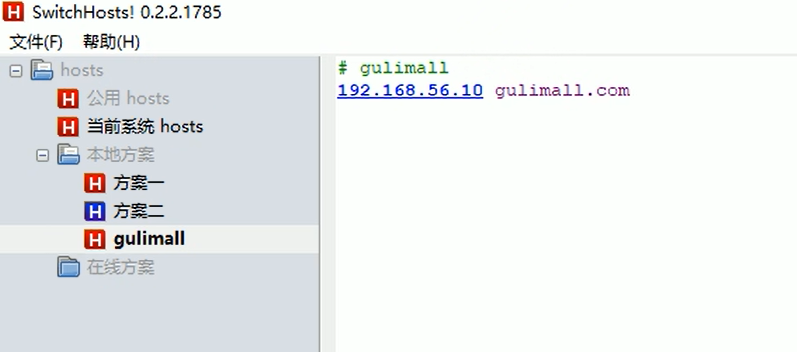
Test success:
4.3.2. Configure nginx.conf
First, docker installs Nginx and configures self-starting.
cd /mydata/nginx
cd conf
vi nginx.conf
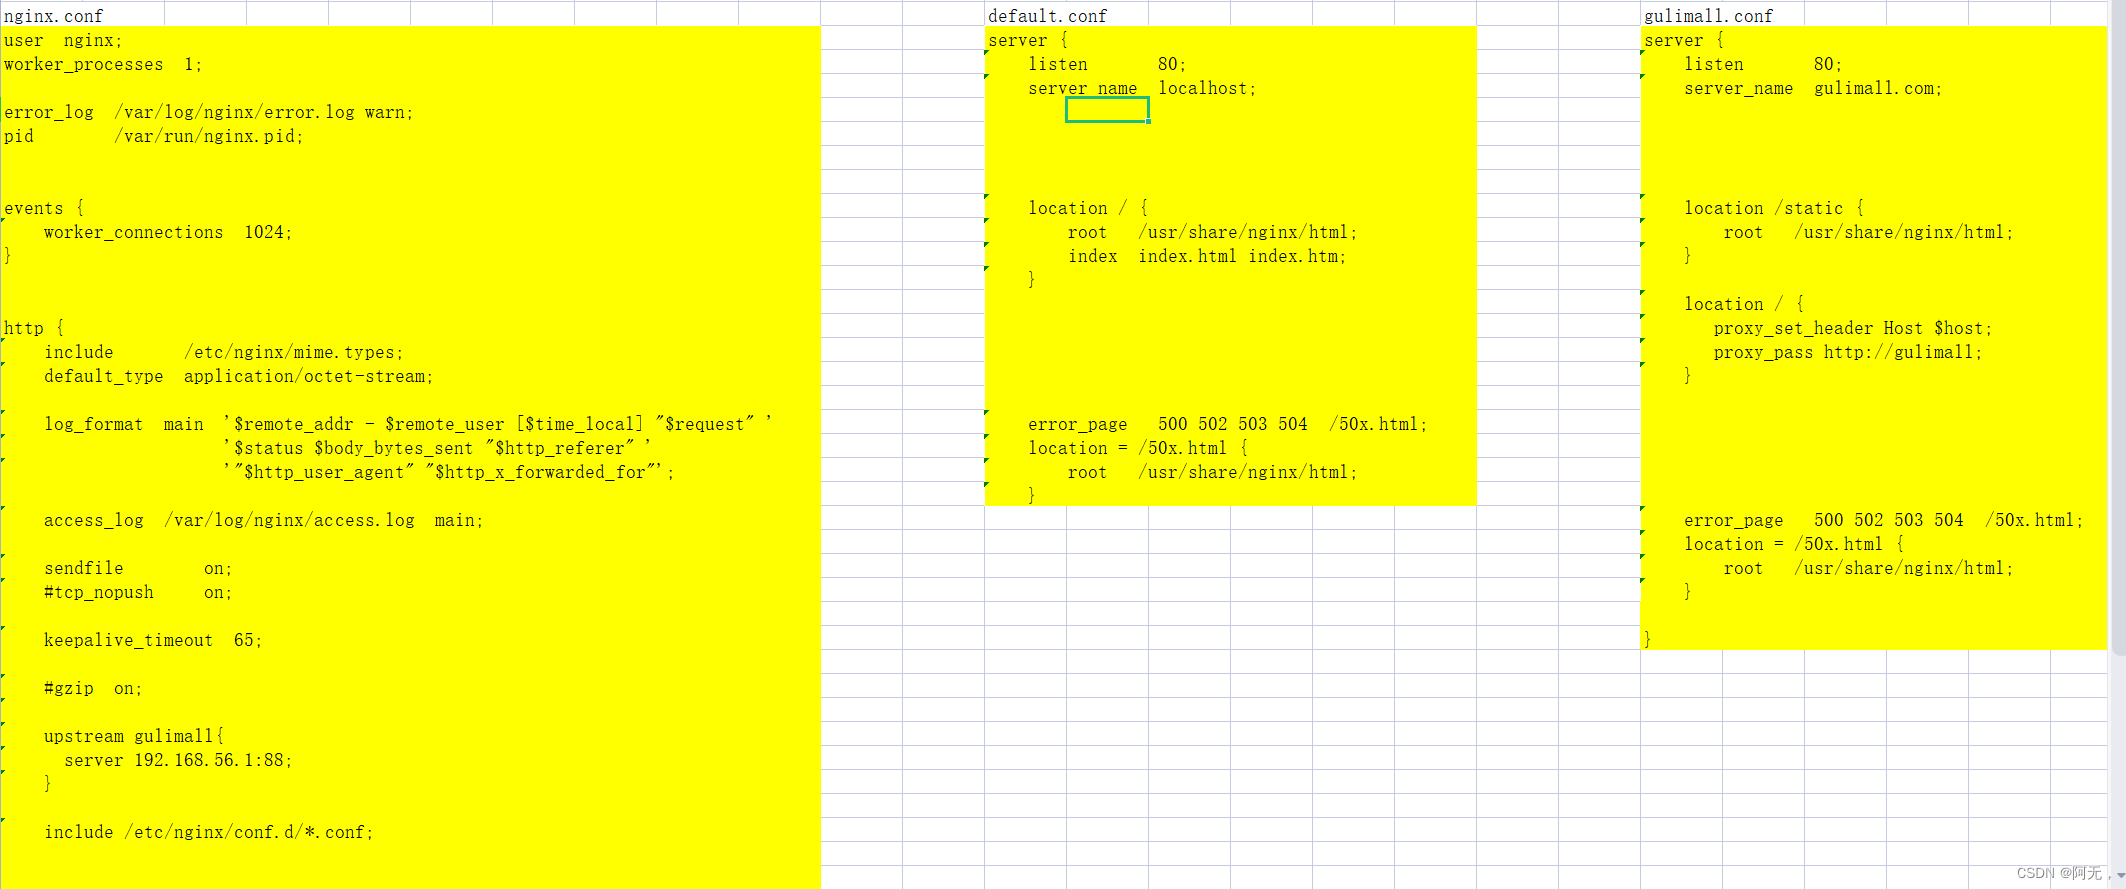
user  nginx;
worker_processes  1;

error_log  /var/log/nginx/error.log warn;
pid        /var/run/nginx.pid;


events {
    worker_connections  1024;
}


http {
    include       /etc/nginx/mime.types;    #支持的mime类型
    default_type  application/octet-stream;    #默认数据类型

    log_format  main  '$remote_addr - $remote_user [$time_local] "$request" '    #日志格式
                      '$status $body_bytes_sent "$http_referer" '
                      '"$http_user_agent" "$http_x_forwarded_for"';

    access_log  /var/log/nginx/access.log  main;    #日志地址

    sendfile        on;
    #tcp_nopush     on;

    keepalive_timeout  65;

    #gzip  on;    #开启压缩

    upstream gulimall{        #配置上游服务器,起名为gulimall
      server 192.168.56.1:88;    #配置上游服务器为网关地址
    }

    include /etc/nginx/conf.d/*.conf;    #该路径下的配置文件会全部合并到这里


}
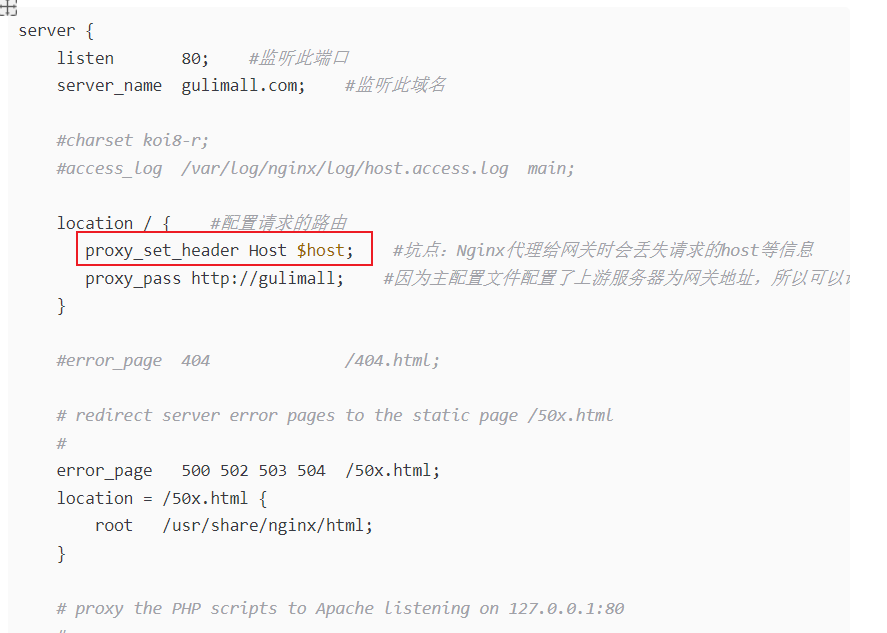
4.3.3. Configure /etc/nginx/conf.d/gulimall.conf
This configuration file is included by Nginx's http global block configuration.
server {
    listen       80;    #监听此端口
    server_name  gulimall.com;    #监听此域名

    #charset koi8-r;
    #access_log  /var/log/nginx/log/host.access.log  main;

    location / {    #配置请求的路由
       proxy_set_header Host $host;    #坑点:Nginx代理给网关时会丢失请求的host等信息
       proxy_pass http://gulimall;    #因为主配置文件配置了上游服务器为网关地址,所以可以请求路由到http://192.168.xxx.xxx:10000/
    }

    #error_page  404              /404.html;

    # redirect server error pages to the static page /50x.html
    #
    error_page   500 502 503 504  /50x.html;
    location = /50x.html {
        root   /usr/share/nginx/html;
    }

    # proxy the PHP scripts to Apache listening on 127.0.0.1:80
    #
    #location ~ \.php$ {
    #    proxy_pass   http://127.0.0.1;
    #}

    # pass the PHP scripts to FastCGI server listening on 127.0.0.1:9000
    #
    #location ~ \.php$ {
    #    root           html;
    #    fastcgi_pass   127.0.0.1:9000;
    #    fastcgi_index  index.php;
    #    fastcgi_param  SCRIPT_FILENAME  /scripts$fastcgi_script_name;
    #    include        fastcgi_params;
    #}

    # deny access to .htaccess files, if Apache's document root
    # concurs with nginx's one
    #
    #location ~ /\.ht {
    #    deny  all;
    #}
}
After the configuration is complete, restart the Nginx container.
4.3.4, gateway configuration "gulimall.com" routing rules
Note: domain name mapping can only be placed at the end, otherwise it will overwrite the above "/api/xxx" path
spring:
  cloud:
    gateway:
      routes:
#        - id: test_route
#          uri: https://www.baidu.com
#          predicates:
#            #              根据参数来匹配
#            - Query=url,baidu

        # 和admin_route顺序不能乱,否则页面访问报404,因为被它拦截了
        # 我们一般把精确的路由放在上面,优先级高
        # 匹配了这个路由之后,不会匹配下面的路由
        - id: product_route
          uri: lb://gulimall-product
          predicates:
            - Path=/api/product/**
          # 前端的请求是 http://localhost:88/api/product/category/list/tree
          # 后端实际需要的请求是,http://localhost:12000/product/category/list/tree
          filters:
            - RewritePath=/api/(?<segment>.*),/$\{segment}

            #  http://localhost:88/api/thirdparty/oss/policy
        - id: third_party_route
          #  lb 负载均衡
          uri: lb://gulimall-third-party
           # 匹配所有以api开头的请求
          predicates:
            - Path=/api/thirdparty/**
          filters:
            #  路径重写
            # (?<segment>.*)  $\{segment} 相当于片段
            - RewritePath=/api/thirdparty/(?<segment>.*),/$\{segment}

        - id: member_route
          #  lb 负载均衡
          uri: lb://gulimall-member
          # 匹配所有以api开头的请求
          predicates:
            - Path=/api/member/**
          filters:
            #  路径重写
            # (?<segment>.*)  $\{segment} 相当于片段
            - RewritePath=/api/(?<segment>.*),/$\{segment}

        - id: ware_route
          uri: lb://gulimall-ware
          predicates:
            - Path=/api/ware/**
          filters:
            - RewritePath=/api/(?<segment>.*),/$\{segment}

        #  前端项目发送请求都以 /api 开头
        - id: admin_route
          #  lb 负载均衡  到renren-fast服务
          uri: lb://renren-fast
          # 匹配所有以api开头的请求
          predicates:
            - Path=/api/**
          filters:
            #  路径重写
            # http://localhost:88/api/captcha.jpg 在网关匹配到相应的规则后
            #  就变成了 http://localhost:8080/api/captcha.jpg
            # 但实际上我们需要真正访问的是 http://localhost:8080/renren-fast/captcha.jpg
            # (?<segment>.*)  $\{segment} 相当于片段
            - RewritePath=/api/(?<segment>.*),/renren-fast/$\{segment}

        # 域名映射只能放在最后面,否则会覆盖上面的api路径
        # 例如我们访问product的api路径,优先匹配到这个的话就会去直接找product
        # 不会再路径重写了
        - id: gulimall_host_route
          uri: lb://gulimall-product
          predicates:
            - Host=**.gulimall.com
4.3.5. Pit point: When Nginx proxies to the gateway, it will lose the requested host and other information
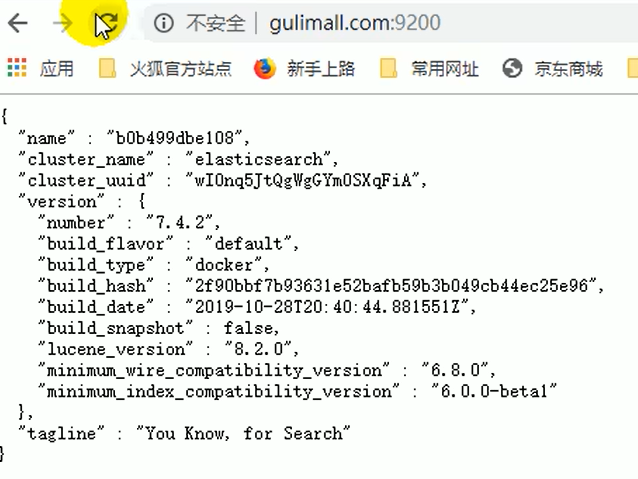
4.3.6, the test passed
Restart the Nginx container and visit "gulimall.com":
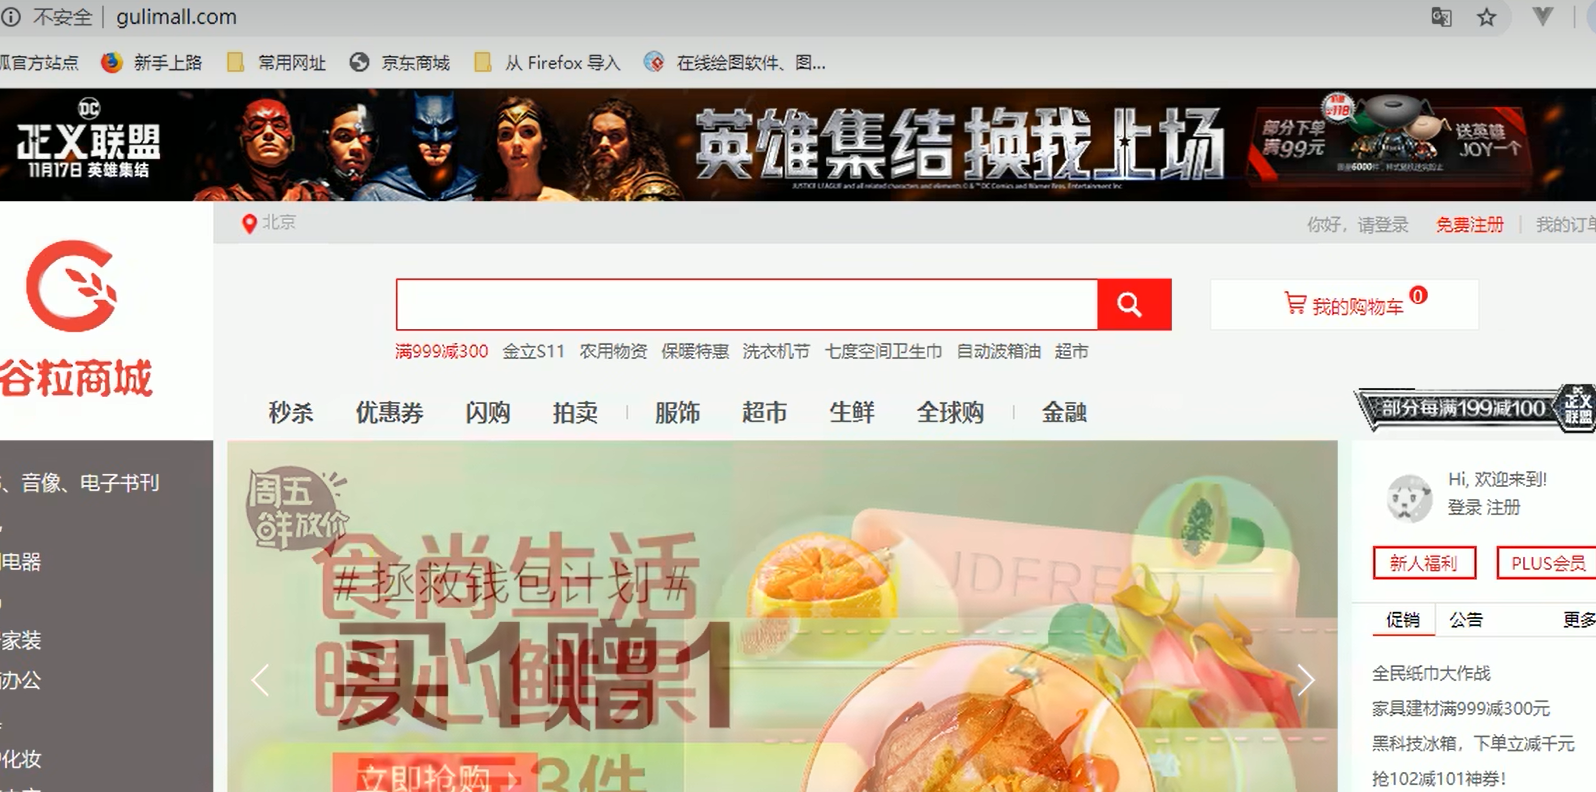
Access interface:

4.3.7 Summary, reverse proxy process
- The client accesses the windows browser
gulimall.com, and the browser will access our configured virtual machine - nginx in the virtual machine listens to port 80 (server_name is also configured with gulimall.com), and
include /etc/nginx/conf.d/*.conf;the configuration in nginx.conf includes all .conf files under conf.d to configure the server - The gulimall.conf configuration
proxy_pass http://gulimall;means that access to this address will be transferred to nginx.confupstream gulimall, where the address of the gateway is configured - When the above-mentioned nginx hands over the request to the gateway, nginx will lose a lot of data, such as host, cookie, etc., and the assertion of our gateway configuration is based on the host. This
proxy_set_header Host $host;configuration represents the retention of host information - The gateway forwards the request to the corresponding service according to the domain name assertion
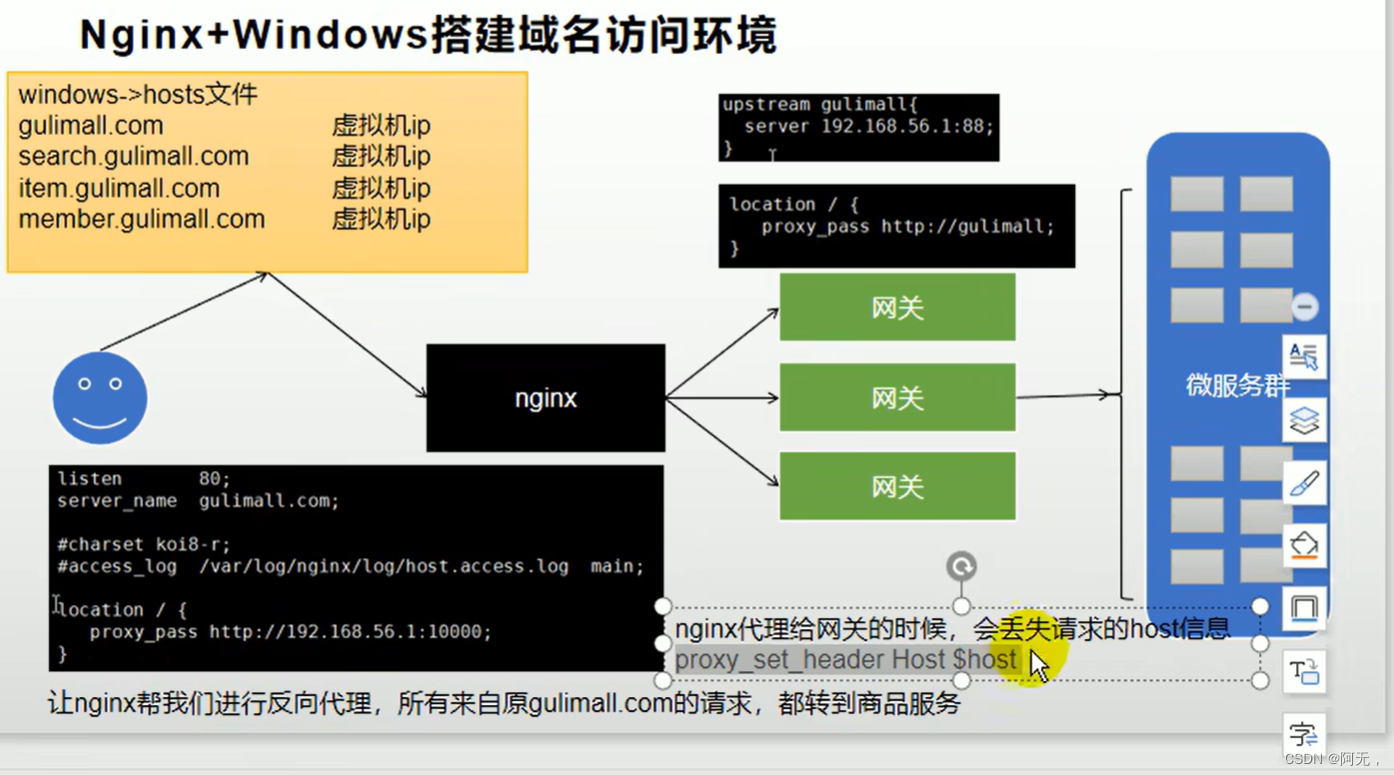
When nginx proxies to the gateway, the requested Host information will be lost, which needs to be configured.