Although the edge i detection can detect the edge, but the edge is discontinuous. The image outline can connect the edges to form a whole, which includes information such as the size, position, and direction of the target.
1. Find contours: findContours()
格式:contours, hierarchy = findCountours ( image, mode, method )
- Return value contours: the found contour
- Contours includes several contours[i], each contours[i] represents a contour, representing a numpy.ndarray type.
- Get the total number of contours: len(contours)
- Get the total number of pixels of the current contour: len(contours[i])
- Return value hierarchy: organizational hierarchy.
- Express the positional nesting relationship between contours.
- Returns 4 index numbers [NEXT, BEFORE, FIRST, ROOT] and defaults to -1 when there is no nesting relationship.
- This number is determined by the extraction method in the parameter mode.
- Parameter image: The input image must be an 8-bit single-channel binary image, and must be a white object with a black background.
- Parameter mode: determines the extraction method of the contour:
- cv2.RETR_EXTERNAL only detects outer contours.
- cv2.RETR_LIST does not establish a hierarchical relationship for the retrieved contours.
- cv2.RETR_CCOMP only builds 2 level contours.
- cv2.RETR_TREE builds a hierarchical tree.
- Parameter method: determines how to express the contour:
- cv2.CHAIN_APPROX_NONE: Keep all points, adjacent to no more than 1 pixel.
- cv2.CHAIN_APPROX_SIMPLE: Only keep the end coordinates in the direction.

2. Draw contours: drawContours()
格式:image = drawContours (image, contours, contourIdx, color, thickness)
- Return value image: the result image, it can also be written in the form of no return value image.
- Parameter contours: the contour to be drawn.
- Parameter contourIdx: The index of the contour to be drawn.
- Parameter color: The color of the drawn line.
- Parameter thickness: The width of the drawn line.
Above code:
import cv2
import numpy as np
import matplotlib.pyplot as plt

o = cv2.imread('contours.bmp')

plt.figure(figsize=(10,10),dpi=100)
plt.subplot(1,4,1)
plt.title("O")
plt.imshow(o),plt.axis('off')

# 转换为8位灰度图
gray = cv2.cvtColor(o,cv2.COLOR_BGR2GRAY)

# 二值化图像
ret, binary = cv2.threshold(gray,127,255,cv2.THRESH_BINARY)

# 提取轮廓
contours, hierarchy = cv2.findContours(binary,
                                cv2.RETR_TREE, # 建立等级树
                      cv2.CHAIN_APPROX_SIMPLE) # 保留关键点
n=len(contours) # 获取轮廓个数
contoursImg=[] # 创建一个填充轮廓的元组

for i in range(n):
    temp=np.zeros(o.shape,np.uint8) # 创建一个所有元素为0的矩阵
    contoursImg.append(temp) # 添加画布
    contoursImg[i]=cv2.drawContours(contoursImg[i], # 传入画布
                                          contours, # 提取当前的轮廓集合
                                                 i, # 第i个轮廓
                                         (0,0,255), # RGB通道选择B
                                                 5) # 线条宽度5
    # 显示
    plt.subplot(1,4,i+2)
    plt.title("Contours"+str(i))
    plt.imshow(contoursImg[i]),plt.axis('off')

print(hierarchy) # 打印组织层次
Operation:
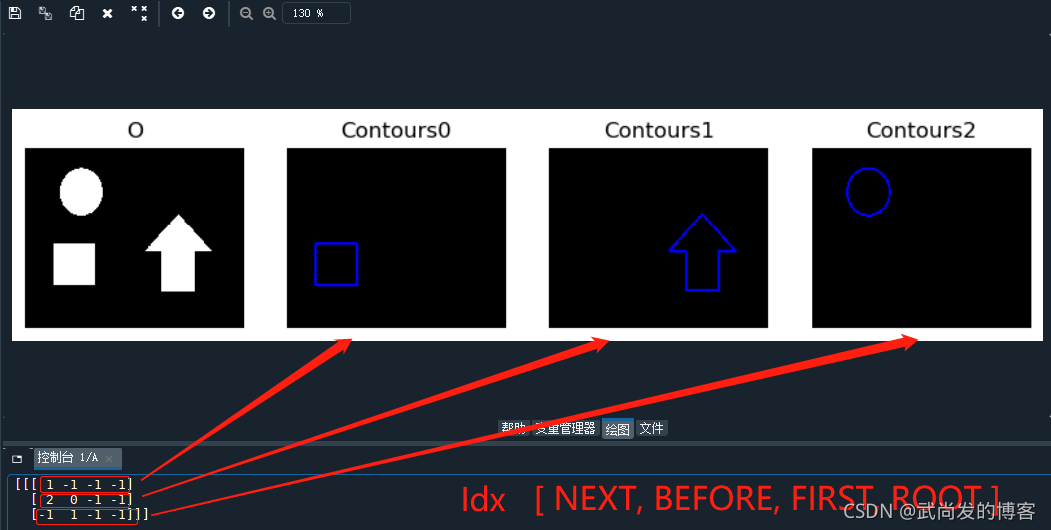
The hierarchical organization printed here: the two-dimensional array represented by the hierarchy, it is necessary to explain:
according to the order of [back profile Index, front profile Index, child profile Index, parent profile Index], first in the first array [1, -1,-1,-1] means that the back contour index of Contours0 is 1, the front contour does not exist, so it is -1, the child contour does not exist, so it is -1, and the parent contour does not exist, so it is -1.
3. Moment feature: moments
The easiest way to compare two images is to compare moment features. A simple understanding is to use a set of matrix data to represent the contour: size, position, angle, shape, etc. When the compared matrix data is exactly the same, the two contours are also the same.
-
Spatial moments: m00 represents the object area.
Zero-order moment: m00
First-order moment: m10, m01
Second-order moment: m20, m11, m02
Third-order moment: m30, m21, m12, m03 -
Central moment: used to solve the consistency comparison of two objects at different positions.
Second-order central moments: mu20, mu11, mu02
Third-order central moments: mu30, mu21, mu12, mu03 -
Normalized central moment: Solve the consistency comparison of two objects after translation and scaling.
Second-order Hu moments: nu20, nu11, nu02
Third-order Hu moments: nu30, nu21, nu12, nu03
Above code:
import cv2
import numpy as np
o = cv2.imread('moments.bmp')
cv2.imshow("original",o)
gray = cv2.cvtColor(o,cv2.COLOR_BGR2GRAY)
ret, binary = cv2.threshold(gray,127,255,cv2.THRESH_BINARY)
contours, hierarchy = cv2.findContours(binary,
cv2.RETR_LIST,
cv2.CHAIN_APPROX_SIMPLE)
n=len(contours)
contoursImg=[]
for i in range(n):
temp=np.zeros(o.shape,np.uint8)
contoursImg.append(temp)
contoursImg[i]=cv2.drawContours(contoursImg[i],contours,i,255,3) # 绘制轮廓
cv2.imshow("contours[" + str(i)+"]",contoursImg[i])
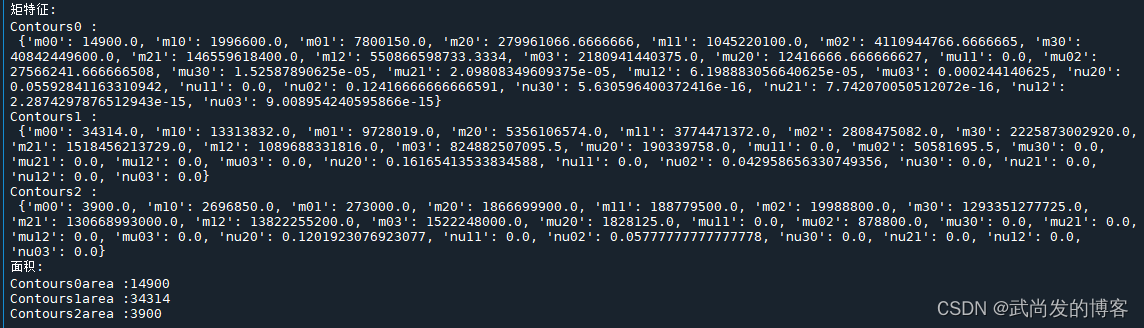
print("矩特征:")
for i in range(n):
print("Contours"+str(i)+" :\n",cv2.moments(contours[i])) # 打印矩特征
print("面积:")
for i in range(n):
print("Contours"+str(i)+"area :%d" %cv2.moments(contours[i])['m00']) # 打印轮廓面积
cv2.waitKey()
cv2.destroyAllWindows()
result:
4. Get the area and perimeter of the contour: contourArea / arcLength
cv2.contoursArea(contours[0]) # Get the contour area
cv2.arcLength(contours[0],closed) # Get the contour perimeter (closed is True to indicate that the contour is closed, and vice versa.)
5. Shape matching: matchShapes
score = cv2.matchShapes(grayscale image 1, grayscale image 2, compare Hu way, 0)
returns a match score of type float.
Above code:
import cv2
from matplotlib import pyplot as plt

#--------------读取3幅原始图像--------------------
o1 = cv2.imread('cs1.bmp')
o2 = cv2.imread('cs2.bmp')
o3 = cv2.imread('cc.bmp')

#--------------色彩空间转换--------------------
gray1 = cv2.cvtColor(o1,cv2.COLOR_BGR2GRAY)
gray2 = cv2.cvtColor(o2,cv2.COLOR_BGR2GRAY)
gray3 = cv2.cvtColor(o3,cv2.COLOR_BGR2GRAY)

#-------------进行Hu矩匹配--------------------
ret0 = cv2.matchShapes(gray1,gray1,2,0)
ret1 = cv2.matchShapes(gray1,gray2,2,0)
ret2 = cv2.matchShapes(gray1,gray3,2,0)
#--------------打印差值--------------------
print("模板图像得分:",ret0)
print("相似度得分:",ret1)
print("相似度得分:",ret2)

plt.subplot(131)
plt.imshow(o1)
plt.title("pattern")

plt.subplot(132)
plt.imshow(o2)
plt.title("o2")

plt.subplot(133)
plt.imshow(o3)
plt.title("o3")

cv2.waitKey()
cv2.destroyAllWindows()
operation result:

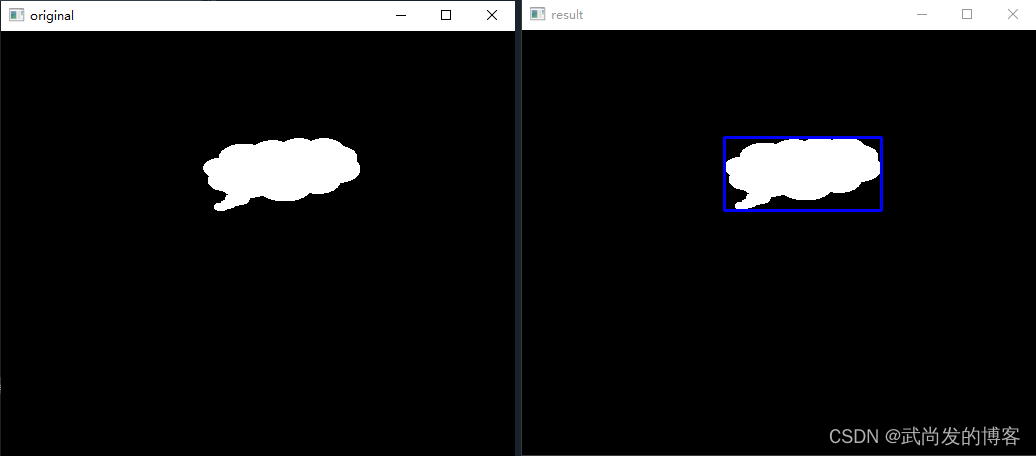
6. Rectangular outer frame: boundingRect
x,y,w,h = cv2.boundingRect(contours[0])
Returns the x, y, x-direction length w, y-direction length h of the upper left corner of the outer frame of a contour.
Above code:
import cv2
import numpy as np

#---------------读取并显示原始图像------------------
o = cv2.imread('cc.bmp')
cv2.imshow("original",o)

#---------------提取图像轮廓------------------
gray = cv2.cvtColor(o,cv2.COLOR_BGR2GRAY)
ret, binary = cv2.threshold(gray,127,255,cv2.THRESH_BINARY)
contours, hierarchy = cv2.findContours(binary,
                                       cv2.RETR_LIST,
                                       cv2.CHAIN_APPROX_SIMPLE)

#---------------构造矩形边界------------------
x,y,w,h = cv2.boundingRect(contours[0])
rect = np.array([[[x, y]], [[x+w, y]], [[x+w, y+h]], [[x, y+h]]])
# 注意:这里的rect是一个list类型,应该以[]的方式出现
cv2.drawContours(o, [rect], -1, (255, 0,0), 2)

#---------------显示矩形边界------------------
cv2.imshow("result",o)
cv2.waitKey()
cv2.destroyAllWindows()
Running results:
Summary: There are many ways to draw geometric contours, so I won’t list them one by one here. I will share them here today, hoping to help you. . .