need
Without further ado, let's get right to the point! We often encounter a requirement to display a long picture in a fixed-height card, as shown in the figure below.
Suppose we want to display this long picture . If you don't consider customizing the area where the long image is displayed, this is easy to implement, and there is nothing to say.
Container(width: 300,height: 400,decoration: BoxDecoration(border: Border.all(color: Colors.deepOrangeAccent, width: 3)),child: Image.network("https://fb-cdn.fanbook.mobi/fanbook/app/files/chatroom/image/9a61840fbbcf766b15f8601b66b9d63c.jpeg",fit: BoxFit.fitWidth,),
),
Regarding BoxFitthis enumeration, I copied the meaning of each specific enumeration value directly from the official notes for your convenience.
1.#### BoxFit.fill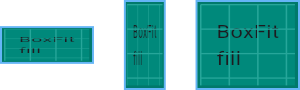
2.#### BoxFit.contain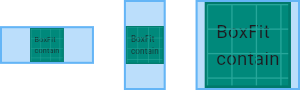
3.#### BoxFit.cover
4.#### BoxFit.fitWidth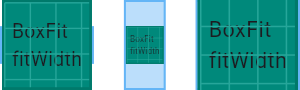
5.####BoxFit.fitHeight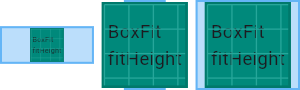
6.#### BoxFit.none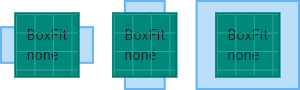
7.#### BoxFit.scaleDown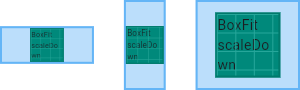
question
For a long picture, I only want to display the middle part, top, bottom, or even any area of the picture, how to achieve it. If you only use BoxFitenumeration, I am afraid that the product manager's unrestrained ideas cannot be realized that day. To achieve this requirement, I believe some people already know the method. That's right, drawing. By customizing CustomPainterand then using Flutter Canvasthe object's canvas.drawImageRect()methods.
open write directly
1. Custom clipping object
For this small tool, we write it backwards, which may be easier to understand. First we define a class XHImagClipperto inherit from CustomPainter.
The requirement is to customize the cropped display of the super-long image. It is easy to think of what data we need. As for how to provide the data, we will talk about it below.
1. An object is required Image, which contains the width and height information of the original image. This is a built-in object Imagefrom 2. We need to know the starting position of cropping, which we use to indicate that the range is all , for example, it means the top; it means the bottom; it means the center position . 3. The ratio that needs to be cropped is used to define.dart:ui(x, y)[0,1]y=0y=1y=0.5ratio
Well, by translating what was said above, we have implemented the following code.
import 'dart:ui' as ui;

/// 图片裁剪
class XHImageClipper extends CustomPainter {final ui.Image image;final double x;final double y;final double ratio;XHImageClipper(this.image, {this.x = 0.0, this.y = 0.0, this.ratio = 0.75});@overridevoid paint(Canvas canvas, Size size) {//TODO}@overridebool shouldRepaint(CustomPainter oldDelegate) {// TODO: implement shouldRepaintreturn true;}
}
XHImageClipperThe core method in the next implementation paint(). That's the custom drawing part.
Little Tips
drawImageRect(Image image, Rect src, Rect dst, Paint paint). This is an internal function of canvas. It is to cut out the rectangleimagein the areasrcand draw it intodstthe rectangle area. It is conceivable that if the aspect ratio of the two rectangles is inconsistent, the picture will be deformed. Armed with this knowledge base, we continue.
We are mainly used to deal with the logic of ultra-long and ultra-wide pictures. If we define 宽/高the ratio of the picture, or if 高/宽the ratio exceeds it 3, it will be considered as an ultra-long or ultra-wide picture, and other pictures will display the entire content of the picture.
Our purpose is to cut out the rectangle of the specified area of the super long picture and draw it into dstthe rectangle, so dstthere is nothing to say about it, it is the width and height of the canvse. So we only need to calculate srcthe rectangle, even if the requirements are fulfilled.
1. The logic for super long pictures.
- x-axis start position
final l = x * imgSourceWidth; - width
final w = imgSourceWidth; - high
final h = imgSourceWidth / ratio; - The starting position of the y-axis
double t = y * (imgSourceHeight - h)
The source code is as follows. It is relatively simple. You should understand it by looking at the source code directly. If you don’t understand it, you can leave a message.
void paint(Canvas canvas, Size size) {final paint = Paint();final imgSourceWidth = image.width;final imgSourceHeight = image.height;Rect src = Rect.fromLTWH(0, 0, imgSourceWidth.toDouble(), imgSourceHeight.toDouble());//超长异形图if (imgSourceHeight / imgSourceWidth > 3.0) {debugPrint("hh:超长异形图");final l = x * imgSourceWidth;final w = imgSourceWidth;final h = imgSourceWidth / ratio;double t = y * (imgSourceHeight - h);src = Rect.fromLTWH(l, t, w.toDouble(), h);}//超宽异形图if (imgSourceWidth / imgSourceHeight > 3.0) {debugPrint("hh:超宽异形图");double t = y * imgSourceHeight;final h = imgSourceHeight;final w = imgSourceWidth * ratio;double l = x * (imgSourceWidth - w);if (l + w > imgSourceWidth) l = 0;src = Rect.fromLTWH(l, t, w.toDouble(), h.toDouble());}canvas.drawImageRect(image, src, Rect.fromLTWH(0, 0, size.width, size.height), paint);}
2. Download image data
There are many ways to download image data. For the sake of simplicity, we directly use the method of downloading images inside Flutter to achieve it.
Future<ImageInfo> getImageInfoByProvider(ImageProvider provider) {
final Completer<ImageInfo> completer = Completer<ImageInfo>();
bool flag = false;
provider.resolve(const ImageConfiguration()).addListener(ImageStreamListener((info, _) {if (!flag) {completer.complete(info);flag = true;}
}));
return completer.future;
}
The source code of the entire display component XHClipperImageContaineris as follows. In fact, the x, y, and ratio. The classes we talked about in the previous article XHImageClipperhave been explained, and the definition here is actually for transparent XHImageClipperuse. Then the sum inside is the width widthand heightheight of the required picture card.
class XHClipperImageContainer extends StatefulWidget {final double width;final double height;final double x;final double y;final double ratio;final ImageProvider imageProvider;const XHClipperImageContainer({Key? key,required this.imageProvider,required this.width,required this.height,this.x = 0,this.y = 0,this.ratio = 0.75,}) : super(key: key);@override_XHClipperImageContainerState createState() =>_XHClipperImageContainerState();
}

class _XHClipperImageContainerState extends State<XHClipperImageContainer> {XHImageClipper? clipper;@overrideinitState() {super.initState();_getImage();}Future<ImageInfo> getImageInfoByProvider(ImageProvider provider) {final Completer<ImageInfo> completer = Completer<ImageInfo>();bool flag = false;provider.resolve(const ImageConfiguration()).addListener(ImageStreamListener((info, _) {if (!flag) {completer.complete(info);flag = true;}}));return completer.future;}void _getImage() async {final imageInfo = await getImageInfoByProvider(widget.imageProvider);clipper = XHImageClipper(imageInfo.image,x: widget.x, y: widget.y, ratio: widget.ratio);setState(() {});}@overrideWidget build(BuildContext context) {return CustomPaint(painter: clipper,size: Size(widget.width, widget.height),);}@overridevoid dispose() {clipper = null;super.dispose();}
}
3. use
If I want the image to be displayed from the bottom in a card with an aspect ratio of 0.75, I can write as follows.
Container(child: XHClipperImageContainer(width: 300,height: 300 * 4 / 3.0,x: 0,y: 1,ratio: 0.75,imageProvider: NetworkImage("https://fb-cdn.fanbook.mobi/fanbook/app/files/chatroom/image/9a61840fbbcf766b15f8601b66b9d63c.jpeg"),),
)
The effect is as shown in the figure below. With a little bit of polishing, you can easily achieve the effect in the previous article.
That's it, this article is over~
at last
A front-end information package is prepared for everyone. Contains 54, 2.57G front-end related e-books, "Front-end Interview Collection (with answers and analysis)", difficult and key knowledge video tutorials (full set).
Friends in need, you can click the card below to receive and share for free