In the article that takes you to easily grasp the overall construction process of MMSegmentation, we introduce you to the overall framework of MMSegmentation and share the mainstream semantic segmentation models that have been reproduced in MMSegmentation.
Today we will take you to learn about common public semantic segmentation datasets, and how to run your own dataset on MMSegmentation, so that you can quickly get started training your own semantic segmentation model.
https://github.com/open-mmlab/mmsegmentationgithub.com/open-mmlab/mmsegmentation
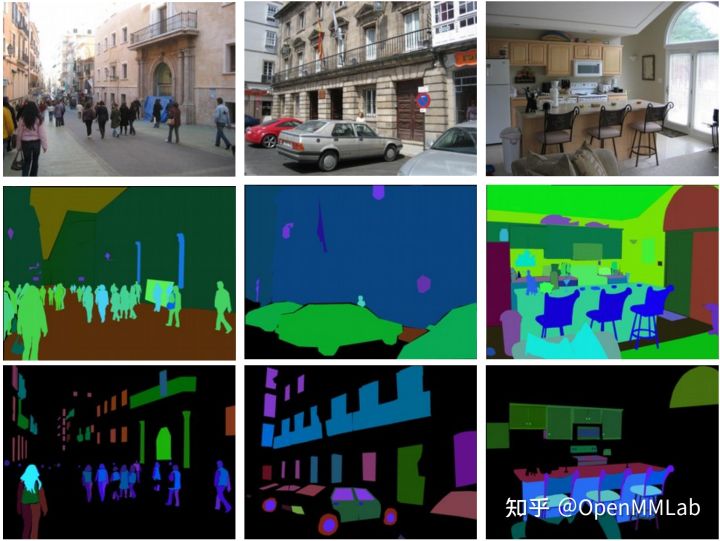
1. Common Semantic Segmentation Datasets
Datasets currently supported by MMSegmentation
Currently, MMSegmentation supports the training and reasoning of 14 data sets, including data sets of urban street scenes, indoor scenes, medicine, satellite remote sensing and other scenes. See the table below for their specific information:
| dataset name | image main scene | Number of split categories | Number of training set images | Number of validation set images |
| Cityscapes | outdoor street view | 19 | 2,975 | 500 |
| ADE20K | everyday scene | 150 | 20,210 | 2,000 |
| Pascal Context | everyday scene | 60 | 4,996 | 5,104 |
| PASCAL VOC 2012 + Aug | everyday scene | 21 | 10,582 | 1,449 |
| COCO-Stuff 10k | everyday scene | 171 | 9,000 | 1,000 |
| COCO-Stuff 164k | everyday scene | 171 | 118,287 | 5,000 |
| CHASE_DB1 | medicine, retinal vessels | 1 | 20 | 8 |
| DRIVE | medicine, retinal vessels | 1 | 20 | 20 |
| HRF | medicine, retinal vessels | 1 | 15 | 30 |
| STARE | medicine, retinal vessels | 1 | 10 | 10 |
| LoveDA | remote sensing | 7 | 2,522 | 1,669 |
| Potsdam | remote sensing | 6 | 3,456 | 2,016 |
| Vaihingen | remote sensing | 6 | 344 | 398 |
| iSAID | remote sensing | 16 | 33,978 | 11,644 |
We provide complete documentation for the preparation of the above datasets , including download links to the original dataset and scripts to reorganize it into a format that MMSegmentaion can run. In addition, we also provide a number of models trained on these datasets for your use.
Among them, Cityscapes and ADE20K are the two most commonly used semantic segmentation public datasets, which we will focus on below.
Cityscapes
Cityscapes is one of the most commonly used semantic segmentation datasets, which is a dataset specifically for urban street scenes. The entire dataset consists of street views of 50 different cities, and the dataset includes 5,000 finely annotated images and 20,000 roughly annotated images. MMSegmentation currently supports finely labeled images. It uses 19 commonly used categories to evaluate segmentation accuracy. Refer to the category information in https://www.cityscapes-dataset.com/dataset-overview/#class-definitions , as shown in the following table Shown:
| class attribute | Category (19 types in total) |
| flat | road, sidewalk |
| human | person, rider |
| vehicle | car, truck, bus, train |
| construction | building, wall, fence |
| object | pole, traffic light, traffic sign, motorcycle, bicycle |
| nature | vegetation, terrain |
| sky | sky |
Here is a sample Cityscapes dataset:
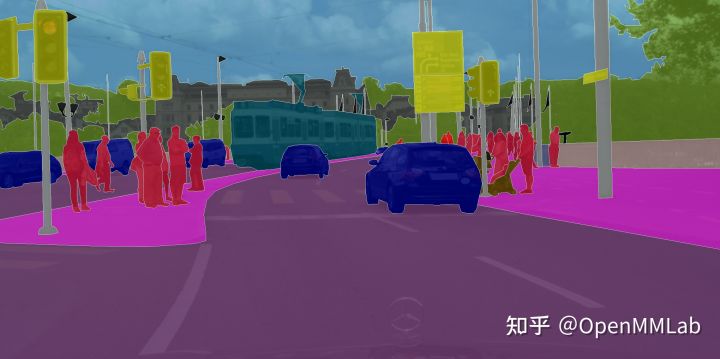
Source: https://www.cityscapes-dataset.com/examples/
Source: https://www.cityscapes-dataset.com/examples/
For the performance of the test set, although there are no annotations available, the official website provides calculation indicators and evaluation servers , so that model results can be uploaded and rankings on different tasks (such as the semantic segmentation task here) can be obtained. In MMSegmentation, you can refer to the method in the document and operate as follows.
Assuming that the model configuration file used is configs/pspnet/pspnet_r50-d8_512x1024_40k_cityscapes.py, first, the configuration of the test data set needs to be provided:
data = dict(
    test=dict(
        img_dir='leftImg8bit/test',
        ann_dir='gtFine/test'))
Then run the following command:
./tools/test.py configs/pspnet/pspnet_r50-d8_512x1024_40k_cityscapes.py \
    checkpoints/pspnet_r50-d8_512x1024_40k_cityscapes_20200605_003338-2966598c.pth \
    4 --format-only --eval-options "imgfile_prefix=./pspnet_test_results"
This will ./pspnet_test_resultssave the predicted results in png format in the folder, and then use zip -r results.zip pspnet_test_results/ the command to compress them and submit them to the official website for scores and rankings.
As of May 2022, the Top5 algorithms of the Cityscapes test set list on PaperWithCode are as follows:
| ranking | Model | Mean IoU | additional training data | paper | years |
| 1 | ViT-Adapter-L (Mask2Former, BEiT pretrain, Mapillary) |
85.2% | yes | Vision Transformer Adapter for Dense Predictions | 2022 |
| 2 | HRNetV2 + OCR + | 84.5% | yes | Segmentation Transformer: Object-Contextual Representations for Semantic Segmentation | 2019 |
| 3 | Hawk+ | 84.4% | no | Lawin Transformer: Improving Semantic Segmentation Transformer with Multi-Scale Representations via Large Window Attention | 2022 |
| 4 | EfficientPS | 84.21% | yes | EfficientPS: Efficient Panoptic Segmentation | 2020 |
| 5 | Panoptic-DeepLab | 84.2% | yes | Panoptic-DeepLab: A Simple, Strong, and Fast Baseline for Bottom-Up Panoptic Segmentation | 2019 |
ADE20K
ADE20K is also one of the most commonly used semantic segmentation datasets. It is a dataset with more than 20,000 images in 150 categories, with 20,210 images in the training set and 2,000 images in the validation set. In the past two years, most of the newly proposed models (especially those of the Transformer class) have tested their performance in semantic segmentation tasks on the ADE20K dataset.
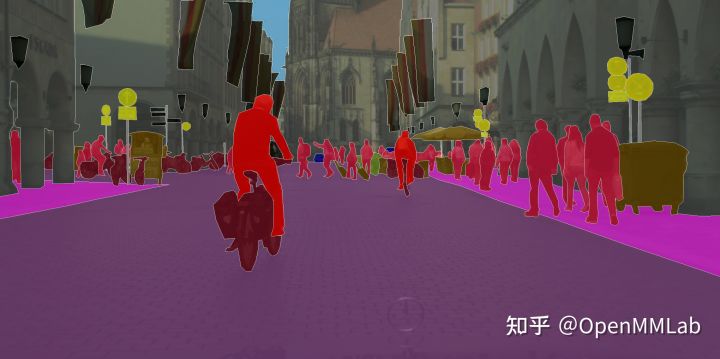
The following is a sample of the ADE20K dataset:
Source: Scene Parsing through ADE20K Dataset, Figure 1
./mmseg/datasets/ade.py Information for 150 categories can be seen in :
CLASSES = (
    'wall', 'building', 'sky', 'floor', 'tree', 'ceiling', 'road', 'bed ',
    'windowpane', 'grass', 'cabinet', 'sidewalk', 'person', 'earth',
    'door', 'table', 'mountain', 'plant', 'curtain', 'chair', 'car',
    'water', 'painting', 'sofa', 'shelf', 'house', 'sea', 'mirror', 'rug',
    'field', 'armchair', 'seat', 'fence', 'desk', 'rock', 'wardrobe',
    'lamp', 'bathtub', 'railing', 'cushion', 'base', 'box', 'column',
    'signboard', 'chest of drawers', 'counter', 'sand', 'sink',
    'skyscraper', 'fireplace', 'refrigerator', 'grandstand', 'path',
    'stairs', 'runway', 'case', 'pool table', 'pillow', 'screen door',
    'stairway', 'river', 'bridge', 'bookcase', 'blind', 'coffee table',
    'toilet', 'flower', 'book', 'hill', 'bench', 'countertop', 'stove',
    'palm', 'kitchen island', 'computer', 'swivel chair', 'boat', 'bar',
    'arcade machine', 'hovel', 'bus', 'towel', 'light', 'truck', 'tower',
    'chandelier', 'awning', 'streetlight', 'booth', 'television receiver',
    'airplane', 'dirt track', 'apparel', 'pole', 'land', 'bannister',
    'escalator', 'ottoman', 'bottle', 'buffet', 'poster', 'stage', 'van',
    'ship', 'fountain', 'conveyer belt', 'canopy', 'washer', 'plaything',
    'swimming pool', 'stool', 'barrel', 'basket', 'waterfall', 'tent',
    'bag', 'minibike', 'cradle', 'oven', 'ball', 'food', 'step', 'tank',
    'trade name', 'microwave', 'pot', 'animal', 'bicycle', 'lake',
    'dishwasher', 'screen', 'blanket', 'sculpture', 'hood', 'sconce',
    'vase', 'traffic light', 'tray', 'ashcan', 'fan', 'pier', 'crt screen',
    'plate', 'monitor', 'bulletin board', 'shower', 'radiator', 'glass',
    'clock', 'flag')
As of May 2022, the Top5 algorithms of the ADE20K verification set list on PaperWithCode are as follows:
| ranking | Model | Mean IoU | additional training data | paper | years |
| 1 | ViT-Adapter-L (Mask2Former, BEiT pretrain) |
60.5 | yes | Vision Transformer Adapter for Dense Predictions | 2022 |
| 2 | SwinV2-G (UperNet) |
59.9 | yes | Swin Transformer V2: Scaling Up Capacity and Resolution | 2021 |
| 3 | ViT-Adapter-L (UperNet, BEiT pretrain) |
58.4 | yes | Vision Transformer Adapter for Dense Predictions | 2022 |
| 4 | SeMask (SeMask Swin-L FaPN-Mask2Former) |
58.2 | 是 | SeMask: Semantically Masked Transformers for Semantic Segmentation | 2021 |
| 5 | SeMask (SeMask Swin-L MSFaPN-Mask2Former) |
58.2 | 是 | SeMask: Semantically Masked Transformers for Semantic Segmentation | 2021 |
关于测试集的表现,Cityscapes 数据集 SOTA 结果近几年鲜有明显增长,SOTA mIoU 数值在 80 ~ 85 之间。而 ADE20K 的 SOTA mIoU 数值仍然在被不停刷新,目前在 55~60 之间,偏低的指标绝对值主要可以归于以下两个原因:
- ADE20K 数据集类别更多(150类),mIoU 的指标容易被其中的长尾小样本类别拖累,因而指标偏低。
- ADE20K 数据集图片数量更多(训练集 20, 210 张,验证集 2, 000 张),对算法模型性能的考验更高。
目前 Cityscapes 数据集主要用在一些应用型文章如实时语义分割,而 ADE20K 则主要用在刷新 SOTA 的 Vision Transformer 类的研究型文章中。
预告一下:截止 2022 年 5 月,两个常用语义分割数据集的榜单刚被 ViT-Adapter 刷新为第一名。这个工作也是使用 MMSegmentation 作为语义分割框架,MMSegmentation 正在支持这个算法。敬请期待哦!
看到这里,相信大家已经跃跃欲试,想用 MMSegmentation 一键复现目前最新的工作了!那么在自己的数据集上改如何复现呢?其实不管是已经支持的 Cityscapes, ADE20K 数据集,还是自己的数据集,都需要在配置文件里配置数据相关的信息,如数据集本地存储路径,数据预处理流程 Pipeline ;继承数据集基类 CustomDataset 以方便调用在某个数据集上加载图像和标注,解析加载数据,评估模型表现等各种功能。下面分别介绍这几个部分。
2. 数据配置文件
MMSegmentation 的数据集配置基文件在 ./configs/_base_/datasets 里面,每个数据集配置文件主要包括:(1)data 字段,主要包括dataloader 的配置,例如模型训练时每个 GPU 上面的样本数目和进程数;(2)数据集和数据预处理配置,例如数据集路径和数据预处理 Pipeline。
数据配置文件的 data 字段
这是数据配置文件的一个样例:
data = dict(
    samples_per_gpu=4,
    workers_per_gpu=4,
    train=dict(
        type='ADE20KDataset',
        data_root='data/ade/ADEChallengeData2016',
        img_dir='images/training',
        ann_dir='annotations/training',
        pipeline=train_pipeline),
    val=dict(
        type='ADE20KDataset',
        data_root='data/ade/ADEChallengeData2016',
        img_dir='images/validation',
        ann_dir='annotations/validation',
        pipeline=test_pipeline),
    test=dict(
        type='ADE20KDataset',
        data_root='data/ade/ADEChallengeData2016',
        img_dir='images/validation',
        ann_dir='annotations/validation',
        pipeline=test_pipeline))
data 中重要的是如下几个字段:
train,valandtest: 构建数据集实例的配置,可以通过registry&build机制来构建,分别用于模型的训练、验证和测试。samples_per_gpu: 在模型训练时每个 GPU 加载的样本数,它乘以模型训练时的 GPU 数目就是模型训练时的batch_size。 例如,当使用 8 块 GPU 做分布式训练并且samples_per_gpu=4,那么batch_sizeis8*4=32。如果想定义不同batch_size用于验证和测试,需要在版本 >=0.24.1 的 MMSegmentation 中使用val_dataloader和test_dataloaser。workers_per_gpu: 数据加载时每个 GPU 使用的子进程(subprocess)数目。0则意味着主进程加载数据。
需要说明的是,samples_per_gpu 仅用于模型训练,因为目前 MMSegmentation 并不支持 batch 方式的推理,所以验证和测试时 samples_per_gpu=1,即每张 GPU 的样本数都是 1。
MMSegmentation 在 v0.24.1 之前,除了 train、val、test、samples_per_gpu 和 workers_per_gpu,data 中的其他字段必须是 PyTorch 中 dataloader 的输入参数,并且模型训练、验证和测试的 dataloaders 都有着同样的输入参数。在 v0.24.1 之后,尽管上述的参数定义仍然可用,但是会将优先支持使用 train_dataloader、val_dataloader和 test_dataloaser 去分别指定模型训练、验证和测试时 dataloader 所需要的参数。
以下就是一个 train_dataloader、val_dataloader和 test_dataloaser使用不同参数的样例:
data = dict(
    samples_per_gpu=4,
    workers_per_gpu=4,
    shuffle=True,
    train=dict(type='xxx', ...),
    val=dict(type='xxx', ...),
    test=dict(type='xxx', ...),
    # 在验证和测试时使用不同的 batch size
    val_dataloader=dict(samples_per_gpu=1, workers_per_gpu=4, shuffle=False),
    test_dataloader=dict(samples_per_gpu=1, workers_per_gpu=4, shuffle=False))
假如只有一张 GPU 用于模型的训练和测试,因为整体 dataloader 参数定义的优先级比较低,所以训练的 batch size 是 4 并且数据集将会被 shuffle,验证和测试的 batch size 是 1 并且数据集不会被 shuffle。
在 MMSegmentation v0.24.1 之后,我们更推荐使用专门的 dataloader 设置去替代整体 dataloader 的定义,这样可以让数据配置更加清晰易懂。可以修改为:
data = dict(
    train=dict(type='xxx', ...),
    val=dict(type='xxx', ...),
    test=dict(type='xxx', ...),
    # 使用特定的 dataloader 设置
    train_dataloader=dict(samples_per_gpu=4, workers_per_gpu=4, shuffle=True),
    val_dataloader=dict(samples_per_gpu=1, workers_per_gpu=4, shuffle=False),
    test_dataloader=dict(samples_per_gpu=1, workers_per_gpu=4, shuffle=False))
数据集预处理 Pipeline
Pipeline 由一系列数据预处理模块组成,得益于 MM 系列模块化的特性,每个模块也都可以单独配置并通过 registry&build 机制来构建。
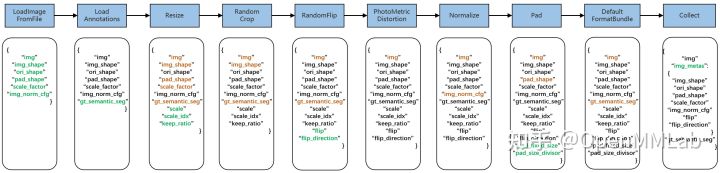
上图是 MMSegmentation 典型的训练流程 Pipeline,每个模块都接收字典输入,输出也是字典。按照从左到右的顺序执行,绿色表示该模块运行后的新增字段,橙色表示该模块运行后被修改的字段。Pipeline 中的数据变换可以被划分如下:
- 图片和标签加载,例如
LoadImageFromFile和LoadAnnotations。 - 数据处理,例如
RandomFlip,PhotoMetricDistortion和Resize等,这部分是通常在训练流程中使用。 - 数据收集,例如
Collect,它会重新收集数据处理的字典,用来准备输入到模型里的数据。
在 MMSegmentation 框架中,图片和标签加载和数据处理流程一般是固定的,用户在定制自己数据集的时候,也需要结合具体情况构建合适的 Pipeline。以 ADE20K 数据集为例,在配置文件中,训练时的 Pipeline 如下所示:
# dataset settings
dataset_type = 'ADE20KDataset' # 数据集类型,这将被用来定义数据集。
data_root = 'data/ade/ADEChallengeData2016' # 数据的根路径。
img_norm_cfg = dict( # 图像归一化配置,用来归一化输入的图像。
    mean=[123.675, 116.28, 103.53], # 预训练里用于预训练主干网络模型的平均值。
    std=[58.395, 57.12, 57.375], # 预训练里用于预训练主干网络模型的标准差。
    to_rgb=True) # 预训练里用于预训练主干网络的图像的通道顺序。
crop_size = (512, 512) # 训练时的裁剪大小
train_pipeline = [
    dict(type='LoadImageFromFile'),
    dict(type='LoadAnnotations', reduce_zero_label=True),
    dict(type='Resize', # 变化图像和其注释大小的数据增广。
        img_scale=(2048, 512), # 图像和标注的 resize 尺度
        ratio_range=(0.5, 2.0)), # 随机 resize 的比例范围。
    dict(type='RandomCrop', # 随机裁剪当前图像和其注释。
        crop_size=crop_size, # 随机裁剪图像生成 patch 的大小。
        cat_max_ratio=0.75), # 单个类别可以填充的最大区域的比例。
    dict(type='RandomFlip', # 翻转图像和其注释。
        prob=0.5),  # 翻转图像的概率
    dict(type='PhotoMetricDistortion'), # 光学上使用一些方法扭曲当前图像。
    dict(type='Normalize', # 归一化当前图像数据。
         **img_norm_cfg),
    dict(type='Pad', # 填充当前图像到指定大小。
        size=crop_size, # 填充的图像大小。
        pad_val=0, # 图像的填充值。
        seg_pad_val=255), # 'gt_semantic_seg'的填充值。
    dict(type='DefaultFormatBundle'), # 默认格式转换的组合操作。
    dict(type='Collect', keys=['img', 'gt_semantic_seg']), # 决定数据里哪些键被传递到分割器里的流程。
]
在构建自己的 Pipeline 时,一定要仔细检查是否真正调用了修改的配置文件,因为新增和修改的字典一旦被错误地覆盖或者遗漏,在运行程序时也可能不会报错,使得排查错误变得困难。
3. CustomDataset介绍
在训练或验证时经常需要获取该数据集的相关信息,比如获取数据集注释的相关信息,评估数据集预测结果的某些评价指标等等。因此,在 ./mmseg/datasets/custom.py 里面把数据集抽象成一个基类 CustomDataset,在基类里面定义了这些基本的函数,以方便被调用。
CustomDataset里面主要有以下几个函数:
load_annotations():加载全部标注文件,返回一个 List, 其中每个元素是一个字典,键分别是filename和ann,值里的信息是图片和对应的标注的文件名。get_ann_info(idx):根据输入inx获取对应语义分割标注的文件名。prepare_train_img(idx):获得经过训练数据处理 Pipeline 之后的训练集的图像数组img,和对应的元信息img_metas。img_metas里的内容可见上一章介绍 Pipeline 的示意图。prepare_test_img(idx):获得经过测试数据流 Pipeline 之后的验证集或测试集的图像数组,和其对应的元信息。字典里内容和prepare_train_img()的一样。__getitem__(idx):通过判断当前是否为训练模式来调用prepare_train_img(idx)或prepare_test_img(idx)。evaluate(): 评估数据集,输入预测的结果,返回这个数据集所需要的一些评价指标。
因为MMSegmentation 数据集都继承自 CustomDataset,所以熟悉它便熟悉了MMSegmentation 其他数据集的加载、解析和评估的流程。
在介绍完数据集配置文件中需要加入的预处理 Pipeline 和数据集需要继承的 CustomDataset 类之后,下面介绍如何处理自己的数据集,以便训练或验证。
4. 数据集准备和定制化
数据集的准备和定制化,具体可以分成以下几步:
- 数据集准备,推荐在 mmsegmetaion 目录新建路径 data,然后将数据集转换成 MMSegmentation 可用的格式:分别定义好数据集图像和标注的正确文件路径,其中的标注格式为仅包含每个像素对应标签 id 的单通道标注文件,而不是三通道的 RGB 格式。
- 在
./mmseg/datasets里定义该数据集以注册到DATASETS里。 - 在
./configs/_base_/datasets里面设置训练与验证时数据集配置的参数,如数据集路径,数据增强策略等。
上述步骤主要改动的文件位置为:
mmsegmentation
   |
   |- data
   |     |- my_dataset                 # 转换后的自己的数据集文件
   |- mmseg
   |     |- datasets
   |     |     |- __init__.py          # 在这里加入自己的数据集的类
   |     |     |- my_dataset.py               ## 定义自己的数据集的类
   |     |     |- ...
   |- configs
   |     |- _base_
   |     |     |- datasets
   |     |     |     |- my_dataset_config.py      # 自己的数据集的配置文件
   |     |     |- ...
   |     |- ...
   |- ...
接下来我们详细介绍这三步。
数据集准备
在使用模型做训练、验证和推理前,需要将数据集处理成 MMSegmentation 定制化的格式。对于 MMSegmentation 已经支持的数据集,我们在 ./tools/convert_datasets 中提供了数据集的转换脚本,它们会转换这些原始数据集的大小(例如将较大的遥感数据集裁剪成较小的)和内容(例如将 RBG 格式的标注转换成仅包含每个像素对应标签 id 的单通道标注),同时改变图像和标注的格式与文件夹结构。相关命令可参考数据集准备文档,转换后的数据集可以被 MMSegmentation 一键运行。
数据集最终的目录组织如下,需要将图片放到 img_dir 下,对应的分割标注放到 ann_dir 下:
├── data
│   ├── my_dataset
│   │   ├── img_dir
│   │   │   ├── train
│   │   │   │   ├── xxx{img_suffix}
│   │   │   │   ├── yyy{img_suffix}
│   │   │   │   ├── zzz{img_suffix}
│   │   │   ├── val
│   │   ├── ann_dir
│   │   │   ├── train
│   │   │   │   ├── xxx{seg_map_suffix}
│   │   │   │   ├── yyy{seg_map_suffix}
│   │   │   │   ├── zzz{seg_map_suffix}
│   │   │   ├── val
其中 {img_suffix} 和 {seg_map_suffix} 是图像和标注的后缀,常用的是 .png 和 .jpg。
实现自己的数据集
生成好上述数据格式后,在 ./mmseg/dataset 里实现数据集,使它可以被注册到 MMCV 的 DATASETS 里面然后被模型调用。实现自己的数据集,只需要继承 CustomDataset 这个类,再定义数据集标注的名称、可视化调色盘以及文件夹后缀格式,如下所示:
from .builder import DATASETS
from .custom import CustomDataset

#将 MyDataset 类注册到 DATASETS 里
@DATASETS.register_module()
class MyDataset(CustomDataset):
    # 数据集标注的各类名称,即 0, 1, 2, 3... 各个类别的对应名称
    CLASSES = ('label_a', 'label_b', 'label_c', 'label_d',
               'label_e', ...)
    # 各类类别的 BGR 三通道值,用于可视化预测结果
    PALETTE = [[255, 255, 255], [0, 0, 255], [0, 255, 255], [0, 255, 0],
               [255, 255, 0], ...]

    # 图片和对应的标注,这里对应的文件夹下均为 .png 后缀
    def __init__(self, **kwargs):
        super(MyDataset, self).__init__(
            img_suffix='.png',
            seg_map_suffix='.png',
            reduce_zero_label=False, # 此时 label 里的 0(上面 CLASSES 里第一个 “label_a”)在计算损失函数和指标时不会被忽略。
            **kwargs)
在 ./mmseg/dataset/my_dataset.py 里面定义了数据集的分割类别 CLASSES 和对应的 BGR 通道的调色板 PALETTE,PALETTE 只在预测结果可视化的时候会用到,并不会影响训练和验证。需要强调的是,如果 label 中的 0 是背景并且想在计算评价指标的时候忽略掉它,需要设置 reduce_zero_label=True。
它在 ./mmseg/core/evaluation/metrics.py 中的原理是:当设置 reduce_zero_label=True 时,会修改分割的标签类别,将 index 为 0 的类别安排到 255,所以在训练和和测试加载分割标注时,都会做如下操作:
if reduce_zero_label:
    label[label == 0] = 255
    label = label - 1
    label[label == 254] = 255
255 是标签里被忽略的 index。创建好 ./mmseg/dataset/my_dataset.py 后,需要在 ./mmseg/dataset/__init__.py 里也加入它:
# Copyright (c) OpenMMLab. All rights reserved.
from .my_dataset import MyDataset

__all__ = [
    ...,
    'MyDataset'
]
设置数据集配置文件
数据集定义好后,还需要在 ./configs/_base_/datasets 里面定义该数据集有关的配置项 my_dataset_config.py,使之与其他的配置参数一起在训练和测试时调用。
首先简单介绍下为何多了一个 _base_ 基配置文件夹:自从 2020 年 6 月 MMDetection 发布 V2.0 版本以来,OpenMMLab 代码库设计了新的 config 系统,支持了多重继承机制。将常用的数据集配置、基础模型以及训练策略放到了 ./configs/_base_/ 文件夹中。每个新的 config 只需要继承一个或者多个已有的 config,然后对其中需要修改的字段进行重载。通过将 config 继承的层级控制在可接受范围内,提升了配置文件的可维护性。
以下为数据集配置文件的一个示例:
# 在./mmseg/datasets/__init__.py 中定义的数据集类型
dataset_type = 'MyDataset'
# 数据集准备生成的文件夹路径
data_root = 'data/my_dataset'

img_norm_cfg = dict( # 常用这组参数归一化是因为它是 ImageNet 1K 预训练使用的图像均值与方差
    mean=[123.675, 116.28, 103.53], std=[58.395, 57.12, 57.375], to_rgb=True)

crop_size = (512, 512) # 训练时图像裁剪的大小
train_pipeline = [
    dict(type='LoadImageFromFile'),
    dict(type='LoadAnnotations', reduce_zero_label=True),
    dict(type='Resize', img_scale=(512, 512), ratio_range=(0.5, 2.0)),
    dict(type='RandomCrop', crop_size=crop_size, cat_max_ratio=0.75),
    dict(type='RandomFlip', prob=0.5),
    dict(type='PhotoMetricDistortion'),
    dict(type='Normalize', **img_norm_cfg),
    dict(type='Pad', size=crop_size, pad_val=0, seg_pad_val=255),
    dict(type='DefaultFormatBundle'),
    dict(type='Collect', keys=['img', 'gt_semantic_seg']),
]
test_pipeline = [
    dict(type='LoadImageFromFile'),
    dict(
        type='MultiScaleFlipAug',
        img_scale=(512, 512),
        # img_ratios=[0.5, 0.75, 1.0, 1.25, 1.5, 1.75],
        flip=False,
        transforms=[
            dict(type='Resize', keep_ratio=True),
            dict(type='RandomFlip'),
            dict(type='Normalize', **img_norm_cfg),
            dict(type='ImageToTensor', keys=['img']),
            dict(type='Collect', keys=['img']),
        ])
]
data = dict(
    samples_per_gpu=4, # 单个 GPU 的 Batch size
    workers_per_gpu=4, # 单个 GPU 分配的数据加载线程数
    train=dict( # 训练数据集配置
        type=dataset_type, # 数据集的类别, 细节参考自 mmseg/datasets/
        data_root=data_root, # 数据集的根目录。
        img_dir='img_dir/train', # 数据集图像的文件夹
        ann_dir='ann_dir/train', # 数据集注释的文件夹
        pipeline=train_pipeline), # 流程, 由之前创建的 train_pipeline 传递进来
    val=dict( # 验证数据集的配置
        type=dataset_type,
        data_root=data_root,
        img_dir='img_dir/val',
        ann_dir='ann_dir/val',
        pipeline=test_pipeline), # 由之前创建的 test_pipeline 传递的流程
    test=dict(
        type=dataset_type,
        data_root=data_root,
        img_dir='img_dir/val',
        ann_dir='ann_dir/val',
pipeline=test_pipeline)) 各个配置项的具体作用可以参考配置文件教程。至此,定义的数据集就完成了数据集的准备和定制化,只需要在 ./configs/ 里创建的配置文件里调用该数据集即可。例如:
_base_ = [
    '../_base_/models/pspnet_r50-d8.py', '../_base_/datasets/my_dataset_config.py',
    '../_base_/default_runtime.py', '../_base_/schedules/schedule_80k.py'
]
model = dict(
    decode_head=dict(num_classes=YOUR_DATASET_CLASSES), auxiliary_head=dict(num_classes=YOUR_DATASET_CLASSES))
总结
本文主要讲解了数据集相关的内容,包括目前学术界主流的语义分割数据集在 MMSegmentation中的实现,以及如何用 MMSegmentation 跑自己的数据集。希望可以帮助大家快速上手使用 MMSegmentation 代码库进行实验。
欢迎大家来 MMSegmentation 体验,如果对你有帮助的话,欢迎给我们点个 star~
https://github.com/open-mmlab/mmsegmentationgithub.com/open-mmlab/mmsegmentation