This tutorial is implemented little by little following a video from a Silicon Valley three years ago. However , following the tutorial, there will be many problems that have not appeared in the video. This article focuses on the problems and solutions encountered during the construction process! !
1. Environmental preparation
# Update first
$ sudo apt-get update
1. Install docker (see my previous tutorial)
2. Install docker-compose
#Install dependency tools
$ sudo apt-get install python-pip -y #Install
orchestration tools
$ sudo pip install docker-compose #View
version
$ sudo docker-compose version
3. Install Golang
# 1. 使用wget工具下载安装包
$ wget https://dl.google.com/go/go1.11.linux-amd64.tar.gz
# 2. 解压tar包到/usr/local
$ sudo tar zxvf go1.11.linux-amd64.tar.gz -C /usr/local
# 3. 创建Go目录
$ mkdir $HOME/go
# 4. 用vi打开~./bashrc,配置环境变量
$ vim ~/.bashrc
# 5. 增加下面的环境变量,保存退出
	export GOROOT=/usr/local/go
    export GOPATH=$HOME/go
    export PATH=$PATH:$GOROOT/bin:$GOPATH/bin
# 6. 使环境变量立即生效, 下面两个命令二选一
$ source ~/.bashrc
$ . ~/.bashrc
# 7. 检测go是否安装好
$ go version
4. Install node.js
- Download binary source package
$ wget https://nodejs.org/dist/v8.11.4/node-v8.11.4-linux-x64.tar.xz
- Unzip and install
# Decompress the specified compressed package to the /opt directory
$ sudo tar xvf node-v8.11.4-linux-x64.tar.xz -C /opt
- get the node-v8.11.4-linux-x64 directory in the /opt directory
- Make node.js available globally
# Open the system-level configuration file /etc/profile
$ sudo vim /etc/profile
# Add the following configuration items, save and exit
export NODEJS_HOME=/opt/node-v8.11.4-linux-x64
export PATH=$PATH:$NODEJS_HOME/ bin
# Reload the configuration file
$ . /etc/profile
/etc/profile -> the configuration file for setting environment variables
- effective for all users under the current system
- test
$ node -v
5. Install Git
It is best to update apt-get first, otherwise you may download an old version of git. This is a good habit. When downloading any package, it is best to update the tool
$ apt-get update$ apt-get install git
2. Deploy hyper ledger fabric (# is followed by comments!)
(1), pull the mirror
$ cd ~ # Create a placement directory under the home directory here
$ mkdir hyperledger-fabric #Create a placement directory
$ cd hyperledger-fabric #Enter the directory
# Download and execute the script, [ ***Need to bypass the wall, need to bypass the wall, need to bypass the wall, need to bypass the wall, need to bypass the wall,*** ]
$ curl -sSL http://bit.ly/2ysbOFE | bash - s 1.2.0 1.2.0 0.4.10Reminder: This process will make you have the urge to smash the computer, control your emotions!!!!
# After the download is complete, check what mirror is downloaded
$ docker images
The screenshots below are from the tutorial I learned, but there will always be some images that cannot be pulled down during my operation!

Reason: Because the official sh file has problems related to the version number, the download of the mirror will lack several important files. At this time, we need to pull the missing mirror by ourselves.
Solution: Compare the screenshots above and pull whatever is missing.
docker pull hyperledger/fabric-ca:1.2.0
docker pull hyperledger/fabric-orderer:1.2.0
docker pull hyperledger/fabric-peer:1.2.0
docker pull hyperledger/fabric-ccenv:1.2.0
docker pull hyperledger/fabric-tools:1.2.0
docker pull hyperledger/fabric-baseos:0.4.15
docker pull hyperledger/fabric-kafka:0.4.10
docker pull hyperledger/fabric-zookeeper:0.4.10
docker pull hyperledger/fabric-couchdb:0.4.10
Observation found that there are many mirrors with the same ID but different tags. We use
docker rmi hyperledger/fabric-tools:latest
To delete the mirror named fabric-tools in the hyperledger folder, the version number is latest, and the others are deleted in this way
I didn't do this operation here, because there were too many images pulled and I was too lazy to delete them. It turns out that it can be used without deleting.
(2), set global access
# Go to the ~/hyperledger-fabric/fabric-samples/bin directory
$ cd ~/hyperledger-fabric/fabric-samples/bin
kyp@ubuntu:~/hyperledger-fabric/fabric-samples/bin$ tree
.
├── configtxgen
├── configtxlator
├── cryptogen
├── discover
├── fabric-ca-client
├── get-docker-images.sh
├── idemixgen
├── orderer
└── peer
# Copy these binaries to /
$ sudo cp * /usr/local/bin in the usr/local/bin directory
# After performing the above operations, these executable programs of fabric can be used in the global scope
3. Start running the First-Network environment test (whether the previous steps are successful or not depends on whether the sample program can be started)
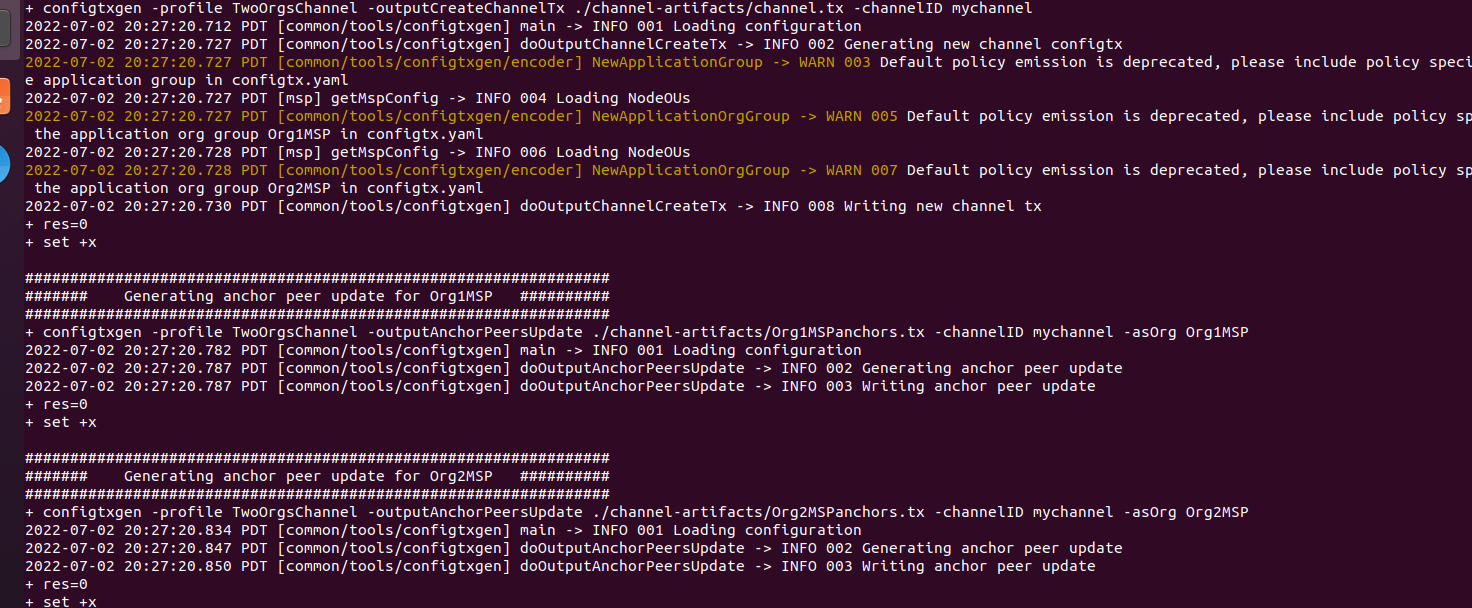
- Execute the ./byfn.sh generate command to generate the corresponding file
$ cd ~/hyperledger-fabric/fabric-samples/first-network/ #进入到first-network
$ ./byfn.sh generate
This is used to generate the relevant configuration files in advance (to prepare for the subsequent automatic start of the blockchain network)
The result is shown in the figure
2. Execute ./byfn.sh up to start the network
# byfn == build your first network
$ ./byfn.sh up
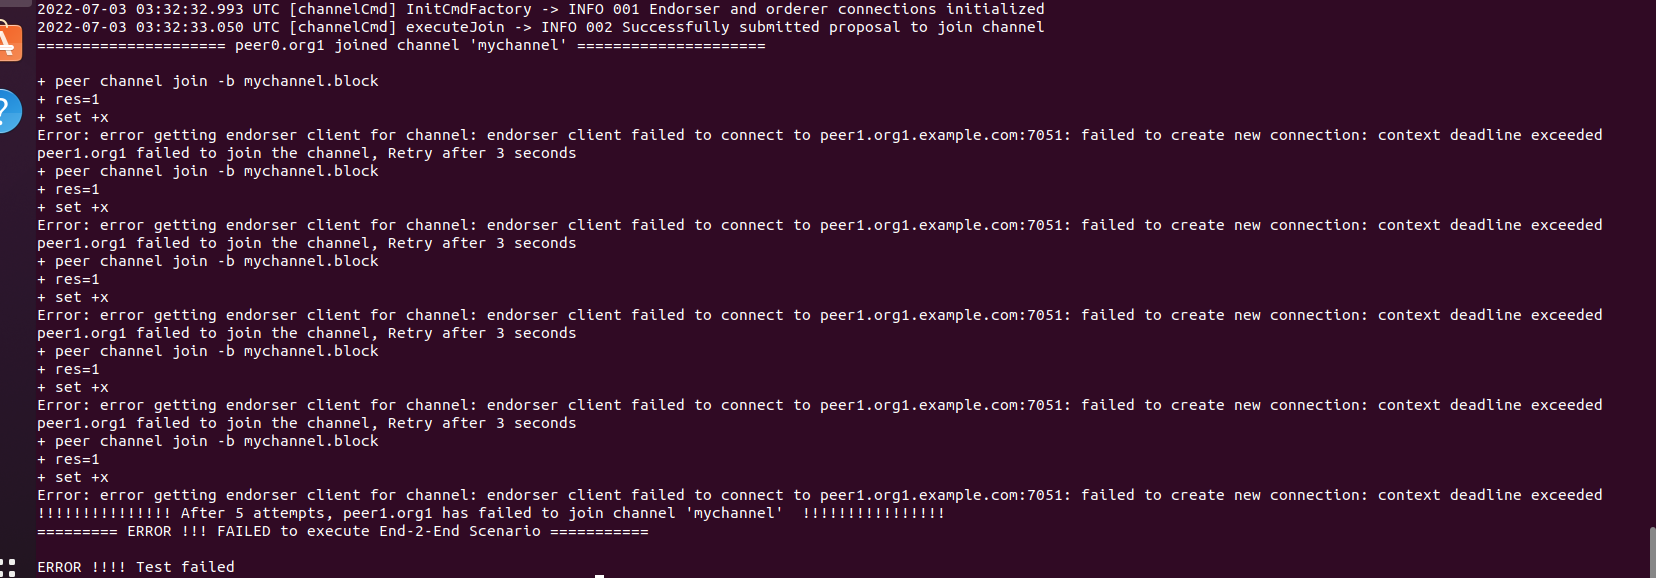
Here, when I execute it on my computer, there is a problem! ! ! Infuriating
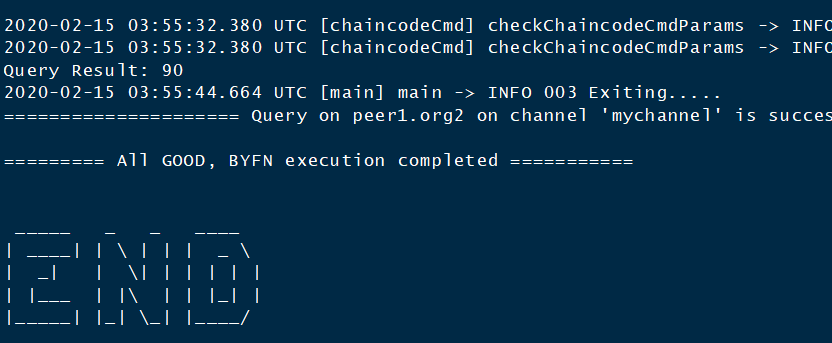
Following the tutorial the following screenshot should appear:
But the result of my execution is as follows: roughly means that a new connection cannot be established, and a new node cannot be communicated.
error getting endorser client for channel: endorser client failed to connect to peer1.org1.example.com:7051: failed to create new connection: context deadline exceeded
peer1.org1 failed to join the channel, Retry after 3 seconds
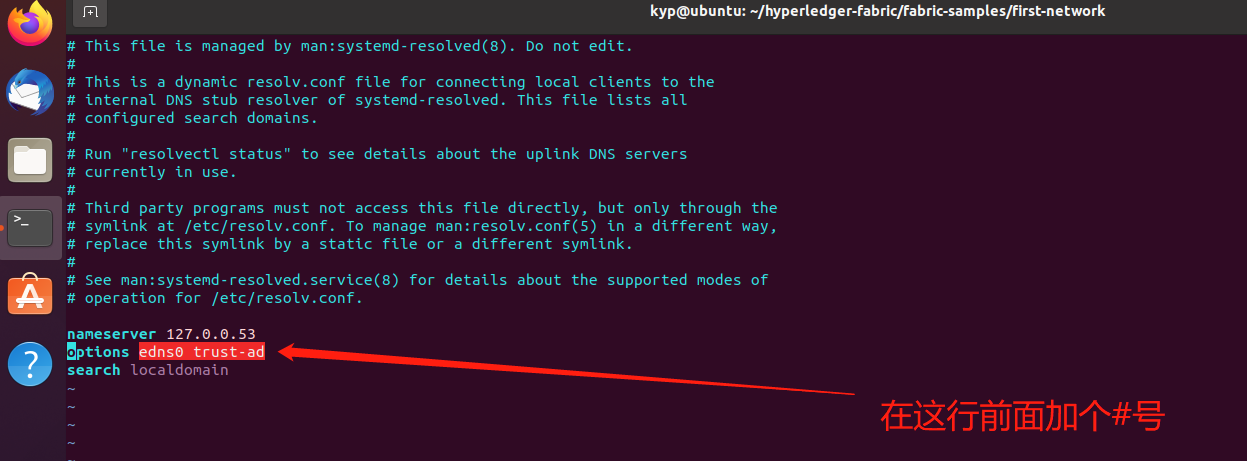
solution:
First we stop the network:
$ ./byfn.sh down
We are typing:
$ sudo vim /etc/resolv.conf

2. Execute ./byfn.sh up again to start the network (if it was successful before, do not do this step)
$ cd ~/hyperledger-fabric/fabric-samples/first-network/ # Enter the first-network to execute
$ ./byfn.sh up
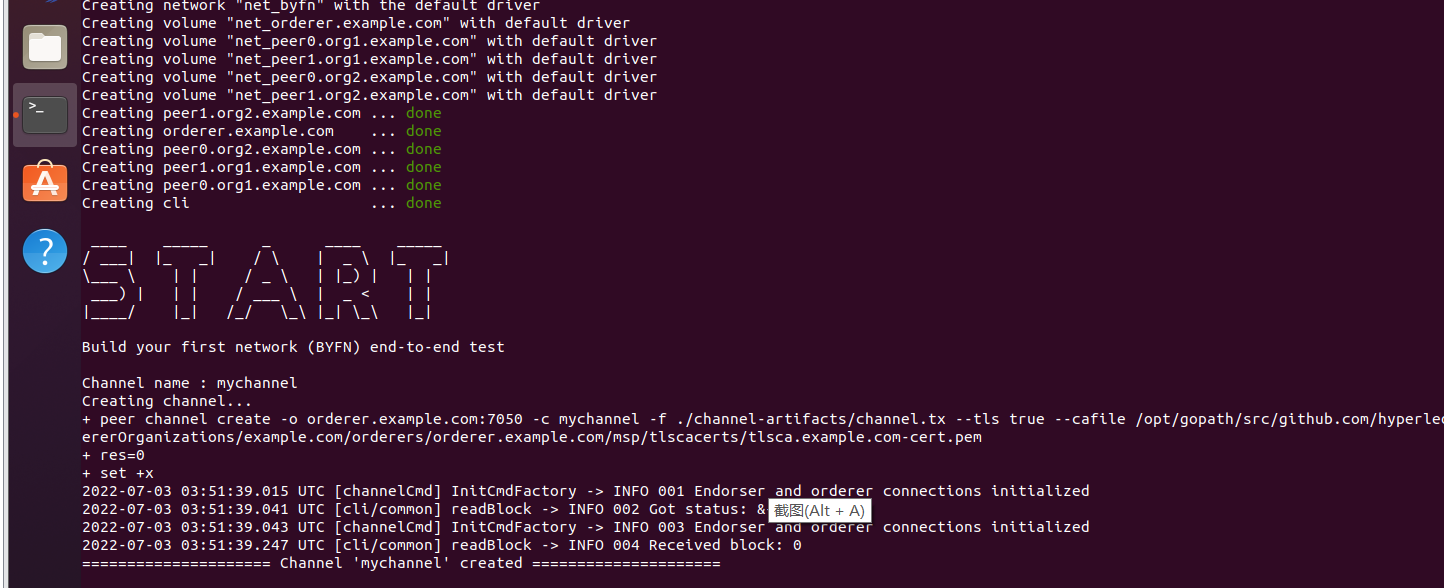
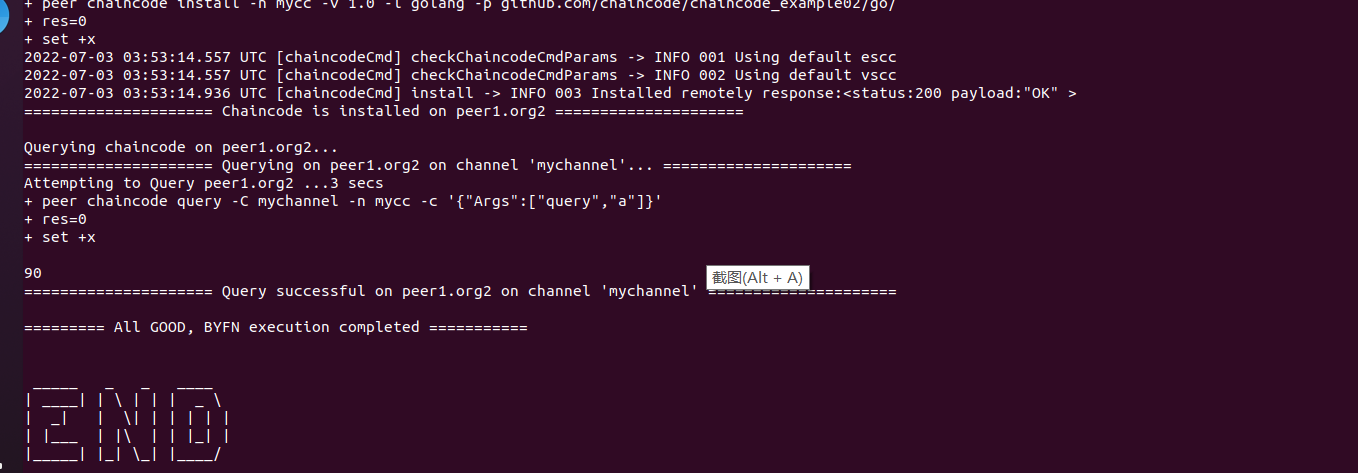
When the above two screenshots appear, the startup is successful! ! ! Congratulations
3. You can view the startup status of the node through the docker ps command.
$ docker ps

4. If we want to stop the network, we can execute the ./byfn.sh down command to stop
$ ./byfn.sh down
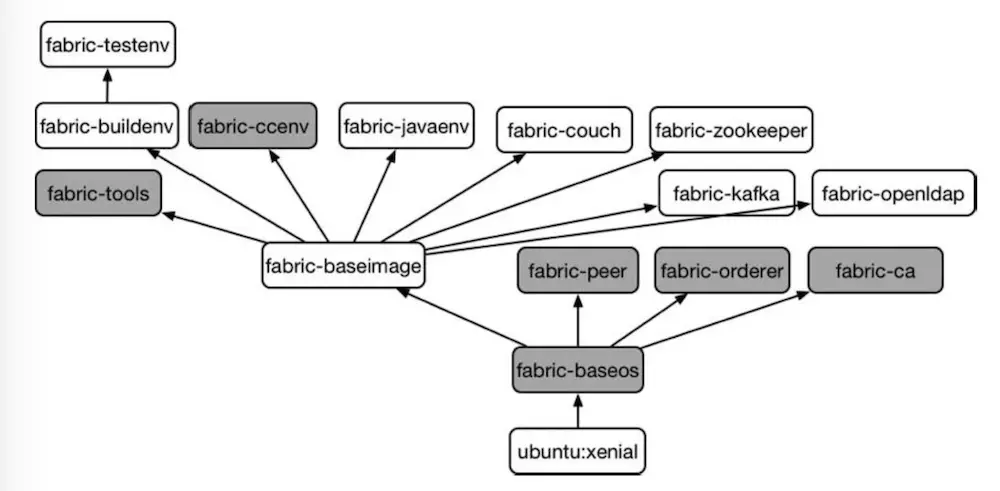
The following is a dependency diagram of the main image of the fabric
The above is the environment construction and testing of hyperledger fabric.