Ⅰ. Introduction to vue3
vue3 code onepiece [One Piece]
February 7, 2022 will become the default version, and
vue2 will be completely phased outby the end of 2023.
Ⅱ. Optimize content
- Update rendering is between 1 to 2 times faster;
- The first rendering is about 50% faster;
- The running memory is reduced by about 50%;
- Packed memory is reduced by about 40%;
- Stronger ts (typescript) support => quote the original words of the author ( You Yuxi );
It's really not bad to use React for types , it's nothing more than a poor performance.
Article directory
-
-
- Ⅰ. Introduction to vue3
- Ⅱ. Optimize content
- Ⅲ. Source code optimization
- Ⅳ. Project Creation
- V. Test you to which stage?
-
- Logic code modular composition Api => as shown in the figure: (Logical changes are no longer scattered )

Ⅲ. Source code optimization
| proxy | Virtual dom (diff algorithm + static markup) |
|---|---|
| Use ES6 proxy object to monitor the implementation principle of data => click to learn |
Static tagging of dom that may change only listens for tagged ones |
Ⅳ. Project Creation
- There are 2 ways to create projects in vue3 => Vite is more recommended
- To use scaffolding to create, you must first install the vue scaffolding, and the project startup speed is not as fast as Vite .
| ① vue scaffolding creation | ② Vite creation |
|---|---|
| #Install or upgrade => npm install -g @vue/cli #Create project => npm create vue_test |
#Create project => npm init vite-app vue-test2 |
V. Test you to which stage?
Stage ① Simple page writing (need to master)
1.setup function and setup single-text component
| setup function | setup single text component |
|---|---|
| 1. The variables and methods in it need to return to be used | 1. Variables in single-text components do not need retrun |
| 2. Do not deconstruct the response data to prevent the response from invalidating | 2. As long as it is created by reactive and ref, it can respond with data |
| 3. Through the function parameters, get the parent-child component communication object (props, emit) | 3. Access through built-in functions to communicate with components (defineProps, defineEmits) |
Ⅰ.setup function [response data writing, parent-child communication writing] =>
| Parent component : |
<templete> <!-- vue3 可以不用,单个盒子包裹起来 -->
   <Children :fatherName = 'fatherName'  @handle = 'fun' />
</templete>
<script>
export default {


  setup(){


	function fun(num){

       console.log('接受子组件传递过来的值'+num ); }
    return {


	  fun,
	  fatherName: '张xx',
    }
  }
}
</script>
| Child component ( Children ): |
<templete>  <!-- vue3 可以不用,单个盒子包裹起来 -->
   <span> {

   { name }} </span>
   <span> {

   { age  }} </span>
   <span> {

   { fatherName }} </span>
</templete>
<script>
import {

       reactive , toRefs } from 'vue';
export default {


    props:{


         fatherName:{

       type:String }
    },
    setup(props,{

        emit }){


        console.log( props.fatherName );  // => 获取父组件  传递  子组件的参数
        emit('handle' , 123);             // => 子组件 委托 父组件 调用方法接受参数

		const state = reactive({

       name: '张三', age: 18 })
		return {


			//...state   => 会失去响应
			...toRefs(state)   // => 正确写法
			...toRefs(props)
		}
    }
}
</script>
setup single-text component [response data writing, parent-child communication writing] =>
| Parent component : |
<templete>
   <Children :fatherName = 'fatherName'  @handle = 'fun' />
</templete>
<script setup>
export default {


  const fun = (num) =>{

       console.log('接受子组件传递过来的值'+num );  }
  const fatherName = '李xx',
}
</script>
| Child component ( Children ): |
<templete>
   <span> {

   { state.name }} </span>
   <span> {

   { state.age  }} </span>
   <span> {

   { fatherName }} </span>
</templete>
<script setup>
    import {

       reactive } from 'vue';
    const state = reactive({

      name:'李四', age:20 });

    const {

       fatherName } = defineProps({

           fatherName : {

       type : String },    }) ; // => 获取父组件  传递  子组件的参数
    const emit = defineEmit(['handle']);
    emit('handle', 123 )     // => 子组件 委托 父组件 调用方法接受参数
</script>
2. Component Communication
- In addition to the props and emits embedded in the setup parameters mentioned in [1] , there are:
- proxy.$parent [directly obtain, or call the parent component method] and ref [directly obtain, or call the child component method];
Note: proxy.$parent and ref can only get and call child or parent setup function return .
<templete>
	<Children  ref = 'children' />
</templete>
<script>
import {

       getCurrentInstance , ref } from 'vue';
export default {


    setup(){


    	const {

       proxy } = getCurrentInstance();
    	console.log( proxy.$parent );  // => 获取父组件的 return 中的所有对象 .

		const children = ref(null);
		// 变量名要和组件的ref值 对应  , 赋值必须为 ref(null) .
		console.log(children.value);  //=> 获取父组件的 return 中的所有对象 .
    }
}
</script>
3. You can also pass methods and variables through provide and inject ;
Matters needing attention: provide and inject receive one transfer each, only from parent => child => grandchild => ... ( one-way transfer from top to bottom )
①父组件:
    import {

     provide } from 'vue'
    export default {


		setup(){


		 	const name = '张三'
		 	provide('name ', name )    //向下传递
		 	return  {

     name }
		}
	}
-------------------------------------------------------------
②子组件:
    import {

     inject } from 'vue'
	export default {


		setup(){


			const getName = inject( 'name');  //接收父传递下来的
			return  {

     getName }
		}
	}
- After the group, the global state management library (vuex and pinia) can also be used, and the components can use the properties and methods at the same time, which will be mentioned in stage ③.
3. Lifecycle
| There are 3 changes between vue3 and vue2 |
- Beforecreate and create are written directly into the setup function
- Add 'on' before all hook functions such as: mounted => onMounted
- destory renamed to onUnmounted
- Import method (vue3 is modular) such as: import { onMounted } from 'vue'
| view2 | view 3 | Details |
|---|---|---|
| beforcreate create |
setup( ) | new Vue (start→end) |
| beforeMounted Mounted |
onBeforeMounted onMounted |
Template, DOM rendering (start → end) |
| beforeUpdate update |
onBeforeUpdate onUpdate |
Data is updated (start → end) |
| beforeDestory destory |
onBeforeUnmount onUnmounted |
leave the current component (start → end) |
4. Data response (ref, reactive)
ref object (generally used for primitive data types)
- Modifying and obtaining the value of the ref object in js requires adding the value attribute, but not in html ;
- In html, it is necessary to add .value by judging whether the __V_isRef of the ref object needs to be added.
......
<template>
	<p> 姓名 : {

    {

     name }} </p>
</template>
......
setup(){


 	const name = ref('张三')
 	name.value = '李四';
 	return {

    name}
}
- If ref is a basic type , it will respond to data through the same Object.defineProperty object of vue2.
- If ref is an application type , then "help" => internal conversion to reactive, using proxy object for data response.
 - ref('123')   =>     采用 Object.defineProperty() 进行响应

 - ref( {

    name:'123'} )  =>   reactive( value:{

      name : 123} )  => 采用 proxy 进行响应
reactive objects (generally used to reference data types)
- Reactive uses proxy objects, which saves the traversal of the key of Object.defineProperty, so that it has a faster response speed for the data types that should be referenced;
- reactive Do not create an array directly when listening to an array, just modify it
Wrong spelling: ( click the button, after the method is executed, the page data cannot respond )
 let  arr =	reactive([1,2]);
 function changeArr(){


 	arr = ['3','4','5'];
 }
Correct spelling:
 let  arr =	reactive({

     val:[1, 2] });
 function changeArr(){


 	arr.val = ['3', '4', '5'];
 }
- The principle of reactive proxy:
 const proxyObj = new Proxy({

     name:'123' }, {


	get:(obj,key,receiver)=>{


		  return Reflect.get(obj, key,receiver)
	},
	set:(obj,key,value,receiver) => {


         return Reflect.set(obj, key, value, receiver)
    }
})
Learn more about the difference between vue2 and vue3 data response => click here
- Reactive is mostly used in conjunction with toRefs to make variables in the template easier.
5. Monitoring and computing properties (watch, watchEffct... )
- Difference between watch and computed
| the difference | watch (listen) | computed (computed property) |
|---|---|---|
| LF | Do not use the cache (consume a lot of resources ) | Cache by default ( low resource consumption ) |
| asynchronous | Asynchronous support | Async is not supported |
| monitor | One -to-many (or one-to-one) | Many-to-one (or one-to-one) |
import {

    watch, computed, ref} from 'vue'
......
setup(){


    const num = ref (1);
    watch(num,(newValue,oldValue)=>{

      console.log(newValue); });  //num 改变就会执行
    //-------------------------------------------------------------------------
    const  a =  ref(2);
    const  b =  ref(2);
    let S = computed(()=>{

    return a.value * b.value }});  //a,b 一个改变就 重新计算 S
}
- Vue3 adds watchEffect , which will monitor the ref and reactive objects that appear in the callback function, and will execute if there is a change
...
  watchEffect(()=>{

      console.log(a,b));  })   // 只监听ref 和 reactive 且出现在回调函数中的对象
...
6. Api modularity
- Import what you need to save memory , such as:
import {

     onMounted , reactive} from 'vue';
Stage ② Encapsulation of special components (need to master)
1. Recursive application of components
- In the final analysis, component recursion is the component import component itself. By continuously passing down parameters, the final control ends, and the purpose of component encapsulation is achieved.
- To import this component in vue3, you only need to add a name attribute, while vue2 needs to write one more step to import this component
Practical scenarios => tree menus, flowcharts, hierarchical components...
Take tree components as an example:
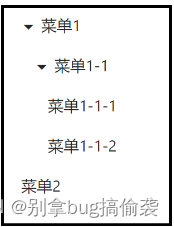
- First, pass an object with a hierarchical relationship to the object, such as: We need to judge whether to import recursively according to (whether there are children)
1. Use this treeList component:
<tree-list :Arr="Arr" />
...
const Arr = [
        {


          text: "菜单1",
          children: [
            {


              text: "菜单1-1",
              children: [{

     text: "菜单1-1-1" }, {

     text: "菜单1-1-2" }],
            },
          ],
        },
        {

     id: "2", text: "菜单2" },
      ];
2. Edit this component => (pass)
 <div v-for="item in Arr">
  	<p>{

    {

     item.text }}</p>
    <tree-list
       v-if="item.children"
      :Arr="item.children"
      :index="index"
      :key="item.id"
    />
</div>
...
export default {


	name: "tree-list",
	props: {


       Arr: {

     type: Array }
  	},
}
Please refer to the detailed style and code => click here
2. Application of slot
- The main function of the slot is to insert the content in the middle of the component into the corresponding position of the component to make the component more flexible.
- There are three types of slots (normal slots, named slots, and scoped slots)
| normal slot | named slot | scoped slot |
|---|---|---|
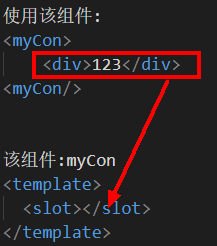 |
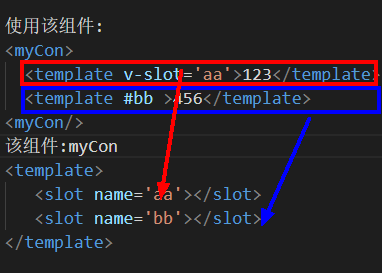 |
 |
| The slot tag is received, and the content inserted by default will only be inserted repeatedly by writing more than one tag . |
v-slot ='aa' can be abbreviated as #aa The insertion position corresponds to the name of the slot one-to-one |
Incoming parameters through props to achieve the purpose of controlling templates |
3. Use of label delivery
- The Teleport tag mainly transmits a piece of html content to the corresponding tag;
- Teleport 和 dom 的 appendChild 方法的区别,主要是操作的是 虚拟dom ( 主要在性能 方面 ) 。
- 参数 to 对应插入的位置 填写对于css选择器
- 参数 disabled 是否插入 该位置 ,true => 已插入、false => 未插入
<template>
	<div id="box">
		<p> 标题 </p>
		<button @click='appendContent'> 插入内容 </button>
		<p> 内容:<span id='content'> </span>  <p/>
	</div>

	<Teleport to="#content"  :disabled = "bool">
		teleport 插入到 改标签 中.
	</Teleport>
</template>
<script>
...
const bool = ref(false);
const appendContent = ()=>{

       bool.value = true }
return {

       bool, appendContent }
</script>
阶段 ③ 全局状态管理 (需要掌握)
1.vuex 4.0
①.下载和导入
 npm  i  vuex   --save
 ---------------------------
 import  Vuex  from  'vuex'
 Vue.use(Vuex);
②.创建store仓库: /store/index.js
import {

     createStore } from 'vuex';
export default createStore({


state: {

    name: 123 },
mutations:{

        getname(state,newVal){

    this.state.name=newVal;}  },
//同步方法:(只有mutations才能改state的值)
actions:{

       getnameAsync(){

     ... }     },  //异步方法
geeter:{

    },  //相当于计算属性
modules: {

    }  //将vuex分块
})
③.简单使用
import {

    useStore} from 'vuex'
export default {


	setup(){


		const store  = useStore();
		console.log(store.state.name);    //获取
		store.commit("getname", 12345);  //修改
		store.dispatch("getnameAsync", 12345);  //修改
	}
}
④.需要了解与 vue2 的差别 => 点击这里
2.pinia (基于vuex5.0 理念)
- 相比vuex ,pinia 更具有优势
| pina | vuex |
|---|---|
| pinia 同时支持vue2和vue3 | vue2要用vuex 3 版本 vue3要用vuex 4 版本 |
| 不分同步异步,更好的ts支持 | 分同步异步,不太兼容ts |
| 享受自动补全 … |
需要注入,导入函数,调用他们 … |
① 安装
npm install pinia
②在 main.js 中 加入
import {

     createApp } from 'vue'
import App from './App.vue'

import {

     createPinia } from 'pinia'  //导入pinia
const  pinia = createPinia();        //调用创建pinia

createApp(App)
			.use(pinia)
			.mount('#app')
③去创建 pinia 仓库
一般选在 /src下的 store 文件夹下 例:创建为 pinia.js
import {

     defineStore } from 'pinia'

export const PiniaStore = defineStore('main',{

      //导出 pinia仓库
    state:() => {

     //相当于全局的 data()
        return {


            name:'张三',
            age:18
        }
    },
    getters:{

    },  //相当于全局的computed
    actions:{

    }   //相当于全局methods
})
③使用 (非常容易)
以/src/view/index.vue 为例:
<template>
    <h3>{

    {

    pinia.name}}</h3>  <!--使用-->
    <h3>{

    {

    pinia.age}}</h3>
    <button @click="pinia.age++">修改pinia数据</button>   <!--修改-->
</template>
<script setup>
    import {

     PiniaStore } from '../../store/pinia'
    const pinia = PiniaStore();
</script>
阶段 ④ 框架的搭建 (需要掌握)
1.vue3路由、及与vue2的区别
创建路由
import {

     createRouter, createWebHistory } from 'vue-router'
const routerHistory = createWebHistory()
 const router = createRouter({


    history: routerHistory,
    routes: []
})
export default router
2. Batch import of global components
- Batch Import
- Main file Main.js
 import toMore from './components/toMore '
 createApp(App)
             .use(toMore)
             .mount('#app')
- Create an import file in the components folder such as: toMore.js
 let toMore=  () => {
      install(app) {
           const com = import.meta.globEager("./*.vue");
            for (const path in com ) {
                app.component( com[path].name, com[path].default);
            }}
     };
 export default toMore;
Stage ⑤ 3.x performance optimization
Non-recursive listening (optimizing reactive, ref)
- When the amount of data is very large, consider using shallowRef and shallowReactive to replace reactive and ref
- shallowRef only listens
valuefor changes in ., if the value is the number of layers below the object, it does not listen; - shallowReactive only listens
第一层for changes. - It can be modified multiple times through the
triggerRefmethod to update the page once after multiple modifications, such as triggerRe(obj)