Article directory
- 1. Steps to uninstall the docker service (practical!!)
- 2. docker private library
- 3. Use of container data volumes
- 4. Interconnection between container volumes and hosts
- 5. Container volumes ro and rw read and write rules
- 6. Volume inheritance and sharing
- 7. docker install tomcat
- 8. docker install mysql
- 9. docker install redis
- 10. mysql master-slave replication of docker
- 11. Hash remainder algorithm for distributed storage (based on redis cluster caching scenario)
- 12. Consistent Hash Algorithm for Distributed Storage (Based on Redis Cluster Cache Scenario)
- 13. Hash slot partition of distributed storage (based on redis cluster cache scenario)
1. Steps to uninstall the docker service (practical!!)
Docker uninstall preparation:
# 1.杀死dockers有关容器
docker kill $(docker ps -a -q)
# 2.删除所有docker容器:
docker rm $(docker ps -a -q)
# 3.删除所有docker镜像:
docker rmi $(docker images -q)
# 4.停止 docker 服务:
systemctl stop docker
# 5.删除docker相关存储目录:(分别进行执行以下四个命令)
rm -rf /etc/docker
rm -rf /run/docker
rm -rf /var/lib/dockershim
rm -rf /var/lib/docker
# (注意)6.如果删除不掉,则先umount,然后再重新执行上面那步“删除docker相关存储目录”。
umount /var/lib/docker/devicemapper
Docker uninstall steps:
# 1.查看系统已经安装了那些docker包
yum list installed | grep docker
# 2.remove卸载掉这些相关的docker包
yum remove containerd.io.x86_64 docker-ce.x86_64 docker-ce-cli.x86_64 docker-ce-rootless-extras.x86_64 docker-scan-plugin.x86_64 [...依据上面的docker服务]
# 3.再次查看,是否有遗漏
yum list installed | grep docker
# 4.再看看docker命令,是否还存在。
docker version
-bash: /usr/bin/docker: No such file or directory
# 5.至此成功卸载docker。
2. docker private library
Alibaba Cloud's Docker Registry is a public image repository provided by Alibaba Cloud. If a company involving confidential information cannot provide images to the public network, it is necessary to create a local private repository.
提示:阿里云的docker registry与docker hub差不多的,只不过docker hub访问很慢而已!
Docker Registry is an official tool that can be used to build private image repositories.
It is also very simple to build a private image repository, just pull one directly through the pull command:
# 拉去registry镜像,用于构建私有仓库。
docker pull registry
# 相当于本地有个私有Docker hub。
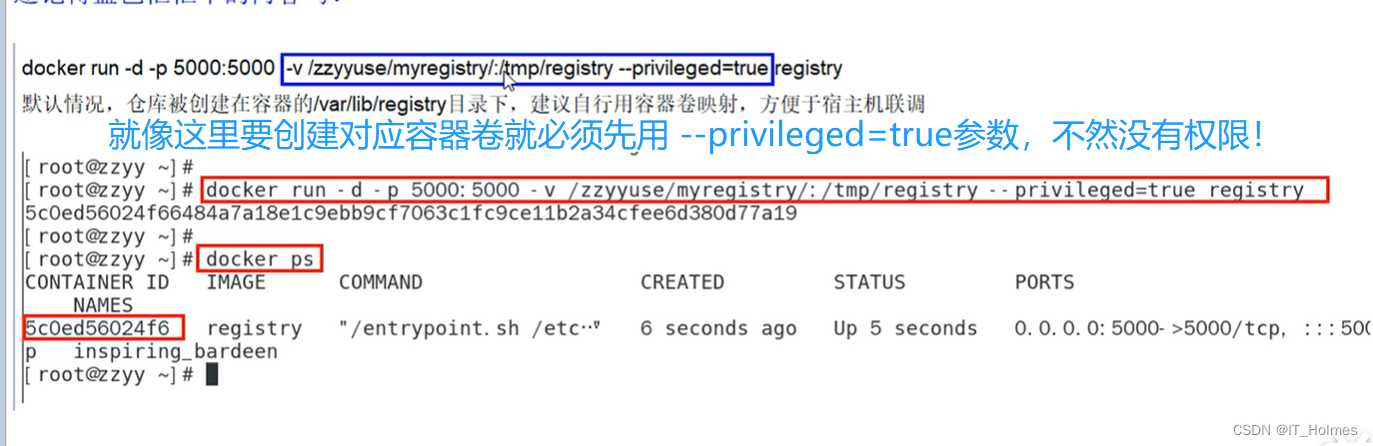
Run the private library command:
# 运行私有库,-v是卷的意思,-p代表指定端口
docker run -d -v /data/registry:/var/lib/registry -p 5000:5000 --name myRegistry registry

# 搭建ubuntu系统(步骤):
docker run -it ubuntu
# 先更新包管理工具
apt-get update
# 之后进行各种安装命令
# 例如:安装ifconfig命令
apt-get install net-tools

The steps to upload an image to a private repository are as follows:
Step 1: Initiate a get request to see what mirrors are on the private server library:
- Format: curl -XGET http://ip where the private library is located: port where the private library is located/v2/_catalog

Step 2: Use the docker tag command to create a standard format image file.
- The role of the docker tag command: In docker, tag is a command used to tag a local image and put it into a warehouse; this command can be used to tag an image.
- The format is as follows: docker tag image:Tag Host:Port/Repository:Tag

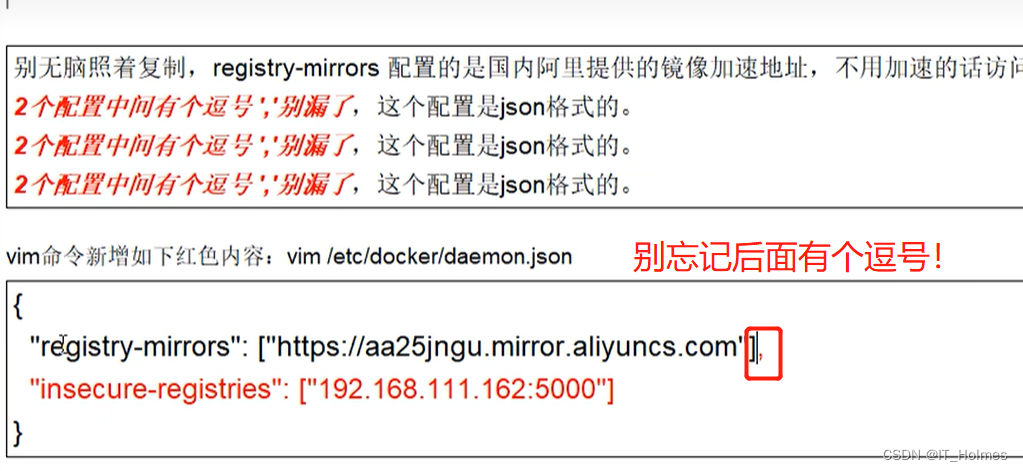
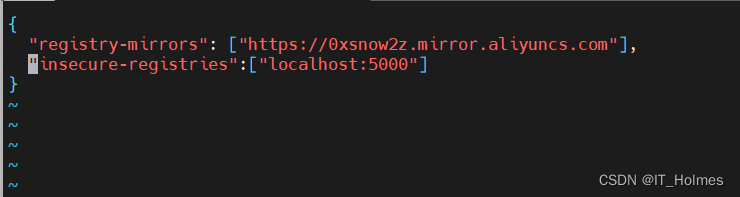
Step 3: Docker does not allow HTTP to push images by default, so modify the configuration file to support HTTP. The modification does not take effect, and the docker service needs to be restarted.
- The new content of /etc/docker/daemon.json is as follows: (insecure-registries tells docker that this address is secure!)
Step 4: Start the private repository of docker.
- Similar command: docker run -d -v /data/registry:/var/lib/registry -p 5000:5000 --name myRegistry registry
- If there is a conflict, you can view it through the docker ps -a command, and start it through the docker start image ID.
Step 5: Use the push command to push the corresponding image.

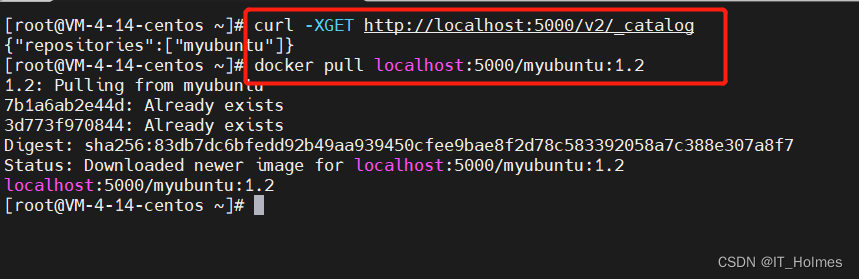
Step 6: Check again through curl to see if the private library has an image.
- Format: curl -XGET http://localhost:5000/v2/_catalog

Step 7: Pull the mirror of the private library.
- Format: docker pull localhost:5000/myubuntu:1.2
3. Use of container data volumes
Notice:
- Use of --privileged=true.
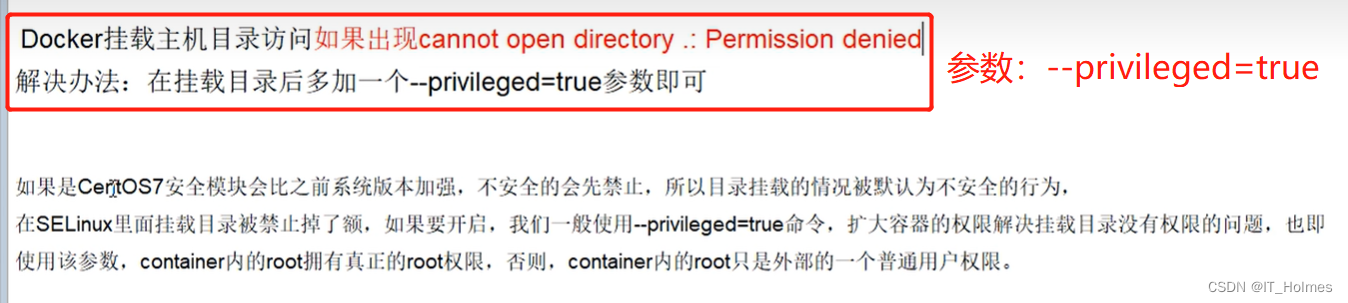
使用-v 参数来绑定容器卷的时候,最好添加上--privileged=true参数,不然没有权限。
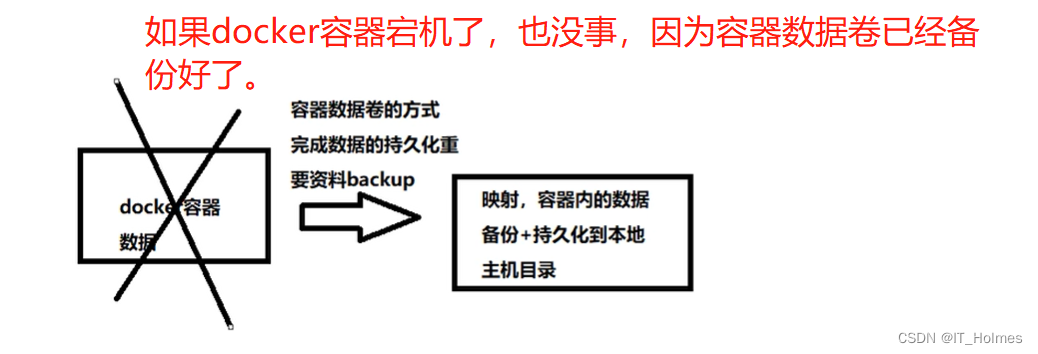
The effect of the container data volume is as follows:
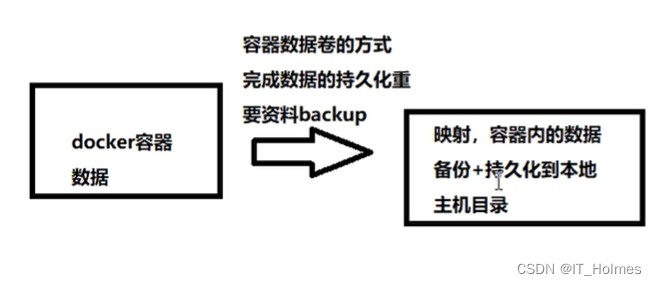
The role of container volumes:
- It is an effect of persistence.
- Save the data in the docker container to the host's disk.

How to run a container instance with container volumes:
- Command format: docker run -it --privileged=true -v /host absolute path directory: /directory image name in the container.
- In fact, it is equivalent to associating two directories in the host and the docker container.

4. Interconnection between container volumes and hosts
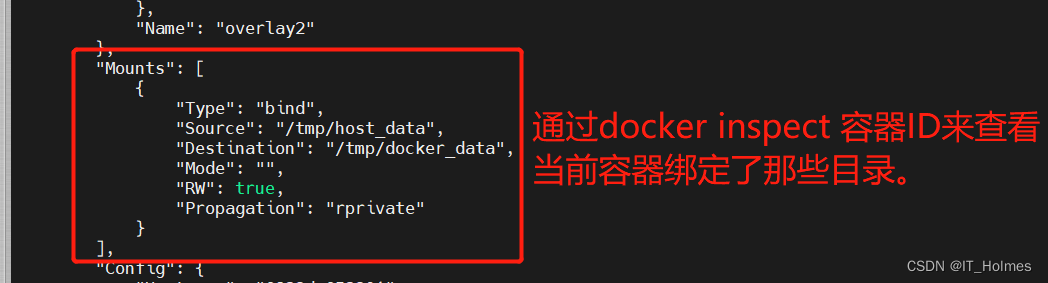
Examples of interconnection between container volumes and hosts are as follows:
# 使用-v 来创建宿主机目录和docker容器目录。
[root@VM-4-14-centos/]$ docker run -it --privileged=true -v /tmp/host_data:/tmp/docker_data --name=u1 ubuntu
# 这样对改目录的内容进行修改,对应的宿主机的内容也会同步!
root@6823da652301:/tmp/docker_data$ touch dockerin.txt
root@6823da652301:/tmp/docker_data$ pwd
/tmp/docker_data
# 对一个容器的目录如下:
[root@VM-4-14-centos host_data]$ pwd
/tmp/host_data
[root@VM-4-14-centos host_data]$ ll
total 0
-rw-r--r-- 1 root root 0 Sep  1 13:08 dockerin.txt
这个过程是双向的,在容器对应目录里面改变,宿主机会改变。在宿主机对应目录下改变,容器里面也会改变!
The -v command can mount multiple container volumes, for example: one mounts the log, one mounts the business logic, and so on.
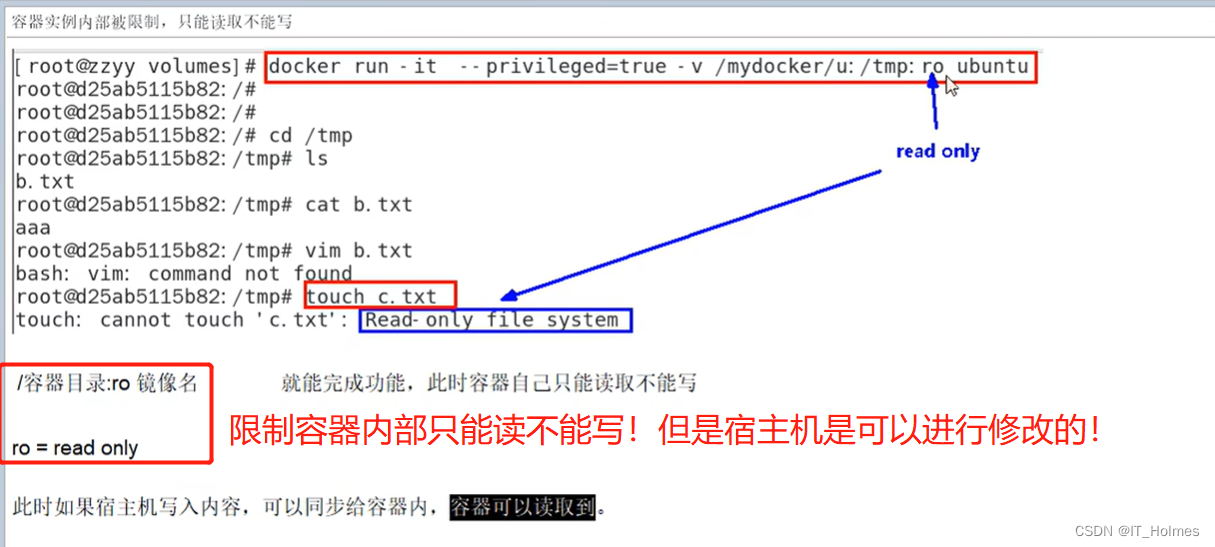
5. Container volumes ro and rw read and write rules
rw read and write rules are configurable:
- docker run -it --privileged=true -v /host absolute path directory:/container strip:rw. rw here means read and write.
- The default is readable and writable.
Internal restrictions of the container, only read but not write ro (read only):
6. Volume inheritance and sharing
for example:
- Container 1 completes the mapping with the host, and container 2 inherits the volume rules of container 1.
The volume inheritance format is as follows:
- docker run -it --privileged=true --volumes-from 父类 --name u2 ubuntu

如果u2停止了,并不会影响u3,u3只是继承了u2的容器卷而已。
7. docker install tomcat
Go directly to the official repository of hub.docker.com to search for tomcat:

也可以通过docker search tomcat查看一下。
# 查看tomcat版本呢
docker search tomcat
# 拉取tomcat,注意这里是拉取得最新版
docker pull tomcat
# 拉取成功后,检查一下
docker images
# 创建容器(运行镜像) 或者 后台启动 -d
docker run -it -p 8080:8080 --name t1 tomcat
After startup, you can visit the home page of tomcat and verify it.
Note: The new version of tomcat has no content under the default webapps. There is a webapps.dist that is the original one. You can unzip the webapps.dist into webapps to access the tomcat homepage.


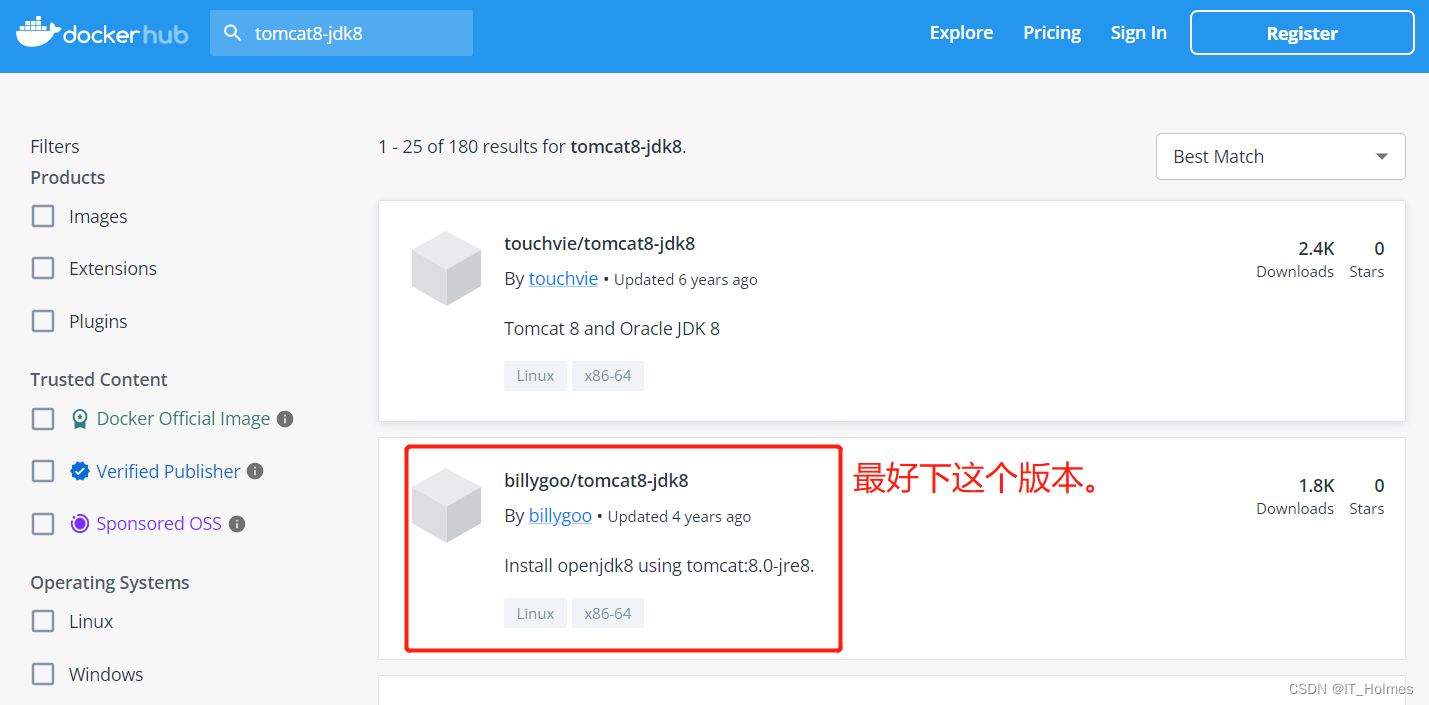
The latest version of tomcat is not used in general projects, so generally download the tomcat8-jdk8 version, you can search on hub.docker.com to see:
8. docker install mysql
8.1 Running the mysql container
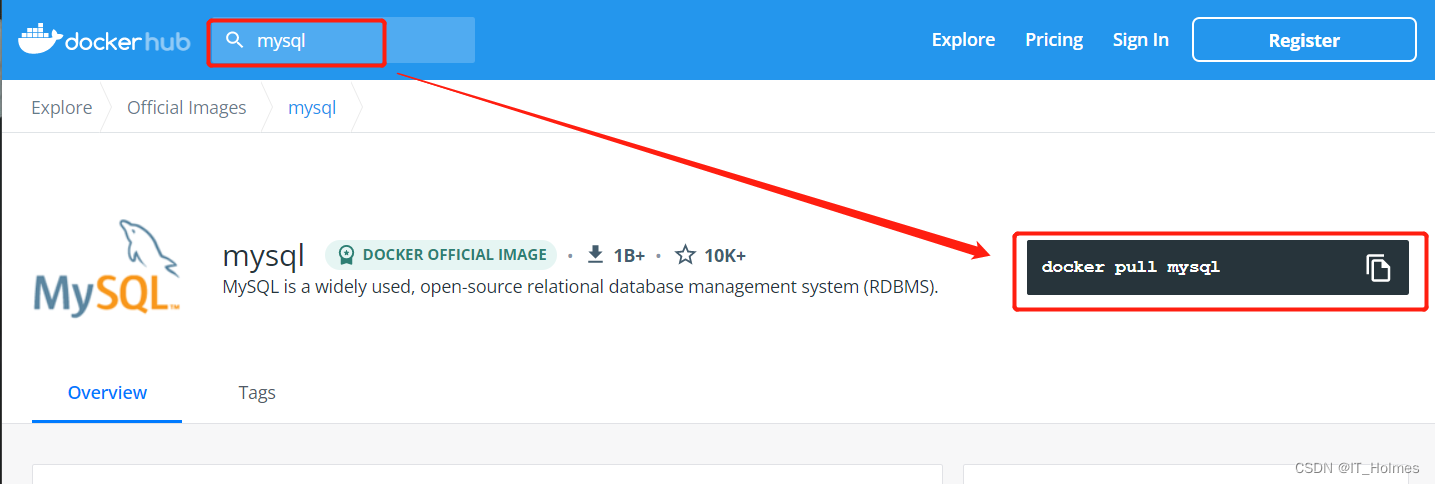
The same docker search query or search on the hub:

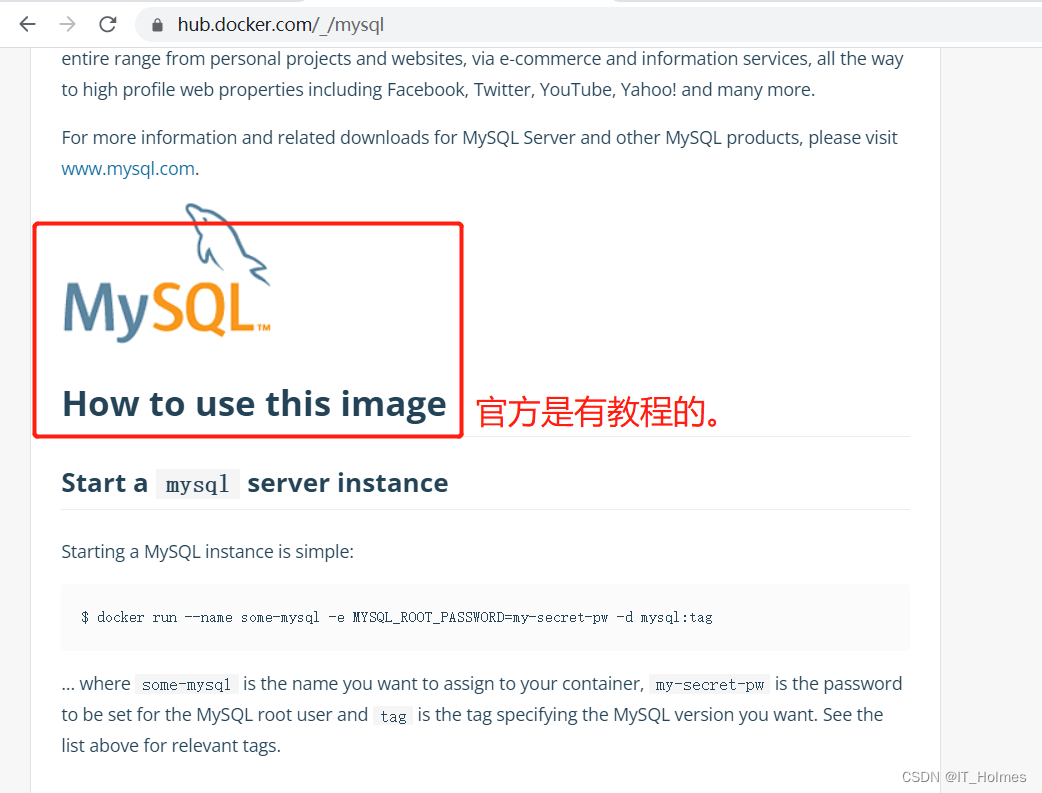
Learn to go to the official documentation to find tutorials:
Run the mysql container:
- Format: docker run --name Mymysql -e MYSQL_ROOT_PASSWORD=password -d mysql:tag
- Note: The server itself carries mysql, and 3306 may be occupied.
# 启动mysql容器实例:
docker run -p 3306:3306 -e MYSQL_ROOT_PASSWORD=123456 -d mysql:5.7

# 开启交互mysql , 输入对应命令:
[root@VM-4-14-centos ~] docker exec -it 733e8e6172c4 /bin/bash
root@733e8e6172c4:/ mysql -uroot -p123456
# 执行一系列的命令就可以了。
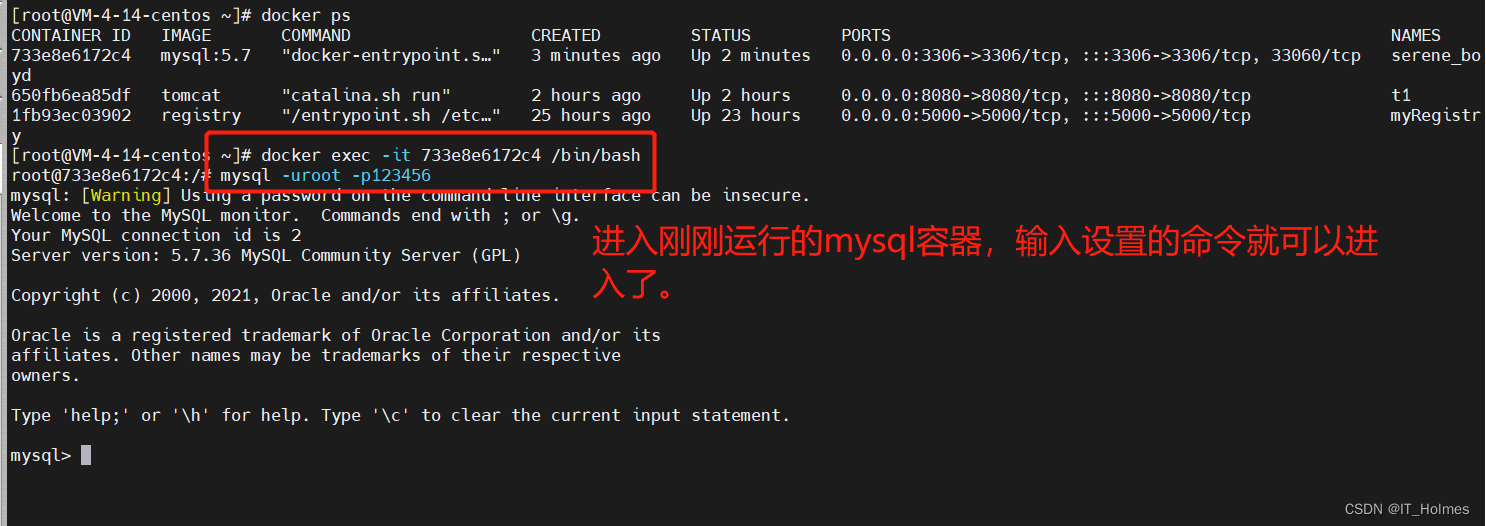
远程连接可以直接连接服务器ip和对应端口就可以了。
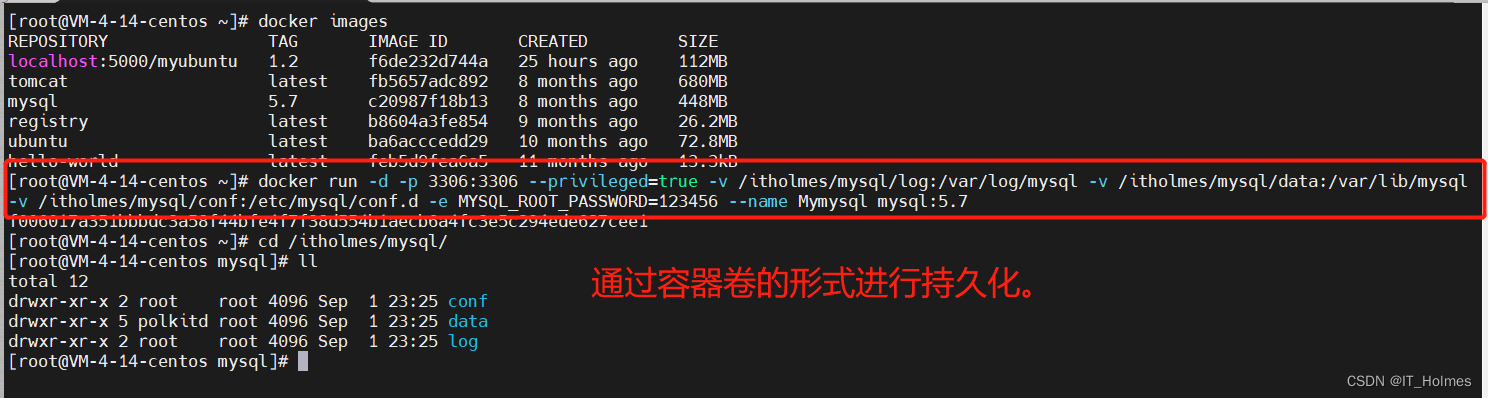
8.2 docker mysql container volume configuration (very important)
The container volume is persistent. If the mysql container volume is not configured, once the mysql container is deleted, the data in the mysql container will be gone, which is the same as deleting the database.
So be sure to configure container volumes!
docker run -d -p 3306:3306 --privileged=true \
-v /itholmes/mysql/log:/var/log/mysql \
-v /itholmes/mysql/data:/var/lib/mysql \
-v /itholmes/mysql/conf:/etc/mysql/conf.d \
-e MYSQL_ROOT_PASSWORD=123456 --name Mymysql mysql:5.7
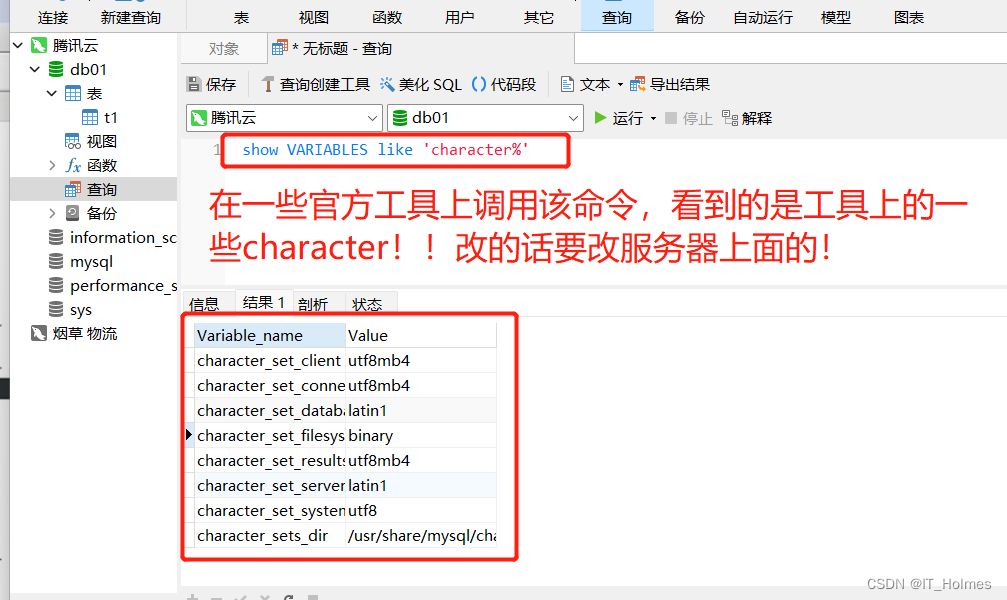
8.3 Chinese problems of docker mysql
Chinese data problem of mysql installed by docker: The
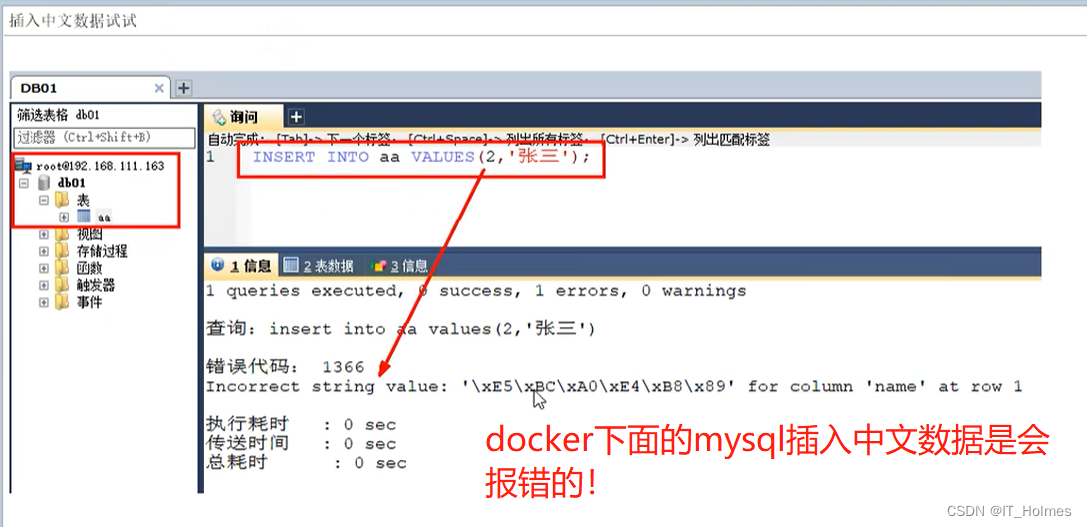
reason is that the default character set encoding of docker is latin1:
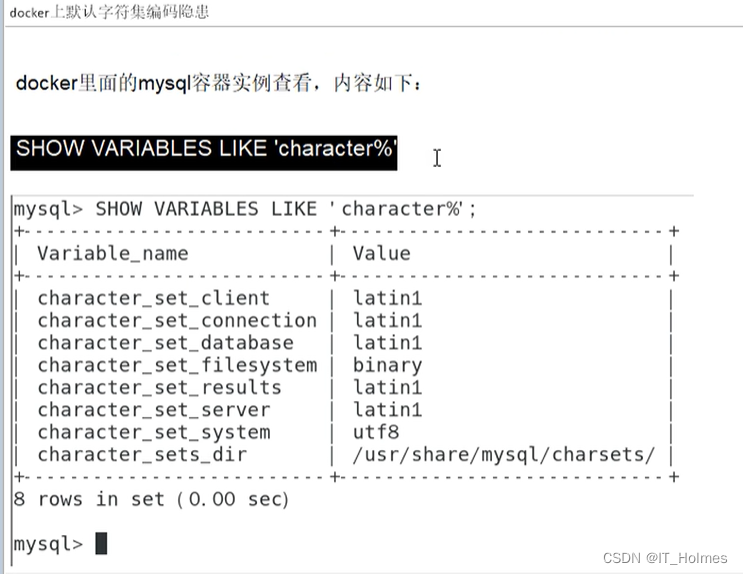
Misunderstandings of using the show variables like 'character%' command in third-party tools:
The premise of solving the Chinese problem is that the container volume must be configured at startup:
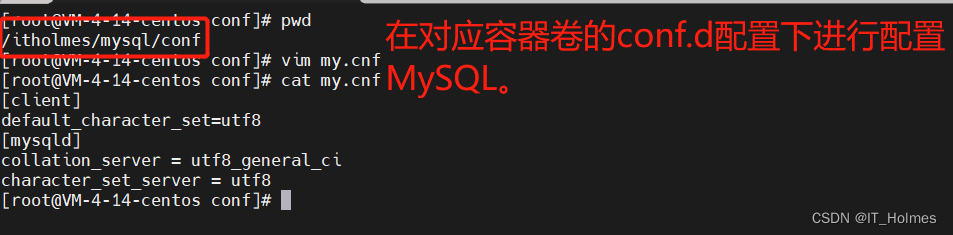
my.cnf is configured as follows:
[client]
default_character_set=utf8
[mysqld]
collation_server = utf8_general_ci
character_set_server = utf8
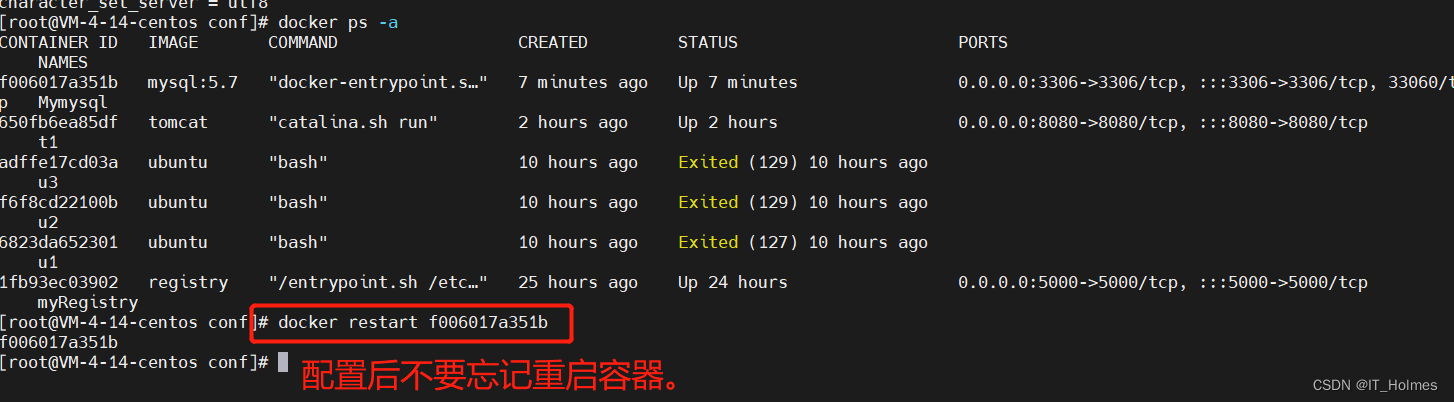
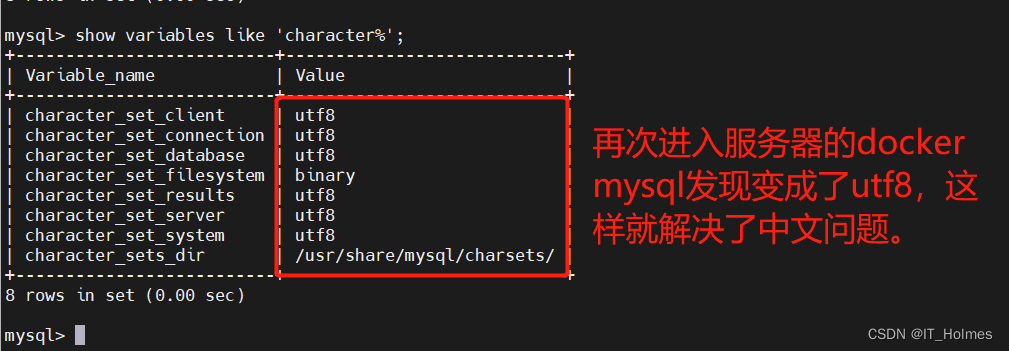
In this way, the persistence problem is solved, and the Chinese problem is solved.
9. docker install redis
Step 1: Pull the redis image.
# 拉取redis镜像
docker images redis:6.0.8
Step 2: Configure the redis.conf file, you can copy one. Redis container related configuration is operated through the configuration of container data volume.
Similarly, redis also uses the form of container data volumes to store related configurations, data, etc.
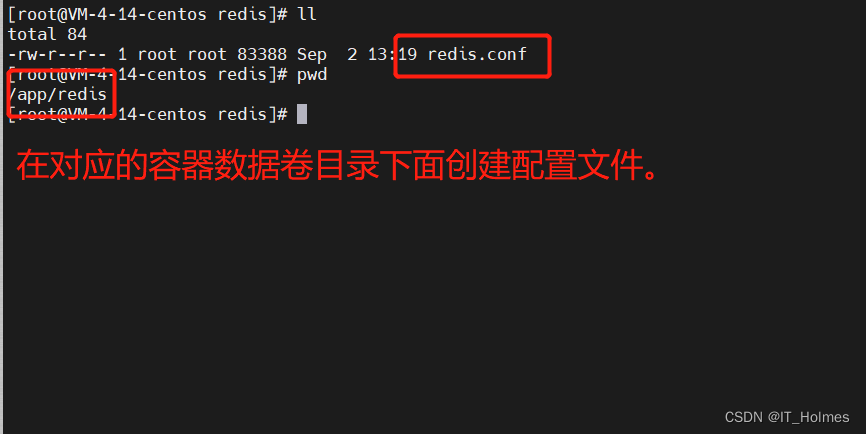
Under the corresponding directory of the container volume, copy a copy of the original redis.conf configuration file and modify its content:
- Step 1: Enable redis password authentication. (add according to the situation)
- Step 2: Allow redis field connections! Comment out bind 127.0.0.1 or the external machine cannot access redis!
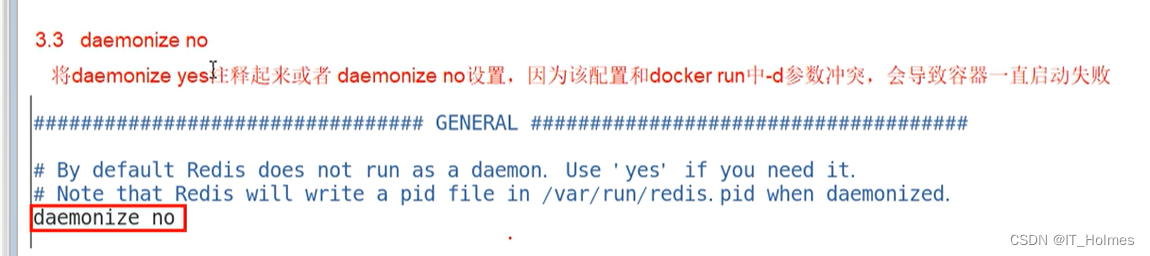
- The third step: daemonize no. Shut down the daemon, because it will conflict with the docker run -d parameter, so set it to no.
- Step 4: Enable redis data persistence appendonly yes (configured according to the situation).
Step 3: Start the redis container. The command is as follows:
docker run -p 6379:6379 --name myredis --privileged=true \
-v /app/redis/redis.conf:/etc/redis/redis.conf \
-v /app/redis/data:/data \
-d redis:6.0.8 redis-server /etc/redis/redis.conf
# redis-server /etc/redis/redis.conf是要指定宿主主机的redis.conf文件。
# 只有这样宿主机的redis.conf才会生效!
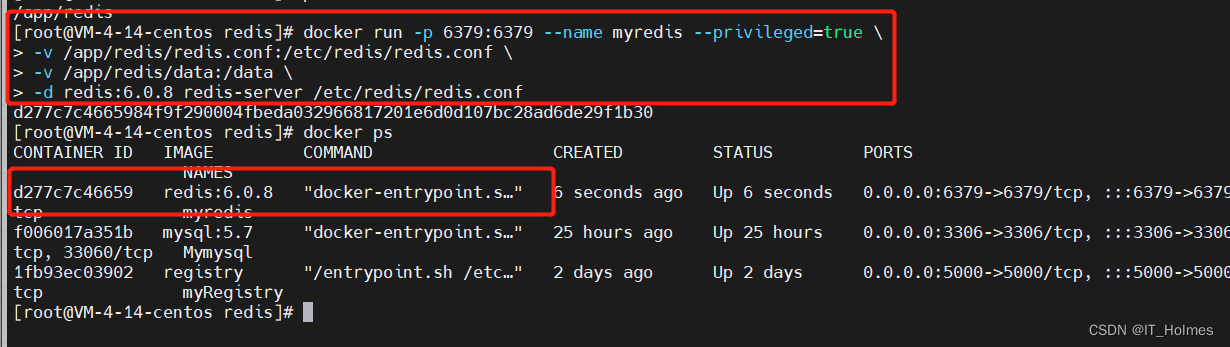
再次提醒要指定宿主机器的redis.conf文件,不然就会用redis容器里面默认的配置文件!
10. mysql master-slave replication of docker
Step 1: Start a container named mysql-master in the form of a container volume.
docker run -p 3307:3306 --name mysql-master \
-v /mydata/mysql-master/log:/var/log/mysql \
-v /mydata/mysql-master/data:/var/lib/mysql \
-v /mydata/mysql-master/conf:/etc/mysql \
-e MYSQL_ROOT_PASSWORD=root \
-d mysql:5.7
Step 2: Go to the directory corresponding to the host container data volume and perform configuration operations.
- Create the my.cnf configuration file:
[mysqld]
## 设置server_id,同一局域网中需要唯一
server_id=101
## 指定不需要同步的数据库名称
binlog-ignore-db=mysql
## 开启二进制日志功能
log-bin=mall-mysql-bin
## 设置二进制日志使用内存大小(事务)
binlog_cache_size=1M
## 设置使用的二进制日志格式(mixed,statement,row)
binlog_format=mixed
## 二进制日志过期清理时间。默认值为0,表示不自动清理。
expire_logs_days=7
## 跳过主从复制中遇到的所有错误或指定类型的错误,避免slave端复制中断。
## 如:1062错误是指一些主键重复,1032错误是因为主从数据库数据不一致
slave_skip_errors=1062
Step 3: After modifying the configuration, restart the master instance.
docker restart mysql-master
Step 4: Enter the mysql-master container, create a user and grant user permissions (the slave machine must have corresponding users and permissions!).
# 进入交互式mysql-master容器
docker exec -it mysql-master /bin/bash
# 进入mysql客户端
mysql -uroot -proot

# 创建用户
create user 'slave'@'%' identified by '123456';
# 给用户赋予权限
grant replication slave, replication client on *.* to 'slave'@'%';
Step 5: Create and start a slave database,.
docker run -p 3308:3306 --name mysql-slave \
-v /mydata/mysql-slave/log:/var/log/mysql \
-v /mydata/mysql-slave/data:/var/lib/mysql \
-v /mydata/mysql-slave/conf:/etc/mysql \
-e MYSQL_ROOT_PASSWORD=root \
-d mysql:5.7
Step 6: Also in the corresponding container data volume directory, configure the relevant information from the database.
- Create the my.cnf configuration file:
[mysqld]
## 设置server_id,同一局域网中需要唯一
server_id=102
## 指定不需要同步的数据库名称
binlog-ignore-db=mysql
## 开启二进制日志功能,以备Slave作为其它数据库实例的Master时使用
log-bin=mall-mysql-slave1-bin
## 设置二进制日志使用内存大小(事务)
binlog_cache_size=1M
## 设置使用的二进制日志格式(mixed,statement,row)
binlog_format=mixed
## 二进制日志过期清理时间。默认值为0,表示不自动清理。
expire_logs_days=7
## 跳过主从复制中遇到的所有错误或指定类型的错误,避免slave端复制中断。
## 如:1062错误是指一些主键重复,1032错误是因为主从数据库数据不一致
slave_skip_errors=1062
## relay_log配置中继日志
relay_log=mall-mysql-relay-bin
## log_slave_updates表示slave将复制事件写进自己的二进制日志
log_slave_updates=1
## slave设置为只读(具有super权限的用户除外)
read_only=1
Step 7: Restart the master-slave container instance.
docker restart mysql-slave
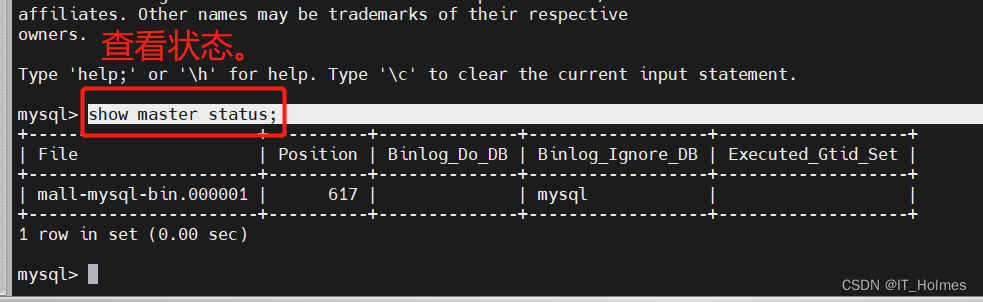
Step 8: Check the master-slave synchronization status in the master database. In order to prepare for the configuration parameters from the database later.
Step 9: Configure master-slave replication in the slave database.
- Configure master-slave replication from the database, command format:
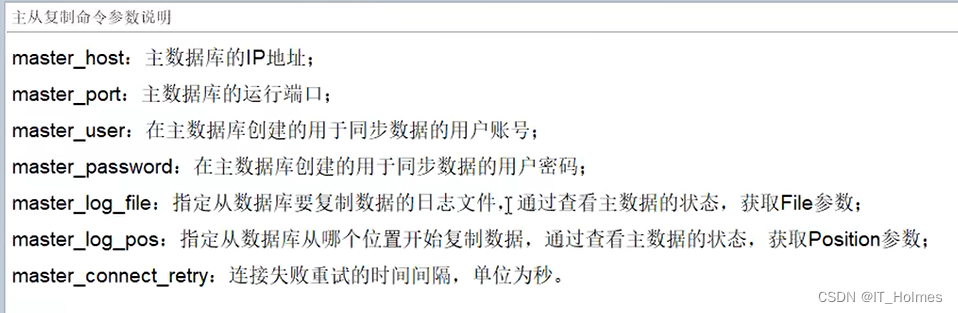
change master to master_host='宿主机IP',master_user='slave',master_password='123456',master_port=3307,master_log_file='mall-mysql-bin.000001',master_log_pos=617,master_connect_retry=30;
- Parameter command description of master-slave replication:
- The case command process is as follows:
# 打开交互,从数据库容器
docker exec -it mysql-slave /bin/bash
# 进入mysql客户端
mysql -uroot -proot
# 配置主从复制参数
change master to master_host='127.0.0.1',master_user='slave',master_password='123456',master_port=3307,master_log_file='mall-mysql-bin.000001',master_log_pos=617,master_connect_retry=30;

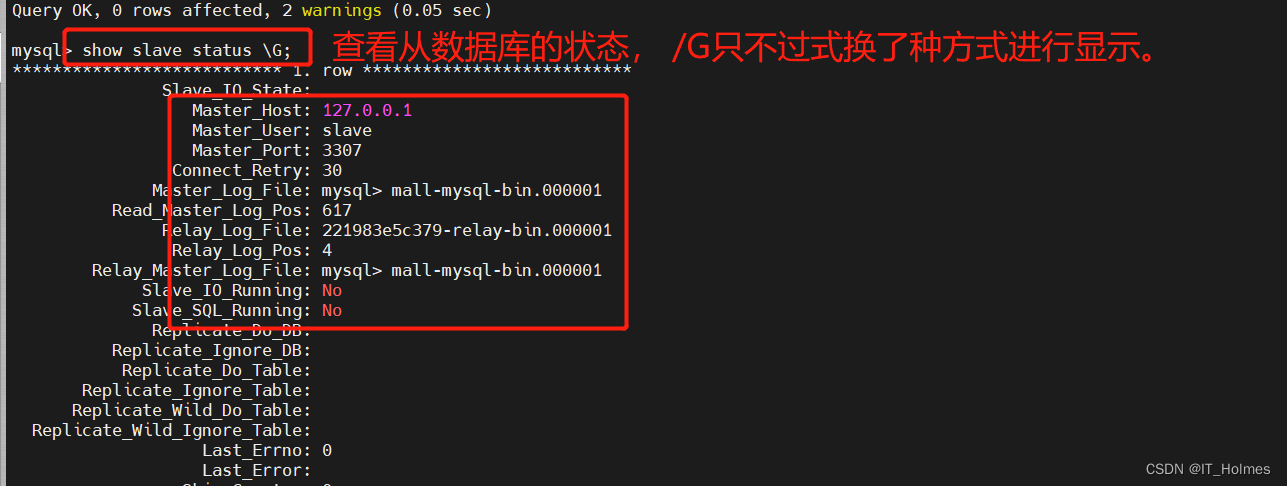
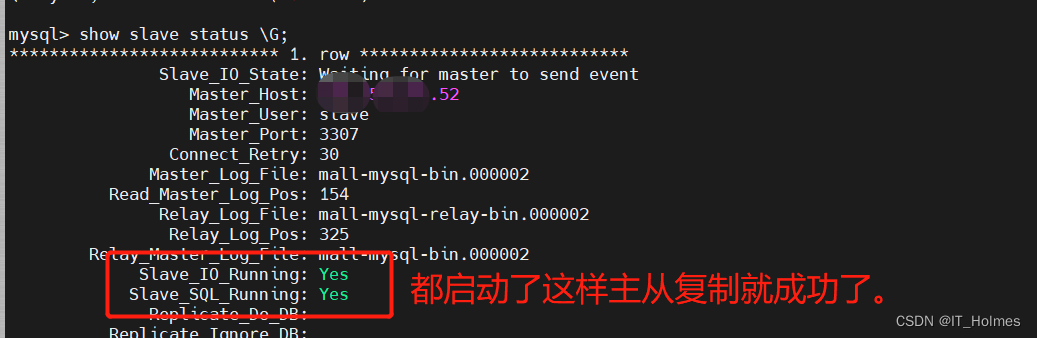
Step 10: View the master-slave synchronization status in the slave database.
# 查看从数据库的状态 \G是一个key-value键值对的形式。
show slave status \G;
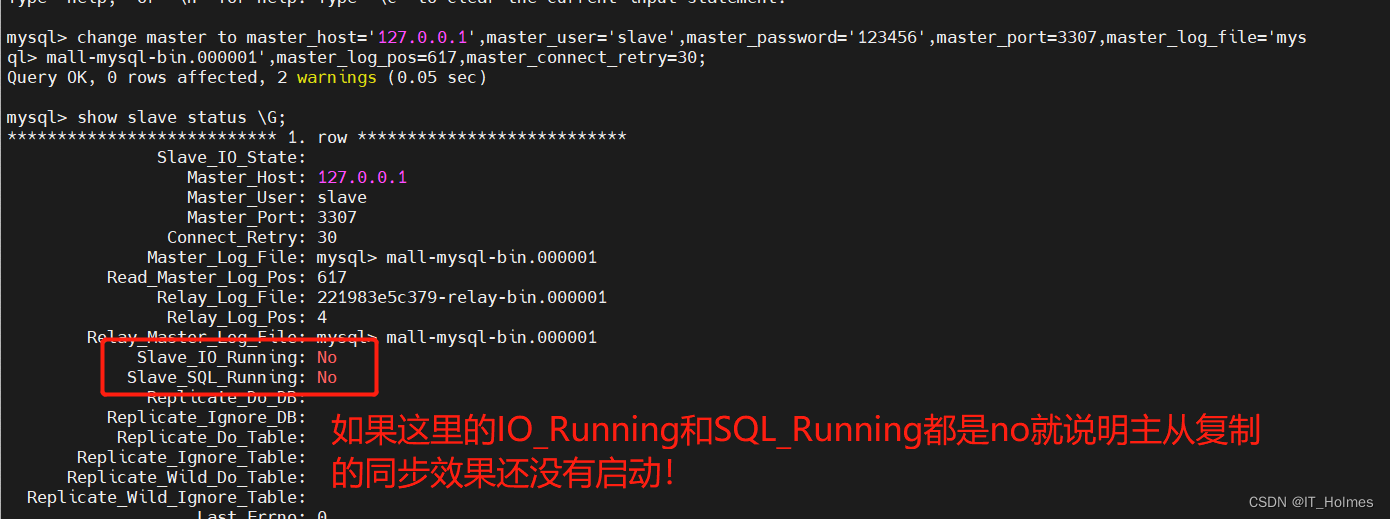
Step 11: In the slave database, enable master-slave replication.
# 在mysql客户端中执行命令
start slave
# 也可以关闭
stop slave
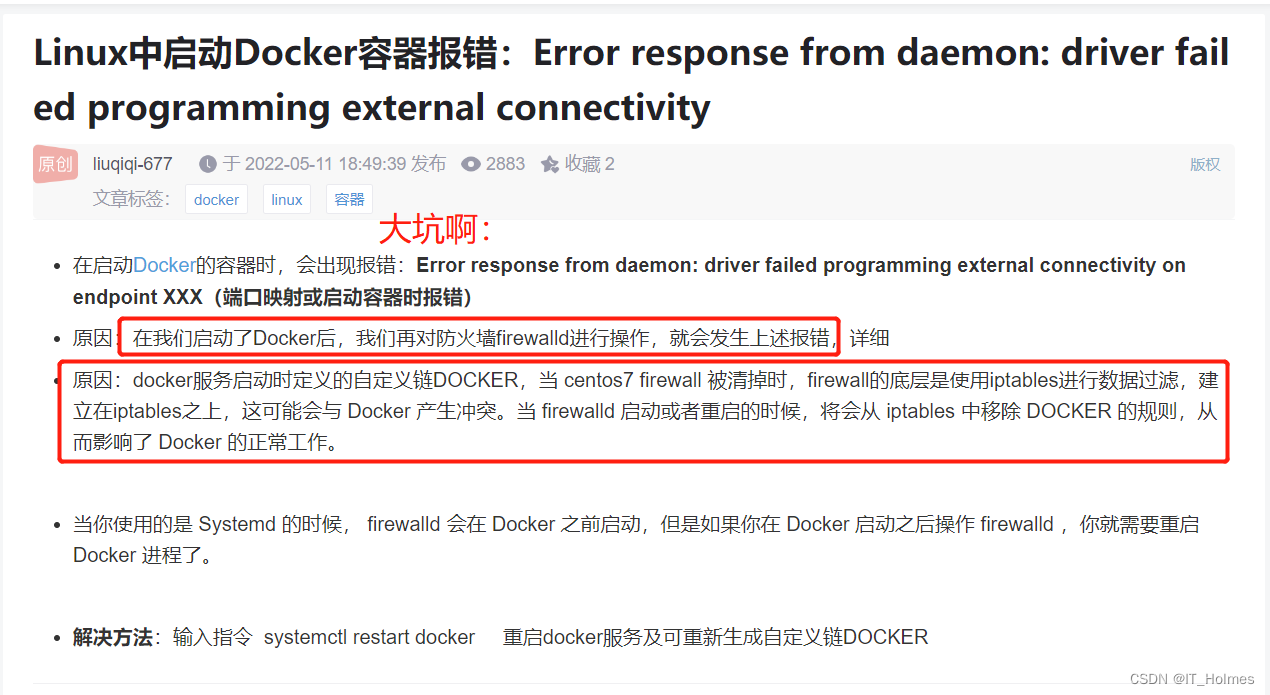
这里由于是云服务器,所以动了一下防火墙和白名单。一旦碰了防火墙一定要重启docker服务,不然从数据库就没办法去连接主数据库了。
Step 12: Test, add data to the master database to see if the slave database can be synchronized.
Notes on stepping on the pit:
- It is best not to operate the firewall when docker is running! ! ! ! ! Otherwise, there will be problems with the docker container network.
11. Hash remainder algorithm for distributed storage (based on redis cluster caching scenario)
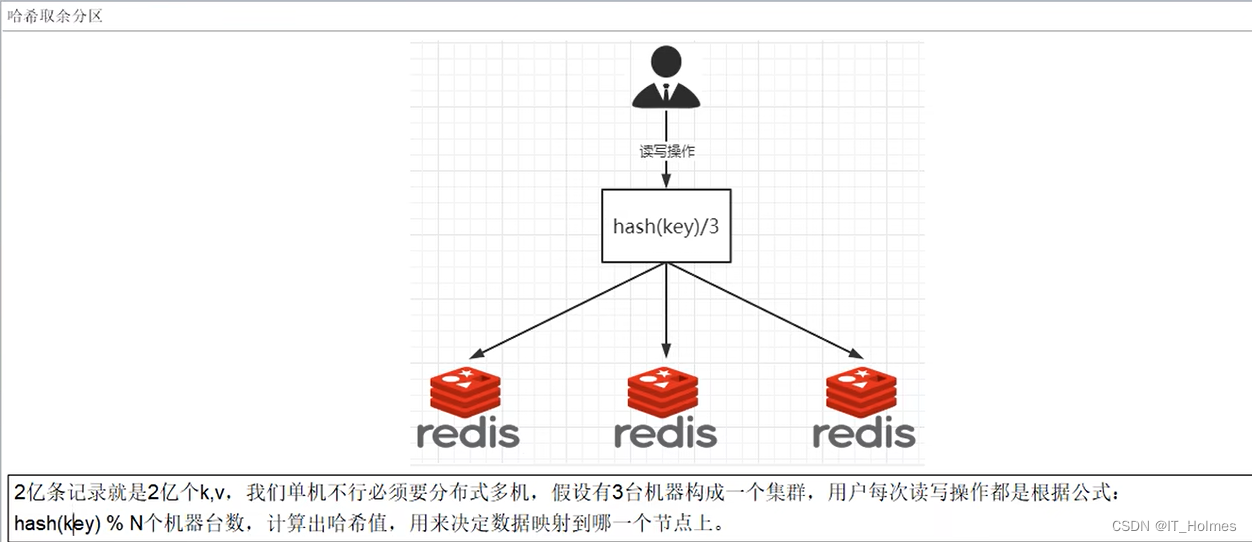
For example, what if there are 200 million data that need to be cached?
Like the following hash remainder partition, the remainder is mapped to which redis node according to a certain hash algorithm.
Advantages:

Disadvantages:
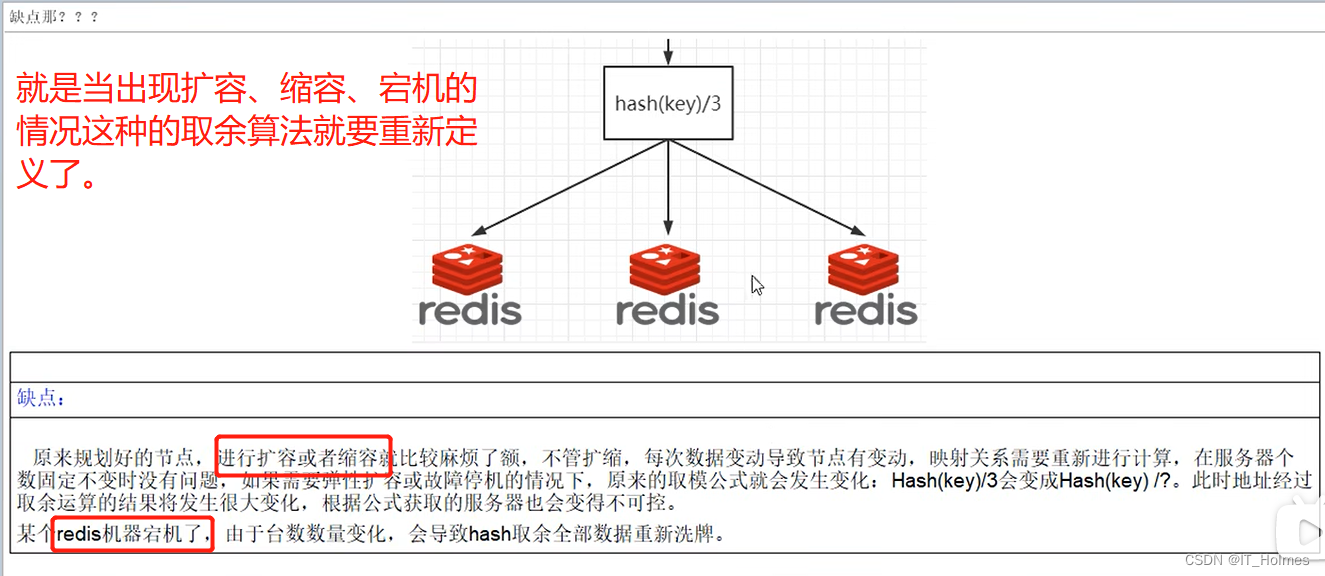
Summarize:
- The hash remainder partitioning algorithm is relatively common, but this algorithm is suitable for small data volume environments.
- Problem: When the capacity is expanded, reduced, or a machine is down, the number of denominators has changed, and taking the remainder will not work.
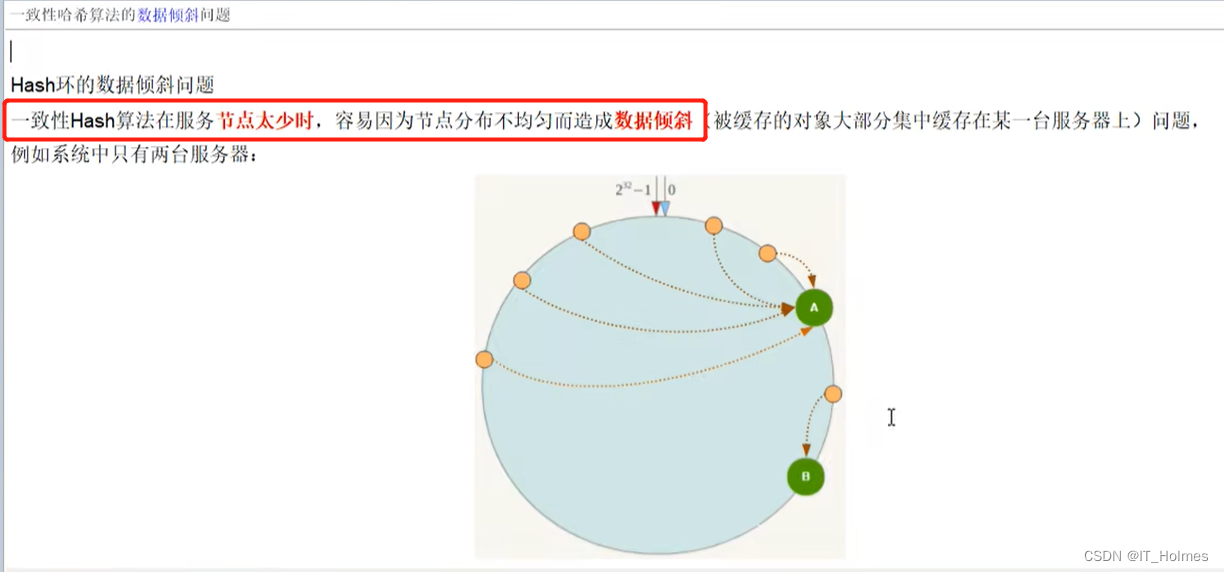
12. Consistent Hash Algorithm for Distributed Storage (Based on Redis Cluster Cache Scenario)
The purpose of the consistent hashing algorithm is to solve the problem of data changes and mapping in distributed caches, when a machine goes down and the number of denominators changes.
Consistent Hash Algorithm - Algorithm to build a consistent hash ring:
The consistent hashing algorithm organizes the entire hash value space into a virtual ring.
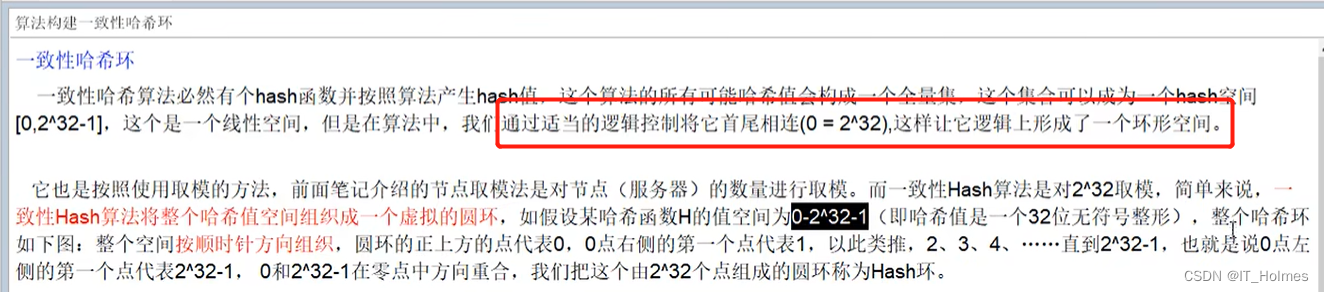
The entire space is organized clockwise.
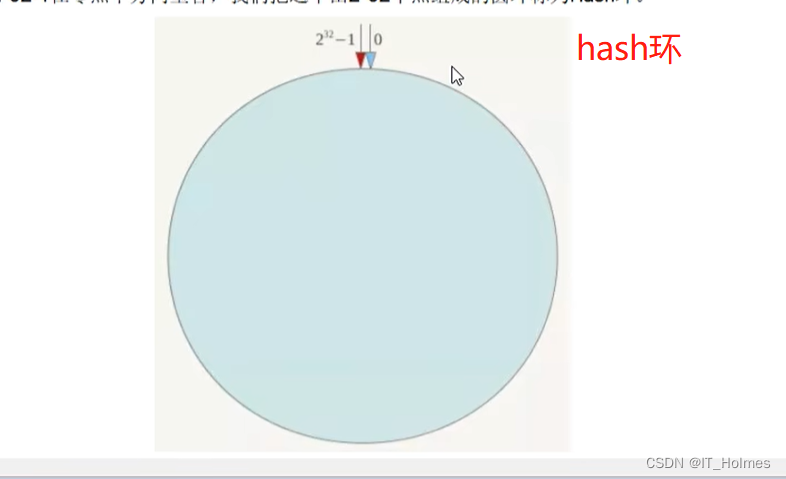
Consistent Hash Algorithm - Server IP Node Mapping:
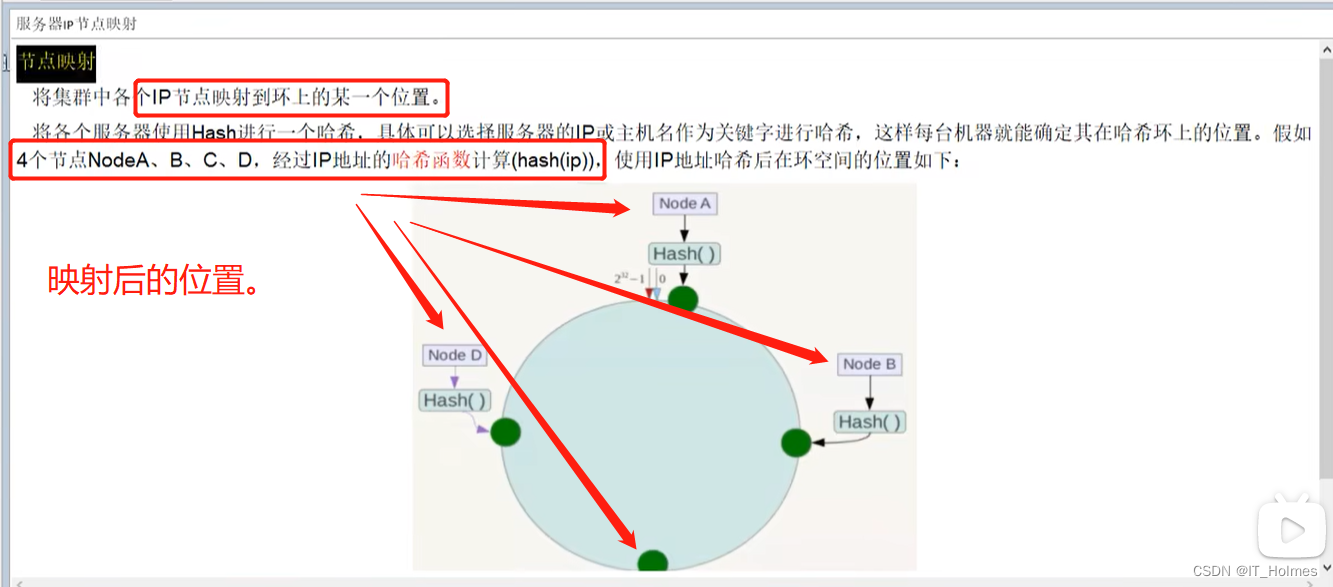
Consistent Hash Algorithm - The key drop rule for the key to fall to the server:
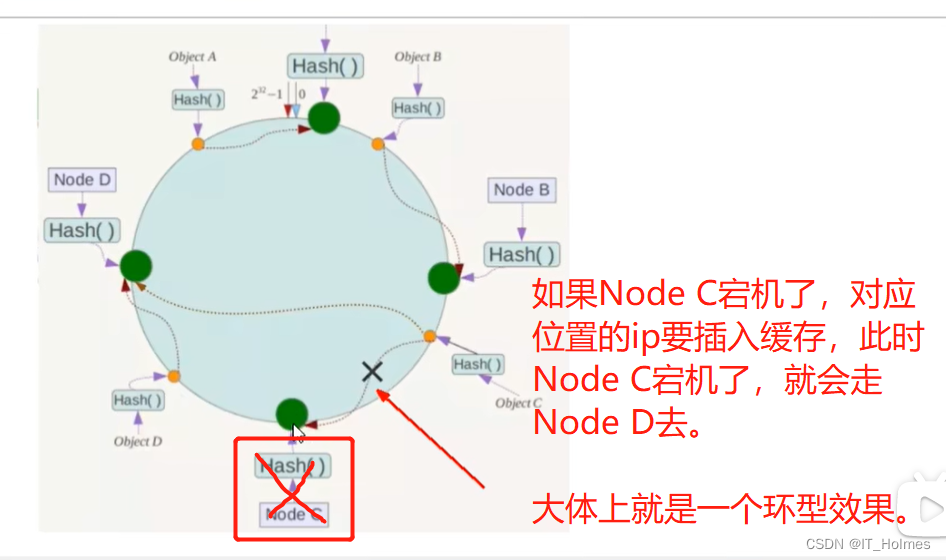
Consistent hash algorithm advantages and disadvantages:
- Advantages: Improve fault tolerance (it's okay if there is a node service down in the middle.) and scalability (it's okay to add nodes in the middle).
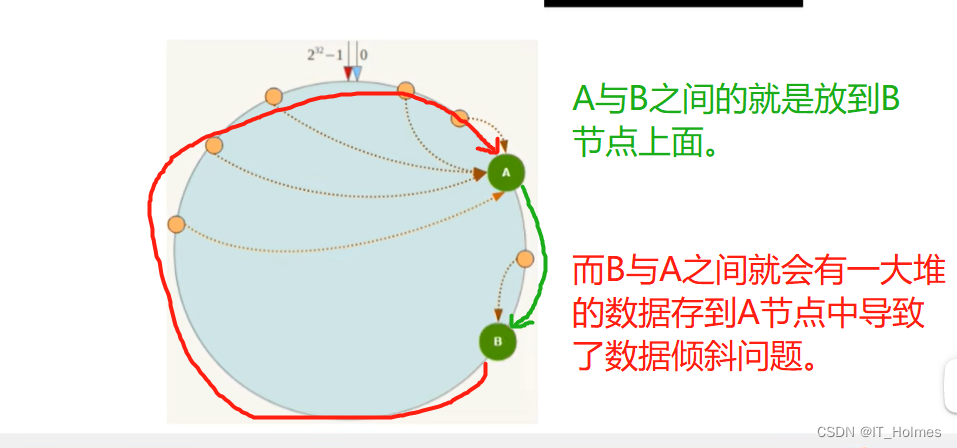
- Disadvantages: There is a problem of data skew. Too few nodes and uneven distribution.
13. Hash slot partition of distributed storage (based on redis cluster cache scenario)
Hash slot partitioning is the best! ! Factory standard.
Principle: A layer is added between data and nodes, which is called a hash slot, which is used to manage the relationship between data and nodes.
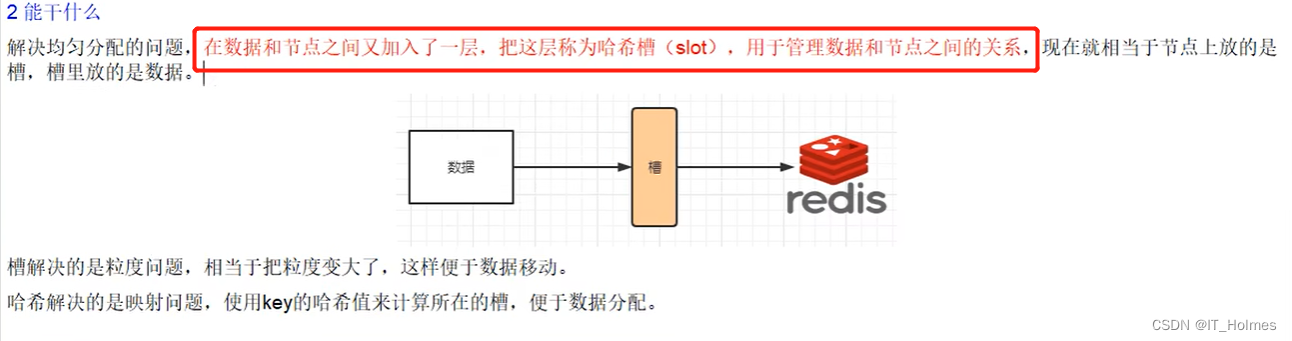
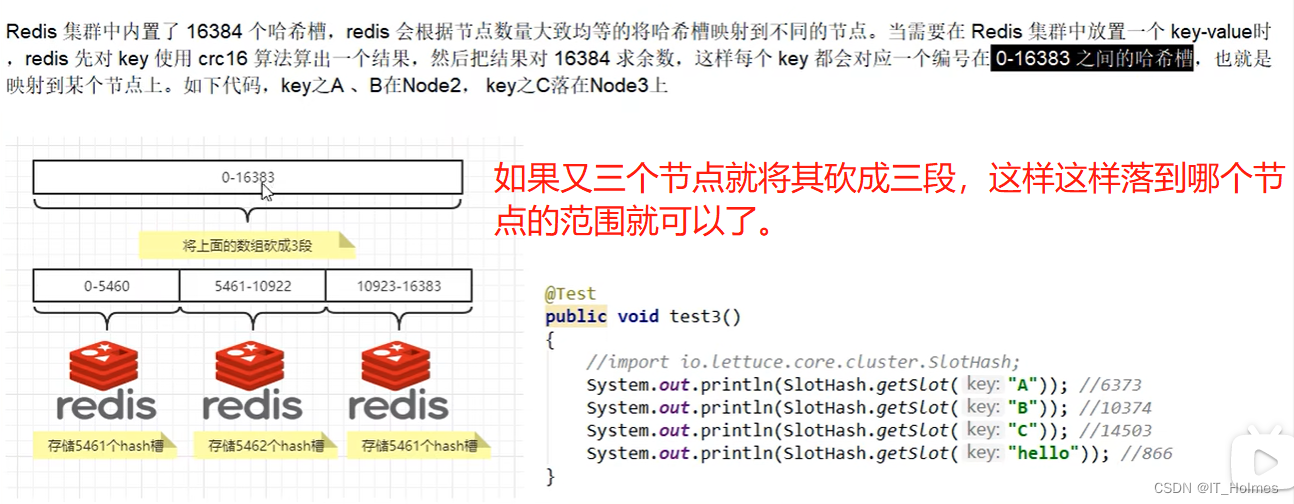
Hash slot: The maximum number of slots in a redis cluster is 16384.

Why is the number of redis cluster slots 2^14 - 1 (16384)?
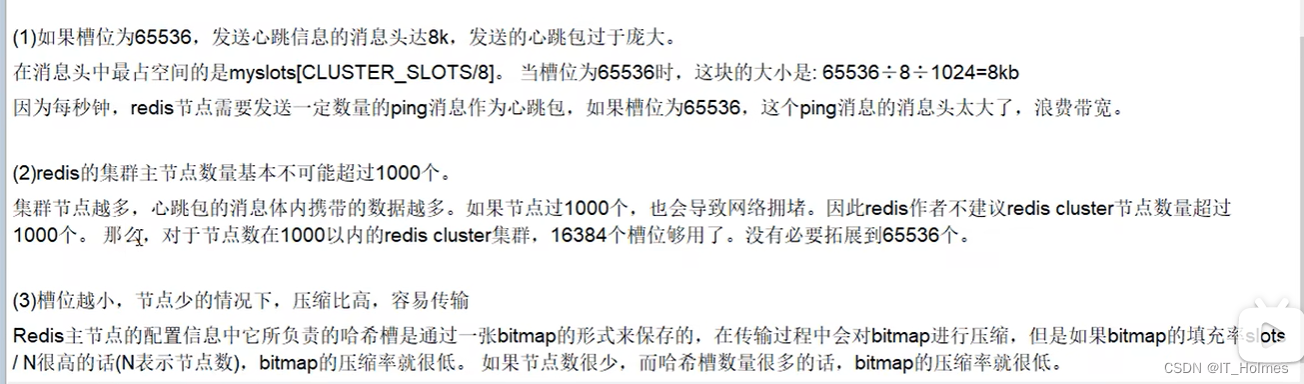
It is also the remainder of 16384, and the remainder is a few keys and falls into the corresponding slot. Taking the slot as a unit, the number of slots is also fixed.
See the next chapter for redis cluster construction.