In the previous blog ( mysql cluster building basics ), the basic knowledge of mysql cluster was introduced. This blog explained how to build a mysql cluster in a windows environment. During this time, under the leadership of our architects, a mysql cluster was built, allowing I have benefited a lot. I will share the results below and teach you how to build a mysql cluster in three minutes.
· Preparation - preliminary work
· Build the road - three minutes to get
Test cluster - see results
【Ready to work】
1、mysql-cluster-gpl-7.4.9-winx64
Download method:
http://dev.mysql.com/downloads/cluster/
2. Two computers
One configuration management node, one data node and one SQL node, and one configured with one data node and one SQL node.
Management node: 192.168.22.238
Data Node A: 192.168.22.238
Data Node B: 192.168.22.240
SQL Node A: 192.168.22.238
SQL Node B: 192.168.22.240
【Building the road】
First, configure the mysql cluster
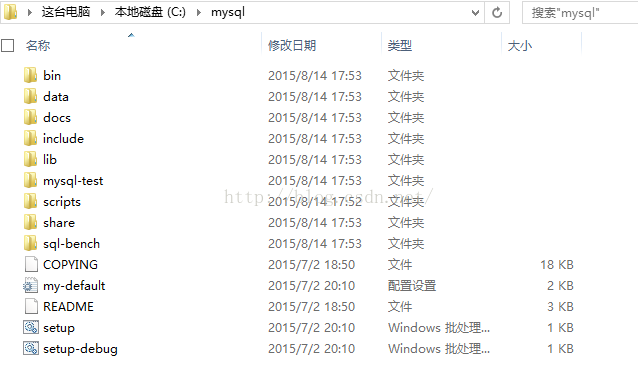
1. Unzip the downloaded mysql cluster compressed package to the C:\mysql directory of the management node 192.168.22.238:
2. Configure the management node:
Create two folders, cluster-logs and config, in the C:\Mysql\Bin directory on the computer of the configuration management node (192.168.22.238). Cluster-logs is used to store log files, and two configuration files, my.ini and config.ini, are created in the config folder:
my.ini
- [mysql_cluster]
- # Options for management node process
- config-file=C:/mysql/bin/config/config.ini
config.ini
- [ndbd default]
- # Options affecting ndbd processes on all data nodes:
- NoOfReplicas=2 # Number of replicas
- DataDir=C:/mysql/bin/cluster-data # Directory for each data node's data files
- # Forward slashes used in directory path,
- # rather than backslashes. This is correct;
- # see Important note in text
- DataMemory=80M # Memory allocated to data storage
- IndexMemory=18M # Memory allocated to index storage
- # For DataMemory and IndexMemory, we have used the
- # default values. Since the "world" database takes up
- # only about 500KB, this should be more than enough for
- # this example Cluster setup.
- [ndb_mgmd]
- # Management process options:
- HostName=192.168.22.238 # Hostname or IP address of management node
- DataDir=C:/mysql/bin/cluster-logs # Directory for management node log files
- [ndbd]
- # Options for data node "A":
- HostName=192.168.22.238 # Hostname or IP address
- [ndbd]
- # Options for data node "B":
- HostName=192.168.22.240 # Hostname or IP address
- [mysqld]
- # SQL node A options:
- HostName=192.168.22.238 # Hostname or IP address
- [mysqld]
- # SQL node B options:
- HostName=192.168.22.240 # Hostname or IP address
3、配置数据节点:
在配置数据节点(192.168.25.48、192.168.25.49)的计算机上的C:\Mysql\Bin目录下建立cluster-data文件夹,用来存放数据:SQL节点不用任何配置,至此,整个MySQL集群就搭建完成了。
将管理节点(192.168.22.238)电脑C:\mysql文件拷到192.168.22.240电脑的C盘
二、启动mysql集群
启动顺序:管理节点→数据节点→sql节点
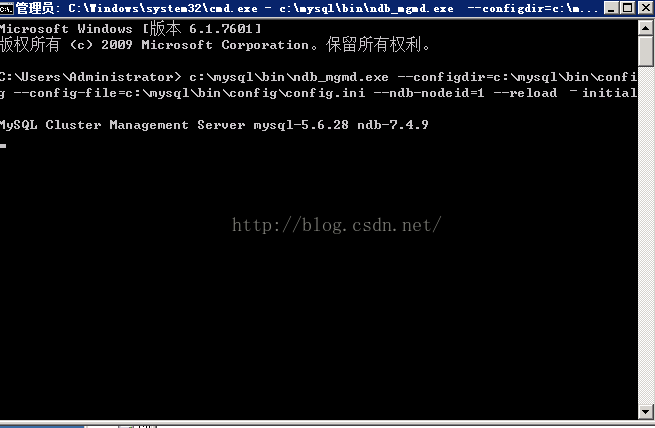
1、启动管理节点
在cmd中运行命令:
c:\mysql\bin\ndb_mgmd.exe --configdir=c:\mysql\bin\config --config-file=c:\mysql\bin\config\config.ini --ndb-nodeid=1 --reload –initial
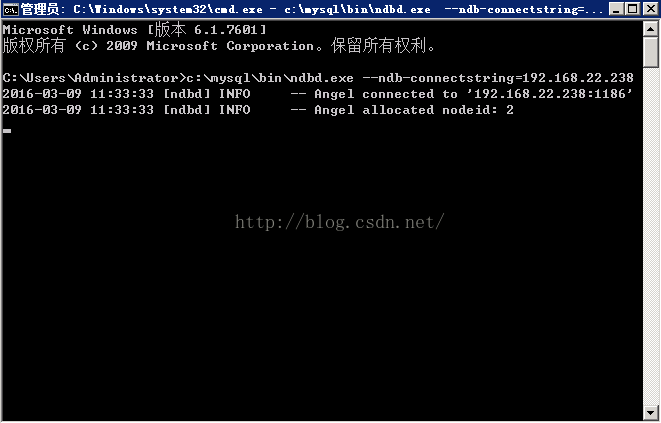
在cmd中运行如下命令:
c:\mysql\bin\ndbd.exe --ndb-connectstring=192.168.22.238
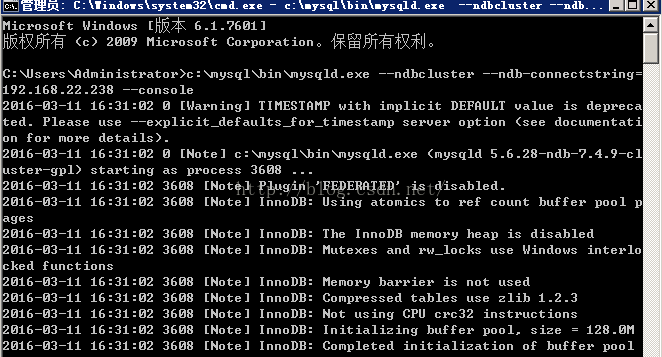
3、启动每个sql节点:
在cmd中运行如下命令:
c:\mysql\bin\mysqld.exe --ndbcluster --ndb-connectstring=192.168.22.238 --console
4、查看每个节点的状态
在cmd命令中运行:c:\mysql\bin\ndb_mgm,再执行“show”命令,可以查看到每个节点的连接状态:
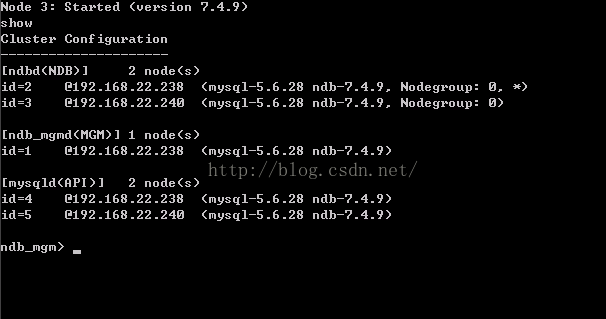
这就表明每个节点均连接正确。
【测试mysql集群】
1、在sql节点A建立数据库并插入数据:
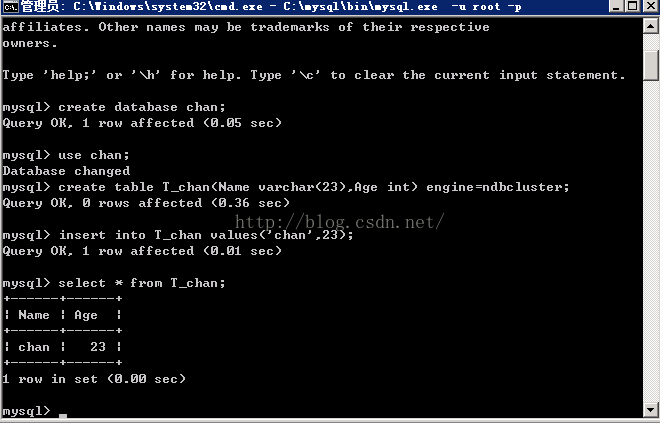
在sql节点A的计算机上(192.168.22.238)的cmd中运行C:\mysql\bin\mysql.exe -u root -p命令登录mysql,接下来需要输入密码时,密码默认为空(直接回车)。
·创建名为“chan”的数据库:
create database chan;
Create a table named "T_chan":
use chan;
create table T_chan(Name varchar(23),Age int) engine=ndbcluster;
Note that engine=ndbcluster must be added after the table building statement. Why should it be added? It will be introduced in the next blog.
Insert data:
insert into T_chan values('chan',23);
·Query data:
select * from T_chan;
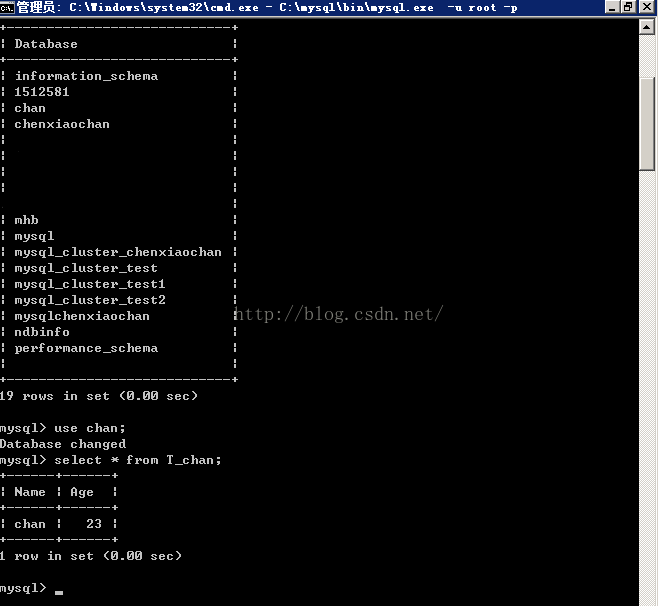
2. Found data in sql node B
Run the C:\mysql\bin\mysql.exe -u root -p command in cmd on the computer of sql node B (192.168.22.240) to log in to mysql.
Execute the show databases; command to view the newly created database on sql node A;
execute
use chan;
select * from T_chan;
can query the data inserted in sql node A.
At this point, the mysql cluster construction has been completed. I also encountered some problems during the construction process. In the next blog, I will share the problems I encountered with you.
【Summarize】
What we do now in the MySQL cluster is that when a data node goes down, it will not affect the operation of the entire cluster, and the data will not be lost, ensuring the integrity of the data. There were some difficulties when I first built it, but these are small things. After reading the above steps, do you feel that MySQL is very simple to build, what problems will you encounter when you are proficient in building, and how to solve them, you can easily get it done.