Building a fully distributed cluster environment for hadoop cluster environment (2)
We introduced the construction of the pseudo-distributed cluster environment of hadoop in the previous article, the construction of a pseudo-distributed cluster environment for hadoop cluster environment (1) .
Fully distributed cluster refers to the deployment of hadoop services on multiple machines. Below I take three machines (server1, server2, server3) as an example. Build a fully distributed cluster environment.
1. Linux machine environment configuration
First create a virtual machine server1 using the VMware virtual machine. Configure the basic environment of the virtual machine.
1.1 Modify the hostname
Switch to root user
su rootedit /etc/sysconfig/networkfile
vim /etc/sysconfig/network

NETWORKING=yes
HOSTNAME=server1    # 主机名
1.2 Modify ip
edit /etc/sysconfig/network-scripts/ifcfg-eno16777736file
vim /etc/sysconfig/network-scripts/ifcfg-eno16777736The modifications are as follows:
TYPE=Ethernet
DEFROUTE=yes # 默认设置yes
BOOTPROTO=static    # 设置static,静态分配
IPV4_FAILURE_FATAL=no
IPV6INIT=yes
IPV6_AUTOCONF=yes
IPV6_DEFROUTE=yes
IPV6_FAILURE_FATAL=no
NAME=eno16777736
UUID=2ce59a48-ae92-483b-a73c-7844147b6ba0
HWADDR=00:0C:29:21:8D:08
PREFIX0=24
ONBOOT=yes  # 开始机自动网络
IPADDR=192.168.108.99   # 设置IP
NETMASK=255.255.255.0   #  子网掩码
GATEWAY0=192.168.108.2 # 设置网关
DNS1=192.168.108.2
1.3 Modify the hostname and ip mapping relationship
edit /etc/hostsfile
# 编辑/etc/hosts文件
vim /etc/hosts

192.168.108.11 server1
edit /etc/hostnamefile
vim /etc/hostname

zhang
1.4 Turn off the firewall
chkconfig iptables off1.5 Add root operation permission to hadoop user
Modify /etc/sudoerspermissions
chmod u+w /etc/sudoersEdit /etc/sudoersthe file and add root operation permissions to the hadoop user
# hadoop 用户名
hadoop ALL=(root) NOPASSWD:ALL
1.6 Close the linux graphical interface
Versions below centos 7:
vim /etc/inittab

id:5:initdefault:
改为
id:3:initdefault:
centos 7.x version:
- remove existing symlinks
rm /etc/systemd/system/default.target- Default level is converted to 3
# 默认级别转换为3(文本模式)
ln -sf /lib/systemd/system/multi-user.target /etc/systemd/system/default.target

# 默认级别转换为5(图形模式)
ln -sf /lib/systemd/system/graphical.target /etc/systemd/system/default.target- reboot
rebootIf you need to switch the graphical interface to execute the command:startx
2, java environment construction
2.1 Delete the built-in jdk
Execute to
java -versionview the java environment, if not, it can be ignoredCheck the built-in jdk,
rpm -qa | grep jdkDelete the built-in jdk,
yum -y remove java-1.7.0-openjdk-xxxx
2.2 Upload jdk compressed package
Through the Windows client, upload the jdk compressed package. (using the git command window)
scp D:/dsoftmanager/jdk-8u151-linux-x64.tar.gz root@192.168.108.11:/home/hadoop2.3 Unzip jdk, configure environment variables
Create /java directory,
sudo mkdir /javaCopy the uploaded jdk archive to the
/javadirectorysudo cp /home/hadoop/jdk-8u151-linux-x64.tar.gz /javaUnzip the compressed package
# 切换到/java目录

cd /java


# 解压jdk

sudo tar -zxvf jdk-8u151-linux-x64.tar.gz
Configure java environment variables
# 编辑/etc/profile文件

vim /etc/profile


# java环境变量

JAVA_HOME=/java/jdk1.8.0_151
PATH=$PATH:$JAVA_HOME/bin:/usr/bin:/usr/sbin:/bin:/sbin:/usr/X11R6/bin
CLASSPATH=.:$JAVA_HOME/lib/tools.jar:$JAVA_HOME/lib/dt.jar
export  JAVA_HOME  PATH  CLASSPATH
After restarting, the test
java -versionappears as follows, indicating success
java version "1.8.0_151"
Java(TM) SE Runtime Environment (build 1.8.0_151-b12)
Java HotSpot(TM) 64-Bit Server VM (build 25.151-b12, mixed mode)
3. Clone the machine to modify the basic configuration of Linux
3.1 Clone machine server2, server3
Regarding VMware virtual machine cloning, screenshots are not shown here. When cloning, choose full clone.
3.2 Modify the configuration of server2 and server3
The following files of server2 and server3 need to be modified:
- 3.2.1 Modification
/etc/sysconfig/network
vim /etc/sysconfig/network

# server2机器HOSTNAME改为server2,server3机器HOSTNAME改为server3
HOSTNAME=server2- 3.2.2 Modification
/etc/sysconfig/network-scripts/ifcfg-eno16777736
vim /etc/sysconfig/network-scripts/ifcfg-eno16777736

# server2机器将ip改为192.168.108.12,server3的ip改为192.168.108.13
IPADDR=192.168.108.12
When cloning, the network card information will also be cloned, so you need to modify the mac value of the network card.
The mac value /etc/sysconfig/network--scripts/ifcfg-eno16777736in the modification . HWADDRThe mac value is unique per machine.
The mac value is obtained, as shown in the figure:
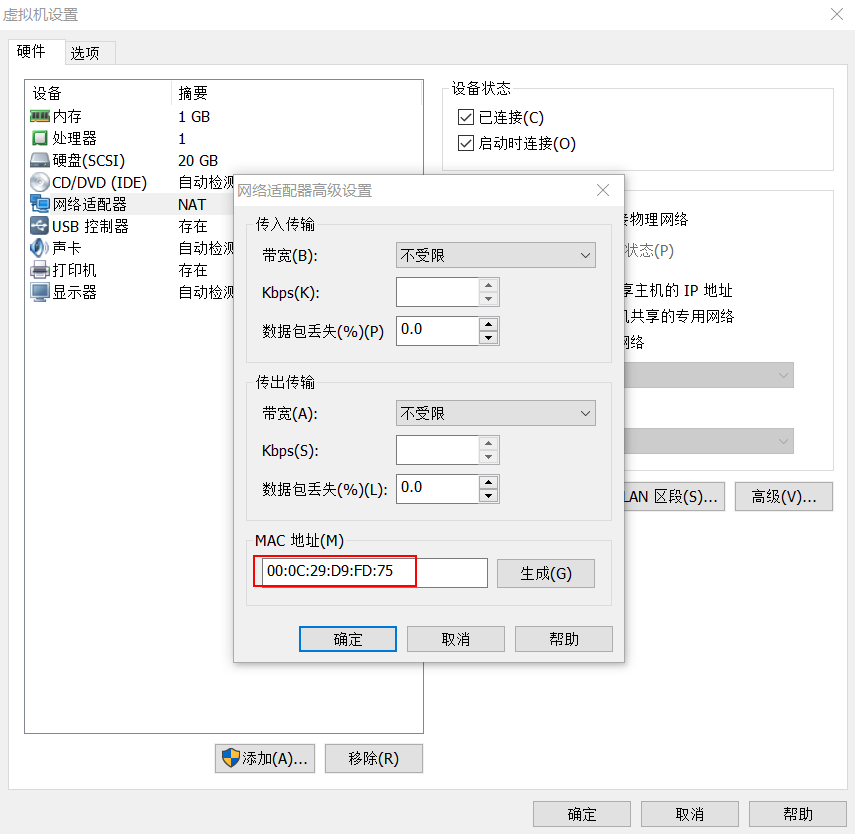
Specific reference: Solution for eth0 cannot be started after Linux virtual machine is copied
- 3.2.3 Modification
/etc/hostname
# server2机器改为server2,server3机器改为server3
server2- 3.2.4 Modification
/etc/hosts
Change server1, server2, server3 /etc/hoststo
192.168.108.11 server1
192.168.108.12 server2
192.168.108.13 server3- 3.2.5 After restarting, check each other
ping, and it will workpingfine
ping 192.168.108.11
ping 192.168.108.12
ping 192.168.108.13
4. SSH secret login
The following operations need to be performed on each machine
4.1 Generate public key and private key on server1, server2 and server3 respectively
Execute the ssh-keygen -t rsacommand, just press Enter
ssh-keygen -t rsa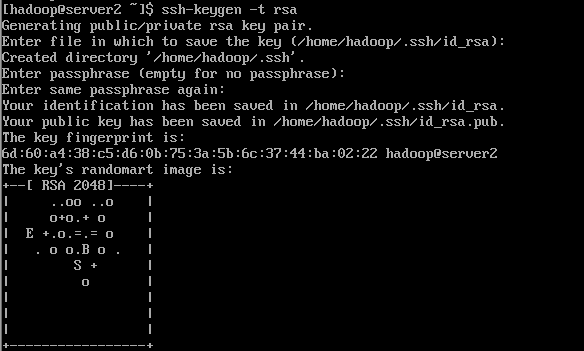
4.2 Send the generated public key to other hosts
ssh-copy-id server1
ssh-copy-id server2
ssh-copy-id server3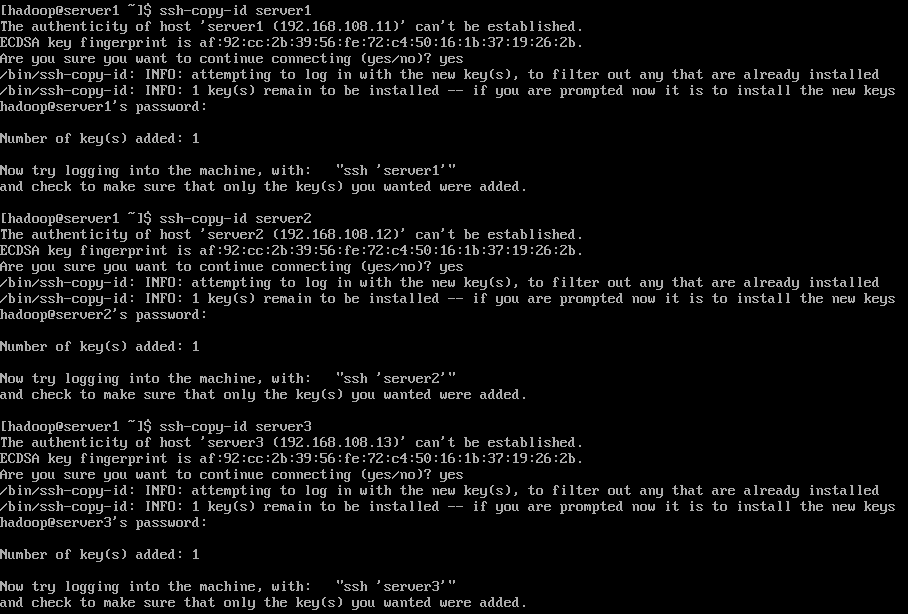
4.3 Mutual to ssh 主机名switch
ssh server1

ssh server2

ssh server3
If you don't need to enter a password, it means that you have successfully logged in without a secret.
5. Hadoop compression package decompression and environment variable configuration
For a fully distributed cluster of hadoop, server1the machine configures the hadoop environment first, and scpsynchronizes it server2with the server3machine through commands.
5.1 Upload the compressed package of hadoop
scp d:/dsoftmanager/hadoop-2.7.5.tar.gz hadoop@192.168.108.11:/home/hadoop5.2 Compress hadoop package
- 5.2.1 Create a
/hadoopdirectory
sudo mkdir /hadoop- 5.2.2 Copy the hadoop compressed package to the
/hadoopdirectory
sudo cp /home/hadoop/hadoop-2.7.5.tar.gz /hadoop- 5.2.3 Decompress the hadoop package
# 进入/hadoop目录
cd /hadoop

# 解压hadoop包
sudo tar -zxvf hadoop-2.7.5.tar.gz
5.3 Configure hadoop environment variables
Open the /etc/profile file and configure the hadoop environment variables
sudo vim /etc/profile


export HADOOP_HOME=/hadoop/hadoop-2.7.5
export PATH=$PATH:$JAVA_HOME/bin:$HADOOP_HOME/bin:$HADOOP_HOME/sbin
5.4 Restart and test hadoop environment variables
echo ${HADOOP_HOME}Output: /hadoop/hadoop2.7.5
6. Basic environment configuration of hadoop service
Before configuring the environment, we need to assign hadoop services to server1, server2, and server3.
The distribution is as follows:
| server1 | server2 | server3 |
|---|---|---|
| intended | ||
| datanode | datanode | datanode |
| secondarynode | ||
| resourcemanager | ||
| nodemanager | nodemanager | nodemanager |
| historyserver |
6.1 Permission setting of hadoop development directory
Change the current directory to the root directory /. Execute ls -ldirectory.
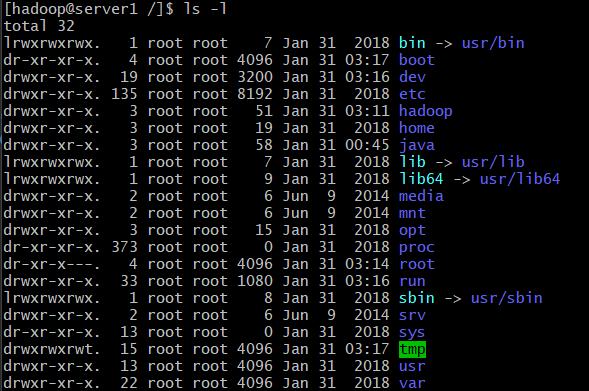
We can see that the hadoop directory is root user permissions. We need to change permissions to hadoop user.
# 更改/hadoop目录权限
sudo chown -R hadoop:hadoop /hadoop
6.2 hadoop-env.sh file configuration
Modify the JAVA_HOME environment of hadoop-env.sh
# 将目录切换到${HADOOP_HOME}目录下
cd ${HADOOP_HOME}

# 打开etc/hadoop/hadoop-env.sh文件
sudo vim etc/hadoop/hadoop-env.sh

# 修改JAVA_HOME路径
JAVA_HOME=/java/jdk1.8.0_151
6.3 core-site.xml file configuration
Create the data/tmp directory under the ${HADOOP_HOME} directory
# 创建data目录
mkdir data

# 切换到data目录
cd data

# 创建tmp目录
mkdir tmp
Modify the core-site.xml file
# 进入${HADOOP_HOME}
cd ${HADOOP_HOME}

# 打开 etc/hadoop/core-site.xml文件
sudo vim etc/hadoop/core-site.xml
Modifications:
<configuration>
    <property>
        <name>fs.defaultFS</name>
        <value>hdfs://server1:8020</value>
    </property>
    <property>
        <name>hadoop.tmp.dir</name>
        <value>/hadoop/hadoop-2.7.5/data/tmp</value>
    </property>
</configuration>
6.4 hdfs-site.xml file configuration
Modify etc/hadoop/hdfs-site.xml file
sudo vim etc/hadoop/hdfs-site.xmlModifications:
<configuration>
    <!-- 指定HDFS副本的数量 -->
    <property>
        <name>dfs.replication</name>
        <value>3</value>
    </property>
    <property>
        <!--指定secondaryNameNode的地址和端口号-->
        <name>dfs.namenode.secondary.http-address</name>
        <value>server2:50090</value>
    </property>
</configuration>
6.5 Configuring slaves
Open slaves file
sudo vim etc/hadoop/slavesThe modifications are as follows:
server1
server2
server3
6.5 yarn-site.xml file configuration
Open yarn-site.xml file
sudo vim etc/hadoop/yarn-site.xmlModifications:
<configuration>
    <property>
        <name>yarn.nodemanager.aux-services</name>
        <value>mapreduce_shuffle</value>
    </property>
    <property>
        <!--resourcemanager服务指定地址-->
        <name>yarn.resourcemanager.hostname</name>
        <value>server1</value>
    </property>
    <property>
        <!--启动日志聚集功能-->
        <name>yarn.log-aggregation-enable</name>
        <value>true</value>
    </property>
    <property>
        <!--日志保存时间-->
        <name>yarn.log-aggregation.retain-seconds</name>
        <value>106800</value>
    </property>
</configuration>
6.6 mapred-site.xml file configuration
Copy a mapred-site.xml from mapred-site.xml.template
sudo cp etc/hadoop/mapred-site.xml.template etc/hadoop/mapred-site.xmlModify the mapred-site.xml file
sudo vim etc/hadoop/mapred-site.xmlModifications:
<configuration>
    <property>
        <name>mapreduce.framework.name</name>
        <value>yarn</value>
    </property>
    <property>
        <!--historyserver地址为server3-->
        <name>mapreduce.jobhistory.address</name>
        <value>server3:10020</value>
    </property>
    <property>
        <name>mapreduce.jobhistory.webapp.address</name>
        <value>server3:19888</value>
    </property>
</configuration>
7 Transfer the /hadoop directory to the server2 and server3 machines via the scp command
7.1 Create a /hadoop directory on the server2 and server3 machines respectively
sudo mkdir /hadoop7.2 Modify /hadoop user permissions
sudo chown -R hadoop:hadoop /hadoop7.3 The scp command sends the /hadoop/hadoop2.7.5 directory of server1 to the /hadoop directory of server2 and server3
# 将server1的/hadoop/hadoop2.7.5通过scp发送到server2的/hadoop目录
scp /hadoop/hadoop2.7.5 server2:/hadoop

scp /hadoop/hadoop2.7.5 server3:/hadoop
7.4 Configure hadoop environment variables for server2 and server3
Hadoop environment configuration of server2 and server3
sudo vim /etc/profile

export HADOOP_HOME=/hadoop/hadoop-2.7.5
export PATH=$PATH:$JAVA_HOME/bin:$HADOOP_HOME/bin:$HADOOP_HOME/sbin
8. Format the namenode
bin/hdfs namenode -format9. The hadoop service starts
9.1 server1 starts the dfs service
sbin/start-dfs.sh9.2 server1 starts yarn service
sbin/start-yarn.sh9.3 Start the historyserver of server3
sbin/mr-jobhistory-daemon.sh start historyserver9, hadoop's wordcount case test
9.1 Create a wc.input file
In the /home/hadoop directory, create a wc.input file
vim /home/hadoop/wc.input9.2 Create the input directory /wordcounttest/input in HDFS
bin/hdfs dfs -mkdir -p /wordcounttest/input9.3 Upload the wc.inpt file to hdfs
bin/hdfs dfs -put /home/hadoop/wc.input /wordcounttest/input9.4 Run the demo of wordcount
bin/yarn jar share/hadoop/mapreduce/hadoop-mapreduce-examples-2.7.5.jar wordcount /wordcounttest/input /wordcounttest/output

9.5 Viewing the running results
- 9.5.1 View output directory
bin/hdfs dfs -ls /wordcounttest/output/result:
Found 2 items
-rw-r--r--   3 hadoop supergroup          0 2018-01-31 06:33 /wordcounttest/output/_SUCCESS
-rw-r--r-- 3 hadoop supergroup 140 2018-01-31 06:33 /wordcounttest/output/part-r-00000- 9.5.2 Viewing output results
bin/hdfs dfs -cat /wordcounttest/output/part-r-00000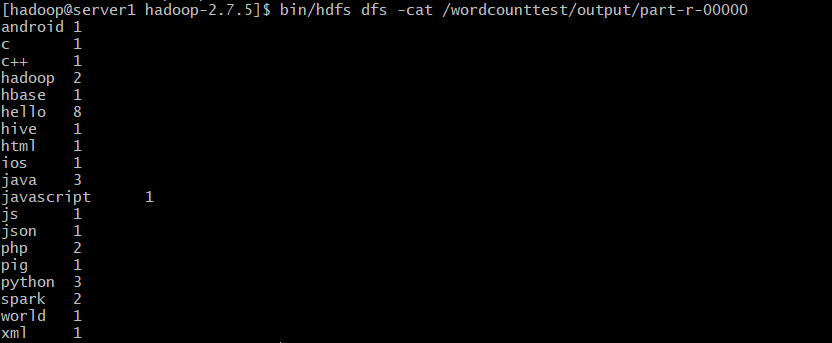
10. Turn off the service
10.1 Close the dfs service
sbin/stop-dfs.sh10.2 Shut down the yarn service
sbin/stop-yarn.sh10.3 Shut down the historyserver service
sbin/mr-jobhistory-daemon.sh stop historyserver10.4 Shut down all services
sbin/stop-all.sh