1. Introduction to Linux
1. Overview of Linux
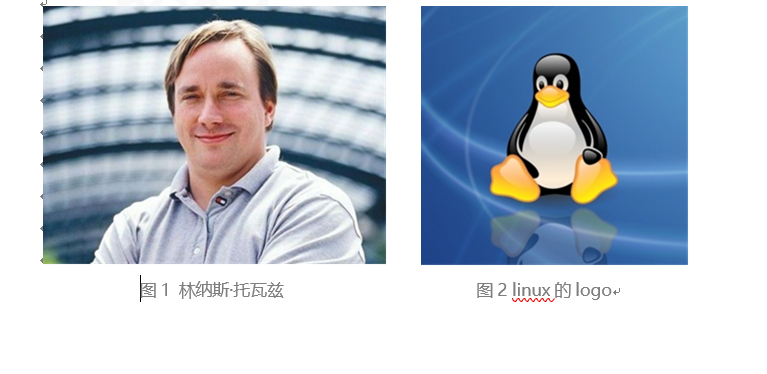
Linux is an open source and free operating system based on Unix. Because of the stability and security of the system, it has almost become the best system environment for program code to run. Linux was originally developed by Linus Torvalds. Due to the open source code, thousands of different Linux systems have been derived.
The Linux system is widely used, not only can it run the program code we write for a long time, but also can be installed in various computer hardware devices, such as mobile phones, tablet computers, routers, etc. Especially mentioned here, we know that the bottom layer of the Android program runs on the linux system.
2. Classification of Linux
(1) Linux is basically divided into two directions according to different market demands:
1) Graphical interface version: focus on user experience, similar to the window operating system, but the current maturity is not enough
2) Server version: There is no good-looking interface, so the operating system is operated by entering commands in the console window, similar to DOS, which is the best choice for our assumption of the server
(2) Linux is divided into two types according to the native degree:
1) Kernel version: The version number of the system kernel developed and maintained by the kernel team under the leadership of Linus
2) Release version: a version re-released by some organizations or companies for secondary development on the basis of the kernel version
(3) Different Linux distributions can be divided into n kinds:

Second, the installation of Linux
1. Virtual machine installation
Because Linux is also a system, it is essentially no different from the Window of our computer, so if we want to learn Linux, we must first replace the Window system of our computer with the Linux system, or install dual systems on our computer, does it sound terrible? In fact, we can install a software on our computer. This soft armor can simulate one or more virtual computer machines. This is a virtual machine.
There are two commonly used virtualizers:
VMware's virtual machine software, powerful, paid products
VitrualBox virtual machine software Oracle's virtual machine software, free commodity
2. Installation of CentOS
CentOS is a Linux distribution. It is currently the main version used for application server systems in enterprises. The installation of CentOS is actually to install the system into the VMware virtual machine software, so that the VMware virtual machine software simulates a Linux system. Computer. For CentOS6.5 installation, please refer to "CentOS Installation Manual"
Third, the basic commands of Linux
The server version of Linux is installed, but there is no graphical interface. We can only go to the operating system through the console. We have to use Linux commands similar to DOS commands to go to the operating system. Then we will learn Linux commands. There are hundreds of Linux commands, and the courses cannot be covered one by one, and there is no need to cover them one by one. According to the needs of our programmers in their daily work, the following types are summarized for learning.
1. Directory switching command
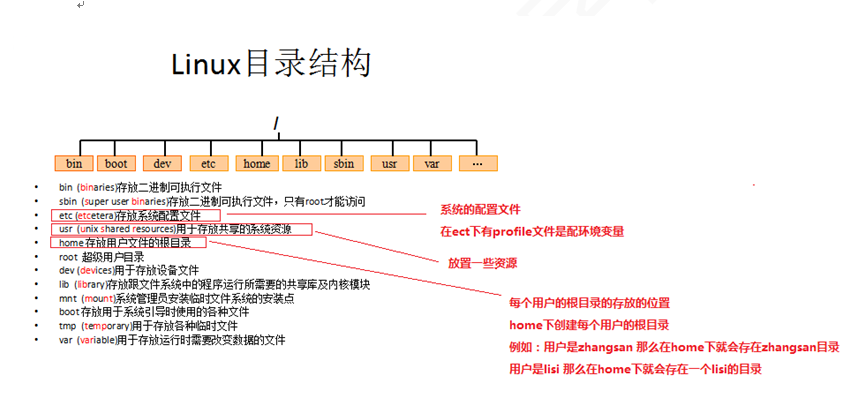
In the window, you can switch the directory you want to enter through the graphical interface and the mouse, but Linux must switch the directory through the cd command. But before learning the cd command, it is necessary for us to distinguish the directory structure of Linux ( detailed description of the Linux directory structure )
cd usr switch to the usr directory in this directory
cd ../ switch to the previous directory
cd / changes to the system root directory
cd ~ Change to user home directory
cd - change to the previous directory
2. Directory operation commands (add, delete, modify, check)
(1) Add directory operations (add)
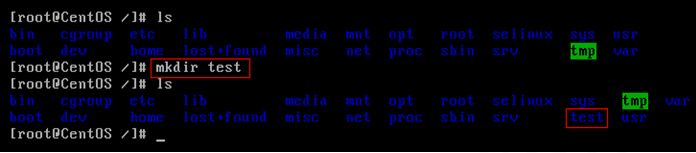
Command: mkdir directory name
Example: mkdir test in the root directory / will generate a test directory in the root directory /
(2) View the catalog (check)
Command: ls [-al] parent directory
Example: Use ls in the root directory /, you can see all the directories and files in this directory

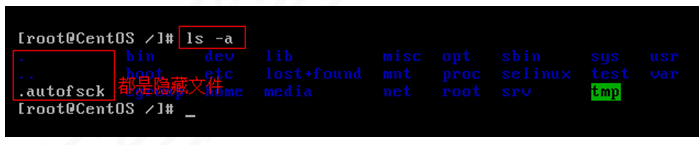
Example: Use ls -a under the root directory /, you can see all files and directories in this directory, including hidden ones
Example: Use ls -l in the root directory /, you can see the detailed information of all directories and files in this directory

Note: ls -l can be abbreviated to ll
(3) Find the directory (check)
Command: find directory arguments
Example: Find directories (files) related to test under /root find /root -name 'test*'
(4) Modify the name of the directory (change)
Command: mv directory name new directory name
Example: There is an oldTest directory in the test directory, use the mv oldTest newTest command to modify

Note: The syntax of mv can not only rename directories but also rename various files, compressed packages, etc.
(5) Move the location of the directory---cut (change)
Command: mv directory name new location of directory
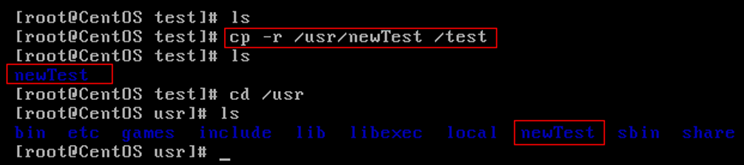
Example: Cut the newTest directory to /usr under test, use mv newTest /usr

Note: The mv syntax can not only cut directories, but also cut files and compressed packages.
(6) Copy directory (change)
Command: cp -r directory name directory copy destination -----r stands for recursive copy
Example: Copy newTest under /usr to test under the root directory, use cp -r /usr/newTest /test
Note: The cp command can copy not only directories but also files, compressed packages, etc., without writing -r recursion when copying files and compressed packages
(7) Delete directory (delete)
Command: rm [-rf] directory
Example: delete newTest under /usr, enter /usr and use rm -r newTest

Example: To delete newTest under /test without asking for forced deletion, use rm -rf newTest under /test

Note: rm can not only delete directories, but also other files or compressed packages. In order to enhance everyone's memory, no matter delete any directory or file, use rm -rf directory/file/compressed package directly ( Bah, if you really do this, It's time to run away )
3. File operation commands (add, delete, modify, check)
(1) Creation of files (increase)
Command: touch filename ----- empty file
Example: Create an empty file touch aaa.txt in the test directory

(2) Viewing (checking) of documents
Command: cat/more/less/tail file
Example: Use cat to view the /etc/sudo.conf file, only the last screen can be displayed
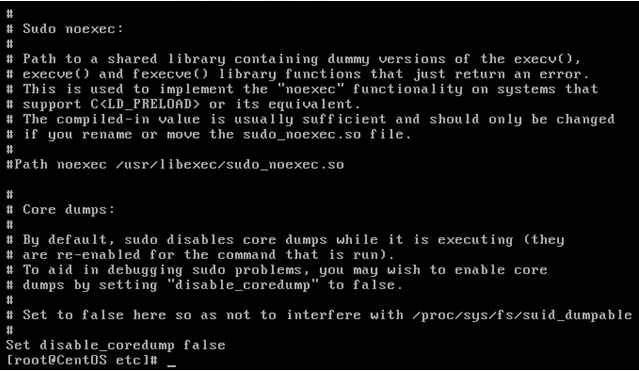
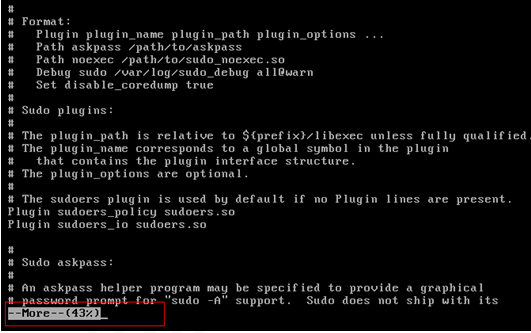
Example: Use more to view the /etc/sudo.conf file, the percentage can be displayed, carriage return can go to the next line, space can go to the next page, q can exit the view
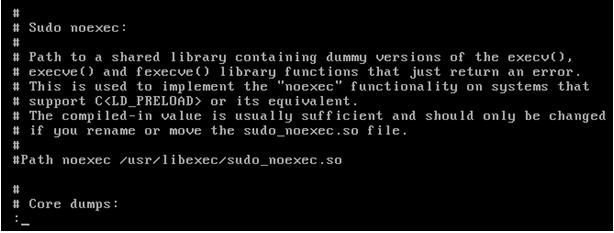
Example: use less to view the /etc/sudo.conf file, use PgUp and PgDn on the keyboard to page up and down, q to end the view
Example: Use tail -10 to view the last 10 lines of the /etc/sudo.conf file, Ctrl+C ends

Note: The command tail -f file can dynamically monitor a file, such as the log file of tomcat, the log will change with the running of the program, you can use tail -f catalina-2016-11-11.log to monitor the file Variety
(3) Modify the content of the file (modify)
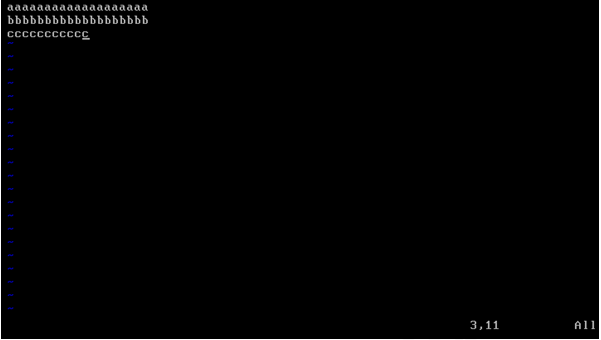
Command: vim file
Example: Edit the aaa.txt file under /test, use vim aaa.txt

But it cannot be edited at this time, because it is in command mode at this time, click i/a/o on the keyboard to enter the editing mode, and you can edit the file
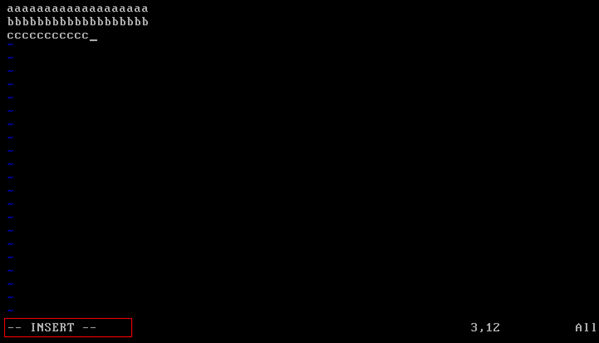
After editing, press Esc to return to command mode
At this time, although the file has been edited, but it has not been saved, you need to enter a colon: enter the bottom line mode, enter wq in the bottom line mode to write the content and exit, that is, save; enter q! to force quit without saving.

Summarize:
The vim editor is a powerful component in Linux and an enhanced version of the vi editor. There are many commands and shortcuts for the vim editor, but they are not explained here, and you don’t need to study them thoroughly. Use vim to edit and modify files. The method will basically be able to use it. Attachment: "Introduction to vi usage" and "vim command collection"
About the use of vim:
In actual development, the main function of using the vim editor is to modify the configuration file
vim file------>enter file----->command mode------>press i to enter edit mode----->edit file------->press Esc to enter Bottom line mode -----> input: wq/q!
(4) Delete file (delete)
Delete in the same directory: memorize the rm -rf file (recommended or -r)
4. Commands for compressing files
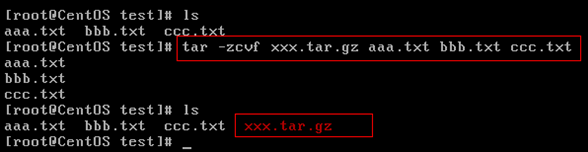
(1) Package and compress the file
Package files in Linux generally end with .tar, and compressed commands generally end with .gz.
In general, packaging and compression are carried out together, and the suffix name of the packaged and compressed file is generally .tar.gz.
Command: tar -zcvf pack the compressed file name to pack the compressed file
Where: z: call the gzip compression command to compress
c: package file
v: show the running process
f: Specify the file name
Example: Package and compress all files under /test The compressed package name is xxx.tar.gz
tar -zcvf xxx.tar.gz aaa.txt bbb.txt ccc.txt
或:tar -zcvf xxx.tar.gz /test/*
(2) Decompress the compressed package ( key )
Command: tar [-xvf] compress file
Among them: x: represents decompression
Example: Extract xxx.tar.gz under /test to the current directory
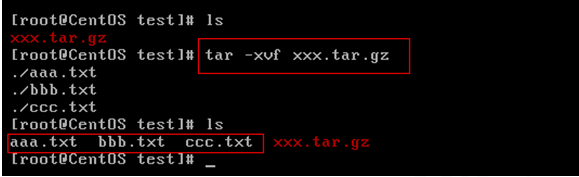
tar -xvf xxx.tar.gz
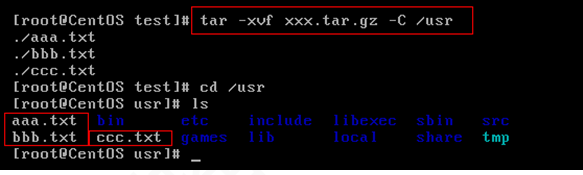
Example: Extract xxx.tar.gz under /test to the root directory /usr
tar -xvf xxx.tar.gz -C /usr------C represents the specified decompression location
5. other commands
(1) Display the current location
pwd

(2) Search command
Command: grep string to search file to search for
Example: Search the /usr/sudu.conf file for lines containing the string to
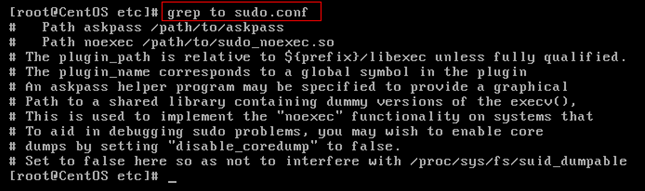
Example: Search the /usr/sudu.conf file for lines containing the string to to be highlighted

(3) Pipeline command
Command: | Use the output of the previous command as the input of this directory
Example: View all processes in the current system that include the system string

(4) View the process
Command: ps -ef
Example: View the processes running in the current system
(5) Kill the process
Command: kill -9 process pid
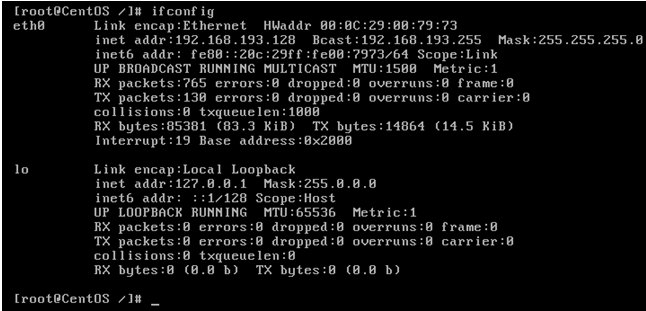
(6) Network communication commands
View the network card information of the current system: ifconfig
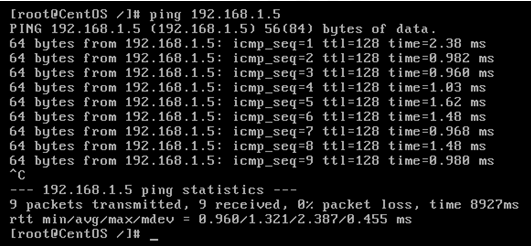
Check the connection to a machine: ping
View the port usage of the current system: netstat -an

6. Permission Commands in Linux
Permissions are an important concept in Linux. Each file/directory has permissions. Through the ls -l command, we can view the permissions of files or directories in a directory.
Example: ls -l in a random directory
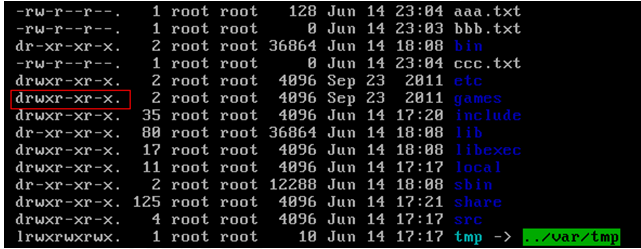
The information for the contents of the first column is explained as follows:
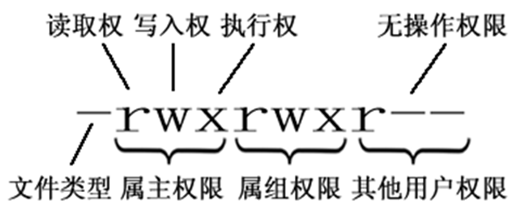
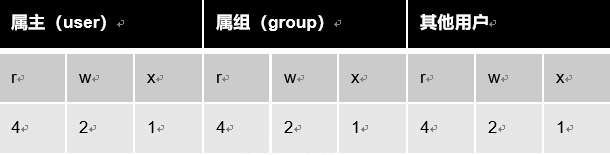
Owner: the authority of the person who created the file; group: the authority of other people in the group of the person who created the file
other users: other users
Type of file:
d: represents the directory
-: represents the file
l: stands for link (can be considered as a shortcut in window)
The last 9 digits are divided into 3 groups, each of which represents the authority of the owner, the authority of users in the same group as the current user, and the authority of other users.
r: indicates that the permission is readable, and r can also be represented by the number 4
w: indicates that the permission is writable, and w can also be represented by the number 2
x: represents the permission is executable, x can also be represented by the number 1
Command to modify file/directory permissions: chmod
Example: Modify the permissions of aaa.txt under /test so that the owner has all permissions, and the group where the owner belongs has read and write permissions.
Other users only have read permission
chmod u=rwx,g=rw,o=r aaa.txt
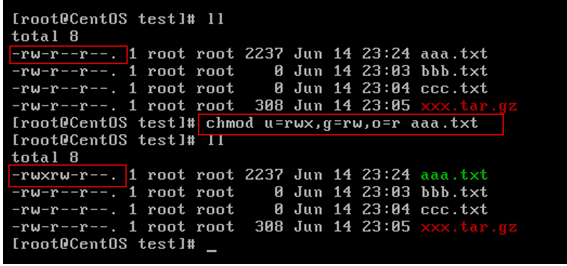
The above example can also be represented numerically:
chmod 764 aaa.txt
Fourth, the use of remote connection tools
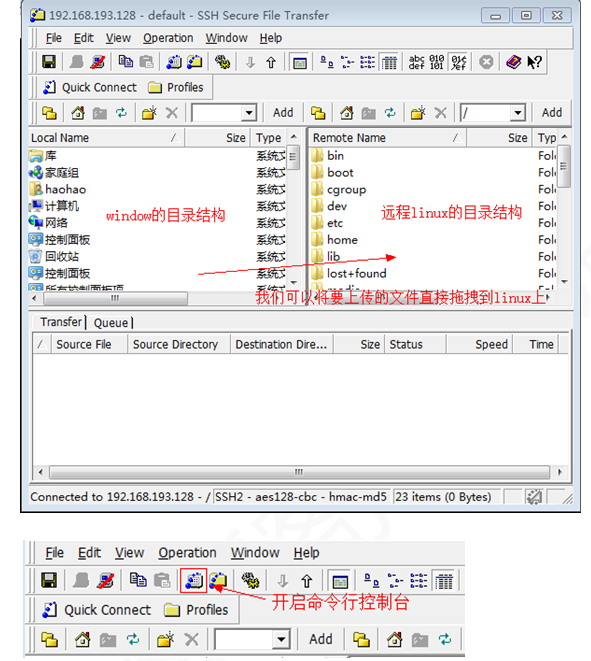
In actual development, Linux servers are located in other places. We need to connect to Linux remotely and operate it. There are many Linux remote operation tools. Commonly used in enterprises are Puttty, secureCRT, SSH Secure, etc. In the course, we use the SSH Secure tool for remote connection, which is a free remote tool that integrates a graphical interface and a command line window. The installation package is as follows:

After installation, two icons will appear:
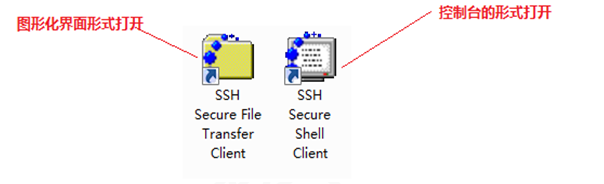
Click the GUI icon:
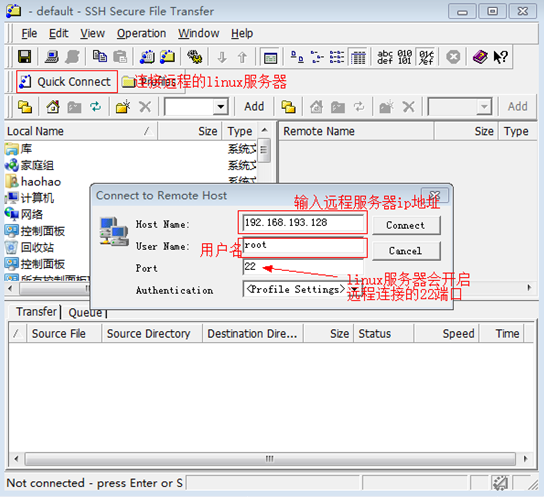

Enter the interface:
About the solution of garbled remote tools:
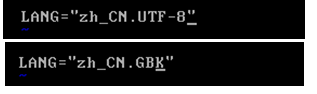
When using a remote tool to connect, if there are Chinese files or directories in Linux, garbled characters will appear when displayed. The reason is that the Linux encoding is UTF-8, and the default remote tool is the local encoding of the current system, which is GBK. So the solution is to unify the two codes and it is OK, but the SSH Secure tool cannot set the code, so the unified code is performed by modifying the linux system code.
There is an i18n file in the /etc/sysconfig directory of linux representing the system code of linux
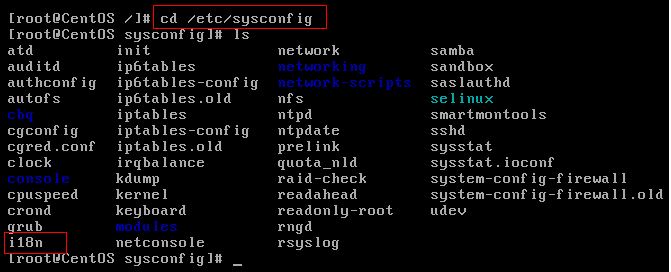
Modify it from UTF-8 to GBK to reproduce the connection to linux:
Five, Linux software installation
1. JDK installation
Note: rpm and software related commands are equivalent to the software assistant management software under windows
step:
1) Check whether the current Linux system has java installed
Type rpm -qa | grep java

2) Uninstall both openJDK
Enter rpm -e --nodeps software to uninstall

3) Upload jdk to linux
4) Install the plugin yum install glibc.i686 required for jdk to run (optional)
5) Unzip jdk to /usr/local (jdk folder will be created automatically)
6) Configure the jdk environment variable, open the /etc/profile configuration file, and copy the following configuration into it
#set java environment
JAVA_HOME=/usr/local/jdk1.7.0_71
CLASSPATH=.:$JAVA_HOME/lib.tools.jar
PATH=$JAVA_HOME/bin:$PATH
export JAVA_HOME CLASSPATH PATH
7) Reload the /etc/profile configuration file source /etc/profile
2. Mysql installation
step:
1) View the mysql that comes with CentOS
Type rpm -qa | grep mysql

2) Uninstall the built-in mysql

3) Upload Mysql to linux
4) Install mysql dependencies (optional)
yum -y install libaio.so.1 libgcc_s.so.1 libstdc++.so.6
yum update libstdc++-4.4.7-4.el6.x86_64
5) Unzip Mysql to the mysql directory under /usr/local/ (the mysql directory needs to be created manually)
cd /usr/local
mkdir mysql
tar -xvf MySQL-5.6.22-1.el6.i686.rpm-bundle.tar -C /usr/local/mysql
6) Install mysql under /usr/local/mysql
Install the server side: rpm -ivh MySQL-server-5.6.22-1.el6.i686.rpm
Install the client: rpm -ivh MySQL-client-5.6.22-1.el6.i686.rpm
7) Start mysql
service mysql start
8) Add mysql to the system service and set it to start on boot
Add to system service: chkconfig --add mysql
Autostart: chkconfig mysql on
9) Login to mysql
After mysql is installed, a temporary random password will be generated, which is stored in /root/.mysql_secret
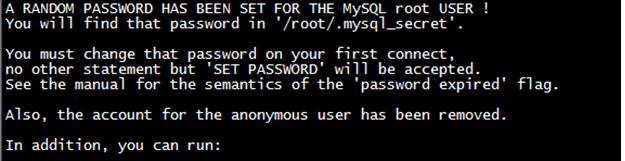
mysql –u root -p
10) Modify the password of mysql
set password = password('root');
11) Enable mysql remote login
By default, mysql does not support remote login to mysql for security reasons, so you need to set the permission to enable remote login to mysql
After logging in to mysql, enter the following command:
grant all privileges on *.* to 'root' @'%' identified by 'root';
flush privileges;
12) Open port 3306 for external access to Linux
/sbin/iptables -I INPUT -p tcp --dport 3306 -j ACCEPT
/etc/rc.d/init.d/iptables save --- permanently save changes to the firewall

3. Tomcat installation
step:
1) Upload Tomcat to linux
2) Unzip Tomcat to /usr/local
3) Open port 8080 for external access to Linux
/sbin/iptables -I INPUT -p tcp --dport 8080 -j ACCEPT
/etc/rc.d/init.d/iptables save
4) Start and close Tomcat
Enter tomcat's bin to start: ./startup.sh
Enter tomcat's bin to close: ./shutdown.sh