Linux-Basic Command 2-2
- 1. Find the directory where the command file is stored-which
- Two, find a file or directory-find
- Three, Linux directory structure tree directory structure root directory
- Four, view the content of the file
- Five, statistical file content-wc command
- Six, retrieve and filter file content-grep command
- Seven, compression commands-gzip, bzip2 commands
- Eight, archive command-tar command
- Nine, text editor -vi (m) command
1. Find the directory where the command file is stored-which
- The search scope is determined by the environment variable PATH (echo $PATH)
which command|program name###By default, when the first target is found, the search will not continue
or the which -a command|program name###Search in all search paths - Example
which ls
which history
uses which to find internal commands, the corresponding program will not be found

Two, find a file or directory-find
-
Recursively, according to the target's name, type, size and other attributes to perform a fine search.
find[Search range][Search condition expression]
Search range, find the directory location of the file or subdirectory
Find the condition expression, find the condition type -
Use the find command to achieve multiple search conditions
. Use the logical operator
-a to indicate and (and)
-o to indicate or (or) between expressions.
Example: find /boot -size +1024k -a -name "vmlize"
find /etc /sysconfig/network

-
Common search condition types
| Lookup type | Keyword | Description |
|---|---|---|
| Find by name | -name | Search according to the name of the target file, allowing the use of "*" and "?" wildcards to search according to the size of the target file |
| Find by file size | -size | Generally use the "+" and "-" signs to set the size exceeding or smaller than the specified size as the search condition. Commonly used capacity units include kB (note that k is lowercase), MB, GB |
| Find by file owner | -user | Search based on whether the file belongs to the target user |
| Search by file type | -type | Search according to the file type. File types include ordinary files (f), directories (d), block device files (b), character device files (c) and other block device files (b): devices that read data in blocks (hard disks) , Memory, CD-ROM) character device file (c): a device that reads data according to a single character (keyboard, mouse) |
- The exec usage of find-The exec
parameter is followed by a Linux command, which is terminated by a semicolon ";". Since the semicolon has different meanings in various systems, a backslash escape is added in front of the semicolon The character \".
{} represents the file name found by the previous find. The
-find command matches all the ordinary files in the current directory, and uses the ls-l command in the -exec option to list them
find ./ -type f- exec ls -l{};
Three, Linux directory structure tree directory structure root directory
●The starting point of all partitions, directories, files, etc.
●In the entire tree-shaped directory structure, an independent "/" is used to indicate
- Common subdirectories
/root
/bin
/boot
/dev
/etc
/home
/var
/usr /
sbin
| - | - |
|---|---|
| /root | Administrator's host (home) directory |
| /home | / xxx The home directory of ordinary users other than the root user |
| /bin | Store binary files, all user-executable commands. Actually a soft link, link to /usr/bin |
| /sbin | Store binary files, only administrative commands that can be executed by the administrator. Soft link to /usr/sbin |
| /boot | System kernel, startup file directory |
| /dev | Store device files (CD-ROM, hard disk, etc.) |
| /etc | Store configuration files for system programs and most applications (rpm, yum installation) |
| /where | Store files that can be changed, including various log files |
| /lib | Store the dynamic link shared library file of the system program (similar to the DLL file in windows>. Soft link to /usr/lib |
| /usr | Store system user tools and programs |
| /media | Removable media mount points, such as USB flash drives, CD-ROM drives, etc. |
| /proc | File to store the information of the mapping system |
| / mnt | Directory for temporarily mounting storage devices |
| /opt | The directory where the third-party application is installed |
| /tmp | Temporary files stored in the system |
Four, view the content of the file
1. The cat command
- Directly display the content of the entire file
cat [option] file name... - 示例
[root@localhost ~]# cat /etc/sysconfig/network

- Common options
-n, -b, -s
-n: number all output lines
-b: no number for blank lines
-s: replace all consecutive blank lines with one blank line
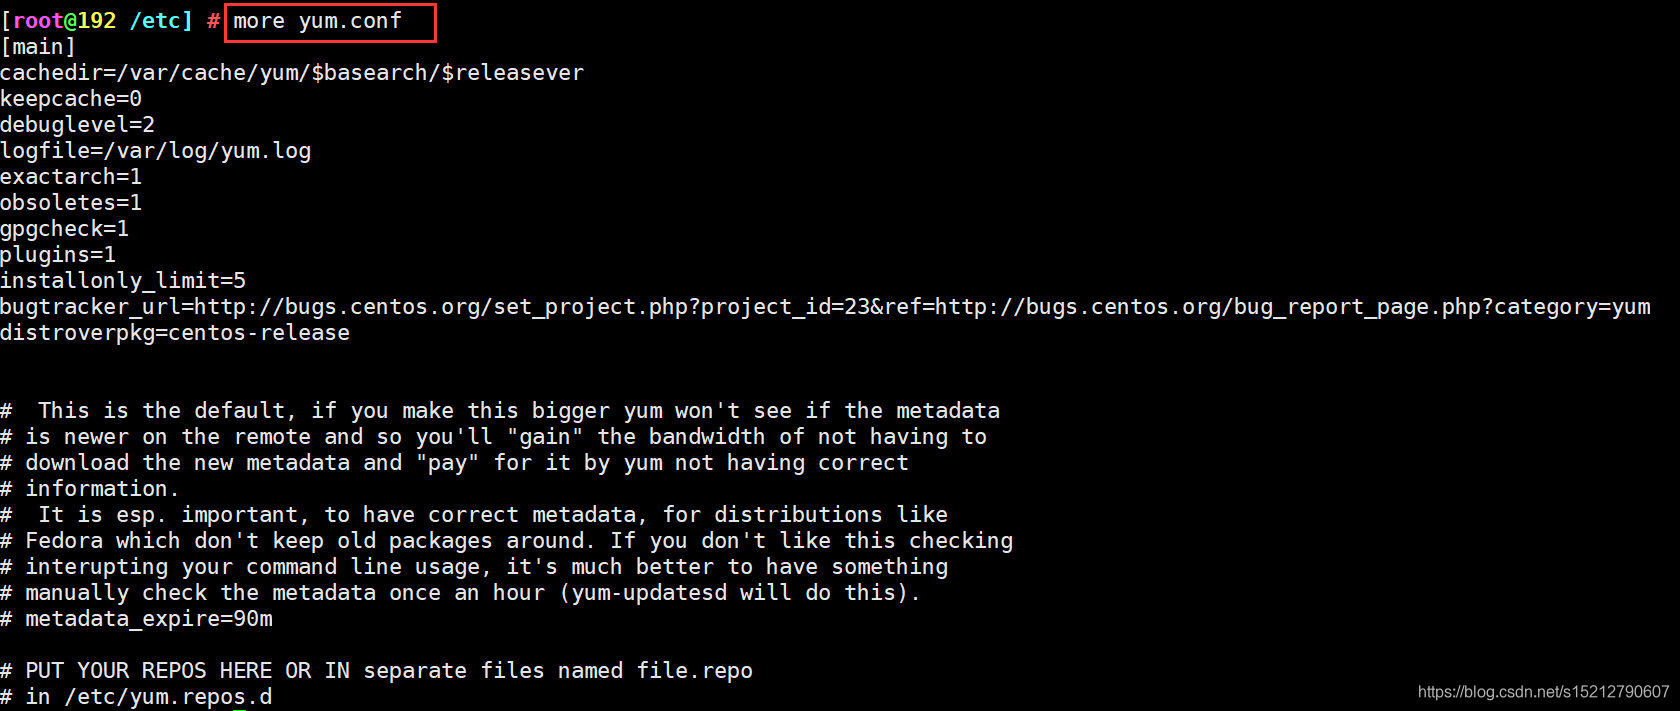
2. The more command
-
Full screen mode to display the contents of the file in pages
more[options]file name...
-
Interactive operation method
Press the Enter key to scroll down line by line
Press the space bar to scroll down one screen
Press the b key to scroll up one screen
Press the q key to exit When scrolling down
to the last page, it will automatically exit when
combined with pipeline operations (for example: ls- R /etc | more) cannot page up
3. Less command
-
Same as the more command, but with more extended functions.
[Options] File name...

-
Interactive operation method
Page Up page up, Page Down page down
Press "I" key to find content, "n" next content, "N" previous content
You can scroll up and down line by line through the and l direction keys.
Other functions and The more command is basically similar
. It will not automatically exit after
scrolling down to the last page . It can be paged up when used in combination with pipe operations.
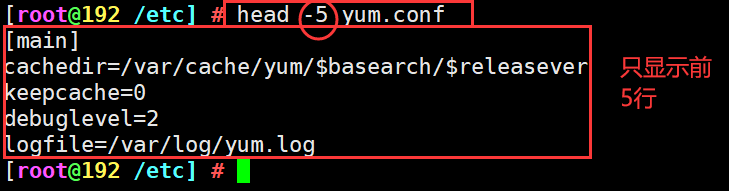
4. Head and tail commands
- head command
Purpose: view part of the content at the beginning of the file (default is 10 lines) head -n file name...
-n is the number of lines
head -5 yum.conf-display the first 5 lines of the file
- tail command
Purpose: view a small part of the content at the end of the file (default is 10 lines)
tail -n file name...
tail -f file name//track the dynamic update of the file tail content - Example:
tail -5f /etc/ yum.conf

Five, statistical file content-wc command
- Count the number of words in the file (Word Count) and other information
wc[Options].….Target file…

- Common command options
-I: count the number of lines
-w: count the number of words
-c: count the number of bytes
Note: The wc command without any options, the default is to use the three options -lwc at the same time
Six, retrieve and filter file content-grep command
- Find and display the line containing the specified character string in the file
grep[options]...Search criteria target file - Common command options
-i, -v, -n, -c, -e
-i: case insensitive when searching
-v: display all lines that do not contain matching text (reverse query, reverse matching)
-c: only output matches the total number of lines (number> could not be matched to the
-n: display the line number and matching lines
-e: achieve multiple search criteria to match the logical relationship or
a E: support for extended regular expressions, egrep command is equivalent to using
- o: Exact match, which means "match only".
- Search condition setting
The string to be searched is enclosed in double quotation marks.
"^..." means beginning with...,...S means ending with...
"^S" means blank line
Seven, compression commands-gzip, bzip2 commands
- Make compressed files, unzip compressed files (when gzip is used to compress a plain text file, the effect is very obvious, and the file size can be reduced by about 70%)
gzip [-9] file name...
bzip2 [-9] file name …
Compressed files in gzip -d .gz format and compressed files in
bzip2 -d .bz2 format - Common command options
-9, -d
Use the -9 option to increase the compression ratio
. The value of the command can be between 1 (the fastest compression speed, the lowest compression quality) to 9 (the slowest compression speed, the highest compression rate) Integer, its default value is 6 (compression speed and compression quality is more balanced value)
-d: used to decompress files that have been compressed, equivalent to using gunzip, bunzip2 commands
gunzip file name.gz
gzip -d file name.gz
bunzip2 File name.bz2
bzip2 -d File name.bz2 - Note the
gzip, bzip2 commands: The
default extension of the compressed file made by gzip is ".gz", the original file is no longer retained The
default extension of the compressed file made by bzip2 is ".bz2", the original file is no longer retained
Eight, archive command-tar command
- Make archive file, release archive file
tar [option]...archive file name source file or directory
tar "option]...archive file name "-C target directory] - Common command options
-c, -x, -C, -v, -f, -p, -t, -z, -j
●-c: create a package file in .tar format.
●x: Unzip the package file in .tar format.
-C: Specify the target folder to be released when decompressing.
●-f: indicates the use of archive files.
-P: Keep file and directory permissions when packaging.
-p: Keep the absolute path of files and directories when packaging.
-t: List the files in the package.
●-v: output detailed information (verbose)
●-j: call bzip2 program to compress or decompress.
●-z: Call gzip program to compress or decompress.
- 示例
cd /etc/
tar -jcvf usershow.tar.bz2 passwd shadow
tar jxvf usershow.tar.bz2 -c /opt/

Nine, text editor -vi (m) command
1. Function
- The role of the text editor
Create or modify text files
Maintain various configuration files in the Linux system
2. Command
- The most commonly used text editor in Linux
vi: the default text editor of UNIX-like operating systems
vim: vim is an enhanced version of the vi text editor (generally referred to as vi editor)
vi file name
vim file name
! vim returns to the last edit document
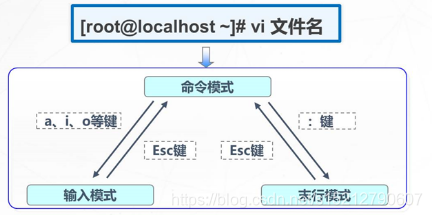
3. Three modes
- Working mode of vi editor
1. Three working modes
: Command mode, input mode, and last line mode
Command mode: After starting the vi editor, the command mode is entered by default. This mode mainly completes such as cursor movement, string search, and delete, copy, and paste file content, etc. Related operations.
Input mode: The main operation in this mode is to enter the content of the file, and you can modify the body of the text file or add new content. When in the input mode, the last line of the vi editor will display the status prompt message "–INSERT --".
Last line mode: In this mode, you can set the vi editing environment, save the file, exit the editor, and perform operations such as searching and replacing the content of the file. When in the last line mode, a colon ":" prompt appears on the last line of the vi editor.
2. The command mode is switched to the input mode:
a: Insert content after the current cursor position
i: Insert content before the current cursor position
o: Insert a new line content below the line
where the cursor is located O: Insert one above the line where the cursor is located New line content
A: Insert content
at the end of the current line I: Insert content at the beginning of the current line
3. Command mode
| Operation type | Operation keys | Features |
|---|---|---|
| Page move | Page Up key or ctrl+B | Scroll up a whole page of content |
| - | Page Down key or ctrl+F | Scroll down a whole page of content |
| Quick jump within the line | Home button or ^ button, number 0 button | Jump to the beginning of the line |
| - | End key or $ key | Jump to the end of the line |
| Quick jump between lines | 1G or gg#G, M | Go to line 1 of the file content |
| - | G | Jump to the last line of the file |
| - | #G | 跳转到文件中的第#行(其中“#"号用具体数字替换) |
| - | M | 跳转至当前页的中间位置 |
| 显示行号 | :set nu | 在编辑器中显示行号 |
| - | :set nonu | 取消行号显示 |
| 删除 | x或Delete键 | 册除光标处的单个字符 |
| - | dd | 册除当前光标所在行(有剪切功能) |
| - | #dd | 删除从光标处开始的#行内容 |
| - | d^ | 册删除当前光标之前到行首的所有宁符 |
| - | ds | 册除当前光标处到行尾的所有字符 |
| - | dw | 删除光标处的整个单词 |
| 替换字符 | R或shift+r | 替换当前光标处字符 |
| 复制 | yy | 复制当前行整行的内容到剪贴板 |
| - | #yy | 复制从光标处开始的#行内容 |
| 粘贴 | p | 粘贴到光标所在行之下 |
| - | P | 粘贴到光标所在行之上 |
| 查找 | /word | 从当前光标处开始向后进行查找字符串"word" |
| - | ?word | 从当前光标处开始向前进行查找 |
| - | n | 定位下一个匹配的被查找字符串 |
| - | N | 定位上一个匹配的被查找字符串 |
| 撤销 | u | 按一次取消最近的一次操作:重复u键,恢复多步操作 |
| - | U | 用于取消对当前行所做的所有编辑 |
| 保存退出 | :W | 保存修改的内容 |
| - | :w | 新文件名另存为其它文件 |
| - | :q | - |
| - | :q ! | 放弃对文件内容的修改并退出 |
| - | ZZ或:wq、:x | 保存当前的文件内容并退出vi编辑器 |
| 打开新文件 | :e其它文件名 | 打开新的文件进行编辑 |
| 读入文件内容 | :r其它文件名. | 在当前文件中读入其他文件内容 |
| 文件内容替换 | s/o1d/ new | 将当前行中查找到的第-一个字符串“old”串替换为"new" |
| - | s /old/ new/g | 将当前行中查找到的所有字符串"old"替换为"new" |
| - | :#,# s/old/new/g | 在行号“#, #“范围内替换所有的字符串"old"为"new” |
| - | :% s/old/ new/g | 在整个文件范围内替换所有的字符串“old"为"new" |
| - | s /old/new/c | 在替换命令末尾加入c命令,将对每个替换动作提示用户进行确认 |
| - | :8,11 m 4 | 将8-11行的内容剪切到第4行下面 |
| - | :8,11 co 4 | 将8-11行的内容复制到第4行下面 |
Tips:
SHIFT+3 key combination: all relevant strings can be highlighted in the script file
- Switch between different modes