1. Installation and use experience
Online experience address: http://www.django-photologue.net/
Download address: https://github.com/jdriscoll/django-photologue
Installation after download:
Unzip the file package - find the file path where setup.py is located, copy

Start cmd, paste, enter the command
python setup.py installThe corresponding components will be installed
The IDE opens the example file

Type in the Terminal console
python manage.py migrate (有时这一步不用输入)
python manage.py makegrations
python manage.py migrate
This database is established

Next, you need to open the admin system
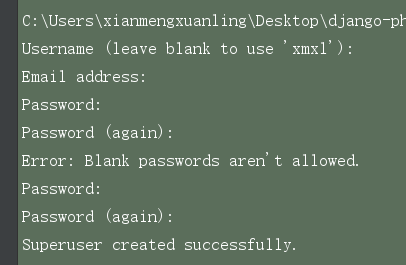
python manage.py createsuperuser Enter the username and password in turn (this account is the username and password in the background of the photo component)
The page can now be opened
![]()
Some open errors, it may be that port 8000 is occupied and needs to be replaced

It's like this normally

Visit: http://127.0.0.1:8022/admin/login/?next=/admin/
Enter username and password

addEdit after adding pictures and other information
Information is available at the front desk

Experience:
It is relatively simple to upload and edit photos. I haven't found a way to upload multiple photos at a time. I need to upload them one by one.
2. Introduction to other articles
Reference document: http://simple-is-better.com/news/227
djang-photologue is a django app that is used to display pictures to the web. It has powerful functions. It automatically converts the size and brightness of pictures, generates picture urls, supports picture collections, watermarks, batch uploads, cache, basically ordinary WEB. It has all the functions of the picture.
Installation method, according to the wiki documentation:
1. Go here to find the download address, http://code.google.com/p/django-photologue/
2. Installation
python setup.py install3. Add module support to django settings
INSTALLED_APPS = (
         # ...other installed applications,
         'photologue',
    )
4. Provide admin support
5. Synchronize the database
python manage.py syncdb6. Initialize, answer some questions
python manage.py plinit7.Add entry to urls.py
urlpatterns += patterns('',
        (r'^admin/(.*)', admin.site.root),
        (r'^photologue/', include('photologue.urls')),
    )
This is OK, let's talk about how to use it.
photologue provides a set of templates to support various commonly used WEB forms, they all require you to have a base.html, which has two blocks, title and content, so it can be used, of course, this is not easy to use, you can use Change them with your own ideas.
The photologue background provides a class, specifically some models, the general process is like this, first set a photo size image size and method related, if necessary, you can set Photo effects image effect and watermark watermark. When adding pictures, operate photos in admin, then you can choose the photo size you want to use. When the length or width of photo size is 0, it means that it changes according to the comparison with the change of another variable, which is very useful. When using it specifically, you can pass a Photo object to the template parameter, like this:
object_list=Photo.objects.all()
return render_to_response("photologue/photo_list.html",{'object_list':object_list},context_instance=RequestContext(request))
The Photo object is a model-derived class, which means it supports all kinds of queries, okay.
In addition, the usage in the template is roughly like this: …
Where get_display_url means that you have a photo size called display, if you have a name called XXX, you can use get_XXX_url to get the picture address in this photo size format, pythonic!