The first blog post explains the basic concepts of JMS (1) – JMS in simple terms . We introduce two message models of JMS: point-to-point and publish-subscribe models, and two ways that messages are consumed: synchronous and asynchronous, objects of the JMS programming model, and finally Said the advantages of JMS.
In the second blog post, JMS (2) – a brief introduction and installation of ActiveMQ, we introduced the message middleware ActiveMQ, installation, startup, and advantages and disadvantages.
In the third blog post, JMS (3) – A simple HelloWorld instance of ActiveMQ , we implemented a point-to-point synchronous message model, and did not present a publish-subscribe model to everyone.
foreword
In this blog post, based on Spring+JMS+ActiveMQ+Tomcat, we make an integrated instance of Spring4.1.0 and ActiveMQ5.11.1, and implement Point-To-Point asynchronous queue message and PUB/SUB (publish/subscribe) model, simple example , does not contain any business.
Environmental preparation
tool
JDK1.6 or 1.7
Spring4.1.0
ActiveMQ5.11.1
Tomcat7.x
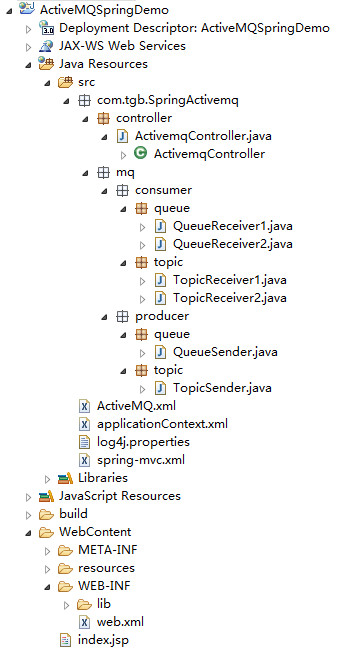
Directory Structure
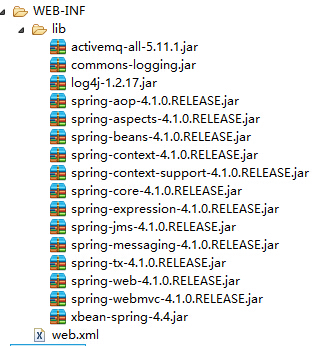
Required jar package
Project configuration
Configure the ConnectionFactory
The connectionFactory is used by Spring to create a link to the JMS server. Spring provides a variety of connectionFactory. We introduce two SingleConnectionFactory and CachingConnectionFactory.
SingleConnectionFactory: Requests to establish a JMS server connection will always return the same connection, and will ignore the Connection's close method call.
CachingConnectionFactory: inherits SingleConnectionFactory, so it has all the functions of SingleConnectionFactory, and it also adds a cache function, which can cache Session, MessageProducer and MessageConsumer. We use CachingConnectionFactory as an example.
<bean id="connectionFactory" class="org.springframework.jms.connection.CachingConnectionFactory">
</bean>- 1
- 2
The ConnectionFactory provided by Spring is only used by Spring to manage the ConnectionFactory. The ConnectionFactory that actually generates the link to the JMS server must be provided by the JMS service provider, and it needs to be injected into the ConnectionFactory provided by Spring. What we use here is JMS implemented by ActiveMQ, so what we can really generate Connection here should be the ConnectionFactory provided by ActiveMQ. So the complete code to define a ConnectionFactory should look like this:
    <!-- ActiveMQ 连接工厂 -->
    <!-- 真正可以产生Connection的ConnectionFactory,由对应的 JMS服务厂商提供-->
    <!-- 如果连接网络:tcp://ip:61616;未连接网络:tcp://localhost:61616 以及用户名,密码-->
    <amq:connectionFactory id="amqConnectionFactory"
        brokerURL="tcp://192.168.3.3:61616" userName="admin" password="admin"  />

    <!-- Spring Caching连接工厂 -->
    <!-- Spring用于管理真正的ConnectionFactory的ConnectionFactory -->
    <bean id="connectionFactory" class="org.springframework.jms.connection.CachingConnectionFactory">
        <!-- 目标ConnectionFactory对应真实的可以产生JMS Connection的ConnectionFactory -->
        <property name="targetConnectionFactory" ref="amqConnectionFactory"></property>
        <!-- 同上,同理 -->
        <!-- <constructor-arg ref="amqConnectionFactory" /> -->
        <!-- Session缓存数量 -->
        <property name="sessionCacheSize" value="100" />
    </bean>
Configure the producer
After configuring the ConnectionFactory, we need to configure the producer. The producer is responsible for producing the message and sending it to the JMS server. But how do we send messages? It is usually implemented by using the JmsTemplate class provided by Spring, so the core of configuring the producer is to configure the JmsTemplate for message sending. For the message sender, it needs to know where to send the message when it sends the message. For this, we need to inject a ConnectionFactory object provided by Spring when we define the JmsTemplate.
When using JmsTemplate for message sending, we need to know which message type to send: one is the point-to-point ActiveMQQueue, and the other is the ActiveMQTopic that supports the subscription/publishing mode. As follows:
    <!-- Spring JmsTemplate 的消息生产者 start-->

    <!-- 定义JmsTemplate的Queue类型 -->
    <bean id="jmsQueueTemplate" class="org.springframework.jms.core.JmsTemplate">
        <!-- 这个connectionFactory对应的是我们定义的Spring提供的那个ConnectionFactory对象 -->
        <constructor-arg ref="connectionFactory" />
        <!-- 非pub/sub模型(发布/订阅),即队列模式 -->
        <property name="pubSubDomain" value="false" />
    </bean>

    <!-- 定义JmsTemplate的Topic类型 -->
    <bean id="jmsTopicTemplate" class="org.springframework.jms.core.JmsTemplate">
         <!-- 这个connectionFactory对应的是我们定义的Spring提供的那个ConnectionFactory对象 -->
        <constructor-arg ref="connectionFactory" />
        <!-- pub/sub模型(发布/订阅) -->
        <property name="pubSubDomain" value="true" />
    </bean>

    <!--Spring JmsTemplate 的消息生产者 end-->
How does the producer specify the destination and send the message? You can just look at the source code, it is no longer provided here.
Configure the consumer
After the producer sends a message to the specified destination Destination, the next step is for the consumer to consume the message from the specified destination. So how does the consumer know that a producer has sent a message to the specified destination Destination? Each consumer needs a corresponding MessageListenerContainer for each destination. For the message listening container, in addition to knowing which destination to listen to, it also needs to know where to listen, that is to say, it also needs to know which JMS server to listen to, which is achieved by injecting a ConnectionFactory into it when configuring the MessageListenerContainer. of. So when we configure a MessageListenerContainer, there are three properties that must be specified: one is the ConnectionFactory that indicates where to listen from; the other is the Destination that indicates what to listen for; the other is the MessageListener that processes the message after receiving the message.
<!-- 消息消费者 start-->

    <!-- 定义Queue监听器 -->
    <jms:listener-container destination-type="queue" container-type="default" connection-factory="connectionFactory" acknowledge="auto">
        <jms:listener destination="test.queue" ref="queueReceiver1"/>
        <jms:listener destination="test.queue" ref="queueReceiver2"/>
    </jms:listener-container>

    <!-- 定义Topic监听器 -->
    <jms:listener-container destination-type="topic" container-type="default" connection-factory="connectionFactory" acknowledge="auto">
        <jms:listener destination="test.topic" ref="topicReceiver1"/>
        <jms:listener destination="test.topic" ref="topicReceiver2"/>
    </jms:listener-container>

    <!-- 消息消费者 end -->
ActiveMQ.xml
At this point, the ActiveMQ.xml for Spring, JMS, ActiveMQ integration has been completed. The following shows all the xml
<?xml version="1.0" encoding="UTF-8"?>
<beans xmlns="http://www.springframework.org/schema/beans"
    xmlns:context="http://www.springframework.org/schema/context"
    xmlns:xsi="http://www.w3.org/2001/XMLSchema-instance" xmlns:amq="http://activemq.apache.org/schema/core"
    xmlns:jms="http://www.springframework.org/schema/jms"
    xsi:schemaLocation="http://www.springframework.org/schema/beans
        http://www.springframework.org/schema/beans/spring-beans-4.0.xsd
        http://www.springframework.org/schema/context
        http://www.springframework.org/schema/context/spring-context-4.0.xsd
        http://www.springframework.org/schema/jms
        http://www.springframework.org/schema/jms/spring-jms-4.0.xsd
        http://activemq.apache.org/schema/core
        http://activemq.apache.org/schema/core/activemq-core-5.8.0.xsd">

    <!-- ActiveMQ 连接工厂 -->
    <!-- 真正可以产生Connection的ConnectionFactory,由对应的 JMS服务厂商提供-->
    <!-- 如果连接网络:tcp://ip:61616;未连接网络:tcp://localhost:61616 以及用户名,密码-->
    <amq:connectionFactory id="amqConnectionFactory"
        brokerURL="tcp://192.168.3.3:61616" userName="admin" password="admin"  />

    <!-- Spring Caching连接工厂 -->
    <!-- Spring用于管理真正的ConnectionFactory的ConnectionFactory -->
    <bean id="connectionFactory" class="org.springframework.jms.connection.CachingConnectionFactory">
        <!-- 目标ConnectionFactory对应真实的可以产生JMS Connection的ConnectionFactory -->
        <property name="targetConnectionFactory" ref="amqConnectionFactory"></property>
        <!-- 同上,同理 -->
        <!-- <constructor-arg ref="amqConnectionFactory" /> -->
        <!-- Session缓存数量 -->
        <property name="sessionCacheSize" value="100" />
    </bean>

    <!-- Spring JmsTemplate 的消息生产者 start-->

    <!-- 定义JmsTemplate的Queue类型 -->
    <bean id="jmsQueueTemplate" class="org.springframework.jms.core.JmsTemplate">
        <!-- 这个connectionFactory对应的是我们定义的Spring提供的那个ConnectionFactory对象 -->
        <constructor-arg ref="connectionFactory" />
        <!-- 非pub/sub模型(发布/订阅),即队列模式 -->
        <property name="pubSubDomain" value="false" />
    </bean>

    <!-- 定义JmsTemplate的Topic类型 -->
    <bean id="jmsTopicTemplate" class="org.springframework.jms.core.JmsTemplate">
         <!-- 这个connectionFactory对应的是我们定义的Spring提供的那个ConnectionFactory对象 -->
        <constructor-arg ref="connectionFactory" />
        <!-- pub/sub模型(发布/订阅) -->
        <property name="pubSubDomain" value="true" />
    </bean>

    <!--Spring JmsTemplate 的消息生产者 end-->


    <!-- 消息消费者 start-->

    <!-- 定义Queue监听器 -->
    <jms:listener-container destination-type="queue" container-type="default" connection-factory="connectionFactory" acknowledge="auto">
        <jms:listener destination="test.queue" ref="queueReceiver1"/>
        <jms:listener destination="test.queue" ref="queueReceiver2"/>
    </jms:listener-container>

    <!-- 定义Topic监听器 -->
    <jms:listener-container destination-type="topic" container-type="default" connection-factory="connectionFactory" acknowledge="auto">
        <jms:listener destination="test.topic" ref="topicReceiver1"/>
        <jms:listener destination="test.topic" ref="topicReceiver2"/>
    </jms:listener-container>

    <!-- 消息消费者 end -->
</beans>
In view of the large content of the blog post, we are only pasting the configuration of web.xml, and we will not provide the XML configuration of Spring and SpringMVC in the blog post. For other content, you can check the source code .
web.xml
<?xml version="1.0" encoding="UTF-8"?>
<web-app xmlns:xsi="http://www.w3.org/2001/XMLSchema-instance"
    xmlns="http://java.sun.com/xml/ns/javaee" xmlns:web="http://java.sun.com/xml/ns/javaee/web-app_3_0.xsd"
    xsi:schemaLocation="http://java.sun.com/xml/ns/javaee http://java.sun.com/xml/ns/javaee/web-app_3_0.xsd"
    version="3.0">
    <display-name>ActiveMQSpringDemo</display-name>

    <!-- Log4J Start -->
    <context-param>
        <param-name>log4jConfigLocation</param-name>
        <param-value>classpath:log4j.properties</param-value>
    </context-param>
    <context-param>
        <param-name>log4jRefreshInterval</param-name>
        <param-value>6000</param-value>
    </context-param>
    <!-- Spring Log4J config -->
    <listener>
        <listener-class>org.springframework.web.util.Log4jConfigListener</listener-class>
    </listener>
    <!-- Log4J End -->

    <!-- Spring 编码过滤器 start -->
    <filter>
        <filter-name>characterEncoding</filter-name>
        <filter-class>org.springframework.web.filter.CharacterEncodingFilter</filter-class>
        <init-param>
            <param-name>encoding</param-name>
            <param-value>UTF-8</param-value>
        </init-param>
        <init-param>
            <param-name>forceEncoding</param-name>
            <param-value>true</param-value>
        </init-param>
    </filter>
    <filter-mapping>
        <filter-name>characterEncoding</filter-name>
        <url-pattern>/*</url-pattern>
    </filter-mapping>
    <!-- Spring 编码过滤器 End -->

    <!-- Spring Application Context Listener Start -->
    <context-param>
        <param-name>contextConfigLocation</param-name>
        <param-value>classpath*:applicationContext.xml,classpath*:ActiveMQ.xml</param-value>
    </context-param>
    <listener>
        <listener-class>org.springframework.web.context.ContextLoaderListener</listener-class>
    </listener>
    <!-- Spring Application Context Listener End -->


    <!-- Spring MVC Config Start -->
    <servlet>
        <servlet-name>SpringMVC</servlet-name>
        <servlet-class>org.springframework.web.servlet.DispatcherServlet</servlet-class>

        <init-param>
            <param-name>contextConfigLocation</param-name>
            <param-value>classpath:spring-mvc.xml</param-value>
        </init-param>
        <load-on-startup>1</load-on-startup>
    </servlet>
    <servlet-mapping>
        <servlet-name>SpringMVC</servlet-name>
        <!-- Filter all resources -->
        <url-pattern>/</url-pattern>
    </servlet-mapping>
    <!-- Spring MVC Config End -->

</web-app>
running result
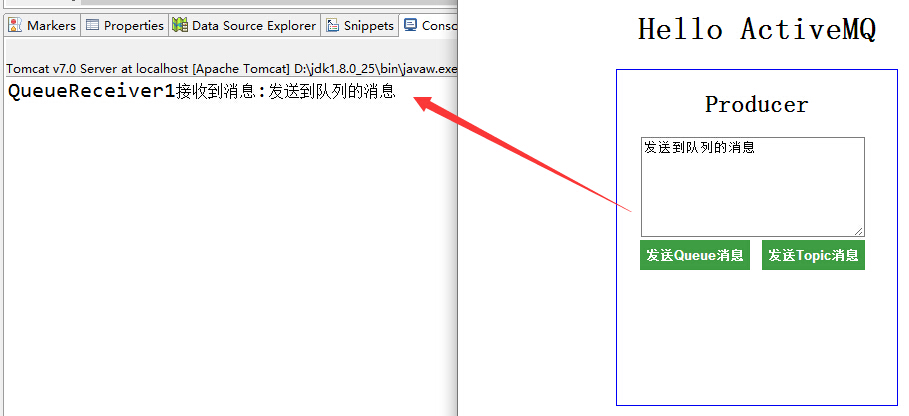
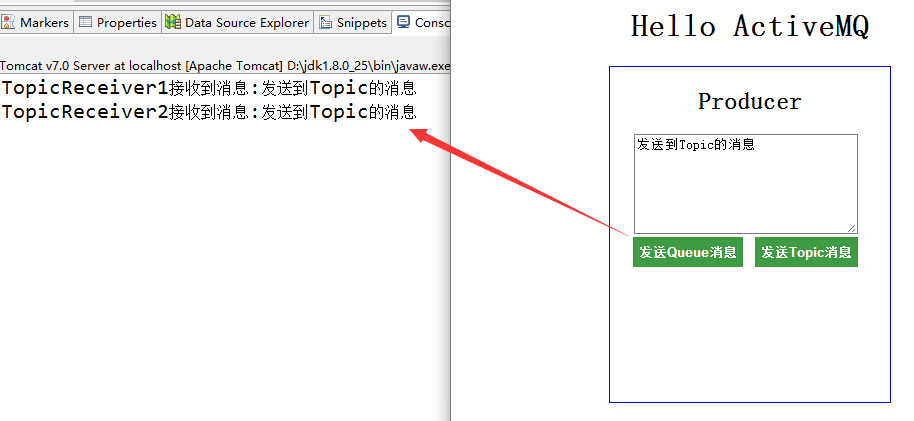
As can be seen from the above figure, the difference between the queue model and the PUB/SUB model is that the Queue can only be received by one consumer, and members in other Queues cannot receive the information that has been consumed, while the Topic can, as long as the Topic is subscribed Consumers can get all the information released by producers.
Summarize
Spring provides support for JMS, ActiveMQ provides a good implementation, and at this point we have a perfect combination of the two.
In the next blog post, we implement Spring and ActiveMQ message persistence.