
Article directory
-
- Environmental preparation
- Easy version installation
- Configure MySQL master-slave replication
-
- Create bridge network and specify IP range
- Create data and configuration storage directory
- Prepare configuration file
- start the database
- Remote Access Configuration (Master-Slave)
- Master library creates replication user
- Check the status of the master machine
- Information for setting master from library
- Enable master-slave replication
Environmental preparation
I need a MySQL8 version of MySQL, because I have not used MySQL5 personally, and I don't know if there will be some feature deviations between the two.
By default your environment is the same as mine.
Easy version installation
First install only one MySQL, and many details will be mixed together if you are master and slave.
docker run -d -p 3306:3306 --privileged=true -v /mysql/log:/var/log/mysql -v /mysql/data:/var/lib/mysql -v /mysql/conf:/etc/mysql/conf.d -e MYSQL_ROOT_PASSWORD=123456 --name mysql mysql
Here are the parameters:
-p:指定内外端口映射,虚拟机为外,docker 容器为内,写在前面的为外部端口,写在后面的为内部端口。因为 MySQL 本身端口为 3306,为了不使你们混淆,我外部端口不设置为 3306。
-v:指定内外存储卷映射,Docker 实践经验(三)讲的就是这个。
-e:往容器内部传参,最后会由 MySQL 来接收。关于这个 -e 其实我也还没研究它的一个走势。
Such a simple MySQL will be able to move.
set password
If you don't set a password, you're not sure if you can still get in the next time you want to log in.
Uncertain means that it may be possible to get in, and it may not be possible to get in.
So we set a password by ourselves to be safer.
mysql> use mysql

mysql> update user set authentication_string='123456' where user='root' and host='localhost';

mysql> flush privileges;
Don't comment.
Now that MySQL is active, it can be considered to be deleted, and we start to make master-slave replication.
If you want to keep it for use:
modify my.cnf and synchronize it to MySQL through the data volume:
cd /mysql/conf
vim my.cnf
插入以下内容:
[client]
default_character_set=utf8
[mysqld]
collation_server = utf8_general_ci
character_set_server = utf8
Restart MySQL:
docker restart mysql
docker exec -it mysql bash
Configure MySQL master-slave replication
Create bridge network and specify IP range
docker network create --driver bridge mysql-master-slave
The default number of mysql connections is not enough
set global max_connections=500;
set global mysqlx_max_connections=500;
Create data and configuration storage directory
# 创建主库数据存放目录
mkdir -p /home/docker/mysql/master/data
# 创建主库配置存放目录
mkdir -p /home/docker/mysql/master/conf

# 创建从库1数据存放目录
mkdir -p /home/docker/mysql/slave1/data
# 创建从库1配置存放目录
mkdir -p /home/docker/mysql/slave1/conf
Prepare configuration file
master database
[mysqld]
pid-file        = /var/run/mysqld/mysqld.pid
socket          = /var/run/mysqld/mysqld.sock
datadir         = /var/lib/mysql

secure-file-priv= NULL

# Disabling symbolic-links is recommended to prevent assorted security risks
symbolic-links=0

# 服务器唯一ID,默认是1
server-id=10

# 启用二进制日志
log-bin=mysql-bin

# 最大连接数
max_connections=10000

# 设置默认时区
default-time_zone='+8:00'

# 0:区分大小写
# 1:不区分大小写
lower_case_table_names=1

!includedir /etc/mysql/conf.d/
from the database
[mysqld]
pid-file        = /var/run/mysqld/mysqld.pid
socket          = /var/run/mysqld/mysqld.sock
datadir         = /var/lib/mysql

secure-file-priv= NULL

# Disabling symbolic-links is recommended to prevent assorted security risks
symbolic-links=0

# 服务器唯一ID,默认是1
server-id=11

# 启用二进制日志
log-bin=mysql-bin

# 最大连接数
max_connections=10000

# 设置默认时区
default-time_zone='+8:00'

# 0:区分大小写
# 1:不区分大小写
lower_case_table_names=1

!includedir /etc/mysql/conf.d/
start the database
Start the master database
If the above steps are completely followed by me, the command here does not need to change the parameters.
docker run -d -p 3316:3306 --name mysql_master --restart=always --network mysql-master-slave -v /home/docker/mysql/master/data:/var/lib/mysql -v /home/docker/mysql/master/conf/my.cnf:/etc/mysql/my.cnf -e MYSQL_ROOT_PASSWORD=123456 mysql
start slave database
docker run -d -p 3326:3306 --name mysql_slave1 --restart=always --network mysql-master-slave -v /home/docker/mysql/slave1/data:/var/lib/mysql -v /home/docker/mysql/slave1/conf/my.cnf:/etc/mysql/my.cnf -e MYSQL_ROOT_PASSWORD=123456 mysql
Remote Access Configuration (Master-Slave)
# 在容器 mysql_master 中开启一个交互模式的终端
docker exec -it mysql_master /bin/bash

# 在容器 mysql_slave1 中开启一个交互模式的终端
docker exec -it mysql_slave1 /bin/bash

# mysql 登录
mysql -u root -p

# 给予远程用户所有表所有权限
GRANT ALL ON *.* TO 'root'@'%';

# 更改加密规则
ALTER USER 'root'@'localhost' IDENTIFIED BY '123456' PASSWORD EXPIRE NEVER;

# 远程访问
ALTER USER 'root'@'%' IDENTIFIED WITH mysql_native_password BY '123456';

# 刷新权限
flush privileges;
Master library creates replication user
CREATE USER 'woniu'@'%' IDENTIFIED WITH mysql_native_password BY 'woniu123456';

GRANT REPLICATION SLAVE ON *.* TO 'woniu'@'%';

flush privileges;
Check the status of the master machine
SHOW MASTER STATUS;

Information for setting master from library
If you follow my steps completely, you need to fill in the ip on your own host and the two data shown in the above figure.
change master to master_host='192.168.190.133', master_user='woniu', master_password='woniu123456', master_port=3316, master_log_file='mysql-bin.000003', master_log_pos=2838, master_connect_retry=30;
Parameter definition:
master_host:主数据库的IP地址;
master_port:主数据库的运行端口;
master_user:在主数据库创建的用于同步数据的用户账号;
master_password:在主数据库创建的用于同步数据的用户密码;
master_log_file:指定从数据库要复制数据的日志文件,通过查看主数据的状态,获取File参数;
master_log_pos:指定从数据库从哪个位置开始复制数据,通过查看主数据的状态,获取Position参数;
master_connect_retry:连接失败重试的时间间隔,单位为秒。
Enable master-slave replication
# 开始同步
start slave;

# 同步状态
show slave status \;
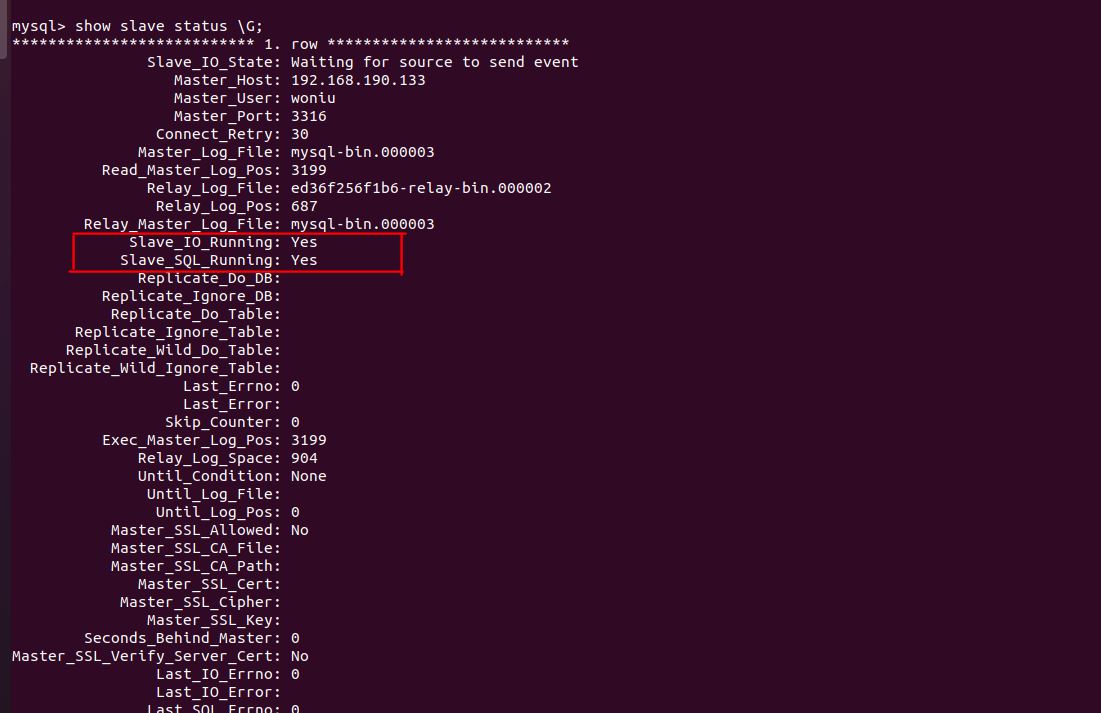
If it succeeds, the circled place should be yes,
if it fails, the log will be displayed:
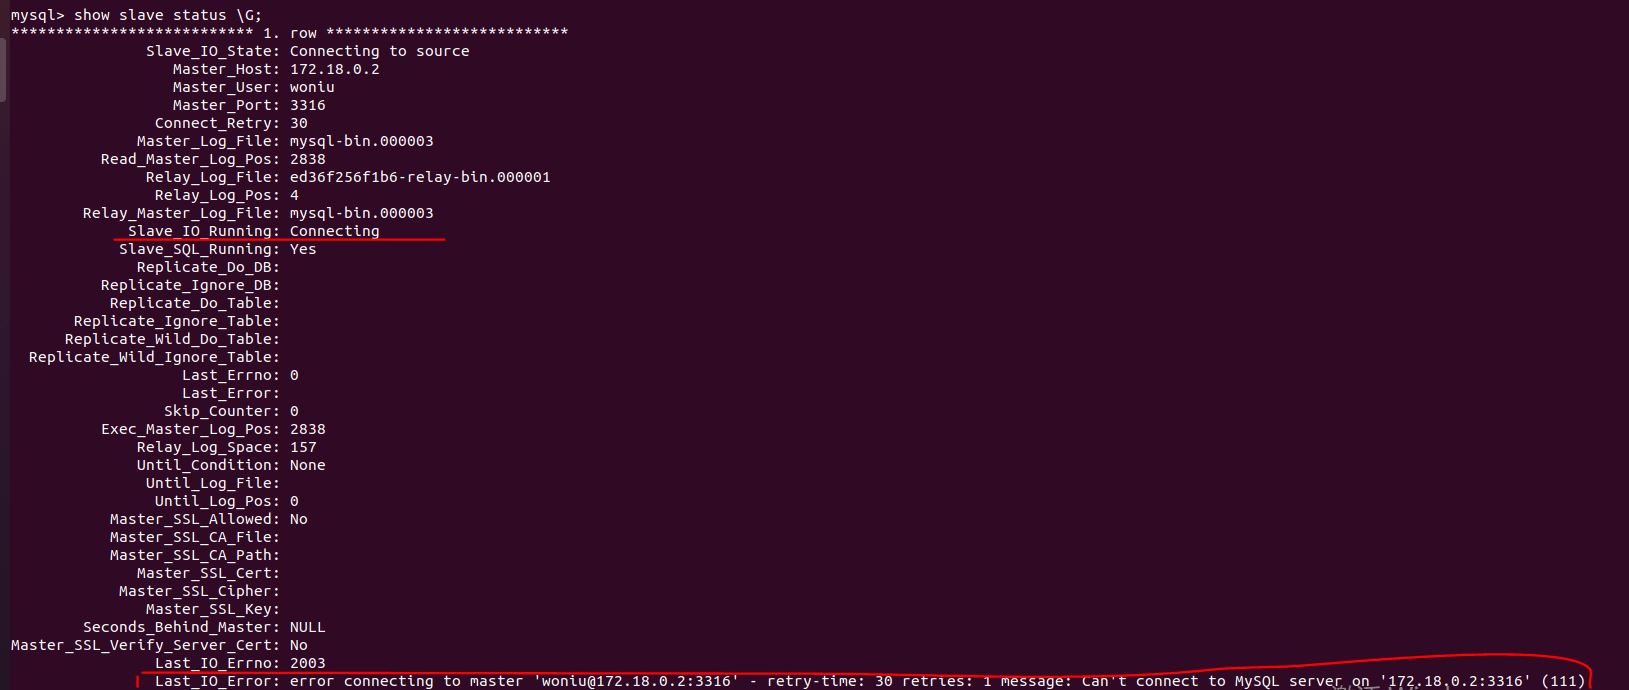
You can use Baidu by yourself, but what Baidu comes out may not apply to us. After all, we are deployed on docker, and there are few existing materials.
It depends on experience.