Article directory
Spring Boot uses a global configuration file application.properties , which is placed in the src/main/resources directory or under /config on the classpath. The role of the global configuration file of SpringBoot is to modify the configuration values of some default configurations, and also allow users to customize configuration properties.
application.yaml is also a type of configuration file. The difference between the two configuration files is that the file format of the configuration properties is different.
This blog uses application.properties for configuration
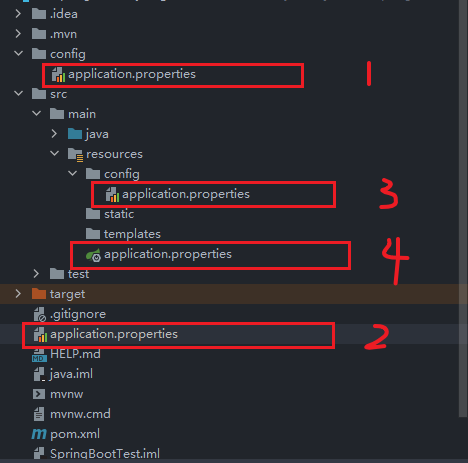
Note: If there is no configuration file
application.propertiesorapplication.yamlfile in the project, you can create a new one under the resource path
1. Configuration properties
custom properties
Many custom properties need to application.propertiesbe defined in , such as database constant configuration, default port number configuration, etc. In addition to these configuration constants, custom constants are also allowed:
# applicatino.properties 中指定配置
com.atcjx.name=cuijiexiang
com.atcjx.password=123456
Add an annotation above the member variable in the configuration file that needs to be used @Value(“${path}”), and you can bind the value in the configuration file class to the member variable:
@RestController
public class baseController {
@Value("${com.atcjx.name}")
private String name;
@Value("${com.atcjx.password")
private String password;
@RequestMapping("/")
String request(){
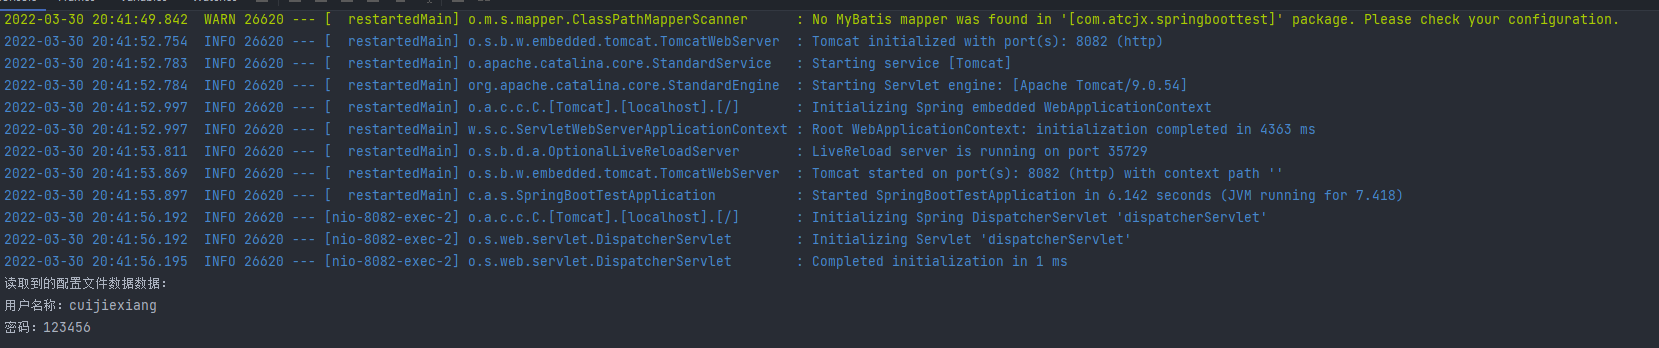
System.out.println("读取到的配置文件数据数据:");
System.out.println("用户名称:" + name);
System.out.println("密码:" + password);
return null;
}
}
After starting the project localhost:8080/, you can see the following results:

If there are too many attribute values to be injected, it will take a lot of time to bind one by one. In order to quickly bind a large number of configuration attributes, it is officially recommended to use @ConfigurationProprites(prefix = “...”)annotations to specify which attribute prefix in the configuration file to use.
@Component
@ConfigurationProperties(prefix = "com.atcjx")
public class configBean {


    private String name;
    private String password;
    // 省略get、set方法
}
It should be noted that @ConfigurationPropertiesannotations need to be injected into the IOC container for use: with Spring injection class annotations, for example @Component, it is also necessary to add additions to the entry class @EnableConfigurationProperties.
// 开启允许配置文件配置属性
@EnableConfigurationProperties
@SpringBootApplication
public class SpringBootTestApplication {


    public static void main(String[] args) {


        SpringApplication.run(SpringBootTestApplication.class, args);
    }
}
Use Spring injection where you need to use:
@RestController
public class baseController {


    // 使用@AutoWired注入
    @Autowired
    configBean configBean;

    @RequestMapping("/")
    String request(){


        System.out.println("读取到的配置文件数据数据:");
        System.out.println("用户名称:" + configBean.getName());
        System.out.println("密码:" + configBean.getPassword());
        return "";
    }
}
Access localhost:8080/: read successfully!
random value property
In many cases, the random value is also an important part of the configuration. If the generation of the random value is put into the code, the code will be bloated and difficult to understand. SpringBoot configuration files help us solve this problem. Use ${random}can randomly generate different types of values, such as: int, long, string type.
dudu.secret=${random.value}
dudu.number=${random.int}
dudu.bignumber=${random.long}
dudu.uuid=${random.uuid}
dudu.number.less.than.ten=${random.int(10)}
dudu.number.in.range=${random.int[1024,65536]}
2. Configuration file
Profile priority
Sort by descending priority :
- filepath:/config/applicaiton.properties
- filepath:/applicaiton.properties
- classpath:/config/applicaiton.properties
- classpath:/applicaiton.properties
The locations are as follows:
Higher-priority profiles can override lower-priority profiles.
Comparing application.properties and application.yml files in the same path, the configuration priority of application.properties will be higher!
Multi-environment configuration
In many cases, applications need to be deployed to different runtime environments, which leads to different environment configuration details. Take the log as an example, the production log will set the log level to WARNor higher, and the log needs to be written to the log file to facilitate the maintenance and management of operation and maintenance; the log level only needs DEBUGthe level during development, and the log is output to the console Maybe a good choice.
If every time you publish, you have to delete or replace the configuration file, it will cause unnecessary trouble. SpringBoot provides us with multi-environment configuration to solve this problem.
Before configuring multiple environments, you need to understand that the name of the configuration file in different environments is different. The name of the configuration file in different environments starts with application, followed by "-{profile}" to specify the corresponding environment, for example:
- application-dev.properties: Development environment configuration file
- application-prod.properties: Production environment configuration file
The names can be defined by themselves, mainly to distinguish different environments. Now we can start the multi-environment configuration.
Step 1: Create a responsive environment configuration file
Create configuration files for three environments, namely development environment, test environment, and production environment:

Step 2: Add the default environment
If the default environment has not been specified, SpringBoot will load application.properties by default. If you need to switch the environment, you need to specify the development environment configuration file in application.properties :
spring.profiles.active=dev
This means that when SpringBoot starts, load the configuration file application-dev.properties , be sure to pay attention to the corresponding file name!
Now we have completed the multi-environment configuration!
Replenish
If the project has been packaged, switching the environment needs to use the command line command to achieve:
# 设置启动环境为 dev
java -jar xxx.jar --spring.profiles.active=dev