
Lead
When using Mendix to create multiple apps, the user account of each app must be integrated with the company's authentication scheme to simplify the user's login procedure and achieve the consistency of user management. For App developers, this article will introduce how to integrate the Mendix App running locally with the Active Directory Federation Services (AD FS) server through the SAML component of Mendix, so that the single sign-on program can be tested and verified during the development process.
1. What is SAML
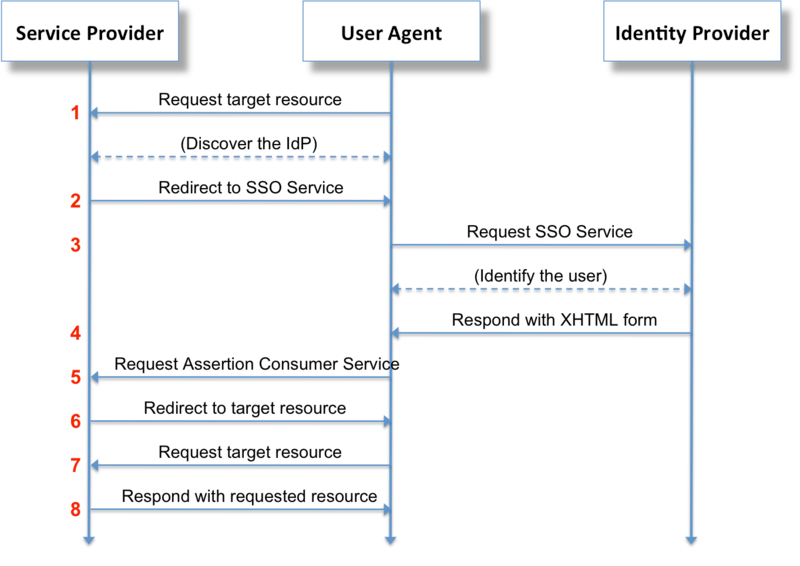
Security Assertion Markup Language (SAML) is an open standard that allows identity providers (IdP) to pass authorization credentials to service providers (SP), allowing users to log in and use many different web applications with a set of credentials.
The user uses a user agent (usually a web browser) to request web resources protected by the SAML service provider. The service provider who wants to know the identity of the requesting user sends an identity verification request to the SAML identity provider through the user agent.
2. Requirements for AD FS
In this test environment, AD FS is acting as the identity provider, and Mendix App is the service provider. AD FS, as the identity provider of SAML, requires an SSL certificate to provide HTTPS requests for federated authentication services. For the single sign-on task we want to perform, the SSL certificate on AD FS must meet the following requirements:
-
Credentials are publicly trusted (used for production deployment)
-
The credential contains the server authentication enhanced key usage (EKU) value
-
The voucher contains the joint service name in the subject or subject alternate name (SAN), for example siemensdc.siemens.demo
A total of two virtual machines were used in the test environment. The first is an AD domain controller, which includes directory services (AD DS), domain name services (DNS) and so on. The second is to install the certificate service (AD CS), the joint service (AD FS) and Mendix Studio Pro, and join the first controlled domain. The SSL certificate required by AD FS is generally obtained from a public certificate authority (CA). In this test environment, it was generated by AD CS.
For how to generate a new SSL certificate from AD CS and use it for the installation and configuration of AD FS, please refer to this link:
https://geekdudes.wordpress.com/2017/01/03/installing-ad-federation-service-on-windows-server-2016/

3. SAML configuration on Mendix
The following describes in sequence how to add SAML components to Mendix App and perform the corresponding configuration to achieve the purpose of single sign-on.
-
SSL Proxy
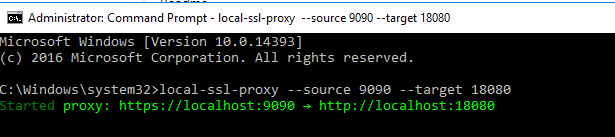
Since AD FS requires the service provider to use HTTPS, and Mendix can only use HTTP when running on the local side, the solution is to download and install a simple SSL Proxy.
先下载安装Node.js在命令提示符窗口执行 ”npm install -g local-ssl-proxy”执行 “local-ssl-proxy --source 9090 --target 18080”。实际Mendix运行端口是18080,但用户可用https://localhost:9090登入Mendix App。
-
Download the SAML component
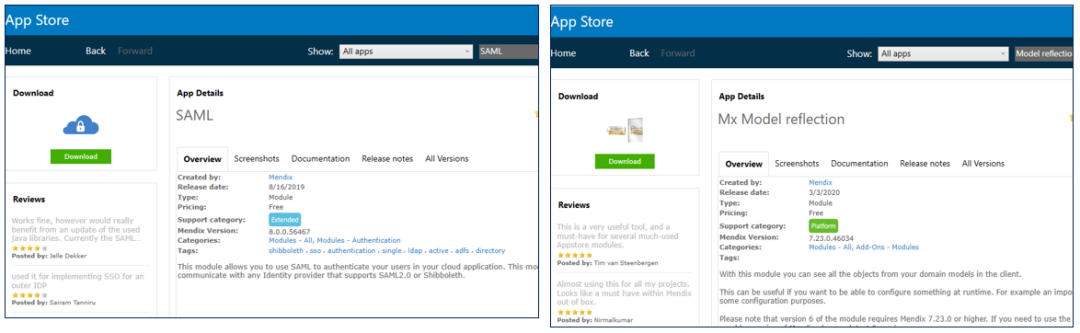
Download the SAML component from the App Store: https://appstore.home.mendix.com/link/app/1174/
And Mx Model reflection component: https://appstore.home.mendix.com/link/app/69/
And join the App project.
-
SAML20.Startup
In the project settings, select SAML20.Startup as the microflow to be executed after the project is started. Or add SAML20.Startup to the startup microflow of the original project.

Set the URL of the App to https://localhost:9090, and the port during execution to 18080.

Set the navigation menu of the App, increase the SSO configuration function, and call the SAML20.OpenConfiguration microflow when clicked.

-
Navigation menu
Set the navigation menu of the App, increase the user management function, and open the Administration.Account_Overview page when clicked.

-
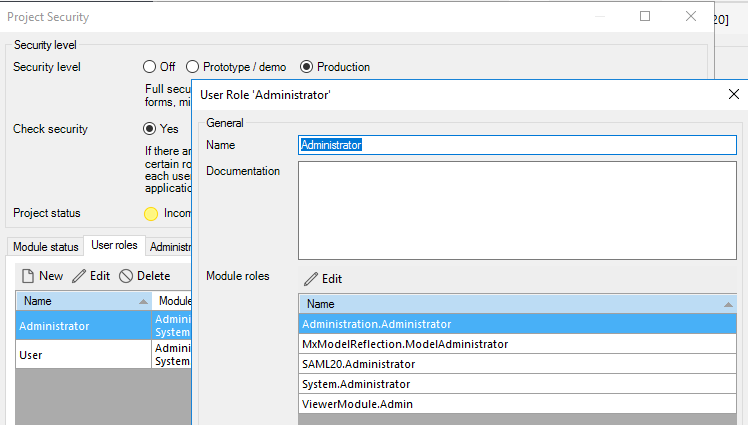
Project permissions
Set project permissions and map the project manager role to the manager roles of other modules.
Click the Run Locally button above in Mendix Studio Pro. After the service is ready, click the View button to start the browser and log in with the MxAdmin account.
Click SSO Configuration in the navigation menu to enter the SAML configuration page. If you are prompted for web security credentials, please choose Continue.
-
SP Configuration
Open the SP Configuration page, first enter the organization and contact information (each field must be filled in), then click the Save button, and finally click Download SP Metadata to download the service provider attribute file (sp_metadata.xml).


-
AD FS Manager
Open the AD FS manager in the server manager.

In AD FS Manager, execute Add Relying Party Trust... to create a new relying party trust.

-
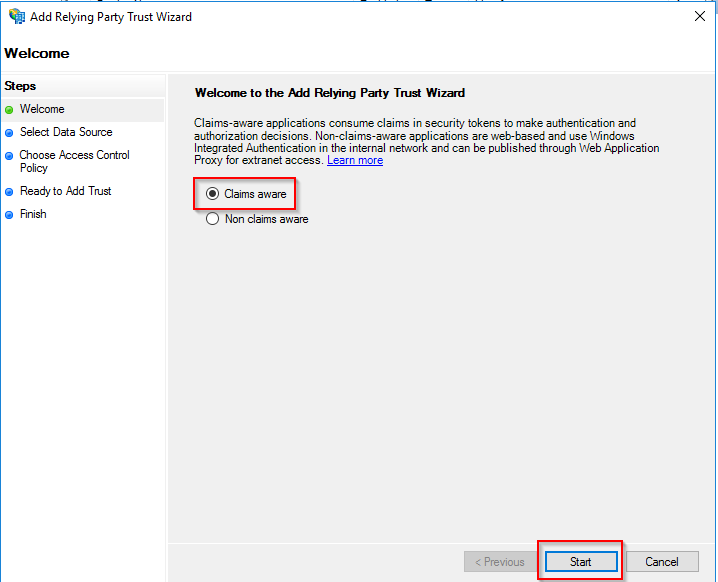
Claims aware
Select Claims aware and press Start.
Select Import data about the relying party from a file, then select the sp_metadata.xml downloaded in the previous step, and finally press Next.

Enter the display name and press Next.

Select Permit everyone, and then press Next.

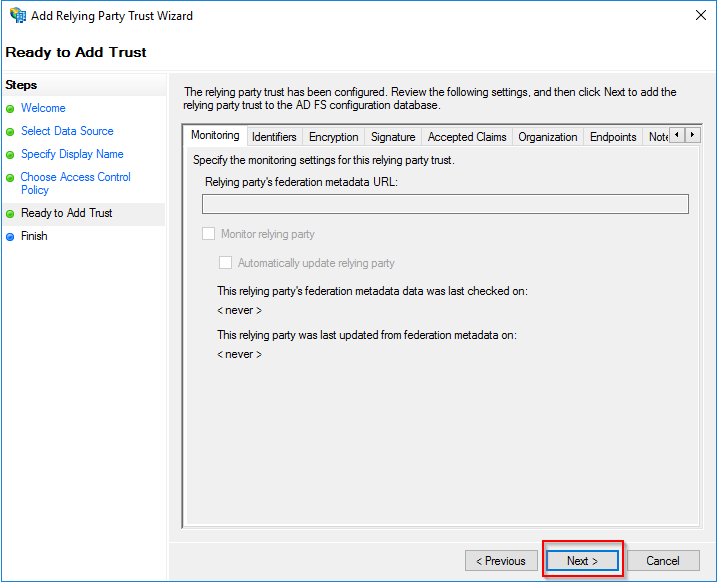
You can view the current settings on the view settings page, and click Next.
Because you want to set the claim issuance policy and decide which attributes the claim must include, check Configure claims issuance policy for this application, and then click Close.

In the Edit Claims Issuance Policy dialog box, press the Add Rule... button.

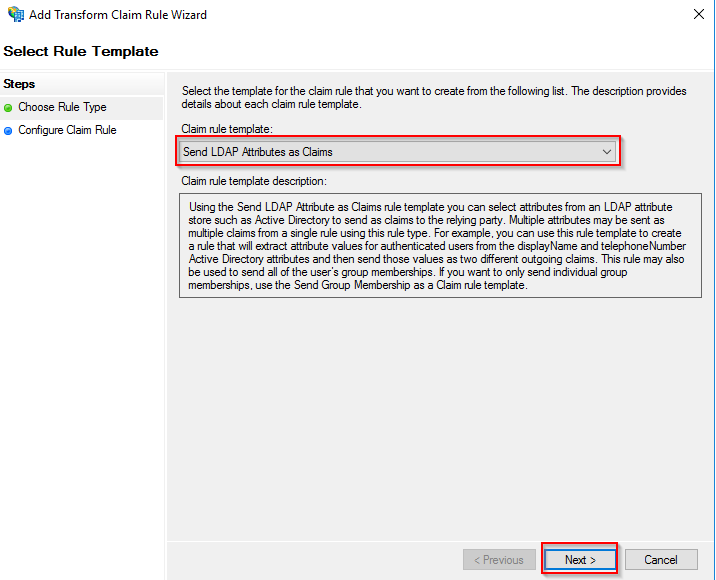
Select Send LDAP Attributes as Claims and press Next.
Set the rule display name, specify Active Directory as the attribute storage area, and then choose to export the two attributes of E-Mail-Addresses and SAM-Account-Name and their corresponding declaration types, and finally press Finish.

In the Edit Claims Issuance Policy dialog box, click the OK button to complete the setting.

In AD FS Manager, find the URL of Federation Metadata.

Enter the URL of Federation Metadata in a new browser window: https://<hostname>/FederationMetadata/2007-06/FederationMetadata.xml and download FederationMetadata.xml.
-
Mendix App
Go back to the Mendix App page, open the IdP Configuration page, and press the New button to create a new identity provider configuration. The first time it is executed, it will ask to synchronize the object, press the OK button to continue.

After checking all modules, press the Click to refresh button on the right, and then press the Next button.

Enter the alias of the identity provider, choose not to read IDP metadata from the URL, then choose the FederationMetadata.xml downloaded in the previous step, and finally press Next.

On the Configure Request Authentication page, keep the default values and press Next.

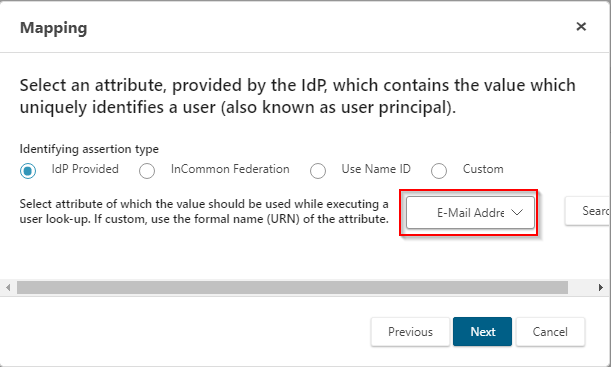
Select E-Mail Address as the user principal attribute on the Mapping page. Press Next.
Select Administration.Account as the user object, and select Name to store the user principal attributes. Press Next.

For the purpose of testing, choose to allow the module to create users on the User provisioning page and specify the default role of the new user. Press Next.

Press Save to complete the setting.

On the IdP Configuration page, select the newly created identity provider, and then press the Toggle Active button to activate it.

That's it, we have completed the basic SAML configuration. If you are interested in the various options in the SAML component and the control of the login behavior, you can refer to the file description:
https://docs.mendix.com/appstore/modules/saml。
4. Test SSO
We will use the domain administrator to log in to Windows, and first confirm that the administrator has set the E-Mail Address in the AD account properties.

In the configuration options of the aforementioned SAML component, we select that after the user's identity is authenticated, if the user does not exist in the Mendix App, the SAML component will automatically create the user. So before proceeding with SSO login, first check the account list of the Mendix App currently being tested.

Open the browser and enter the URL https://localhost:9090/SSO. Since you are currently logging in to Windows as a domain administrator, the SAML module of the test App is automatically created as [email protected] after obtaining identity authentication from AD FS The user with the account name, the role is User, and the newly created user is automatically logged in to the Mendix App for testing.

5. Summary
This article introduces the steps of how Mendix running locally uses SAML to achieve single sign-on with the enterprise authentication system AD FS. App developers can test or explore various possible single sign-on behaviors in the development environment, except for quick changes and adjustments. , It will not affect the operation of the enterprise certification system in the production environment.
The SAML component used this time is downloaded from the Mendix App Store. No code modification is required. Single sign-on can be achieved only by configuration. It shows that Mendix uses reusable components to develop apps in a pile-up manner. Significantly improve application development productivity.
For more information, please visit the following link:
Mendix official website: https://www.mendix.com/zh/
Mendix industry solutions: https://solutions.mendix.com/
Mendix platform guide: https://www.mendix.com/evaluation-guide/
Mendix animation display: https://www.mendix.com/demos/