Preface
Hello everyone, this is Xiao Zhang~
I remember that when I was young, there was only one clock at home to see the time (the kind that contained hour, minute, and second hands). It was hung on the wall and kept rattling. Now the living conditions are better. Basically, people have a mobile phone and can also watch the time. No longer rely on watches, and today's article content is related to this kind of clocks and watches;
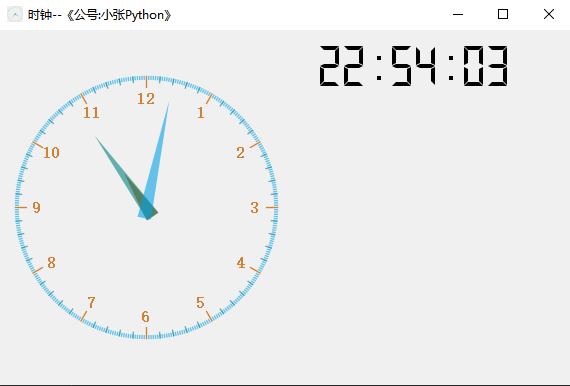
This article will use Python to draw two types of watches at the same time; one is the above-mentioned clock with hour, minute, and second hands ( for convenience, collectively referred to as old clocks below ), the other is an electronic watch, and the final operating results are as follows
Environment configuration
Python packages used in the program
PyQt5
math
sys
Realization ideas
The realization idea is roughly divided into three parts:老式钟表制作、电子表制作、两表合并为一个界面
Vintage watchmaking
Looking at the old clock interface as a whole, there are the following patterns: hour hand, minute hand, second hand, 1-12 hour scale, small scale for each grid, and large scale for every 5 grids
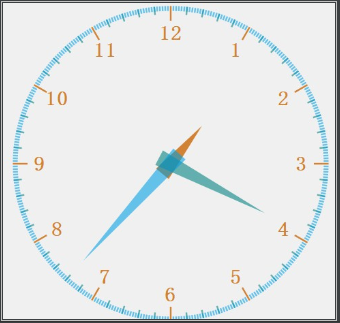
When the clock is running, the hour hand, minute hand, and second hand change with time and rotate a certain angle counterclockwise with the center of the interface as the circle point. This angle can be calculated
For convenience, I use the QPainter control in PyQt5 to achieve the entire interface effect. This control is actually a painter to draw the elements on the interface.
The clock trajectory is actually to stitch together every second picture, and finally form a coherent time series image, so the paintEvent function is rewritten to draw every second real-time image;
 def paintEvent(self, event):

        hour_points = [QPoint(5,8),QPoint(-5,8),QPoint(0,-30)]
        minute_points = [QPoint(5,8),QPoint(-5,8),QPoint(0,-65)]
        second_points = [QPoint(5,8),QPoint(-5,8),QPoint(0,-80)]

        hour_color = QColor(200,100,0,200)
        minute_color = QColor(0,127,127,150)
        second_color = QColor(0,160,230,150)

        min_len = min(self.width(),self.height())
        time = QTime.currentTime() #获取当前时间
        painter = QPainter(self)
        painter.setRenderHint(QPainter.Antialiasing)
        painter.translate(self.width()/2,self.height()/2)#平移到窗口中心
        painter.scale(min_len/200.0,min_len/200.0) #进行尺度缩放

        #----------绘制时针------------
        painter.setPen(Qt.NoPen)
        painter.setBrush(hour_color)#颜色
        painter.save()
        # 根据 1小时时= 30°,水品方向逆时针旋转时针
        painter.rotate(30.0*((time.hour()+time.minute()/60.0)))
        painter.drawConvexPolygon(QPolygon(hour_points))
        painter.restore() # save 退出,可重新设置画笔

        painter.setPen(hour_color)
        #绘制小时线(360/12 = 30度)
        for i in range(12):
            painter.drawLine(88,0,96,0)#绘制水平线
            painter.rotate(30.0)# 原有旋转角度上进行旋转;

        radius = 100 # 半径
        font = painter.font()
        font.setBold(True)
        painter.setFont(font)
        pointSize = font.pointSize()#字体大小
        # print(pointSize)

        #绘制小时文本
        for i in range(12):
            nhour = i + 3 # 从水平 3 点进行绘制
            if(nhour>12):
                nhour -= 12
            painter.drawText(self.textRectF(radius*0.8,pointSize,i*30),Qt.AlignCenter,str(nhour))

        #绘制分针;
        painter.setPen(Qt.NoPen)
        painter.setBrush(minute_color)
        painter.save()

        # 1分钟为6°,
        painter.rotate(6.0*(time.minute()+time.second()/60.0))
        painter.drawConvexPolygon(QPolygon(minute_points))
        painter.restore()

        #绘制分针线
        painter.setPen(minute_color)
        for i in range(60):
            if(i%5 !=0):
                painter.drawLine(92,0,96,0)
            painter.rotate(6.0)

        #绘制秒针
        painter.setPen(Qt.NoPen)
        painter.setBrush(second_color)
        painter.save()
        #绘制秒线
        painter.rotate(6.0*time.second())
        painter.drawConvexPolygon(QPolygon(second_points))
        painter.restore()

        painter.setPen(second_color)
        for i in range(360):
            if(i%5!=0 or i%30!=0):#绘制
                painter.drawLine(94,0,96,0)
            painter.rotate(1.0)#旋转
Set up a time timing control, use the signal slot mechanism to connect the interface, and update the interface every second
     	self.timer = QTimer()  # 定时器
        self.timer.timeout.connect(self.update)
        self.timer.start(1000)  # 每1s 更新一次
Electronic watch production
The production of electronic watches is relatively simpler than that of old-fashioned watches. The QLCDNumber control is used in the production process.
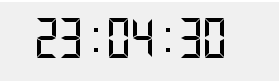
The QLDNumber control is used to preview numbers, but the above styles make the numbers look more technological, and it is a very good choice for electronic watch previews!

Before using, you need to fine-tune the properties of the control, such as font style, number of characters occupied in the control, border properties, etc.;
self.lcdNumber = QtWidgets.QLCDNumber(Form)
        self.lcdNumber.setGeometry(QtCore.QRect(0, 0, 250, 50))
        self.lcdNumber.setContextMenuPolicy(QtCore.Qt.DefaultContextMenu)
        self.lcdNumber.setFrameShape(QtWidgets.QFrame.NoFrame)
        self.lcdNumber.setSmallDecimalPoint(False)
        self.lcdNumber.setDigitCount(8)
        self.lcdNumber.setSegmentStyle(QtWidgets.QLCDNumber.Flat)
        self.lcdNumber.setProperty("value", 2021.0)
        self.lcdNumber.setObjectName("lcdNumber")
The running effect of the electronic watch is also with the help of the timing control, which updates the time of the current interface every second, but QPainter is not used here.
 		self.lcdNumber.display('00:00:00')
        time_slot =QTimer(self)
        # time_slot.setInterval(1000)
        # time_slot.start()
        time_slot.timeout.connect(self.event_1)
        time_slot.start(1000)
    def event_1(self):
        time_format = QTime.currentTime()
        time_format = time_format.toString("hh:mm:ss")
        self.lcdNumber.display(time_format)
        QApplication.processEvents()
Merge two tables interface
After the two table interfaces are created, finally use a Widget as the base class, and use Qt's horizontal layout to splice the two tables horizontally together to form the final effect
Core code
  		self.label1 = Clock_paint()
        self.label2 = MyWidget()
        self.horizon_layout = QHBoxLayout()
        self.horizon_layout.addWidget(self.label1)
        self.horizon_layout.addWidget(self.label2)
        self.setLayout(self.horizon_layout)
        self.setWindowTitle('时钟--《公号:小张Python》')
        self.setWindowIcon(QIcon('clock.jpg'))
to sum up
The case in this article can be regarded as a small application of PyQt5. PyQt5 is a package of Qt in the Python language. I personally recommend this library when making GUI interfaces. Compared to tk, I prefer the former because it has more flexibility in GUI production and plans to follow. There are more small cases to introduce the related usage of PyQt5, so stay tuned!
Okay, the above is the entire content of this article. Finally, thank you all for reading. See you in the next issue~
Source code acquisition
Source article related to the acquisition mode, focus on micro-channel public number, Zhang Python , background replies keyword 210,227 to