Article directory
1 Unzip Ubuntu-base
2 Install Qemu-User-Static tool
3 Set software source
4 Mount the root file system and Chroot
1 Unzip Ubuntu-base
we use the command "tar xvf ubuntu-base-16.04.5-base-armhf. tar.gz", as shown in Figure 1.1:

After decompression is complete, it is the root file system. Use the command "ls" to view the directory.

2 Install the Qemu-User-Static tool
QEMU is a software designed to simulate different machine architectures. It is well supported in ubuntu. If you need to mount the ubuntu armhf version of the file, you must install the qemu-user-static tool.
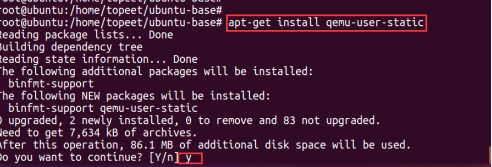
First use the command "apt-get install qemu-user-static" to install under Ubuntu, press y to continue during the installation process. As shown in Figure 2.1:
This step is to install qemu-user-static on the pc's ubuntu, and then use the command
"cp /usr/bin/qemu-arm-static ./usr/bin/" to copy qemu-arm-static to just decompress it Directory. As shown in Figure 2.2:
![]()
3 Set the software source
Ubuntu installation software is downloaded and installed from the Internet through the name apt-get. We need to specify the software source.
In order to make a successful root file system to be connected to the Internet, you can directly copy the dns configuration file of the machine to the corresponding location of the root file system, and use the command "cp /etc/resolv.conf ./etc/resolv.conf", as shown in Figure 3.1 Show:

Then modify the root file system software source, use the command "vim ./etc/apt/sources.list" to enter the file. As shown in Figure 3.2:
![]()
Add the ubuntu arm source, I chose the source of the University of Science and Technology of China, add the following content at the end of the article:
deb http://mirrors.ustc.edu.cn/ubuntu-ports/ xenial main multiverse restricted universe
deb http://mirrors.ustc.edu.cn/ubuntu-ports/ xenial-backports main multiverse restricted universe
deb http: / /mirrors.ustc.edu.cn/ubuntu-ports/ xenial-proposed main multiverse restricted universe
deb http://mirrors.ustc.edu.cn/ubuntu-ports/ xenial-security main multiverse restricted universe
deb http: // mirrors .ustc.edu.cn / ubuntu-ports / xenial-updates main multiverse restricted universe
deb-src http://mirrors.ustc.edu.cn/ubuntu-ports/ xenial main multiverse restricted universe
deb-src http: // mirrors .ustc.edu.cn / ubuntu-ports / xenial-backports main multiverse restricted universe
deb-src http://mirrors.ustc.edu.cn/ubuntu-ports/ xenial-proposed main multiverse restricted universe
deb-src http://mirrors.ustc.edu.cn/ubuntu-ports/ xenial-security main multiverse restricted universe
deb-src http://mirrors.ustc.edu.cn/ubuntu-ports/
xenial -updates main multiverse restricted universe如图 3.3 所示 :

Save and exit.
4 Mount the root file system and Chroot
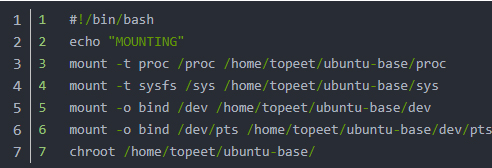
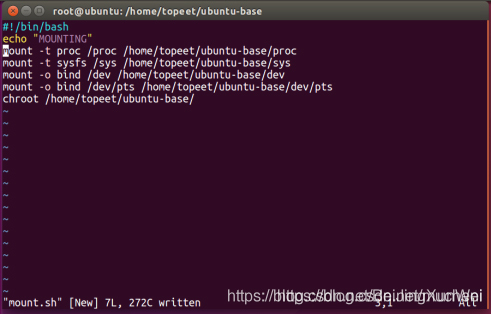
(1) First, mount the file system that has just been downloaded on the machine. You need to mount proc, sys, dev, dev/pts and other file systems. Use the command "vi mount.sh" to add the mount script. As shown in Figure 4.1:
![]()
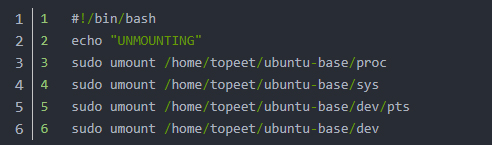
The content of the script umount.sh for the mounting process is as follows:
As shown in Figure 4.2:
Save and exit:
(2) Then use the command "vi umount.sh" to add the uninstall script. As shown in Figure 4.3:

The content of the script umount.sh for the uninstall process is as follows:
As shown in Figure 4.4:

Save and exit.
(3) Then use the command "chmod 777 mount.sh umount.sh" to modify the script permissions, as shown in Figure 4.5:

(4) Then use the command "mount.sh" to run the mount. As shown in Figure 4.6:
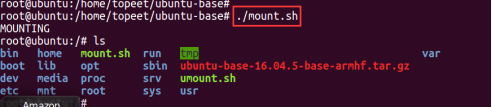
At this point, we can see that the root directory is switched to the directory where ubuntu is currently made.
(5) Since ubuntu base is a minimal root file system, many commands and software are not available, so we need to install the commonly used commands and software first, and enter the following commands:

Some screenshots are shown in Figure 4.7:

(6) Then use the command "passwd root" to set the root user password, here we set it to topeet. As shown in Figure 4.8:

(7) Next, use the following commands to set the host name and local IP:

As shown in Figure 4.9:

(8) Next, configure the serial terminal. We use the command "ln -s /lib/systemd/system/[email protected] /etc/systemd/system/getty.target.wants/[email protected]" to specify the serial port terminal. As shown in Figure 4.10:

Since I am using the i.mx6u platform, I need to add a link named [email protected] to connect to the [email protected] service. The platform of i.mx is ttymxc0.
(9) Next, configure DHCP. You can also wait for the configuration after downloading to the development board, but it will be very slow at startup. Use the following command:
![]()
As shown in Figure 4.11:

(10) After setting, you can exit the root file system, enter the command "exit" to exit. As shown in Figure 4.12:

(11) Finally, we will exit and execute the umount.sh script to cancel the mount. As shown in Figure 4.13:

At this point, the ubuntu base root file system has been made, and then we can use the development board to test.