A stage summary of Linux commonly used commands (2)
I. Introduction
1. dumpe2fs: query ext series super block information
2. xfs_info: query xfs series super block information
3. df: list the overall disk usage of the
file system 4. du: check the disk usage of the file system (usually used in the view The disk space occupied by the directory)
5. ln: Hard link and symbolic link
. I will use a practical example to teach you the commands for disk partitioning, formatting and mounting.
6. lsblk: List all disks on the system.
7. blkid: lists the UUID and other parameters of the device
8. parted: lists the partition table type and partition information of the disk (mklabel: sets the disk format for the new hard disk: GPT or MBR)
9. gdisk/fdisk: disk partition, delete Partition and so on (I will specify in the actual example)
10. partprob: update the partition table information of the Linux kernel
11. mkfs: disk formatting
12. mount: mount
13, umount: unmount
Second, the specific introduction and usage of the command
1.
Introduction to dumpe2fs : query ext series super block information.
Usage: dumpe2fs [-bh] Device file name (for example: /dev/vda5)
-b: List the parts reserved as bad sectors
-h: List only the data of the super block
2.
Introduction to xfs_info : Query xfs series super block information.
Usage: xfs_info mount point|device file name (for example: /dev/vda2)
3. df
introduction: List the overall disk usage of the file system.
Usage: df [-ahiT] (commonly used) Directory or file name
-a: List all file systems, including system-specific file systems such as /proc
-h: Display in GBytes, MBytes, KBytes formats that are easier to read
-i: Do not use the disk capacity, but display the number of inodes
-T: The file system name (such as xfs) of the hard disk partition is also listed
4. Du
introduction: View the disk usage of the file system (usually to view the disk space occupied by the directory).
Usage: du [-as] File or directory name
-a: List all files and directory capacity, because by default only the number of files under the directory is counted
-s: Only list the total amount, not each individual item Directory footprint
5. ln
introduction: hard link and symbolic link.
Usage: ln [-sf] Source file target file
-s: If you don't add any parameters (such as: ln file 1 file 2), it is a hard link, if you add -s, it is a symbolic link
-f: if the target file exists, just Actively delete the target file and then create it
3. Examples to explain disk partitioning, formatting and mounting commands
Steps:
1. Add a new hard disk
2. Divide the disk and create a usable disk partition
3. Format the disk partition and establish a file system usable by the system
4. Create a mount point (the mount point is the directory), and Its mount
Step 1: Add a new hard disk.

Keep clicking Next, just set the size of the hard disk you want to set, and then click Finish. Then restart the system, you will find an additional sdb device under /dev.

Introduction to lsblk : List all disks on the system.
Usage: lsblk device (for example: /dev/sdb)
Step 2: Divide the disk and create usable disk partitions
. Use parted to set the GPT partition of sdb and observe related information before partitioning.

Note: gdisk is suitable for GPT partition, fdisk is suitable for MBR partition, don't make a mistake! ! !
Parted
introduction: List the partition table type and partition information of the disk.
Usage: parted device (such as: /dev/sdb)
mklabel: set the partition type
print: print device information
q: exit
Now use gdisk to partition the newly added 20G hard disk into a 10G xfs file system. Introduction to

gdisk
: disk partitions, delete partitions, etc. (I will specify in the actual example)
Usage: gdisk device
d: delete a partition
n: Add a partition
p: print partition table
q: exit without saving
w: exit with saving partition operation
Note: fdisk uses d, n, p, q, w in the same way, but the partitioning process is still different! ! !
Use partprobe to update the partition table of the kernel, there is sdb1 when using lsblk
Partprobe
introduction: update the partition table information of the Linux kernel
Usage: partprobe

Now there is the sdb1 partition, but it needs to be formatted and set up the xfs file system.

It is not possible to use blkid /dev/sdb1 when it is not formatted. It is only after using mkfs to format parameters such as UUID, file system type xfs and so on.
Introduction to mkfs : Disk formatting
Usage: mkfs [-t file system type] device
Introduction to blkid : List the UUID and other parameters of the device.
Usage: blkid or blkid device
Now you can mount the file system, we first create a wjxt directory under etc, then mount sdb1 to wjxt, and unmount it from the wjxt directory.

Note: You can also use [mount /dev/sdb1 /etc/wjxt], it is better to use UUID because it is equivalent to the ID number, the name can be the same, but there is only one ID number for a person, so there will be no confusion.
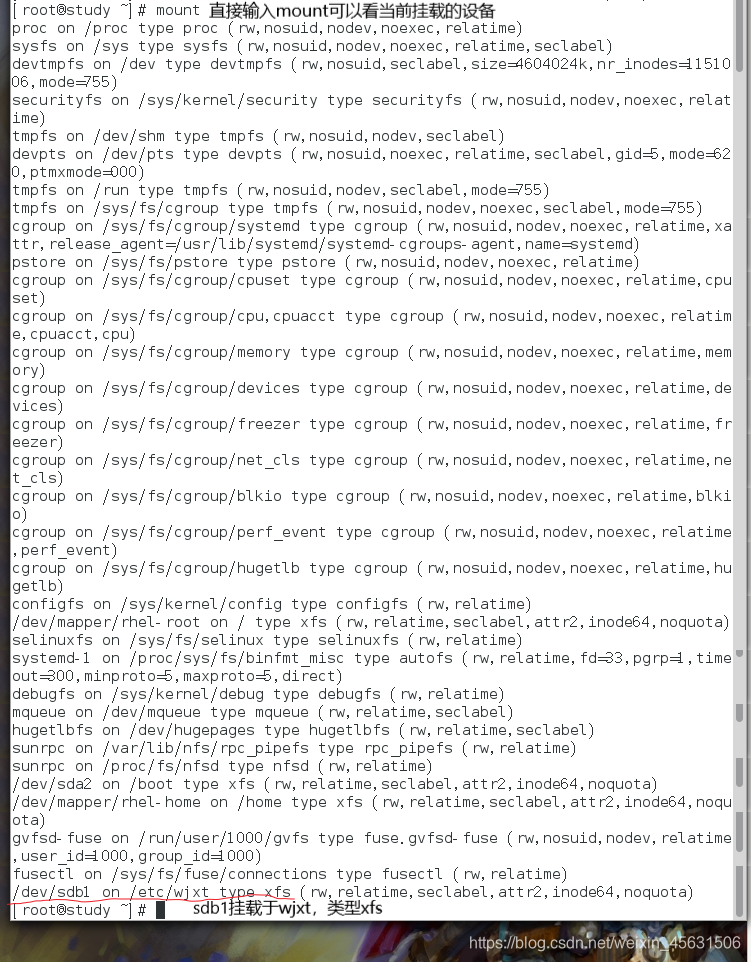
Mount
introduction: mount
usage: mount or mount [-a] device mount point
-a: mount all unmounted disks according to the data in the configuration file /etc/fstab.
Note: /etc/fstab is used for self-starting mounting, otherwise you will have to mount it with mount every time you boot.
Enter nano /etc/fstab (you can also use other editors, I personally like to use nano)

so that sdb1 will be automatically mounted after booting! ! !
Then is to uninstall sdb1

umount
introduction: uninstall
Usage: umount device