1. The main hardware
1. One jetson nano board;
2. One tf card: the official recommendation starts with 16GB;
3. Card reader: used to burn the system into tf card;
4. 5V4A DC power supply: this power supply is recommended. Nano has a variety of power supply methods. This kind of power supply is larger, which can ensure the stability of the system. The official recommendation is 5V4A. Some developers use 5V6A, and it is no problem to use.
5. HDMI cable with HDMI display: used for display, a display is necessary when you turn on it for the first time, but if you set up a remote desktop later, you don't need it;
6. Other peripheral accessories: mouse and keyboard, USB wireless network card / M2 interface network card Edimax EW-7811Un / network cable / PC, two-pin short jumper (required, used to modify the power supply mode).
Second, the steps
1. Burn the system image to the TF card
I did this step under win10. It can also be done under linux and mac. Please refer to the official tutorial.
Download the latest system image file first:
https://developer.nvidia.com/embedded/dlc/jetson-nano-dev-kit-sd-card-image
Insert the tf card into the card reader, and insert the card reader into the computer. Download the tf card formatting tool, I use SD Card Formatter to format.

Download the programming tool Etcher to write the image: https://www.balena.io/etcher/

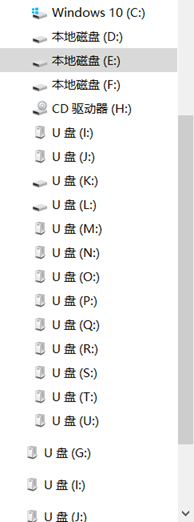
It takes about ten minutes to complete. After the programming is completed, the SD card will be automatically divided into multiple non-readable and writable areas. If you are a Windows 10 system, you can see that about 10 drive letters have been recognized. This is a normal operation. If your computer is a Windows 7 system, you will not observe this phenomenon. Considering that you may need to re-program the system later, I suggest you switch to a Windows 10 computer.
If an error occurs during the programming process or a misoperation causes the programming to be interrupted, just reformat and program again.
Then unplug the card reader, and then plug the tf card into the nano.
2. Boot
We are using DC power supply (the black power port on the left side of HDMI), and we need to set the power supply mode on the board to disable the USB power supply mode before it can be used.
We find the two pins of J48 and short the jumper caps.

After that, we plug in the tf card (located under the radiator), HDMI cable, keyboard and mouse, USB wireless network card, and finally plug in the power to boot.
After booting, follow the normal ubuntu system installation steps to install it.


It is recommended to choose English as the font, and garbled characters sometimes appear when using Chinese.
Three , power supply mode
Nano has four modes of power supply:
The first is the mirco USB port power supply, the power is 5W (5V2A) The maximum power designed by the board itself is 10W, but if there are other peripherals, such as screens, the power requirements will be higher than 10W;
The second type is GPIO pin power supply, the power is 15W (5V3A);
The third is the DC interface power supply mode, which can carry the largest power, above 20W (5V4A), 5V4A or 5V6A DC power supply can be used;
The fourth type is all power IO reverse power supply, which can reach 30W (5V6A).
Fourth , Nano networking method
Method 1 (requires router)
The easiest and most convenient way is to plug into the LAN port of the router with a network cable to connect to the Internet.
Method 2 (troublesome but available, actual measurement is feasible)
The computer must also have a network port! ! !
The notebook is connected to the mobile phone hotspot for networking, and the nano motherboard is wired to the notebook;

Connect the motherboard and the computer's network cable interface with a network cable (provided that the notebook has a network cable interface), open the "Network and Internet " of the notebook , select "Ethernet", select "Change adapter options", select WLAN, right click to open WLAN properties , and open sharing . Check to allow other users to connect through this computer's Internet connection , and drop down to check the local connection (usually local connection).

Click to confirm, remember that the IP address of the wired network card at this time is 192.168.137.1.

The IP acquisition method of Nano is set to DHCP. Use the following script to view link information and test the situation of China Unicom:
service network restart #重启网络服务

ifconfig #查看网卡信息,若看到Ethe0地址为192.168.137.***,即代表主板已成功连接笔记本网络

ping 192.168.137.1#测试是否连上笔记本

ping www.baidu.com #测试联网情况
Method 3 USB interface networking
Connect the USB interface of the motherboard and the mobile phone with a USB data cable, and then turn on the USB sharing of the mobile phone.
! ! ! Note: This method is mentioned in a blogger's article, but my actual measurement is not feasible, and I consulted the store, Jetson Nano does not support USB sharing network.
Method 4 (low cost and easy to use)
Buy 360USB wireless network card, etc., which can be used as a usb wireless network card of the wireless motherboard to connect to mobile hotspots.
Method 5 install a wireless network card
The Nano motherboard reserves the M.2 Key E interface, which can be connected to a wireless network card. Note that this interface can only be connected to a wireless network card. The cost is about 100RMB. The installation is relatively simple, and most stores sell it.
Five, Jetson Nano video tutorial
https://www.bilibili.com/video/BV12Z4y1x72C?from=search&seid=5365807463471147437
reference:
https://www.waveshare.net/study/article-881-1.html
https://blog.csdn.net/Tsing_qsu/article/details/106331725