The Android framework now commonly has MVC mode, MVP mode, and MVVM mode. Let us first clarify a concept: a pattern refers to a structural way of organizing code, and a pattern does not improve the efficiency of code execution. The mode is used for the convenience of subsequent function expansion and the clear structure of the code.
When we first started Android development, we wrote all the code in Activity, so the scalability and clear structure of the code were not good. As a result, the MVC mode of Android has evolved. This article also mainly describes how to extract the original writing into the MVC mode.
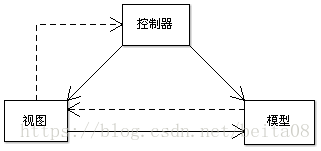
The MVC model divides the software into three basic parts: Model, View and Controller.
Model-used to generate data (access to the network, database, etc.)
View-View layer related (code related to interface layout controls, etc.)
Controller-logic control layer (code related to business logic)
1. Activity is omnipotent
First, let's take the login function as an example to look at the original situation where the code was written to Activity:
Layout file activity_login.xml:
<?xml version="1.0" encoding="utf-8"?>
<LinearLayout
    xmlns:android="http://schemas.android.com/apk/res/android"
    xmlns:tools="http://schemas.android.com/tools"
    android:layout_width="match_parent"
    android:layout_height="match_parent"
    android:gravity="center_horizontal"
    android:orientation="vertical"
    tools:context=".LoginActivity">

    <ImageView
        android:layout_width="wrap_content"
        android:layout_height="wrap_content"
        android:layout_marginBottom="40dp"
        android:layout_marginTop="40dp"
        android:src="@mipmap/ic_launcher_round"/>

    <EditText
        android:id="@+id/et_phone_number"
        android:layout_width="match_parent"
        android:layout_height="wrap_content"
        android:layout_marginEnd="40dp"
        android:layout_marginStart="40dp"
        android:hint="请输入手机号"
        android:inputType="number"
        android:textColor="#333333"
        android:textSize="14sp"/>

    <EditText
        android:id="@+id/et_password"
        android:layout_width="match_parent"
        android:layout_height="wrap_content"
        android:layout_marginEnd="40dp"
        android:layout_marginStart="40dp"
        android:layout_marginTop="40dp"
        android:hint="请输入密码"
        android:inputType="textPassword"
        android:textColor="#333333"
        android:textSize="14sp"/>

    <Button
        android:id="@+id/btn_login"
        android:layout_width="match_parent"
        android:layout_height="wrap_content"
        android:layout_marginEnd="40dp"
        android:layout_marginStart="40dp"
        android:layout_marginTop="40dp"
        android:text="登 录"
        android:textColor="#FFFFFF"
        android:textSize="20sp"/>

    <ProgressBar
        android:id="@+id/progressBar"
        android:layout_width="wrap_content"
        android:layout_height="wrap_content"
        android:layout_centerInParent="true"
        android:visibility="gone"/>
</LinearLayout>
Activity代码LoginActivity:
public class LoginActivity extends AppCompatActivity implements View.OnClickListener {
    private static final String TAG = "LoginActivity";

    private EditText    etPhoneNumber;
    private EditText    etPassword;
    private Button      btnLogin;
    private ProgressBar progressBar;

    @Override
    protected void onCreate(Bundle savedInstanceState) {
        super.onCreate(savedInstanceState);
        setContentView(R.layout.activity_login);

        etPhoneNumber = (EditText) findViewById(R.id.et_phone_number);
        etPassword = (EditText) findViewById(R.id.et_password);
        btnLogin = (Button) findViewById(R.id.btn_login);
        progressBar = (ProgressBar) findViewById(R.id.progressBar);

        btnLogin.setOnClickListener(this);
    }

    @Override
    public void onClick(View v) {
        switch (v.getId()) {
            case R.id.btn_login:    //登录
                String phoneNumber = etPhoneNumber.getText().toString().trim();
                String password = etPassword.getText().toString().trim();
                gotoLogin(phoneNumber, password);
                break;
            default:
                break;
        }
    }

    private void gotoLogin(String phoneNumber, String password) {
        //本地对输入情况做校验
        boolean validateOk = validateInput(phoneNumber, password);
        if (validateOk) {
            progressBar.setVisibility(View.VISIBLE);
            String md5Password = MD5Utils.getMd5(password);
            OkHttpUtils
                    .post()
                    .url(Constants.URL_LOGIN)
                    .addParams("phoneNumber", phoneNumber)
                    .addParams("password", md5Password)
                    .build()
                    .execute(new StringCallback() {
                        @Override
                        public void onError(okhttp3.Call call, Exception e, int id) {
                            progressBar.setVisibility(View.GONE);
                            Log.i(TAG, "onError: ---登录访问异常---" + e.getMessage());
                            e.printStackTrace();
                            Toast.makeText(LoginActivity.this, "网络访问出现异常", Toast.LENGTH_SHORT).show();
                        }

                        @Override
                        public void onResponse(String response, int id) {
                            progressBar.setVisibility(View.GONE);
                            Log.i(TAG, "onResponse: 登录成功 response = " + response + " ---");
                            Gson gson = new Gson();
                            LoginData loginData = gson.fromJson(response, LoginData.class);

                            switch (loginData.status) {
                                case 200: //用户名未注册
                                case 201: //密码有误
                                case 203: //登录失败
                                    Toast.makeText(LoginActivity.this, loginData.message, Toast.LENGTH_SHORT).show();
                                    Log.i(TAG, "onResponse: = " + loginData.message);
                                    break;
                                case 202:   //登录成功
                                    Toast.makeText(LoginActivity.this, loginData.message, Toast.LENGTH_SHORT).show();
                                    Log.i(TAG, "onResponse: = " + loginData.message);

                                    //本地保存必要的用户信息
                                    //......

                                    Intent intent = new Intent(LoginActivity.this, LoginSuccessActivity.class);
                                    startActivity(intent);
                                    //登录页面直接消失
                                    finish();
                                    break;
                                default:
                                    Toast.makeText(LoginActivity.this, "登录出现未知异常", Toast.LENGTH_SHORT).show();
                                    break;
                            }
                        }
                    });
        }
    }

    private boolean validateInput(String phoneNumber, String password) {
        if (TextUtils.isEmpty(phoneNumber)) {
            Toast.makeText(this, "手机号不能为空", Toast.LENGTH_SHORT).show();
            return false;
        }
        if (TextUtils.isEmpty(password)) {
            Toast.makeText(this, "密码不能为空", Toast.LENGTH_SHORT).show();
            return false;
        }
        if (!phoneNumber.matches(Constants.STR_PHONE_REGEX2)) {  //匹配正则表达式
            Toast.makeText(this, "请输入正确的手机号", Toast.LENGTH_SHORT).show();
            return false;
        }
        return true;
    }

}
Two, realize the MVC pattern
To use the MVC mode to implement the above login function, we need to extract the data-related code and become a separate Model layer. Finally, the Model layer can directly provide the logged-in user data LoginData.
Create a model package in the project first, and then create the LoginModel.java class, which is the Login Model layer:
//Model层只用来产生数据
public class LoginModel {
    private static final String TAG = "LoginModel";

    public void gotoLogin(String phoneNumber, String md5Password, final OnNetResponseListener listener) {
        OkHttpUtils
                .post()
                .url(Constants.URL_LOGIN)
                .addParams("phoneNumber", phoneNumber)
                .addParams("password", md5Password)
                .build()
                .execute(new StringCallback() {
                    @Override
                    public void onError(okhttp3.Call call, Exception e, int id) {
                        Log.i(TAG, "onError: ---网络访问出现异常---" + e.getMessage());
                        e.printStackTrace();
                        listener.onNetResposeError("网络访问出现异常");
                    }

                    @Override
                    public void onResponse(String response, int id) {
                        Log.i(TAG, "onResponse: 登录成功 response = " + response + " ---");
                        Gson gson = new Gson();
                        LoginData loginData = gson.fromJson(response, LoginData.class);
                        listener.onNetReponseSuccess(loginData);
                    }
                });
    }

    public interface OnNetResponseListener {

        void onNetResposeError(String msg);

        void onNetReponseSuccess(LoginData loginData);
    }
}
Among them, because access to the network is an asynchronous operation, the obtained data needs to be returned back using a callback (that is, the observer design mode). After the LoginModel is extracted , the original LoginActivity access network code is adjusted accordingly, as follows:
public class LoginActivity extends AppCompatActivity implements View.OnClickListener {
    private static final String TAG = "LoginActivity";

    private EditText    etPhoneNumber;
    private EditText    etPassword;
    private Button      btnLogin;
    private ProgressBar progressBar;

    @Override
    protected void onCreate(Bundle savedInstanceState) {
        super.onCreate(savedInstanceState);
        setContentView(R.layout.activity_login);

        etPhoneNumber = (EditText) findViewById(R.id.et_phone_number);
        etPassword = (EditText) findViewById(R.id.et_password);
        btnLogin = (Button) findViewById(R.id.btn_login);
        progressBar = (ProgressBar) findViewById(R.id.progressBar);

        btnLogin.setOnClickListener(this);
    }

    @Override
    public void onClick(View v) {
        switch (v.getId()) {
            case R.id.btn_login:    //登录
                String phoneNumber = etPhoneNumber.getText().toString().trim();
                String password = etPassword.getText().toString().trim();
                login(phoneNumber, password);
                break;
            default:
                break;
        }
    }

    private void login(String phoneNumber, String password) {
        //本地对输入情况做校验
        boolean validateOk = validateInput(phoneNumber, password);
        if (validateOk) {
            progressBar.setVisibility(View.VISIBLE);
            String md5Password = MD5Utils.getMd5(password);

            LoginModel loginModel = new LoginModel();
            loginModel.gotoLogin(phoneNumber, md5Password, new LoginModel.OnNetResponseListener() {
                @Override
                public void onNetResposeError(String msg) {
                    progressBar.setVisibility(View.GONE);
                    Toast.makeText(LoginActivity.this, msg, Toast.LENGTH_SHORT).show();
                }

                @Override
                public void onNetReponseSuccess(LoginData loginData) {
                    progressBar.setVisibility(View.GONE);
                    switch (loginData.status) {
                        case 200: //用户名未注册
                        case 201: //密码有误
                        case 203: //登录失败
                            Toast.makeText(LoginActivity.this, loginData.message, Toast.LENGTH_SHORT).show();
                            Log.i(TAG, "onResponse: = " + loginData.message);
                            break;
                        case 202:   //登录成功
                            Toast.makeText(LoginActivity.this, loginData.message, Toast.LENGTH_SHORT).show();
                            Log.i(TAG, "onResponse: = " + loginData.message);

                            //本地保存必要的用户信息
                            //......

                            Intent intent = new Intent(LoginActivity.this, LoginSuccessActivity.class);
                            startActivity(intent);
                            //登录页面直接消失
                            finish();
                            break;
                        default:
                            Toast.makeText(LoginActivity.this, "登录出现未知异常", Toast.LENGTH_SHORT).show();
                            break;
                    }
                }
            });

        }
    }

    private boolean validateInput(String phoneNumber, String password) {
        if (TextUtils.isEmpty(phoneNumber)) {
            Toast.makeText(this, "手机号不能为空", Toast.LENGTH_SHORT).show();
            return false;
        }
        if (TextUtils.isEmpty(password)) {
            Toast.makeText(this, "密码不能为空", Toast.LENGTH_SHORT).show();
            return false;
        }
        if (!phoneNumber.matches(Constants.STR_PHONE_REGEX2)) {  //匹配正则表达式
            Toast.makeText(this, "请输入正确的手机号", Toast.LENGTH_SHORT).show();
            return false;
        }
        return true;
    }
}
So we use the MVC mode to also achieve the above login function
Three, summary
My understanding: The so-called MVC mode is to extract the part of the code of our original code data acquisition function into the model layer. In fact, there is an MVC model in the development of each end. Android as a mobile end, the MVC model and the back end are not exactly the same. In Android, I prefer to divide it like this: the M layer is independent, and the roles of the V layer and C layer are assumed by the Activity. ( Some people will think: treat the XML layout as the V layer, and regard the Activity as the controller, so that the Activity reads the data of the V view layer. If you understand it this way, V is the Activity in the MVP mode, and I feel a bit confused )
Through the above code, perhaps we still feel that the code in the Activity is a bit complicated, because the roles of the V layer and the C layer are assumed by the Activity. If we want to go further, we need to further understand the MVP mode.