I wanted to try to develop a simple game of "Tetris", but I haven't done it. The main reason was that I didn't do it before, which caused the idea to be delayed. It turns out that if you can do it, don't honk the horn.
Here are some thoughts after the development.
1. Preview
The game Tetris basically has a preview function, that is, you can see what the next block appears on the game interface.
So we need a function equivalent to preview, this preview function will be a random
cubeReady () {


    let random = parseInt(Math.random() * 5);
    this.cubeReadyType = random;
    switch (random) {


        case 0: this.cubuBuildLong(); break;
        case 1: this.cubuBuildBlock(); break;
        case 2: this.cubuBuildConvex(); break;
        case 3: this.cubuBuildSeven(); break;
        case 4: this.cubuBuildAniSeven(); break;
        default: break;
    }
}
This random means random [square block], [long strip], [convex block], [7-character block], [anti-7-character block] these 5 shapes.
The method of construction is not difficult, but the four small squares are combined into the above five forms.
The code in the code cubeReadyTypeis to record the type of block constructed during the preview, so as to facilitate the definition of the type of block we actually operate in the game (the module that the game regenerates, and the use of it when rotating).
2. Cubes for game operation
For the game-operated squares, my approach is to move the coordinates of the squares constructed during the preview to the game operation interface collectively to the left and record them in a new array.
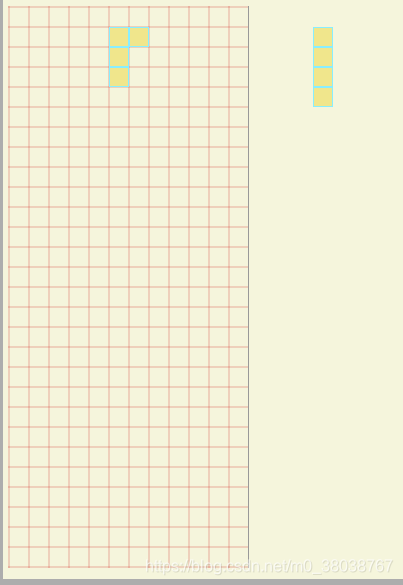
(It’s ugly) The reason why the left and right are different in this picture is that the preview is the next stage of the block, so when the game starts and the module hits the bottom, I call the preview function first, and then call the module construction method in the game. Then call the preview function.
3. Bottom, touch the left and right borders
This judgment is relatively simple, but my approach is rather dull, because my interface width is fixed, so I recorded the width of the border, so that there are the coordinates of the left border, the coordinates of the right border, and the coordinates of the bottom.
As for the judgment, I created a different method and judged when I moved.
// 向下加速
goDown () {


    let bottomFlag = this.cubeBoundary().bottomFlag; // 是否到达边界
    let touchFlag = this.touchBottom(); // 是否触底
    if (!bottomFlag && !touchFlag) {


        for (let i = 0; i < 4; i++) {


            this.cubeList[i].top += 20;
        }
    }
}
I personally think that the bottomFlag can be removed, because when I wrote the code, I didn't consider if there were already blocks underneath, so the bottomFlag was uniformly written in the method cubeBoundaryof whether it touched the boundary .
The bottoming touchBottommethod refers to the meaning of touching the existing square and the lower boundary.
4. Rotate the cube
Each form of squares looks different after being rotated, except for square squares.
So I wrote another four methods to manipulate the rotation of the remaining four squares. The following is the processing of personal rotation.
For the processing of long bars, I first judge their state at this time, whether they are horizontal or vertical
if (this.cubeList[0].left == this.cubeList[1].left) {


    changeKey = 'left';
    constantKey = 'top';
}
if (this.cubeList[0].top == this.cubeList[1].top) {


    changeKey = 'top';
    constantKey = 'left'
}
Each rotation is based on the third small square as the center. My rotation method is realized by changing the coordinates, because my square composition is built by an array cubeList. The item in this array is an object containing left and top. changeKeyIt represents the key to be changed, and it constantKeyrepresents the key that remains consistent with the third small square.
For the rotation of the convex square, I use the middle square among the three small squares at the bottom of the convex square as the rotation point. During the rotation, I proceeded in three situations,
if (this.cubeList[i].left < this.cubeList[1].left) {


    this.cubeList[i].left = this.cubeList[1].left;
    this.cubeList[i].top = this.cubeList[1].top - 20;
} else if (this.cubeList[i].left == this.cubeList[1].left) {


    if (this.cubeList[i].top < this.cubeList[1].top) {


        this.cubeList[i].left = this.cubeList[1].left + 20;
    } else {


        this.cubeList[i].left = this.cubeList[1].left - 20;
    }
    this.cubeList[i].top = this.cubeList[1].top;
} else {


    this.cubeList[i].left = this.cubeList[1].left;
    this.cubeList[i].top = this.cubeList[1].top + 20;
}
The transformation is performed according to the ratio of the left of the remaining three small squares to the left of the middle small square.
For the rotation of the 7-shaped square and the reverse 7-shaped, the third from the top of the 7 is used as the rotation point, and it is also judged according to the ratio of left. The only thing to note is that these two shapes are top in the horizontal state. ratio.
The above is my rotating idea, but this method is very complicated and cumbersome, so I won't paste the code.
5. Eliminate
The so-called elimination, my idea is to eliminate the small squares with the same top value if they just fill a row.
Before I do the elimination, I allListsort the arrays that I piled up when I hit the bottom, and let them sort them according to the top value in descending order. The purpose is to facilitate the downward shift of the small square to be looped to after the elimination. As long as there is elimination, the next item will add 20 to the top value (because my small square has a width and height of 20).
allListItems will be added every time it hits the bottom, and these items are the parts that have not been eliminated in the game interface.
6. Background image
In the above interface diagram, the background is the state of the grid, this is not a picture, nor is spanit constructed by many labels.
Instead, it is built using css.
background-image: linear-gradient(90deg, rgba(200, 0, 0, 0.15) 10%, rgba(0, 0, 0, 0) 10%),
                  linear-gradient(rgba(200, 0, 0, 0.15) 10%, rgba(0, 0, 0, 0) 10%);
background-size: 20px 20px;
The above 6 points are some of the "reviews" written by Tetris this time. Generally speaking, there are still many areas that can be improved, and the realization of functions should have a more concise and effective way.
This is the first time I write this summary. It is really **. I hope that those who see it will forgive me, and I hope everyone can help suggest some better implementation methods.