Haproxy cooperates with Nginx to build a web cluster deployment experiment (detailed graphic!)
Article Directory
- One, common web cluster scheduler
- Two, Haproxy application analysis
- Three, Haproxy scheduling algorithm principle
- Fourth, Haproxy builds a Web cluster
- Five, log definition
One, common web cluster scheduler
1) The current common Web cluster scheduler is divided into software and hardware. The
software usually uses the open source LVS, Haproxy, Nginx
2) LVS has the best performance, but it is relatively complicated to build; Nginx's upstream module supports cluster functions, but the health check function of cluster nodes is not strong, and high concurrency is not as good as Haproxy
3) The most commonly used hardware is F5, and many people use domestic products such as Barracuda and NSFOCUS
Two, Haproxy application analysis
- LVS has strong anti-load capability in enterprise applications, but there are shortcomings.
LVS does not support regular processing and cannot achieve dynamic and static separation.
For large-scale websites, the implementation and configuration of LVS are complicated and the maintenance success is relatively high. - Haproxy is a software that provides high availability, load balancing, and proxy based on TCP and HTTP applications. It is
suitable for web sites with heavy loads. It
runs on hardware and supports tens of thousands of concurrent connection requests.
Three, Haproxy scheduling algorithm principle
Haproxy supports a variety of scheduling algorithms, the most commonly used are three
- RR (Round Robin)
RR algorithm is the simplest and most commonly used algorithm, namely round-robin scheduling - LC (Least Connections)
minimum connections algorithm dynamically allocates front-end requests according to the number of back-end node connections. - SH (Source Hashing) is
based on the source access scheduling algorithm. It is used in some scenarios where Session sessions are recorded on the server side. Cluster scheduling can be done based on the source IP, Cookie, etc.
Fourth, Haproxy builds a Web cluster
Installation package required for the experiment
haproxy-1.5.19.tar.gz
nginx-1.12.0.tar.gz
Environment configuration
| Host | operating system | IP address | Required software/installation package/tool |
|---|---|---|---|
| Haproxy-Server abbreviation HS |
CentOS7 7-2 |
192.168.2.4 | haproxy-1.5.19.tar.gz |
| Nginx-Server1 abbreviation NS1 |
CentOS7 7-3 |
192.168.2.5 | nginx-1.12.0.tar.gz |
| Nginx-Server2 abbreviation NS1 |
CentOS7 7-4 |
192.168.2.6 | nginx-1.12.0.tar.gz |
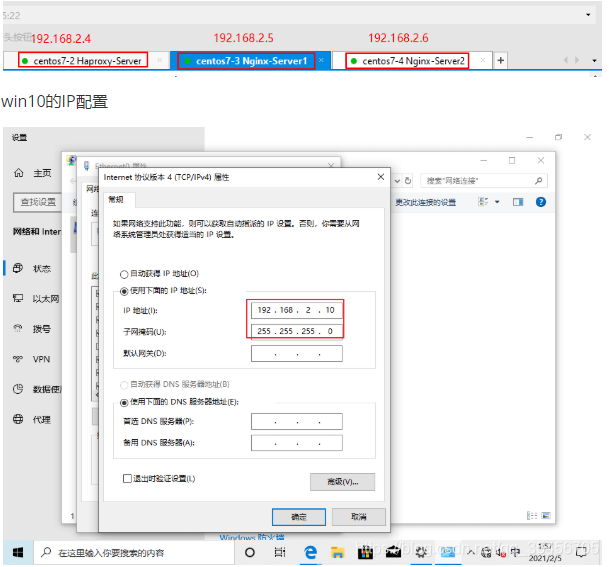
| Client | Win10 | 192.168.2.10 |
note:
1) Because of the same network segment, there is no need for gateway and DNS services, just comment in the network card configuration.
2) All servers need to close the firewall.
3) It is best to configure the nginx server first, and then configure the haproxy server to prevent errors. The last thing to visit is the address/test.html of the haproxy server.
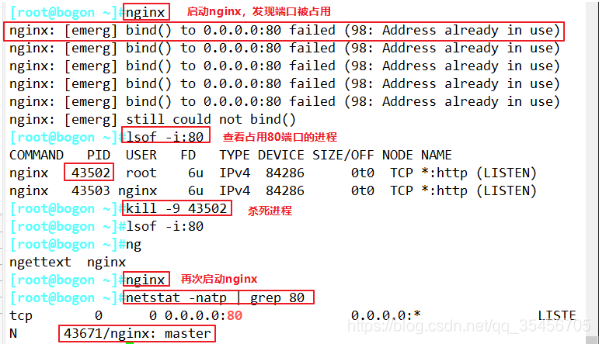
4) When the nginx port is occupied, the following methods can be used to solve the problem
lsof -i:80
kill -9 进程号
nginx或者/usr/local/nginx/sbin/nginx
netstat -natp | grep 80
1. Script compilation and installation of Nginx server (yum source comes with deployment)
NS1:192.168.2.5
NS2:192.168.2.6
Note: You need to drag the nginx-1.12.0.tar.gz package to the /opt directory first
#!/bin/bash
#======配置yum源======
echo -e "\033[31m =====正在验证当前为仅主机还是NAT模式===== \033[0m"
ping -c2 -w2 www.baidu.com &> /dev/null
if [ $? -eq 0 ];then echo -e "\033[31m 检测当前为NAT模式,为您配置在线yum源 \033[0m"
mkdir -p /etc/yum.repos.d/repo.bak

mv -f /etc/yum.repos.d/* /etc/yum.repos.d/repo.bak &> /dev/null

wget -O /etc/yum.repos.d/CentOS-Base.repo https://mirrors.aliyun.com/repo/Centos-7.repo &> /dev/null

yum clean all &> /dev/null
yum list &> /dev/null
echo -e "\033[31m 在线源已配置完成 \033[0m"

else
echo -e "\033[31m 检测当前为仅主机模式,为您配置本地yum源 \033[0m"
mount /dev/sr0 /mnt &> /dev/null
cd /etc/yum.repos.d/
mkdir -p /etc/yum.repos.d/repo.bak

mv -f /etc/yum.repos.d/* /etc/yum.repos.d/repo.bak &> /dev/null

echo '[local]
name=local
baseurl=file:///mnt
enabled=1
gpgcheck=0' > /etc/yum.repos.d/local.repo
yum clean all &> /dev/null
yum makecache &> /dev/null

df -h | grep "/mnt"
if [ $? -ne 0 ];then
echo -e "\033[31m 检测当前为仅主机模式,但光盘未连接! \033[0m"
else
echo -e "\033[31m 本地yum源已配置完成 \033[0m"
fi
fi
#======编译安装nginx服务======
#安装所需开发包和编译环境、编译器
yum -y install pcre-devel zlib-devel openssl-devel gcc gcc-c++ make
#创建程序用户,便于准确控制访问
useradd -M -s /sbin/nologin nginx

#解压安装包
cd /opt
tar zxvf nginx-1.12.0.tar.gz -C /opt/

#指定安装路径、指定用户名、组名、启用模块以支持统计状态
cd nginx-1.12.0/
./configure --prefix=/usr/local/nginx --user=nginx --group=nginx --with-http_stub_status_module --with-file-aio --with-http_gzip_static_module --with-http_flv_module --with-http_ssl_module


#编译及安装
make && make install

#软链接便于系统识别nginx操作命令
ln -s /usr/local/nginx/sbin/nginx /usr/local/sbin/

#添加nginx系统服务
echo '[Unit]
Description=nginx
After=network.target
[Service]
Type=forking
PIDFile=/usr/local/nginx/logs/nginx.pid
ExecStart=/usr/local/nginx/sbin/nginx
ExecrReload=/bin/kill -s HUP $MAINPID
ExecrStop=/bin/kill -s QUIT $MAINPID
PrivateTmp=true
[Install]
WantedBy=multi-user.target' > /lib/systemd/system/nginx.service

#赋权及开启服务、开启开机自启
chmod 754 /lib/systemd/system/nginx.service
systemctl start nginx.service
systemctl enable nginx.service
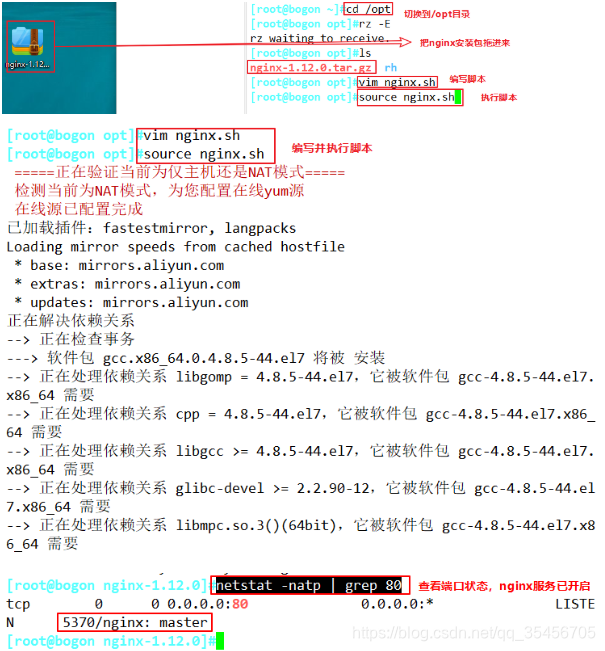
The above operations are the same for the two nginx servers, so I won’t repeat them
NS1:192.168.2.5
echo "this is NS1 web" > /usr/local/nginx/html/test.html
cat /usr/local/nginx/html/test.html

NS2:192.168.163.6
echo "this is NS2 web" > /usr/local/nginx/html/test.html
cat /usr/local/nginx/html/test.html

2. Deploy haproxy server
Haproxy-Server:192.168.2.4
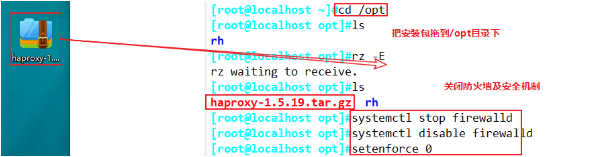
1) Turn off the firewall, and upload the software packages required to install Haproxy to the /opt directory
systemctl stop firewalld
systemctl disable firewalld
setenforce 0

cd /opt
#把haproxy-1.5.19.tar.gz安装包拖进来
2) Compile and install Haproxy
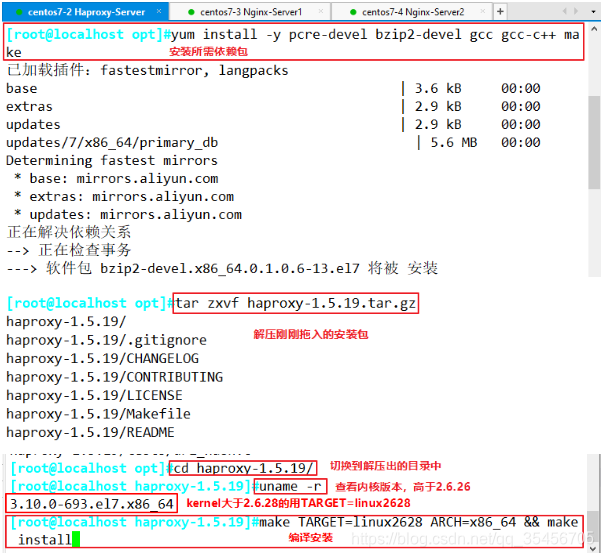
yum install -y pcre-devel bzip2-devel gcc gcc-c++ make

tar zxvf haproxy-1.5.19.tar.gz
cd haproxy-1.5.19/
make TARGET=linux2628 ARCH=x86_64 && make install

参数说明
#使用uname -r查看内核,如:2.6.18-371.el5,此时该参数用TARGET=linux26;kernel大于2.6.28的用TARGET=linux2628
TARGET=linux26	#内核版本
ARCH=x86_64 	#系统位数,64位系统
3) Haproxy server configuration
mkdir /etc/haproxy
cp examples/haproxy.cfg /etc/haproxy/

cd /etc/haproxy/
vim haproxy.cfg
global
  #4~5行–修改,配置日志记录,local0为日志设备,默认存放到系统日志
  log /dev/log   local0 info
  log /dev/log   local0 notice
  #log loghost    local0 info
  maxconn 4096   #最大连接数,需考虑ulimit-n限制

  #8行–注释,chroot运行路径,为该服务自设置的根目录,一般需将此行注释掉
  #chroot /usr/share/haproxy
  uid 99    #用户UID
  gid 99    #用户GID
  daemon    #守护进程模式

defaults
  log     global      #定义日志为global配置中的日志定义
  mode    http	      #模式为http
  option  httplog     #采用http日志格式记录日志
  option  dontlognull #不记录健康检查日志信息
  retries 3           #检查节点服务器失败次数,连续达到三次失败,则认为节点不可用
  redispatch				    #当服务器负载很高时,自动结束当前队列处理比较久的连接
  maxconn 2000					#最大连接数
  contimeout      5000			#连接超时时间
  clitimeout      50000			#客户端超时时间
  srvtimeout      50000			#服务器超时时间

#删除下面所有listen项–,添加
listen  webcluster 0.0.0.0:80
    option httpchk GET /test.html	#检查服务器的test.html文件
    balance roundrobin				#负载均衡调度算法使用轮询算法roundrobin
    server inst1 192.168.2.5:80 check inter 2000 fall 3		#定义在线节点
    server inst2 192.168.2.6:80 check inter 2000 fall 3

#--参数说明----------------
balance roundrobin   #负载均衡调度算法
#轮询算法: roundrobin;最小连接数算法: leastconn;来源访问调度算法: source,类似于nginx的ip_hash

check inter 2000 #表示haproxy服务器和节点之间的一个心跳频率
fall 3   #表示连续三次检测不到心跳频率则认为该节点失效
若节点配置后带有""backup"表示该节点只是个备份节点,只有主节点失效该节点才会上。不携带"backup",表示为主节点,和其它主节点共同提供服务。

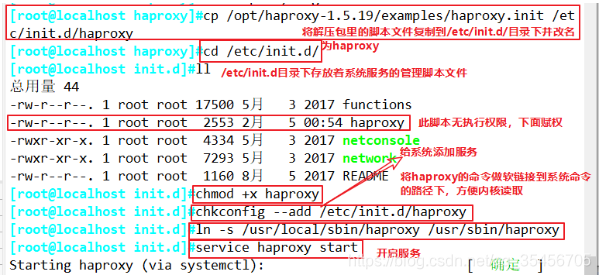
4) Add Haproxy system service
Note: This step needs to be done after the Nginx server is set up, otherwise it will fail to start
cp /opt/haproxy-1.5.19/examples/haproxy.init /etc/init.d/haproxy
cd /etc/init.d/
ll
chmod +x haproxy
chkconfig --add /etc/init.d/haproxy
ln -s /usr/local/sbin/haproxy /usr/sbin/haproxy
service haproxy start
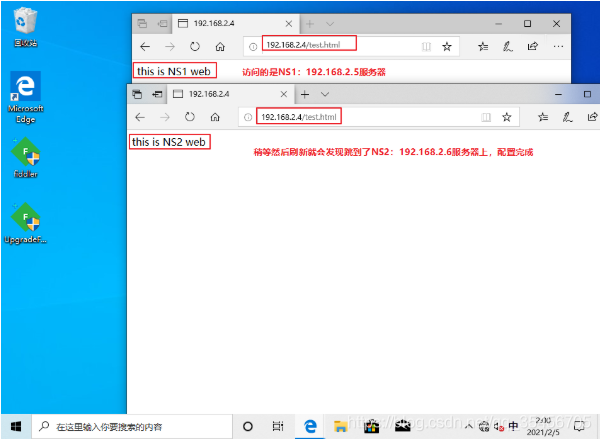
3. Test the web cluster
Open http://192.168.2.4/test.html with a browser on the client, and constantly refresh the browser to test the load balancing effect
Five, log definition
1. Edit haproxy configuration file
By default, the log of haproxy is output to the syslog of the system, which is not very convenient to view. In order to better manage the log of haproxy, we generally define it separately in the production environment. The info and notice logs of haproxy need to be recorded in different log files.
vim /etc/haproxy/haproxy.cfg
global
	log /dev/log local0 info
	log /dev/log local0 notice

service haproxy restart
123456
2. Modify the rsyslog configuration
Need to modify the rsyslog configuration, in order to facilitate management. Define haproxy-related configuration independently in haproxy.conf and put it under /etc/rsyslog.d/. When rsyslog starts, it will automatically load all configuration files in this directory.
vim /etc/rsyslog.d/haproxy.conf

if ($programname == 'haproxy' and $syslogseverity-text == 'info')
then -/var/log/haproxy/haproxy-info.log
&~
if ($programname == 'haproxy' and $syslogseverity-text == 'notice')
then -/var/log/haproxy/haproxy-notice.log
&~
12345678
Note:
This part of the configuration is to record the info log of haproxy to /var/log/haproxy/haproxy-info.log, and to record the notice log to /var/log/haproxy/haproxy-notice.log. "&~" means that when the log is written to the log file, rsyslog stops processing this information.
systemctl restart rsyslog.service

tail -f /var/log/haproxy/haproxy-info.log		#查看haproxy的访问请求日志信息