1. Redis high availability mode
1. Master-slave replication: Master-slave replication is the basis of high-availability Redis. Sentinel and clusters are all based on master-slave replication to achieve high availability. Master-slave replication mainly implements multi-machine backup of data, as well as load balancing and simple failure recovery for read operations.
Defects:
●Failure recovery cannot be automated;
●Write operations cannot be load balanced;
●Storage capacity is limited by a single machine.
2. Sentinel: On the basis of master-slave replication, Sentinel realizes automatic failure recovery.
Defects:
●Write operations cannot be load balanced;
●Storage capacity is limited by a single machine;
●Sentinel cannot automatically failover the slave node. In the read-write separation scenario, the failure of the slave node will cause the read service to be unavailable, and the slave node needs to be Additional monitoring and switching operations.
3. Clustering: Through clustering, Redis solves the problem that write operations cannot be load balanced, and storage capacity is limited by a single machine, and realizes a relatively complete high-availability solution.
Two, Redis master-slave replication
Master-slave replication refers to copying the data of one Redis server to other Redis servers. The former is called the master node (Master), and the latter is called the slave node (Slave);
Data replication is one-way, only from the master node to the slave node
By default, each Redis server is the master node; and a master node can have multiple slave nodes (or no slave nodes), but a slave node can only have one master node.
2.1 The role of master-slave replication
●Data redundancy: Master-slave replication realizes hot backup of data, which is a data redundancy method besides persistence.
●Failure recovery: When the master node has a problem, the slave node can provide services to achieve rapid failure recovery; in fact, it is a kind of service redundancy.
●Load balancing: On the basis of master-slave replication, with the separation of read and write, the master node can provide the write service, and the slave node can provide the read service (that is, the application connects to the master node when writing Redis data, and the application connects to the slave node when reading Redis data ), share the server load; especially in the scenario of writing less and reading more, sharing the read load by multiple slave nodes can greatly increase the concurrency of the Redis server.
●High-availability cornerstone: In addition to the above functions, master-slave replication is also the basis for the implementation of sentinels and clusters. Therefore, master-slave replication is the basis for Redis high availability.
2.2 Master-slave replication process
(1) If a slave machine process is started, it will send a "sync command" command to the Master machine to request a synchronous connection.
(2) Whether it is the first connection or reconnection, the Master machine will start a background process to save the data snapshot to the data file (execute the rdb operation), and the Master will also record all the commands to modify the data and cache them in the data file in.
(3) After the background process completes the cache operation, the Master machine will send the data file to the Slave machine, and the Slave machine will save the data file to the hard disk , and then load it into the memory , and then the Master machine will modify all the data. The operation is sent to the slave machine. If the Slave fails and causes a downtime, it will automatically reconnect after returning to normal.
(4) After the Master machine receives the connection from the Slave side machine, it sends its complete data file to the Slave side machine. If Mater receives synchronization requests from multiple slaves at the same time, the Master will start a process in the background to save The data file is then sent to all slave-side machines to ensure that all slave-side machines are normal.
Three, build Redis master-slave replication
Master节点: 192. 168.238.10
Slave1节点: 192. 168.238.20
Slave2节点: 192. 168.238.30
#!/bin/bash
#yum源
echo -e "\033[31m =====正在验证当前为仅主机还是NAT模式===== \033[0m"
ping -c1 -W1 www.baidu.com &> /dev/null
if [ $? -eq 0 ];then echo -e "\033[31m 检测当前为NAT模式,为您配置在线yum源 \033[0m"
mkdir -p /etc/yum.repos.d/repo.bak
mv -f /etc/yum.repos.d/* /etc/yum.repos.d/repo.bak &> /dev/null
wget -O /etc/yum.repos.d/CentOS-Base.repo https://mirrors.aliyun.com/repo/Centos-7.repo &> /dev/null
yum clean all &> /dev/null
yum list &> /dev/null
echo -e "\033[31m 在线源已配置完成 \033[0m"
else
echo -e "\033[31m 检测当前为仅主机模式,为您配置本地yum源 \033[0m"
mount /dev/sr0 /mnt &> /dev/null
cd /etc/yum.repos.d/
mkdir -p /etc/yum.repos.d/repo.bak
mv -f /etc/yum.repos.d/* /etc/yum.repos.d/repo.bak &> /dev/null
echo '[local]
name=local
baseurl=file:///mnt
enabled=1
gpgcheck=0' > /etc/yum.repos.d/local.repo
yum clean all &> /dev/null
yum makecache &> /dev/null
df -h | grep "/mnt"
if [ $? -ne 0 ];then
echo -e "\033[31m 检测当前为仅主机模式,但光盘未连接! \033[0m"
else
echo -e "\033[31m 本地yum源已配置完成 \033[0m"
fi
fi
#关闭防火墙
systemctl stop firewalld
setenforce 0
yum install -y gcc gcc-c++ make
rpm -q expect
rpm -q tcl
yum -y install expect
cd /opt
tar zxvf redis-5.0.7.tar.gz -C /opt/
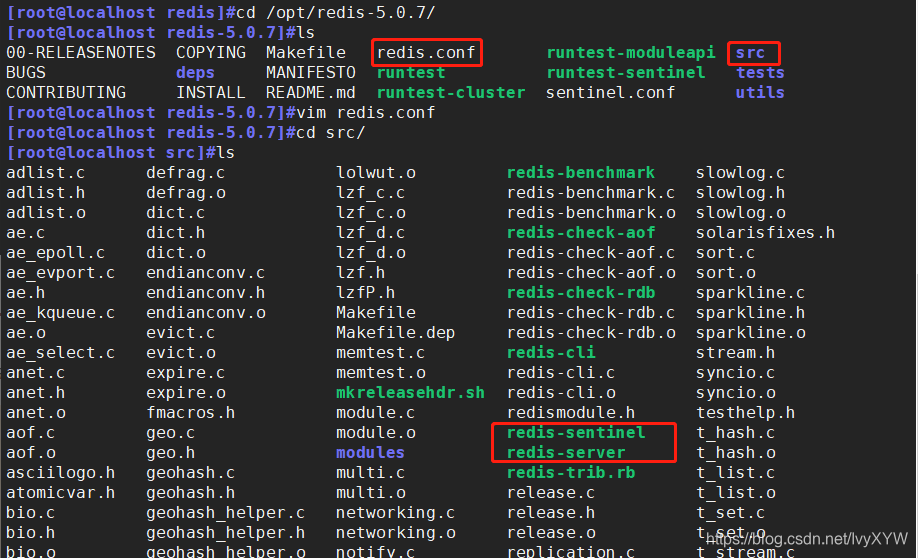
cd /opt/redis-5.0.7/
make
make PREFIX=/usr/local/redis install
#由于Redis源码包中直接提供了Makefile 文件,所以在解压完软件包后,不用先执行./configure进行配置,可直接执行make与make install 命令进行安装。
#在/utils里执行软件包提供的install_server.sh脚本文件设置Redis服务所需要的相关配置文件
cd /opt/redis-5.0.7/utils
#开始免交换执行
/usr/bin/expect <<EOF
#expect开始标志
spawn ./install_server.sh
#Please select the redis port for this instance: [6379]
expect "instance"
send "\r"
#Please select the redis config file name [/etc/redis/6379.conf]
expect "config"
send "\r"
#Please select the redis log file name [/var/log/redis_6379.log]
expect "log"
send "\r"
#Please select the data directory for this instance [/var/lib/redis/6379]
expect "data"
send "\r"
#Please select the redis executable path []
expect "executable"
send "/usr/local/redis/bin/redis-server\r"
#Is this ok? Then press ENTER to go on or Ctrl-C to abort.
expect "abort"
send "\r"
expect eof
EOF
ln -s /usr/local/redis/bin/* /usr/local/bin/
netstat -natp | grep redis
/etc/init.d/redis_6379 restart
/etc/init.d/redis_6379 status
sed -i '/bind 127.0.0.1/c bind 0.0.0.0' /etc/redis/6379.conf
sed -i 's/appendonly no/appendonly yes/' /etc/redis/6379.conf
/etc/redis/6379.conf
/etc/init.d/redis_6379 restart
/etc/init.d/redis_6379 status
Execute commands from the server
sed -i '/replicaof <masterip> <masterport>/c replicaof 192.168.238.10 6379'
Modify Redis configuration file (Master node operation)
The above script will operate this step
vim /etc/redis/6379.conf
bind 0.0.0.0      			  #70行,修改监听地址为0.0.0.0
daemonize yes       		  #137行,开启守护进程
logfile /var/log/redis_6379.log    #172行,指定日志文件目录.
dir /var/lib/redis/6379            #264行,指定工作目录
appendonly yes           		   #700行,开启AOF持久化功能

/etc/init.d/redis_6379 restart
Modify Redis configuration file (Slave node operation)
The above script will operate this step
vim /etc/redis/6379.conf
bind 0.0.0.0		#70行,修改监听地址为0.0.0.0
daemonize yes		#137行,开启守护进程
logfile /var/log/redis_6379.log	#172行,指定日志文件目录
dir /var/lib/redis/6379			#264行,指定工作目录
replicaof 192.168.238.10 6379 		#288行,指定要同步的Master节点IP和端口
appendonly yes		#700行,开启AOF持久化功能

/etc/init.d/redis_6379 restart
Verify the master-slave effect
Look at the log on the Master node
tail -f /var/log/redis_6379.log
Replica 192.168.80.11:6379 asks for synchronization
Replica 192.168.80.12:6379 asks for synchronization

Verify the slave node on the master node
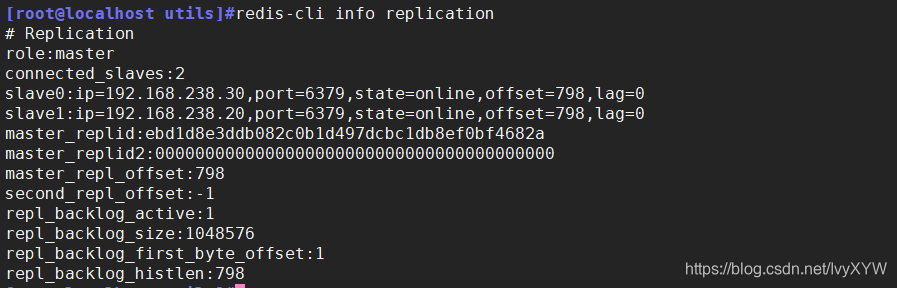
redis-cli info replication
# Replication
role:master
connected slaves:2
slave0:ip=192.168.80.11, port=6379, state=online, offset=1246, lag=0
slave1:ip=192.168.80.12, port=6379, state=online, offset=1246, lag=1
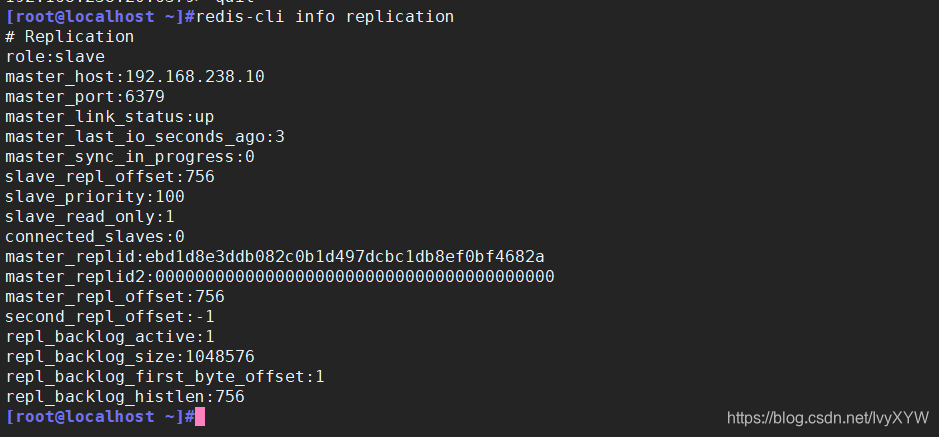
Verify the slave node on the slave node
Four, Redis sentinel mode
The core function of Sentinel: Based on master-slave replication, Sentinel introduces automatic failover of the master node.
4.1 Principle of Sentinel Mode
Sentinel: It is a distributed system used to monitor each server in the master-slave structure . When a failure occurs, a new Master is selected through a voting mechanism and all slaves are connected to the new Master. Therefore, the number of the entire cluster running sentinels must not be less than 3 nodes.
4.2 The role of sentinel mode
●Monitoring: The sentry will constantly check whether the master node and slave node are operating normally.
●Automatic failover: When the master node fails to work normally, the sentinel will start an automatic failover operation, which will upgrade one of the slave nodes of the failed master node to the new master node, and make other slave nodes copy the new master node .
●Notification (reminder): The sentry can send the result of the failover to the client.
4.3 The sentinel structure consists of two parts, sentinel node and data node
1. Sentinel node: The sentinel system consists of one or more sentinel nodes. The sentinel node is a special redis node and does not store data.
2. Data node: Both the master node and the slave node are data nodes.
The start of the sentinel depends on the master-slave mode, so you must install the master-slave mode before doing the sentinel mode. All nodes need to deploy the sentinel mode. The sentinel mode will monitor whether all Redis working nodes are normal. When the Master appears When there is a problem, because other nodes have lost contact with the master node, they will vote. More than half of the vote is considered that there is a problem with this Master, and then the sentry room will be notified, and then one of the Slaves will be selected as the new Master.
It is important to note that objective offline is a concept unique to the master node; if the slave node and the sentinel node fail, after the sentinel subjectively offline, there will be no subsequent objective offline and failover operations.
Five, configure sentinel mode
Master节点: 192.168.238.10
Slave1节点: 192.168.238.20
Slave2节点: 192.168.238.30
systemctl stop firewalld
setenforce 0
Modify the configuration file of Redis sentry mode (all node operations)
vim /opt/redis-5.0.7/sentinel.conf
protected-mode no		#17行,关闭保护模式
port 26379			#21行,Redis哨 兵默认的监听端口
daemonize yes		#26行,指定sentine1为后台启动
logfile "/var/log/sentinel.log"		#36行,指定日志存放路径
dir "/var/lib/redis/6379"		#65行,指定数据库存放路径
sentinel monitor mymaster 192.168.80.10 6379 2 		#84行, 修改
#指定该哨兵节点监控192.168.80.10:6379这个主节点,该主节点的名称是mymaster,最后的2的含义与主节点的故障判定有关:至少需要2个哨兵节点同意,才能判定主节点故障并进行故障转移
sentinel down-after-milliseconds mymaster 3000 		#113行, 判定服务器down掉的时间周期,默认30000毫秒 (30秒 )
sentinel failover-timeout mymaster 180000		#146行,故障节点的最大超时时间为180000 (180秒)
Activate sentinel mode
Start master first, then slave
cd /opt/redis-5.0.7/
redis-sentinel sentinel.conf &

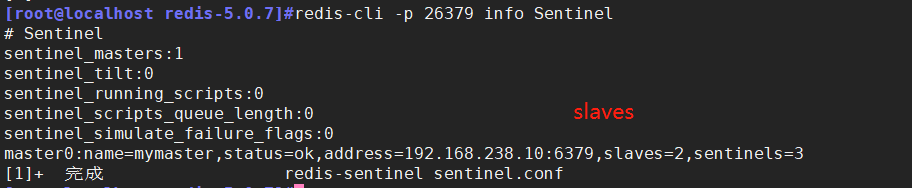
View sentinel information
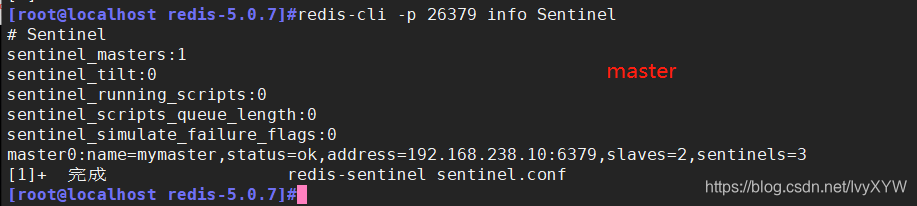
redis-cli -p 26379 info Sentinel
# Sentinel
sentinel_masters:1
sentinel_tilt:0
sentinel_running_scripts:0
sentinel_scripts_queue_length:0
sentinel_simulate_failure_flags:0
master0:name=mymaster,status=ok,address=192.168.80.10: 6379,slaves=2,sentinels=3
Failure simulation
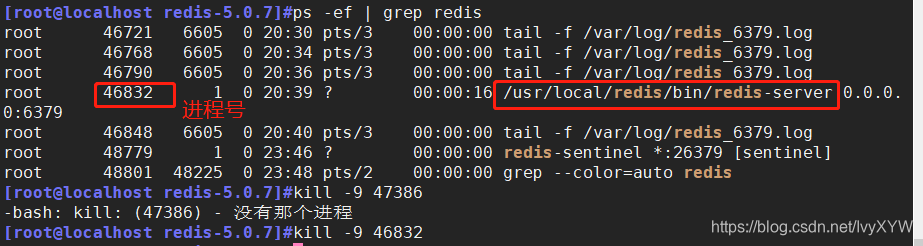
View redis-server process number
ps -ef | grep redis
root    57031    1    	 0 15:20 ?    		00:00:07 /usr/local/bin/redis-server 0.0.0.0:6379
root    57742    1   	 1 16:05 ?    		00:00:07 redis-sentinel *:26379 [sentinel]
root    57883    57462   0 16:17 pts/1      00:00:00 grep --color=auto redis

主:
root      46721   6605  0 20:30 pts/3    00:00:00 tail -f /var/log/redis_6379.log
root      46768   6605  0 20:34 pts/3    00:00:00 tail -f /var/log/redis_6379.log
root      46790   6605  0 20:36 pts/3    00:00:00 tail -f /var/log/redis_6379.log
root      46832      1  0 20:39 ?        00:00:16 /usr/local/redis/bin/redis-server 0.0.0.0:6379
root      46848   6605  0 20:40 pts/3    00:00:00 tail -f /var/log/redis_6379.log
root      48779      1  0 23:46 ?        00:00:00 redis-sentinel *:26379 [sentinel]
root      48801  48225  0 23:48 pts/2    00:00:00 grep --color=auto redis


从:
[root@localhost redis-5.0.7]#ps -ef | grep redis
root      47386      1  0 20:30 ?        00:00:19 /usr/local/redis/bin/redis-server 0.0.0.0:6379
root      49483      1  0 23:46 ?        00:00:00 redis-sentinel *:26379 [sentinel]
root      49519  48928  0 23:50 pts/1    00:00:00 grep --color=auto redis

#杀死Master 节点上redis- server的进程号
kill -9 57031    #Master节点上redis-server的进程号

Validation results
tail -f /var/log/sentinel.log
57742:X 07 Aug 2020 16:19:21.170 # +failover-state-select-slave master mymaster 192.168.80.11 6379
57742:x 07 Aug 2020 16:19:21.170 # -sdown slave 192.168.80.12:6379 192.168.80.12 6379 @ mymaster 192.168.80.11 6379
57742:X 07 Aug 2020 16:19:21.272 # +selected-slave slave 192.168.80.12:6379 192.168.80.12 6379 @ mymaster 192.168.80.11 6379
57742:X 07 Aug 2020 16:19:21.272 ★+failover-state-send-slaveof-noone slave 192.168.80.12:6379 192.168.80.12 6379 @ mymaster 192.168.80.11 6379
57742:X 07 Aug 2020 16:19:21.338 * +failover-state-wait-promotion slave 192.168.80.12:6379 192.168.80.12 6379 @ mymaster 192.168.80.11 6379
57742:X 07 Aug 2020 16:19:21.402 # -failover- abort-slave-timeout master mymaster 192.168.80.11 6379
57742:X 07 Aug 2020 16:19:21.799 # -sdown master mymaster 192.168.80.11 6379
57742:X 07 Aug 2020 16:19:21.826 # +new - epoch 41
57742:X 07 Aug 2020 16:19:21.827 # +vote- for-leader b12178afd9f862e0ead00763c2c7f1ae7f5de22e 41
57742:X 07 Aug 2020 16:19:31.137 * +convert- to- slave slave 192.168.80.12:6379 192.168.80.12 6379 @ mymaster 192.168.80.11 6379
[root@localhost redis-5.0.7]#tail -f /var/log/sentinel.log
48779:X 25 Feb 2021 23:46:57.327 * +sentinel sentinel 0d2634b6bba9148fd0dcc86b6f1b84e345a2c35e 192.168.238.20 26379 @ mymaster 192.168.238.10 6379
48779:X 25 Feb 2021 23:47:13.367 * +sentinel sentinel 4172c90a7e2f5c352bad5df746aa995a4ed8c229 192.168.238.30 26379 @ mymaster 192.168.238.10 6379
48779:X 25 Feb 2021 23:54:22.812 # +sdown master mymaster 192.168.238.10 6379
48779:X 25 Feb 2021 23:54:22.904 # +new-epoch 1
48779:X 25 Feb 2021 23:54:22.904 # +vote-for-leader 4172c90a7e2f5c352bad5df746aa995a4ed8c229 1
48779:X 25 Feb 2021 23:54:23.788 # +config-update-from sentinel 4172c90a7e2f5c352bad5df746aa995a4ed8c229 192.168.238.30 26379 @ mymaster 192.168.238.10 6379
48779:X 25 Feb 2021 23:54:23.788 # +switch-master mymaster 192.168.238.10 6379 192.168.238.30 6379
48779:X 25 Feb 2021 23:54:23.789 * +slave slave 192.168.238.20:6379 192.168.238.20 6379 @ mymaster 192.168.238.30 6379
48779:X 25 Feb 2021 23:54:23.789 * +slave slave 192.168.238.10:6379 192.168.238.10 6379 @ mymaster 192.168.238.30 6379
48779:X 25 Feb 2021 23:54:53.881 # +sdown slave 192.168.238.10:6379 192.168.238.10 6379 @ mymaster 192.168.238.30 6379


Six, Redis cluster mode
Cluster, namely Redis Cluster, is a distributed storage solution introduced in Redis 3.0.
The cluster is composed of multiple nodes (Node), and Redis data is distributed among these nodes. The nodes in the cluster are divided into master nodes and slave nodes: only the master node is responsible for the maintenance of read and write requests and cluster information; the slave nodes only replicate the data and status information of the master node.
6.1 The role of clusters can be summarized into two points
(1) Data partition: Data partition (or data sharding) is the core function of the cluster.
The cluster disperses data to multiple nodes. On the one hand, it breaks through the memory size limit of Redis single machine, and the storage capacity is greatly increased; on the other hand, each master node can provide external read and write services, which greatly improves the responsiveness of the cluster.
Redis stand-alone memory size limitation is mentioned in the introduction of persistence and master-slave replication; for example, if the stand-alone memory is too large, the fork operation of bgsave and bgrewriteaof may cause the master process to block, and it may be possible when the host is switched in the master-slave environment As a result, the slave node cannot provide services for a long time, and the replication buffer of the master node may overflow during the full replication phase.
(2) High availability: The cluster supports master-slave replication and automatic failover of the master node (similar to sentinel); when any node fails, the cluster can still provide external services.
6.2 Data Sharding of Redis Cluster
Redis cluster introduces the concept of hash slots.
Redis cluster has 16384 hash slots (No. 0-16383)
. Each node in the cluster is responsible for a part of the hash slot. After
each key is checked by CRC16 , the remainder of 16384 is taken to determine which one to place. Hope slot, through this value, to find the node corresponding to the corresponding slot, and then automatically jump to the corresponding node for access operations
6.3 Take a cluster composed of 3 nodes as an example
Node A contains hash slots 0 to
5460. Node B contains hash slots 5461 to 10922.
Node C contains hash slots 10923 to 16383.
6.4 Master-slave replication model of Redis cluster
The cluster has three nodes A, B, and C. If node B fails, the entire cluster will be unavailable due to lack of slots in the range of 5461-10922.
Add a slave node A1, B1, and C1 for each node. The entire cluster consists of three Master nodes and three slave nodes. After node B fails, the cluster elects the master node with B1 as the main node to continue serving. When B and B1 both fail, the cluster will be unavailable.
Seven, build Redis cluster mode
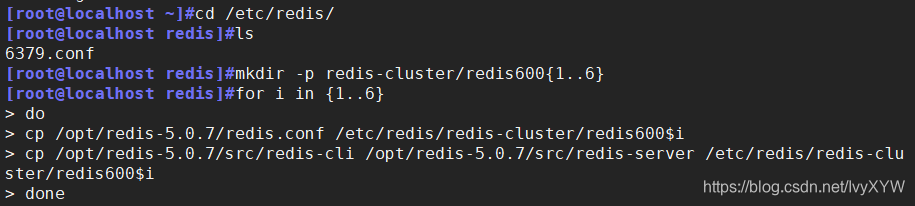
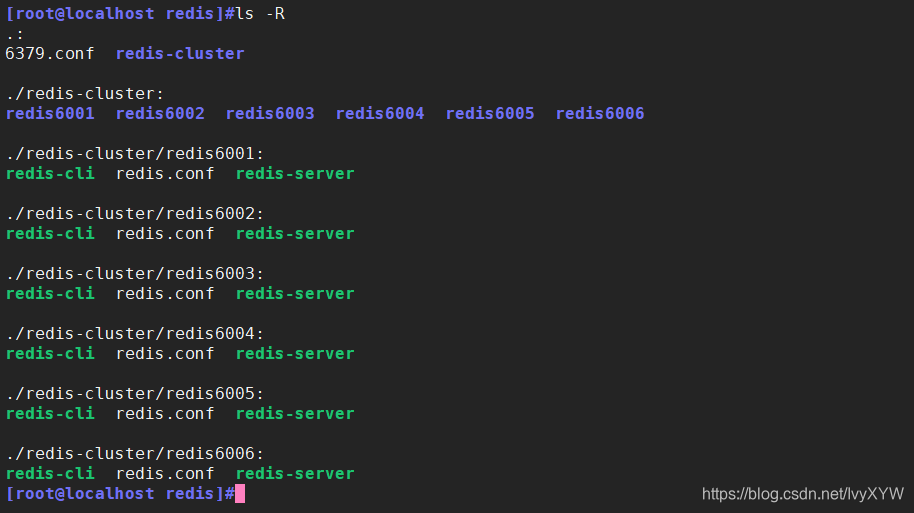
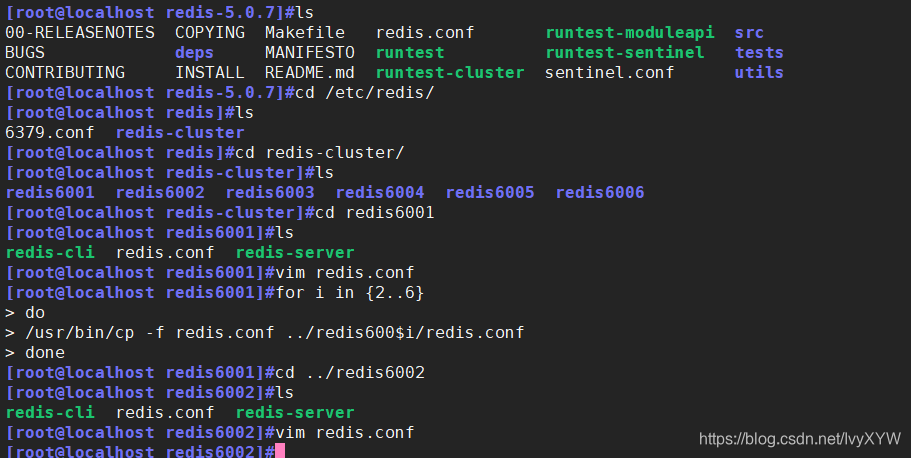
A redis cluster generally requires 6 nodes, 3 masters and 3 slaves. For convenience, all nodes here are simulated on the same server:
distinguished by port numbers: 3 master node port numbers: 6001/6002/6003, and corresponding slave node port numbers: 6004/6005/6006.
cd /etc/redis/
mkdir -p redis-cluster/redis600{

    1..6}
for i in {

    1..6}
do
cp /opt/redis-5.0.7/redis.conf /etc/redis/redis-cluster/redis600$i
cp /opt/redis-5.0.7/src/redis-cli /opt/redis-5.0.7/src/redis-server /etc/redis/redis-cluster/redis600$i
done
Turn on the cluster function
#The configuration files of the other 5 folders are modified in the same way. Note that the 6 ports are all different.
cd /etc/redis/redis-cluster/redis 6001
vim redis.conf
bind 127.0.0.1
#69行,注释掉bind项,默认监听所有网卡
protected-mode no
#88行,修改,关闭保护模式
port 6001
#92行,修改,redis监听端口,
daemonize yes
#136行,开启守护进程,以独立进程启动
cluster-enabled yes
#832行,取消注释,开启群集功能
cluster-config-file nodes-6001.conf
#840行,取消注释,群集名称文件设置
cluster-node-timeout 15000
#846行,取消注释群集超时时间设置
appendonly yes
#700行,修改,开启AOF持久化

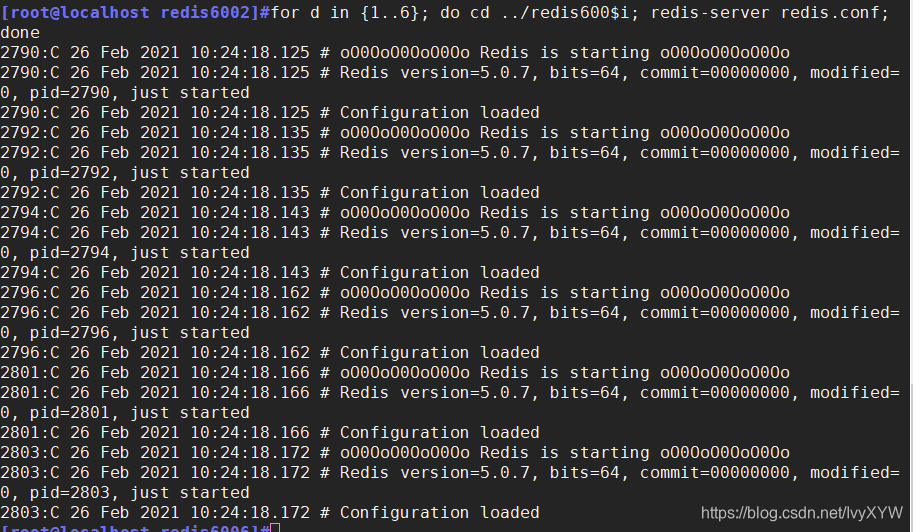
Start the redis node
Enter the six folders and execute the command: redis-server redis.conf to start the redis node
cd /etc/redis/redis-cluster/redis6001
redis-server redis.conf
for d in {

    1..6}
do
cd /etc/redis/redis-cluster/redis600$d
redis-server redis.conf
done
ps -ef | grep redis
Start the cluster
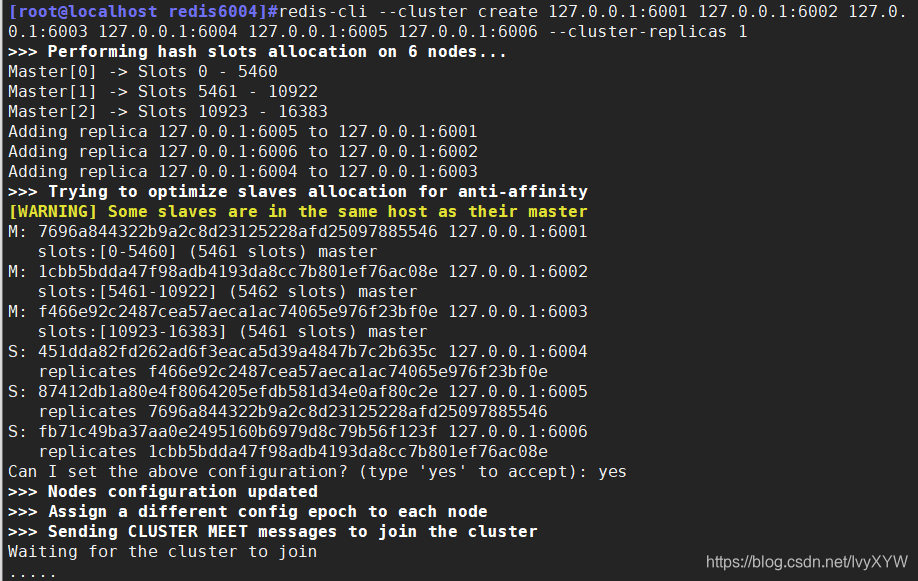
redis-cli --cluster create 127.0.0.1:6001 127.0.0.1:6002 127.0.0.1:6003 127.0.0.1:6004 127.0.0.1:6005 127.0.0.1:6006 --cluster-replicas 1
#The six instances are divided into three groups, each group has one master and one slave, the front is the master node, and the back is the slave node. You need to enter yes to create the following interaction.
-Replicas 1 means that each master node has 1 slave node.
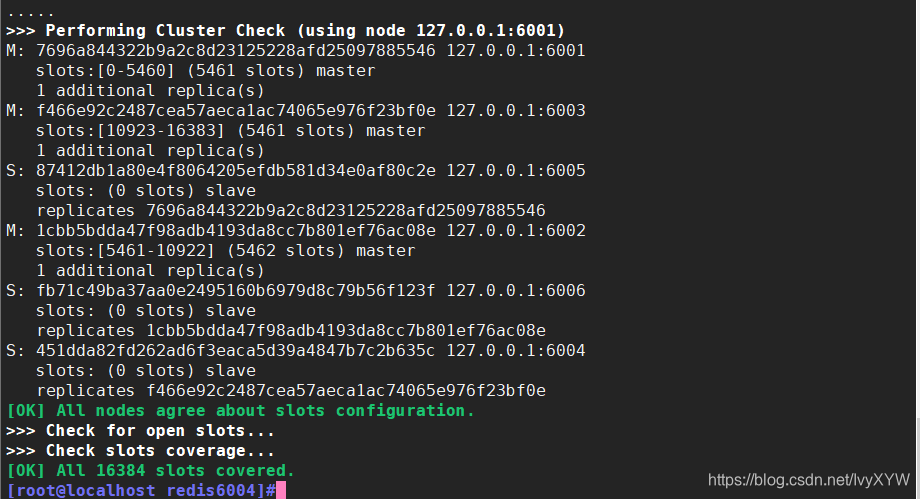
#Test cluster
redis-cli -p 6001 -c         #加-c参数,节点之,间就可以互相跳转
127.0.0.1:6001> cluster slots    #查看节点的哈希槽编号范围
1) 1) (integer) 5461
   2) (integer) 10922        #哈希槽编号范围
   3) 1) "127.0.0.1"
      2) (integer) 6003        #主节点IP和端口号
      3) " fdca661922216dd69a63a7c9d3c4540cd6baef44"
   4) 1) "127.0.0.1"
      2) (integer) 6004        #从节点IP和端口号
     3) " a2c0c32aff0f38980accd2b63d6d952812e44740"
2) 1) (integer) 0
   2) (integer) 5460
   3) 1) "127.0.0.1"
      2) (integer) 6001
      3) "0e5873747a2e26bdc935bc76c2bafb19d0a54b11"
      4) 1) "127.0.0.1"
         2) (integer) 6006
         3) "8842ef5584a85005e135fd0ee59e5a0d67b0cf8e"
3) 1) (integer) 10923
   2) (integer) 16383
   3) 1) "127.0.0.1"
      2) (integer) 6002
      3) "81 6ddaa3d1469540b2ffbcaaf9aa867646846b30"
   4) 1) "127.0.0.1"
      2) (integer) 6005
      3) " f847077bfe6722466e96178ae8cbb09dc8b4d5eb"
127.0.0.1:6001> set name zhangsan
-> Redi rected to slot [5798] located at 127.0.0.1:6003
OK
127.0.0.1:6001> cluster keyslot name    #查看name键的槽编号
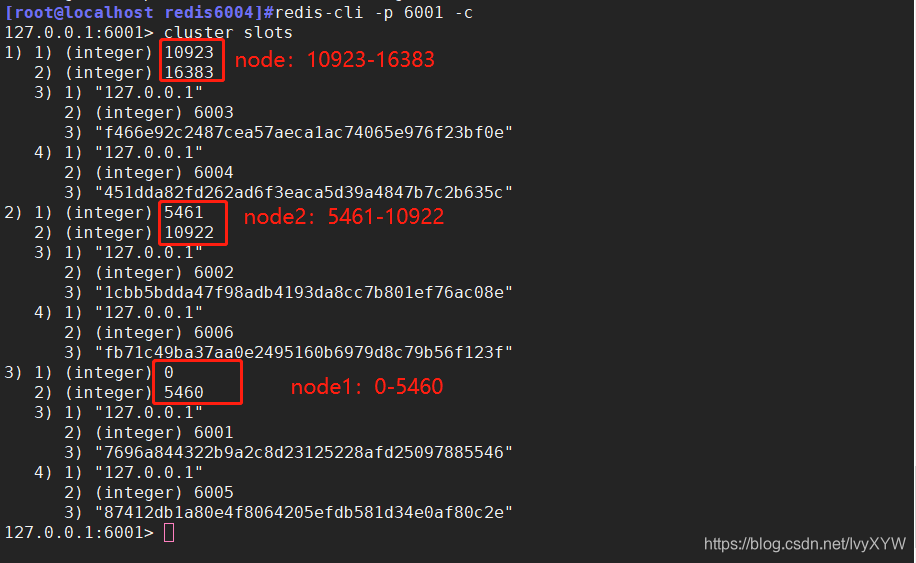
127.0.0.1:6001> cluster slots
1) 1) (integer) 10923
   2) (integer) 16383
   3) 1) "127.0.0.1"
      2) (integer) 6003
      3) "f466e92c2487cea57aeca1ac74065e976f23bf0e"
   4) 1) "127.0.0.1"
      2) (integer) 6004
      3) "451dda82fd262ad6f3eaca5d39a4847b7c2b635c"
2) 1) (integer) 5461
   2) (integer) 10922
   3) 1) "127.0.0.1"
      2) (integer) 6002
      3) "1cbb5bdda47f98adb4193da8cc7b801ef76ac08e"
   4) 1) "127.0.0.1"
      2) (integer) 6006
      3) "fb71c49ba37aa0e2495160b6979d8c79b56f123f"
3) 1) (integer) 0
   2) (integer) 5460
   3) 1) "127.0.0.1"
      2) (integer) 6001
      3) "7696a844322b9a2c8d23125228afd25097885546"
   4) 1) "127.0.0.1"
      2) (integer) 6005
      3) "87412db1a80e4f8064205efdb581d34e0af80c2e"
      127.0.0.1:6001> set name xyw
-> Redirected to slot [5798] located at 127.0.0.1:6002
OK
127.0.0.1:6002> cluster keyslot name
(integer) 5798