table of Contents
2. Modify hdfs-site and core-site configuration
3. Synchronize EditsLog data of namenode
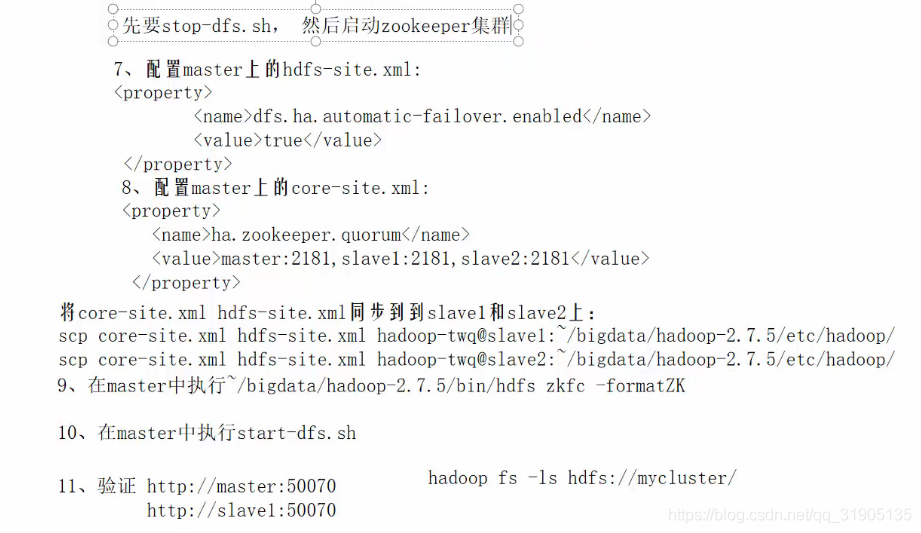
Four, configure automatic state change
Five, kill an active namenode for verification
Six, realize the role of zookeeper in HA
8. Configure yarn (ResourceManager) cluster
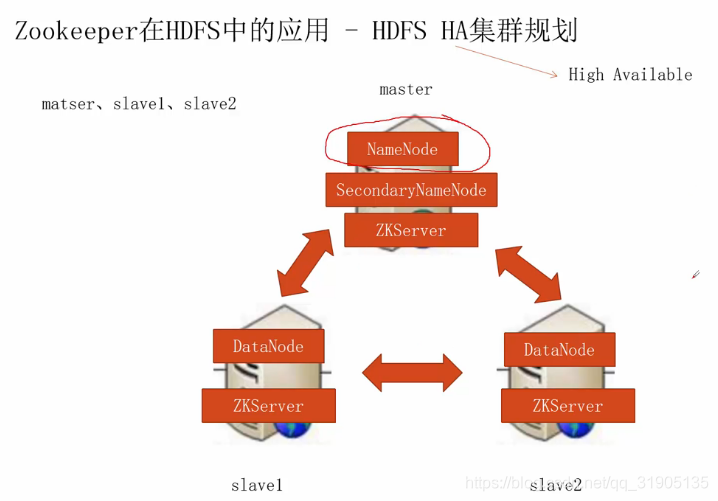
1. HDFS HA cluster planning

2. Modify hdfs-site and core-site configuration
(1) Stop the cluster, stop-dfs.sh, and then back up the core-site.xml and hdfs-site.xml files of the hdfs of the three machines
(2) Add the following configuration to hdfs-site.xml of the master node
<property>
    <name>dfs.nameservices</name>
    <value>mycluster</value>
    <description>hdfs各节点服务的逻辑名称,可以是任意值</description>
</property>
<property>
    <name>dfs.ha.namenodes.mycluster</name>
    <value>nn1,nn2</value>
    <description>每一个namenode在集群中的唯一标识</description>
</property>
<property>
    <name>dfs.namenode.rpc-address.mycluster.nn1</name>
    <value>master:8020</value>
    <description>nn1这个namenode节点在rpc的时候使用的端口</description>
</property>
<property>
    <name>dfs.namenode.rpc-address.mycluster.nn2</name>
    <value>slave1:8020</value>
    <description>nn2这个namenode节点在rpc的时候使用的端口</description>
</property>
<property>
    <name>dfs.namenode.http-address.mycluster.nn1</name>
    <value>master:50070</value>
    <description>nn1这个namenode节点在对外提供的http服务的端口</description>
</property>
<property>
    <name>dfs.namenode.http-address.mycluster.nn2</name>
    <value>slave1:50070</value>
    <description>nn2这个namenode节点在对外提供的http服务的端口</description>
</property>

<property>
    <name>dfs.namenode.shared.edits.dir</name>
    <value>qjournal:://master:8485:slave1:8485:slave2:8485/mycluster</value>
    <description>标识journal组</description>
</property>
<property>
    <name>dfs.journalnode.edits.dir</name>
    <value>/home/hadoop-twq/bigdata/dfs/journal/data</value>
    <description>存储journal数据的地方</description>
</property>
<property>
    <name>dfs.client.failover.proxy.provider.mycluster</name>
  <value>org.apache.hadoop.hdfs.server.namenode.ha.ConfiguredFailoverProxyProvider</value>
    <description>用于java客户端来连接Active的namenode</description>
</property>

<property>
    <name>dfs.ha.fencing.methods</name>
    <value>sshfence</value>
    <description>用于在namenode失败的时候不会对外提供服务</description>
</property>
<property>
    <name>dfs.ha.fencing.ssh.private-key-files</name>
    <value>/home/hadoop-twq/.ssh/id_dsa</value>
    <description>用于在namenode失败的时候不会对外提供服务</description>
</property>
(3) Configure password-free ssh and install fuser
Use hadoop-twq account to configure keyless login master on slave1
ssh-keygen -t dsa -P '' -f ~/.ssh/id_dsa
cat ~/.ssh/id_dsa.pub >> ~/.ssh/authorized_keys
scp ~/.ssh/authorized_keys hadoop-twq@master: ~/.ssh/
ssh master does not require a password to indicate a successful configuration
Install fuser on master and salve1 as root user
yum -y install psmisc
(4) Placement core-site.xml
<property>
    <name>fs.defaultFS</name>
    <value>hdfs:mycluster</value>
    <description>hdfs的基本路径</description>
</property>
Copy core-site.xml and hdfs-site.xml to slave1 and slave2
scp core-site.xml hdfs-site.xml hadoop-twq@slave1:~/bigdata/hadoop-2.7.5/etc/hadoop/
scp core-site.xml hdfs-site.xml hadoop-twq@slave2:~/bigdata/hadoop-2.7.5/etc/hadoop/
3. Synchronize EditsLog data of namenode
(1) Execute on master, slave1, slave2
~/bigdata/hadoop-2.7.5/sbin/hadoop-daemon.sh start journalnode
(2) Execute in master
scp r~/bigdata/dfs/name/ hadoop-twq@slave1: ~/bigdata/dfs/
(3) If you switch from an HDFS cluster with insufficient HA to an HA cluster, then execute:
Execute in slave1
~/bigdata/hadoop-2.7.5/bin/hdfs namenode -bootstrapStandby => synchronize the data of two namenodes
Execute in master
hdfs namenode -initialzeSharedEdits =》 Initialize the data of the journal node
If it is a newly built HDFS cluster of HA, then execute:
Execute in master
hdfs namenode -format is fine
(4) Restart the hdfs cluster
start-hdfs.sh
Four, configure automatic state change
In the production environment, it needs to be configured to automatically switch the active namenode node, and the construction of the zk cluster is omitted here
Five, kill an active namenode for verification
Visit http://master:50070 to see that the current node is active
Visit http://slave1:50070 to see that the current node is in standby state
View the process number of the namenode node in jps on the master, kill -9 process number, and kill the process
, Visit http://master:50070 again and find that the current node has become a standby state.
Visit http://slave1:50070 again and find that the node of slave1 is automatically elected as active by zk.
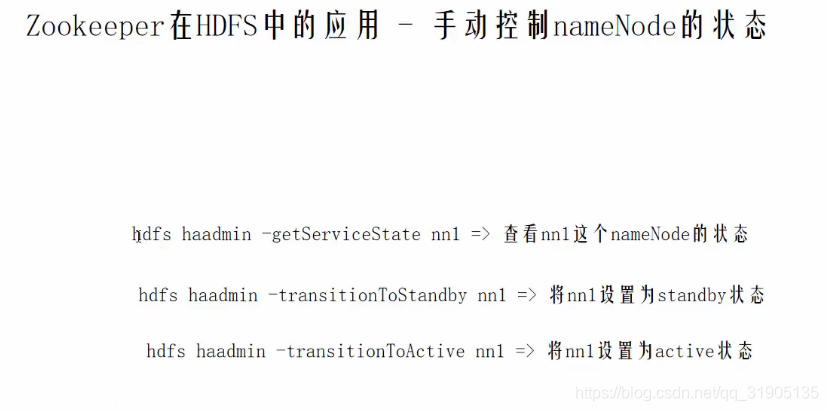
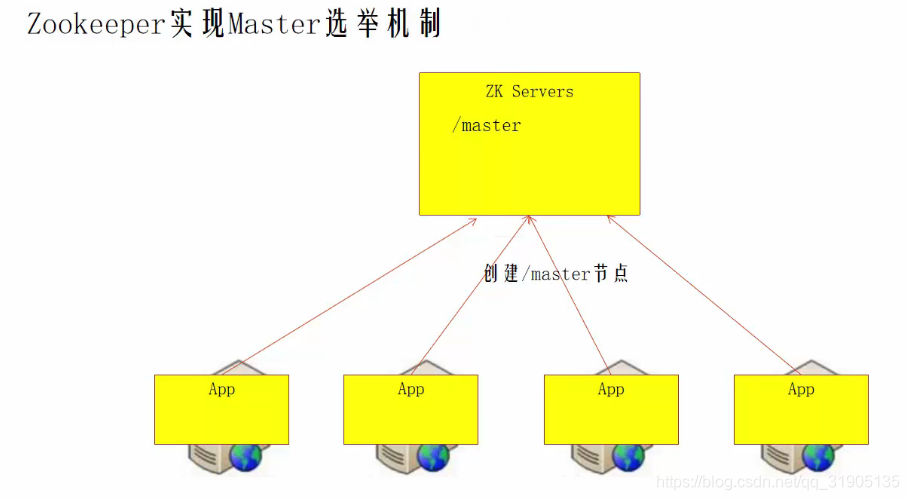
Six, realize the role of zookeeper in HA
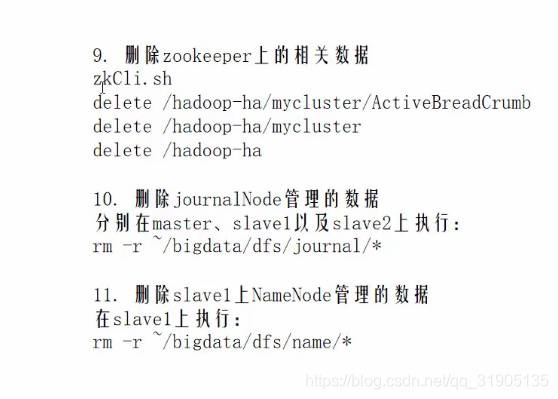
Seven, clean up junk data
When we need to restore the HA cluster to a single node non-HA state, we need to clean up some junk data
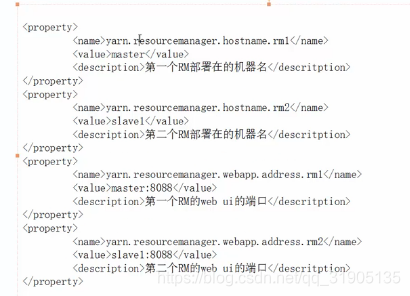
8. Configure yarn (ResourceManager) cluster
Comment out the original resourcemanager.hostname and resourcemanager.address

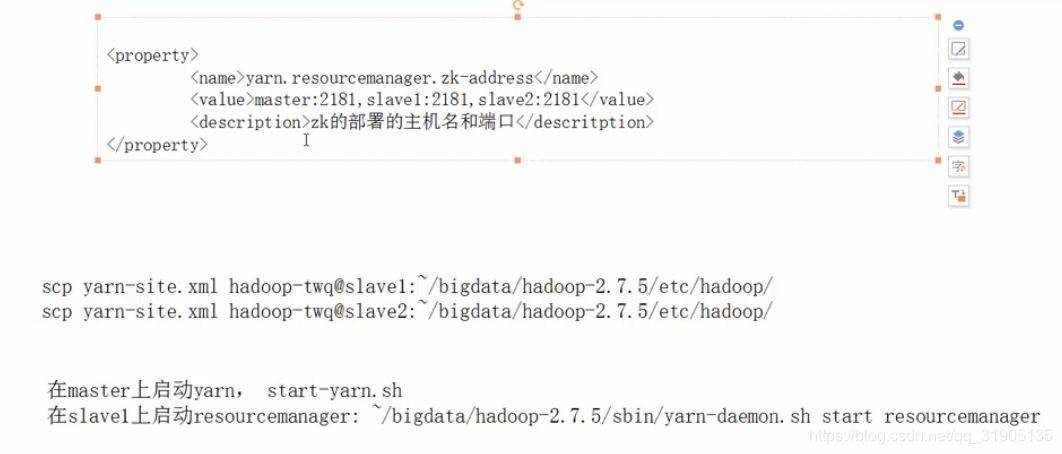
Check the status of yarn
yarn rmadmin -getServiceState rm1
Printing out active indicates that the current yarn node is in the elected state.