Use static (static) NAT mode to surf the Internet under linux
Tools used: windows 10 professional 64-bit operating system, VMware Workstation Pro 15.5.1
1. View
1. Check whether it is Nat mode
Click "centOS7" --> right-click "centOS7" and select "Settings" -> click "Network Adapter" -> select "Custom" and modify it to "VMnet8 (NAT mode)"

2. Click "Edit"- >Select "Virtual Network Editor" --> Click "Change Settings" (you do not have permission when performing the third step, just skip it)

Two, edit network card information
1. Select "VMnet8" -->Cancel "DHCP Service Assignment" -->Modify Subnet IP and Subnet Mask -->Select "NAT Settings"

2. Configure Gateway 
&& 
3.
1. Right-click the network icon in the lower right corner, select "Open Network and Sharing Center" -> right-click "VMware Network Adapter VMnet8", select "Properties", select "IPv4", and click "Properties". 
2. Configure the properties of IPv4 (save the settings at the end and click "OK")
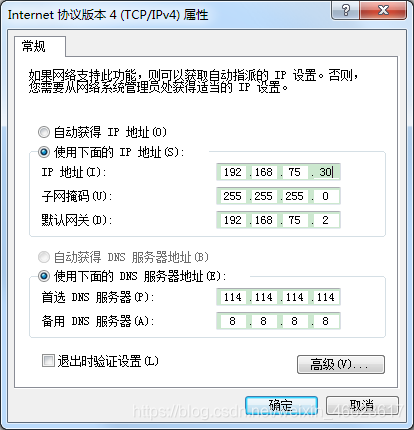
Note, the
ip address cannot be the same as the previously configured (192.168.75.11).
Four, centos7 network card file configuration
vi /etc/sysconfig/network-scripts/ifcfg-ens33
Edit content (same as the previous view configuration) ("##" is marked as a modification point, there may be unmarked points)
TYPE=Ethernet
PROXY_METHOD=none
BROWSER_ONLY=no
BOOTPROTO=static       ##
DEFROUTE=yes           ##
IPV4_FAILURE_FATAL=no
IPV6INIT=yes
IPV6_AUTOCONF=yes
IPV6_DEFROUTE=yes
IPV6_FAILURE_FATAL=no
IPV6_ADDR_GEN_MODE=stable-privacy
NAME=ens33
UUID=2f5218ad-0f78-460c-bf3d-dc0201221c2a
DEVICE=ens33
ONBOOT=yes          ##
IPADDR=192.168.75.11    ##同之前查看配置地址相同
NETMASK=255.255.255.0  ##同之前查看配置地址相同
GATEWAY=192.168.75.2   ##同之前查看配置地址相同
DNS1=114.114.114.114   ##      ” 1 “ 是 123 的 1
After all configurations are complete, restart the network
[root@localhost ~]# service network restart
The display means the restart is successful and the 
configuration is complete.
If there are any errors in this article, please leave a comment and correct me.