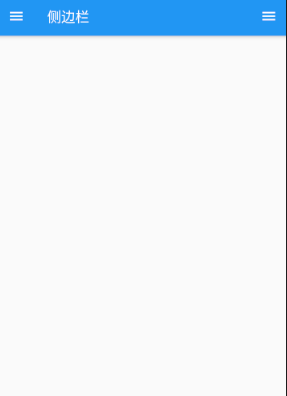
Today we make a sidebar, click the icon at the top (this is directly generated by the sidebar component), you can achieve the following effects
Copy it to the main.dart file to run the same effect as the root blogger
(1) Effect picture
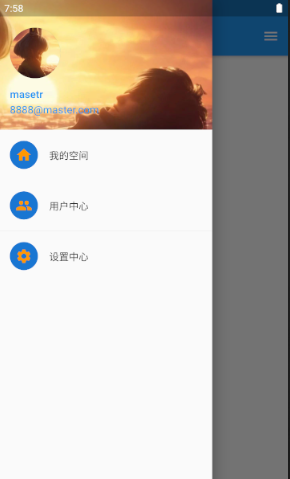
(2) Implementation method The
drawer component and its own components realize the
column and row components.
Background image image
avatar clipavatar
(3) Code implementation
import 'package:flutter/material.dart';

void main() => runApp(MyApp());
class MyApp extends StatelessWidget {
  @override
  Widget build(BuildContext context) {
    return MaterialApp(
    debugShowCheckedModeBanner: false,
        home: Scaffold(
      appBar: AppBar(
        title: Text('侧边栏'),
       // centerTitle: true,
      ),
      body:Container(),
       drawer: Drawer(
        child: Column(
          children: <Widget>[
            Row(
              children: [
                Expanded(
                    child: UserAccountsDrawerHeader(
                  accountName: Text("masetr",style: TextStyle(color: Colors.blue,fontSize: 15),),
                  accountEmail: Text("[email protected]",style: TextStyle(color: Colors.blue,fontSize: 15)),
                  currentAccountPicture: CircleAvatar(
                    backgroundImage: AssetImage("images/mouse1.jpg"),
                  ),
                  decoration: BoxDecoration(
                      image: DecorationImage(
                          image: AssetImage("images/mouse2.jpg"),
                          fit: BoxFit.cover)),
                )),
              ],
            ),
            ListTile(
              leading: CircleAvatar(
                child: Icon(Icons.home,color: Colors.orange,),
              ),
              title: Text("我的空间"),
            ),
            Divider(),
            ListTile(
              leading: CircleAvatar(
                child: Icon(Icons.people,color: Colors.orange),
              ),
              title: Text("用户中心"),
            ),
            Divider(),
            ListTile(
              leading: CircleAvatar(
                child: Icon(Icons.settings,color: Colors.orange),
              ),
              title: Text("设置中心"),
            )
          ],
        ),
      ),
      endDrawer: Drawer(//右边侧边栏
        child: Text("right"),
      ),
    ));
  }
}